Chapter 4. Data Analysis with Hive and Pig in Amazon EMR
The examples in previous chapters focused on developing custom JAR Job Flows. This Job Flow type makes heavy use of developing map and reduce routines using the Java programming language. The development cycle of custom JAR Job Flows requires writing map and reduce routines, compiling and packaging the build artifacts, uploading these artifacts to S3, and then creating the Job Flow and retrieving results. This can be a very time-consuming process to explore a data set and build an application. Custom JAR Job Flows can also create barriers for organizations that don’t have Java knowledge and experience.
Fortunately, you don’t need to be a Java programmer to develop MapReduce applications and use the power of Amazon EMR. Amazon EMR supports several Job Flow application types that we will cover in this chapter, focusing heavily on Pig and Hive application types and how they can be built and tested in Amazon EMR. Pig and Hive are higher-level data processing languages that may be better choices for building Job Flows in organizations that have greater technical expertise using scripting-based languages, or have deep knowledge of SQL for extracting needed data elements.
Hive and Pig will be used in separate walkthroughs in this chapter to rebuild the data filtering and request error counting examples from Chapter 3. The programs will be directly run in an interactive mode on a live Amazon EMR cluster to explore the data set and review the outcomes of each Hive and Pig command.
As you’ll see, Hive or Pig Job Flows can be used to build applications that perform many of the same functions that have been covered in this book. They can also be used as tools to perform ad hoc interactive query sessions against large data sets. This chapter will help broaden the toolset that you can use to perform data analytics under Amazon EMR regardless of whether your organization’s core strengths are in Java development, scripting languages, SQL, or other programming languages.
Let’s start by exploring the Job Flow types available under Amazon EMR.
Amazon Job Flow Technologies
Amazon EMR currently supports four different types of technologies to be added as steps to an EMR cluster. Amazon has worked to tweak each of the cluster types to support interaction with other AWS services and to perform well in the AWS cloud environment. Selection of a particular cluster type is more dependent on the technology needs for your project and the type of application being built. Let’s briefly examine the technologies available for steps in an Amazon EMR cluster:
- Hive
-
Hive is an open source data warehouse package that runs on top of Hadoop in Amazon EMR. Hive Query Language (HQL) is a powerful language that leverages much of the strengths of SQL and also includes a number of powerful extensions for data parsing and extraction. Amazon has modified Hive to work in AWS and to easily integrate with other AWS services. Hive queries are converted into a series of
mapandreduceprocesses run across the Amazon EMR cluster by the Hive engine. Hive Job Flows are a good fit for organizations with strong SQL skills. Hive also has a number of extensions to directly support AWS DynamoDB to populate Amazon EMR data directly in and out of DynamoDB. - Custom JAR
- Custom JAR Job Flows utilize core Hadoop libraries that are preloaded into the cluster. A Java application is compiled and uploaded into S3 and is compiled against the Hadoop libraries of the same version used in Amazon EMR. The previous examples in this book exclusively used this job flow technology to demonstrate data manipulation and analysis in Amazon EMR. Custom JAR Job Flows give developers the greatest flexibility in writing MapReduce applications.
- Streaming
- Streaming Job Flows allow you to write Amazon EMR Job Flows in Ruby, Perl, Python, PHP, R, Bash, or C++. The nodes of the cluster contain the Apache streaming library, and applications can reference functions from this library. When creating a Streaming Job Flow, you can specify separate scripts for the mapper and reducers executed in the Job Flow. Streaming Job Flows are also good for organizations familiar with scripting languages. This Job Flow type can be used to convert an existing extract, transform, and load (ETL) application to run in the cloud with the increased scale of Amazon EMR.
- Pig program
- Pig is a data flow engine that sits on top of Hadoop in Amazon EMR, and is preloaded in the cluster nodes. Pig applications are written in a high-level language called Pig Latin. Pig provides many of the same benefits of Hive applications by allowing applications to be written at a higher level than the MapReduce routines covered earlier. It has been extended with a number of user-defined functions (UDFs) that allow it to work more readily on unstructured data. Pig, like Hive, translates Pig scripts into a series of MapReduce jobs that are distributed and executed across the Amazon EMR cluster. Pig Job Flows are a good fit for organizations with strong SQL skills that would like to extend Pig with UDFs to perform custom actions.
The remainder of this chapter will focus on Pig and Hive applications in Amazon EMR. These job flow technologies most closely resemble the functions and features demonstrated with the Custom JAR Job Flows covered earlier in this book. You can also run Pig and Hive Job Flows inside of Amazon EMR in an interactive mode to develop, test, and troubleshoot applications on a live, running Amazon EMR cluster.
More on Job Flow Types
This book does not cover the details of Streaming Job Flows in great detail. Streaming Job Flows follow a similar development and testing pattern as a standard command-line application, written in Ruby, Perl, Python, PHP, R, Bash, or C++. We recommend reviewing Amazon EMR’s sample word splitter application or the machine learning examples in Chapter 5 written in Python to learn more about Streaming Job Flows.
What Is Pig?
Pig is an Apache open source project that provides a data flow engine that executes a SQL-like language into a series of parallel tasks in Hadoop. Amazon has integrated Pig into Amazon EMR for execution in Pig Job Flows. These additions allow Pig scripts to access S3 and other AWS services, along with inclusion of the Piggybank string and date manipulation UDFs, and support for the MapR version of Hadoop.
Pig performs similar data operations as SQL, but has its own syntax and can be extended with user defined functions. You can join, sort, filter, and group data by using operators and language keywords on data sets.
Utilizing Pig in Amazon EMR
A Pig Job Flow is typically created by choosing Pig Program in Add Step when creating a new cluster, or Job Flow, from the Amazon EMR Management Console. Figure 4-1 shows the initial configuration for creating a Pig Job Flow.
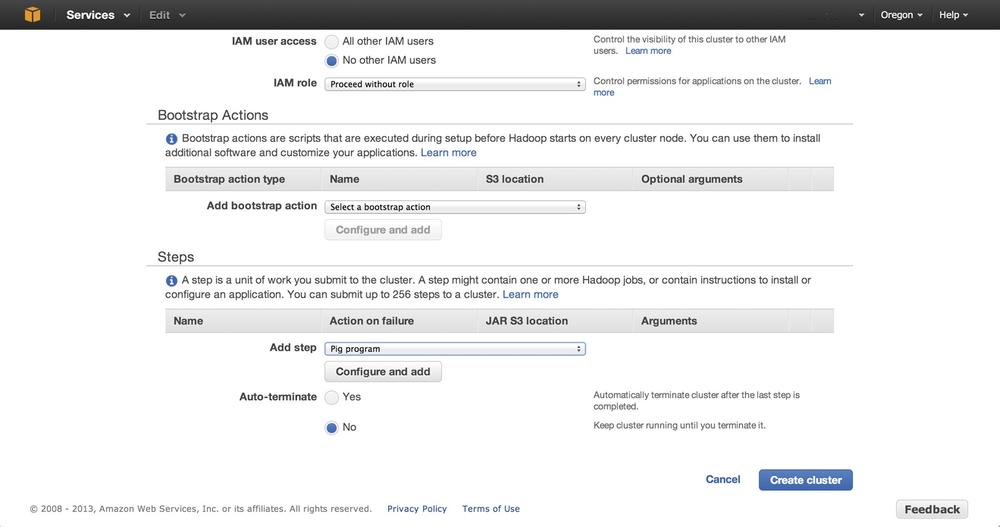
Pig Job Flows can be run as a standard Job Flow where a Pig script is chosen in S3 for execution, and also in an interactive mode. Creating an interactive Pig Session option does not require any steps to be added or configured in Figure 4-1. This is possible because as you recall from our first Job Flow in Figure 2-8 Hive and Pig are installed by default on every new Cluster. The cluster will need to be setup with Auto-terminate set to No though so the cluster stays running with no steps. In interactive mode, no additional parameters, scripts, or settings are specified under the step Add and configure pop-up. Instead, you can enter Pig Latin commands and parameters directly at the command line on the master node. This starts an interactive Job Flow that waits for a connection to be made, after which you can enter commands into the cluster command line on the master EMR node. The cluster will continue to run until you terminate it using the Amazon EMR Management Console or EMR command-line tool.
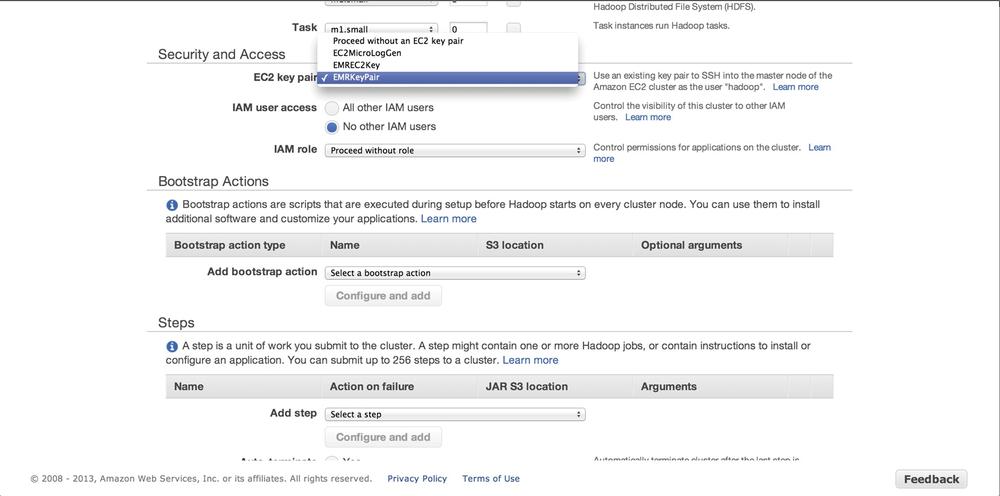
The EC2 key pair under Security and Access is a required setting on interactive Job Flows—you use it to connect directly to the master node in the Amazon EMR cluster. If no key pair exists or you prefer a new one for your Amazon EMR instances, review Amazon’s detailed article on creating a key pair for an interactive session. You specify the key pair in the Security and Access section of the new cluster as shown in Figure 4-2.
Connecting to the Master Node
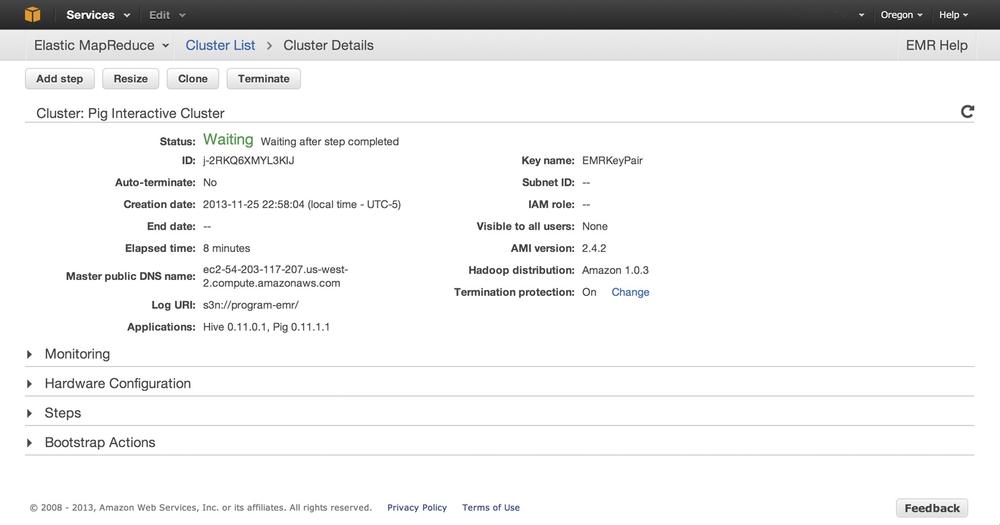
Once the Pig interactive Job Flow has been created, the job appears in a Waiting state in the Management Console, as shown in Figure 4-3. You’ll need to establish a session so you can enter Pig commands directly into the EMR cluster. You use the Master Public DNS Name to establish the connection to the master node—this name can be found in the Cluster details page of the console as shown in Figure 4-3.
With this information, you can now establish a session to the master node using an SSH client and the EC2 key pair. The following example uses a Linux command shell to establish the session. Amazon has an excellent article on establishing a connection to the master node using the EMR command-line utility or other operating systems in its AWS documentation. After connecting to the node, use the pig command to get to an interactive Pig prompt. You should have a session similar to the following:
$ ssh -i EMRKeyPair.pem hadoop@ec2-10-10-10-10.compute-1.amazonaws.com
Linux (none) 3.2.30-49.59.amzn1.i686 #1 SMP Wed Oct 3 19:55:00 UTC 2012 i686
--------------------------------------------------------------------------

Welcome to Amazon Elastic MapReduce running Hadoop and Debian/Squeeze.

Hadoop is installed in /home/hadoop. Log files are in /mnt/var/log/hadoop.
Check /mnt/var/log/hadoop/steps for diagnosing step failures.

The Hadoop UI can be accessed via the following commands:

  JobTracker    lynx http://localhost:9100/
  NameNode      lynx http://localhost:9101/

--------------------------------------------------------------------------
hadoop@ip-10-10-10-10:~$ pig
2013-07-21 19:53:24,898 [main] INFO  org.apache.pig.Main - Apache Pig
version 0.11.1-amzn (rexported) compiled Jun 24 2013, 18:37:44
2013-07-21 19:53:24,899 [main] INFO  org.apache.pig.Main - Logging error
messages to: /home/hadoop/pig_1374436404892.log
2013-07-21 19:53:24,988 [main] INFO  org.apache.pig.impl.util.Utils -
Default bootup file /home/hadoop/.pigbootup not found
2013-07-21 19:53:25,735 [main] INFO  org.apache.pig.backend.hadoop.
executionengine.HExecutionEngine - Connecting to hadoop file system
at: hdfs://10.10.10.10:9000
2013-07-21 19:53:28,851 [main] INFO  org.apache.pig.backend.hadoop.
executionengine.HExecutionEngine - Connecting to map-reduce job tracker
at: 10.10.10.10:9001
grunt>
Pig Latin Primer
Now that you’ve established a connection to the master node, let’s explore the Pig Latin statements you’ll use in building your Pig Job Flow.
LOAD
The first thing you will want to do in your application is load input data into the application for processing. In Pig Latin, you do this via the LOAD statement. Pig has been extended by Amazon to allow data to be loaded from S3 storage.
As we saw in our previous Job Flows, the data in an application is generally loaded out of S3. To load data into the Pig application, you’ll need to specify the full S3 path and bucket name in the load statement. For example, to load sample-syslog.log from the bucket program-emr, use the following LOAD statement:
LOAD 's3://program-emr/sample-syslog.log' USING TextLoader as (line:chararray);
The LOAD statement supports a number of load types, including TextLoader, PigStorage, and HBaseStorage. The TextLoader is the focus of upcoming examples, which show its ability to load a data set out of S3. We’ll also look at PigStorage and HBaseStorage, which are useful for manipulating the Amazon EMR HDFS storage directly.
Pig Latin uses a concept of schemas. Schemas allow you to specify the structure of the data when loading it via the LOAD statement. If your data contained four fields—log date, host, application, and log message—then the schema could be defined as follows on the LOAD statement:
LOAD 's3://program-emr/sample-syslog.log' USING TextLoader as
    (logdate:chararray, host:chararray, application:chararray, logmsg:chararray);
This can be useful in loading data sets with data structures that map easily to Pig’s default schemas. For data sets that don’t map to existing schemas, it makes sense to load the data into a single character array for parsing with Amazon’s piggybank UDF library.
STORE
The STORE statement allows you to write out data. STORE performs the opposite of the LOAD statement and has also been modified to work with S3 and other AWS services. You need the full S3 bucket and location path in order to specify the location of your desired storage output. To write out data to S3, you could use an example like the following to write processed results:
STORE user_variable into 's3://program-emr/processed-results';
DUMP
DUMP is a useful statement for debugging and troubleshooting scripts while they are being developed in the interactive session. The DUMP statement will send the data held by a variable to the screen.
DUMP user_variable;
ILLUSTRATE
ILLUSTRATE is similar to the DUMP statement because it is primarily used for debugging and troubleshooting purposes. ILLUSTRATE will dump a single row of the data to the screen instead of the entire contents of a variable. In cases where it may be necessary to verify that an operation is generating the proper format, you may prefer to use this in order to see a single line of a variable instead of millions of rows of potential output. ILLUSTRATE uses the same statement syntax as DUMP:
ILLUSTRATE user_variable;
FOREACH
FOREACH, as the name implies, performs an action or expression on every record in a data pipeline in Pig. The results of FOREACH are new data elements that can be used later in the interactive session or script. In Pig terminology, this is typically referred to as projection. The following example generates, or projects, four new data elements from the RAW_LOG row on which the FOREACH statement operates:
FOREACH RAW_LOG generate logdate:chararray, host:chararray,
    application:chararray, logmsg:chararray;
FILTER
The FILTER statement allows us to perform much of the data cleansing and removal functions that were done in the custom JAR application. The FILTER statement takes an expression and returns a data set matching the expression. It is similar to using a WHERE clause in SQL, and can contain multiple expressions separated by and or or to chain Boolean matching expressions together. An example of the FILTER statement matching on a regular expression is listed here:
FILTER RAW_LOG BY line matches '.*SEVERE.*';
The equivalent FILTER statement in SQL would be expressed as follows and highlights the SQL-like nature of Pig Latin:
select * from TMP_RAW_LOG where line like '%SEVERE%';
To connect the FILTER statement to the concepts you have already learned, we could say that the FILTER statement performs much of the same function as the map phase in our custom JAR. Each row is processed by the FILTER statement and emitted into the variable that holds the results of the filter. From the custom JAR mapper, the FILTER statement is performing the following logic:
...
// Filter any web requests that had a 300 HTTP return code or higher
if ( httpCode >= 300 )
{
    // Output the log line as the key and HTTP status as the value
    output.collect( value, new IntWritable(httpCode) );
}
...
GROUP
You can use the GROUP statement to collate data on a projected element or elements of a data set. GROUP can be useful for aggregating data to perform computations on a set of values, including grouping data sets on one to many projected elements. The syntax of the GROUP statement is as follows:
GROUP user_variable BY x;
The GROUP statement works very similarly to the GROUP clause in SQL. Expressing similar functionality in SQL would yield the following equivalent statement:
select * from TMP_USER_VARIABLE GROUP BY X;
In the custom JAR application that we built in the previous chapter, the grouping was done for us as part of the key/value pairs that are emitted by the mapper. The grouping is utilized in the reduce phase of the custom JAR to perform calculations on the grouped keys. The following portion of the reduce method utilizes the grouped data to count the number of equivalent HTTP requests that resulted in an HTTP error:
...
// Iterate over all of the values (counts of occurrences of the web requests)
int count = 0;

while( values.hasNext() )
{
        // Add the value to our count
    count += values.next().get();
}
...
More on Pig
This book covers Pig briefly to demonstrate one of our earlier building blocks that uses Pig Latin. There is a lot more to learn about Pig Latin and the many data manipulations and analysis functions in the language. To learn more about Pig, see Programming Pig by Alan Gates (O’Reilly).
Exploring Data with Pig Latin
With a connection established, let’s walk through an interactive Pig session to demonstrate the Pig Latin statements in action. This will explore the data set against a live Amazon EMR cluster.
Pig relies on a set of UDFs to perform many of the data manipulation functions and arithmetic operations. In Pig and Amazon EMR, a number of these functions are included in a Java UDF library called piggybank.jar. To use these functions, you must register the Amazon library with Pig. You can use the EXTRACT routine in this library to parse the NASA log data into its individual columns using the regular expression from the previous log parsing custom JAR Job Flow. To register Amazon (and any other UDFs), use the register statement. The individual UDF statements used should be listed as DEFINEs in interactive sessions and Pig scripts. The following interactive session details the process of registering the library and the UDF:
grunt> register file:/home/hadoop/lib/pig/piggybank.jar
grunt> DEFINE EXTRACT org.apache.pig.piggybank.evaluation.string.EXTRACT;
grunt>
The interactive Job Flow session that this created takes no parameters to start. To load an input file, use the LOAD statement to bring the web logs into Amazon EMR from S3. The TextLoader takes the S3 location and maps it to the schema defined as a single log line projected by the line name given on the statement as an array of characters (chararray). The RAW_LOGS identifier will hold the data set loaded into Pig.
To verify what has been done so far, we can use the ILLUSTRATE statement to show a single data value held by the RAW_LOGS identifier. Executing the ILLUSTRATE statement causes Pig to create a number of MapReduce jobs in the Amazon EMR cluster, and displays a data row to the screen from the cluster. The following interactive session details the output returned from executing the ILLUSTRATE statement:
grunt> RAW_LOGS = LOAD 's3://program-emr/input/NASA_access_log_Jul95'
USING TextLoader as (line:chararray);
grunt> ILLUSTRATE RAW_LOGS;
2013-07-21 20:53:33,561 [main] INFO
org.apache.pig.backend.hadoop.executionengine.
HExecutionEngine - Connecting to hadoop file system at: hdfs://10.10.10.10:9000
2013-07-21 20:53:33,562 [main] INFO
org.apache.pig.backend.hadoop.executionengine.
HExecutionEngine - Connecting to map-reduce job tracker at: 10.10.10.10:9001
2013-07-21 20:53:33,572 [main] INFO
org.apache.pig.backend.hadoop.executionengine.
mapReduceLayer.MRCompiler - File concatenation threshold: 100 optimistic? false
2013-07-21 20:53:33,576 [main] INFO
org.apache.pig.backend.hadoop.executionengine.
mapReduceLayer.MultiQueryOptimizer - MR plan size before optimization: 1
...
...
2013-07-21 20:53:36,380 [main] INFO
org.apache.pig.backend.hadoop.executionengine.
mapReduceLayer.JobControlCompiler - Setting Parallelism to 1
2013-07-21 20:53:36,393 [main] WARN  org.apache.pig.data.SchemaTupleBackend -
SchemaTupleBackend has already been initialized
2013-07-21 20:53:36,396 [main] INFO
org.apache.pig.backend.hadoop.executionengine.
mapReduceLayer.PigMapOnly$Map - Aliases being processed per job phase
(AliasName[line,offset]): M: RAW_LOGS[2,11] C:  R:
--------------------------------------------------------------------------------
| RAW_LOGS| line:chararray
--------------------------------------------------------------------------------
|         | slip137-5.pt.uk.ibm.net - - [01/Jul/1995:02:33:07 -0400] "GET /...
--------------------------------------------------------------------------------
This shows that the logfile is now loaded in the data pipeline for further processing. From the work done on the custom JAR application, we know that the next logical step in the Pig program is to parse the log record into individual data columns. You can use the FOREACH statement with the UDF extract routine to iterate through each log line in RAW_LOGS and split the data into projected named columns.
This should look very familiar because this is the same regular expression from Chapter 3 that you used to split up the data into columns. The data will need to be further typecast to data types that can be used in arithmetic expressions. The FOREACH statement needs to be executed again to convert the HTTP status and bytes columns from character arrays to integers. The ILLUSTRATE statement shows the effect of the FOREACH statement on the data set:
grunt> LOGS_BASE = FOREACH RAW_LOGS GENERATE
    FLATTEN(
      EXTRACT(line, '^(\\S+) (\\S+) (\\S+) \\[([\\w:/]+\\s[+\\-]\\d{4})\\]
            "(.+?)" (\\d{3}) (\\S+)')
    )
    as (
      clientAddr:    chararray,
      remoteLogname: chararray,
      user:          chararray,
      time:          chararray,
      request:       chararray,
      status:        chararray,
      bytes_string:  chararray
  );
grunt> CONV_LOG = FOREACH LOGS_BASE generate clientAddr, remoteLogname, user,
time, request, (int)status, (int)bytes_string;
grunt> ILLUSTRATE CONV_LOG;
-------------------------------------------------------------------------------
| CONV_LOG| clientAddr:chararray| remoteLogname:chararray| user:chararray...
-------------------------------------------------------------------------------
|         | tty15-08.swipnet.se | -                      | -             ...
-------------------------------------------------------------------------------
The individual log line has now been expressed as individual fields, and has been converted to Pig data types that allow the log data to be filtered to only the HTTP error entries. You can now use the FILTER statement to restrict the data set down by evaluating the status value on each record in the logfile. The expression—(status >= 300)—maps directly to the logic used in the map routine of the custom JAR to determine which records to emit and which ones to throw away for further processing in the data pipeline. Using the ILLUSTRATE statement, we can assess the logic used in the filter to see the resulting data set:
grunt> FILTERED = FILTER CONV_LOG BY status >= 300;
grunt> ILLUSTRATE FILTERED;
--------------------------------------------------------------------------------
| FILTERED| clientAddr:chararray| request:chararray                      | status
--------------------------------------------------------------------------------
|         | piweba3y.prodigy.com| GET /images/NASA-logosmall.gif HTTP/1.0| 304
--------------------------------------------------------------------------------
Now you can use the DUMP statement to further examine the resulting data set beyond this initial record. At this point, much of the functionality of the mapper built earlier has been covered. So far through the interactive session, the data has been imported into Amazon EMR and filtered down to the records, including records of an HTTP status value of 300 or higher.
In the custom JAR application, you needed to identify a key value so data could be grouped and evaluated further in the reduce phase. The Pig script has not identified any data element as a key in the commands that have been run. The GROUP statement provides a similar key grouping from the earlier application. The request column is the data element to allow the GROUP statement to build a data set for further calculations.
grunt> GROUP_REQUEST = GROUP FILTERED BY request;
grunt> ILLUSTRATE GROUP_REQUEST;
--------------------------------------------------------------------------------
| group:chararray | FILTERED:bag{:tuple(clientAddr:chararray,remoteLogname:..
--------------------------------------------------------------------------------
| GET /cgi-bin/imagemap/countdown?320,274 HTTP/1.0 | {(piweba2y.prodigy.com, ...
--------------------------------------------------------------------------------
The ILLUSTRATE statement on GROUP_REQUEST shows the results of the data grouping based on HTTP requests. The data now looks very similar to the input to the reduce phase of the earlier custom JAR application.
To compute the total number of error requests for each unique HTTP request string, run the GROUP_REQUEST data through a FOREACH statement to count the number of entries found in the log. The FLATTEN keyword will treat each request in a grouping as a separate line for processing. The incoming data set prior to flattening will be a data tuple, or array.
Group Key: GET /cgi-bin/imagemap/countdown?320,274 HTTP/1.0,
Tuple:     {(piweba2y.prodigy.com, ..., 98), (ip16-085.phx.primenet.com, ...,
98)}
The FLATTEN keyword expresses the array as individual data lines for the COUNT operation to give us a total per request. The result of this operation yields a counting process similar to the reduce routine in the custom JAR application. You can run the ILLUSTRATE or DUMP statements to validate the end results of the FOREACH statement. Finally, the STORE statement writes the result set out to S3. The storage is handled automatically as part of the custom JAR, but should be explicitly written out with the STORE statement in Pig:
grunt> FINAL_DATA = FOREACH GROUP_REQUEST GENERATE
FLATTEN(group) AS request, COUNT($1);
grunt> STORE FINAL_DATA into 's3://program-emr/pig-output';
Reviewing the end result set in S3 yields the same results as our custom JAR workflow. The key differences, after we remove the numerous calls to ILLUSTRATE and DUMP, is a small set of nine Pig Latin statements that generate the same output as the earlier custom JAR Job Flow. With the custom JAR program, the process took several develop, build, test, publish, and execute cycles to work out issues in developing the map and reduce routines. With the interactive session, you are able to build and diagnose your application inside of a running Amazon EMR cluster.
Remember to Terminate Interactive Sessions
To clean up from the interactive session, you’ll need to choose the Terminate option from the Amazon EMR console. Be aware that, unlike the previous custom JAR Job Flows, Amazon EMR will keep the interactive session running and you will continue to incur Amazon EMR usage charges until the cluster is terminated.
Running Pig Scripts in Amazon EMR
The load and store statements used in the interactive session used literal paths to very specific files stored in S3. To turn the interactive session statements into a Pig script, which can be used in Amazon EMR, you need to modify the literal paths to use the $INPUT and $OUTPUT parameters, which will be passed to the Job Flow when it is created in Amazon EMR. Adding these parameters—and removing the ILLUSTRATE and DUMP statements from the interactive session—yields the following Pig script that can be run in a noninteractive session in Amazon EMR:
--
-- setup piggyback functions
--
register file:/home/hadoop/lib/pig/piggybank.jar
DEFINE EXTRACT org.apache.pig.piggybank.evaluation.string.EXTRACT;

--
-- Load input file for processing
--
RAW_LOGS = LOAD '$INPUT' USING TextLoader as (line:chararray);

--
-- Parse and convert log records into individual column values
--
LOGS_BASE = FOREACH RAW_LOGS GENERATE
    FLATTEN(
      EXTRACT(line, '^(\\S+) (\\S+) (\\S+) \\[([\\w:/]+\\s[+\\-]\\d{4})\\]
        "(.+?)" (\\d{3}) (\\S+)')
    )
    as (
      clientAddr:    chararray,
      remoteLogname: chararray,
      user:          chararray,
      time:          chararray,
      request:       chararray,
      status:        chararray,
      bytes_string:  chararray
  );

CONV_LOG = FOREACH LOGS_BASE generate clientAddr, remoteLogname, user, time,
    request, (int)status, (int)bytes_string;

--
-- Remove log lines that do not contain errors and group data based on HTTP
--   request lines
--
FILTERED = FILTER CONV_LOG BY status >= 300;
GROUP_REQUEST = GROUP FILTERED BY request;

--
-- Count the log lines that are for the same HTTP request and output the
--   results to S3
--
final_data = FOREACH GROUP_REQUEST GENERATE FLATTEN(group) AS request, COUNT($1);
STORE final_data into '$OUTPUT';
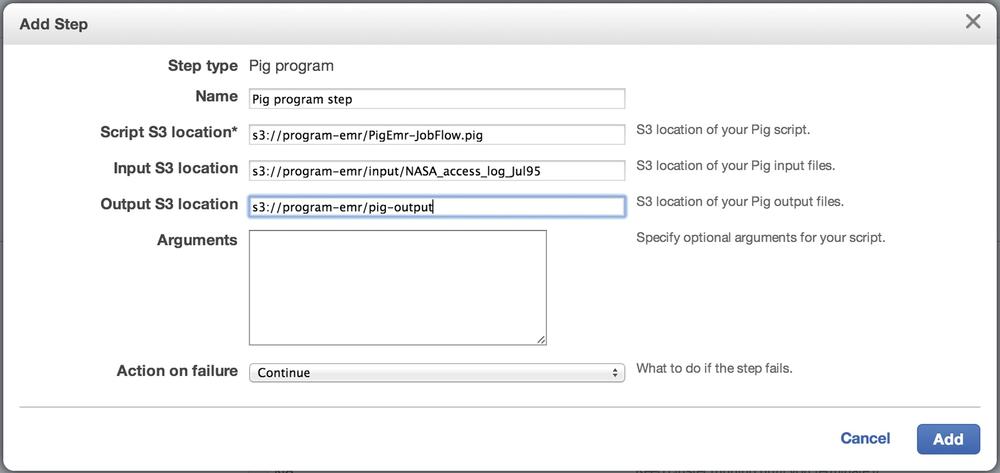
You can upload this Pig script to an S3 bucket and select it as a parameter in creating a Pig Program Job Flow. To run the Pig script from the Amazon EMR console, a Pig Program step is added as a step in the cluster and the Pig script, input, and output files are specified when configuring the step in cluster creation. Figure 4-4 shows the parameters used in the Pig Program step with the Pig script, input, and output locations set to the files used from the interactive session. Running this new Job Flow yields the same results we saw during the interactive session and validates the changes made to the script to take input and output parameters to the LOAD and STORE statements.
What Is Hive?
Hive is a powerful SQL-like language that allows us to query Amazon EMR. Hive was built to lower the barrier of entry for the large masses of IT professionals who know how to develop in SQL and harness the power of Amazon EMR. The Hive Query Language (HQL) much more closely resembles SQL in feature and function than Pig. The time required for someone who already understands SQL to begin developing in Hive is much shorter than it would be for Pig or Java MapReduce development. Hive is preinstalled on the Amazon EMR nodes in clusters using the Hive Program Job Flow.
Utilizing Hive in Amazon EMR
You’ll need to create an interactive session to walk through a number of HQL queries inside the Amazon EMR cluster. You create the interactive Hive Job Flow from the Amazon EMR Management Console. Starting an interactive Hive Session
is created in the same manner as the Pig example earlier. A new cluster is created with no steps added and the cluster Auto-terminate option set to No. We can use the same EC2 key pair to access the master node in the Amazon EMR cluster in the Hive session that we used for the earlier Pig session walkthrough.
After connecting to the master node in the cluster, invoke the hive command to begin working with HQL commands directly on the EMR cluster. A connection to an interactive Hive Job Flow will look similar to the following example session:
$ ssh -i EMRKeyPair.pem hadoop@ec2-10-10-10-10.compute-1.amazonaws.com
Linux (none) 3.2.30-49.59.amzn1.i686 #1 SMP Wed Oct 3 19:55:00 UTC 2012 i686
--------------------------------------------------------------------------

Welcome to Amazon Elastic MapReduce running Hadoop and Debian/Squeeze.

Hadoop is installed in /home/hadoop. Log files are in /mnt/var/log/hadoop.
Check /mnt/var/log/hadoop/steps for diagnosing step failures.

The Hadoop UI can be accessed via the following commands:

  JobTracker    lynx http://localhost:9100/
  NameNode      lynx http://localhost:9101/

--------------------------------------------------------------------------
hadoop@ip-10-10-10-10:~$ hive
Logging initialized using configuration in file:/home/hadoop/.versions/
hive-0.8.1/conf/hive-log4j.properties
Hive history file=/mnt/var/lib/hive_081/tmp/history/hive_job_log_hadoop_
201307220206_218802535.txt
hive>
Hive Primer
Now that you’ve established a session to the master node, you’ll use a number of HQL statements to load, parse, filter, group, and output a result set out of Amazon EMR into S3. The statements covered here should look very similar in form and function to SQL. There are some key differences, but looking at the statements needed for a Hive application demonstrates how transferrable SQL knowledge is to Hive development.
SerDe
Hadoop and MapReduce applications that use formal programming languages can work with data with limited structure. The statements and language constructs allow the data to be parsed into a structure the application can work on, deserialize, and then write out later in another format or structure after serialization.
SQL and database systems, however, work with data sets that have a defined structure and set of data types. To allow Hive to have much of the language structure of SQL but still be able to work with the limited structure of data in Hadoop, developers created a number of serializers and deserializers, or SerDes, to allow Hive to input data into a structured format. In the Pig and Java examples throughout the book, we used the individual language constructs and regular expressions to perform the same serialization and deserialization functionality. So, these should not be not new concepts when compared to previous examples.
There are a number of SerDes available in Hive. SerDes are added to an HQL script through add statements at the start of the script. We can use the regular expression used in earlier examples in Hive as well by adding hive_contrib.jar as follows:
add jar /home/hadoop/hive/lib/hive_contrib.jar;
Additional SerDes can be written and included from S3. This is one of the features Amazon has added to support Hive in AWS. Amazon has also provided a SerDe for working with JSON-formatted data. The JSON SerDe can be added to a script from its S3 location in AWS as follows:
add jar s3://elasticmapreduce/samples/hive-ads/libs/jsonserde.jar;
SerDes define the input and output data formats when you are creating tables to process and query inside of an HQL script. To parse the web logs, your input format needs to specify a regular expression for your log, convert the columns to a set of strings defined by the output format, and number each output column:
CREATE TABLE weblog_data(
        host STRING,
        identity STRING,
        user STRING,
        time STRING,
        request STRING,
        status STRING,
        size STRING)
      ROW FORMAT SERDE 'org.apache.hadoop.hive.contrib.serde2.RegexSerDe'
      WITH SERDEPROPERTIES (
        "input.regex" = "^(\\S+) (\\S+) (\\S+) \\[([\\w:/]+
                \\s[+\\-]\\d{4})\\] \"(.+?)\" (\\d{3}) (\\S+)",
        "output.format.string" = "%1$s %2$s %3$s %4$s %5$s %6$s %7$s"
      )
      LOCATION 's3://program-emr/input';
CREATE TABLE
The CREATE TABLE statement follows a similar syntax as SQL. The CREATE TABLE statement is used for input and output of data from the Hive script with a defined set of data types and structure to the table. The earlier example created a table that maps to the seven columns in our log data and imports the data set into this table from S3.
Amazon extensions to Hive allow access to tables stored in S3 and another AWS service, DynamoDB. To create a table handled outside of the HDFS storage in the Amazon EMR cluster, use the EXTERNAL keyword when creating the table. This tells Hive that the table exists outside of its storage, and a LOCATION is required to tell Hive where the table exists. The following example uses EXTERNAL to create a table in S3:
CREATE EXTERNAL TABLE MyTable (
        host STRING,
        identity STRING,
        user STRING,
        time STRING,
        request STRING,
        status STRING,
        size STRING)
    ROW FORMAT DELIMITED FIELDS TERMINATED BY ','
    LOCATION 's3://program-emr/output';
The schema information about what tables exist in Hive is maintained in the master node, and by default is not maintained outside of the Amazon EMR cluster. This means any table that is created in Hive will cease to exist once the Amazon EMR cluster is terminated. You can persist the tables using the EXTERNAL keyword to store the data outside of Amazon EMR on S3, Amazon’s Redshift Data Warehouse, or Amazon Relational Database Service (RDS).
INSERT
The INSERT statement serves the same purpose in Hive as it does in SQL: to place data into storage. Hive on Amazon EMR allows this location to be another Hive table, S3 location, external table, or another Amazon database service like DynamoDB. The INSERT statements in Hive take a query as the data source to load data into the storage location. To write the output of a query result to S3, use the following INSERT syntax in Hive:
INSERT OVERWRITE DIRECTORY 's3://program-emr/hive-output' select * from table;
The OVERWRITE keyword in the example will replace the data in the destination. The INTO keyword could be used in place of OVERWRITE to append the data rather than replace it.
More on Hive
This chapter covers only a small portion of what can be accomplished with Hive. To learn more about Hive, see Programming Hive by Edward Capriolo, Dean Wampler, and Jason Rutherglen (O’Reilly).
Exploring Data with Hive
You can now put the Hive commands covered earlier to direct use in the interactive Hive session. You’ll need to register the SerDe library with Hive so the data can be parsed with the web log regular expression you used in earlier examples. You’ll start by adding the contributed SerDe JAR to the session with a simple add jar statement and the location of the library on the master node:
hive> add jar /home/hadoop/hive/lib/hive_contrib.jar;
Added /home/hadoop/hive/lib/hive_contrib.jar to class path
Added resource: /home/hadoop/hive/lib/hive_contrib.jar
hive>
The interactive session has no defined input or outputs. The CREATE TABLE statement is used to pull in the web log information from S3. We parse the web log using the regex SerDe from our library input to separate out each field to map to the table structure. The output format takes each record and maps it to the string data types for each column in the table. The LOCATION specifies the directory where your input files are located.
hive> CREATE TABLE weblog_data(
        host STRING,
        identity STRING,
        user STRING,
        time STRING,
        request STRING,
        status STRING,
        size STRING)
      ROW FORMAT SERDE 'org.apache.hadoop.hive.contrib.serde2.RegexSerDe'
      WITH SERDEPROPERTIES (
        "input.regex" = "^(\\S+) (\\S+) (\\S+) \\[([\\w:/]+\\s[+\\-]\\d{4})\\] \
        \"(.+?)\" (\\d{3}) (\\S+)",
        "output.format.string" = "%1$s %2$s %3$s %4$s %5$s %6$s %7$s"
      )
      LOCATION 's3://program-emr/input';
OK
Time taken: 22.122 seconds
hive>
Hive does not have the ILLUSTRATE statement like the earlier Pig example. However, you can use standard SQL statements to review the data loaded into the weblog_data table—this was created to confirm the data has been parsed and loaded into the Hive table. Performing a simple count operation shows the full data set has been loaded into Hive:
hive> select count(*) from weblog_data;
Total MapReduce jobs = 1
Launching Job 1 out of 1
Number of reduce tasks determined at compile time: 1
...
...
2013-07-22 21:42:12,434 Stage-1 map = 100%,  reduce = 100%, Cumulative
CPU 31.28 sec
2013-07-22 21:42:13,444 Stage-1 map = 100%,  reduce = 100%, Cumulative
CPU 31.28 sec
2013-07-22 21:42:14,463 Stage-1 map = 100%,  reduce = 100%, Cumulative
CPU 31.28 sec
2013-07-22 21:42:15,480 Stage-1 map = 100%,  reduce = 100%, Cumulative
CPU 31.28 sec
MapReduce Total cumulative CPU time: 31 seconds 280 msec
Ended Job = job_201307220201_0001
Counters:
MapReduce Jobs Launched:
Job 0: Map: 1  Reduce: 1   Accumulative CPU: 31.28 sec   HDFS Read: 320
HDFS Write: 8 SUCCESS
Total MapReduce CPU Time Spent: 31 seconds 280 msec
OK
1891715
Time taken: 149.023 seconds
hive>
You can review the individual rows of data using simple select statements to pull back data rows from the Amazon EMR cluster:
hive> select * from weblog_data limit 1;
OK
199.72.81.55    -    -  01/Jul/1995:00:00:01 -0400      GET /history/apollo/
HTTP/1.0        200     6245
Time taken: 14.75 seconds
hive>
The execution times to run each of these Hive statements may appear shockingly high for such a small data set to anyone who has performed similar queries against a traditional database. The runtimes are high because the Hive command is being parsed and run as a MapReduce job on multiple nodes in the EMR cluster. The execution times are similar to runtimes from the earlier Job Flow applications. A traditional database system that SQL commands are usually run on achieves higher performance compared to Hive due to the structured nature of the data set and system and index optimizations that can take advantage of the structure.
The query entered into the Hive command line is processed and turned into a set of map and reduce jobs. These jobs are executed on each node against a shard of the data set on each node and the end result set is returned. Hadoop does not have the strict data structures and indexing that help a traditional database system perform SQL statements quickly.
Filtering the data set in Hive is as simple as adding a WHERE clause to the HQL query. Using the status column in the table, the expression (status >= 300) will typecast the column and return the matching records. Using the earlier select statement, we can obtain the count of error rows in the log as in the following example interactive session:
hive> select count(*) from weblog_data where status >= 300;
...
Total MapReduce CPU Time Spent: 36 seconds 850 msec
OK
190180
Time taken: 113.596 seconds
hive>
The map and reduce phases from the custom JAR application can be written into a single HQL statement in Hive. The data filter is performed by the WHERE clause with a check on the status column. You can perform the count and grouping of the data using the group and COUNT(*) from standard SQL data functions and expressions. Utilizing the INSERT statement stores the data to S3 and completes the set of functionality in Hive to replicate the custom JAR Job Flow. The end result set in S3 is the same result set as the earlier Job Flow examples.
hive> INSERT OVERWRITE DIRECTORY 's3://program-emr/hive-output' select request,
count(*) from weblog_data where status>=300 group by request;
...
Counters:
15290 Rows loaded to s3://program-emr/hive-output
MapReduce Jobs Launched:
Job 0: Map: 1  Reduce: 1   Accumulative CPU: 36.65 sec   HDFS Read: 320 HDFS
    Write: 0 SUCCESS
Total MapReduce CPU Time Spent: 36 seconds 650 msec
OK
Time taken: 123.133 seconds
hive>
To clean up your interactive session, choose the Terminate option from the Amazon EMR console. Be aware that Amazon EMR will keep the interactive session running and you will continue to incur Amazon EMR usage charges until the cluster is terminated.
Running Hive Scripts in Amazon EMR
The Hive CREATE TABLE and INSERT statements need to use the $INPUT and $OUTPUT parameters so the statements used in the interactive Hive session can be used in a Hive script. Modifying these statements and removing the statements used to review the data counts yields the following Hive script, which can be run in a noninteractive session in Amazon EMR:
add jar /home/hadoop/hive/lib/hive_contrib.jar;

CREATE TABLE weblog_data(
  host STRING,
  identity STRING,
  user STRING,
  time STRING,
  request STRING,
  status STRING,
  size STRING)
ROW FORMAT SERDE 'org.apache.hadoop.hive.contrib.serde2.RegexSerDe'
WITH SERDEPROPERTIES (
  "input.regex" = "^(\\S+) (\\S+) (\\S+) \\[([\\w:/]+
        \\s[+\\-]\\d{4})\\] \"(.+?)\" (\\d{3}) (\\S+)",
  "output.format.string" = "%1$s %2$s %3$s %4$s %5$s %6$s %7$s"
)
LOCATION '${INPUT}';

INSERT OVERWRITE DIRECTORY '${OUTPUT}' select request,
    count(*) from weblog_data where status>=300 group by request;
This Hive script follows the same script execution pattern that has been used by all of the Job Flows. It is uploaded to an S3 bucket and the input and output locations are specified on the step configuration screen in Job Flow creation. The $INPUT and $OUTPUT variables are replaced with these Management Console values. Running the Job Flow as a Hive script yields the same results and validates the parameter changes made to the Hive statements.
Finding the Top 10 with Hive
Hive can be a powerful tool in lowering the barrier to entry so that many organizations can begin using Amazon EMR to process and analyze data. Hive may also make it easier to build applications that want to focus on data outliers or require data sorting and ordering. Trying to find the “Top 10” is a common scenario that requires data ranking and sorting on a smaller, final data set.
For the custom JAR application to find the Top 10 error records, you’d need to configure the Amazon EMR cluster to have a single reduce routine to collate and sort the results from each of the mappers. You could also do this by building multiple steps, with each step performing a portion of the data manipulation to get to the final list of Top 10.
In Hive, adding the order and limit clause to the HQL statement removes much of the work of figuring out how to configure the map and reduce phases—these are taken care of by the Hive engine. In an interactive session, the Hive engine shows the HQL broken down into multiple jobs to pull back a list of 10 requests that happen most frequently in the web log:
hive> select request, count(*) as cnt from weblog_data where status >= 300\
group by request order by cnt DESC limit 10;
...
MapReduce Jobs Launched:
Job 0: Map: 1  Reduce: 1   Accumulative CPU: 36.7 sec   HDFS
Read: 320 HDFS Write: 1031366 SUCCESS
Job 1: Map: 1  Reduce: 1   Accumulative CPU: 5.24 sec   HDFS
Read: 1031843 HDFS Write: 460 SUCCESS
Total MapReduce CPU Time Spent: 41 seconds 940 msec
OK
GET /images/NASA-logosmall.gif HTTP/1.0    21010
GET /images/KSC-logosmall.gif HTTP/1.0    12435
GET /images/MOSAIC-logosmall.gif HTTP/1.0    6628
GET /images/USA-logosmall.gif HTTP/1.0  6577
GET /images/WORLD-logosmall.gif HTTP/1.0        6413
GET /images/ksclogo-medium.gif HTTP/1.0 5837
GET /images/launch-logo.gif HTTP/1.0    4628
GET /shuttle/countdown/liftoff.html HTTP/1.0    3509
GET /shuttle/countdown/ HTTP/1.0        3345
GET /shuttle/countdown/images/cdtclock.gif HTTP/1.0     3251
Time taken: 171.563 seconds
hive>
Our Application with Hive and Pig
The Hive and Pig examples in this chapter can be used to replace a number of the building blocks developed in earlier chapters. These approaches do not extend the application, but they allow additional technologies and languages to be brought to bear on analyzing the data in Amazon EMR. You can use the interactive sessions to directly interact with the Amazon EMR cluster and to analyze and examine large data sets using ad hoc queries from the Amazon EMR master node.
Get Programming Elastic MapReduce now with the O’Reilly learning platform.
O’Reilly members experience books, live events, courses curated by job role, and more from O’Reilly and nearly 200 top publishers.

