Chapter 1. Introduction to F#
F# is a powerful language that spans multiple paradigms of development. This chapter provides a brief introduction to the heart of F#—the F# compiler, tools, and its place in Visual Studio 2010.
In this chapter, you will create a couple of simple F# applications and then I’ll point out key Visual Studio features for F# development. I won’t cover much of Visual Studio here, so I encourage you to explore the IDE on your own to learn more, or refer to the documentation online at http://msdn.microsoft.com/en-us/vstudio/default.aspx.
If you are already familiar with Visual Studio, you should still skim through this chapter. Creating and debugging F# projects works just like C# or VB.NET; however, F# has a unique characteristic when it comes to multiple-file projects. In addition, F# has a feature called F# Interactive that will dramatically increase your productivity. Not to be missed!
Getting to Know F#
As with all programming books, it is customary to write a Hello, World application, and I don’t want to deviate from tradition. Open up Notepad or your favorite text editor and create a new file named HelloWorld.fs with the following text:
// HelloWorld.fs

printfn "Hello, World"
Success! You’ve just written your first F# application. To compile
this application, use the F# compiler, fsc.exe, located in the Program
Files\Microsoft F#\v4.0 folder. (Or, if you are using the
Mono, wherever you chose to install F#.) The following
snippet shows calling the F# compiler on the command line to build and run
your application:
C:\Program Files\Microsoft F#\v4.0>fscHelloWorld.fsMicrosoft F# Compiler, (c) Microsoft Corporation, All Rights Reserved F# Version 1.9.8.0, compiling for .NET Framework Version v4.0.21017 C:\Program Files\Microsoft F#\v4.0>HelloWorld.exeHello, World!
Visual Studio 2010
Tools are the lifeblood of any programming language, and F# is no different. While you can be successful writing F# code in your favorite text editor and invoking the compiler exclusively from the command line, you’ll likely be more productive using tools. Like C# and VB.NET, F# is a first-class citizen in Visual Studio. F# in Visual Studio has all the features you would expect, such as debugger support, IntelliSense, project templates, and so on.
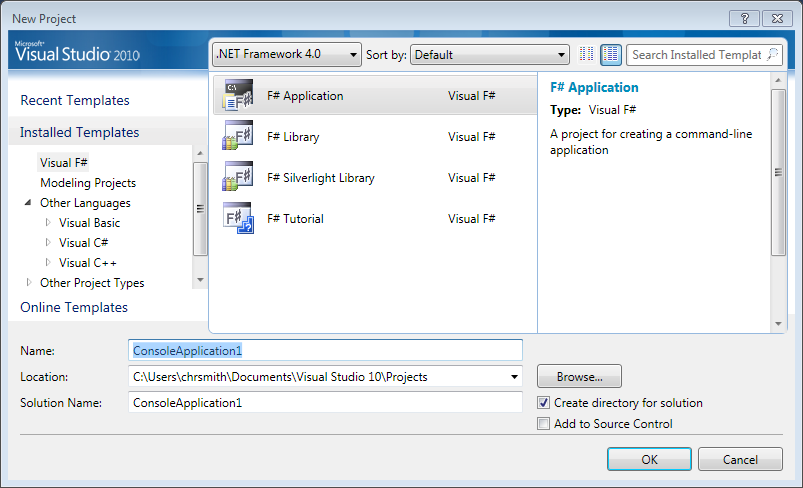
To create your first F# project, open up the Visual Studio IDE and select File→New Project from the menu bar to open the New Project dialog, as shown in Figure 1-1. Select Visual F# in the left pane, select F# Application in the right pane, and click OK.
After you click OK in the New Project dialog, you’ll see an empty code editor, a blank canvas ready for you to create your F# masterpiece.
To start with, let’s revisit our Hello, World application. Type the following code into the F# editor:
printfn "Hello, World"
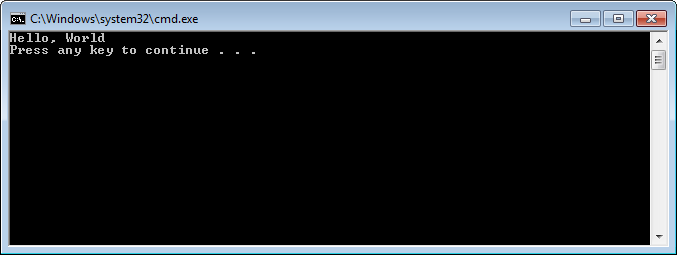
Now press Control + F5 to run your application. When your application starts, a console window will appear and display the entirely unsurprising result shown in Figure 1-2.
Your Second F# Program
It may be startling to see a program work without an explicit
Main method. You will see why this is
admissible in the next chapter, but for now let’s create a more
meaningful Hello, World–type program to get a feel for basic F#
syntax.
The code in Example 1-1 will create a program that accepts two command-line parameters and prints them to the console. In addition, it displays the current time.
(*
Mega Hello World:
Take two command line parameters and then print
them along with the current time to the console.
*)

open System

[<EntryPoint>]
let main (args : string[]) =

    if args.Length <> 2 then
        failwith "Error: Expected arguments <greeting> and <thing>"

    let greeting, thing = args.[0], args.[1]
    let timeOfDay = DateTime.Now.ToString("hh:mm tt")

    printfn "%s, %s at %s" greeting thing timeOfDay

    // Program exit code
    0
Now that you have actual F# code, hopefully you are curious about what is going on. Let’s look at this program line by line to see how it works.
Values
Example 1-1 introduces three values named
greeting, thing, and timeOfDay:
letgreeting,thing= args.[0], args.[1] lettimeOfDay= DateTime.Now.ToString("hh:mm tt")
The key thing here is that the let keyword binds a
name to a value. It is worth
pointing out that unlike most other programming languages, in F# values
are immutable by default, meaning they
cannot be changed once initialized. We will cover why values are
immutable in Chapter 3, but for now it
is sufficient to say it has to do with functional programming.
F# is also case-sensitive, so any two values with names that only differ by case are considered different:
let number = 1 let Number = 2 let NUMBER = 3
A value’s name can be any combination of letters, numbers,
an underscore _, or an apostrophe
'. However, the name must begin with
a letter or an underscore.
Note
You can enclose the value’s name with a pair of tickmarks, in which case the name can contain any character except for tabs and newlines. This allows you to refer to values and functions exposed from other .NET languages that may conflict with F# keywords:
let``this.Isn't %A% good value Name$!@#``= 5
Whitespace Matters
Other languages, like C#, use semicolons and curly braces to indicate when statements and blocks of code are complete. However, programmers typically indent their code to make it more readable anyway, so these extra symbols often just add syntactic clutter to the code.
In F#, whitespace—spaces and newlines—is significant. The
F# compiler allows you to use whitespace to delimit code blocks. For
example, anything indented more than the if keyword is considered to be in the body of
the if statement. Because tab characters can
indicate an unknown number of space characters, they are prohibited in
F# code.
Note
You can configure the Visual Studio editor to automatically convert tab characters into spaces by changing the relevant setting under Tools→Options→Text Editor→F#.
Reviewing Example 1-1, notice that the
body of the main method was indented
by four spaces, and the body of the if statement was indented by another four
spaces:
let main (args : string[]) =
if args.Length <> 2 then
failwith "Error: Expected arguments <greeting> and <thing>"
    let greeting, thing = args.[0], args.[1]
    let timeOfDay = DateTime.Now.ToString("hh:mm tt")
printfn "%s, %s at %s" greeting thing timeOfDay
// Program exit code
0If the body of the if
statement, the failwith, was dedented
four spaces and therefore lined up with the if keyword, the F# compiler would yield a
warning. This is because the compiler wouldn’t be able to determine if
the failwith was meant for the body
of the if statement:
[<EntryPoint>]
let main (args : string[]) =

    if args.Length <> 2 then
    failwith "Error: Expected arguments <greeting> and <thing>"

Warning FS0058: possible incorrect indentation: this token is offside of
context started at position (25:5). Try indenting this token further or
using standard formatting conventions
The general rule is that anything belonging to a method or
statement must be indented further than the keyword that began the
method or statement. So in Example 1-1, everything in the main method was indented past the first
let and everything in the if statement was indented past the if keyword. As you see and write more F# code,
you will quickly find that omitting semicolons and curly braces makes
the code easier to write and also much easier to read.
.NET Interop
Example 1-1 also demonstrated how F# can interoperate with existing .NET libraries:
open System// ... let timeOfDay =DateTime.Now.ToString("hh:mm tt")
The .NET Framework contains a broad array of libraries for
everything from graphics to databases to web services. F# can take
advantage of any .NET library natively by calling directly into it. In
Example 1-1, the DateTime.Now property was used in the System namespace in the mscorlib.dll assembly. Conversely, any code
written in F# can be consumed by other .NET languages.
For more information on .NET libraries, you can skip ahead to Appendix A for a quick tour of what’s available.
Comments
Like any language, F# allows you to comment your code.
To declare a single-line comment, use two slashes,
//; everything after them until the
end of the line will be ignored by the compiler:
// Program exit codeFor larger comments that span multiple lines, you can use
multiline comments, which indicate to the compiler to ignore everything
between the (* and *) characters:
(*Mega Hello World: Take two command line parameters and then print them along with the current time to the console.*)
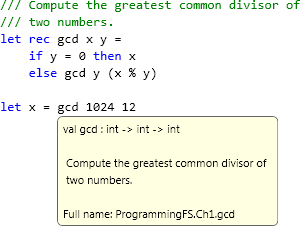
For F# applications written in Visual Studio, there is a third
type of comment: an XML documentation comment. If a comment starting with three slashes, ///, is placed above an identifier, Visual
Studio will display the comment’s text when you hover over it.
Figure 1-3 shows applying an XML documentation comment and its associated tooltip.
F# Interactive
So far you have written some F# code and executed it, and the rest of the book will have many more examples. While you could leave a wake of new projects while working through this book and trying out the samples, Visual Studio comes with a tool called F# Interactive or FSI. Using the FSI window, you will not only find it much easier to work through the examples in this book, but it will also help you write applications.
F# Interactive is a tool known as a REPL, which stands for read-evaluate-print loop. It accepts F# code, compiles and executes it, then prints the results. This allows you to quickly and easily experiment with F# code without needing to create new projects or build a full application to see the result of a five-line snippet.
In C# and VB.NET, you must compile and then run your application in order to see its results, which makes it cumbersome to try out and experiment with small code fragments. Even if you use the Visual Studio Immediate Window while debugging, you are limited to just evaluating expressions and cannot actually write code, such as defining new functions and classes.
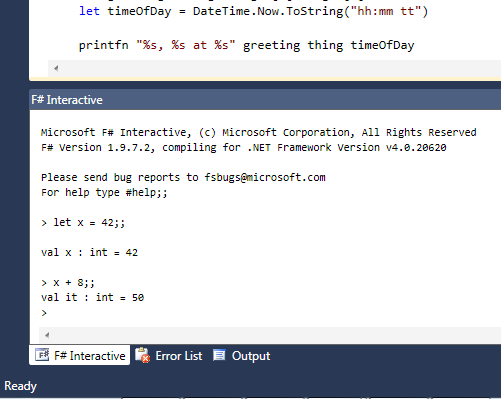
In Visual Studio, most profiles launch the F# Interactive window by
using the Control+Alt+F keyboard combination. Once the FSI window is
available, it accepts F# code until you terminate the input with ;; and a newline. The code entered will be
compiled and executed just as shown in Figure 1-4.
After each code snippet is sent to FSI, for every name introduced, you will see val <name>.
If an expression was left unnamed, by default, it will be
called it. After the name of the
identifier will be a colon and the type of the code
evaluated, followed by its value. For example, in Figure 1-4, the value x was introduced, of type int, with value 42.
Note
If you are running F# without Visual Studio, you can find a
console version of F# Interactive named fsi.exe in the same directory you found
fsc.exe.
Try running these other snippets in FSI. Note that every code snippet is terminated with ;;:
> 2 + 2;;
val it : int = 4
> // Introduce two values
let x = 1
let y = 2.3

val x : int
val y : float

> float x + y;;
val it : float = 3.3
> let cube x = x * x * x;;

val cube : int -> int

> cube 4;;
val it : int = 64
FSI dramatically simplifies testing and debugging your applications because you can send F# code from your current project to the FSI window by highlighting the code in Visual Studio and pressing Alt+Enter.
After selecting all the code in Example 1-1 within the code editor and pressing Alt+Enter, you will see the following in the FSI window:
>

val main : string array -> int
This allows you to write code in the Visual Studio editor—which
offers syntax highlighting and IntelliSense—but test your code using the
FSI window. You can test the main
method you sent to FSI simply by calling it:
> main [| "Hello"; "World" |];;
Hello, World at 10:52 AM
val it : int = 0
Note
The majority of the samples in this book are taken directly from FSI sessions. I encourage you to use FSI as well to follow along and experiment with the F# language’s syntax.
Managing F# Source Files
When you are starting out in F# programming, most of the programs you write will live only in FSI or perhaps in a single code file. Your F# projects, however, will quickly grow and be broken up across multiple files and eventually multiple projects.
The F# language has some unique characteristics when it comes to managing projects with multiple source files. In F#, the order in which code files are compiled is significant.
You can only call into functions and classes defined earlier in the code file or in a separate code file compiled before the file where the function or class is used. If you rearrange the order of the source files, your program may no longer build!
Note
The reason for this significance in compilation order is type inference, a topic covered in the next chapter.
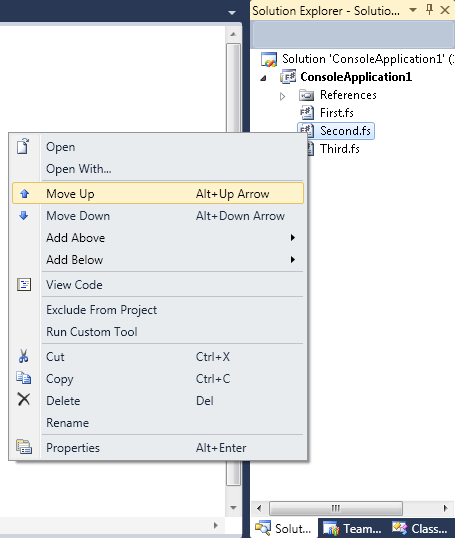
F# source files are compiled in the order they are displayed in Visual Studio’s Solution Explorer, from top to bottom. Whenever you add a new code file, it is added to the bottom of the list, but if you want to rearrange the source files, you can right-click a code file and select Move Up or Move Down, as shown in Figure 1-5. The keyboard shortcut for reordering project files is Alt+Up and Alt+Down.
Now that you are armed with the logistical know-how for compiling F# applications, the rest of this book will focus exclusively on the syntax and semantics of the F# programming language.
Get Programming F# now with the O’Reilly learning platform.
O’Reilly members experience books, live events, courses curated by job role, and more from O’Reilly and nearly 200 top publishers.

