Chapter 4. Animation
Animation is the visible change of an attribute over time. The changing attribute might be positional: something moves or changes size. But other kinds of attribute can animate as well. For example, a view’s background color might change from red to green, not instantly, but perceptibly fading from one to the other. Or a view might change from opaque to transparent, not instantly, but perceptibly fading away.
Without help, most of us would find animation beyond our reach. There are just too many complications — complications of calculation, of timing, of screen refresh, of threading, and many more. Fortunately, help is provided. You don’t perform an animation yourself; you describe it, you order it, and it is performed for you. You get animation on demand.
Asking for an animation can be as simple as setting a property value; under some circumstances, a single line of code will result in animation:
myLayer.backgroundColor = UIColor.redColor().CGColor // animate to red
And this is no coincidence. Apple wants to facilitate your use of animation. Animation is crucial to the character of the iOS interface. It isn’t just cool and fun; it clarifies that something is changing or responding. For example, one of my first apps was based on an OS X game in which the user clicks cards to select them. In the OS X version, a card was highlighted to show it was selected, and the computer would beep to indicate a click on an ineligible card. On iOS, these indications were insufficient: the highlighting felt weak, and you can’t use a sound warning in an environment where the user might have the volume turned off or be listening to music. So in the iOS version, animation is the indicator for card selection (a selected card waggles eagerly) and for tapping on an ineligible card (the whole interface shudders, as if to shrug off the tap).
(If you’re looking to create a complete constantly running animated world, as for certain types of game, look into Sprite Kit. This book doesn’t discuss Sprite Kit, but an understanding of the concepts in this chapter will prepare you very well for Sprite Kit.)
Tip
The Simulator’s Debug → Toggle Slow Animations menu item helps you inspect animations by making them run more slowly.
Drawing, Animation, and Threading
When you change a visible view property, that change does not visibly take place there and then. Rather, the system records that this is a change you would like to make, and marks the view as needing to be redrawn. Later, when all your code has run to completion and the system has, as it were, a free moment, then it redraws all views that need redrawing, applying their new visible property features. Let’s call this the redraw moment. (I’ll explain what the redraw moment really is later in this chapter.)
You can see that this is true simply by changing some visible aspect of a view and changing it back again, in the same code: on the screen, nothing happens. For example, suppose a view’s background color is green, and that your code changes it to red, and then later changes it back to green:
// view starts out green
view.backgroundColor = UIColor.redColor()
// ... time-consuming code goes here ...
view.backgroundColor = UIColor.greenColor()
// code ends, redraw moment arrives
The system accumulates all the desired changes until the redraw moment happens, and the redraw moment doesn’t happen until after your code has finished, so when the redraw moment does happen, the last accumulated change in the view’s color is to green — which is its color already. Thus, no matter how much time-consuming code lies between the color changes, the user won’t see any color change at all.
Animation works the same way, and is part of the same process. When you ask for an animation to be performed, the animation doesn’t start happening on the screen until the next redraw moment. (You can force an animation to start immediately, but this is unusual.)
The animation mechanism itself is an ingenious illusion. Think of the animation as a kind of movie, a cartoon, interposed between the user and the “real” screen. While the animation lasts, this movie is superimposed onto the screen. When the animation is finished, the movie is removed, revealing the state of the “real” screen behind it. The user is unaware of all this, because (if you’ve done things correctly) at the time that it starts, the movie’s first frame looks just like the state of the “real” screen at that moment, and at the time that it ends, the movie’s last frame looks just like the state of the “real” screen at that moment.
So, when you animate a view’s movement from position 1 to position 2, you can envision a typical sequence of events like this:
- You reposition the view. The view is now set to position 2, but there has been no redraw moment, so it is still portrayed at position 1.
- You order an animation of the view from position 1 to position 2.
- The rest of your code runs to completion.
- The redraw moment arrives. If there were no animation, the view would now suddenly be portrayed at position 2. But there is an animation, and so the “animation movie” appears. It starts with the view portrayed at position 1, so that is still what the user sees.
- The animation proceeds, portraying the view at intermediate positions between position 1 and position 2. (The documentation describes the animation as now in-flight.)
- The animation ends, portraying the view ending up at position 2.
- The “animation movie” is removed, revealing the view indeed at position 2 — where you put it in the first step.
Realizing that the “animation movie” is different from what happens to the real view is key to configuring an animation correctly. A frequent complaint of beginners is that a position animation is performed as expected, but then, at the end, the view “jumps” to some other position. This happens because you set up the animation but failed to move the view to match its final position in the “animation movie”; the “jump” happens because, when the “movie” is whipped away at the end of the animation, the real situation that’s revealed doesn’t match the last frame of the “movie.”
There isn’t really an “animation movie” in front of the screen — but it’s a good analogy, and the effect is much the same. In reality, it is not a layer itself that is portrayed on the screen; it’s a derived layer called the presentation layer. Thus, when you animate the change of a view’s position or a layer’s position from position 1 to position 2, its nominal position changes immediately; meanwhile, the presentation layer’s position remains unchanged until the redraw moment, and then changes over time, and because that’s what’s actually drawn on the screen, that’s what the user sees.
(A layer’s presentation layer can be accessed through its presentationLayer method — and the layer itself may be accessed through the presentation layer’s modelLayer method. I’ll give examples, in this chapter and the next, of situations where accessing the presentation layer is a useful thing to do.)
Like a real movie (especially an old-fashioned animated cartoon), an “animation movie” has “frames.” An animated value does not change smoothly and continuously; it changes in small, individual increments that give the illusion of smooth, continuous change. This illusion works because the device itself undergoes a periodic, rapid, more or less regular screen refresh, and the incremental changes are made to fall between these refreshes. Apple calls the system component responsible for this the animation server.
The animation server operates on an independent thread. You don’t have to worry about the details (thank heavens, because multithreading is generally rather tricky and complicated), but you can’t ignore it either. Your code runs independently of and possibly simultaneously with the animation — that’s what multithreading means — so communication between the animation and your code can require some planning.
Arranging for your code to be notified when an animation ends is a common need. Most of the animation APIs provide a way to set up such a notification. One use of an “animation ended” notification might be to chain animations together: one animation ends and then another begins, in sequence. Another use is to perform some sort of cleanup. A very frequent kind of cleanup has to do with handling of touches: while an animation is in-flight, if your code is not running, the interface by default is responsive to the user’s touches, which might cause all kinds of havoc as your views try to respond while the animation is still happening and the screen presentation doesn’t match reality. To take care of this, it’s common practice to turn off your app’s responsiveness to touches as you set up an animation and then turn it back on when you’re notified that the animation is over.
Since your code can run even after you’ve set up an animation, or might start running while an animation is in-flight, you need to be careful about setting up conflicting animations. Multiple animations can be set up (and performed) simultaneously, but trying to animate or change a property that’s already in the middle of being animated may be an incoherency. You’ll want to take care not to let your animations step on each other’s feet accidentally.
Outside forces can interrupt your animations. The user might click the Home button to send your app to the background, or an incoming phone call might arrive while an animation is in-flight. The system deals coherently with this situation by simply canceling all in-flight animations when an app is backgrounded; you’ve already arranged before the animation for your views to assume the final states they will have after the animation, so no harm is done — when your app resumes, everything is in that final state you arranged beforehand. But if you wanted your app to resume an animation in the middle, where it left off when it was interrupted, that would require some canny coding on your part.
Image View and Image Animation
UIImageView provides a form of animation so simple as to be scarcely deserving of the name; still, sometimes it might be all you need. You supply the UIImageView with an array of UIImages, as the value of its animationImages or highlightedAnimationImages property. This array represents the “frames” of a simple cartoon; when you send the startAnimating message, the images are displayed in turn, at a frame rate determined by the animationDuration property, repeating as many times as specified by the animationRepeatCount property (the default is 0, meaning to repeat forever), or until the stopAnimating message is received. Before and after the animation, the image view continues displaying its image (or highlightedImage).
For example, suppose we want an image of Mars to appear out of nowhere and flash three times on the screen. This might seem to require some sort of NSTimer-based solution, but it’s far simpler to use an animating UIImageView:
let mars = UIImage(named: "Mars")!
UIGraphicsBeginImageContextWithOptions(mars.size, false, 0)
let empty = UIGraphicsGetImageFromCurrentImageContext()!
UIGraphicsEndImageContext()
let arr = [mars, empty, mars, empty, mars]
let iv = UIImageView(image:empty)
iv.frame.origin = CGPointMake(100,100)
self.view.addSubview(iv)
iv.animationImages = arr
iv.animationDuration = 2
iv.animationRepeatCount = 1
iv.startAnimating()
You can combine UIImageView animation with other kinds of animation. For example, you could flash the image of Mars while at the same time sliding the UIImageView rightward, using view animation as described in the next section.
UIImage supplies a form of animation parallel to that of UIImageView: an image can itself be an animated image. Just as with UIImageView, this really means that you’ve prepared multiple images that form a sequence serving as the “frames” of a simple cartoon. You can create an animated image with one of these UIImage class methods:
-
animatedImageWithImages:duration: -
As with UIImageView’s
animationImages, you supply an array of UIImages. You also supply the duration for the whole animation. -
animatedImageNamed:duration: -
You supply the name of a single image file, as with
init(named:), with no file extension. The runtime appends"0"(or, if that fails,"1") to the name you supply and makes that image file the first image in the animation sequence. Then it increments the appended number, gathering images and adding them to the sequence (until there are no more, or we reach"1024"). -
animatedResizableImageNamed:capInsets:resizingMode:duration: - Combines an animated image with a resizable image (Chapter 2).
You do not tell an animated image to start animating, nor are you able to tell it how long you want the animation to repeat. Rather, an animated image is always animating, repeating its sequence once every duration seconds, so long as it appears in your interface; to control the animation, add the image to your interface or remove it from the interface, possibly exchanging it for a similar image that isn’t animated.
An animated image can appear in the interface anywhere a UIImage can appear as a property of some interface object. In this example, I construct a sequence of red circles of different sizes, in code, and build an animated image which I then display in a UIButton:
var arr = [UIImage]()
let w : CGFloat = 18
for i in 0 ..< 6 {
    UIGraphicsBeginImageContextWithOptions(CGSizeMake(w,w), false, 0)
    let con = UIGraphicsGetCurrentContext()!
    CGContextSetFillColorWithColor(con, UIColor.redColor().CGColor)
    let ii = CGFloat(i)
    CGContextAddEllipseInRect(con, CGRectMake(0+ii,0+ii,w-ii*2,w-ii*2))
    CGContextFillPath(con)
    let im = UIGraphicsGetImageFromCurrentImageContext()
    UIGraphicsEndImageContext()
    arr += [im]
}
let im = UIImage.animatedImageWithImages(arr, duration:0.5)
b.setImage(im, forState:.Normal) // b is a button in the interface
View Animation
All animation is ultimately layer animation, which I’ll discuss later in this chapter. However, for a limited range of properties, you can animate a UIView directly: these are its alpha, bounds, center, frame, transform, and (if the view doesn’t implement drawRect:) backgroundColor. You can also animate a UIView’s change of contents. This list of animatable features, despite its brevity, will often prove quite sufficient.
The syntax for animating a UIView involves calling a UIView class method and expressing the desired animation in a function that you pass as an argument. Such a function corresponds to an Objective-C block, so the documentation refers to this as block-based animation, and I will use phrases such as “animation block” or “animations: block” even though “block” is not the official Swift term for such a construct.
For example, suppose we have a UIView self.v in the interface, with a yellow background color, and we want to animate that view’s change of background color to red. This will do it:
UIView.animateWithDuration(0.4, animations: {
    self.v.backgroundColor = UIColor.redColor()
})
Any animatable change made within an animations: block will be animated, so we can animate a change both in the view’s color and in its position simultaneously:
UIView.animateWithDuration(0.4, animations: {
    self.v.backgroundColor = UIColor.redColor()
    self.v.center.y += 100
})
We can also animate changes to multiple views within the same animations: block. For example, suppose we want to make one view dissolve into another. We start with the second view present in the view hierarchy, but with an alpha of 0, so that it is invisible. Then we animate the change of the first view’s alpha to 0 and the second view’s alpha to 1.
In that case, we might like to place the second view in the view hierarchy just before the animation starts (invisibly, because its alpha starts at 0) and remove the first view just after the animation ends (invisibly, because its alpha ends at 0). An additional parameter, completion:, lets us specify what should happen after the animation ends:
let v2 = // ... create and configure new view here ...
v2.alpha = 0
self.v.superview!.addSubview(v2)
UIView.animateWithDuration(0.4, animations: {
    self.v.alpha = 0
    v2.alpha = 1
    }, completion: {
        _ in
        self.v.removeFromSuperview()
})
Tip
Another way to remove a view from the view hierarchy with animation is to call performSystemAnimation:onViews:options:animations:completion: with a first argument .Delete (the only possible first argument). This causes the view to blur, shrink, and fade, and sends it removeFromSuperview() afterward.
Code that isn’t about animatable view properties can appear in an animations: block with no problem, but we must be careful to keep any changes to animatable properties that we do not want animated out of the animations: block. In the preceding example, in setting v2.alpha to 0, I just want to set it right now, instantly; I don’t want that change to be animated. So I’ve put that line before the animations: block.
Sometimes, though, that’s not so easy; perhaps, within the animations: block, we must call a method that might perform animatable changes. The performWithoutAnimation: method solves the problem; it goes inside an animations: block, but whatever happens in its block is not animated. In this rather artificial example, the view jumps to its new position and then slowly turns red:
UIView.animateWithDuration(0.4, animations: {
    self.v.backgroundColor = UIColor.redColor()
    UIView.performWithoutAnimation {
        self.v.center.y += 100
    }
})
The material inside an animations: block (but not inside a performWithoutAnimation: block) orders the animation — that is, it gives instructions for what the animation will be when the redraw moment comes. If you change an animatable view property as part of the animation, you should not change that property again afterward; the results can be confusing. This code, for example, is essentially incoherent:
UIView.animateWithDuration(2, animations: {
    self.v.center.y += 100
})
self.v.center.y += 300
What actually happens is that the view jumps 300 points down and then animates 100 points further down. That’s probably not what you intended. After you’ve ordered an animatable view property to be animated inside an animations: block, don’t change that view property’s value again until after the animation is over.
On the other hand, this code does a smooth single animation to a position 400 points further down:
UIView.animateWithDuration(2, animations: {
    self.v.center.y += 100
    self.v.center.y += 300
})
That’s because basic positional view animations are additive by default (in iOS 8 and later). This means that the second animation is run simultaneously with the first, and is blended with it.
Tip
New in iOS 9, a UIVisualEffectView is animatable in the same ways as a regular UIView. What’s more, setting a UIVisualEffectView’s effect is animatable! Thus, for example, you can blur with animation by starting with a UIVisualEffectView whose effect is nil and then setting its effect to a UIBlurEffect inside an animations: block.
View Animation Options
The UIView class methods animateWithDuration: and animateWithDuration:completion: are both reduced forms. The full form of this method, which you should use whenever you need the maximum in flexibility and power, is animateWithDuration:delay:options:animations:completion:. The parameters are:
-
duration - The duration of the animation: how long it takes (in seconds) to run from start to finish. You can also think of this as the animation’s speed. Obviously, if two views are told to move different distances in the same time, the one that must move further must move faster.
-
delay -
The delay before the animation starts. The default is no delay. A delay is not the same as applying the animation using delayed performance; the animation is applied immediately, but when it starts running it spins its wheels, with no visible change, until the
delaytime has elapsed. -
options - A bitmask combining additional options.
-
animations - The block containing view property changes to be animated.
-
completion -
The block to run when the animation ends (or
nil). It takes one Bool parameter indicating whether the animation ran to completion. The block is called, with a parameter indicatingtrue, even if nothing in theanimations:block triggers any animations. It’s fine for this block to order a further animation, thus chaining animations.
Here are some of the chief options: values (UIViewAnimationOptions) that you might wish to use:
- Animation curve
An animation curve describes how the animation changes speed during its course. The term “ease” means that there is a gradual acceleration or deceleration between the animation’s central speed and the zero speed at its start or end. Specify one at most:
-
.CurveEaseInOut(the default) -
.CurveEaseIn -
.CurveEaseOut -
.CurveLinear(constant speed throughout)
-
-
.Repeat - If included, the animation will repeat indefinitely. There is no way, as part of this command, to specify a certain number of repetitions; you ask either to repeat forever or not at all. This feels like an oversight (a serious oversight); I’ll suggest a workaround in a moment.
-
.Autoreverse - If included, the animation will run from start to finish (in the given duration time), and will then run from finish to start (also in the given duration time). The documentation’s claim that you can autoreverse only if you also repeat is incorrect; you can use either or both (or neither).
When using .Autoreverse, you will want to clean up at the end so that the view is back in its original position when the animation is over. To see what I mean, consider this code:
let opts = UIViewAnimationOptions.Autoreverse
UIView.animateWithDuration(1, delay: 0, options: opts, animations: {
    self.v.center.x += 100
    }, completion: nil)
The view animates 100 points to the right and then animates 100 points back to its original position — and then jumps 100 points back to the right. The reason is that the last actual value we assigned to the view’s center x is 100 points to the right, so when the animation is over and the “animation movie” is whipped away, the view is revealed still sitting 100 points to the right. The solution is to move the view back to its original position in the completion: handler:
let opts = UIViewAnimationOptions.Autoreverse
let xorig = self.v.center.x
UIView.animateWithDuration(1, delay: 0, options: opts, animations: {
    self.v.center.x += 100
    }, completion: {
        _ in
        self.v.center.x = xorig
})
Working around the inability to specify a finite number of repetitions is tricky. One solution is to resort to an outmoded animation syntax:
let count = 3
UIView.animateWithDuration(1, delay: 0, options: opts, animations: {
    UIView.setAnimationRepeatCount(Float(count)) // *
    self.v.center.x += 100
    }, completion: {
        _ in
        self.v.center.x = xorig
})
I regard this as unfortunate. The setAnimationRepeatCount method is part of a completely different animation syntax — the “begin/commit” syntax — which was superseded by the block-based syntax back in iOS 4, and whose use Apple has subsequently discouraged (which is why I don’t discuss it in this book). Yet Apple also treats it as the official way to order a limited number of view animation repetitions. It would have been better to add a repeat count parameter, and in Appendix B I extend UIView with a class method that does exactly that.
There are also some options saying what should happen if another animation is already ordered or in-flight:
-
.BeginFromCurrentState - If this animation animates a property already being animated by an animation that is previously ordered or in-flight, then instead of canceling the previous animation (completing the requested change instantly), if that is what would normally happen, this animation will use the presentation layer to decide where to start, and, if possible, will “blend” its animation with the previous animation.
-
.OverrideInheritedDuration - Prevents inheriting the duration from a surrounding or in-flight animation (the default is to inherit it).
-
.OverrideInheritedCurve - Prevents inheriting the animation curve from a surrounding or in-flight animation (the default is to inherit it).
You will have less need for .BeginFromCurrentState than in iOS 7 and before, because, as I’ve already said, simple view animations are additive by default in iOS 8 and later. This code, for example, caused a jump in iOS 7 unless you used .BeginFromCurrentState (because we’re ordering two conflicting animations of the view’s position), but is a single smooth diagonal animation in iOS 8 and later:
UIView.animateWithDuration(1, animations: {
    self.v.center.x += 100
})
UIView.animateWithDuration(1, animations: {
    self.v.center.y += 100
})
To see what it means for animations to be additive, try this code:
UIView.animateWithDuration(2, animations: {
    self.v.center.x += 100
})
delay(1) {
    let opts = UIViewAnimationOptions.BeginFromCurrentState
    UIView.animateWithDuration(1, delay: 0, options: opts,
        animations: {
            self.v.center.y += 100
        }, completion: nil)
}
The second animation launches under delayed performance halfway through the first animation. When the second animation starts, the view turns the corner in a gentle curve, with some residual horizontal motion from the first animation.
Canceling a View Animation
Once a view animation is in-flight, how can you cancel it? To illustrate the problem, I’ll start with a simple unidirectional positional animation, with a long duration so that we can interrupt it in midflight. To facilitate the explanation, I’ll conserve both the view’s original position and its final position in properties:
self.pOrig = self.v.center
self.pFinal = self.v.center
self.pFinal.x += 100
UIView.animateWithDuration(4, animations: {
    self.v.center = self.pFinal
})
Now imagine that we have a button that we can tap during that animation, and that this button is supposed to cancel the animation. How can we do that?
One possibility is to reach down to the CALayer level and call removeAllAnimations. (If the layer has more than one animation and you want to cancel only one of them, you can call removeAnimationForKey:; I’ll talk later in this chapter about how to distinguish layer animations by key.) This has the advantage of simplicity, but the disadvantage that it simply stops the animation dead: the “animation movie” is whipped away instantly, “jumping” the view to its final position, effectively doing what the system does automatically when the app goes into the background:
self.v.layer.removeAllAnimations()
Now let’s try to devise a more subtle form of cancellation: the view should hurry to its final position. This is not easy to arrange in iOS 8 and later, because animations are additive. We cannot merely impose another animation that moves the view to its final position with a short duration, because this doesn’t cancel the existing animation. Therefore we must remove the first animation manually. We already know how to do that: call removeAllAnimations. But we also know that if we do that, the view will jump to its final position; we want it to remain, for the moment, at its current position — meaning the animation’s current position. That position is where the presentation layer currently is. Therefore we reposition the view at the location of its presentation layer, and then remove the animation, and then perform the final “hurry home” animation:
self.v.layer.position =
    (self.v.layer.presentationLayer() as! CALayer).position
self.v.layer.removeAllAnimations()
UIView.animateWithDuration(0.1, animations: {
    self.v.center = self.pFinal
})
If cancellation means returning the view to its original position, set the view’s center to self.pOrig instead of self.pFinal. If it means just stopping wherever we happen to be, then omit the final animation.
Now let’s suppose that the animation we want to cancel is an infinitely repeating autoreversing animation:
self.pOrig = self.v.center
let opts : UIViewAnimationOptions = [.Autoreverse, .Repeat]
UIView.animateWithDuration(1, delay: 0, options: opts,
    animations: {
        self.v.center.x += 100
    }, completion: nil)
In that case, it is sufficient to impose another animation, because the new animation is not additive with the first one. Only simple view animations are additive; I have not elaborated on what “simple” means, but one thing it means is “not repeating.” Thus, the second animation cancels the first. Here’s how to cancel that animation by returning it rapidly to its original position:
UIView.animateWithDuration(0.1, delay:0,
    options:.BeginFromCurrentState,
    animations: {
        self.v.center = self.pOrig
    }, completion:nil)
This is a situation where the .BeginFromCurrentState option is useful! It is needed to prevent the view from jumping momentarily to the “final” position, 100 points to the right, to which we set it to initiate the repeating animation.
(If you object that storage of the view’s original or final position as a view controller property is not a very encapsulated solution, then consider storing it instead in the view’s layer using key–value coding. The implementation is left as an exercise for the reader. Hint: a CGPoint will need to be wrapped in an NSValue.)
Custom Animatable View Properties
You can define your own custom view property that can be animated by changing it in an animation block, provided the custom view property itself changes an animatable view property.
For example, imagine a UIView subclass, MyView, which has a Bool swing property. All this does is reposition the view: when swing is set to true, the view’s center x value is increased by 100; when swing is set to false, the view’s center x value is decreased by 100. A view’s center is animatable, so we can make a MyView’s swing property itself be animatable.
The trick (which I had never thought of it until an Apple WWDC 2014 video suggested it) is to implement MyView’s swing setter with a zero-duration animation block. This basically means that there is no animation by default, but if we happen to be inside an animation block already when the swing property is set, the setter’s animation block inherits the duration of the surrounding animation block — because such inheritance is, as I mentioned earlier, the default:
class MyView : UIView {
    var swing : Bool = false {
        didSet {
            var p = self.center
            p.x = self.swing ? p.x + 100 : p.x - 100
            UIView.animateWithDuration(0, animations: {
                self.center = p
                })
        }
    }
}
If we now change a MyView’s swing directly, the view jumps to its new position. But if we change it in an animation block, the change in position is animated, with the specified duration:
UIView.animateWithDuration(1, animations: {
    self.v.swing = !self.v.swing // "animatable" Bool property
})
Springing View Animation
A springing view animation has an animation curve with a very fast ease-in and a very slow ease-out; the animation can even oscillate for a while around its final value, as if it were being snapped into place by a spring. To use it, call animateWithDuration:delay:usingSpringWithDamping:initialSpringVelocity:.... For example:
UIView.animateWithDuration(0.8, delay: 0,
    usingSpringWithDamping: 0.7,
    initialSpringVelocity: 20,
    options: [],
    animations: {
        self.v.center.y += 100
    }, completion: nil)
The damping: and initialSpringVelocity: parameters modify the behavior of the animation curve. If the damping is less than 1, there’s a waggle as the animated view assumes its final position; this waggle becomes quite pronounced at values less than about 0.7, and at values like 0.3 there are several waggles before the view settles into place.
The initial spring velocity gives the view an initial “kick,” speeding up the initial ease-in and increasing the tendency of the view to overshoot its final position on its first approach. Depending on the duration and damping amount, it may need to be quite large to make an appreciable difference. You can have a lot of waggly fun with smaller damping values and larger initial spring velocity values. Conversely, a small initial spring velocity (about 10 or less) and a high damping (1.0 or close to it) gives a normal animation that wouldn’t particularly remind anyone of a spring, but that does have a pleasingly rapid beginning and slow ending; many of Apple’s own system animations are actually spring animations of that type (consider, for example, the way folders open in the springboard).
Keyframe View Animation
A view animation can be described as a set of keyframes. This means that, instead of a simple beginning and end point, you specify multiple stages in the animation and those stages are joined together for you. You call animateKeyframesWithDuration:...; it has an animations: block, and inside that block you call addKeyframeWithRelativeStartTime:relativeDuration:animations: multiple times to specify each stage. Each keyframe’s start time and duration is between 0 and 1, relative to the animation as a whole. (Giving a keyframe’s start time and duration in seconds is a common beginner mistake.)
For example, here I’ll waggle a view back and forth horizontally while moving it down the screen vertically:
var p = self.v.center
let dur = 0.25
var start = 0.0
let dx : CGFloat = 100
let dy : CGFloat = 50
var dir : CGFloat = 1
UIView.animateKeyframesWithDuration(4,
    delay: 0, options: [],
    animations: {
        UIView.addKeyframeWithRelativeStartTime(start,
            relativeDuration: dur,
            animations: {
                p.x += dx*dir; p.y += dy
                self.v.center = p
            })
        start += dur; dir *= -1
        UIView.addKeyframeWithRelativeStartTime(start,
            relativeDuration: dur,
            animations: {
                p.x += dx*dir; p.y += dy
                self.v.center = p
            })
        start += dur; dir *= -1
        UIView.addKeyframeWithRelativeStartTime(start,
            relativeDuration: dur,
            animations: {
                p.x += dx*dir; p.y += dy
                self.v.center = p
            })
        start += dur; dir *= -1
        UIView.addKeyframeWithRelativeStartTime(start,
            relativeDuration: dur,
            animations: {
                p.x += dx*dir; p.y += dy
                self.v.center = p
            })
    }, completion: nil)
In that code, there are four keyframes, evenly spaced: each is 0.25 in duration (one-fourth of the whole animation) and each starts 0.25 later than the previous one (as soon as the previous one ends). In each keyframe, the view’s center x value increases or decreases by 100, alternately, while its center y value keeps increasing by 50.
The keyframe values are points in space and time; the actual animation interpolates between them. How this interpolation is done depends upon the options:, which are UIKeyframeAnimationOptions values whose names start with CalculationMode. The default is .CalculationModeLinear. In our example, this means that the path followed by the view is a sharp zig-zag, the view seeming to bounce off invisible walls at the right and left. But if the setting is .CalculationModeCubic, our view describes a smooth S-curve, starting at the view’s initial position and ending at the last keyframe point, and passing through the three other keyframe points like the maxima and minima of a sine wave.
Because my keyframes are perfectly even, I could achieve the same effects by using .CalculationModePaced and .CalculationModeCubicPaced, respectively. The Paced options simply ignore the relative start time and relative duration values of the keyframes; you might as well pass 0 for all of them. Instead, they divide up the times and durations evenly, exactly as my code has done.
Finally, .CalculationModeDiscrete means that the changed animatable properties don’t animate: the animation jumps to each keyframe.
The outer animations: block can contain other changes to animatable view properties, as long as they don’t conflict with the keyframe animations:; these are animated over the total duration. For example:
UIView.animateKeyframesWithDuration(4,
    delay: 0, options: [],
    animations: {
        self.v.alpha = 0
        // ...
The result is that as the view zigzags back and forth down the screen, it also gradually fades away.
It is also legal and meaningful to supply an animation curve as part of the options: argument. Unfortunately, the documentation fails to make this clear; and Swift’s obsessive-compulsive attitude towards data types resists folding a UIViewAnimationOptions animation curve directly into a value typed as a UIViewKeyframeAnimationOptions. Yet if you don’t do it, the default is .CurveEaseInOut, which may not be what you want. Here’s how to combine .CalculationModeLinear with .CurveLinear:
var opts : UIViewKeyframeAnimationOptions = .CalculationModeLinear
let opt2 : UIViewAnimationOptions = .CurveLinear
opts.insert(UIViewKeyframeAnimationOptions(rawValue:opt2.rawValue))
That’s two different senses of Linear. The first means that the path described by the moving view is a sequence of straight lines. The second means that the moving view’s speed along that path is steady.
Transitions
A transition is an animation that emphasizes a view’s change of content. Transitions are ordered using one of two UIView class methods:
-
transitionWithView:duration:options:animations:completion: -
transitionFromView:toView:duration:options:completion:
The transition animation types are expressed as part of the options: bitmask:
-
.TransitionFlipFromLeft,.TransitionFlipFromRight -
.TransitionCurlUp,.TransitionCurlDown -
.TransitionFlipFromBottom,.TransitionFlipFromTop -
.TransitionCrossDissolve
transitionWithView:... performs the transition animation on that view. In this example, a UIImageView containing an image of Mars flips over as its image changes to a smiley face; it looks as if the image view were two-sided, with Mars on one side and the smiley face on the other:
let opts : UIViewAnimationOptions = .TransitionFlipFromLeft
UIView.transitionWithView(self.iv, duration: 0.8, options: opts,
    animations: {
        self.iv.image = UIImage(named:"Smiley")
    }, completion: nil)
In that example, I’ve put the content change inside the animations: block. That’s conventional but misleading; the truth is that if all that’s changing is the content, nothing needs to go into the animations: block. The change of content can be anywhere, before or even after this entire line of code. It’s the flip that’s being animated. You might use the animations: block here to order additional animations, such as a change in a view’s center.
You can do the same sort of thing with a custom view that does its own drawing. Let’s say that I have a UIView subclass, MyView, that draws either a rectangle or an ellipse depending on the value of its Bool reverse property:
class MyView : UIView {
    var reverse = false
    override func drawRect(rect: CGRect)  {
        let f = self.bounds.insetBy(dx: 10, dy: 10)
        let con = UIGraphicsGetCurrentContext()!
        if self.reverse {
            CGContextStrokeEllipseInRect(con, f)
        } else {
            CGContextStrokeRect(con, f)
        }
    }
}
This code flips a MyView instance while changing its drawing from a rectangle to an ellipse or vice versa:
let opts : UIViewAnimationOptions = .TransitionFlipFromLeft
self.v.reverse = !self.v.reverse
UIView.transitionWithView(self.v, duration: 1, options: opts,
    animations: {
        self.v.setNeedsDisplay()
    }, completion: nil)
By default, if a view has subviews whose layout changes as part of a transition animation, that change in layout is not animated: the layout changes directly to its final appearance when the transition ends. If you want to display a subview of the transitioning view being animated as it assumes its final state, use .AllowAnimatedContent in the options bitmask.
transitionFromView:toView:... names two views; the first is replaced by the second, while their superview undergoes the transition animation. There are two possible configurations, depending on the options you provide:
- Remove one subview, add the other
-
If
.ShowHideTransitionViewsis not one of the options, then the second subview is not in the view hierarchy when we start; the transition removes the first subview from its superview and adds the second subview to that same superview. - Hide one subview, show the other
-
If
.ShowHideTransitionViewsis one of the options, then both subviews are in the view hierarchy when we start; thehiddenof the first isfalse, thehiddenof the second istrue, and the transition reverses those values.
In this example, a label self.lab is already in the interface. The animation causes the superview of self.lab to flip over, while at the same time a different label, lab2, is substituted for the existing label:
let lab2 = UILabel(frame:self.lab.frame)
lab2.text = self.lab.text == "Hello" ? "Howdy" : "Hello"
lab2.sizeToFit()
UIView.transitionFromView(self.lab, toView: lab2,
    duration: 0.8, options: .TransitionFlipFromLeft,
    completion: {
        _ in
        self.lab = lab2
    })
It’s up to you to make sure beforehand that the second view (toView:) has the desired position, so that it will appear in the right place in its superview.
Implicit Layer Animation
Animating a layer can be as simple as setting a property. A change in what the documentation calls an animatable property is automatically interpreted as a request to animate that change. In other words, animation of layer property changes is the default! Multiple property changes are considered part of the same animation. This mechanism is called implicit animation.
You may be wondering: if implicit animation is the default, why didn’t we notice it happening in any of the layer examples in Chapter 3? It’s because there are two common situations where implicit layer animation doesn’t happen:
- Implicit layer animation doesn’t operate on a UIView’s underlying layer. You can animate a UIView’s underlying layer directly, but you must use explicit layer animation (discussed later in this chapter).
- Implicit layer animation doesn’t affect a layer as it is being created, configured, and added to the interface. Implicit animation comes into play when you change an animatable property of a layer that is already present in the interface.
In Chapter 3 we constructed a compass out of layers. The compass itself is a CompassView that does no drawing of its own; its underlying layer is a CompassLayer that also does no drawing, serving only as a superlayer for the layers that constitute the drawing. None of the layers that constitute the actual drawing is the underlying layer of a view, so a property change to any of them, once they are established in the interface, is animated automatically.
So, presume that we have established all our compass layers in the interface. And suppose we have a reference to the arrow layer (arrow). If we rotate the arrow layer simply by changing its transform property, the arrow rotation is animated:
// an implicit animation
arrow.transform = CATransform3DRotate(
    arrow.transform, CGFloat(M_PI)/4.0, 0, 0, 1)
CALayer properties listed in the documentation as animatable in this way are anchorPoint and anchorPointZ, backgroundColor, borderColor, borderWidth, bounds, contents, contentsCenter, contentsRect, cornerRadius, doubleSided, hidden, masksToBounds, opacity, position and zPosition, rasterizationScale and shouldRasterize, shadowColor, shadowOffset, shadowOpacity, shadowRadius, and sublayerTransform and transform.
In addition, a CAShapeLayer’s path, strokeStart, strokeEnd, fillColor, strokeColor, lineWidth, lineDashPhase, and miterLimit are animatable; so are a CATextLayer’s fontSize and foregroundColor, and a CAGradientLayer’s colors, locations, and endPoint.
Basically, a property is animatable because there’s some sensible way to interpolate the intermediate values between one value and another. The nature of the animation attached to each property is therefore generally just what you would intuitively expect. When you change a layer’s hidden property, it fades out of view (or into view). When you change a layer’s contents, the old contents are dissolved into the new contents. And so forth.
(The fact that a CAShapeLayer’s path can be animated is particularly intriguing, and I’ll give an example later in this chapter.)
Animation Transactions
Animation operates with respect to a transaction (a CATransaction), which collects all animation requests and hands them over to the animation server in a single batch. Every animation request takes place in the context of some transaction. You can make this explicit by wrapping your animation requests in calls to the CATransaction class methods begin and commit; the result is a transaction block. Additionally, there is always an implicit transaction surrounding your code, and you can operate on this implicit transaction without any begin and commit.
To modify the characteristics of an implicit animation, you modify the transaction that surrounds it. Typically, you’ll use these CATransaction class methods:
-
setAnimationDuration: - The duration of the animation.
-
setAnimationTimingFunction: - A CAMediaTimingFunction; timing functions are discussed in the next section.
-
setDisableActions: - Toggles implicit animations for this transaction.
-
setCompletionBlock: - A block to be called when the animation ends. The block takes no parameters. The block is called even if no animation is triggered during this transaction.
CATransaction also implements KVC to allow you to set and retrieve a value for an arbitrary key, similar to CALayer.
By nesting transaction blocks, you can apply different animation characteristics to different elements of an animation. You can also use transaction commands outside of any transaction block to modify the implicit transaction. So, in our previous example, we could slow down the animation of the arrow like this:
CATransaction.setAnimationDuration(0.8)
arrow.transform = CATransform3DRotate(
    arrow.transform, CGFloat(M_PI)/4.0, 0, 0, 1)
An important use of transactions is to turn implicit animation off. This is valuable because implicit animation is the default, and can be unwanted (and a performance drag). To turn off implicit animation, call setDisableActions: with argument true. There are other ways to turn off implicit animation (discussed later in this chapter), but this is the simplest.
setCompletionBlock: is an extraordinarily useful and probably underutilized tool. The transaction’s completion block signals the end, not only of the implicit layer property animations you yourself have ordered as part of this transaction, but of all animations ordered during this transaction, including Cocoa’s own animations. Thus, it’s a way to be notified when any and all animations come to an end.
The “redraw moment” that I’ve spoken of in connection with drawing, layout, layer property settings, and animation is actually the end of the current transaction. Thus, for example:
- You set a view’s background color; the displayed color of the background is changed when the transaction ends.
-
You call
setNeedsDisplay;drawRect:is called when the transaction ends. -
You call
setNeedsLayout; layout happens when the transaction ends. - You order an animation; the animation starts when the transaction ends.
What’s really happening is this. Your code runs within an implicit transaction. Your code comes to an end, and the transaction commits itself. It is then, as part of the transaction commit procedure, that the screen is updated: first layout, then drawing, then obedience to layer property changes, then the start of any animations. The transaction then continues on a background thread, under the guidance of the animation server, while any animations are performed, and finally calls its completion block, if any, when the animations are over.
Warning
An explicit transaction block that orders an animation to a layer, if the block is not preceded by any other changes to the layer, can cause animation to begin immediately when the CATransaction class method commit is called, without waiting for the redraw moment, while your code continues running. In my experience, this can cause trouble (animation delegate messages cannot arrive, and the presentation layer can’t be queried properly) and should be avoided.
Media Timing Functions
The CATransaction class method setAnimationTimingFunction: takes as its parameter a media timing function (CAMediaTimingFunction). This class is the general expression of the animation curves we have already met (ease-in-out, ease-in, ease-out, and linear), and you can use it with those very same predefined curves, by calling the CAMediaTimingFunction initializer init(name:) with one of these parameters:
-
kCAMediaTimingFunctionLinear -
kCAMediaTimingFunctionEaseIn -
kCAMediaTimingFunctionEaseOut -
kCAMediaTimingFunctionEaseInEaseOut -
kCAMediaTimingFunctionDefault
A media timing function is a Bézier curve defined by two points. The curve graphs the fraction of the animation’s time that has elapsed (the x-axis) against the fraction of the animation’s change that has occurred (the y-axis); its endpoints are therefore at (0.0,0.0) and (1.0,1.0), because at the beginning of the animation there has been no elapsed time and no change, and at the end of the animation all the time has elapsed and all the change has occurred.
The curve’s defining points are its endpoints, and each endpoint needs only one Bézier control point to define the tangent to the curve. And because the curve’s endpoints are known, defining the two control points is sufficient to describe the entire curve. And because a point is a pair of floating-point values, a media timing function can be expressed as four floating-point values. That is, in fact, how it is expressed.
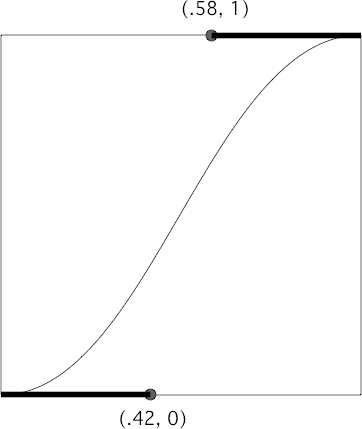
So, for example, the ease-in-out timing function is expressed as the four values 0.42, 0.0, 0.58, 1.0. That defines a Bézier curve with one endpoint at (0.0,0.0), whose control point is (0.42,0.0), and the other endpoint at (1.0,1.0), whose control point is (0.58,1.0) (Figure 4-1).
To define your own media timing function, supply the coordinates of the two control points by calling init(controlPoints:). (It helps to design the curve in a standard drawing program first so that you can visualize how the placement of the control points shapes the curve.) For example, here’s a media timing function that starts out quite slowly and then whips quickly into place after about two-thirds of the time has elapsed. I call this the “clunk” timing function, and it looks great with the compass arrow:
let clunk = CAMediaTimingFunction(controlPoints: 0.9, 0.1, 0.7, 0.9)
CATransaction.setAnimationTimingFunction(clunk)
arrow.transform = CATransform3DRotate(
    arrow.transform, CGFloat(M_PI)/4.0, 0, 0, 1)
Core Animation
Core Animation is the fundamental underlying iOS animation technology. View animation and implicit layer animation are merely convenient façades for Core Animation. Core Animation is explicit layer animation, and revolves primarily around the CAAnimation class and its subclasses, which allow you to create far more elaborate specifications of an animation than anything we’ve encountered so far.
You may never program at the level of Core Animation, but you should read this section anyway, if only to learn how animation really works and to get a sense of its mighty powers. In particular:
- Core Animation works even on a view’s underlying layer. Thus, Core Animation is the only way to apply full-on layer property animation to a view.
- Core Animation permits fine control over the intermediate values and timing of an animation.
- Core Animation allows animations to be grouped into complex combinations.
- Core Animation provides transition animation effects that aren’t available otherwise, such as new content “pushing” the previous content out of a layer.
Warning
Animating a view’s underlying layer with Core Animation is layer animation, not view animation — so you don’t get any automatic layout of that view’s subviews. This can be a reason for preferring view animation.
CABasicAnimation and Its Inheritance
The simplest way to animate a property with Core Animation is with a CABasicAnimation object. CABasicAnimation derives much of its power through its inheritance, so I’ll describe that inheritance along with CABasicAnimation itself. You will readily see that all the property animation features we have met so far are embodied in a CABasicAnimation instance.
- CAAnimation
CAAnimation is an abstract class, meaning that you’ll only ever use a subclass of it. Some of CAAnimation’s powers come from its implementation of the CAMediaTiming protocol.
-
delegate The delegate messages are
animationDidStart:andanimationDidStop:finished:.A CAAnimation instance retains its delegate; this is very unusual behavior and can cause trouble if you’re not conscious of it (I’m speaking from experience). Alternatively, don’t set a delegate; to make your code run after the animation ends, call the CATransaction class method
setCompletionBlock:before configuring the animation.-
duration,timingFunction -
The length of the animation, and its timing function (a CAMediaTimingFunction). A duration of
0(the default) means0.25seconds unless overridden by the transaction. -
autoreverses,repeatCount,repeatDuration,cumulative -
For an infinite
repeatCount(in Swift), useFloat.infinity. TherepeatDurationproperty is a different way to govern repetition, specifying how long the repetition should continue rather than how many repetitions should occur; don’t specify both arepeatCountand arepeatDuration. Ifcumulativeistrue, a repeating animation starts each repetition where the previous repetition ended (rather than jumping back to the start value). -
beginTime -
The delay before the animation starts. To delay an animation with respect to now, call
CACurrentMediaTimeand add the desired delay in seconds. The delay does not eat into the animation’s duration. -
timeOffset - A shift in the animation’s overall timing; looked at another way, specifies the starting frame of the “animation movie,” which is treated as a loop. For example, an animation with a duration of 8 and a time offset of 4 plays its second half followed by its first half.
CAAnimation, along with all its subclasses, implements KVC to allow you to set and retrieve a value for an arbitrary key, similar to CALayer (Chapter 3) and CATransaction.
-
- CAPropertyAnimation
CAPropertyAnimation is a subclass of CAAnimation. It too is abstract, and adds the following:
-
keyPath -
The all-important string specifying the CALayer key that is to be animated. Recall from Chapter 3 that CALayer properties are accessible through KVC keys; now we are using those keys! The convenience initializer
init(keyPath:)creates the instance and assigns it akeyPath. -
additive -
If
true, the values supplied by the animation are added to the current presentation layer value. -
valueFunction - Converts a simple scalar value that you supply into a transform.
-
Warning
There is no animatable CALayer key called "frame". To animate a layer’s frame using explicit layer animation, if both its position and bounds are to change, you must animate both. Similarly, you cannot use explicit layer animation to animate a layer’s affineTransform property, because affineTransform is not a property (it’s a pair of convenience methods); you must animate its transform instead. Attempting to form an animation with a key path of "frame" or "affineTransform" is a common beginner error.
- CABasicAnimation
CABasicAnimation is a subclass (not abstract!) of CAPropertyAnimation. It adds the following:
-
fromValue,toValue -
The starting and ending values for the animation. These values must be Objective-C objects, so numbers and structs will have to be wrapped accordingly, using NSNumber and NSValue (Swift will automatically take care of the former but not the latter). If neither
fromValuenortoValueis provided, the former and current values of the property are used. If just one offromValueortoValueis provided, the other uses the current value of the property. -
byValue -
Expresses one of the endpoint values as a difference from the other rather than in absolute terms. So you would supply a
byValueinstead of afromValueor instead of atoValue, and the actualfromValueortoValuewould be calculated for you by subtraction or addition with respect to the other value. If you supply only abyValue, thefromValueis the property’s current value.
-
Using a CABasicAnimation
Having constructed and configured a CABasicAnimation, the way you order it to be performed is to add it to a layer. This is done with the CALayer instance method addAnimation:forKey:. (I’ll discuss the purpose of the forKey: parameter later; it’s fine to ignore it and use nil, as I do in the examples that follow.)
However, there’s a slight twist. A CAAnimation is merely an animation; all it does is describe the hoops that the presentation layer is to jump through, the “animation movie” that is to be presented. It has no effect on the layer itself. Thus, if you naively create a CABasicAnimation and add it to a layer with addAnimation:forKey:, the animation happens and then the “animation movie” is whipped away to reveal the layer sitting there in exactly the same state as before. It is up to you to change the layer to match what the animation will ultimately portray.
This requirement may seem odd, but keep in mind that we are now in a much more fundamental, flexible world than the automatic, convenient worlds of view animation and implicit layer animation. Using explicit animation is more work, but you get more power. The converse, of course, is that you don’t have to change the layer if it doesn’t change as a result of the animation.
To ensure good results, start by taking a plodding, formulaic approach to the use of CABasicAnimation, like this:
- Capture the start and end values for the layer property you’re going to change, because you’re likely to need these values in what follows.
-
Change the layer property to its end value, first calling
setDisableActions:if necessary to prevent implicit animation. -
Construct the explicit animation, using the start and end values you captured earlier, and with its
keyPathcorresponding to the layer property you just changed. - Add the explicit animation to the layer.
Note
The explicit animation is copied when it is added to the layer. Therefore the animation must be configured first and added to the layer later. Configuring an animation after it has been added to a layer will have no effect on how that layer is animated, because the animation that has been added to the layer is no longer the animation you are configuring.
Here’s how you’d use this approach to animate our compass arrow rotation:
// capture the start and end values
let startValue = arrow.transform
let endValue = CATransform3DRotate(
    startValue, CGFloat(M_PI)/4.0, 0, 0, 1)
// change the layer, without implicit animation
CATransaction.setDisableActions(true)
arrow.transform = endValue
// construct the explicit animation
let anim = CABasicAnimation(keyPath:"transform")
anim.duration = 0.8
let clunk = CAMediaTimingFunction(controlPoints:0.9, 0.1, 0.7, 0.9)
anim.timingFunction = clunk
anim.fromValue = NSValue(CATransform3D:startValue)
anim.toValue = NSValue(CATransform3D:endValue)
// ask for the explicit animation
arrow.addAnimation(anim, forKey:nil)
Once you’re comfortable with the full form, you will find that in many cases it can be condensed. For example, when the fromValue and toValue are not set, the former and current values of the property are used automatically. (This magic is possible because, at the time the CABasicAnimation is added to the layer, the presentation layer still has the former value of the property, while the layer itself has the new value; thus, the CABasicAnimation is able to retrieve them.) In our example, therefore, there is no need to set the fromValue and toValue, and no need to capture the start and end values beforehand. Here’s the condensed version:
CATransaction.setDisableActions(true)
arrow.transform = CATransform3DRotate(
    arrow.transform, CGFloat(M_PI)/4.0, 0, 0, 1)
let anim = CABasicAnimation(keyPath:"transform")
anim.duration = 0.8
let clunk = CAMediaTimingFunction(controlPoints:0.9, 0.1, 0.7, 0.9)
anim.timingFunction = clunk
arrow.addAnimation(anim, forKey:nil)
As I mentioned earlier, you will omit changing the layer if it doesn’t change as a result of the animation. For example, let’s make the compass arrow appear to vibrate rapidly, without ultimately changing its current orientation. To do this, we’ll waggle it back and forth, using a repeated animation, between slightly clockwise from its current position and slightly counterclockwise from its current position. The “animation movie” neither starts nor stops at the current position of the arrow, but for this animation it doesn’t matter, because it all happens so quickly as to appear perfectly natural:
// capture the start and end values
let nowValue = arrow.transform
let startValue = CATransform3DRotate(
    nowValue, CGFloat(M_PI)/40.0, 0, 0, 1)
let endValue = CATransform3DRotate(
    nowValue, CGFloat(-M_PI)/40.0, 0, 0, 1)
// construct the explicit animation
let anim = CABasicAnimation(keyPath:"transform")
anim.duration = 0.05
anim.timingFunction = CAMediaTimingFunction(
    name:kCAMediaTimingFunctionLinear)
anim.repeatCount = 3
anim.autoreverses = true
anim.fromValue = NSValue(CATransform3D:startValue)
anim.toValue = NSValue(CATransform3D:endValue)
// ask for the explicit animation
arrow.addAnimation(anim, forKey:nil)
That code, too, can be shortened considerably from its full form. We can eliminate the need to calculate the new rotation values based on the arrow’s current transform by setting our animation’s additive property to true; this means that the animation’s property values are added to the existing property value for us, so that they are relative, not absolute. For a transform, “added” means “matrix-multiplied,” so we can describe the waggle without any reference to the arrow’s current rotation. Moreover, because our rotation is so simple (around a cardinal axis), we can take advantage of CAPropertyAnimation’s valueFunction; the animation’s property values can then be simple scalars (in this case, angles), because the valueFunction tells the animation to interpret these as rotations around the z-axis:
let anim = CABasicAnimation(keyPath:"transform")
anim.duration = 0.05
anim.timingFunction = CAMediaTimingFunction(
    name:kCAMediaTimingFunctionLinear)
anim.repeatCount = 3
anim.autoreverses = true
anim.additive = true
anim.valueFunction = CAValueFunction(
    name:kCAValueFunctionRotateZ)
anim.fromValue = M_PI/40
anim.toValue = -M_PI/40
arrow.addAnimation(anim, forKey:nil)
Warning
Instead of using a valueFunction, we could have set the animation’s key path to "transform.rotation.z" to achieve the same effect. However, Apple advises against this, as it can result in mathematical trouble when there is more than one rotation.
Let’s return once more to our arrow “clunk” rotation for one final alternative implementation using the additive and valueFunction properties. We set the arrow layer to its final transform at the outset, so when the time comes to configure the animation, its toValue, in additive terms, will be 0; the fromValue will be its current value expressed negatively, like this:
let rot = CGFloat(M_PI)/4.0
CATransaction.setDisableActions(true)
arrow.transform = CATransform3DRotate(arrow.transform, rot, 0, 0, 1)
// construct animation additively
let anim = CABasicAnimation(keyPath:"transform")
anim.duration = 0.8
let clunk = CAMediaTimingFunction(controlPoints:0.9, 0.1, 0.7, 0.9)
anim.timingFunction = clunk
anim.fromValue = -rot
anim.toValue = 0
anim.additive = true
anim.valueFunction = CAValueFunction(name:kCAValueFunctionRotateZ)
arrow.addAnimation(anim, forKey:nil)
This is an interesting way of describing the animation; in effect, it expresses the animation in reverse, regarding the final position as correct and the current position as an aberration to be corrected. It also happens to be how additive view animations are rewritten behind the scenes, and explains their behavior.
Springing Animation
New in iOS 9, springing animation is exposed at the Core Animation level, through the CASpringAnimation class (a CABasicAnimation subclass). As might be expected, it has more options than its corresponding view animation API. Here’s a rough equivalent of the springing view animation from earlier in this chapter; the mass and stiffness values were arrived at experimentally:
CATransaction.setDisableActions(true)
self.v.layer.position.y += 100
let anim = CASpringAnimation(keyPath: "position")
anim.damping = 0.7
anim.initialVelocity = 20
anim.mass = 0.04
anim.stiffness = 4
anim.duration = 0.8
self.v.layer.addAnimation(anim, forKey: nil)
A very nice feature of CASpringAnimation is that its settlingDuration property will tell you, even without running the animation, how long it will take the animation as currently configured to come to rest.
Keyframe Animation
Keyframe animation (CAKeyframeAnimation) is an alternative to basic animation (CABasicAnimation); they are both subclasses of CAPropertyAnimation and they are used in identical ways. The difference is that a keyframe animation, in addition to specifying a starting and ending value, also specifies multiple values through which the animation should pass on the way, the stages (keyframes) of the animation. This can be as simple as setting the animation’s values array.
Here’s a more sophisticated version of our animation for waggling the compass arrow: the stages include the start and end states and eight alternating waggles in between, with the degree of waggle becoming progressively smaller:
var values = [0.0]
for (var i = 20, direction = 1.0; i < 60; i += 5, direction *= -1) {
    values.append( direction * M_PI / Double(i) )
}
values.append(0.0)
let anim = CAKeyframeAnimation(keyPath:"transform")
anim.values = values
anim.additive = true
anim.valueFunction = CAValueFunction(name: kCAValueFunctionRotateZ)
arrow.addAnimation(anim, forKey:nil)
Here are some CAKeyframeAnimation properties:
-
values - The array of values the animation is to adopt, including the starting and ending value.
-
timingFunctions -
An array of timing functions, one for each stage of the animation (so that this array will be one element shorter than the
valuesarray). -
keyTimes -
An array of times to accompany the array of values, defining when each value should be reached. The times start at
0and are expressed as increasing fractions of1, ending at1. -
calculationMode Describes how the
valuesare treated to create all the values through which the animation must pass:-
The default is
kCAAnimationLinear, a simple straight-line interpolation from value to value. -
kCAAnimationCubicconstructs a single smooth curve passing through all the values (and additional advanced properties,tensionValues,continuityValues, andbiasValues, allow you to refine the curve). -
kCAAnimationPacedandkCAAnimationCubicPacedmeans the timing functions and key times are ignored, and the velocity is made constant through the whole animation. -
kCAAnimationDiscretemeans no interpolation: we jump directly to each value at the corresponding key time.
-
The default is
-
path -
When you’re animating a property whose values are pairs of floats (CGPoints), this is an alternative way of describing the values; instead of a
valuesarray, which must be interpolated to arrive at the intermediate values along the way, you supply the entire interpolation as a single CGPath. The points used to draw the path are the keyframe values, so you can still apply timing functions and key times. If you’re animating a position, therotationModeproperty lets you ask the animated object to rotate so as to remain perpendicular to the path.
In this example, the values array is a sequence of five images to be presented successively and repeatedly in a layer’s contents, like the frames in a movie; the effect is similar to image animation, discussed earlier in this chapter:
let anim = CAKeyframeAnimation(keyPath:"contents")
// self.images is an array of UIImage
anim.values = self.images.map {$0.CGImage!}
anim.keyTimes = [0.0, 0.25, 0.5, 0.75, 1.0]
anim.calculationMode = kCAAnimationDiscrete
anim.duration = 1.5
anim.repeatCount = Float.infinity
// self.sprite is a CALayer
self.sprite.addAnimation(anim, forKey:nil)
Making a Property Animatable
So far, we’ve been animating built-in animatable properties. If you define your own property on a CALayer subclass, you can easily make that property animatable through a CAPropertyAnimation (a CABasicAnimation or a CAKeyframeAnimation). For example, here we animate the increase or decrease in a CALayer subclass property called thickness, using essentially the pattern for explicit animation that we’ve already developed:
let lay = self.v.layer as! MyLayer
let cur = lay.thickness
let val : CGFloat = cur == 10 ? 0 : 10
lay.thickness = val
let ba = CABasicAnimation(keyPath:"thickness")
ba.fromValue = cur
lay.addAnimation(ba, forKey:nil)
To make our layer responsive to such a command, it needs a thickness property (obviously) and it must return true from the class method needsDisplayForKey:, where the key is the string name of the property:
class MyLayer : CALayer {
    var thickness : CGFloat = 0
    override class func needsDisplayForKey(key: String) -> Bool {
        if key == "thickness" {
            return true
        }
        return super.needsDisplayForKey(key)
    }
}
Returning true from needsDisplayForKey: causes this layer to be redisplayed repeatedly as the thickness property changes. So if we want to see the animation, this layer also needs to draw itself in some way that depends on the thickness property. Here, I’ll implement the layer’s drawInContext: to make thickness the thickness of the black border around a red rectangle:
override func drawInContext(con: CGContext) {
    let r = self.bounds.insetBy(dx:20, dy:20)
    CGContextSetFillColorWithColor(con, UIColor.redColor().CGColor)
    CGContextFillRect(con, r)
    CGContextSetLineWidth(con, self.thickness)
    CGContextStrokeRect(con, r)
}
At every frame of the animation, drawInContext: is called, and because the thickness value differs at each step, it appears animated.
We have made MyLayer’s thickness property animatable when using explicit layer animation, but it would be even cooler to make it animatable when using implicit layer animation (that is, when setting lay.thickness directly). Later in this chapter, I’ll show how to do that.
Tip
No law says that you have to draw in response to animated changes in a layer property. Consider layer animation more abstractly as a way of getting the runtime to calculate and send you timed interpolated value changes! The possibilities are limitless.
Grouped Animations
A grouped animation (CAAnimationGroup) combines multiple animations into one, by means of its animations property (an array of animations). By delaying and timing the various component animations, complex effects can be achieved.
A CAAnimationGroup is itself an animation; it is a CAAnimation subclass, so it has a duration and other animation features. Think of the CAAnimationGroup as the parent, and its animations as its children. Then the children inherit default property values from their parent. Thus, for example, if you don’t set a child’s duration explicitly, it will inherit the parent’s duration.
Let’s use a grouped animation to construct a sequence where the compass arrow rotates and then waggles. This requires very little modification of code we’ve already written. We express the first animation in its full form, with explicit fromValue and toValue. We postpone the second animation using its beginTime property; notice that we express this in relative terms, as a number of seconds into the parent’s duration, not with respect to CACurrentMediaTime. Finally, we set the overall parent duration to the sum of the child durations, so that it can embrace both of them (failing to do this, and then wondering why some child animations never occur, is a common beginner error):
// capture current value, set final value
let rot = M_PI/4.0
CATransaction.setDisableActions(true)
let current = arrow.valueForKeyPath("transform.rotation.z") as! Double
arrow.setValue(current + rot, forKeyPath:"transform.rotation.z")
// first animation (rotate and clunk)
let anim1 = CABasicAnimation(keyPath:"transform")
anim1.duration = 0.8
let clunk = CAMediaTimingFunction(controlPoints:0.9, 0.1, 0.7, 0.9)
anim1.timingFunction = clunk
anim1.fromValue = current
anim1.toValue = current + rot
anim1.valueFunction = CAValueFunction(name:kCAValueFunctionRotateZ)
// second animation (waggle)
var values = [0.0]
for (var i = 20, direction = 1.0; i < 60; i += 5, direction *= -1) {
values.append( direction * M_PI / Double(i) )
}
values.append(0.0)
let anim2 = CAKeyframeAnimation(keyPath:"transform")
anim2.values = values
anim2.duration = 0.25
anim2.additive = true
anim2.beginTime = anim1.duration - 0.1
anim2.valueFunction = CAValueFunction(name: kCAValueFunctionRotateZ)
// group
let group = CAAnimationGroup()
group.animations = [anim1, anim2]
group.duration = anim1.duration + anim2.duration
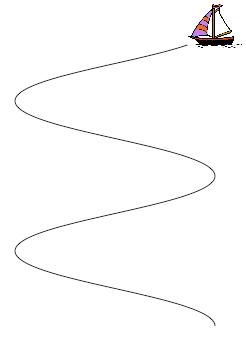
arrow.addAnimation(group, forKey:nil)In that example, I grouped two animations that animated the same property sequentially. Now let’s go to the other extreme and group some animations that animate different properties simultaneously. I have a small view (self.v), located near the top-right corner of the screen, whose layer contents are a picture of a sailboat facing to the left. I’ll “sail” the boat in a curving path, both down the screen and left and right across the screen, like an extended letter “S” (Figure 4-2). Each time the boat comes to a vertex of the curve, changing direction across the screen, I’ll turn the boat picture so that it faces the way it’s about to move. At the same time, I’ll constantly rock the boat, so that it always appears to be pitching a little on the waves.
Here’s the first animation, the movement of the boat along its curving path. It illustrates the use of a CAKeyframeAnimation with a CGPath; the calculationMode of kCAAnimationPaced ensures an even speed over the whole path. We don’t set an explicit duration because we want to adopt the duration of the group:
let h : CGFloat = 200
let v : CGFloat = 75
let path = CGPathCreateMutable()
var leftright : CGFloat = 1
var next : CGPoint = self.v.layer.position
var pos : CGPoint
CGPathMoveToPoint(path, nil, next.x, next.y)
for _ in 0 ..< 4 {
    pos = next
    leftright *= -1
    next = CGPointMake(pos.x+h*leftright, pos.y+v)
    CGPathAddCurveToPoint(path, nil,
        pos.x, pos.y+30,
        next.x, next.y-30,
        next.x, next.y)
}
let anim1 = CAKeyframeAnimation(keyPath:"position")
anim1.path = path
anim1.calculationMode = kCAAnimationPaced
Here’s the second animation, the reversal of the direction the boat is facing. This is simply a rotation around the y-axis. It’s another CAKeyframeAnimation, but we make no attempt at visually animating this reversal: the calculationMode is kCAAnimationDiscrete, so that the boat image reversal is a sudden change, as in our earlier “sprite” example. There is one less value than the number of points in our first animation’s path, and the first animation has an even speed, so the reversals take place at each curve apex with no further effort on our part. (If the pacing were more complicated, we could give both the first and the second animation identical keyTimes arrays, to coordinate them.) Once again, we don’t set an explicit duration:
let revs = [0.0, M_PI, 0.0, M_PI]
let anim2 = CAKeyframeAnimation(keyPath:"transform")
anim2.values = revs
anim2.valueFunction = CAValueFunction(name:kCAValueFunctionRotateY)
anim2.calculationMode = kCAAnimationDiscrete
Here’s the third animation, the rocking of the boat. It has a short duration, and repeats indefinitely:
let pitches = [0.0, M_PI/60.0, 0.0, -M_PI/60.0, 0.0]
let anim3 = CAKeyframeAnimation(keyPath:"transform")
anim3.values = pitches
anim3.repeatCount = Float.infinity
anim3.duration = 0.5
anim3.additive = true
anim3.valueFunction = CAValueFunction(name:kCAValueFunctionRotateZ)
Finally, we combine the three animations, assigning the group an explicit duration that will be adopted by the first two animations. As we hand the animation over to the layer displaying the boat, we also change the layer’s position to match the final position from the first animation, so that the boat won’t jump back to its original position afterward:
let group = CAAnimationGroup()
group.animations = [anim1, anim2, anim3]
group.duration = 8
self.v.layer.addAnimation(group, forKey:nil)
CATransaction.setDisableActions(true)
self.v.layer.position = next
Here are some further CAAnimation properties (from the CAMediaTiming protocol) that come into play especially when animations are grouped:
-
speed -
The ratio between a child’s timescale and the parent’s timescale. For example, if a parent and child have the same duration, but the child’s
speedis1.5, its animation runs one-and-a-half times as fast as the parent. -
fillMode Suppose the child animation begins after the parent animation, or ends before the parent animation, or both. What should happen to the appearance of the property being animated, outside the child animation’s boundaries? The answer depends on the child’s
fillMode:-
kCAFillModeRemovedmeans the child animation is removed, revealing the layer property at its actual current value whenever the child is not running. -
kCAFillModeForwardsmeans the final presentation layer value of the child animation remains afterward. -
kCAFillModeBackwardsmeans the initial presentation layer value of the child animation appears right from the start. -
kCAFillModeBothcombines the previous two.
-
Freezing an Animation
CALayer adopts the CAMediaTiming protocol. Thus, a layer can have a speed. This will affect any animation attached to it. A CALayer with a speed of 2 will play a 10-second animation in 5 seconds. A layer can also have a timeOffset.
One remarkably powerful way to take advantage of this feature of CALayer is to assign a layer a speed of 0. This effectively “freezes” any animation attached to the layer. You can then change the layer’s timeOffset to display any single frame of the animation. In effect, the frozen animation has given you a whole slew of interpolated states “for free,” any of which you can select by setting the layer’s timeOffset.
To illustrate, let’s explore the animatable path property of a CAShapeLayer. Consider a layer that can display a rectangle or an ellipse or any of the intermediate shapes between them. I can’t imagine what the notion of an intermediate shape between a rectangle or an ellipse may mean, let alone how to draw such an intermediate shape; but thanks to frozen animations, I don’t have to. Here, I’ll construct the CAShapeLayer, add it to the interface, give it an animation from a rectangle to an ellipse, and keep a reference to it as a property:
let shape = CAShapeLayer()
shape.frame = v.bounds
v.layer.addSublayer(shape)
shape.fillColor = UIColor.clearColor().CGColor
shape.strokeColor = UIColor.redColor().CGColor
let path = CGPathCreateWithRect(shape.bounds, nil)
shape.path = path
let path2 = CGPathCreateWithEllipseInRect(shape.bounds, nil)
let ba = CABasicAnimation(keyPath: "path")
ba.duration = 1
ba.fromValue = path
ba.toValue = path2
shape.speed = 0
shape.timeOffset = 0
shape.addAnimation(ba, forKey: nil)
self.shape = shape
I’ve added the animation to the layer, but because the layer’s speed is 0, no animation takes place; the rectangle is displayed and that’s all. There’s also a UISlider in the interface. I’ll respond to the user changing the value of the slider by setting the frame of the animation:
@IBAction func doSlider(sender: AnyObject) { // slider action
    let slider = sender as! UISlider
    self.shape.timeOffset = Double(slider.value)
}
This astonishing feature of layers and animations can be used in many powerful ways. It lies at the heart of interactive view controller transition animations (Chapter 6), and is probably used in unsuspected places throughout the iPhone and iPad interface.
Transitions
A layer transition is an animation involving two “copies” of a single layer, in which the second “copy” appears to replace the first. It is described by an instance of CATransition (a CAAnimation subclass), which has these chief properties describing the animation:
-
type Your choices are:
-
kCATransitionFade -
kCATransitionMoveIn -
kCATransitionPush -
kCATransitionReveal
-
-
subtype If the
typeis notkCATransitionFade, your choices are:-
kCATransitionFromRight -
kCATransitionFromLeft -
kCATransitionFromTop -
kCATransitionFromBottom
-
Note
For historical reasons, the terms Bottom and Top in the names of the subtype settings have the opposite of their expected meanings.
To understand a layer transition, first implement one without changing anything else about the layer:
let t = CATransition()
t.type = kCATransitionPush
t.subtype = kCATransitionFromBottom
t.duration = 2
lay.addAnimation(t, forKey: nil)
The entire layer exits moving down from its original place while fading away, and another copy of the very same layer enters moving down from above while fading in. If, at the same time, we change something about the layer’s contents, then the old contents will appear to exit downward while the new contents appear to enter from above:
// ... configure the transition as before ...
CATransaction.setDisableActions(true)
lay.contents = UIImage(named: "Smiley")!.CGImage
lay.addAnimation(t, forKey: nil)
A common device is for the layer that is to be transitioned to be inside a superlayer that is exactly the same size and whose masksToBounds is true. This confines the visible transition to the bounds of the layer itself. Otherwise, the entering and exiting versions of the layer are visible outside the layer. In Figure 4-3, which shows a smiley face pushing an image of Mars out of the layer, I’ve emphasized this arrangement by giving the superlayer a border as well.
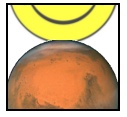
A transition on a superlayer can happen simultaneously with animation of a sublayer. The animation will be seen to occur on the second “copy” of the layer as it moves into position. This is analogous to the .AllowAnimatedContent option for view animation.
Animations List
The method that asks for an explicit animation to happen is CALayer’s addAnimation:forKey:. To understand how this method actually works (and what the “key” is), you need to know about a layer’s animations list.
An animation is an object (a CAAnimation) that modifies how a layer is drawn. It does this merely by being attached to the layer; the layer’s drawing mechanism does the rest. A layer maintains a list of animations that are currently in force. To add an animation to this list, you call addAnimation:forKey:. When the time comes to draw itself, the layer looks through its animations list and draws itself in accordance with whatever animations it finds there. (The list of things the layer must do in order to draw itself is sometimes referred to by the documentation as the render tree.) The order in which animations were added to the list is the order in which they are applied.
The animations list is maintained in a curious way. The list is not exactly a dictionary, but it behaves somewhat like a dictionary. An animation has a key — the forKey: parameter in addAnimation:forKey:. If an animation with a certain key is added to the list, and an animation with that key is already in the list, the one that is already in the list is removed. Thus a rule is maintained that only one animation with a given key can be in the list at a time — the exclusivity rule. This explains why sometimes ordering an animation can cancel an animation already ordered or in-flight: the two animations had the same key, so the first one was removed. (In iOS 8 and later, additive view animations affecting the same property work around this limitation simply by giving the additional animations a different key name — for example, "position" and "position-2".)
It is also possible to add an animation with no key (the key is nil); it is then not subject to the exclusivity rule (that is, there can be more than one animation in the list with no key).
The forKey: parameter in addAnimation:forKey: is thus not a property name. It could be a property name, but it can be any arbitrary value. Its purpose is to enforce the exclusivity rule. It does not have any meaning with regard to what property a CAPropertyAnimation animates; that is the job of the animation’s keyPath.
(Apple’s use of the term “key” in addAnimation:forKey: is thus unfortunate and misleading; I wish they had named this method addAnimation:withIdentifier: or something like that.)
However, there is a relationship between the “key” in addAnimation:forKey: and a CAPropertyAnimation’s keyPath — if a CAPropertyAnimation’s keyPath is nil at the time that it is added to a layer with addAnimation:forKey:, that keyPath is set to the forKey: value. Thus, you can misuse the forKey: parameter in addAnimation:forKey: as a way of specifying what keyPath an animation animates. (Implicit layer animation crucially depends on this fact.)
Warning
I have seen many prominent but misleading examples that use this technique, apparently in the mistaken belief that the “key” in addAnimation:forKey: is the way you are supposed to specify what property to animate. This is wrong. Set the CAPropertyAnimation’s keyPath explicitly (as do all my examples); that’s what it’s for.
You can use the exclusivity rule to your own advantage, to keep your code from stepping on its own feet. Some code of yours might add an animation to the list using a certain key; then later, some other code might come along and correct this, removing that animation and replacing it with another. By using the same key, the second code is easily able to override the first: “You may have been given some other animation with this key, but throw it away; play this one instead.”
In some cases, the key you supply is ignored and a different key is substituted. In particular, the key with which a CATransition is added to the list is always kCATransition (which happens to be "transition"); thus there can be only one transition animation in the list.
You can think of an animation in a layer’s animations list as being the “animation movie” I spoke of at the start of this chapter. As long as an animation is in the list, the movie is present, either waiting to be played or actually playing. An animation that has finished playing is, in general, pointless; the animation should now be removed from the list, as its presence serves no purpose and it imposes an extra burden on the render tree. Therefore, an animation has a removedOnCompletion property, which defaults to true: when the “movie” is over, the animation removes itself from the list.
Warning
You may encounter examples that set removedOnCompletion to false and set the animation’s fillMode to kCAFillModeForwards or kCAFillModeBoth, as a way of causing the layer to keep the appearance of the last frame of the “animation movie” even after the animation is over, and preventing a property from apparently jumping back to its initial value when the animation ends. This is wrong. The correct approach, as I have explained, is to change the property value to match the final frame of the animation. The proper use of kCAFillModeForwards is in connection with a child animation within a grouped animation.
You can’t access the entire animations list directly. You can access the key names of the animations in the list, with animationKeys; and you can obtain or remove an animation with a certain key, with animationForKey: and removeAnimationForKey:; but animations with a nil key are inaccessible. You can, however, remove all animations, including animations with a nil key, using removeAllAnimations. When your app is suspended, removeAllAnimations is called on all layers for you; that is why it is possible to suspend an app coherently in the middle of an animation.
If an animation is in-flight when you remove it from the animations list manually, by calling removeAllAnimations or removeAnimationForKey:, it will stop; however, that doesn’t happen until the next redraw moment. You might be able to work around this, if you need an animation to be removed immediately, by wrapping the remove... call in an explicit transaction block.
Actions
For the sake of completeness, I will now explain how implicit animation really works — that is, how implicit animation is turned into explicit animation behind the scenes. The basis of implicit animation is the action mechanism. Feel free to skip this section if you don’t want to get into the under-the-hood nitty-gritty of implicit animation.
What an Action Is
An action is an object that adopts the CAAction protocol. This means simply that it implements runActionForKey:object:arguments:. The action object could do anything in response to this message. The notion of an action is completely general. The only class that adopts the CAAction protocol is CAAnimation, but in fact the action object doesn’t have to be an animation — it doesn’t even have to perform an animation.
You would never send runActionForKey:object:arguments: to an animation directly. Rather, this message is sent to an action object for you, as the basis of implicit animation. The key is the property that was set, and the object is the layer whose property was set.
What an animation does when it receives runActionForKey:object:arguments: is to assume that the second parameter, the object:, is a layer, and to add itself to that layer’s animations list. Thus, for an animation, receiving the runActionForKey:object:arguments: message is like being told: “Play yourself!”
This is where the rule comes into play, which I mentioned earlier, that if an animation’s keyPath is nil, the key by which the animation is assigned to a layer’s animations list is used as the keyPath. When an animation is sent runActionForKey:object:arguments:, it calls addAnimation:forKey: to add itself to the layer’s animation’s list, using the name of the property as the key. The animation’s keyPath for an implicit layer animation is usually nil, so the animation’s keyPath winds up being set to the same key! That is how the property that you set ends up being the property that is animated.
Action Search
When you set a property of a layer and trigger an implicit animation, you are actually triggering the action search: the layer searches for an action object (a CAAction) to which it can send the runActionForKey:object:arguments: message. The procedure by which the layer searches for this object is quite elaborate.
The search for an action object begins when something causes the layer to be sent the actionForKey: message. Three sorts of event can cause this to happen:
A specially marked CALayer property is set — by calling the setter method explicitly, by setting the property itself, or by means of
setValue:forKey:. All animatable properties, and indeed most (or all) other CALayer properties, are marked in this special way. (You can mark a custom property in this same way by designating it as@NSManaged, as I’ll demonstrate later in this chapter.)Setting a layer’s
frameproperty sets itspositionandboundsand callsactionForKey:for the"position"and"bounds"keys. Calling a layer’ssetAffineTransform:method sets itstransformand callsactionForKey:for the"transform"key.-
The layer is sent
setValue:forKey:with a key that is not a property. This is because CALayer’ssetValue:forUndefinedKey:, by default, callsactionForKey:. - Various other miscellaneous types of event take place, such as the layer being added to the interface. I’ll give some examples later in this chapter.
Tip
CATransaction’s setDisableActions:, with an argument of true, prevents the actionForKey: message from being sent. That’s how it actually works behind the scenes.
At each stage of the action search, the following rules are obeyed regarding what is returned from that stage of the search:
- An action object
-
If an action object is produced, that is the end of the search. The action mechanism sends that action object the
runActionForKey:object:arguments:message; if this an animation, the animation responds by adding itself to the layer’s animations list. -
NSNull() -
If
NSNull()is produced, that is the end of the search. There will be no implicit animation;NSNull()means, “Do nothing and stop searching.” -
nil -
If
nilis produced, the search continues to the next stage.
The action search proceeds by stages, as follows:
-
The layer’s
actionForKey:might terminate the search before it even starts. The layer will do this if it is the underlying layer of a view, or if the layer is not part of a window’s layer hierarchy. In such a case, there should be no implicit animation, so the whole mechanism is nipped in the bud. (This stage is special in that a returned value ofnilends the search and no animation takes place.) -
If the layer has a delegate that implements
actionForLayer:forKey:, that message is sent to the delegate, with this layer as the layer and the property name as the key. If an action object orNSNull()is returned, the search ends. -
The layer has a property called
actions, which is a dictionary. If there is an entry in this dictionary with the given key, that value is used, and the search ends. The layer has a property called
style, which is a dictionary. If there is an entry in this dictionary with the keyactions, it is assumed to be a dictionary; if thisactionsdictionary has an entry with the given key, that value is used, and the search ends. Otherwise, if there is an entry in thestyledictionary calledstyle, the same search is performed within it, and so on recursively until either anactionsentry with the given key is found (the search ends) or there are no morestyleentries (the search continues).(If the
styledictionary sounds profoundly weird, that’s because it is profoundly weird. It is actually a special case of a larger, separate mechanism, which is also profoundly weird, having to do not with actions, but with a CALayer’s implementation of KVC. When you callvalueForKey:on a layer, if the key is undefined by the layer itself, thestyledictionary is consulted. I have never written or seen code that uses this mechanism for anything, and I’ll say no more about it.)-
The layer’s class is sent
defaultActionForKey:, with the property name as the key. If an action object orNSNull()is returned, the search ends. - If the search reaches this last stage, a default animation is supplied, as appropriate. For a property animation, this is a plain vanilla CABasicAnimation.
Hooking Into the Action Search
You can affect the action search at any of its various stages to modify what happens when the search is triggered.
For example, you can turn off implicit animation for some particular property. One way would be to return nil from actionForKey: itself, in a CALayer subclass. Here’s the code from a CALayer subclass that doesn’t animate its position property (but does animate its other properties normally):
override func actionForKey(key: String) -> CAAction? {
    if key == "position" {
        return nil
    }
    return super.actionForKey(key)
}
For more flexibility, we can take advantage of the fact that a CALayer acts like a dictionary (allowing us to set an arbitrary key’s value) — we’ll embed a switch in our CALayer subclass that we can use to turn implicit position animation on and off at will:
override func actionForKey(key: String) -> CAAction? {
    if key == "position" {
        if self.valueForKey("suppressPositionAnimation") != nil {
            return nil
        }
    }
    return super.actionForKey(key)
}
To turn off implicit position animation for an instance of this layer, we set its "suppressPositionAnimation" key to a non-nil value:
layer.setValue(true, forKey:"suppressPositionAnimation")
Another possibility is to cause some stage of the search to produce an action object of your own. You would then be affecting how implicit animation behaves.
Let’s say we want a certain layer’s duration for an implicit position animation to be 5 seconds. We can achieve this with a minimally configured animation, like this:
let ba = CABasicAnimation()
ba.duration = 5
The idea now is to situate this animation where it will be produced by the action search for the "position" key. We could, for instance, put it into the layer’s actions dictionary:
layer.actions = ["position": ba]
The only property of this animation that we have set is its duration; that setting, however, is final. Although animation properties that you don’t set can be set through CATransaction, in the usual manner for implicit property animation, animation properties that you do set can not be overridden through CATransaction. Thus, when we set this layer’s position, if an implicit animation results, its duration is 5 seconds, even if we try to change it through CATransaction:
CATransaction.setAnimationDuration(1.5) // won't work
layer.position = CGPointMake(100,100)
Storing an animation in the actions dictionary, however, is a somewhat inflexible way to hook into the action search. If we have to write our animation beforehand, we know nothing about the layer’s starting and ending values for the changed property. A much more powerful approach is to make our action object a custom CAAction object — because in that case, it will be sent runActionForKey:..., and we can construct and run an animation now, when we are in direct contact with the layer to be animated. Here’s a barebones version of such an object:
class MyAction : NSObject, CAAction {
    func runActionForKey(event: String, object anObject: AnyObject,
        arguments dict: [NSObject : AnyObject]?) {
            let anim = CABasicAnimation(keyPath: event)
            anim.duration = 5
            let lay = anObject as! CALayer
            let newP = lay.valueForKey(event)
            let oldP = (lay.presentationLayer() as! CALayer)
                .valueForKey(event)
            lay.addAnimation(anim, forKey:nil)
    }
}
The idea is that this would then be the action object that we store in the actions dictionary:
layer.actions = ["position": MyAction()]
Our custom CAAction object, MyAction, doesn’t do anything very interesting — but it could. That’s the point. As the code demonstrates, we have access to the name of the animated property (event), the old value of that property (from the layer’s presentation layer), and the new value of that property (from the layer itself). We are thus free to configure the animation in all sorts of ways. In fact, we can add more than one animation to the layer, or a group animation. We don’t even have to add an animation to the layer! We are free to interpret the setting of this property in any way we like.
Here’s a modification of our MyAction object that creates and runs a keyframe animation that “waggles” as it goes from the start value to the end value:
class MyWagglePositionAction : NSObject, CAAction {
    func runActionForKey(event: String, object anObject: AnyObject,
        arguments dict: [NSObject : AnyObject]?) {
            let lay = anObject as! CALayer
            let newP = (lay.valueForKey(event) as! NSValue).CGPointValue()
            let oldP = ((lay.presentationLayer() as! CALayer)
                .valueForKey(event) as! NSValue).CGPointValue()
            let d = sqrt(pow(oldP.x - newP.x, 2) + pow(oldP.y - newP.y, 2))
            let r = Double(d/3.0)
            let theta = Double(atan2(newP.y - oldP.y, newP.x - oldP.x))
            let wag = 10*M_PI/180.0
            let p1 = CGPointMake(
                oldP.x + CGFloat(r*cos(theta+wag)),
                oldP.y + CGFloat(r*sin(theta+wag)))
            let p2 = CGPointMake(
                oldP.x + CGFloat(r*2*cos(theta-wag)),
                oldP.y + CGFloat(r*2*sin(theta-wag)))
            let anim = CAKeyframeAnimation(keyPath: event)
            anim.values = [oldP,p1,p2,newP].map{NSValue(CGPoint:$0)}
            anim.calculationMode = kCAAnimationCubic
            lay.addAnimation(anim, forKey:nil)
    }
}
By adding this CAAction object to a layer’s actions dictionary under the "position" key, we have created a CALayer that waggles when its position is set. Our CAAction doesn’t set the animation’s duration, so our own call to CATransaction’s setAnimationDuration: works. The power of this mechanism is simply staggering. We can modify any layer in this way — even one that doesn’t belong to us.
Instead of modifying the layer’s actions dictionary, we could hook into the action search by setting the layer’s delegate to an instance that responds to actionForLayer:forKey:. This has the advantage of serving as a single locus that can do different things depending on what the layer is and what the key is. Here’s an implementation that does exactly what the actions dictionary did — it returns an instance of our custom CAAction object, so that setting the layer’s position waggles it into place:
override func actionForLayer(layer: CALayer,
    forKey key: String) -> CAAction? {
        if key == "position" {
            return MyWagglePositionAction()
        }
        return nil
}
Finally, I’ll demonstrate overriding defaultActionForKey:. This code would go into a CALayer subclass; setting this layer’s contents will automatically trigger a push transition from the left:
override class func defaultActionForKey(key: String) -> CAAction? {
    if key == "contents" {
        let tr = CATransition()
        tr.type = kCATransitionPush
        tr.subtype = kCATransitionFromLeft
        return tr
    }
    return super.defaultActionForKey(key)
}
Tip
Both the delegate’s actionForLayer:forKey: and the subclass’s defaultActionForKey: are declared as returning a CAAction. Therefore, to return NSNull() from your implemention of one of these methods, you’ll need to typecast it to CAAction to quiet the compiler; you’re lying (NSNull does not adopt the CAAction protocol), but it doesn’t matter.
Making a Custom Property Implicitly Animatable
Earlier in this chapter, we made a custom layer’s thickness property animatable through explicit layer animation. Now that we know how implicit layer animation works, we can make our layer’s thickness property animatable through implicit animation as well. Thus, we will be able to animate our layer’s thickness with code like this:
let lay = self.v.layer as! MyLayer
let cur = lay.thickness
let val : CGFloat = cur == 10 ? 0 : 10
lay.thickness = val // implicit animation
We have already implemented needsDisplayForKey: to return true for the "thickness" key, and we have provided an appropriate drawInContext: implementation. Now we’ll add two further pieces of the puzzle. As we now know, to make our MyLayer class respond to direct setting of a property, we need to hook into the action search and return a CAAction. The obvious place to do this is in the layer itself, at the very start of the action search, in an actionForKey: implementation:
override func actionForKey(key: String) -> CAAction? {
    if key == "thickness" {
        let ba = CABasicAnimation(keyPath: key)
        ba.fromValue =
            (self.presentationLayer() as! CALayer).valueForKey(key)
        return ba
    }
    return super.actionForKey(key)
}
Finally, we must declare MyLayer’s thickness property @NSManaged. Otherwise, actionForKey: won’t be called in the first place (the action search will never happen):
class MyLayer : CALayer {
    @NSManaged var thickness : CGFloat
    // ...
}
Tip
The @NSManaged declaration invites Cocoa to generate and dynamically inject getter and setter accessors into our layer class; it is the equivalent of Objective-C’s @dynamic (and is completely different from Swift’s dynamic).
Nonproperty Actions
An action search is also triggered when a layer is added to a superlayer (key kCAOnOrderIn) and when a layer’s sublayers are changed by adding or removing a sublayer (key "sublayers").
Warning
These triggers and their keys are incorrectly described in Apple’s documentation (and headers).
In this example, we use our layer’s delegate so that when our layer is added to a superlayer, it will “pop” into view:
let layer = CALayer()
// ... configure layer here ...
layer.delegate = self
self.view.layer.addSublayer(layer)
In the layer’s delegate (self), we implement the actual animation as a group animation, fading the layer quickly in from an opacity of 0 and at the same time scaling its transform to make it momentarily appear a little larger:
override func actionForLayer(layer: CALayer,
    forKey key: String) -> CAAction? {
        if key == kCAOnOrderIn {
            let anim1 = CABasicAnimation(keyPath:"opacity")
            anim1.fromValue = 0.0
            anim1.toValue = layer.opacity
            let anim2 = CABasicAnimation(keyPath:"transform")
            anim2.toValue = NSValue(CATransform3D:
                CATransform3DScale(layer.transform, 1.2, 1.2, 1.0))
            anim2.autoreverses = true
            anim2.duration = 0.1
            let group = CAAnimationGroup()
            group.animations = [anim1, anim2]
            group.duration = 0.2
            return group
        }
}
The documentation says that when a layer is removed from a superlayer, an action is sought under the key kCAOnOrderOut. This is true but useless, because by the time the action is sought, the layer has already been removed from the superlayer, so returning an animation has no visible effect. A possible workaround is to trigger the animation in some other way (and remove the layer afterward, if desired).
Recall, for example, that an action search is triggered when an arbitrary key is set on a layer. Let’s implement the key "farewell" so that it shrinks and fades the layer and then removes it from its superlayer:
layer.delegate = self
layer.setValue("", forKey:"farewell")
The supplier of the action object — in this case, the layer’s delegate — returns the shrink-and-fade animation; it also sets itself as that animation’s delegate, and removes the layer when the animation ends:
override func actionForLayer(layer: CALayer,
    forKey key: String) -> CAAction? {
        if key == "farewell" {
            let anim1 = CABasicAnimation(keyPath:"opacity")
            anim1.fromValue = layer.opacity
            anim1.toValue = 0.0
            let anim2 = CABasicAnimation(keyPath:"transform")
            anim2.toValue = NSValue(CATransform3D:
                CATransform3DScale(layer.transform, 0.1, 0.1, 1.0))
            let group = CAAnimationGroup()
            group.animations = [anim1, anim2]
            group.duration = 0.2
            group.delegate = self // animationDidStop will be called
            group.setValue(layer, forKey:"remove") // identifier
            layer.opacity = 0
            return group
        }
}
override func animationDidStop(anim: CAAnimation, finished flag: Bool) {
    if let layer = anim.valueForKey("remove") as? CALayer {
        layer.removeFromSuperlayer()
    }
}
Emitter Layers
Emitter layers (CAEmitterLayer) are, to some extent, on a par with animated images: once you’ve set up an emitter layer, it just sits there animating all by itself. The nature of this animation is rather narrow: an emitter layer emits particles, which are CAEmitterCell instances. However, by clever setting of the properties of an emitter layer and its emitter cells, you can achieve some astonishing effects. Moreover, the animation is itself animatable using Core Animation.
Here are some useful basic properties of a CAEmitterCell:
-
contents,contentsRect - These are modeled after the eponymous CALayer properties, although CAEmitterCell is not a CALayer subclass; so, respectively, an image (a CGImage) and a CGRect specifying a region of that image. They define the image that a cell will portray.
-
birthrate,lifetime - How many cells per second should be emitted, and how many seconds each cell should live before vanishing, respectively.
-
velocity - The speed at which a cell moves. The unit of measurement is not documented; perhaps it’s points per second.
-
emissionLatitude,emissionLongitude - The angle at which the cell is emitted from the emitter, as a variation from the perpendicular. Longitude is an angle within the plane; latitude is an angle out of the plane.
So, here’s code to create a very elementary emitter cell:
// make a gray circle image
UIGraphicsBeginImageContextWithOptions(CGSizeMake(10,10), false, 1)
let con = UIGraphicsGetCurrentContext()!
CGContextAddEllipseInRect(con, CGRectMake(0,0,10,10))
CGContextSetFillColorWithColor(con, UIColor.grayColor().CGColor)
CGContextFillPath(con)
let im = UIGraphicsGetImageFromCurrentImageContext()
UIGraphicsEndImageContext()
// make a cell with that image
let cell = CAEmitterCell()
cell.birthRate = 5
cell.lifetime = 1
cell.velocity = 100
cell.contents = im.CGImage
(In the first line, we deliberately keep the scale at 1, even on a high-resolution screen, because a CAEmitterCell has no contentsScale, as a CALayer does; we’re going to derive a CGImage from this image, and we don’t want its size doubled.)
The result is that little gray circles should be emitted slowly and steadily, five per second, each one vanishing in one second. Now we need an emitter layer from which these circles are to be emitted. Here are some basic CAEmitterLayer properties (beyond those it inherits from CALayer); these define an imaginary object, an emitter, that will be producing the emitter cells:
-
emitterPosition -
The point at which the emitter should be located, in superlayer coordinates. You can optionally add a third dimension to this point,
emitterZPosition. -
emitterSize - The size of the emitter.
-
emitterShape The shape of the emitter. The dimensions of the shape depend on the emitter’s size; the cuboid shape depends also on a third size dimension,
emitterDepth. Your choices are:-
kCAEmitterLayerPoint -
kCAEmitterLayerLine -
kCAEmitterLayerRectangle -
kCAEmitterLayerCuboid -
kCAEmitterLayerCircle -
kCAEmitterLayerSphere
-
-
emitterMode The region of the shape from which cells should be emitted. Your choices are:
-
kCAEmitterLayerPoints -
kCAEmitterLayerOutline -
kCAEmitterLayerSurface -
kCAEmitterLayerVolume
-
Let’s start with the simplest possible case, a single point emitter:
let emit = CAEmitterLayer()
emit.emitterPosition = CGPointMake(30,100)
emit.emitterShape = kCAEmitterLayerPoint
emit.emitterMode = kCAEmitterLayerPoints
We tell the emitter what types of cell to emit by assigning those cells to its emitterCells property (an array of CAEmitterCell). We then add the emitter to our interface, and presto, it starts emitting:
emit.emitterCells = [cell]
self.view.layer.addSublayer(emit)
The result is a constant stream of gray circles emitted from the point (30.0,100.0), each circle marching steadily to the right and vanishing after one second (Figure 4-4).
Now that we’ve succeeded in creating a boring emitter layer, we can start to vary some parameters. The emissionRange defines a cone in which cells will be emitted; if we increase the birthRate and widen the emissionRange, we get something that looks like a stream shooting from a water hose:
cell.birthRate = 100
cell.lifetime = 1.5
cell.velocity = 100
cell.emissionRange = CGFloat(M_PI)/5.0
In addition, as the cell moves, it can be made to accelerate (or decelerate) in each dimension, using its xAcceleration, yAcceleration, and zAcceleration properties. Here, we turn the stream into a falling cascade, like a waterfall coming from the left:
cell.xAcceleration = -40
cell.yAcceleration = 200
All aspects of cell behavior can be made to vary randomly, using the following CAEmitterCell properties:
-
lifetimeRange,velocityRange - How much the lifetime and velocity values are allowed to vary randomly for different cells.
-
scale
scaleRange,scaleSpeed - The scale alters the size of the cell; the range and speed determine how far and how rapidly this size alteration is allowed to change over the lifetime of each cell.
-
color
redRange,greenRange,blueRange,alphaRange
redSpeed,greenSpeed,blueSpeed,alphaSpeed - The color is painted in accordance with the opacity of the cell’s contents image; it combines with the image’s color, so if we want the color stated here to appear in full purity, our contents image should use only white. The range and speed determine how far and how rapidly each color component is to change.
-
spin
spinRange - The spin is a rotational speed (in radians per second); its range determines how far this speed is allowed to change over the lifetime of each cell.
Here we add some variation so that the circles behave a little more independently of one another. Some live longer than others, some come out of the emitter faster than others. And they all start out a shade of blue, but change to a shade of green about half-way through the stream (Figure 4-5):
cell.lifetimeRange = 0.4
cell.velocityRange = 20
cell.scaleRange = 0.2
cell.scaleSpeed = 0.2
cell.color = UIColor.blueColor().CGColor
cell.greenRange = 0.5
cell.greenSpeed = 0.75
Once the emitter layer is in place and animating, you can change its parameters and the parameters of its emitter cells through key–value coding on the emitter layer. You can access the emitter cells through the emitter layer’s "emitterCells" key path; to specify a cell type, use its name property (which you’ll have to have assigned earlier) as the next piece of the key path. For example, suppose we’ve set cell.name to "circle"; now we’ll change the cell’s greenSpeed so that each cell changes from blue to green much earlier in its lifetime:
emit.setValue(3.0, forKeyPath:"emitterCells.circle.greenSpeed")
The significance of this is that such changes can themselves be animated! Here, we’ll attach to the emitter layer a repeating animation that causes our cell’s greenSpeed to move slowly back and forth between two values. The result is that the stream varies, over time, between being mostly blue and mostly green:
let key = "emitterCells.circle.greenSpeed"
let ba = CABasicAnimation(keyPath:key)
ba.fromValue = -1.0
ba.toValue = 3.0
ba.duration = 4
ba.autoreverses = true
ba.repeatCount = Float.infinity
emit.addAnimation(ba, forKey:nil)
A CAEmitterCell can itself function as an emitter — that is, it can have cells of its own. Both CAEmitterLayer and CAEmitterCell conform to the CAMediaTiming protocol, and their beginTime and duration properties can be used to govern their times of operation, much as in a grouped animation. For example, this code causes our existing waterfall to spray tiny droplets in the region of the “nozzle” (the emitter):
let cell2 = CAEmitterCell()
cell.emitterCells = [cell2]
cell2.contents = im.CGImage
cell2.emissionRange = CGFloat(M_PI)
cell2.birthRate = 200
cell2.lifetime = 0.4
cell2.velocity = 200
cell2.scale = 0.2
cell2.beginTime = 0.04
cell2.duration = 0.2
But if we change the beginTime to be larger (hence later), the tiny droplets happen near the bottom of the cascade. We must also increase the duration, or stop setting it altogether, since if the duration is less than the beginTime, no emission takes place at all (Figure 4-6):
cell2.beginTime = 1.4
cell2.duration = 0.4
We can also alter the picture by changing the behavior of the emitter itself. This change turns the emitter into a line, so that our cascade becomes broader (more like Niagara Falls):
emit.emitterPosition = CGPointMake(100,25)
emit.emitterSize = CGSizeMake(100,100)
emit.emitterShape = kCAEmitterLayerLine
emit.emitterMode = kCAEmitterLayerOutline
cell.emissionLongitude = 3*CGFloat(M_PI)/4
There’s more to know about emitter layers and emitter cells, but at this point you know enough to understand Apple’s sample code simulating such things as fire and smoke and pyrotechnics, and you can explore further on your own.
CIFilter Transitions
Core Image filters (Chapter 2) include transitions. You supply two images and a frame time between 0 and 1; the filter supplies the corresponding frame of a one-second animation transitioning from the first image to the second. For example, Figure 4-7 shows the frame at frame time 0.75 for a starburst transition from a solid red image to a photo of me. (You don’t see the photo of me, because this transition, by default, “explodes” the first image to white first, and then quickly fades to the second image.)
Animating a Core Image transition filter is up to you. Thus we need a way of rapidly calling the same method repeatedly; in that method, we’ll request and draw each frame of the transition. This could be a job for an NSTimer, but a better way is to use a display link (CADisplayLink), a form of timer that’s highly efficient, especially when repeated drawing is involved, because it is linked directly to the refreshing of the display (hence the name). The display refresh rate is typically about one-sixtieth of a second; the actual value is given as the display link’s duration, and will undergo slight fluctuations. Like a timer, the display link calls a designated method of ours every time it fires. We can slow the rate of calls by an integral amount by setting the display link’s frameInterval; for example, a display link with a frameInterval of 2 will call us about every one-thirtieth of a second. We can learn the exact time when the display link last fired by querying its timestamp.
In this example, I’ll display the animation in a view’s layer. We initialize ahead of time, in properties, everything we’ll need later to obtain an output image for a given frame of the transition — the CIFilter, the image’s extent, and the CIContext. We also have a timestamp property, which we initialize as well:
let moi = CIImage(image:UIImage(named:"moi")!)!
self.moiextent = moi.extent
let col = CIFilter(name:"CIConstantColorGenerator")!
let cicol = CIColor(color:UIColor.redColor())
col.setValue(cicol, forKey:"inputColor")
let colorimage = col.valueForKey("outputImage") as! CIImage
let tran = CIFilter(name:"CIFlashTransition")!
tran.setValue(colorimage, forKey:"inputImage")
tran.setValue(moi, forKey:"inputTargetImage")
let center = CIVector(x:self.moiextent.width/2.0, y:self.moiextent.height/2.0)
tran.setValue(center, forKey:"inputCenter")
self.tran = tran
self.context = CIContext(options:nil)
self.timestamp = 0.0
We create the display link, setting it to call into our nextFrame: method, and set it going by adding it to the run loop, which retains it:
let link = CADisplayLink(target:self, selector:"nextFrame:")
link.addToRunLoop(NSRunLoop.mainRunLoop(), forMode:NSDefaultRunLoopMode)
Our nextFrame: method is called with the display link as parameter (sender). We store the initial timestamp in a property, and use the difference between that and each successive timestamp value to calculate our desired frame. We ask the filter for the corresponding image and display it. When the frame value exceeds 1, the animation is over and we invalidate the display link (just like a repeating timer), which releases it from the run loop:
let SCALE = 1.0
func nextFrame(sender:CADisplayLink) {
    if self.timestamp < 0.01 { // pick up and store first timestamp
        self.timestamp = sender.timestamp
        self.frame = 0.0
    } else { // calculate frame
        self.frame = (sender.timestamp - self.timestamp) * SCALE
    }
    sender.paused = true // defend against frame loss
    self.tran.setValue(self.frame, forKey:"inputTime")
    let moi = self.context.createCGImage(
        tran.outputImage!, fromRect:self.moiextent)
    CATransaction.setDisableActions(true)
    self.v.layer.contents = moi
    if self.frame > 1.0 {
        sender.invalidate()
    }
    sender.paused = false
}
I have surrounded the time-consuming calculation and drawing of the image with calls to the display link’s paused property, in case the calculation time exceeds the time between screen refreshes; perhaps this isn’t necessary, but it can’t hurt. Our animation occupies one second; changing that value is merely a matter of multiplying by a different scale value when we set our frame property.
Tip
If you experiment with this code, run on the device, as display links do not work well in the Simulator.
UIKit Dynamics
The term UIKit dynamics refers to a suite of classes that supplies a convenient API for animating views in a manner reminiscent of real-world physical behavior. For example, views can be subjected to gravity, collisions, bouncing, and momentary forces, with effects that would otherwise be difficult to achieve.
UIKit dynamics should not be treated as a game engine. It is deliberately quite cartoony and simple, animating only the position (center) and rotation transform of views within a flat two-dimensional space. UIKit dynamics relies on CADisplayLink, and the calculation of each frame takes place on the main thread (not on the animation server’s background thread). There’s no “animation movie” and no distinct presentation layer; the views really are being repositioned in real time. Thus, UIKit Dynamics is not intended for extended use; it is a way of momentarily emphasizing or clarifying functional transformations of your interface.
The Dynamics Stack
Implementing UIKit dynamics involves configuring a “stack” of three things:
- A dynamic animator
- A dynamic animator, a UIDynamicAnimator instance, is the ruler of the physics world you are creating. It has a reference view, whose bounds define the coordinate system of the animator’s world. A view to be animated must be a subview of the reference view (though it does not have to be within the reference view’s bounds). Retaining the animator is up to you, typically with an instance property. It’s fine for an animator to sit empty until you need it; an animator whose world is empty (or at rest) is not running, and occupies no processor time.
- A behavior
-
A UIDynamicBehavior is a rule describing how a view should behave. You’ll typically use a built-in subclass, such as UIGravityBehavior or UICollisionBehavior. You configure the behavior and add it to the animator; an animator has methods and properties for managing its behaviors, such as
addBehavior:,behaviors,removeBehavior:, andremoveAllBehaviors. A behavior’s configuration can be changed, and behaviors can be added to and removed from an animator, even while an animation is in progress. - An item
An item is any object that implements the UIDynamicItem protocol. A UIView is such an object! You add a UIView (one that’s a subview of your animator’s reference view) to a behavior (one that belongs to that animator) — and at that moment, the view comes under the influence of that behavior. If this behavior is one that causes motion, and if no other behaviors prevent, the view will now move (the animator is running).
Some behaviors can accept multiple items, and have methods and properties such as
addItem:,items, andremoveItem:. Others can have just one or two items and must be initialized with these from the outset.New in iOS 9, a UIDynamicItemGroup is a way of combining multiple items to form a single item. Its only property is its
items. You apply behaviors to the resulting grouped item, not to the subitems that it comprises. Those subitems maintain their physical relationship to one another. For purposes of collisions, the boundaries of the individual subitems are respected.
That’s sufficient to get started, so let’s try it! I’ll start by creating my animator and storing it in a property:
self.anim = UIDynamicAnimator(referenceView: self.view)
Now I’ll cause an existing subview of self.view (a UIImageView, self.iv) to drop off the screen, under the influence of gravity. I create a UIGravityBehavior, add it to the animator, and add self.iv to it:
let grav = UIGravityBehavior()
self.anim.addBehavior(grav)
grav.addItem(self.iv)
As a result, self.iv comes under the influence of gravity and is now animated downward off the screen. (A UIGravityBehavior object has properties configuring the strength and direction of gravity, but I’ve left them here at their defaults.)
An immediate concern is that our view falls forever. This is a serious waste of memory and processing power. If we no longer need the view after it has left the screen, we should take it out of the influence of UIKit dynamics by removing it from any behaviors to which it belongs (and we can also remove it from its superview). One way to do this is by removing from the animator any behaviors that are no longer needed. In our simple example, where the animator’s entire world contains just this one item, it will be sufficient to call removeAllBehaviors.
But how will we know when the view is off the screen? A UIDynamicBehavior can be assigned an action function, which is called repeatedly as the animator drives the animation. I’ll configure our gravity behavior’s action function to check whether self.iv is still within the bounds of the reference view, by calling the animator’s itemsInRect: method. Here’s my first attempt:
grav.action = {
    let items = self.anim.itemsInRect(self.view.bounds) as! [UIView]
    let ix = items.indexOf(self.iv)
    if ix == nil {
        self.anim.removeAllBehaviors()
        self.iv.removeFromSuperview()
    }
}
This works in the sense that, after the image view leaves the screen, the image view is removed from the window and the animation stops. Unfortunately, there is also a memory leak: neither the image view nor the gravity behavior has been released. One solution is, in grav.action, to set self.anim (the animator property) to nil, thus breaking the retain cycle. This is a perfectly appropriate solution if, as here, we no longer need the animator for anything; a UIDynamicAnimator is a lightweight object and can very reasonably come into existence only for as long as we need to run an animation. Another possibility is to use delayed performance; even a delay of 0 solves the problem, presumably because the behavior’s action function is no longer running at the time we remove the behavior:
grav.action = {
    let items = self.anim.itemsInRect(self.view.bounds) as! [UIView]
    let ix = items.indexOf(self.iv)
    if ix == nil {
        delay(0) {
            self.anim.removeAllBehaviors()
            self.iv.removeFromSuperview()
        }
    }
}
Now let’s add some further behaviors. If falling straight down is too boring, we can add a UIPushBehavior to create a slight rightward impulse to be applied to the view as it begins to fall:
let push = UIPushBehavior(items:[self.iv], mode:.Instantaneous)
push.pushDirection = CGVectorMake(1, 0)
self.anim.addBehavior(push)
The view now falls in a parabola to the right. Next, let’s add a UICollisionBehavior to make our view strike the “floor” of the screen:
let coll = UICollisionBehavior()
coll.collisionMode = .Boundaries
coll.addBoundaryWithIdentifier("floor",
    fromPoint:CGPointMake(0, self.view.bounds.maxY),
    toPoint:CGPointMake(self.view.bounds.maxX, self.view.bounds.maxY))
self.anim.addBehavior(coll)
coll.addItem(self.iv)
The view now falls in a parabola onto the floor of the screen, bounces a tiny bit, and comes to rest. It would be nice if the view bounced a bit more. Characteristics internal to a dynamic item’s physics, such as bounciness (elasticity), are configured by assigning it to a UIDynamicItemBehavior:
let bounce = UIDynamicItemBehavior()
bounce.elasticity = 0.8
self.anim.addBehavior(bounce)
bounce.addItem(self.iv)
Our view now bounces higher; nevertheless, when it hits the floor, it stops moving to the right, so it just bounces repeatedly, less and less, and ends up at rest on the floor. I’d prefer that, after it bounces, it should roll to the right, so that it eventually leaves the screen. Part of the problem here is that, in the mind of the physics engine, our view is not round. New in iOS 9, we can change that. We’ll have to subclass our view class (UIImageView), and make sure our view is an instance of this subclass:
class MyImageView : UIImageView {
    override var collisionBoundsType: UIDynamicItemCollisionBoundsType {
        return .Ellipse
    }
}
Our image view now has the ability to roll. If the image view is portraying a circular image, the effect is quite realistic: the image itself appears to roll to the right after it bounces. However, it isn’t rolling very fast (because we didn’t initially push it very hard). To remedy that, I’ll add some rotational velocity as part of the first bounce. A UICollisionBehavior has a delegate to which it sends messages when a collision occurs. I’ll make self the collision behavior’s delegate, and when the delegate message arrives, I’ll add rotational velocity to the existing dynamic item bounce behavior, so that our view starts spinning clockwise:
func collisionBehavior(behavior: UICollisionBehavior,
    beganContactForItem item: UIDynamicItem,
    withBoundaryIdentifier identifier: NSCopying?,
    atPoint p: CGPoint) {
        // look for the dynamic item behavior
        let b = self.anim.behaviors
        if let ix = b.indexOf({$0 is UIDynamicItemBehavior}) {
            let bounce = b[ix] as! UIDynamicItemBehavior
            let v = bounce.angularVelocityForItem(item)
            if v <= 6 {
                bounce.addAngularVelocity(6, forItem:item)
            }
        }
}
The view now falls in a parabola to the right, strikes the floor, spins clockwise, and bounces off the floor and continues bouncing its way off the right side of the screen.
Custom Behaviors
You will commonly find yourself composing a complex behavior out of a combination of several built-in UIDynamicBehavior subclass instances. For neatness, clarity, maintainability, and reusability, it might make sense to express that combination as a single custom UIDynamicBehavior subclass.
To illustrate, I’ll turn the behavior from the previous section into a custom UIDynamicBehavior subclass. Let’s call it MyDropBounceAndRollBehavior. Now we can apply this behavior to our view, self.iv, very simply:
self.anim.addBehavior(MyDropBounceAndRollBehavior(view:self.iv))
All the work is now done by the MyDropBounceAndRollBehavior instance. I’ve designed it to affect just one view, so its initializer looks like this:
init(view v:UIView) {
    self.v = v
    super.init()
}
A UIDynamicBehavior receives a reference to its dynamic animator just before being added to it, by implementing willMoveToAnimator:, and can refer to it subsequently as self.dynamicAnimator. To incorporate actual behaviors into itself, our custom UIDynamicBehavior subclass creates and configures them, and calls addChildBehavior:; it can refer to the array of its child behaviors as self.childBehaviors. When our custom behavior is added to or removed from the dynamic animator, the effect is the same as if its child behaviors themselves were added or removed.
Here is the rest of MyDropBounceAndRollBehavior. Our precautions in the gravity behavior’s action block not to cause a retain cycle are simpler than before; it suffices to designate self as an unowned reference and remove self from the animator explicitly:
override func willMoveToAnimator(anim: UIDynamicAnimator?) {
    guard let anim = anim else { return }
    let sup = self.v.superview!
    let grav = UIGravityBehavior()
    grav.action = {
        [unowned self] in
        let items = anim.itemsInRect(sup.bounds) as! [UIView]
        if items.indexOf(self.v) == nil {
            anim.removeBehavior(self)
            self.v.removeFromSuperview()
        }
    }
    self.addChildBehavior(grav)
    grav.addItem(self.v)
    let push = UIPushBehavior(items:[self.v], mode:.Instantaneous)
    push.pushDirection = CGVectorMake(1, 0)
    self.addChildBehavior(push)
    let coll = UICollisionBehavior()
    coll.collisionMode = .Boundaries
    coll.collisionDelegate = self
    coll.addBoundaryWithIdentifier("floor",
        fromPoint:CGPointMake(0, sup.bounds.maxY),
        toPoint:CGPointMake(sup.bounds.maxX, sup.bounds.maxY))
    self.addChildBehavior(coll)
    coll.addItem(self.v)
    let bounce = UIDynamicItemBehavior()
    bounce.elasticity = 0.8
    self.addChildBehavior(bounce)
    bounce.addItem(self.v)
}
func collisionBehavior(behavior: UICollisionBehavior,
    beganContactForItem item: UIDynamicItem,
    withBoundaryIdentifier identifier: NSCopying?,
    atPoint p: CGPoint) {
        let b = self.childBehaviors
        if let ix = b.indexOf({$0 is UIDynamicItemBehavior}) {
            let bounce = b[ix] as! UIDynamicItemBehavior
            let v = bounce.angularVelocityForItem(item)
            if v <= 6 {
                bounce.addAngularVelocity(6, forItem:item)
            }
        }
}
Animator and Behaviors
Here are some further UIDynamicAnimator methods and properties:
-
delegate -
The delegate (UIDynamicAnimatorDelegate) is sent messages
dynamicAnimatorDidPause:anddynamicAnimatorWillResume:. The animator is paused when it has nothing to do: it has no dynamic items, or all its dynamic items are at rest. -
running -
If
true, the animator is not paused; some dynamic item is being animated. -
elapsedTime -
The total time during which this animator has been running since it first started running. The
elapsedTimedoes not increase while the animator is paused, nor is it reset. You might use this in a delegate method oractionmethod to decide that the animation is over. -
updateItemUsingCurrentState: - Once a dynamic item has come under the influence of the animator, the animator is responsible for positioning that dynamic item. If your code manually changes the dynamic item’s position or other relevant attributes, call this method so that the animator can take account of those changes.
Tip
New in iOS 9, you can turn on a display that reveals visually what the animator is doing, showing its field vectors, attachment lines, and so forth; assuming that self.anim refers to the dynamic animator, you would say:
self.anim.performSelector("setDebugEnabled:", withObject:true)The rest of this section surveys the various built-in UIDynamicBehavior subclasses.
UIDynamicItemBehavior
A UIDynamicItemBehavior doesn’t apply any force or velocity; instead, it is a way of endowing items with internal physical characteristics that will affect how they respond to other dynamic behaviors. Here are some of them:
-
density -
Changes the impulse-resisting mass in relation to size. In other words, when we speak of an item’s mass, we mean a combination of its size and its
density. -
elasticity - The item’s tendency to bounce on collision.
-
friction - The item’s tendency to be slowed by sliding past another item.
-
anchored - New in iOS 9. An anchored item is not affected by forces that would make an item move; thus it remains stationary. This gives you something with friction and elasticity off of which you can bounce and slide other items.
-
resistance,angularResistance,allowsRotation -
The item’s tendency to come to rest unless forces are actively applied.
allowsRotationprevents the item from acquiring any angular velocity at all. -
charge - New in iOS 9; meaningful only with respect to magnetic and electric fields, which I’ll get to in a moment.
-
addLinearVelocity:forItem:,linearVelocityForItem
addAngularVelocity:forItem:,angularVelocityForItem - Methods for tweaking linear and angular velocity.
UIGravityBehavior
UIGravityBehavior imposes an acceleration on its dynamic items. By default, this acceleration is downward with a magnitude of 1 (arbitrarily defined as 1000 points per second per second). You can customize gravity by changing its gravityDirection (a CGVector) or its angle and magnitude.
In iOS 9, UIGravityBehavior is effectively a specialization of a new class of behavior, UIFieldBehavior.
UIFieldBehavior
UIFieldBehavior, new in iOS 9, is a generalization of UIGravityBehavior. A field affects any of its items for as long as they are within its region. A region (a UIRegion, also new in iOS 9) has a shape, which is a circle, a rectangle, or the union, intersection, or difference of two regions, or the inverse of a region. An infinite region is legal, and is the default. The shape defines the region’s size; the region’s location within the reference view is defined by the field behavior’s position, which is the region’s effective center. The default position is CGPointZero, the reference view’s top left corner.
A field has a strength property (which can be negative to reverse the directionality of its forces) as well as a falloff defining a change in strength proportional to distance from the center, and a minimumRadius that specifies a central circle in which there is no field effect. Other properties (direction, smoothness, and animationSpeed) are applicable only to those built-in field types that define them.
The built-in field types are obtained by calling a class factory method:
-
linearGravityFieldWithVector: -
Like UIGravityBehavior. Accelerates the item in the direction of a vector that you define, proportionally to its mass, the length of the vector, and the
strengthof the field. The vector is the field’sdirection, and can be changed. -
velocityFieldWithVector: - Like UIGravityBehavior, but it doesn’t apply an acceleration (a force) — instead, it applies a constant velocity.
-
radialGravityFieldWithPosition: -
Like a point-oriented version of UIGravityBehavior. Accelerates the item towards, or pushes it away from, the field’s designated central point (its
position). -
springField - Behaves as if there were a spring stretching from the item to the center, so that the item oscillates back and forth across the center until it settles there.
-
electricField - Behaves like an electric field emanating from the center. A negatively charged item is attracted to the center but repelled as it reaches it.
-
magneticField - Behaves like a magnetic field emanating from the center. A moving charged item’s path is bent away from the center.
-
vortexField - Accelerates the item sideways with respect to the center.
-
dragField - Reduces the item’s speed.
-
noiseFieldWithSmoothness:animationSpeed: -
Adds random disturbance to the position of the item. The
smoothnessis between 0 (noisy) and 1 (smooth). TheanimationSpeedis how many times per second the field should change randomly. Both can be changed in real time. -
turbulenceFieldWithSmoothness:animationSpeed: -
Like
noiseField..., but takes the item’s velocity into account.
Think of a field as an infinite grid of CGVectors, with the potential to affect the speed and direction (that is, the velocity) of an item within its borders; these CGVectors are interactive, in the sense that at every instant of time the vector applicable to a particular item can be recalculated. You can write a custom field by calling the UIFieldBehavior class method fieldWithEvaluationBlock: with a function that takes the item’s position, velocity, mass, and charge, along with the animator’s elapsed time, and returns a CGVector.
In this (silly) example, we create a delayed drag field: for the first quarter second it does nothing, but then it suddenly switches on and applies the brakes to its items, bringing them to a standstill if they don’t already have enough velocity to escape the region’s boundaries:
let b = UIFieldBehavior.fieldWithEvaluationBlock {
    (beh, pt, v, m, c, t) -> CGVector in
    if t > 0.25 {
        return CGVectorMake(-v.dx, -v.dy)
    }
    return CGVectorMake(0,0)
}
The evaluation function receives the behavior itself as a parameter, so it can consult the behavior’s properties in real time. You can define your own properties by subclassing UIFieldBehavior. If you’re going to do that, you might as well also define your own class function to configure and return the custom field. To illustrate, I’ll turn the hard-coded 0.25 delay from the previous example into a property:
class MyDelayedFieldBehavior : UIFieldBehavior {
    var delay = 0.0
    class func dragFieldWithDelay(del:Double) -> Self {
        let f = self.fieldWithEvaluationBlock {
            (beh, pt, v, m, c, t) -> CGVector in
            if t > (beh as! MyDelayedFieldBehavior).delay {
                return CGVectorMake(-v.dx, -v.dy)
            }
            return CGVectorMake(0,0)
        }
        f.delay = del
        return f
    }
}
Here’s an example of creating and configuring our delayed drag field:
let b = MyDelayedFieldBehavior.dragFieldWithDelay(0.25)
b.region = UIRegion(size: self.view.bounds.size)
b.position = CGPointMake(self.view.bounds.midX, self.view.bounds.midY)
b.addItem(v)
self.anim.addBehavior(b)
UIPushBehavior
UIPushBehavior applies a force either instantaneously or continuously (mode), the latter constituting an acceleration. How this force affects an object depends in part upon the object’s mass. The effect of a push behavior can be toggled with the active property; an instantaneous push is repeated each time the active property is set to true.
To configure a push behavior, set its pushDirection or angle and magnitude. In addition, a push may be applied at an offset from the center of an item. This will apply an additional angular acceleration. Thus, in my earlier example, I could have started the view spinning clockwise by means of its initial push, like this:
push.setTargetOffsetFromCenter(UIOffsetMake(0, -200), forItem:self.v)
UICollisionBehavior
UICollisionBehavior watches for collisions either between items belonging to this same behavior or between an item and a boundary (mode). One collision behavior can have multiple items and multiple boundaries. A boundary may be described as a line between two points or as a UIBezierPath, or you can turn the reference view’s bounds into boundaries (setTranslatesReferenceBoundsIntoBoundaryWithInsets:). Boundaries that you create can have an identifier. The collisionDelegate (UICollisionBehaviorDelegate) is called when a collision begins and again when it ends.
How a given collision affects the item(s) involved depends on the physical characteristics of the item(s), which may be configured through a UIDynamicItemBehavior.
New in iOS 9, a dynamic item, such as a UIView, can have a customized collision boundary, rather than its collision boundary being merely the edges of its frame (as in iOS 8 and before). You can have a rectangle dictated by the frame, an ellipse dictated by the frame, or a custom shape — a convex counterclockwise simple closed UIBezierPath. The relevant properties, collisionBoundsType and (for a custom shape) collisionBoundingPath, are read-only, so you will have to subclass, as I did in my earlier example.
UISnapBehavior
UISnapBehavior causes one item to snap to one point as if pulled by a spring. Its damping describes how much the item should oscillate as its settles into that point. This is a very simple behavior: the snap occurs immediately when the behavior is added to the animator, and there’s no notification when it’s over.
New in iOS 9, the snap behavior’s snapPoint is a settable property. Thus, having performed a snap, you can subsequently change the snapPoint and cause another snap to take place.
UIAttachmentBehavior
UIAttachmentBehavior attaches an item to another item or to a point in the reference view, depending on how you initialize it:
-
init(item:attachedToItem:) -
init(item:attachedToAnchor:)
The attachment point is, by default, the item’s center; to change that, there’s a different pair of initializers:
-
init(item:offsetFromCenter:attachedToItem:offsetFromCenter:) -
init(item:offsetFromCenter:attachedToAnchor:)
The attaching medium’s physics are governed by the behavior’s length, frequency, and damping. If the frequency is 0 (the default), the attachment is like a bar; otherwise, and especially if the damping is very small, it is like a spring.
You can subsequently move the anchorPoint (if the attachment is to an anchor). As the other item or the anchorPoint moves, this item moves with it, in accordance with the physics of the attaching medium. An anchorPoint is particularly useful for implementing a draggable view within an animator world, as I’ll demonstrate in the next chapter.
New in iOS 9, there are several more varieties of attachment:
- Limit attachment
A limit attachment is created with this class method:
-
limitAttachmentWithItem:offsetFromCenter:attachedToItem:offsetFromCenter:
It’s like a rope running between two items. Each item can move freely and independently until the
lengthis reached, at which point the moving item drags the other item along.-
- Fixed attachment
A fixed attachment is created with this class method:
-
fixedAttachmentWithItem:attachedToItem:attachmentAnchor:
It’s like two rods, each with an item at one end, and welded together at the other end, which is at the anchor point. If one item moves, it must remain at a fixed distance from the anchor, and will tend to rotate around it while pulling it along, at the same time making the other item rotate around the anchor.
-
- Pin attachment
A pin attachment is created with this class method:
-
pinAttachmentWithItem:attachedToItem:attachmentAnchor:
A pin attachment is like a fixed attachment, but instead of the rods being welded together, they are hinged together. Each item is thus free to rotate around the anchor point, at a fixed distance from it, independently, subject to the pin attachment’s
frictionTorquewhich injects resistance into the hinge.-
- Sliding attachment
A sliding attachment can involve one or two items, and is created with one of these class methods:
-
slidingAttachmentWithItem:attachmentAnchor:axisOfTranslation: -
slidingAttachmentWithItem:attachedToItem:attachmentAnchor:axisOfTranslation:
Imagine a channel running through the anchor point, its direction defined by the axis of translation (a CGVector). Then an item is attached to a rod whose other end slots into that channel and is free to slide up and down it, but whose angle relative to the channel is fixed by its initial definition (given the item’s position, the anchor’s position, and the channel axis) and cannot change.
The channel is infinite by default, but you can add end caps that define the limits of sliding, by specifying the attachment’s
attachmentRange, whose type is a UIFloatRange, which has aminimumand amaximum, plus you can use constantsUIFloatRangeZeroandUIFloatRangeInfinite(and there’s a convenience functionUIFloatRangeIsEqualToRange:). The anchor point is0, and you are defining theminimumandmaximumwith respect to that; thus, a float range(-100.0,100.0)provides freedom of movement up to 100 points away from the initial anchor point. It can take some experimentation to discover whether the end cap along a given direction of the channel is theminimumor themaximum.If there is one item, the anchor is fixed. If there are two items, they can slide independently, and the anchor is free to follow along if one of the items pulls it.
-
Here’s an example of a sliding attachment. We start with a black square and a red square, sitting on the same horizontal, and attached to an anchor midway between them:
// first view
let v = UIView(frame:CGRectMake(0,0,50,50))
v.backgroundColor = UIColor.blackColor()
self.view.addSubview(v)
// second view
let v2 = UIView(frame:CGRectMake(200,0,50,50))
v2.backgroundColor = UIColor.redColor()
self.view.addSubview(v2)
// sliding attachment
let a = UIAttachmentBehavior.slidingAttachmentWithItem(v,
    attachedToItem: v2, attachmentAnchor: CGPointMake(125,25),
    axisOfTranslation: CGVectorMake(0,1))
a.attachmentRange = UIFloatRangeMake(-200,200)
self.anim.addBehavior(a)
The axis through the anchor point is vertical, and we have permitted a maximum of 200. We now apply a slight vertical downward push to the black square:
let p = UIPushBehavior(items: [v], mode: .Instantaneous)
p.pushDirection = CGVectorMake(0,0.1)
self.anim.addBehavior(p)
The black square moves slowly downward, absolutely vertical, with its rod sliding down the channel, until its rod hits the maximum end cap at 200. At that point, the anchor breaks free and begins to move, dragging the red square with it, the two of them continuing downward and slowly rotating round their connection of two rods and the channel (Figure 4-8).
Motion Effects
A view can respond in real time to the way the user tilts the device. Typically, the view’s response will be to shift its position slightly. This is used in various parts of the interface, to give a sense of the interface’s being layered (parallax). When an alert is present, for example, if the user tilts the device, the alert shifts its position; the effect is subtle, but sufficient to suggest subconsciously that the alert is floating slightly in front of everything else on the screen.
Your own views can behave in the same way. A view will respond to shifts in the position of the device if it has one or more motion effects (UIMotionEffect). A view’s motion effects are managed with methods addMotionEffect: and removeMotionEffect:, and the motionEffects property.
The UIMotionEffect class is abstract. The chief subclass provided is UIInterpolatingMotionEffect. Every UIInterpolatingMotionEffect has a single key path, which uses key–value coding to specify the property of its view that it affects. It also has a type, specifying which axis of the device’s tilting (horizontal tilt or vertical tilt) is to affect this property. Finally, it has a maximum and minimum relative value, the furthest distance that the affected property of the view is to be permitted to wander from its actual value as the user tilts the device.
Related motion effects should be combined into a UIMotionEffectGroup (a UIMotionEffect subclass), and the group added to the view. So, for example:
let m1 = UIInterpolatingMotionEffect(
    keyPath:"center.x", type:.TiltAlongHorizontalAxis)
m1.maximumRelativeValue = 10.0
m1.minimumRelativeValue = -10.0
let m2 = UIInterpolatingMotionEffect(
    keyPath:"center.y", type:.TiltAlongVerticalAxis)
m2.maximumRelativeValue = 10.0
m2.minimumRelativeValue = -10.0
let g = UIMotionEffectGroup()
g.motionEffects = [m1,m2]
v.addMotionEffect(g)
You can write your own UIMotionEffect subclass by implementing a single method, keyPathsAndRelativeValuesForViewerOffset:, but this will rarely be necessary.
Animation and Autolayout
The interplay between animation and autolayout can be tricky. As part of an animation, you may be changing a view’s frame (or bounds, or center). You’re really not supposed to do that when you’re using autolayout. If you do, an animation may not work correctly. Or, it may appear to work perfectly, because no layout has happened; however, it is entirely possible that layout will happen, and that it will be accompanied by undesirable effects. As I explained in Chapter 1, when layout takes place under autolayout, what matters are a view’s constraints. If the constraints affecting a view don’t resolve to the size and position that the view has at the moment of layout, the view will jump as the constraints are obeyed. This is almost certainly not what you want.
To persuade yourself that this can be a problem, just animate a view’s position and then ask for immediate layout, like this:
UIView.animateWithDuration(1, animations:{
    self.v.center.x += 100
    }, completion: {
        _ in
        self.v.superview!.setNeedsLayout()
        self.v.superview!.layoutIfNeeded()
})
If we’re using autolayout, the view slides to the right and then jumps back to the left. This is bad. It’s up to us to keep the constraints synchronized with the reality, so that when layout comes along in the natural course of things, our views don’t jump into undesirable states.
One option is to revise the violated constraints to match the new reality. If we’ve planned far ahead, we may have armed ourselves in advance with a reference to those constraints; in that case, our code can now remove and replace them — or, if the only thing that needs changing is the constant value of a constraint, we can change that value in place. Otherwise, discovering what constraints are now violated, and getting a reference to them, is not at all easy.
Alternatively, instead of performing the animation first and then revising the constraints, we can change the constraints first and then animate the act of layout. Again, this assumes that we have a reference to the constraints in question. For example, if we are animating a view 100 points rightward, and if we have a reference to the constraint whose constant positions that view horizontally, we would say this:
let con = self.v_horizontalPositionConstraint
con.constant += 100
UIView.animateWithDuration(1, animations:{
    self.v.superview!.layoutIfNeeded()
})
This technique is not limited to a simple change of constant. You can overhaul the constraints quite dramatically and still animate the resulting change of layout. In this example, I animate a view (v) from one side of its superview (self.view) to the other by removing its leading constraint and replacing it with a trailing constraint:
let c = self.oldConstraint.constant
NSLayoutConstraint.deactivateConstraints([self.oldConstraint])
let newConstraint = v.trailingAnchor.constraintEqualToAnchor(
    self.view.layoutMarginsGuide.trailingAnchor, constant:-c)
NSLayoutConstraint.activateConstraints([newConstraint])
UIView.animateWithDuration(0.4) {
    v.superview!.layoutIfNeeded()
}
Another possibility is to use a snapshot of the original view (Chapter 1). Add the snapshot temporarily to the interface — without using autolayout, and perhaps hiding the original view — and animate the snapshot:
let snap = self.v.snapshotViewAfterScreenUpdates(false)
snap.frame = self.v.frame
self.v.superview!.addSubview(snap)
self.v.hidden = true
UIView.animateWithDuration(1, animations:{
    snap.center.x += 100
})
That works because the snapshot view is not under the influence of autolayout, so it stays where we put it even if layout takes place. If, however, we need to remove the snapshot view and reveal the real view, and if the nature of the animation is such that the real view ultimately needs to be shifted to a new permanent position, then its constraints will still have to be revised.
Still another possibility is to remove the animated view itself from the influence of autolayout by setting its translatesAutoresizingMaskIntoConstraints to true. But that, of itself, will cause a conflict between the view’s inherent autoresizing constraints and the existing constraints that were positioning it under autolayout; those existing constraints must therefore be removed as well, which may require considerable preparation in advance.
Get Programming iOS 9 now with the O’Reilly learning platform.
O’Reilly members experience books, live events, courses curated by job role, and more from O’Reilly and nearly 200 top publishers.

