Chapter 1. A Sneak Preview
“Programming Python: The Short Story”
If you are like most people, when you pick up a book as large as this one, you’d like to know a little about what you’re going to be learning before you roll up your sleeves. That’s what this chapter is for—it provides a demonstration of some of the kinds of things you can do with Python, before getting into the details. You won’t learn the full story here, and if you’re looking for complete explanations of the tools and techniques applied in this chapter, you’ll have to read on to later parts of the book. The point here is just to whet your appetite, review a few Python basics, and preview some of the topics to come.
To do this, I’ll pick a fairly simple application task—constructing a database of records—and migrate it through multiple steps: interactive coding, command-line tools, console interfaces, GUIs, and simple web-based interfaces. Along the way, we’ll also peek at concepts such as data representation, object persistence, and object-oriented programming (OOP); explore some alternatives that we’ll revisit later in the book; and review some core Python ideas that you should be aware of before reading this book. Ultimately, we’ll wind up with a database of Python class instances, which can be browsed and changed from a variety of interfaces.
I’ll cover additional topics in this book, of course, but the techniques you will see here are representative of some of the domains we’ll explore later. And again, if you don’t completely understand the programs in this chapter, don’t worry because you shouldn’t—not yet anyway. This is just a Python demo. We’ll fill in the rest of the details soon enough. For now, let’s start off with a bit of fun.
Note
Readers of the Fourth Edition of Learning Python might recognize some aspects of the running example used in this chapter—the characters here are similar in spirit to those in the OOP tutorial chapter in that book, and the later class-based examples here are essentially a variation on a theme. Despite some redundancy, I’m revisiting the example here for three reasons: it serves its purpose as a review of language fundamentals; some readers of this book haven’t read Learning Python; and the example receives expanded treatment here, with the addition of GUI and Web interfaces. That is, this chapter picks up where Learning Python left off, pushing this core language example into the realm of realistic applications—which, in a nutshell, reflects the purpose of this book.
The Task
Imagine, if you will, that you need to keep track of information about people for some reason. Maybe you want to store an address book on your computer, or perhaps you need to keep track of employees in a small business. For whatever reason, you want to write a program that keeps track of details about these people. In other words, you want to keep records in a database—to permanently store lists of people’s attributes on your computer.
Naturally, there are off-the-shelf programs for managing databases like these. By writing a program for this task yourself, however, you’ll have complete control over its operation. You can add code for special cases and behaviors that precoded software may not have anticipated. You won’t have to install and learn to use yet another database product. And you won’t be at the mercy of a software vendor to fix bugs or add new features. You decide to write a Python program to manage your people.
Step 1: Representing Records
If we’re going to store records in a database, the first step is probably deciding what those records will look like. There are a variety of ways to represent information about people in the Python language. Built-in object types such as lists and dictionaries are often sufficient, especially if we don’t initially care about processing the data we store.
Using Lists
Lists, for example, can collect attributes about people in a positionally ordered way. Start up your Python interactive interpreter and type the following two statements:
>>>bob = ['Bob Smith', 42, 30000, 'software']>>>sue = ['Sue Jones', 45, 40000, 'hardware']
We’ve just made two records, albeit simple ones, to represent two people, Bob and Sue (my apologies if you really are Bob or Sue, generically or otherwise[2]). Each record is a list of four properties: name, age, pay, and job fields. To access these fields, we simply index by position; the result is in parentheses here because it is a tuple of two results:
>>> bob[0], sue[2]             # fetch name, pay
('Bob Smith', 40000)
Processing records is easy with this representation; we just use list operations. For example, we can extract a last name by splitting the name field on blanks and grabbing the last part, and we can give someone a raise by changing their list in-place:
>>>bob[0].split()[-1]# what's bob's last name? 'Smith' >>>sue[2] *= 1.25# give sue a 25% raise >>>sue['Sue Jones', 45, 50000.0, 'hardware']
The last-name expression here proceeds from left to right: we fetch Bob’s name, split it into a list of substrings around spaces, and index his last name (run it one step at a time to see how).
Start-up pointers
Since this is the first code in this book, here are some quick pragmatic pointers for reference:
This code may be typed in the IDLE GUI; after typing
pythonat a shell prompt (or the full directory path to it if it’s not on your system path); and so on.The
>>>characters are Python’s prompt (not code you type yourself).The informational lines that Python prints when this prompt starts up are usually omitted in this book to save space.
I’m running all of this book’s code under Python 3.1; results in any 3.X release should be similar (barring unforeseeable Python changes, of course).
Apart from some system and C integration code, most of this book’s examples are run under Windows 7, though thanks to Python portability, it generally doesn’t matter unless stated otherwise.
If you’ve never run Python code this way before, see an introductory resource such as O’Reilly’s Learning Python for help with getting started. I’ll also have a few words to say about running code saved in script files later in this chapter.
A database list
Of course, what we’ve really coded so far is just two variables, not a database; to collect Bob and Sue into a unit, we might simply stuff them into another list:
>>>people = [bob, sue]# reference in list of lists >>>for person in people:print(person)['Bob Smith', 42, 30000, 'software'] ['Sue Jones', 45, 50000.0, 'hardware']
Now the people list represents our database. We can fetch specific records by their relative positions and process them one at a time, in loops:
>>>people[1][0]'Sue Jones' >>>for person in people:print(person[0].split()[-1])# print last namesperson[2] *= 1.20# give each a 20% raise Smith Jones >>>for person in people: print(person[2])# check new pay 36000.0 60000.0
Now that we have a list, we can also collect values from records using some of Python’s more powerful iteration tools, such as list comprehensions, maps, and generator expressions:
>>>pays = [person[2] for person in people]# collect all pay >>>pays[36000.0, 60000.0] >>>pays = map((lambda x: x[2]), people)# ditto (map is a generator in 3.X) >>>list(pays)[36000.0, 60000.0] >>>sum(person[2] for person in people)# generator expression, sum built-in 96000.0
To add a record to the database, the usual list operations,
such as append and
extend, will suffice:
>>>people.append(['Tom', 50, 0, None])>>>len(people)3 >>>people[-1][0]'Tom'
Lists work for our people database, and they might be sufficient for some programs, but they suffer from a few major flaws. For one thing, Bob and Sue, at this point, are just fleeting objects in memory that will disappear once we exit Python. For another, every time we want to extract a last name or give a raise, we’ll have to repeat the kinds of code we just typed; that could become a problem if we ever change the way those operations work—we may have to update many places in our code. We’ll address these issues in a few moments.
Field labels
Perhaps more fundamentally, accessing fields by position in a list requires us to memorize what each position means: if you see a bit of code indexing a record on magic position 2, how can you tell it is extracting a pay? In terms of understanding the code, it might be better to associate a field name with a field value.
We might try to associate names with relative positions by
using the Python range built-in
function, which generates successive integers when used in
iteration contexts (such as the sequence assignment used initially
here):
>>>NAME, AGE, PAY = range(3)# 0, 1, and 2 >>>bob = ['Bob Smith', 42, 10000]>>>bob[NAME]'Bob Smith' >>>PAY, bob[PAY](2, 10000)
This addresses readability: the three uppercase variables essentially become field names. This makes our code dependent on the field position assignments, though—we have to remember to update the range assignments whenever we change record structure. Because they are not directly associated, the names and records may become out of sync over time and require a maintenance step.
Moreover, because the field names are independent variables,
there is no direct mapping from a record list back to its field’s
names. A raw record list, for instance, provides no way to label
its values with field names in a formatted display. In the
preceding record, without additional code, there is no path from
value 42 to label AGE: bob.index(42) gives 1, the value of AGE,
but not the name AGE itself.
We might also try this by using lists of tuples, where the tuples record both a field name and a value; better yet, a list of lists would allow for updates (tuples are immutable). Here’s what that idea translates to, with slightly simpler records:
>>>bob = [['name', 'Bob Smith'], ['age', 42], ['pay', 10000]]>>>sue = [['name', 'Sue Jones'], ['age', 45], ['pay', 20000]]>>>people = [bob, sue]
This really doesn’t fix the problem, though, because we still have to index by position in order to fetch fields:
>>>for person in people:print(person[0][1], person[2][1])# name, pay Bob Smith 10000 Sue Jones 20000 >>>[person[0][1] for person in people]# collect names ['Bob Smith', 'Sue Jones'] >>>for person in people:print(person[0][1].split()[-1])# get last namesperson[2][1] *= 1.10# give a 10% raise Smith Jones >>>for person in people: print(person[2])['pay', 11000.0] ['pay', 22000.0]
All we’ve really done here is add an extra level of positional indexing. To do better, we might inspect field names in loops to find the one we want (the loop uses tuple assignment here to unpack the name/value pairs):
>>>for person in people:for (name, value) in person:if name == 'name': print(value)# find a specific field Bob Smith Sue Jones
Better yet, we can code a fetcher function to do the job for us:
>>>def field(record, label):for (fname, fvalue) in record:if fname == label:# find any field by namereturn fvalue>>>field(bob, 'name')'Bob Smith' >>>field(sue, 'pay')22000.0 >>>for rec in people:print(field(rec, 'age'))# print all ages 42 45
If we proceed down this path, we’ll eventually wind up with a set of record interface functions that generically map field names to field data. If you’ve done any Python coding in the past, though, you probably already know that there is an easier way to code this sort of association, and you can probably guess where we’re headed in the next section.
Using Dictionaries
The list-based record representations in the prior section work, though not without some cost in terms of performance required to search for field names (assuming you need to care about milliseconds and such). But if you already know some Python, you also know that there are more efficient and convenient ways to associate property names and values. The built-in dictionary object is a natural:
>>>bob = {'name': 'Bob Smith', 'age': 42, 'pay': 30000, 'job': 'dev'}>>>sue = {'name': 'Sue Jones', 'age': 45, 'pay': 40000, 'job': 'hdw'}
Now, Bob and Sue are objects that map field names to values automatically, and they make our code more understandable and meaningful. We don’t have to remember what a numeric offset means, and we let Python search for the value associated with a field’s name with its efficient dictionary indexing:
>>>bob['name'], sue['pay']# not bob[0], sue[2] ('Bob Smith', 40000) >>>bob['name'].split()[-1]'Smith' >>>sue['pay'] *= 1.10>>>sue['pay']44000.0
Because fields are accessed mnemonically now, they are more meaningful to those who read your code (including you).
Other ways to make dictionaries
Dictionaries turn out to be so useful in Python programming that there are even more convenient ways to code them than the traditional literal syntax shown earlier—e.g., with keyword arguments and the type constructor, as long as the keys are all strings:
>>>bob = dict(name='Bob Smith', age=42, pay=30000, job='dev')>>>sue = dict(name='Sue Jones', age=45, pay=40000, job='hdw')>>>bob{'pay': 30000, 'job': 'dev', 'age': 42, 'name': 'Bob Smith'} >>>sue{'pay': 40000, 'job': 'hdw', 'age': 45, 'name': 'Sue Jones'}
by filling out a dictionary one field at a time (recall that dictionary keys are pseudo-randomly ordered):
>>>sue = {}>>>sue['name'] = 'Sue Jones'>>>sue['age'] = 45>>>sue['pay'] = 40000>>>sue['job'] = 'hdw'>>>sue{'job': 'hdw', 'pay': 40000, 'age': 45, 'name': 'Sue Jones'}
and by zipping together name/value lists:
>>>names = ['name', 'age', 'pay', 'job']>>>values = ['Sue Jones', 45, 40000, 'hdw']>>>list(zip(names, values))[('name', 'Sue Jones'), ('age', 45), ('pay', 40000), ('job', 'hdw')] >>>sue = dict(zip(names, values))>>>sue{'job': 'hdw', 'pay': 40000, 'age': 45, 'name': 'Sue Jones'}
We can even make dictionaries from a sequence of key values and an optional starting value for all the keys (handy to initialize an empty dictionary):
>>>fields = ('name', 'age', 'job', 'pay')>>>record = dict.fromkeys(fields, '?')>>>record{'job': '?', 'pay': '?', 'age': '?', 'name': '?'}
Lists of dictionaries
Regardless of how we code them, we still need to collect our dictionary-based records into a database; a list does the trick again, as long as we don’t require access by key at the top level:
>>>bob{'pay': 30000, 'job': 'dev', 'age': 42, 'name': 'Bob Smith'} >>>sue{'job': 'hdw', 'pay': 40000, 'age': 45, 'name': 'Sue Jones'} >>>people = [bob, sue]# reference in a list >>>for person in people:print(person['name'], person['pay'], sep=', ')# all name, pay Bob Smith, 30000 Sue Jones, 40000 >>>for person in people:if person['name'] == 'Sue Jones':# fetch sue's payprint(person['pay'])40000
Iteration tools work just as well here, but we use keys rather than obscure positions (in database terms, the list comprehension and map in the following code project the database on the “name” field column):
>>>names = [person['name'] for person in people]# collect names >>>names['Bob Smith', 'Sue Jones'] >>>list(map((lambda x: x['name']), people))# ditto, generate ['Bob Smith', 'Sue Jones'] >>>sum(person['pay'] for person in people)# sum all pay 70000
Interestingly, tools such as list comprehensions and on-demand generator expressions can even approach the utility of SQL queries here, albeit operating on in-memory objects:
>>>[rec['name'] for rec in people if rec['age'] >= 45]# SQL-ish query ['Sue Jones'] >>>[(rec['age'] ** 2 if rec['age'] >= 45 else rec['age']) for rec in people][42, 2025] >>>G = (rec['name'] for rec in people if rec['age'] >= 45)>>>next(G)'Sue Jones' >>>G = ((rec['age'] ** 2 if rec['age'] >= 45 else rec['age']) for rec in people)>>>G.__next__()42
And because dictionaries are normal Python objects, these records can also be accessed and updated with normal Python syntax:
>>>for person in people:print(person['name'].split()[-1])# last nameperson['pay'] *= 1.10# a 10% raise Smith Jones >>>for person in people: print(person['pay'])33000.0 44000.0
Nested structures
Incidentally, we could avoid the last-name extraction code in the prior examples by further structuring our records. Because all of Python’s compound datatypes can be nested inside each other and as deeply as we like, we can build up fairly complex information structures easily—simply type the object’s syntax, and Python does all the work of building the components, linking memory structures, and later reclaiming their space. This is one of the great advantages of a scripting language such as Python.
The following, for instance, represents a more structured record by nesting a dictionary, list, and tuple inside another dictionary:
>>>bob2 = {'name': {'first': 'Bob', 'last': 'Smith'},'age': 42,'job': ['software', 'writing'],'pay': (40000, 50000)}
Because this record contains nested structures, we simply index twice to go two levels deep:
>>>bob2['name']# bob's full name {'last': 'Smith', 'first': 'Bob'} >>>bob2['name']['last']# bob's last name 'Smith' >>>bob2['pay'][1]# bob's upper pay 50000
The name field is another dictionary here, so instead of splitting up a string, we simply index to fetch the last name. Moreover, people can have many jobs, as well as minimum and maximum pay limits. In fact, Python becomes a sort of query language in such cases—we can fetch or change nested data with the usual object operations:
>>>for job in bob2['job']: print(job)# all of bob's jobs software writing >>>bob2['job'][-1]# bob's last job 'writing' >>>bob2['job'].append('janitor')# bob gets a new job >>>bob2{'job': ['software', 'writing', 'janitor'], 'pay': (40000, 50000), 'age': 42, 'name': {'last': 'Smith', 'first': 'Bob'}}
It’s OK to grow the nested list with append, because
it is really an independent object. Such nesting can come in handy
for more sophisticated applications; to keep ours simple, we’ll
stick to the original flat record structure.
Dictionaries of dictionaries
One last twist on our people database: we can get a little more mileage out of dictionaries here by using one to represent the database itself. That is, we can use a dictionary of dictionaries—the outer dictionary is the database, and the nested dictionaries are the records within it. Rather than a simple list of records, a dictionary-based database allows us to store and retrieve records by symbolic key:
>>>bob = dict(name='Bob Smith', age=42, pay=30000, job='dev')>>>sue = dict(name='Sue Jones', age=45, pay=40000, job='hdw')>>>bob{'pay': 30000, 'job': 'dev', 'age': 42, 'name': 'Bob Smith'} >>>db = {}>>>db['bob'] = bob# reference in a dict of dicts >>>db['sue'] = sue>>> >>>db['bob']['name']# fetch bob's name 'Bob Smith' >>>db['sue']['pay'] = 50000# change sue's pay >>>db['sue']['pay']# fetch sue's pay 50000
Notice how this structure allows us to access a record
directly instead of searching for it in a loop—we get to Bob’s
name immediately by indexing on key bob. This really is a dictionary of
dictionaries, though you won’t see all the gory details unless you
display the database all at once (the Python pprint
pretty-printer module can help with legibility here):
>>>db{'bob': {'pay': 30000, 'job': 'dev', 'age': 42, 'name': 'Bob Smith'}, 'sue': {'pay': 50000, 'job': 'hdw', 'age': 45, 'name': 'Sue Jones'}} >>>import pprint>>>pprint.pprint(db){'bob': {'age': 42, 'job': 'dev', 'name': 'Bob Smith', 'pay': 30000}, 'sue': {'age': 45, 'job': 'hdw', 'name': 'Sue Jones', 'pay': 50000}}
If we still need to step through the database one record at
a time, we can now rely on dictionary iterators. In recent Python releases, a dictionary iterator
produces one key in a for loop
each time through (for compatibility with earlier releases, we can
also call the db.keys method
explicitly in the for loop
rather than saying just db, but
since Python 3’s keys result is a generator, the effect
is roughly the same):
>>>for key in db:print(key, '=>', db[key]['name'])bob => Bob Smith sue => Sue Jones >>>for key in db:print(key, '=>', db[key]['pay'])bob => 30000 sue => 50000
To visit all records, either index by key as you go:
>>>for key in db:print(db[key]['name'].split()[-1])db[key]['pay'] *= 1.10Smith Jones
or step through the dictionary’s values to access records directly:
>>>for record in db.values(): print(record['pay'])33000.0 55000.0 >>>x = [db[key]['name'] for key in db]>>>x['Bob Smith', 'Sue Jones'] >>>x = [rec['name'] for rec in db.values()]>>>x['Bob Smith', 'Sue Jones']
And to add a new record, simply assign it to a new key; this is just a dictionary, after all:
>>>db['tom'] = dict(name='Tom', age=50, job=None, pay=0)>>> >>>db['tom']{'pay': 0, 'job': None, 'age': 50, 'name': 'Tom'} >>>db['tom']['name']'Tom' >>>list(db.keys())['bob', 'sue', 'tom'] >>>len(db)3 >>>[rec['age'] for rec in db.values()][42, 45, 50] >>>[rec['name'] for rec in db.values() if rec['age'] >= 45]# SQL-ish query ['Sue Jones', 'Tom']
Although our database is still a transient object in memory, it turns out that this dictionary-of-dictionaries format corresponds exactly to a system that saves objects permanently—the shelve (yes, this should probably be shelf, grammatically speaking, but the Python module name and term is shelve). To learn how, let’s move on to the next section.
Step 2: Storing Records Persistently
So far, we’ve settled on a dictionary-based representation for our database of records, and we’ve reviewed some Python data structure concepts along the way. As mentioned, though, the objects we’ve seen so far are temporary—they live in memory and they go away as soon as we exit Python or the Python program that created them. To make our people persistent, they need to be stored in a file of some sort.
Using Formatted Files
One way to keep our data around between program runs is to write all the data out to a simple text file, in a formatted way. Provided the saving and loading tools agree on the format selected, we’re free to use any custom scheme we like.
Test data script
So that we don’t have to keep working interactively, let’s first write a script that initializes the data we are going to store (if you’ve done any Python work in the past, you know that the interactive prompt tends to become tedious once you leave the realm of simple one-liners). Example 1-1 creates the sort of records and database dictionary we’ve been working with so far, but because it is a module, we can import it repeatedly without having to retype the code each time. In a sense, this module is a database itself, but its program code format doesn’t support automatic or end-user updates as is.
# initialize data to be stored in files, pickles, shelves

# records
bob = {'name': 'Bob Smith', 'age': 42, 'pay': 30000, 'job': 'dev'}
sue = {'name': 'Sue Jones', 'age': 45, 'pay': 40000, 'job': 'hdw'}
tom = {'name': 'Tom',       'age': 50, 'pay': 0,     'job': None}

# database
db = {}
db['bob'] = bob
db['sue'] = sue
db['tom'] = tom

if __name__ == '__main__':       # when run as a script
    for key in db:
        print(key, '=>\n  ', db[key])
As usual, the __name__
test at the bottom of Example 1-1 is true only when this
file is run, not when it is imported. When run as a top-level
script (e.g., from a command line, via an icon click, or within
the IDLE GUI), the file’s self-test code under this test dumps the
database’s contents to the standard output stream (remember,
that’s what print function-call
statements do by default).
Here is the script in action being run from a system command
line on Windows. Type the following command in a Command Prompt
window after a cd to the
directory where the file is stored, and use a similar console
window on other types of computers:
...\PP4E\Preview> python initdata.py
bob =>
   {'job': 'dev', 'pay': 30000, 'age': 42, 'name': 'Bob Smith'}
sue =>
   {'job': 'hdw', 'pay': 40000, 'age': 45, 'name': 'Sue Jones'}
tom =>
   {'job': None, 'pay': 0, 'age': 50, 'name': 'Tom'}
File name conventions
Since this is our first source file (a.k.a. “script”), here are three usage notes for this book’s examples:
The text
...\PP4E\Preview>in the first line of the preceding example listing stands for your operating system’s prompt, which can vary per platform; you type just the text that follows this prompt (python initdata.py).Like all examples in this book, the system prompt also gives the directory in the downloadable book examples package where this command should be run. When running this script using a command-line in a system shell, make sure the shell’s current working directory is PP4E\Preview. This can matter for examples that use files in the working directory.
Similarly, the label that precedes every example file’s code listing tells you where the source file resides in the examples package. Per the Example 1-1 listing label shown earlier, this script’s full filename is PP4E\Preview\initdata.py in the examples tree.
We’ll use these conventions throughout the book; see the Preface for more on getting the examples if you wish to work along. I occasionally give more of the directory path in system prompts when it’s useful to provide the extra execution context, especially in the system part of the book (e.g., a “C:\” prefix from Windows or more directory names).
Script start-up pointers
I gave pointers for using the interactive prompt earlier. Now that we’ve started running script files, here are also a few quick startup pointers for using Python scripts in general:
On some platforms, you may need to type the full directory path to the Python program on your machine; if Python isn’t on your system path setting on Windows, for example, replace
pythonin the command withC:\Python31\python(this assumes you’re using Python 3.1).On most Windows systems you also don’t need to type
pythonon the command line at all; just type the file’s name to run it, since Python is registered to open “.py” script files.You can also run this file inside Python’s standard IDLE GUI (open the file and use the Run menu in the text edit window), and in similar ways from any of the available third-party Python IDEs (e.g., Komodo, Eclipse, NetBeans, and the Wing IDE).
If you click the program’s file icon to launch it on Windows, be sure to add an
input()call to the bottom of the script to keep the output window up. On other systems, icon clicks may require a#!line at the top and executable permission via achmodcommand.
I’ll assume here that you’re able to run Python code one way or another. Again, if you’re stuck, see other books such as Learning Python for the full story on launching Python programs.
Data format script
Now, all we have to do is store all of this in-memory data in a file. There are a variety of ways to accomplish this; one of the most basic is to write one piece of data at a time, with separators between each that we can use when reloading to break the data apart. Example 1-2 shows one way to code this idea.
"""
Save in-memory database object to a file with custom formatting;
assume 'endrec.', 'enddb.', and '=>' are not used in the data;
assume db is dict of dict;  warning: eval can be dangerous - it
runs strings as code;  could also eval() record dict all at once;
could also dbfile.write(key + '\n') vs print(key, file=dbfile);
"""

dbfilename = 'people-file'
ENDDB  = 'enddb.'
ENDREC = 'endrec.'
RECSEP = '=>'

def storeDbase(db, dbfilename=dbfilename):
    "formatted dump of database to flat file"
    dbfile = open(dbfilename, 'w')
    for key in db:
        print(key, file=dbfile)
        for (name, value) in db[key].items():
            print(name + RECSEP + repr(value), file=dbfile)
        print(ENDREC, file=dbfile)
    print(ENDDB, file=dbfile)
    dbfile.close()

def loadDbase(dbfilename=dbfilename):
    "parse data to reconstruct database"
    dbfile = open(dbfilename)
    import sys
    sys.stdin = dbfile
    db = {}
    key = input()
    while key != ENDDB:
        rec = {}
        field = input()
        while field != ENDREC:
            name, value = field.split(RECSEP)
            rec[name] = eval(value)
            field = input()
        db[key] = rec
        key = input()
    return db

if __name__ == '__main__':
    from initdata import db
    storeDbase(db)
This is a somewhat complex program, partly because it has both saving and loading logic and partly because it does its job the hard way; as we’ll see in a moment, there are better ways to get objects into files than by manually formatting and parsing them. For simple tasks, though, this does work; running Example 1-2 as a script writes the database out to a flat file. It has no printed output, but we can inspect the database file interactively after this script is run, either within IDLE or from a console window where you’re running these examples (as is, the database file shows up in the current working directory):
...\PP4E\Preview>python make_db_file.py...\PP4E\Preview>python>>>for line in open('people-file'):...print(line, end='')... bob job=>'dev' pay=>30000 age=>42 name=>'Bob Smith' endrec. sue job=>'hdw' pay=>40000 age=>45 name=>'Sue Jones' endrec. tom job=>None pay=>0 age=>50 name=>'Tom' endrec. enddb.
This file is simply our database’s content with added formatting. Its data originates from the test data initialization module we wrote in Example 1-1 because that is the module from which Example 1-2’s self-test code imports its data. In practice, Example 1-2 itself could be imported and used to store a variety of databases and files.
Notice how data to be written is formatted with the as-code
repr call and is re-created
with the eval call, which
treats strings as Python code. That allows us to store and
re-create things like the None
object, but it is potentially unsafe; you shouldn’t use eval if you can’t be sure that the
database won’t contain malicious code. For our purposes, however,
there’s probably no cause for alarm.
Utility scripts
To test further, Example 1-3 reloads the database from a file each time it is run.
from make_db_file import loadDbase
db = loadDbase()
for key in db:
    print(key, '=>\n  ', db[key])
print(db['sue']['name'])
And Example 1-4 makes changes by loading, updating, and storing again.
from make_db_file import loadDbase, storeDbase
db = loadDbase()
db['sue']['pay'] *= 1.10
db['tom']['name'] = 'Tom Tom'
storeDbase(db)
Here are the dump script and the update script in action at a system command line; both Sue’s pay and Tom’s name change between script runs. The main point to notice is that the data stays around after each script exits—our objects have become persistent simply because they are mapped to and from text files:
...\PP4E\Preview>python dump_db_file.pybob => {'pay': 30000, 'job': 'dev', 'age': 42, 'name': 'Bob Smith'} sue => {'pay': 40000, 'job': 'hdw', 'age': 45, 'name': 'Sue Jones'} tom => {'pay': 0, 'job': None, 'age': 50, 'name': 'Tom'} Sue Jones ...\PP4E\Preview>python update_db_file.py...\PP4E\Preview>python dump_db_file.pybob => {'pay': 30000, 'job': 'dev', 'age': 42, 'name': 'Bob Smith'} sue => {'pay': 44000.0, 'job': 'hdw', 'age': 45, 'name': 'Sue Jones'} tom => {'pay': 0, 'job': None, 'age': 50, 'name': 'Tom Tom'} Sue Jones
As is, we’ll have to write Python code in scripts or at the interactive command line for each specific database update we need to perform (later in this chapter, we’ll do better by providing generalized console, GUI, and web-based interfaces instead). But at a basic level, our text file is a database of records. As we’ll learn in the next section, though, it turns out that we’ve just done a lot of pointless work.
Using Pickle Files
The formatted text file scheme of the prior section works, but it has some major limitations. For one thing, it has to read the entire database from the file just to fetch one record, and it must write the entire database back to the file after each set of updates. Although storing one record’s text per file would work around this limitation, it would also complicate the program further.
For another thing, the text file approach assumes that the
data separators it writes out to the file will not appear in the
data to be stored: if the characters => happen to appear in the data, for
example, the scheme will fail. We might work around this by
generating XML text to represent records in the text file, using
Python’s XML parsing tools, which we’ll meet later in this text, to
reload; XML tags would avoid collisions with actual data’s text, but
creating and parsing XML would complicate the program substantially
too.
Perhaps worst of all, the formatted text file scheme is already complex without being general: it is tied to the dictionary-of-dictionaries structure, and it can’t handle anything else without being greatly expanded. It would be nice if a general tool existed that could translate any sort of Python data to a format that could be saved in a file in a single step.
That is exactly what the Python pickle module is designed to do. The
pickle module translates an
in-memory Python object into a serialized byte
stream—a string of bytes that can be written to any file-like
object. The pickle module also
knows how to reconstruct the original object in memory, given the
serialized byte stream: we get back the exact same object. In a
sense, the pickle module replaces
proprietary data formats—its serialized format is general and
efficient enough for any program. With pickle, there is no need to manually
translate objects to data when storing them persistently, and no
need to manually parse a complex format to get them back. Pickling
is similar in spirit to XML representations, but it’s both more
Python-specific, and much simpler to code.
The net effect is that pickling allows us to store and fetch
native Python objects as they are and in a single step—we use normal
Python syntax to process pickled records. Despite what it does, the
pickle module is remarkably easy
to use. Example 1-5 shows
how to store our records in a flat file, using pickle.
from initdata import db
import pickle
dbfile = open('people-pickle', 'wb')               # use binary mode files in 3.X
pickle.dump(db, dbfile)                            # data is bytes, not str
dbfile.close()
When run, this script stores the entire database (the
dictionary of dictionaries defined in Example 1-1) to a flat file named
people-pickle in the current working directory.
The pickle module handles the
work of converting the object to a string. Example 1-6 shows how to access
the pickled database after it has been created; we simply open the
file and pass its content back to pickle to remake the object from its
serialized string.
import pickle
dbfile = open('people-pickle', 'rb')               # use binary mode files in 3.X
db = pickle.load(dbfile)
for key in db:
    print(key, '=>\n  ', db[key])
print(db['sue']['name'])
Here are these two scripts at work, at the system command line again; naturally, they can also be run in IDLE, and you can open and inspect the pickle file by running the same sort of code interactively as well:
...\PP4E\Preview>python make_db_pickle.py...\PP4E\Preview>python dump_db_pickle.pybob => {'pay': 30000, 'job': 'dev', 'age': 42, 'name': 'Bob Smith'} sue => {'pay': 40000, 'job': 'hdw', 'age': 45, 'name': 'Sue Jones'} tom => {'pay': 0, 'job': None, 'age': 50, 'name': 'Tom'} Sue Jones
Updating with a pickle file is similar to a manually formatted file, except that Python is doing all of the formatting work for us. Example 1-7 shows how.
import pickle
dbfile = open('people-pickle', 'rb')
db = pickle.load(dbfile)
dbfile.close()

db['sue']['pay'] *= 1.10
db['tom']['name'] = 'Tom Tom'

dbfile = open('people-pickle', 'wb')
pickle.dump(db, dbfile)
dbfile.close()
Notice how the entire database is written back to the file after the records are changed in memory, just as for the manually formatted approach; this might become slow for very large databases, but we’ll ignore this for the moment. Here are our update and dump scripts in action—as in the prior section, Sue’s pay and Tom’s name change between scripts because they are written back to a file (this time, a pickle file):
...\PP4E\Preview>python update_db_pickle.py...\PP4E\Preview>python dump_db_pickle.pybob => {'pay': 30000, 'job': 'dev', 'age': 42, 'name': 'Bob Smith'} sue => {'pay': 44000.0, 'job': 'hdw', 'age': 45, 'name': 'Sue Jones'} tom => {'pay': 0, 'job': None, 'age': 50, 'name': 'Tom Tom'} Sue Jones
As we’ll learn in Chapter 17, the Python pickling system
supports nearly arbitrary object types—lists, dictionaries, class
instances, nested structures, and more. There, we’ll also learn
about the pickler’s text and binary storage protocols; as of Python
3, all protocols use bytes
objects to represent pickled data, which in turn requires pickle
files to be opened in binary mode for all protocols. As we’ll see
later in this chapter, the pickler and its data format also underlie
shelves and ZODB databases, and pickled class instances provide both
data and behavior for objects stored.
In fact, pickling is more general than these examples may imply. Because they accept any object that provides an interface compatible with files, pickling and unpickling may be used to transfer native Python objects to a variety of media. Using a network socket, for instance, allows us to ship pickled Python objects across a network and provides an alternative to larger protocols such as SOAP and XML-RPC.
Using Per-Record Pickle Files
As mentioned earlier, one potential disadvantage of this section’s examples so far is that they may become slow for very large databases: because the entire database must be loaded and rewritten to update a single record, this approach can waste time. We could improve on this by storing each record in the database in a separate flat file. The next three examples show one way to do so; Example 1-8 stores each record in its own flat file, using each record’s original key as its filename with a .pkl appended (it creates the files bob.pkl, sue.pkl, and tom.pkl in the current working directory).
from initdata import bob, sue, tom
import pickle
for (key, record) in [('bob', bob), ('tom', tom), ('sue', sue)]:
    recfile = open(key + '.pkl', 'wb')
    pickle.dump(record, recfile)
    recfile.close()
Next, Example 1-9
dumps the entire database by using the standard library’s glob module to do filename expansion and thus collect all
the files in this directory with a .pkl
extension. To load a single record, we open its file and deserialize
with pickle; we must load only
one record file, though, not the entire database, to fetch one
record.
import pickle, glob
for filename in glob.glob('*.pkl'):         # for 'bob','sue','tom'
    recfile = open(filename, 'rb')
    record  = pickle.load(recfile)
    print(filename, '=>\n  ', record)

suefile = open('sue.pkl', 'rb')
print(pickle.load(suefile)['name'])         # fetch sue's name
Finally, Example 1-10 updates the database by fetching a record from its file, changing it in memory, and then writing it back to its pickle file. This time, we have to fetch and rewrite only a single record file, not the full database, to update.
import pickle
suefile = open('sue.pkl', 'rb')
sue = pickle.load(suefile)
suefile.close()

sue['pay'] *= 1.10
suefile = open('sue.pkl', 'wb')
pickle.dump(sue, suefile)
suefile.close()
Here are our file-per-record scripts in action; the results are about the same as in the prior section, but database keys become real filenames now. In a sense, the filesystem becomes our top-level dictionary—filenames provide direct access to each record.
...\PP4E\Preview>python make_db_pickle_recs.py...\PP4E\Preview>python dump_db_pickle_recs.pybob.pkl => {'pay': 30000, 'job': 'dev', 'age': 42, 'name': 'Bob Smith'} sue.pkl => {'pay': 40000, 'job': 'hdw', 'age': 45, 'name': 'Sue Jones'} tom.pkl => {'pay': 0, 'job': None, 'age': 50, 'name': 'Tom'} Sue Jones ...\PP4E\Preview>python update_db_pickle_recs.py...\PP4E\Preview>python dump_db_pickle_recs.pybob.pkl => {'pay': 30000, 'job': 'dev', 'age': 42, 'name': 'Bob Smith'} sue.pkl => {'pay': 44000.0, 'job': 'hdw', 'age': 45, 'name': 'Sue Jones'} tom.pkl => {'pay': 0, 'job': None, 'age': 50, 'name': 'Tom'} Sue Jones
Using Shelves
Pickling objects to files, as shown in the preceding section,
is an optimal scheme in many applications. In fact, some
applications use pickling of Python objects across network sockets
as a simpler alternative to network protocols such as the SOAP and
XML-RPC web services architectures (also supported by Python, but
much heavier than pickle).
Moreover, assuming your filesystem can handle as many files as you’ll need, pickling one record per file also obviates the need to load and store the entire database for each update. If we really want keyed access to records, though, the Python standard library offers an even higher-level tool: shelves.
Shelves automatically pickle objects to and from a keyed-access filesystem. They behave much like dictionaries that must be opened, and they persist after each program exits. Because they give us key-based access to stored records, there is no need to manually manage one flat file per record—the shelve system automatically splits up stored records and fetches and updates only those records that are accessed and changed. In this way, shelves provide utility similar to per-record pickle files, but they are usually easier to code.
The shelve interface is
just as simple as pickle: it is
identical to dictionaries, with extra open and close calls. In fact,
to your code, a shelve really does appear to be a persistent
dictionary of persistent objects; Python does all the work of
mapping its content to and from a file. For instance, Example 1-11 shows how to store
our in-memory dictionary objects in a shelve for permanent
keeping.
from initdata import bob, sue
import shelve
db = shelve.open('people-shelve')
db['bob'] = bob
db['sue'] = sue
db.close()
This script creates one or more files in the current directory with the name people-shelve as a prefix (in Python 3.1 on Windows, people-shelve.bak, people-shelve.dat, and people-shelve.dir). You shouldn’t delete these files (they are your database!), and you should be sure to use the same base name in other scripts that access the shelve. Example 1-12, for instance, reopens the shelve and indexes it by key to fetch its stored records.
import shelve
db = shelve.open('people-shelve')
for key in db:
    print(key, '=>\n  ', db[key])
print(db['sue']['name'])
db.close()
We still have a dictionary of dictionaries here, but the
top-level dictionary is really a shelve mapped onto a file. Much
happens when you access a shelve’s keys—it uses pickle internally to serialize and
deserialize objects stored, and it interfaces with a keyed-access
filesystem. From your perspective, though, it’s just a persistent
dictionary. Example 1-13
shows how to code shelve updates.
from initdata import tom
import shelve
db = shelve.open('people-shelve')
sue = db['sue']                       # fetch sue
sue['pay'] *= 1.50
db['sue'] = sue                       # update sue
db['tom'] = tom                       # add a new record
db.close()
Notice how this code fetches sue by key, updates in memory, and then
reassigns to the key to update the shelve; this is a requirement of
shelves by default, but not always of more advanced shelve-like
systems such as ZODB, covered in Chapter 17. As we’ll see later, shelve.open also
has a newer writeback keyword
argument, which, if passed True,
causes all records loaded from the shelve to be cached in memory,
and automatically written back to the shelve when it is closed; this
avoids manual write backs on changes, but can consume memory and
make closing slow.
Also note how shelve files are explicitly closed. Although we
don’t need to pass mode flags to shelve.open (by default it creates the
shelve if needed, and opens it for reads and writes otherwise), some
underlying keyed-access filesystems may require a close call in order to flush output
buffers after changes.
Finally, here are the shelve-based scripts on the job, creating, changing, and fetching records. The records are still dictionaries, but the database is now a dictionary-like shelve which automatically retains its state in a file between program runs:
...\PP4E\Preview>python make_db_shelve.py...\PP4E\Preview>python dump_db_shelve.pybob => {'pay': 30000, 'job': 'dev', 'age': 42, 'name': 'Bob Smith'} sue => {'pay': 40000, 'job': 'hdw', 'age': 45, 'name': 'Sue Jones'} Sue Jones ...\PP4E\Preview>python update_db_shelve.py...\PP4E\Preview>python dump_db_shelve.pybob => {'pay': 30000, 'job': 'dev', 'age': 42, 'name': 'Bob Smith'} sue => {'pay': 60000.0, 'job': 'hdw', 'age': 45, 'name': 'Sue Jones'} tom => {'pay': 0, 'job': None, 'age': 50, 'name': 'Tom'} Sue Jones
When we ran the update and dump scripts here, we added a new
record for key tom and increased
Sue’s pay field by 50 percent. These changes are permanent because
the record dictionaries are mapped to an external file by shelve.
(In fact, this is a particularly good script for Sue—something she
might consider scheduling to run often, using a cron job on Unix, or
a Startup folder or msconfig entry on Windows…)
Step 3: Stepping Up to OOP
Let’s step back for a moment and consider how far we’ve come. At this point, we’ve created a database of records: the shelve, as well as per-record pickle file approaches of the prior section suffice for basic data storage tasks. As is, our records are represented as simple dictionaries, which provide easier-to-understand access to fields than do lists (by key, rather than by position). Dictionaries, however, still have some limitations that may become more critical as our program grows over time.
For one thing, there is no central place for us to collect record processing logic. Extracting last names and giving raises, for instance, can be accomplished with code like the following:
>>>import shelve>>>db = shelve.open('people-shelve')>>>bob = db['bob']>>>bob['name'].split()[-1]# get bob's last name 'Smith' >>>sue = db['sue']>>>sue['pay'] *= 1.25# give sue a raise >>>sue['pay']75000.0 >>>db['sue'] = sue>>>db.close()
This works, and it might suffice for some short programs. But if we ever need to change the way last names and raises are implemented, we might have to update this kind of code in many places in our program. In fact, even finding all such magical code snippets could be a challenge; hardcoding or cutting and pasting bits of logic redundantly like this in more than one place will almost always come back to haunt you eventually.
It would be better to somehow hide—that is, encapsulate—such bits of code. Functions in a module would allow us to implement such operations in a single place and thus avoid code redundancy, but still wouldn’t naturally associate them with the records themselves. What we’d like is a way to bind processing logic with the data stored in the database in order to make it easier to understand, debug, and reuse.
Another downside to using dictionaries for records is that they are difficult to expand over time. For example, suppose that the set of data fields or the procedure for giving raises is different for different kinds of people (perhaps some people get a bonus each year and some do not). If we ever need to extend our program, there is no natural way to customize simple dictionaries. For future growth, we’d also like our software to support extension and customization in a natural way.
If you’ve already studied Python in any sort of depth, you probably already know that this is where its OOP support begins to become attractive:
- Structure
With OOP, we can naturally associate processing logic with record data—classes provide both a program unit that combines logic and data in a single package and a hierarchy that allows code to be easily factored to avoid redundancy.
- Encapsulation
With OOP, we can also wrap up details such as name processing and pay increases behind method functions—i.e., we are free to change method implementations without breaking their users.
- Customization
And with OOP, we have a natural growth path. Classes can be extended and customized by coding new subclasses, without changing or breaking already working code.
That is, under OOP, we program by customizing and reusing, not by rewriting. OOP is an option in Python and, frankly, is sometimes better suited for strategic than for tactical tasks. It tends to work best when you have time for upfront planning—something that might be a luxury if your users have already begun storming the gates.
But especially for larger systems that change over time, its code reuse and structuring advantages far outweigh its learning curve, and it can substantially cut development time. Even in our simple case, the customizability and reduced redundancy we gain from classes can be a decided advantage.
Using Classes
OOP is easy to use in Python, thanks largely to Python’s dynamic typing model. In fact, it’s so easy that we’ll jump right into an example: Example 1-14 implements our database records as class instances rather than as dictionaries.
class Person:
    def __init__(self, name, age, pay=0, job=None):
        self.name = name
        self.age  = age
        self.pay  = pay
        self.job  = job

if __name__ == '__main__':
    bob = Person('Bob Smith', 42, 30000, 'software')
    sue = Person('Sue Jones', 45, 40000, 'hardware')
    print(bob.name, sue.pay)

    print(bob.name.split()[-1])
    sue.pay *= 1.10
    print(sue.pay)
There is not much to this class—just a constructor method that fills out the instance with data passed in as arguments to the class name. It’s sufficient to represent a database record, though, and it can already provide tools such as defaults for pay and job fields that dictionaries cannot. The self-test code at the bottom of this file creates two instances (records) and accesses their attributes (fields); here is this file’s output when run under IDLE (a system command-line works just as well):
Bob Smith 40000
Smith
44000.0
This isn’t a database yet, but we could stuff these objects into a list or dictionary as before in order to collect them as a unit:
>>>from person_start import Person>>>bob = Person('Bob Smith', 42)>>>sue = Person('Sue Jones', 45, 40000)>>>people = [bob, sue]# a "database" list >>>for person in people:print(person.name, person.pay)Bob Smith 0 Sue Jones 40000 >>>x = [(person.name, person.pay) for person in people]>>>x[('Bob Smith', 0), ('Sue Jones', 40000)] >>>[rec.name for rec in people if rec.age >= 45]# SQL-ish query ['Sue Jones'] >>>[(rec.age ** 2 if rec.age >= 45 else rec.age) for rec in people][42, 2025]
Notice that Bob’s pay defaulted to zero this time because we didn’t pass in a value for that argument (maybe Sue is supporting him now?). We might also implement a class that represents the database, perhaps as a subclass of the built-in list or dictionary types, with insert and delete methods that encapsulate the way the database is implemented. We’ll abandon this path for now, though, because it will be more useful to store these records persistently in a shelve, which already encapsulates stores and fetches behind an interface for us. Before we do, though, let’s add some logic.
Adding Behavior
So far, our class is just data: it replaces dictionary keys with object attributes, but it doesn’t add much to what we had before. To really leverage the power of classes, we need to add some behavior. By wrapping up bits of behavior in class method functions, we can insulate clients from changes. And by packaging methods in classes along with data, we provide a natural place for readers to look for code. In a sense, classes combine records and the programs that process those records; methods provide logic that interprets and updates the data (we say they are object-oriented, because they always process an object’s data).
For instance, Example 1-15 adds the last-name
and raise logic as class methods; methods use the self argument to access or update the
instance (record) being processed.
class Person:
    def __init__(self, name, age, pay=0, job=None):
        self.name = name
        self.age  = age
        self.pay  = pay
        self.job  = job
    def lastName(self):
        return self.name.split()[-1]
    def giveRaise(self, percent):
        self.pay *= (1.0 + percent)

if __name__ == '__main__':
    bob = Person('Bob Smith', 42, 30000, 'software')
    sue = Person('Sue Jones', 45, 40000, 'hardware')
    print(bob.name, sue.pay)

    print(bob.lastName())
    sue.giveRaise(.10)
    print(sue.pay)
The output of this script is the same as the last, but the results are being computed by methods now, not by hardcoded logic that appears redundantly wherever it is required:
Bob Smith 40000
Smith
44000.0
Adding Inheritance
One last enhancement to our records before they become
permanent: because they are implemented as classes now, they
naturally support customization through the inheritance search
mechanism in Python. Example 1-16, for instance,
customizes the last section’s Person class in order to give a 10 percent
bonus by default to managers whenever they receive a raise (any
relation to practice in the real world is purely
coincidental).
from person import Person

class Manager(Person):
    def giveRaise(self, percent, bonus=0.1):
        self.pay *= (1.0 + percent + bonus)

if __name__ == '__main__':
    tom = Manager(name='Tom Doe', age=50, pay=50000)
    print(tom.lastName())
    tom.giveRaise(.20)
    print(tom.pay)
When run, this script’s self-test prints the following:
Doe
65000.0
Here, the Manager class
appears in a module of its own, but it could have been added to the
person module instead (Python
doesn’t require just one class per file). It inherits the
constructor and last-name methods from its superclass, but it
customizes just the giveRaise
method (there are a variety of ways to code this extension, as we’ll
see later). Because this change is being added as a new subclass,
the original Person class, and
any objects generated from it, will continue working unchanged. Bob
and Sue, for example, inherit the original raise logic, but Tom gets
the custom version because of the class from which he is created. In
OOP, we program by customizing, not by
changing.
In fact, code that uses our objects doesn’t need to be at all
aware of what the raise method does—it’s up to the object to do the
right thing based on the class from which it is created. As long as
the object supports the expected interface (here, a method called
giveRaise), it will be compatible
with the calling code, regardless of its specific type, and even if
its method works differently than others.
If you’ve already studied Python, you may know this behavior
as polymorphism; it’s a core property of the
language, and it accounts for much of your code’s flexibility. When
the following code calls the giveRaise method, for example, what
happens depends on the obj object
being processed; Tom gets a 20 percent raise instead of 10 percent
because of the Manager class’s
customization:
>>>from person import Person>>>from manager import Manager>>>bob = Person(name='Bob Smith', age=42, pay=10000)>>>sue = Person(name='Sue Jones', age=45, pay=20000)>>>tom = Manager(name='Tom Doe', age=55, pay=30000)>>>db = [bob, sue, tom]>>>for obj in db:obj.giveRaise(.10)# default or custom >>>for obj in db:print(obj.lastName(), '=>', obj.pay)Smith => 11000.0 Jones => 22000.0 Doe => 36000.0
Refactoring Code
Before we move on, there are a few coding alternatives worth noting here. Most of these underscore the Python OOP model, and they serve as a quick review.
Augmenting methods
As a first alternative, notice that we have introduced some
redundancy in Example 1-16: the raise
calculation is now repeated in two places (in the two classes). We
could also have implemented the customized Manager class by
augmenting the inherited raise method instead
of replacing it completely:
class Manager(Person):
    def giveRaise(self, percent, bonus=0.1):
        Person.giveRaise(self, percent + bonus)
The trick here is to call back the superclass’s version of
the method directly, passing in the self argument explicitly. We still
redefine the method, but we simply run the general version after
adding 10 percent (by default) to the passed-in percentage. This
coding pattern can help reduce code redundancy (the original raise
method’s logic appears in only one place and so is easier to
change) and is especially handy for kicking off superclass
constructor methods in practice.
If you’ve already studied Python OOP, you know that this coding scheme works because we can always call methods through either an instance or the class name. In general, the following are equivalent, and both forms may be used explicitly:
instance.method(arg1, arg2)
class.method(instance, arg1, arg2)
In fact, the first form is mapped to the second—when calling
through the instance, Python determines the class by searching the
inheritance tree for the method name and passes in the instance
automatically. Either way, within giveRaise, self refers to the instance that is the
subject of the call.
Display format
For more object-oriented fun, we could also add a few
operator overloading methods to our people classes. For example, a
__str__ method, shown here,
could return a string to give the display format for our objects
when they are printed as a whole—much better than the default
display we get for an instance:
class Person:
    def __str__(self):
        return '<%s => %s>' % (self.__class__.__name__, self.name)

tom = Manager('Tom Jones', 50)
print(tom)                               # prints: <Manager => Tom Jones>
Here __class__ gives the
lowest class from which self
was made, even though __str__
may be inherited. The net effect is that __str__ allows us to print instances
directly instead of having to print specific attributes. We could
extend this __str__ to loop
through the instance’s __dict__
attribute dictionary to display all attributes generically; for
this preview we’ll leave this as a suggested exercise.
We might even code an __add__ method to make + expressions automatically call the
giveRaise method. Whether we
should is another question; the fact that a + expression gives a person a raise
might seem more magical to the next person reading our code than
it should.
Constructor customization
Finally, notice that we didn’t pass the job argument when making a manager in
Example 1-16; if we had,
it would look like this with keyword arguments:
tom = Manager(name='Tom Doe', age=50, pay=50000, job='manager')
The reason we didn’t include a job in the example is that it’s redundant with the class of the object: if someone is a manager, their class should imply their job title. Instead of leaving this field blank, though, it may make more sense to provide an explicit constructor for managers, which fills in this field automatically:
class Manager(Person):
    def __init__(self, name, age, pay):
        Person.__init__(self, name, age, pay, 'manager')
Now when a manager is created, its job is filled in
automatically. The trick here is to call to the superclass’s
version of the method explicitly, just as we did for the giveRaise method
earlier in this section; the only difference here is the unusual
name for the constructor method.
Alternative classes
We won’t use any of this section’s three extensions in later
examples, but to demonstrate how they work, Example 1-17 collects these
ideas in an alternative implementation of our Person classes.
"""
Alternative implementation of person classes, with data, behavior,
and operator overloading (not used for objects stored persistently)
"""

class Person:
    """
    a general person: data+logic
    """
    def __init__(self, name, age, pay=0, job=None):
        self.name = name
        self.age  = age
        self.pay  = pay
        self.job  = job
    def lastName(self):
        return self.name.split()[-1]
    def giveRaise(self, percent):
        self.pay *= (1.0 + percent)
    def __str__(self):
        return ('<%s => %s: %s, %s>' %
               (self.__class__.__name__, self.name, self.job, self.pay))

class Manager(Person):
    """
    a person with custom raise
    inherits general lastname, str
    """
    def __init__(self, name, age, pay):
        Person.__init__(self, name, age, pay, 'manager')
    def giveRaise(self, percent, bonus=0.1):
        Person.giveRaise(self, percent + bonus)

if __name__ == '__main__':
    bob = Person('Bob Smith', 44)
    sue = Person('Sue Jones', 47, 40000, 'hardware')
    tom = Manager(name='Tom Doe', age=50, pay=50000)
    print(sue, sue.pay, sue.lastName())
    for obj in (bob, sue, tom):
        obj.giveRaise(.10)                 # run this obj's giveRaise
        print(obj)                         # run common __str__ method
Notice the polymorphism in this module’s self-test loop: all three objects share the constructor, last-name, and printing methods, but the raise method called is dependent upon the class from which an instance is created. When run, Example 1-17 prints the following to standard output—the manager’s job is filled in at construction, we get the new custom display format for our objects, and the new version of the manager’s raise method works as before:
<Person => Sue Jones: hardware, 40000> 40000 Jones
<Person => Bob Smith: None, 0.0>
<Person => Sue Jones: hardware, 44000.0>
<Manager => Tom Doe: manager, 60000.0>
Such refactoring (restructuring) of code is common as class hierarchies grow and evolve. In fact, as is, we still can’t give someone a raise if his pay is zero (Bob is out of luck); we probably need a way to set pay, too, but we’ll leave such extensions for the next release. The good news is that Python’s flexibility and readability make refactoring easy—it’s simple and quick to restructure your code. If you haven’t used the language yet, you’ll find that Python development is largely an exercise in rapid, incremental, and interactive programming, which is well suited to the shifting needs of real-world projects.
Adding Persistence
It’s time for a status update. We now have encapsulated in the form of classes customizable implementations of our records and their processing logic. Making our class-based records persistent is a minor last step. We could store them in per-record pickle files again; a shelve-based storage medium will do just as well for our goals and is often easier to code. Example 1-18 shows how.
import shelve
from person import Person
from manager import Manager

bob = Person('Bob Smith', 42, 30000, 'software')
sue = Person('Sue Jones', 45, 40000, 'hardware')
tom = Manager('Tom Doe',  50, 50000)

db = shelve.open('class-shelve')
db['bob'] = bob
db['sue'] = sue
db['tom'] = tom
db.close()
This file creates three class instances (two from the original class and one from its customization) and assigns them to keys in a newly created shelve file to store them permanently. In other words, it creates a shelve of class instances; to our code, the database looks just like a dictionary of class instances, but the top-level dictionary is mapped to a shelve file again. To check our work, Example 1-19 reads the shelve and prints fields of its records.
import shelve
db = shelve.open('class-shelve')
for key in db:
    print(key, '=>\n  ', db[key].name, db[key].pay)

bob = db['bob']
print(bob.lastName())
print(db['tom'].lastName())
Note that we don’t need to reimport the Person class here in order to fetch its
instances from the shelve or run their methods. When instances are
shelved or pickled, the underlying pickling system records both
instance attributes and enough information to locate their classes
automatically when they are later fetched (the class’s module simply
has to be on the module search path when an instance is loaded).
This is on purpose; because the class and its instances in the
shelve are stored separately, you can change the class to modify the
way stored instances are interpreted when loaded (more on this later
in the book). Here is the shelve dump script’s output just after
creating the shelve with the maker script:
bob =>
   Bob Smith 30000
sue =>
   Sue Jones 40000
tom =>
   Tom Doe 50000
Smith
Doe
As shown in Example 1-20, database updates are as simple as before (compare this to Example 1-13), but dictionary keys become attributes of instance objects, and updates are implemented by class method calls instead of hardcoded logic. Notice how we still fetch, update, and reassign to keys to update the shelve.
import shelve
db = shelve.open('class-shelve')

sue = db['sue']
sue.giveRaise(.25)
db['sue'] = sue

tom = db['tom']
tom.giveRaise(.20)
db['tom'] = tom
db.close()
And last but not least, here is the dump script again after running the update script; Tom and Sue have new pay values, because these objects are now persistent in the shelve. We could also open and inspect the shelve by typing code at Python’s interactive command line; despite its longevity, the shelve is just a Python object containing Python objects.
bob =>
   Bob Smith 30000
sue =>
   Sue Jones 50000.0
tom =>
   Tom Doe 65000.0
Smith
Doe
Tom and Sue both get a raise this time around, because they are persistent objects in the shelve database. Although shelves can also store simpler object types such as lists and dictionaries, class instances allow us to combine both data and behavior for our stored items. In a sense, instance attributes and class methods take the place of records and processing programs in more traditional schemes.
Other Database Options
At this point, we have a full-fledged database system: our classes
simultaneously implement record data and record processing, and they
encapsulate the implementation of the behavior. And the Python
pickle and shelve modules provide simple ways to
store our database persistently between program executions. This is
not a relational database (we store objects, not tables, and queries
take the form of Python object processing code), but it is
sufficient for many kinds of programs.
If we need more functionality, we could migrate this application to even more powerful tools. For example, should we ever need full-blown SQL query support, there are interfaces that allow Python scripts to communicate with relational databases such as MySQL, PostgreSQL, and Oracle in portable ways.
ORMs (object relational mappers) such as SQLObject and SqlAlchemy offer another approach which retains the Python class view, but translates it to and from relational database tables—in a sense providing the best of both worlds, with Python class syntax on top, and enterprise-level databases underneath.
Moreover, the open source ZODB system provides a more comprehensive object database for Python, with support for features missing in shelves, including concurrent updates, transaction commits and rollbacks, automatic updates on in-memory component changes, and more. We’ll explore these more advanced third-party tools in Chapter 17. For now, let’s move on to putting a good face on our system.
Step 4: Adding Console Interaction
So far, our database program consists of class instances stored in a shelve file, as coded in the preceding section. It’s sufficient as a storage medium, but it requires us to run scripts from the command line or type code interactively in order to view or process its content. Improving on this is straightforward: simply code more general programs that interact with users, either from a console window or from a full-blown graphical interface.
A Console Shelve Interface
Let’s start with something simple. The most basic kind of interface we can code would allow users to type keys and values in a console window in order to process the database (instead of writing Python program code). Example 1-21, for instance, implements a simple interactive loop that allows a user to query multiple record objects in the shelve by key.
# interactive queries
import shelve
fieldnames = ('name', 'age', 'job', 'pay')
maxfield   = max(len(f) for f in fieldnames)
db = shelve.open('class-shelve')

while True:
    key = input('\nKey? => ')           # key or empty line, exc at eof
    if not key: break
    try:
        record = db[key]                # fetch by key, show in console
    except:
        print('No such key "%s"!' % key)
    else:
        for field in fieldnames:
            print(field.ljust(maxfield), '=>', getattr(record, field))
This script uses the getattr built-in function to fetch an
object’s attribute when given its name string, and the ljust left-justify method of strings to
align outputs (maxfield, derived
from a generator expression, is the length of the longest field
name). When run, this script goes into a loop, inputting keys from
the interactive user (technically, from the standard input stream,
which is usually a console window) and displaying the fetched
records field by field. An empty line ends the session. If our
shelve of class instances is still in the state we left it near the
end of the last section:
...\PP4E\Preview> dump_db_classes.py
bob =>
   Bob Smith 30000
sue =>
   Sue Jones 50000.0
tom =>
   Tom Doe 65000.0
Smith
Doe
We can then use our new script to query the object database interactively, by key:
...\PP4E\Preview>peopleinteract_query.pyKey? =>suename => Sue Jones age => 45 job => hardware pay => 50000.0 Key? =>nobodyNo such key "nobody"! Key? =>
Example 1-22 goes further and allows interactive updates. For an input key, it inputs values for each field and either updates an existing record or creates a new object and stores it under the key.
# interactive updates
import shelve
from person import Person
fieldnames = ('name', 'age', 'job', 'pay')

db = shelve.open('class-shelve')
while True:
    key = input('\nKey? => ')
    if not key: break
    if key in db:
        record = db[key]                      # update existing record
    else:                                     # or make/store new rec
        record = Person(name='?', age='?')    # eval: quote strings
    for field in fieldnames:
        currval = getattr(record, field)
        newtext = input('\t[%s]=%s\n\t\tnew?=>' % (field, currval))
        if newtext:
            setattr(record, field, eval(newtext))
    db[key] = record
db.close()
Notice the use of eval in
this script to convert inputs (as usual, that allows any Python
object type, but it means you must quote string inputs explicitly)
and the use of setattr call to
assign an attribute given its name string. When run, this script
allows any number of records to be added and changed; to keep the
current value of a record’s field, press the Enter key when prompted
for a new value:
Key? =>tom[name]=Tom Doe new?=> [age]=50 new?=>56[job]=None new?=>'mgr'[pay]=65000.0 new?=>90000Key? =>nobody[name]=? new?=>'John Doh'[age]=? new?=>55[job]=None new?=> [pay]=0 new?=>NoneKey? =>
This script is still fairly simplistic (e.g., errors aren’t handled), but using it is much easier than manually opening and modifying the shelve at the Python interactive prompt, especially for nonprogrammers. Run the query script to check your work after an update (we could combine query and update into a single script if this becomes too cumbersome, albeit at some cost in code and user-experience complexity):
Key? =>tomname => Tom Doe age => 56 job => mgr pay => 90000 Key? =>nobodyname => John Doh age => 55 job => None pay => None Key? =>
Step 5: Adding a GUI
The console-based interface approach of the preceding section works, and it may be sufficient for some users assuming that they are comfortable with typing commands in a console window. With just a little extra work, though, we can add a GUI that is more modern, easier to use, less error prone, and arguably sexier.
GUI Basics
As we’ll see later in this book, a variety of GUI toolkits and builders are available for Python programmers: tkinter, wxPython, PyQt, PythonCard, Dabo, and more. Of these, tkinter ships with Python, and it is something of a de facto standard.
tkinter is a lightweight toolkit and so meshes well with a scripting language such as Python; it’s easy to do basic things with tkinter, and it’s straightforward to do more advanced things with extensions and OOP-based code. As an added bonus, tkinter GUIs are portable across Windows, Linux/Unix, and Macintosh; simply copy the source code to the machine on which you wish to use your GUI. tkinter doesn’t come with all the bells and whistles of larger toolkits such as wxPython or PyQt, but that’s a major factor behind its relative simplicity, and it makes it ideal for getting started in the GUI domain.
Because tkinter is designed for scripting, coding GUIs with it is straightforward. We’ll study all of its concepts and tools later in this book. But as a first example, the first program in tkinter is just a few lines of code, as shown in Example 1-23.
From the tkinter module (really, a module package in Python
3), we get screen device (a.k.a. “widget”) construction calls such
as Label; geometry manager
methods such as pack; widget
configuration presets such as the TOP and RIGHT attachment side hints we’ll use
later for pack; and the mainloop call, which starts event
processing.
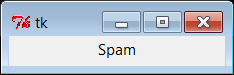
This isn’t the most useful GUI ever coded, but it demonstrates tkinter basics and it builds the fully functional window shown in Figure 1-1 in just three simple lines of code. Its window is shown here, like all GUIs in this book, running on Windows 7; it works the same on other platforms (e.g., Mac OS X, Linux, and older versions of Windows), but renders in with native look and feel on each.
You can launch this example in IDLE, from a console command line, or by clicking its icon—the same way you can run other Python scripts. tkinter itself is a standard part of Python and works out-of-the-box on Windows and others, though you may need extra configuration or install steps on some computers (more details later in this book).
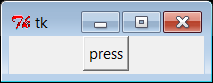
It’s not much more work to code a GUI that actually responds
to a user: Example 1-24
implements a GUI with a button that runs the reply function each time it is
pressed.
from tkinter import *
from tkinter.messagebox import showinfo

def reply():
    showinfo(title='popup', message='Button pressed!')

window = Tk()
button = Button(window, text='press', command=reply)
button.pack()
window.mainloop()
This example still isn’t very sophisticated—it creates an
explicit Tk main window for the
application to serve as the parent container of the button, and it
builds the simple window shown in Figure 1-2 (in tkinter, containers are
passed in as the first argument when making a new widget; they
default to the main window). But this time, each time you click the
“press” button, the program responds by running Python code that
pops up the dialog window in Figure 1-3.
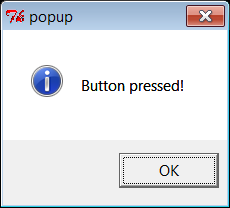
Notice that the pop-up dialog looks like it should for Windows 7, the platform on which this screenshot was taken; again, tkinter gives us a native look and feel that is appropriate for the machine on which it is running. We can customize this GUI in many ways (e.g., by changing colors and fonts, setting window titles and icons, using photos on buttons instead of text), but part of the power of tkinter is that we need to set only the options we are interested in tailoring.
Using OOP for GUIs
All of our GUI examples so far have been top-level script code with a
function for handling events. In larger programs, it is often more
useful to code a GUI as a subclass of the tkinter Frame widget—a
container for other widgets. Example 1-25 shows our
single-button GUI recoded in this way as a class.
from tkinter import *
from tkinter.messagebox import showinfo

class MyGui(Frame):
    def __init__(self, parent=None):
        Frame.__init__(self, parent)
        button = Button(self, text='press', command=self.reply)
        button.pack()
    def reply(self):
        showinfo(title='popup', message='Button pressed!')

if __name__ == '__main__':
    window = MyGui()
    window.pack()
    window.mainloop()
The button’s event handler is a bound method—self.reply, an object that remembers both
self and reply when later called. This example
generates the same window and pop up as Example 1-24 (Figures 1-2 and 1-3); but because it is now a
subclass of Frame, it
automatically becomes an attachable
component—i.e., we can add all of the widgets
this class creates, as a package, to any other GUI, just by
attaching this Frame to the GUI.
Example 1-26 shows
how.
from tkinter import *
from tkinter102 import MyGui

# main app window
mainwin = Tk()
Label(mainwin, text=__name__).pack()

# popup window
popup = Toplevel()
Label(popup, text='Attach').pack(side=LEFT)
MyGui(popup).pack(side=RIGHT)                   # attach my frame
mainwin.mainloop()
This example attaches our one-button GUI to a larger window,
here a Toplevel pop-up window
created by the importing application and passed into the
construction call as the explicit parent (you will also get a
Tk main window; as we’ll learn
later, you always do, whether it is made explicit in your code or
not). Our one-button widget package is attached to the right side of
its container this time. If you run this live, you’ll get the scene
captured in Figure 1-4; the “press” button is
our attached custom Frame.
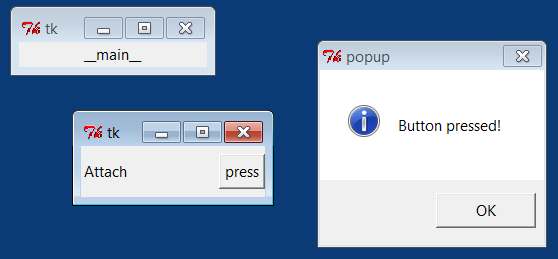
Moreover, because MyGui is
coded as a class, the GUI can be customized by the usual inheritance
mechanism; simply define a subclass that replaces the parts that
differ. The reply method, for
example, can be customized this way to do something unique, as
demonstrated in Example 1-27.
from tkinter import mainloop
from tkinter.messagebox import showinfo
from tkinter102 import MyGui

class CustomGui(MyGui):                            # inherit init
    def reply(self):                               # replace reply
        showinfo(title='popup', message='Ouch!')

if __name__ == '__main__':
    CustomGui().pack()
    mainloop()
When run, this script creates the same main window and button
as the original MyGui class. But
pressing its button generates a different reply, as shown in Figure 1-5, because the custom version of the reply method runs.
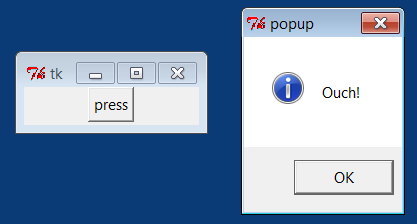
Although these are still small GUIs, they illustrate some fairly large ideas. As we’ll see later in the book, using OOP like this for inheritance and attachment allows us to reuse packages of widgets in other programs—calculators, text editors, and the like can be customized and added as components to other GUIs easily if they are classes. As we’ll also find, subclasses of widget class can provide a common appearance or standardized behavior for all their instances—similar in spirit to what some observers might call GUI styles or themes. It’s a normal byproduct of Python and OOP.
Getting Input from a User
As a final introductory script, Example 1-28 shows how to input
data from the user in an Entry
widget and display it in a pop-up dialog. The lambda it uses defers the call to the
reply function so that inputs can
be passed in—a common tkinter coding pattern; without the lambda, reply would be called when the button is
made, instead of when it is later pressed (we could also use
ent as a global variable within
reply, but that makes it less
general). This example also demonstrates how to change the icon and
title of a top-level window; here, the window icon file is located
in the same directory as the script (if the icon call in this script
fails on your platform, try commenting-out the call; icons are
notoriously platform specific).
from tkinter import *
from tkinter.messagebox import showinfo

def reply(name):
    showinfo(title='Reply', message='Hello %s!' % name)

top = Tk()
top.title('Echo')
top.iconbitmap('py-blue-trans-out.ico')

Label(top, text="Enter your name:").pack(side=TOP)
ent = Entry(top)
ent.pack(side=TOP)
btn = Button(top, text="Submit", command=(lambda: reply(ent.get())))
btn.pack(side=LEFT)

top.mainloop()
As is, this example is just three widgets attached to the
Tk main top-level window; later
we’ll learn how to use nested Frame container widgets in a window like
this to achieve a variety of layouts for its three widgets. Figure 1-6 gives the resulting main and
pop-up windows after the Submit button is pressed. We’ll see
something very similar later in this chapter, but rendered in a web
browser with HTML.
The code we’ve seen so far demonstrates many of the core concepts in GUI programming, but tkinter is much more powerful than these examples imply. There are more than 20 widgets in tkinter and many more ways to input data from a user, including multiple-line text, drawing canvases, pull-down menus, radio and check buttons, and scroll bars, as well as other layout and event handling mechanisms. Beyond tkinter itself, both open source extensions such as PMW, as well as the Tix and ttk toolkits now part of Python’s standard library, can add additional widgets we can use in our Python tkinter GUIs and provide an even more professional look and feel. To hint at what is to come, let’s put tkinter to work on our database of people.
A GUI Shelve Interface
For our database application, the first thing we probably want is a GUI
for viewing the stored data—a form with field names and values—and a
way to fetch records by key. It would also be useful to be able to
update a record with new field values given its key and to add new
records from scratch by filling out the form. To keep this simple,
we’ll use a single GUI for all of these tasks. Figure 1-7 shows the
window we are going to code as it looks in Windows 7; the record for
the key sue has been fetched and
displayed (our shelve is as we last left it again). This record is
really an instance of our class in our shelve file, but the user
doesn’t need to care.
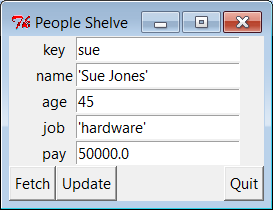
Coding the GUI
Also, to keep this simple, we’ll assume that all records in the database have the same sets of fields. It would be a minor extension to generalize this for any set of fields (and come up with a general form GUI constructor tool in the process), but we’ll defer such evolutions to later in this book. Example 1-29 implements the GUI shown in Figure 1-7.
"""
Implement a GUI for viewing and updating class instances stored in a shelve;
the shelve lives on the machine this script runs on, as 1 or more local files;
"""

from tkinter import *
from tkinter.messagebox import showerror
import shelve
shelvename = 'class-shelve'
fieldnames = ('name', 'age', 'job', 'pay')

def makeWidgets():
    global entries
    window = Tk()
    window.title('People Shelve')
    form = Frame(window)
    form.pack()
    entries = {}
    for (ix, label) in enumerate(('key',) + fieldnames):
        lab = Label(form, text=label)
        ent = Entry(form)
        lab.grid(row=ix, column=0)
        ent.grid(row=ix, column=1)
        entries[label] = ent
    Button(window, text="Fetch",  command=fetchRecord).pack(side=LEFT)
    Button(window, text="Update", command=updateRecord).pack(side=LEFT)
    Button(window, text="Quit",   command=window.quit).pack(side=RIGHT)
    return window

def fetchRecord():
    key = entries['key'].get()
    try:
        record = db[key]                      # fetch by key, show in GUI
    except:
        showerror(title='Error', message='No such key!')
    else:
        for field in fieldnames:
            entries[field].delete(0, END)
            entries[field].insert(0, repr(getattr(record, field)))

def updateRecord():
    key = entries['key'].get()
    if key in db:
        record = db[key]                      # update existing record
    else:
        from person import Person             # make/store new one for key
        record = Person(name='?', age='?')    # eval: strings must be quoted
    for field in fieldnames:
        setattr(record, field, eval(entries[field].get()))
    db[key] = record

db = shelve.open(shelvename)
window = makeWidgets()
window.mainloop()
db.close() # back here after quit or window close
This script uses the widget grid method to arrange labels and
entries, instead of pack; as
we’ll see later, gridding arranges by rows and columns, and so it
is a natural for forms that horizontally align labels with entries
well. We’ll also see later that forms can usually be laid out just
as nicely using pack with
nested row frames and fixed-width labels. Although the GUI doesn’t
handle window resizes well yet (that requires configuration
options we’ll explore later), adding this makes the grid and pack alternatives roughly the same in
code size.
Notice how the end of this script opens the shelve as a
global variable and starts the GUI; the shelve remains open for
the lifespan of the GUI (mainloop returns only after the main
window is closed). As we’ll see in the next section, this state
retention is very different from the web model, where each
interaction is normally a standalone program. Also notice that the
use of global variables makes this code simple but unusable
outside the context of our database; more on this later.
Using the GUI
The GUI we’re building is fairly basic, but it provides a view on the shelve file and allows us to browse and update the file without typing any code. To fetch a record from the shelve and display it on the GUI, type its key into the GUI’s “key” field and click Fetch. To change a record, type into its input fields after fetching it and click Update; the values in the GUI will be written to the record in the database. And to add a new record, fill out all of the GUI’s fields with new values and click Update—the new record will be added to the shelve file using the key and field inputs you provide.
In other words, the GUI’s fields are used for both display and input. Figure 1-8 shows the scene after adding a new record (via Update), and Figure 1-9 shows an error dialog pop up issued when users try to fetch a key that isn’t present in the shelve.
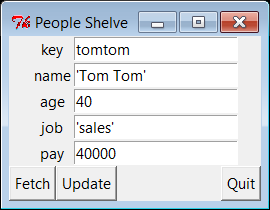
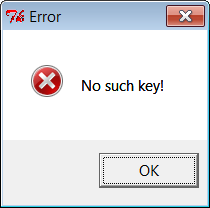
Notice how we’re using repr again to display field values
fetched from the shelve and eval to convert field values to Python
objects before they are stored in the shelve. As mentioned
previously, this is potentially dangerous if someone sneaks some
malicious code into our shelve, but we’ll finesse such concerns
for now.
Keep in mind, though, that this scheme means that strings
must be quoted in input fields other than the key—they are assumed
to be Python code. In fact, you could type an arbitrary Python
expression in an input field to specify a value for an update.
Typing "Tom"*3 in the name
field, for instance, would set the name to TomTomTom after an update (for better or
worse!); fetch to see the result.
Even though we now have a GUI for browsing and changing records, we can still check our work by interactively opening and inspecting the shelve file or by running scripts such as the dump utility in Example 1-19. Remember, despite the fact that we’re now viewing records in a GUI’s windows, the database is a Python shelve file containing native Python class instance objects, so any Python code can access it. Here is the dump script at work after adding and changing a few persistent objects in the GUI:
...\PP4E\Preview> python dump_db_classes.py
sue =>
   Sue Jones 50000.0
bill =>
   bill 9999
nobody =>
   John Doh None
tomtom =>
   Tom Tom 40000
tom =>
   Tom Doe 90000
bob =>
   Bob Smith 30000
peg =>
   1 4
Smith
Doe
Future directions
Although this GUI does the job, there is plenty of room for improvement:
As coded, this GUI is a simple set of functions that share the global list of input fields (
entries) and a global shelve (db). We might instead passdbin tomakeWidgets, and pass along both these two objects as function arguments to the callback handlers using thelambdatrick of the prior section. Though not crucial in a script this small, as a rule of thumb, making your external dependencies explicit like this makes your code both easier to understand and reusable in other contexts.We could also structure this GUI as a class to support attachment and customization (globals would become instance attributes), though it’s unlikely that we’ll need to reuse such a specific GUI.
More usefully, we could pass in the
fieldnamestuple as an input parameter to the functions here to allow them to be used for other record types in the future. Code at the bottom of the file would similarly become a function with a passed-in shelve filename, and we would also need to pass in a new record construction call to the update function becausePersoncould not be hardcoded. Such generalization is beyond the scope of this preview, but it makes for a nice exercise if you are so inclined. Later, I’ll also point you to a suggested reading example in the book examples package, PyForm, which takes a different approach to generalized form construction.To make this GUI more user friendly, it might also be nice to add an index window that displays all the keys in the database in order to make browsing easier. Some sort of verification before updates might be useful as well, and Delete and Clear buttons would be simple to code. Furthermore, assuming that inputs are Python code may be more bother than it is worth; a simpler input scheme might be easier and safer. (I won’t officially say these are suggested exercises too, but it sounds like they could be.)
We could also support window resizing (as we’ll learn, widgets can grow and shrink with the window) and provide an interface for calling methods available on stored instances’ classes too (as is, the
payfield can be updated, but there is no way to invoke thegiveRaisemethod).If we plan to distribute this GUI widely, we might package it up as a standalone executable program—a frozen binary in Python terminology—using third-party tools such as Py2Exe, PyInstaller, and others (search the Web for pointers). Such a program can be run directly without installing Python on the receiving end, because the Python bytecode interpreter is included in the executable itself.
I’ll leave all such extensions as points to ponder, and revisit some of them later in this book.
Before we move on, two notes. First, I should mention that even more graphical packages are available to Python programmers. For instance, if you need to do graphics beyond basic windows, the tkinter Canvas widget supports freeform graphics. Third-party extensions such as Blender, OpenGL, VPython, PIL, VTK, Maya, and PyGame provide even more advanced graphics, visualization, and animation tools for use with Python scripts. Moreover, the PMW, Tix, and ttk widget kits mentioned earlier extend tkinter itself. See Python’s library manual for Tix and ttk, and try the PyPI site or a web search for third-party graphics extensions.
And in deference to fans of other GUI toolkits such as wxPython and PyQt, I should also note that there are other GUI options to choose from and that choice is sometimes very subjective. tkinter is shown here because it is mature, robust, fully open source, well documented, well supported, lightweight, and a standard part of Python. By most accounts, it remains the standard for building portable GUIs in Python.
Other GUI toolkits for Python have pros and cons of their own, discussed later in this book. For example, some exchange code simplicity for richer widget sets. wxPython, for example, is much more feature-rich, but it’s also much more complicated to use. By and large, though, other toolkits are variations on a theme—once you’ve learned one GUI toolkit, others are easy to pick up. Because of that, we’ll focus on learning one toolkit in its entirety in this book instead of sampling many partially.
Although they are free to employ network access at will, programs written with traditional GUIs like tkinter generally run on a single, self-contained machine. Some consider web pages to be a kind of GUI as well, but you’ll have to read the next and final section of this chapter to judge that for yourself.
Step 6: Adding a Web Interface
GUI interfaces are easier to use than command lines and are often all we need to simplify access to data. By making our database available on the Web, though, we can open it up to even wider use. Anyone with Internet access and a web browser can access the data, regardless of where they are located and which machine they are using. Anything from workstations to cell phones will suffice. Moreover, web-based interfaces require only a web browser; there is no need to install Python to access the data except on the single-server machine. Although traditional web-based approaches may sacrifice some of the utility and speed of in-process GUI toolkits, their portability gain can be compelling.
As we’ll also see later in this book, there are a variety of ways to go about scripting interactive web pages of the sort we’ll need in order to access our data. Basic server-side CGI scripting is more than adequate for simple tasks like ours. Because it’s perhaps the simplest approach, and embodies the foundations of more advanced techniques, CGI scripting is also well-suited to getting started on the Web.
For more advanced applications, a wealth of toolkits and frameworks for Python—including Django, TurboGears, Google’s App Engine, pylons, web2py, Zope, Plone, Twisted, CherryPy, Webware, mod_python, PSP, and Quixote—can simplify common tasks and provide tools that we might otherwise need to code from scratch in the CGI world. Though they pose a new set of tradeoffs, emerging technologies such as Flex, Silverlight, and pyjamas (an AJAX-based port of the Google Web Toolkit to Python, and Python-to-JavaScript compiler) offer additional paths to achieving interactive or dynamic user-interfaces in web pages on clients, and open the door to using Python in Rich Internet Applications (RIAs).
I’ll say more about these tools later. For now, let’s keep things simple and code a CGI script.
CGI Basics
CGI scripting in Python is easy as long as you already have a handle on things like HTML forms, URLs, and the client/server model of the Web (all topics we’ll address in detail later in this book). Whether you’re aware of all the underlying details or not, the basic interaction model is probably familiar.
In a nutshell, a user visits a website and receives a form, coded in HTML, to be filled out in his or her browser. After submitting the form, a script, identified within either the form or the address used to contact the server, is run on the server and produces another HTML page as a reply. Along the way, data typically passes through three programs: from the client browser, to the web server, to the CGI script, and back again to the browser. This is a natural model for the database access interaction we’re after—users can submit a database key to the server and receive the corresponding record as a reply page.
We’ll go into CGI basics in depth later in this book, but as a first example, let’s start out with a simple interactive example that requests and then echoes back a user’s name in a web browser. The first page in this interaction is just an input form produced by the HTML file shown in Example 1-30. This HTML file is stored on the web server machine, and it is transferred to the web browser running on the client machine upon request.
<html>
<title>Interactive Page</title>
<body>
<form method=POST action="cgi-bin/cgi101.py">
    <P><B>Enter your name:</B>
    <P><input type=text name=user>
    <P><input type=submit>
</form>
</body></html>
Notice how this HTML form names the script that will process
its input on the server in its action attribute. This page is requested
by submitting its URL (web address). When received by the web
browser on the client, the input form that this code produces is
shown in Figure 1-10 (in Internet
Explorer here).

When this input form is submitted, a web server intercepts the
request (more on the web server in a moment) and runs the Python CGI
script in Example 1-31. Like
the HTML file, this Python script resides on the same machine as the
web server; it’s run on the server machine to handle the inputs and
generate a reply to the browser on the client. It uses the cgi module to parse the form’s input and
insert it into the HTML reply stream, properly escaped. The cgi module gives us a dictionary-like
interface to form inputs sent by the browser, and the HTML code that
this script prints winds up rendering the next page on the client’s
browser. In the CGI world, the standard output stream is connected
to the client through a socket.
#!/usr/bin/python
import cgi
form = cgi.FieldStorage()                 # parse form data
print('Content-type: text/html\n')        # hdr plus blank line
print('<title>Reply Page</title>')        # html reply page
if not 'user' in form:
    print('<h1>Who are you?</h1>')
else:
    print('<h1>Hello <i>%s</i>!</h1>' % cgi.escape(form['user'].value))
And if all goes well, we receive the reply page shown in Figure 1-11—essentially, just an echo of the data we entered in the input page. The page in this figure is produced by the HTML printed by the Python CGI script running on the server. Along the way, the user’s name was transferred from a client to a server and back again—potentially across networks and miles. This isn’t much of a website, of course, but the basic principles here apply, whether you’re just echoing inputs or doing full-blown e-whatever.
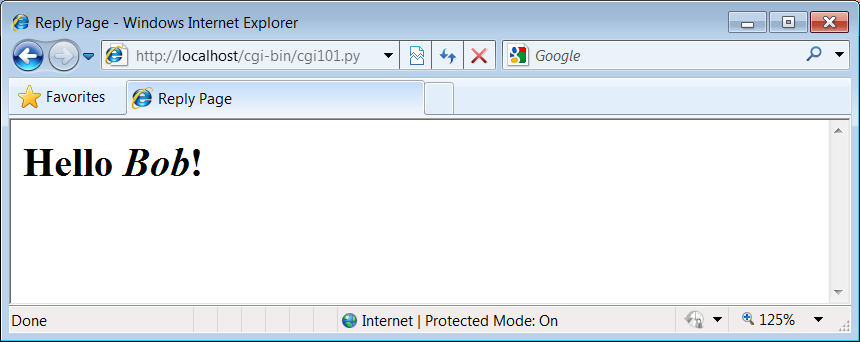
If you have trouble getting this interaction to run on
Unix-like systems, you may need to modify the path to your Python in
the #! line at the top of the
script file and make it executable with a chmod command, but
this is dependent on your web server (again, more on the missing
server piece in a moment).
Also note that the CGI script in Example 1-31 isn’t printing
complete HTML: the <html>
and <body> tags of the
static HTML file in Example 1-30 are missing. Strictly
speaking, such tags should be printed, but web browsers don’t mind
the omissions, and this book’s goal is not to teach legalistic HTML;
see other resources for more on HTML.
GUIs versus the Web
Before moving on, it’s worth taking a moment to compare this basic CGI example with the simple GUI of Example 1-28 and Figure 1-6. Here, we’re running scripts on a server to generate HTML that is rendered in a web browser. In the GUI, we make calls to build the display and respond to events within a single process and on a single machine. The GUI runs multiple layers of software, but not multiple programs. By contrast, the CGI approach is much more distributed—the server, the browser, and possibly the CGI script itself run as separate programs that usually communicate over a network.
Because of such differences, the standalone GUI model may be simpler and more direct: there is no intermediate server, replies do not require invoking a new program, no HTML needs to be generated, and the full power of a GUI toolkit is at our disposal. On the other hand, a web-based interface can be viewed in any browser on any computer and only requires Python on the server machine.
And just to muddle the waters further, a GUI can also employ Python’s standard library networking tools to fetch and display data from a remote server (that’s how web browsers do their work internally), and some newer frameworks such as Flex, Silverlight, and pyjamas provide toolkits that support more full-featured user interfaces within web pages on the client (the RIAs I mentioned earlier), albeit at some added cost in code complexity and software stack depth. We’ll revisit the trade-offs of the GUI and CGI schemes later in this book, because it’s a major design choice today. First, let’s preview a handful of pragmatic issues related to CGI work before we apply it to our people database.
Running a Web Server
Of course, to run CGI scripts at all, we need a web server that will
serve up our HTML and launch our Python scripts on request. The
server is a required mediator between the browser and the CGI
script. If you don’t have an account on a machine that has such a
server available, you’ll want to run one of your own. We could
configure and run a full production-level web server such as the
open source Apache system (which, by the way, can be tailored with
Python-specific support by the mod_python extension). For this chapter,
however, I instead wrote a simple web server in Python using the
code in Example 1-32.
We’ll revisit the tools used in this example later in this book (and explore Unix CGI script configuration requirements we’ll skip here). In short, because Python provides precoded support for various types of network servers, we can build a CGI-capable and portable HTTP web server in just 8 lines of code (and a whopping 16 if we include comments and blank lines).
As we’ll see later in this book, it’s also easy to build
proprietary network servers with low-level socket calls in Python,
but the standard library provides canned implementations for many
common server types, web based or otherwise. The socketserver module, for instance, supports threaded and forking versions
of TCP and UDP servers. Third-party systems such as Twisted provide
even more implementations. For serving up web content, the standard
library modules used in Example 1-32 provide what we need.
"""
Implement an HTTP web server in Python that knows how to run server-side
CGI scripts coded in Python;  serves files and scripts from current working
dir;  Python scripts must be stored in webdir\cgi-bin or webdir\htbin;
"""

import os, sys
from http.server import HTTPServer, CGIHTTPRequestHandler

webdir = '.'   # where your html files and cgi-bin script directory live
port   = 80    # default http://localhost/, else use http://localhost:xxxx/

os.chdir(webdir)                                       # run in HTML root dir
srvraddr = ("", port)                                  # my hostname, portnumber
srvrobj  = HTTPServer(srvraddr, CGIHTTPRequestHandler)
srvrobj.serve_forever()                                # run as perpetual daemon
The classes this script uses assume that the HTML files to be served up reside in the current working directory and that the CGI scripts to be run live in a cgi-bin or htbin subdirectory there. We’re using a cgi-bin subdirectory for scripts, as suggested by the filename of Example 1-31. Some web servers look at filename extensions to detect CGI scripts; our script uses this subdirectory-based scheme instead.
To launch the server, simply run this script (in a console
window, by an icon click, or otherwise); it runs perpetually,
waiting for requests to be submitted from browsers and other
clients. The server listens for requests on the machine on which it
runs and on the standard HTTP port number 80. To use this script to
serve up other websites, either launch it from the directory that
contains your HTML files and a cgi-bin
subdirectory that contains your CGI scripts, or change its webdir variable to reflect the site’s root
directory (it will automatically change to that directory and serve
files located there).
But where in cyberspace do you actually run the server script? If you look closely enough, you’ll notice that the server name in the addresses of the prior section’s examples (near the top right of the browser after the http://) is always localhost. To keep this simple, I am running the web server on the same machine as the web browser; that’s what the server name “localhost” (and the equivalent IP address “127.0.0.1”) means. That is, the client and server machines are the same: the client (web browser) and server (web server) are just different processes running at the same time on the same computer.
Though not meant for enterprise-level work, this turns out to be a great way to test CGI scripts—you can develop them on the same machine without having to transfer code back to a remote server machine after each change. Simply run this script from the directory that contains both your HTML files and a cgi-bin subdirectory for scripts and then use http://localhost/… in your browser to access your HTML and script files. Here is the trace output the web server script produces in a Windows console window that is running on the same machine as the web browser and launched from the directory where the HTML files reside:
...\PP4E\Preview> python webserver.py
mark-VAIO - - [28/Jan/2010 18:34:01] "GET /cgi101.html HTTP/1.1" 200 -
mark-VAIO - - [28/Jan/2010 18:34:12] "POST /cgi-bin/cgi101.py HTTP/1.1" 200 -
mark-VAIO - - [28/Jan/2010 18:34:12] command: C:\Python31\python.exe -u C:\Users
\mark\Stuff\Books\4E\PP4E\dev\Examples\PP4E\Preview\cgi-bin\cgi101.py ""
mark-VAIO - - [28/Jan/2010 18:34:13] CGI script exited OK
mark-VAIO - - [28/Jan/2010 18:35:25] "GET /cgi-bin/cgi101.py?user=Sue+Smith HTTP
/1.1" 200 -
mark-VAIO - - [28/Jan/2010 18:35:25] command: C:\Python31\python.exe -u C:\Users
\mark\Stuff\Books\4E\PP4E\dev\Examples\PP4E\Preview\cgi-bin\cgi101.py
mark-VAIO - - [28/Jan/2010 18:35:26] CGI script exited OK
One pragmatic note here: you may need administrator privileges in order to run a server on the script’s default port 80 on some platforms: either find out how to run this way or try running on a different port. To run this server on a different port, change the port number in the script and name it explicitly in the URL (e.g., http://localhost:8888/). We’ll learn more about this convention later in this book.
And to run this server on a remote computer, upload the HTML files and CGI scripts subdirectory to the remote computer, launch the server script on that machine, and replace “localhost” in the URLs with the domain name or IP address of your server machine (e.g., http://www.myserver.com/). When running the server remotely, all the interaction will be as shown here, but inputs and replies will be automatically shipped across network connections, not routed between programs running on the same computer.
To delve further into the server classes our web server script employs, see their implementation in Python’s standard library (C:\Python31\Lib for Python 3.1); one of the major advantages of open source system like Python is that we can always look under the hood this way. In Chapter 15, we’ll expand Example 1-32 to allow the directory name and port numbers to be passed in on the command line.
Using Query Strings and urllib
In the basic CGI example shown earlier, we ran the Python script by filling out and submitting a form that contained the name of the script. Really, server-side CGI scripts can be invoked in a variety of ways—either by submitting an input form as shown so far or by sending the server an explicit URL (Internet address) string that contains inputs at the end. Such an explicit URL can be sent to a server either inside or outside of a browser; in a sense, it bypasses the traditional input form page.
For instance, Figure 1-12 shows the
reply generated by the server after typing a URL of the following
form in the address field at the top of the web browser (+ means a space here):
http://localhost/cgi-bin/cgi101.py?user=Sue+Smith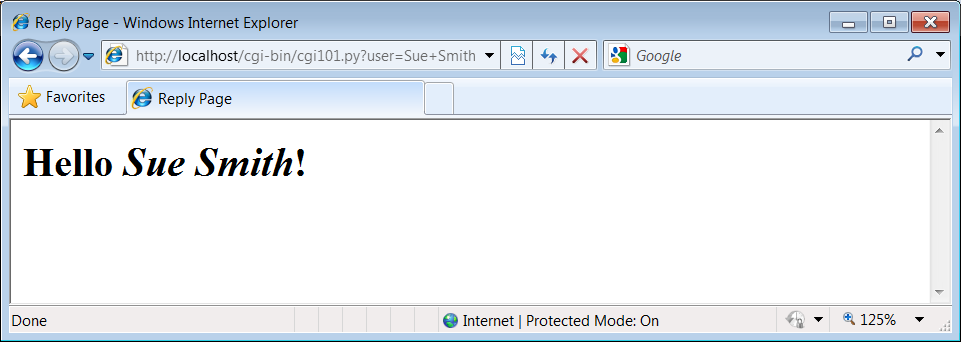
The inputs here, known as query
parameters, show up at the end of the URL after the
?; they are not entered into a
form’s input fields. Adding inputs to URLs is sometimes called a GET
request. Our original input form uses the POST method, which instead
ships inputs in a separate step. Luckily, Python CGI scripts don’t
have to distinguish between the two; the cgi module’s input parser handles any data
submission method differences for us.
It’s even possible, and often useful, to submit URLs with
inputs appended as query parameters completely outside any web
browser. The Python urllib module
package, for instance, allows us to read the reply generated by a
server for any valid URL. In effect, it allows us to visit a web
page or invoke a CGI script from within another script; your Python
code, instead of a browser, acts as the web client. Here is this
module in action, run from the interactive command line:
>>>from urllib.request import urlopen>>>conn = urlopen('http://localhost/cgi-bin/cgi101.py?user=Sue+Smith')>>>reply = conn.read()>>>replyb'<title>Reply Page</title>\n<h1>Hello <i>Sue Smith</i>!</h1>\n' >>>urlopen('http://localhost/cgi-bin/cgi101.py').read()b'<title>Reply Page</title>\n<h1>Who are you?</h1>\n' >>>urlopen('http://localhost/cgi-bin/cgi101.py?user=Bob').read()b'<title>Reply Page</title>\n<h1>Hello <i>Bob</i>!</h1>\n'
The urllib module package
gives us a file-like interface to the server’s reply for a URL.
Notice that the output we read from the server is raw HTML code
(normally rendered by a browser). We can process this text with any
of Python’s text-processing tools, including:
String methods to search and split
The
reregular expression pattern-matching moduleFull-blown HTML and XML parsing support in the standard library, including
html.parser, as well as SAX-, DOM-, and ElementTree–style XML parsing tools.
When combined with such tools, the urllib package is a natural for a variety
of techniques—ad-hoc
interactive testing of websites, custom client-side GUIs, “screen
scraping” of web page content, and automated regression testing
systems for remote server-side
CGI scripts.
Formatting Reply Text
One last fine point: because CGI scripts use text to communicate with
clients, they need to format their replies according to a set of
rules. For instance, notice how Example 1-31 adds a blank line
between the reply’s header and its HTML by printing an explicit
newline (\n) in addition to the
one print adds automatically;
this is a required separator.
Also note how the text inserted into the HTML reply is run
through the cgi.escape (a.k.a.
html.escape in Python 3.2; see
the note under Python HTML and URL Escape Tools)
call, just in case the input includes a character that is special in
HTML. For example, Figure 1-13 shows
the reply we receive for form input Bob
</i> Smith—the </i> in the middle becomes </i> in the reply, and so
doesn’t interfere with real HTML code (use your browser’s view
source option to see this for yourself); if not escaped, the rest of
the name would not be italicized.
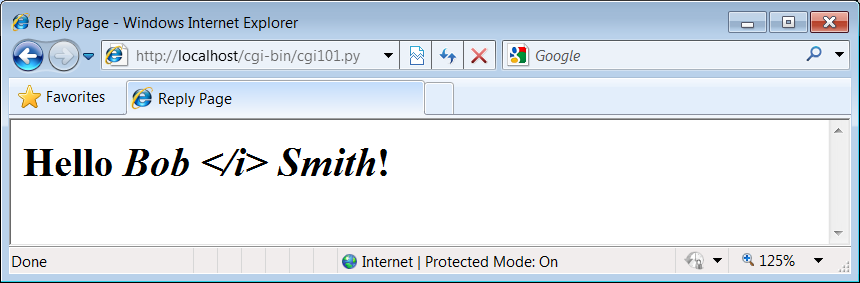
Escaping text like this isn’t always required, but it is a
good rule of thumb when its content isn’t known; scripts that
generate HTML have to respect its rules. As we’ll see later in this
book, a related call, urllib.parse.quote, applies URL escaping
rules to text. As we’ll also see, larger frameworks often handle
text formatting tasks for us.
A Web-Based Shelve Interface
Now, to use the CGI techniques of the prior sections for our database application, we basically just need a bigger input and reply form. Figure 1-14 shows the form we’ll implement for accessing our database in a web browser.
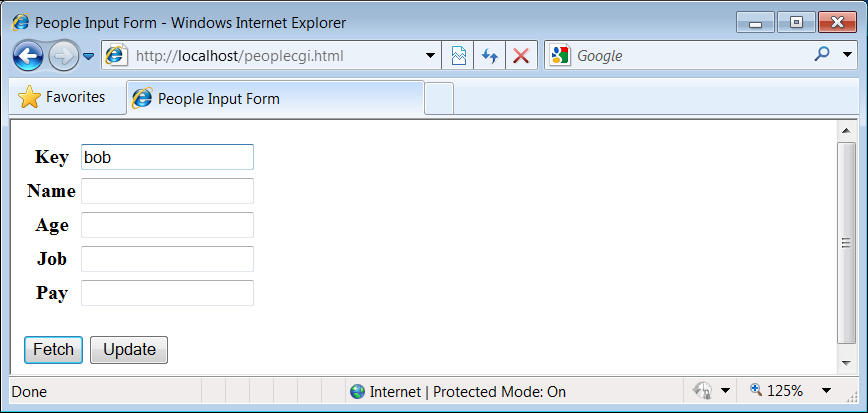
Coding the website
To implement the interaction, we’ll code an initial HTML input form, as well as a Python CGI script for displaying fetch results and processing update requests. Example 1-33 shows the input form’s HTML code that builds the page in Figure 1-14.
<html>
<title>People Input Form</title>
<body>
<form method=POST action="cgi-bin/peoplecgi.py">
    <table>
    <tr><th>Key <td><input type=text name=key>
    <tr><th>Name<td><input type=text name=name>
    <tr><th>Age <td><input type=text name=age>
    <tr><th>Job <td><input type=text name=job>
    <tr><th>Pay <td><input type=text name=pay>
    </table>
    <p>
    <input type=submit value="Fetch",  name=action>
    <input type=submit value="Update", name=action>
</form>
</body></html>
To handle form (and other) requests, Example 1-34 implements a Python CGI script that fetches and updates our shelve’s records. It echoes back a page similar to that produced by Example 1-33, but with the form fields filled in from the attributes of actual class objects in the shelve database.
As in the GUI, the same web page is used for both displaying
results and inputting updates. Unlike the GUI, this script is run
anew for each step of user interaction, and it reopens the
database each time (the reply page’s action field provides a link back to the
script for the next request). The basic CGI model provides no
automatic memory from page to page, so we have to start from
scratch each time.
"""
Implement a web-based interface for viewing and updating class instances
stored in a shelve; the shelve lives on server (same machine if localhost)
"""

import cgi, shelve, sys, os                   # cgi.test() dumps inputs
shelvename = 'class-shelve'                   # shelve files are in cwd
fieldnames = ('name', 'age', 'job', 'pay')

form = cgi.FieldStorage()                     # parse form data
print('Content-type: text/html')              # hdr, blank line is in replyhtml
sys.path.insert(0, os.getcwd())               # so this and pickler find person

# main html template
replyhtml = """
<html>
<title>People Input Form</title>
<body>
<form method=POST action="peoplecgi.py">
    <table>
    <tr><th>key<td><input type=text name=key value="%(key)s">
    $ROWS$
    </table>
    <p>
    <input type=submit value="Fetch",  name=action>
    <input type=submit value="Update", name=action>
</form>
</body></html>
"""

# insert html for data rows at $ROWS$
rowhtml  = '<tr><th>%s<td><input type=text name=%s value="%%(%s)s">\n'
rowshtml = ''
for fieldname in fieldnames:
    rowshtml += (rowhtml % ((fieldname,) * 3))
replyhtml = replyhtml.replace('$ROWS$', rowshtml)

def htmlize(adict):
    new = adict.copy()
    for field in fieldnames:                       # values may have &, >, etc.
        value = new[field]                         # display as code: quoted
        new[field] = cgi.escape(repr(value))       # html-escape special chars
    return new

def fetchRecord(db, form):
    try:
        key = form['key'].value
        record = db[key]
        fields = record.__dict__                   # use attribute dict
        fields['key'] = key                        # to fill reply string
    except:
        fields = dict.fromkeys(fieldnames, '?')
        fields['key'] = 'Missing or invalid key!'
    return fields

def updateRecord(db, form):
    if not 'key' in form:
        fields = dict.fromkeys(fieldnames, '?')
        fields['key'] = 'Missing key input!'
    else:
        key = form['key'].value
        if key in db:
            record = db[key]                       # update existing record
        else:
            from person import Person              # make/store new one for key
            record = Person(name='?', age='?')     # eval: strings must be quoted
        for field in fieldnames:
            setattr(record, field, eval(form[field].value))
        db[key] = record
        fields = record.__dict__
        fields['key'] = key
    return fields

db = shelve.open(shelvename)
action = form['action'].value if 'action' in form else None
if action == 'Fetch':
    fields = fetchRecord(db, form)
elif action == 'Update':
    fields = updateRecord(db, form)
else:
    fields = dict.fromkeys(fieldnames, '?')        # bad submit button value
    fields['key'] = 'Missing or invalid action!'
db.close()
print(replyhtml % htmlize(fields))                 # fill reply from dict
This is a fairly large script, because it has to handle user inputs, interface with the database, and generate HTML for the reply page. Its behavior is fairly straightforward, though, and similar to the GUI of the prior section.
Directories, string formatting, and security
A few fine points before we move on. First of all, make sure the web server script we wrote earlier in Example 1-32 is running before you proceed; it’s going to catch our requests and route them to our script.
Also notice how this script adds the current working
directory (os.getcwd) to the
sys.path module search path
when it first starts. Barring a PYTHONPATH change, this is required to
allow both the pickler and this script itself to import the
person module one level up from
the script. Because of the new way the web server runs CGI scripts
in Python 3, the current
working directory isn’t added to sys.path, even though the shelve’s files
are located there correctly when opened. Such details can vary per
server.
The only other feat of semi-magic the CGI script relies on
is using a record’s attribute dictionary (__dict__) as the source of values when
applying HTML escapes to field values and string formatting to the
HTML reply template string in the last line of the script. Recall
that a %(key)code replacement
target fetches a value by key from a dictionary:
>>>D = {'say': 5, 'get': 'shrubbery'}>>>D['say']5 >>>S = '%(say)s => %(get)s' % D>>>S'5 => shrubbery'
By using an object’s attribute dictionary, we can refer to
attributes by name in the format string. In fact, part of the
reply template is generated by code. If its structure is
confusing, simply insert statements to print replyhtml and to call sys.exit, and run from a simple command
line. This is how the table’s HTML in the middle of the reply is
generated (slightly formatted here for readability):
   <table>
   <tr><th>key<td><input type=text name=key value="%(key)s">
   <tr><th>name<td><input type=text name=name value="%(name)s">
   <tr><th>age<td><input type=text name=age value="%(age)s">
   <tr><th>job<td><input type=text name=job value="%(job)s">
   <tr><th>pay<td><input type=text name=pay value="%(pay)s">
   </table>
This text is then filled in with key values from the
record’s attribute dictionary by string formatting at the end of
the script. This is done after running the dictionary through a
utility to convert its values to code text with repr and escape that text per HTML
conventions with cgi.escape
(again, the last step isn’t always required, but it’s generally a
good practice).
These HTML reply lines could have been hardcoded in the script, but generating them from a tuple of field names is a more general approach—we can add new fields in the future without having to update the HTML template each time. Python’s string processing tools make this a snap.
In the interest of fairness, I should point out that
Python’s newer str.format
method could achieve much the same effect as the traditional
% format expression used by
this script, and it provides specific syntax for referencing
object attributes which to some might seem more explicit than
using __dict__ keys:
>>>D = {'say': 5, 'get': 'shrubbery'}>>>'%(say)s => %(get)s' % D# expression: key reference '5 => shrubbery' >>>'{say} => {get}'.format(**D)# method: key reference '5 => shrubbery' >>>from person import Person>>>bob = Person('Bob', 35)>>>'%(name)s, %(age)s' % bob.__dict__# expression: __dict__ keys 'Bob, 35' >>>'{0.name} => {0.age}'.format(bob)# method: attribute syntax 'Bob => 35'
Because we need to escape attribute values first, though, the format method call’s attribute syntax can’t be used directly this way; the choice is really between both technique’s key reference syntax above. (At this writing, it’s not clear which formatting technique may come to dominate, so we take liberties with using either in this book; if one replaces the other altogether someday, you’ll want to go with the winner.)
In the interest of security, I also need to remind you one
last time that the eval call
used in this script to convert inputs to Python objects is
powerful, but not secure—it happily runs any Python code, which
can perform any system modifications that the script’s process has
permission to make. If you care, you’ll need to trust the input
source, run in a restricted environment, or use more focused input
converters like int and
float. This is generally a
larger concern in the Web world, where request strings might
arrive from arbitrary sources. Since we’re all friends here,
though, we’ll ignore the threat.
Using the website
Despite the extra complexities of servers, directories, and
strings, using the web interface is as simple as using the GUI,
and it has the added advantage of running on any machine with a
browser and Web connection. To fetch a record, fill in the Key
field and click Fetch; the script populates the page with field
data grabbed from the corresponding class instance in the shelve,
as illustrated in Figure 1-15 for
key bob.
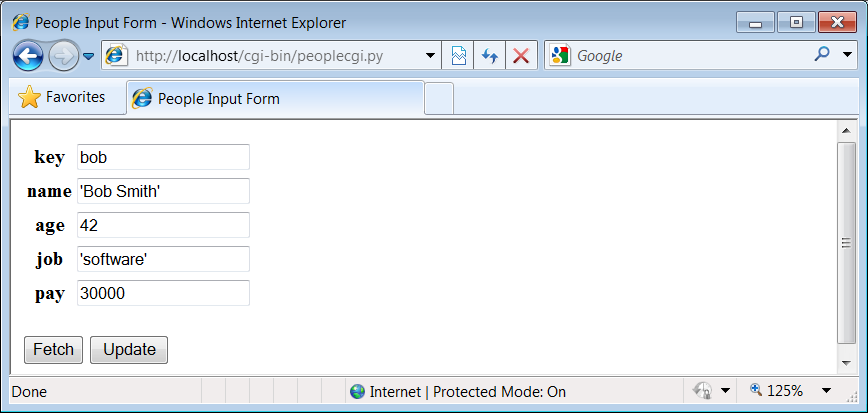
Figure 1-15 shows what happens when the key comes from the posted form. As usual, you can also invoke the CGI script by instead passing inputs on a query string at the end of the URL; Figure 1-16 shows the reply we get when accessing a URL of the following form:
http://localhost/cgi-bin/peoplecgi.py?action=Fetch&key=sue
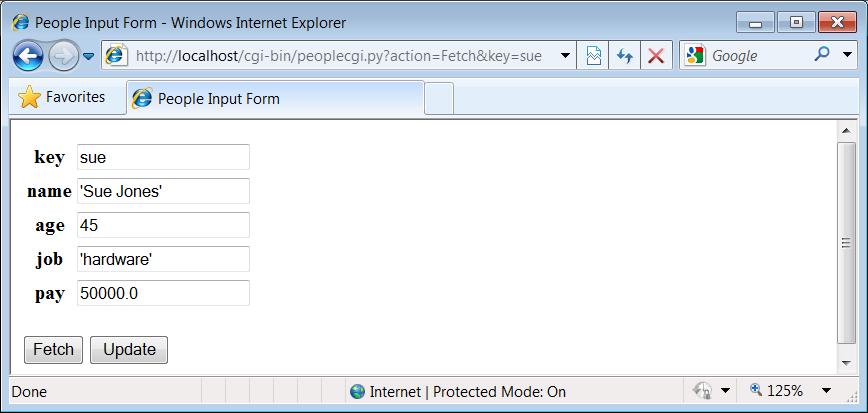
As we’ve seen, such a URL can be submitted either within
your browser or by scripts that use tools such as the urllib package. Again, replace
“localhost” with your server’s domain name if you are running the
script on a remote machine.
To update a record, fetch it by key, enter new values in the
field inputs (and remember to quote string input values here just as in the earlier versions for the script’s eval), and click Update; the script will take the input
fields and store them in the attributes of the class instance in
the shelve. Figure 1-17 shows the
reply we get after updating sue.
Finally, adding a record works the same as in the GUI: fill in a new key and field values and click Update; the CGI script creates a new class instance, fills out its attributes, and stores it in the shelve under the new key. There really is a class object behind the web page here, but we don’t have to deal with the logic used to generate it. Figure 1-18 shows a record added to the database in this way.
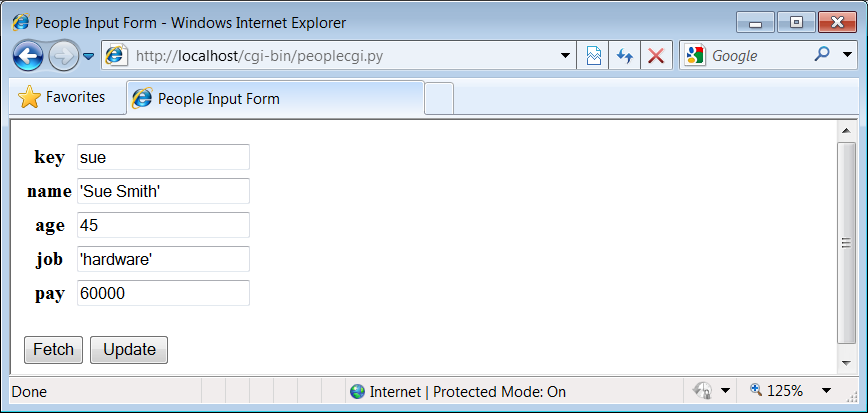
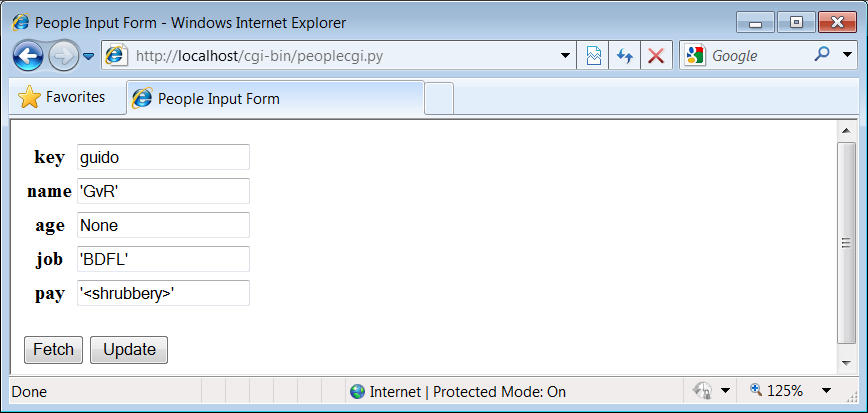
In principle, we could also update and add records by submitting a URL—either from a browser or from a script—such as:
http://localhost/cgi-bin/
   peoplecgi.py?action=Update&key=sue&pay=50000&name=Sue+Smith& ...more...
Except for automated tools, though, typing such a long URL
will be noticeably more difficult than filling out the input page.
Here is part of the reply page generated for the “guido” record’s
display of Figure 1-18 (use your
browser’s “view page source” option to see this for yourself).
Note how the < and > characters are translated to HTML
escapes with cgi.escape before
being inserted into the reply:
<tr><th>key<td><input type=text name=key value="guido"> <tr><th>name<td><input type=text name=name value="'GvR'"> <tr><th>age<td><input type=text name=age value="None"> <tr><th>job<td><input type=text name=job value="'BDFL'"> <tr><th>pay<td><input type=text name=pay value="'<shrubbery>'">
As usual, the standard library urllib module package comes in handy for
testing our CGI script; the output we get back is raw HTML, but we
can parse it with other standard library tools and use it as the
basis of a server-side script regression testing system run on any
Internet-capable machine. We might even parse the server’s reply
fetched this way and display its data in a client-side GUI coded
with tkinter; GUIs and web pages are not mutually exclusive
techniques. The last test in the following interaction shows a
portion of the error message page’s HTML that is produced when the
action is missing or invalid in the inputs, with line breaks added
for readability:
>>>from urllib.request import urlopen>>>url = 'http://localhost/cgi-bin/peoplecgi.py?action=Fetch&key=sue'>>>urlopen(url).read()b'<html>\n<title>People Input Form</title>\n<body>\n <form method=POST action="peoplecgi.py">\n <table>\n <tr><th>key<td><input type=text name=key value="sue">\n <tr><th>name<td><input type=text name=name value="\'Sue Smith\'">\n <tr><t ...more deleted... >>>urlopen('http://localhost/cgi-bin/peoplecgi.py').read()b'<html>\n<title>People Input Form</title>\n<body>\n <form method=POST action="peoplecgi.py">\n <table>\n <tr><th>key<td><input type=text name=key value="Missing or invalid action!">\n <tr><th>name<td><input type=text name=name value="\'?\'">\n <tr><th>age<td><input type=text name=age value="\'?\'">\n<tr> ...more deleted...
In fact, if you’re running this CGI script on “localhost,” you can use both the last section’s GUI and this section’s web interface to view the same physical shelve file—these are just alternative interfaces to the same persistent Python objects. For comparison, Figure 1-19 shows what the record we saw in Figure 1-18 looks like in the GUI; it’s the same object, but we are not contacting an intermediate server, starting other scripts, or generating HTML to view it.
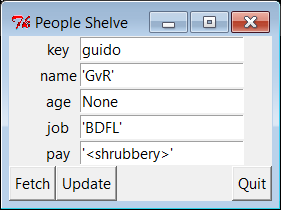
And as before, we can always check our work on the server machine either interactively or by running scripts. We may be viewing a database through web browsers and GUIs, but, ultimately, it is just Python objects in a Python shelve file:
>>>import shelve>>>db = shelve.open('class-shelve')>>>db['sue'].name'Sue Smith' >>>db['guido'].job'BDFL' >>>list(db['guido'].name)['G', 'v', 'R'] >>>list(db.keys())['sue', 'bill', 'nobody', 'tomtom', 'tom', 'bob', 'peg', 'guido']
Here in action again is the original database script we wrote in Example 1-19 before we moved on to GUIs and the web; there are many ways to view Python data:
...\PP4E\Preview> dump_db_classes.py
sue =>
   Sue Smith 60000
bill =>
   bill 9999
nobody =>
   John Doh None
tomtom =>
   Tom Tom 40000
tom =>
   Tom Doe 90000
bob =>
   Bob Smith 30000
peg =>
   1 4
guido =>
   GvR <shrubbery>
Smith
Doe
Future directions
Naturally, there are plenty of improvements we could make here, too:
The HTML code of the initial input page in Example 1-33, for instance, is somewhat redundant with the script in Example 1-34, and it could be automatically generated by another script that shares common information.
In fact, we might avoid hardcoding HTML in our script completely if we use one of the HTML generator tools we’ll meet later, including HTMLgen (a system for creating HTML from document object trees) and PSP (Python Server Pages, a server-side HTML templating system for Python similar to PHP and ASP).
For ease of maintenance, it might also be better to split the CGI script’s HTML code off to a separate file in order to better divide display from logic (different parties with possibly different skill sets could work on the different files).
Moreover, if this website might be accessed by many people simultaneously, we would have to add file locking or move to a database such as ZODB or MySQL to support concurrent updates. ZODB and other full-blown database systems would also provide transaction rollbacks in the event of failures. For basic file locking, the
os.opencall and its flags provide the tools we need.ORMs (object relational mappers) for Python such as SQLObject and SQLAlchemy mentioned earlier might also allow us to gain concurrent update support of an underlying relational database system, but retain our Python class view of the data.
In the end, if our site grows much beyond a few interactive pages, we might also migrate from basic CGI scripting to a more complete web framework such as one of those mentioned at the start of this section— Django, TurboGears, pyjamas, and others. If we must retain information across pages, tools such as cookies, hidden inputs, mod_python session data, and FastCGI may help too.
If our site eventually includes content produced by its own users, we might transition to Plone, a popular open source Python- and Zope-based site builder that, using a workflow model, delegates control of site content to its producers.
And if wireless or cloud interfaces are on our agenda, we might eventually migrate our system to cell phones using a Python port such as those available for scripting Nokia platforms and Google’s Android, or to a cloud-computing platform such as Google’s Python-friendly App Engine. Python tends to go wherever technology trends lead.
For now, though, both the GUI and web-based interfaces we’ve coded get the job done.
The End of the Demo
And that concludes our sneak preview demo of Python in action. We’ve explored data representation, OOP, object persistence, GUIs, and website basics. We haven’t studied any of these topics in any great depth. Hopefully, though, this chapter has piqued your curiosity about Python applications programming.
In the rest of this book, we’ll delve into these and other application programming tools and topics, in order to help you put Python to work in your own programs. In the next chapter, we begin our tour with the systems programming and administration tools available to Python programmers.
[2] No, I’m serious. In the Python classes I teach, I had for many years regularly used the name “Bob Smith,” age 40.5, and jobs “developer” and “manager” as a supposedly fictitious database record—until a class in Chicago, where I met a student named Bob Smith, who was 40.5 and was a developer and manager. The world is stranger than it seems.
Get Programming Python, 4th Edition now with the O’Reilly learning platform.
O’Reilly members experience books, live events, courses curated by job role, and more from O’Reilly and nearly 200 top publishers.

