Chapter 1. Creating a Company in QuickBooks
A company file is where you store your company’s records in QuickBooks, and it’s the first thing you need to work on in the program. You can create a company file from scratch or convert records previously kept in Quicken, but the most agreeable approach is to use a file that someone else created. If you’ve worked with an accountant to set up your company, she might provide you with a company file configured precisely for your business so that you can hit the ground running.
If you must create your own company file, this chapter tells you how to use the QuickBooks EasyStep Interview to get started, and it points you to the other chapters in this book that tell you how to finish the job. If you already have a company file, you’ll learn how to open it and modify basic company information.
Opening QuickBooks
Here are the easiest methods for opening QuickBooks:
Desktop icon. If you requested during installation that QuickBooks create a desktop shortcut, double-click that shortcut to launch QuickBooks.
Quick Launch toolbar. The fastest way to open QuickBooks is to click its icon on the toolbar (Figure 1-1).
If you have a QuickBooks desktop shortcut, right-drag (that’s dragging while holding down the right mouse button) the desktop shortcut onto the Quick Launch toolbar and then choose Copy Here to create a second shortcut on the toolbar. (If you’re trying to clean up your desktop, choose Move Here to move the desktop shortcut to the Quick Launch toolbar.) You can also use the right-drag technique to copy or move a shortcut in Windows Explorer or from the Start menu.
Programs menu. Without a desktop icon, you can launch QuickBooks from the Windows Start menu. Click Start, and then choose Programs → QuickBooks → QuickBooks Pro 2006 (or QuickBooks Premier 2006).

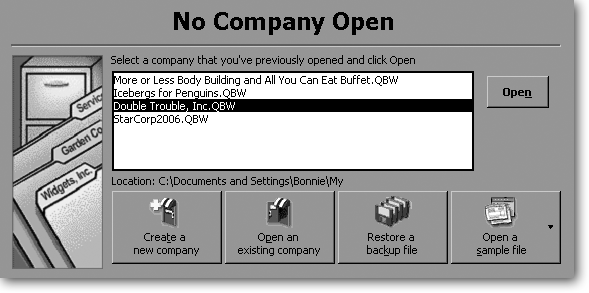
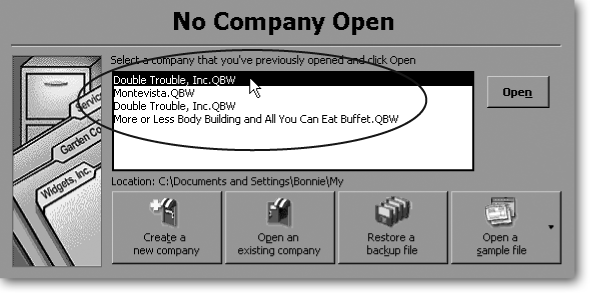
The first time you launch QuickBooks, you’re greeted by the “Welcome to QuickBooks” window. Later, if you close a company file, the No Company Open window appears, as shown in Figure 1-2. These two windows are nearly—but not quite—the same. The rest of this chapter tells you when and how to use each one.
You still have to create or open a company file the first time you launch QuickBooks. But after you’ve opened a company file in one session, QuickBooks kicks off your next session by opening the same company file. If you use only one company file, you might never have to actively open a QuickBooks file again.
Creating a New Company
Keeping books requires accuracy, attention to detail, and persistence, hence the customary image of spectacled accountants hunched over ledgers. QuickBooks can help you keep your books without ruining your vision or your posture—as long as you start your QuickBooks company file with good information.
The EasyStep Interview tries to make creating a company file as painless as possible, but the process isn’t pain free. Indeed, the EasyStep Interview is much like a family reunion, where you’re asked a lot of questions that you don’t want to answer. Unlike the reunion, however, you can skip parts of the Interview or return to it when you’re better prepared for the interrogation.
In QuickBooks 2006, the Interview is short and sweet. All it wants to know is some company information, the industry you’re in, and the features you want to use. The Interview sets your preferences and creates a few accounts, but you have to do the bulk of the work yourself later. For example, the company file that EasyStep Interview creates doesn’t even know what tax form you use to file your business tax return. You must fill in this information in the Company Information dialog box and slog through individually assigning each account to a tax line.
Steps to Take Before You Create Your Company File
If you’ve just started a business and want to inaugurate your books with QuickBooks, your prep work will be a snap. On the other hand, if you have existing books for your business, you have a few small tasks to complete before you jump into QuickBooks’ setup. Whether your books are paper ledgers or electronic files in another program, gather your company information before you open QuickBooks. Then, you can hunker down in front of your computer and crank out a company file in record time. Here’s a guide to what you need to create your company file in QuickBooks.
A Start Date
To keep your entire financial history at your fingertips, you need every transaction and speck of financial information in your QuickBooks company file. But you know that you have better things to do than enter years worth of checks, invoices, and deposits, so the comprehensive approach is practical only if you started your company quite recently.
The more realistic approach is to enter your financial state as of a specific date (ideally the beginning of a fiscal year) and from then on, add all new transactions in QuickBooks. In QuickBooks, the date you choose is called the start date and you shouldn’t choose it arbitrarily. Here are your start date options and the ramifications of each:
The first day of the fiscal year. If you’re setting up QuickBooks during the first half of the year, bite the bullet and choose the first day of your company’s fiscal year as the QuickBooks start date.
Yes, you have to enter checks, credit card charges, invoices, and other transactions that occurred since the beginning of the year, but that won’t take as much time as you think. You’ll regain those hours when tax time rolls around and you nimbly generate the reports you need to complete your tax returns. During the second half of the year, the best approach is to be patient and postpone your QuickBooks setup until the next fiscal year. Intuit releases its new versions in November for just that reason.
The first day of a fiscal period. The next best start date is the first day of a fiscal quarter (or fiscal month at the very least).
Waiting until next year isn’t always an option, particularly if your old accounting system vendor wants a truckload of cash for an upgrade. Starting in the middle of a fiscal year makes the entire year’s accounting more difficult. Even if you fill in year-to-date values for all your accounts, since your company file doesn’t contain a full year’s worth of detail, you’ll have to switch between QuickBooks and your old filing cabinets to prepare your tax returns and look up any financial information. Starting at the beginning of a fiscal period mitigates this hassle but doesn’t eliminate it.
Account Balances
Unless you begin using QuickBooks when you start your business, you need to know your account balances as of the start date to get things rolling. For example, if your checking account has $342 at the end of the year, that value feeds into QuickBooks during setup. Here are the balances you need to know and where you can find them in your records:
Cash balances. For each bank account you use in your business (checking, savings, money market, petty cash, and so on), find the bank statements with statement dates as close to but earlier than the start date for your QuickBooks file.
Gather deposit slips and your checkbook register to identify the transactions that haven’t yet cleared in your bank accounts. You’ll need them to enter transactions, as described in the upcoming chapters. If you have petty cash lying around, count it and use that number to set up your petty cash account.
Customer balances. If customers owe you money, pull the paper copy of every unpaid invoice or statement out of your filing cabinet. If you didn’t keep copies, you’ll have to figure out how much you sold in services and products, the discounts you applied, what you charged for shipping and other charges, and the amount of sales tax. As a last resort, you can ask your customers for copies of the invoices they haven’t paid or create invoices in QuickBooks to match the payments you receive. QuickBooks needs this information to calculate your Accounts Receivable balance.
Vendor balances. If your company considers handing out cash more painful than data entry, find the bills you haven’t paid and get ready to enter them in QuickBooks. If you’d rather reduce the transactions you have to enter, pay those outstanding bills.
Asset values. When you own assets such as buildings or equipment, the value of those assets depreciates over time. If you’ve filed a tax return for your company, you can find asset values and accumulated depreciation on your most recent tax return (yet another reason to begin using QuickBooks at the beginning of a year). If you haven’t filed a tax return for your company, the asset value is typically the price you paid for the asset, and you won’t have any depreciation until you file that first return.
Liability balances. Unpaid vendor bills that you enter in QuickBooks generate the balance for your Accounts Payable liability account. However, you must find the current balances you owe on any loans or mortgages.
Inventory. For each product you stock in inventory, you need to know how many items you had in stock as of the start date, how much you paid for them, and what you expect to sell them for.
Payroll. Payroll services offer great value for the money, which you’ll grow to appreciate as you collect the information you need for payroll (including salary and wages, tax deductions, benefits, pensions, 401(k) deductions, and other stray payroll deductions you might have). You also need to know who receives withholdings, such as tax agencies or the company handling your 401(k) plan. Oh yes, you need payroll details for each employee. Chapter 11 explains the ins and outs of payroll using QuickBooks.
Other Important Information
If you’re going back to the beginning of the fiscal year for the start date, you need every transaction that has occurred since the beginning of the year: sales you’ve made, expenses you’ve incurred, payroll and tax transactions, and so on, to reestablish your asset, liability, equity, income, and expense accounts. So, dig that information out of your existing accounting system (or shoebox). Federal tax returns and payroll tax returns (federal and state) include all sorts of information that QuickBooks setup wants to know, like your federal tax ID number. And the balance sheet that goes with the return is a great starting point for your account balances.
Starting the EasyStep Interview
You can create a brand-new company file from either the “Welcome to QuickBooks” window or the No Company Open window by clicking “Create a new company.” Although the wizard doesn’t provide hints about which step comes next, the interview covers the basics for creating and customizing a company file to fit your business. Click Next or Back to move from screen to screen.
The Get Started screen assures you that you’ll be ready to start using QuickBooks in about 30 minutes. Start by choosing one of the following three buttons:
Convert Data. If you have existing records in Quicken or Peachtree, you’re in luck. Converting your books is easier than starting from scratch.
Skip Interview. If you’re something of a QuickBooks expert, this option lets you set up a company file without a safety net. It opens the bare-bones Creating New Company window, followed by a few screens of data entry. If you need help during the process, you can always click the Help button.
Start Interview. If you don’t fit into either of the previous categories, this one’s for you.
Company Information
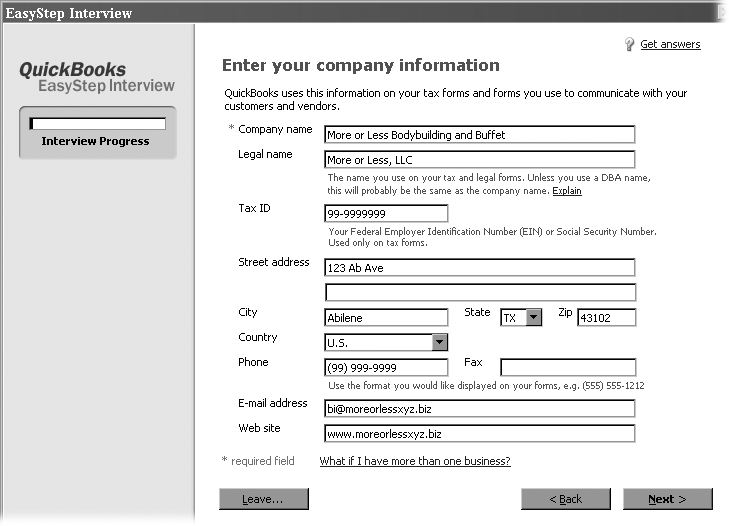
The first setup screen asks you for the basic 411 about your company, as you can see in Figure 1-3. If any of the fields are confusing, try clicking “Get answers” in the upper-right corner. Click Next when you’re done.
The Administrator Password
The second screen in the EasyStep Interview asks you to set a password for the administrator login. The administrator can do absolutely anything in your company file: set up other users, log in as other users, and access any area of the company files. Surprisingly, the administrator password is optional. QuickBooks lets you click Next and skip right over it, but this is no time for shortcuts. Type the password you want to use in both the “Administrator password” and “Retype password” boxes. Keep the login name and password in a safe but memorable place; see the box below for more password advice.
Create Your Company File
After you set the administrator password and click Next, the Create Your Company File screen appears. If you’re new to QuickBooks, the first screen includes a link “Where should I save my company file?”, which opens a QuickBooks Help window that explains the pros and cons of storing files in different places (Section 7.1). QuickBooks veterans can click Next to specify the file name and location.
QuickBooks opens the “Filename for New Company” dialog box, which is really just a Save File dialog box. Initially, it sets the “Save as” type to QuickBooks Files and the location to Program Files → QuickBooks → Company Files. But you’re free to change the name or navigate to a different folder for saving. Here are some guidelines:
QuickBooks fills in the “File name” field with the company name that you entered earlier in the Interview. Keep this name or type one that is shorter or that better identifies the company’s records within.
Instead of the Program Files → QuickBooks folder, consider storing your company file in a folder with the rest of your company data so that it gets backed up along with everything else. (Typically, backup programs skip the Program Files folder.) For example, you could create a Company Files folder in My Documents, if you’re the only person who uses QuickBooks.
When you click Save, QuickBooks can take a minute or so to create the new file, and, in the meantime, the “Creating new company file” message box appears. When the company file is ready, the Easy Step Interview displays the Customizing QuickBooks for your business screen. Click Next to dig in.
Customizing Your Company File
The next several screens in the EasyStep Interview ask you about your business to decide which features to turn on, what to include on your QuickBooks Home page, and so on.
Unlike its counterpart in QuickBooks 2005, this interview sticks to the basics, so you’ll have more setup to do later. As you step through the screens in this section, make a list of the features you’re turning on (and the corresponding page number in this book) for reference.
Here are some guidelines for answering the questions on the screens that follow:
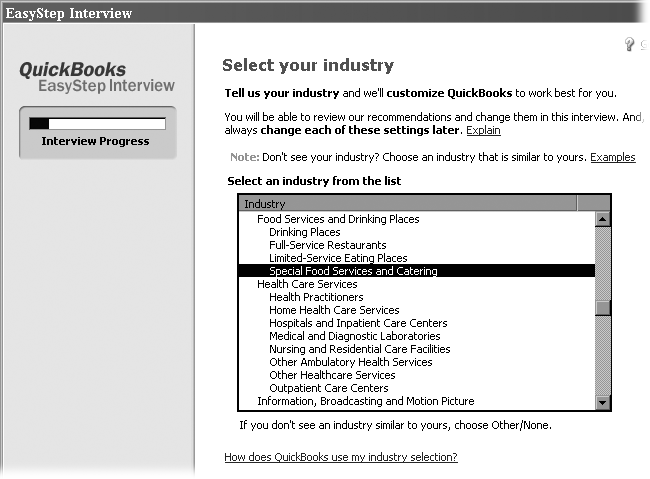
Choose carefully on the “Select your industry” screen. As shown in Figure 1-4, the list of industries is robust, so chances are good you’ll find one that’s close to what your organization does. Based on choice, QuickBooks recommends accounts and preferences. If QuickBooks makes assumptions that you don’t like, you can change preferences later (Section 6.1).
Figure 1-4. The list of industries includes both high-level categories and more targeted industries. For each industry, QuickBooks makes assumptions about customization for you. If none of the choices are even close, choose Other/None at the bottom of the list. QuickBooks then lets you specify exactly which features you want.The “What do you sell?” screen is where you tell QuickBooks whether you sell services, products, or both. When you choose one of these options, QuickBooks knows which types of income accounts you need. The interview asks about whether you track inventory later.
If your business sells things, you see the “Do you sell products online?” screen. Whether you want to sell online or not, you can bypass Intuit’s marketing pitch for their add-on sales services by selecting the “I don’t sell online and I am not interested in doing so” option.
The “Do you charge sales tax?” screen contains only Yes or No options. If you’re one of the unfortunate souls who must navigate the rocky shoals of sales tax, select Yes. If you don’t charge sales tax, select No and breathe a sigh of relief. For detailed instructions on sales taxes in QuickBooks, see Section 4.6.
On the “Do you want to create estimates in QuickBooks?” screen, select Yes or No to turn the estimate feature on or off. If you prepare quotes, bids, or estimates for your customers and want to do so in QuickBooks (Section 8.8.1), select Yes.
The “Using sales receipts in QuickBooks” screen is targeted to retailers who provide sales receipts when customers purchase or pick up products and pay in full. Simply select Yes if you want to create sales receipts in QuickBooks (see Section 8.1.1).
“Using statements in QuickBooks” is where you tell the program whether you generate statements to send to your customers (Section 8.1.3). For example, your wine-of-the-month club might send monthly statements to your members. Or, a consultant could send invoices for work performed and then send a statement that summarizes the fees, payments, and outstanding balance.
The “Using progress invoicing” screen asks whether you invoice customers based on the percentage you’ve completed on a job. To learn why (and how) you might use this feature, see Section 8.9.
“Managing bills you owe” asks whether you plan to write checks to pay bills immediately (No) or enter bills in QuickBooks and then pay them later (Yes). You can read about bill and payment preferences on Section 6.10.
“Tracking inventory in QuickBooks” is the screen where you tell QuickBooks whether you keep track of the products you have in stock. This screen provides a few examples of when to track or bypass inventory, but Section 4.3 includes more guidelines for whether tracking inventory makes sense for your business.
The “Do you accept credit cards?” screen lets you tell QuickBooks whether you take credit cards for payment (as well as whether you want to get a sales pitch about Intuit’s card).
If you bill by the hour, “Tracking time in QuickBooks” is ideal. Select Yes to track the hours that people work and create invoices for their time. You can turn time tracking on in the Interview, but you’ll need the instructions on Section 17.1.1 to set it up properly.
“Do you have employees?” is where you specify whether you need QuickBooks payroll and 1099 features. If you use non-Intuit services to run payroll or generate contractors’ 1099s, select No.
When you click Next on the “Do you have employees?” screen, you see the “Using accounts in QuickBooks” screen and the progress bar indicating that you’re about three-quarters through the interview. With a few more steps, you’ll have your start date and most of the accounts you want to use. Here are the last things to set up:
The “Enter your start date” screen offers a summary of what you learned about starting dates on Section 1.3.1. If you’ve already decided which start date to use, simply type or choose that date in the “Start date” box and click Next.
The “Add your bank account” screen asks if you’d like to add an existing bank account. Select Yes if you’d like QuickBooks to walk you through setting up a bank account. If you’re comfortable setting up the account on your own, select “No, I’ll add a bank account later.”
If you select Yes, the next screen asks for the bank account name, bank account number, and when you opened the account. Click Next again and another screen asks for the statement ending date and ending balance prior to your company file start date. After you create that account, you can add additional bank accounts, or select No to add the rest after you finish the interview.
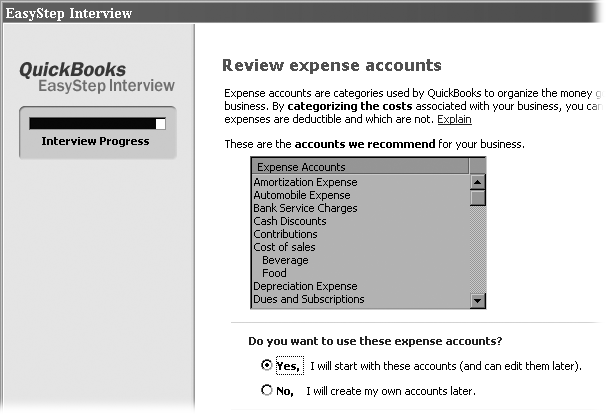
The “Review expense accounts” screen lists the expense accounts typically used by companies in your selected industry, as shown in Figure 1-5. You can’t change these accounts now, but if you need to, make a note to edit your Chart of Accounts once you complete the interview (Section 2.2.1).
The “Review income accounts” screen mimics the expense accounts screen. You’ll see a short list of income accounts typically used by companies in your industry. Select Yes to use the accounts that the program suggests as a start. If you want to create your income accounts from scratch, select “No, I will create my own accounts later.”
When you click Next, you’ll see a bright yellow Congratulations! Click Finish, and you end up in the QuickBooks Learning Center, which contains several tutorials about the remaining setup options. If you made a list of your interview choices, you can start setting up those features now, or you can wait until you need them.
What’s Next
The EasyStep Interview in QuickBooks 2006 doesn’t tell you what to do next. Because the interview sets up only a bare framework, you may be looking for guidance. Look no further than the book in your hands. Here are the ways you can flesh out your company file:
Specify the first month of your fiscal year and tax year. See Section 1.9.
Specify the income tax form you use. See Section 1.9.
Set up your users and passwords. See Section 23.1.1.
Review and/or change the preferences that QuickBooks set. See Section 6.1.
Set up or edit the accounts in your Chart of Accounts. If you set up accounts in the EasyStep Interview, you must edit them to assign them to the tax lines on your tax form. See Section 2.3.2.
Create a journal entry to specify account opening balances. See Section 13.3.
Create items for the products and services you sell. See Section 4.1.
Set up sales tax codes. See Section 4.5.4.
Set up your 1099 tracking. See Section 6.17.
Sign up for Intuit Payroll Service if you want help with payroll. See Section 11.1.
Enter your historical transactions. For invoices, see Section 8.1.3; for bills, see Section 10.2; for payroll, see Section 11.4.
Create a backup copy. See Section 7.2.
Customize your forms. See Section 22.3.
Open an Existing Company File
“Open an existing company” appears in both the “Welcome to QuickBooks” window and the No Company Open window. When you click this button, the “Open a Company” dialog box appears, and you can double-click the name of the company file you want to open. However, the fastest route to opening your company file (in the No Company Open window) is by double-clicking one of the file names in the list of recently opened files, as shown in Figure 1-6.
Convert a Quicken File to QuickBooks
If you’re like many small business owners, your accountant probably recommended that you make the leap from tracking your business in Quicken to using QuickBooks. Quicken doesn’t report your business performance in the way that most accountants want to see, nor does it store your business transactions the way QuickBooks does. If you want the conversion to proceed as smoothly as possible, do some cleanup in your Quicken file first.
For example, you have to record overdue scheduled transactions and send online payments before you convert your Quicken file. Make sure that customer names are consistent and unique. QuickBooks doesn’t support repeating online payments, so you must also send an instruction in Quicken to delete any repeating online payments you’ve set up. In addition, you need complete reports of your past payroll because Quicken payroll transactions don’t convert to QuickBooks.
Intuit has published a detailed guide to help you prepare for a Quicken conversion. The easiest way to locate this document is to point your browser to http://quickbooks.com/support, which displays a section for searching the knowledge base. In the Enter search terms box, type Quicken convert to find topics that include links to the Quicken to QuickBooks Conversion Guide.
When your Quicken file is ready for QuickBooks prime time, you have two options in QuickBooks:
Choose File → New. In the EasyStep Interview window, click Convert Data and choose Quicken.
Choose File → Utilities → Convert → From Quicken.
Restore a Backup File
In the No Company Open window, you’ll see “Restore a backup file.” Backup files are the answer to the adrenaline rush you get when you do something incredibly stupid with your company file or when your hard drive crashes. To learn how to create backup files in the first place, as well as how to restore them, see Section 7.2.
Modifying Company Information
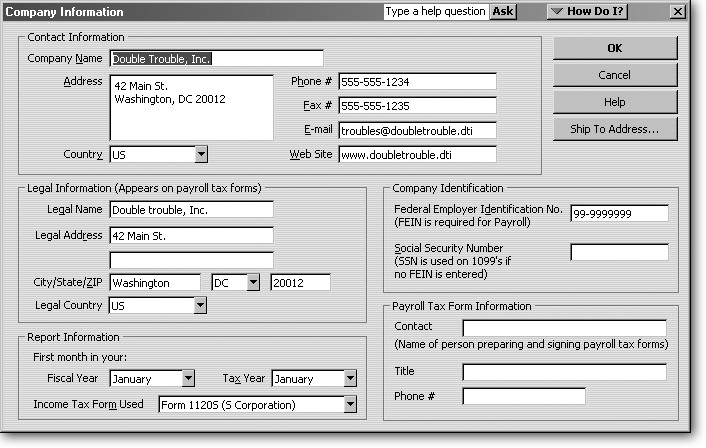
In the EasyStep Interview, QuickBooks extracts the basic information about your company in small chunks spread over several screens. After your company file exists, you can edit any of this information in one dialog box, as illustrated in Figure 1-7. Remember, the legal name and address are the ones you use on your federal and state tax forms. To open this dialog box, choose Company → Company Information.
Get QuickBooks 2006: The Missing Manual now with the O’Reilly learning platform.
O’Reilly members experience books, live events, courses curated by job role, and more from O’Reilly and nearly 200 top publishers.

