Chapter 4. Setting Up Customers and Jobs
You may be fond of strutting around your sales department proclaiming, “Nothing happens until somebody sells something!” As it turns out, you can quote that tired adage in your accounting department, too. Whether you sell products or services, the first sale to a new customer can initiate a flurry of activity, including creating a new customer in QuickBooks, assigning a job for the work, and the ultimate goal of all this effort—invoicing your customer (sending her a bill for your services and products and how much she owes) to collect some income.
The people who buy what you sell have plenty of nicknames: customers, clients, consumers, patrons, patients, purchasers, donors, members, shoppers, and so on. QuickBooks throws out the thesaurus and applies one term—customer—to every person or organization that buys from you. In QuickBooks, a customer is a record of information about your real-life customer. The program takes the data you enter for customers and fills in invoices and other sales forms with your customers’ names, addresses, payment terms, and other information. If you play it safe and define a credit limit, QuickBooks even reminds you when orders put customers over their limits.
To QuickBooks, a job is a record of a real-life project that you agreed (or perhaps begged) to perform for a customer—remodeling a kitchen, designing an advertising campaign, or tracking down the safety deposit box that matches your customer’s key. Regardless of how your organization works, customers and jobs are inseparable in QuickBooks. Both the New Customer dialog box and the Edit Customer dialog box, which you’ll meet in this chapter, include tabs for customer information and job information. When you create a customer, in effect, you get one job built in automatically.
Some organizations don’t track jobs, and if your company is one of those, you don’t have to create jobs in QuickBooks. For example, retail stores sell products, not projects. Even consultants who usually work on projects sometimes work on retainer, which provides a steady income that isn’t related to one specific project. In these situations, you simply create your customers in QuickBooks and move on to invoicing them for their purchases without assigning the income to a job.
Real-world customers are essential to your success, but do you need customers in QuickBooks? Even if you run a primarily cash business, creating customers in QuickBooks could still be a good idea. For example, setting the repeat customers at your store up as customers in QuickBooks not only saves you time by automatically filling in their information on each new sales receipt, it also gives you time to help them become even better customers. And, because your retail business isn’t job-oriented, you can just pretend the fields for job information aren’t there. See the box on Modifying Customer and Job Information to learn more. (If you have a point-of-sale system, like QuickBooks POS, you can track customer sales there and leave customers out of QuickBooks completely.)
On the other hand, when your business revolves around projects, you can create a job in QuickBooks for each project you do for a customer. Suppose you’re a plumber and you regularly do work for a general contractor. You might create several jobs, one for each place you plumb: Smith house, Jones house, and Gates house. In QuickBooks, you can track income and expenses by job and gauge each one’s profitability. This chapter guides you through customer and job creation and helps you decide how to apply customer and job fields in your business.
Before You Create Customers and Jobs
QuickBooks doesn’t care if you create customers and jobs without any forethought, but it pays to take the time to set them up properly. If you want to report and analyze your financial performance to see where your business comes from and which type is most profitable, categorizing your QuickBooks customers and jobs is the way to go. For example, customer and job types can help you produce a report of kitchen remodel jobs that are in progress for residential customers. With that report, you can order catered dinners to treat those clients to customer service they’ll brag about to their friends.
If you take the time to plan your customers and jobs in QuickBooks in advance, you’ll save yourself hours of effort later, when you need information about your business. You can add customer and job categories (as well as customers and jobs) at any time. If you don’t have time to add categories now, come back to this section when you’re ready to learn how.
Categorizing Customers and Jobs
Categorizing your customers and jobs is one way to slice and dice your business reports to show what parts of your business are doing well and what parts need closer attention. For a construction company, knowing that your commercial customers cause fewer headaches and that doing work for them is more profitable than residential jobs is a strong motivator to focus your future marketing efforts on commercial work. Organize your customers and jobs by type, and you’ll easily get some insightful analysis. The box below explains how you can analyze your business even more.
Understanding customer types
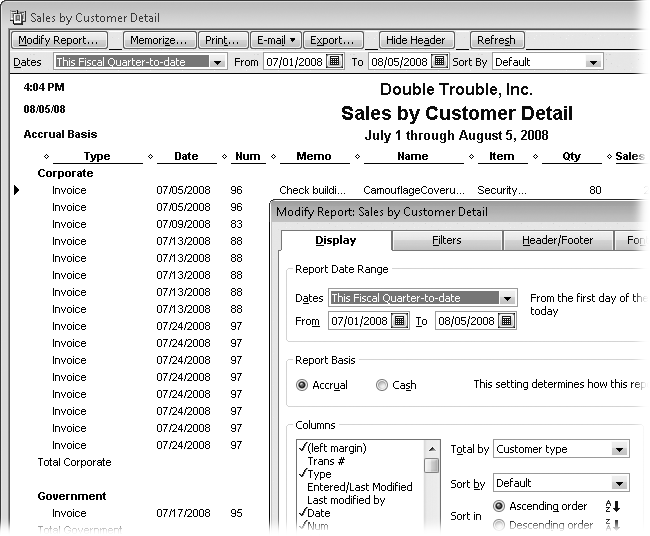
Business owners often like to look at the performance of different segments of their business. Say your building supply business has expanded over the years to include sales to homeowners, so you probably want to know how much you sell to homeowners versus professional contractors. You could designate each customer as Homeowner or Contractor to make this comparison, and then sort invoices by Customer Type, as shown in Figure 4-1. As you’ll learn on Specifying additional customer information, categorizing a customer is as easy as choosing a customer type from the aptly named Customer Type List.
Note
As you’ll see throughout this book, QuickBooks lists make it easy to fill in information in most QuickBooks dialog boxes by choosing from a list instead of typing.
Customer types are yours to mold into whatever categories help you analyze your business. A healthcare provider might classify customers by their insurance, because reimbursement levels depend on whether a patient has Medicare, major medical insurance, or pays privately. A clothing maker might classify customers as custom, retail, or wholesale, because the markup percentages are different for each. And a training company could categorize customers by how they learned about the company’s services.
When you create your company using industry-specific editions of QuickBooks or with the EasyStep Interview (Other Important Information), QuickBooks fills in the Customer Type List with a few typical types of customers for your industry. If your business sense is eccentric, you can delete QuickBooks’ suggestions and fill the Customer Type List with your own entries. As a landscaper, you might include customer types such as Lethal, Means Well, and Green Thumb, so you can decide whether Astroturf, cacti, or orchids are most appropriate.
A common beginners’ mistake is creating customer types that don’t relate to customer characteristics. For example, if you provide consulting services in several areas—like financial forecasting, investment advice, and reading fortunes—your customers might hire you to perform any or all of those services. If you classify your customers by the services you offer, you’ll wonder which customer type to choose when someone hires you for two different services.
Here are some suggestions for applying customer types and other QuickBooks features to analyze your business in different ways.
Services. To track how much business you do for each service you offer, set up separate income accounts in your Chart of Accounts, as outlined on Creating an Account.
Products. To track product sales, create one or more income accounts in your Chart of Accounts.
Customer business type. Use customer types to classify your customers by their business sector, such as corporate, government, and small business.
Nonprofit “customers.” For nonprofit organizations, customer types such as Member, Individual, Corporation, Foundation, and Government Agency can help you target fundraising efforts.
Marketing. To identify the income you earned based on how customers learned about your services, create classes such as Referral, Web, Newspaper, and Blimp. With these categories, you can create a report that shows the revenue you’ve earned from different marketing efforts—and whether each marketing strategy is worth the money.
Customer support. You may find it handy to use classes to categorize customers by their headache factor, such as High Maintenance, Average, and Easy To Please (as long as you’re careful to keep the class designation off of the invoices you send out).
Creating a customer type
You can create the types of customers you want when you set up your QuickBooks company file or at any time after setup is complete. To create a customer type, follow these steps:
If the company file isn’t already open, choose File → Open Previous Company, and then choose the company file you want to open.
If the QuickBooks Login window appears (which it will if you’ve assigned a password to the Admin account or set up multiple users), type your user name and password, and then click OK.
If the Open Previous Company menu doesn’t list the company file you want to open, choose File → “Open or Restore Company”. In the “Open or Restore Company” dialog box, select the “Open a company file” option, and click Next. In the Open a Company dialog box, navigate to the company file and double-click it.
Choose Lists → Customer & Vendor Profile Lists → Customer Type List.
The Customer Type List window opens, displaying the customer types that already exist.
To create a new customer type, press Ctrl+N or, at the bottom of the Customer Type List window, click Customer Type, and then choose New.
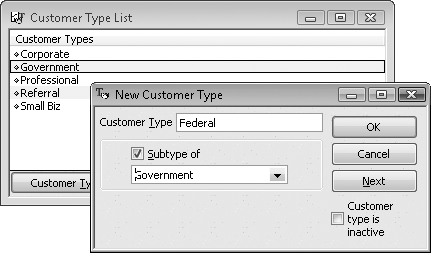
The New Customer Type dialog box opens, shown in Figure 4-2.
Type a name for the customer type in the Customer Type box, and then click OK.
You can set up a customer type as a subtype of another, such as Federal, State, and Local subtypes within the Government customer type. Figure 4-2 shows you how.
To create another customer type, click Next and add another type.
Lather, rinse, and repeat.
When you close the New Customer Type dialog box, the new customer type appears in the Customer Type List.
Categorizing jobs
Jobs are optional in QuickBooks, so job types matter only when you track your work by job. If your sole source of income is selling organic chicken fat ripple ice cream to health-obsessed carnivores, jobs and job types don’t matter. Your relationship with your customers is one long run of selling and delivering products. On the other hand, for project-based businesses, job types add another level of filtering to the reports you produce. If you’re a writer, then you can use job types to track the kinds of documents you produce (Manual, White Paper, and Marketing Propaganda, for instance) and filter the Job Profitability Report by job type to see which types of writing are the most lucrative.
Creating a job type is similar to creating a customer type, described in the previous section. With the company file open, choose Lists → Customer & Vendor Profile Lists → Job Type List. With the Job Type List window open, press Ctrl+N to open the New Job Type window. As you do for customer types, type a name for the job type. For a subtype, turn on the “Subtype of” checkbox and choose the job type to which you want to add this subtype.
Creating Customers in QuickBooks
If bringing in business were as easy as creating customers in QuickBooks, sales of QuickBooks would propel Intuit past Microsoft as the largest software company. Face facts—you still have to convince customers to work with your company. But once you’ve cleared that hurdle, creating those customers in QuickBooks is easy. The box on Creating a New Customer provides some hints on keeping customers straight in QuickBooks.
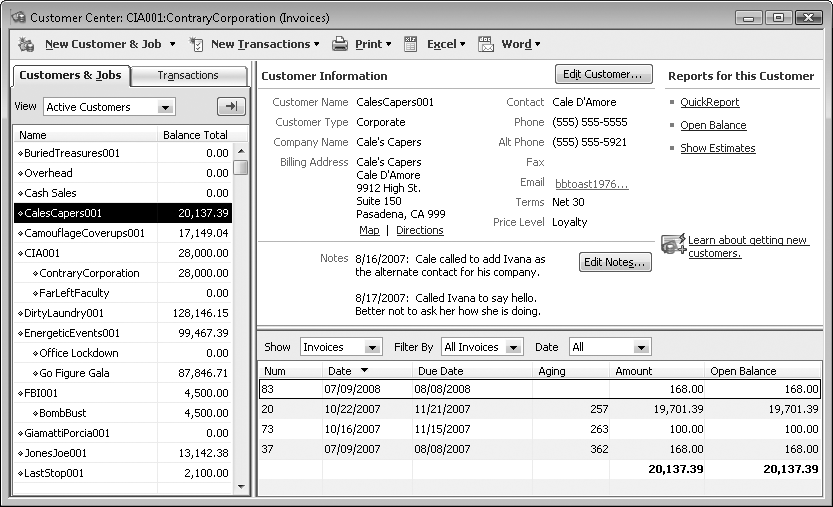
The Customer Center (Figure 4-3) is your starting point for creating, modifying, and viewing customers and jobs. QuickBooks provides four easy ways to open the Customer Center window:
From anywhere in the program, press Ctrl+J.
On the left side of the QuickBooks Home page, click Customers.
On the navigation bar, click Customer Center.
On the QuickBooks menu bar, choose Customers → Customer Center.
Creating a New Customer
QuickBooks is quite accommodating when it comes to creating customers. If you run a mom-and-pop shop and don’t add new customers very often, you can create a customer when you create the customer’s first invoice. The handy <Add New> menu command in every drop-down list of customer and job types is your ticket to just-in-time customer and job type creation. For larger outfits that sign new customers up all the time, creating customers in batches is much more efficient: Without closing and reopening the New Customer dialog box, you can create several customers in one session. Then, when it’s time for billing, you create an invoice and choose the customer you want from the Customer:Job drop-down list.
The box below tells you how to prevent your QuickBooks’ customer list from growing out of control.
In the Customer Center tool bar, create a new customer by clicking New Customer & Job → New Customer. The New Customer dialog box opens, as shown in Figure 4-4. Customer Name is the only field you need to fill in. Type the unique name or code for your new customer, following the customer naming convention you’ve chosen, as described in the box on Creating a New Customer.
Tip
Unless opening and closing the New Customer dialog box gives you a feeling of accomplishment, create all your customers first and then add the jobs for each customer.

If you turn on the multiple currency option (Multiple Currencies), the Currency box appears below the Customer Name box. QuickBooks automatically fills in the Currency box with your home currency, so you usually don’t have to change this value. If the customer pays in a foreign currency, choose it in the Currency drop-down list. QuickBooks creates a separate Accounts Receivable account (Receiving Payments for Invoiced Income) for each currency you use.
Note
In the New Customer dialog box, you may notice the “Go to Customer Manager” button at bottom right. Customer Manager (which switches to the name Customer Manager when you click the button) is an Intuit add-on customer relationship management program (CRM), which sells for $79.95. If you don’t already use a CRM program, you can click the button to learn more.
Entering address information
If you plan to bill your customers, ship them products, or call them to make them feel appreciated, address and contact information is important. On the New Customer dialog box’s Address Info tab, you can specify address and contact information. Here’s a guide to the fields you can enter and what they’re good for:
Company Name. Unlike Customer Name, which acts as an identifier, the Company Name field is nothing more than the customer name as you want it to appear on invoices and other forms you create. QuickBooks automatically copies the company name that you type into the Bill To box.
Contact. To address invoices, letters, and other company communications, enter the primary contact’s salutation or title, first name, middle initial, and last name in the appropriate fields. As often happens, the first person you contact isn’t the person who gets things done day after day. If this turns out to be the case, you can always make this dependable resource the primary contact and assign the figurehead as the alternate contact. QuickBooks automatically copies the salutation and name that you type to the Bill To box and the Contact box.
Bill To address. To complete the address for invoices, type the street address, city, state, country, and postal code, or copy the information from another program (Importing and Exporting Customer Information).
To view or enter address information as separate fields, including Address, City, State/Province, Zip/Postal code, and Country, click the Edit button below the Bill To section. In the Edit Address Information dialog box, QuickBooks automatically turns on the “Show this window again when address is incomplete or unclear” checkbox, which tells the program to notify you when you forget a field like the city or when the address is ambiguous. For example, if the address for your biggest customer for toys is Santa Claus, North Pole, QuickBooks opens the Edit Address Information dialog box so that you can fatten the address up a bit with a street, city, and arctic postal code.
Ship To address. If the billing address and the shipping address are the same, click Copy>> to replicate the contents of the Bill To field in the Ship To field. (The greater-than symbols on the button indicate the direction that QuickBooks copies the address.) If you don’t ship products to the customer, skip the Ship To field altogether.
Note
You can define more than one Ship To address, which is perfect for a single customer with multiple locations. To add another Ship To address, click Add New and fill in the boxes. Once you have shipping addresses created, you can choose the one you want in the Ship To drop-down list. When the shipping address you use most often is visible, turn on the “Default shipping address” checkbox to tell QuickBooks to pick that address automatically. Click the Edit or Delete buttons to modify or remove a shipping address, respectively.
Additional contact information. QuickBooks gets you started by copying the contents of the First Name and Last Name fields into the Contact field. If you plan to look up contact information such as phone number and email in QuickBooks rather than in your contact program (Outlook, for example), fill in the other fields on the Address Info tab to specify the contact’s phone number, fax number, alternate phone number like a cellphone number, email address, an email address to carbon copy, and an alternate contact.
Specifying additional customer information
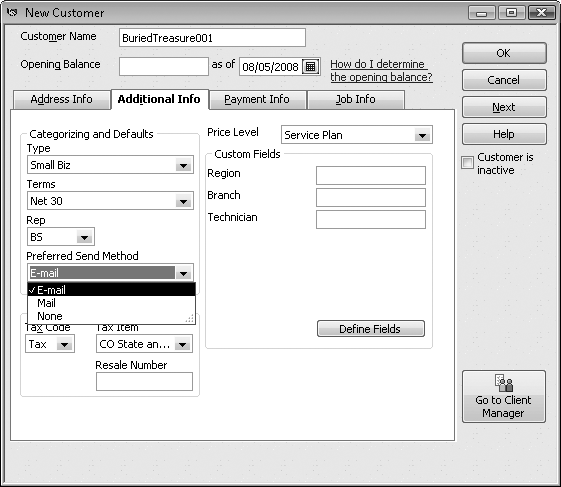
The New Customer dialog box’s Additional Info tab (Figure 4-5) serves up several fields that categorize your customers and simplify your bookkeeping. Although they’re optional, some fields speed up entering transactions by storing the values you use most frequently. Other fields appear or disappear depending on the preferences you choose (preferences are the topic of Chapter 22). For example, if you charge sales tax, you need to turn on QuickBooks Sales Tax preferences if you want the Additional Info tab to include the Tax Code, Tax Item, and Resale Number fields.
Here are the fields you might see on the Additional Info tab and some ways you can use them:
Type. Categorize the customer (see Understanding customer types) by choosing a type from the Type drop-down list, which displays the entries from your Customer Type List. For a healthcare services company, you might categorize customers as government, health insurance, or private pay, so you know how patient you have to be while waiting to receive payment.
Terms. The choice you select in the Terms field represents the payment terms the customer has agreed to. The entries you see in the Terms drop-down menu come from the Terms List (Job Type List), which represents payment terms for your customers and the ones you accept from your vendors. QuickBooks provides several of the most common payment terms, such as Due on Receipt and Net 30, but you can choose <Add New> at the top of the drop-down list to define additional payment terms in the Terms List. If you leave the Terms field blank in a customer record, you have to choose the payment terms every time you create an invoice for that customer.
Figure 4-5. Most of the fields on the Additional Info tab use QuickBooks’ lists. To jump directly to the entry you want in long lists, in any text box with a drop-down list, type the first few characters of that entry. QuickBooks selects the first entry that matches the characters you’ve typed and continues to reselect the best match as you continue typing. You can also scroll to the entry in the list and click to select it. If the entry you want doesn’t exist, click <Add New> to create it.Rep. Choosing a name in the Rep field links a customer to a sales representative, which is helpful if you want to track sales representatives’ results and calculate their sales commissions. But reps don’t have to be sales representatives. One of the best ways to provide good customer service is to assign a customer service representative to a customer. When you choose <Add New> to create a new Rep entry (Sales Rep List), you can select existing names from the Employee List, Vendor List, and the Other Names List.
Preferred Send Method. Choose None, Mail, or E-mail to identify the method that your customer prefers for receiving documents. Choose None if you typically print documents and mail them the old-fashioned way instead of using QuickBooks’ add-on mail feature (Memorized Transactions). If you choose E-mail, QuickBooks automatically turns on the E-mail checkbox when you create forms such as invoices. The Mail method uses an add-on QuickBooks service to mail invoices. You can’t add a new entry to the Preferred Send Method list, so if you use carrier pigeons to correspond with your incarcerated customers, you’ll just have to remember that preference.
Sales Tax Information. The Sales Tax Information area, which has several fields for sales tax, appears only if you turn on the Sales Tax preference (Send Forms). If the customer pays sales tax, choose an entry in the Sales Tax Item list, which specifies the tax rate percentage. See Subitems for instructions on setting up sales tax items and Inserting and deleting line items for the full scoop on charging sales tax.
Customers who buy products for resale usually don’t pay sales tax because that would tax the products twice. (Who says tax authorities don’t have hearts?) To bypass the sales tax, choose Non (for “nontaxable sales”) in the Tax Code List, and then type the customer’s resale number in the Resale Number field. That way, if tax auditors pay you a visit, the resale number tells them where the burden of sales tax should fall.
Price Level. More often than not, customers pay different prices for the same product. Consider the labyrinth of pricing options for seats on airplanes. In QuickBooks, price levels represent discounts or markups that you apply to transactions. For example, you might have one price level called Top20, which applies a 20 percent discount for your best customers, and another price level called AuntMabel that extends a 50 percent discount to your Aunt Mabel because she fronted you the money to start your business. See Creating a Price Level to learn how to define price levels.
Note
In QuickBooks Pro, your only choice is fixed percentage price levels, which means you can increase or decrease prices on all items by fixed percentages. On the other hand, QuickBooks Premier adds the Per Item price level type as an option. Per item price levels open the door to setting the dollar amount of individual items you sell for different customers or jobs.
Custom Fields. QuickBooks provides 15 custom fields, which you can use to store important information that QuickBooks didn’t see fit to give you out of the box. Because custom fields don’t use drop-down lists, you have to type your entries and take care to enter values consistently. Learn more about custom fields on Hiding and Deleting List Entries.
Designating payment information
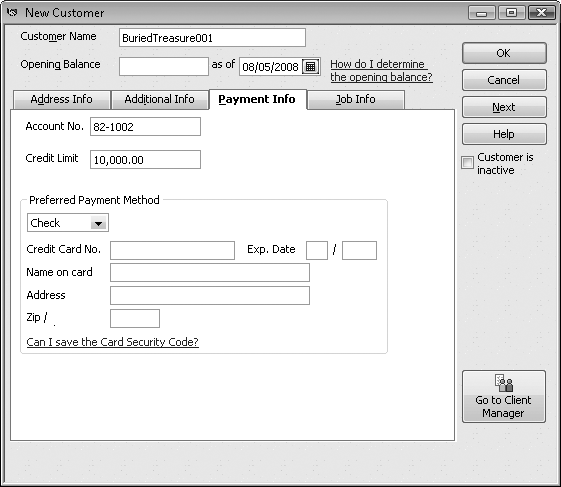
That’s right: The New Customer dialog box has still more fields for storing customer information. The Payment Info tab, shown in Figure 4-6, is the place to say how the customer pays and how much credit you’re willing to extend.
You can use the following fields to specify the customer’s payment information:
Account No. Account numbers are optional in QuickBooks. Large accounting programs based on database management systems often assign unique account numbers, which greatly reduce the time it takes to locate a customer record. In QuickBooks, the Customer Name field works like an identifier, so the Account No. field is best reserved for an account number generated by one of your other business systems. You can use account numbers or the codes in the Customer Name field to both identify and classify your customers. For example, R402 could represent one of your retail customers, whereas W579 could represent a wholesale customer.
Figure 4-6. On the Payment Info tab, only one field has a drop-down menu of commonly used values. You have to type the values you want in all the fields except the Preferred Payment Method field, whose drop-down menu displays the Payment Method List (Customer Message).Credit Limit. You can specify a dollar value of credit that you’re willing to extend to the customer. If you do, QuickBooks warns you when an order or invoice exceeds the customer’s credit limit, but that’s as far as it goes. It’s up to you to reject the order or ship your products COD. If you don’t plan to enforce the credit limits you assign, don’t bother entering a value in this field.
Preferred Payment Method. Choose the payment method that the customer uses most frequently. The Payment Method List includes several common payment methods such as Cash, Check, and Visa, but you can add others by choosing <Add New>. The payment method you specify for the customer appears automatically in the Receive Payments dialog box (Receiving Payments for Invoiced Income) when you choose the customer. If a regular customer forgets her checkbook and pays with cash, you can simply replace Check with Cash as you create the sales receipt in QuickBooks.
Credit card information. For credit card payments (see Paying with Credit Cards for info on QuickBooks’ credit card processing service), you can specify the customer’s credit card number, the name that appears on the card, the billing address for the card, the Zip code, and the expiration date. But before you enter this sensitive and valuable information into your QuickBooks file, check for government and merchant card provider restrictions on storing credit card numbers. For example, QuickBooks doesn’t let you store the card security code (the three digit code on the back of a credit card) as a security precaution. Even if you can legally store the numbers, consider whether your security procedures are sufficient to protect your customers’ credit card information.
Note
The New Customer window includes a Job Info tab, which has fields for job-related information. If you don’t track jobs, you can use the Job Status field to store the overall status of your work for the customer. Document the dates for the work you’re currently doing for the customer in the Start Date, Projected End, and End Date fields. If you perform projects or job-based work for a customer, skip the Job Info tab, since you’ll create separate jobs, as described on Exporting a text file.
Importing and Exporting Customer Information
Chances are you store customer information in programs other than QuickBooks, such as a customer relationship management (CRM) program to track customer interactions or a word processing program to produce mailing labels. (Entering address information tells you how you can learn about Intuit’s CRM product.) Entering the same information more than once isn’t only mind-numbingly tedious, it also wastes time you should spend on more important business tasks, such as selling, managing cash flow, or finding out who has the incriminating pictures from the Christmas party. If the other programs you use support delimited text files, you can avoid data entry grunt work by transferring data to or from QuickBooks. Delimited text files are nothing more than files that separate each piece of data with a comma, space, tab, or other character. The same kind of information appears in the same position in each line, so other programs can pull the information into the right places.
Importing Customer Information
Salespeople learn a lot about companies long before they become customers. For example, knowing who the decision makers are and what they want is at the heart of most sales strategies. If your sales team stores contact names, phone numbers, email addresses, and other information in a program that exports data to delimited files or Excel spreadsheets, why not import the relevant data into QuickBooks when that company finally decides to buy from you?
Note
You don’t have to import every field you’ve captured so far. Salespeople build relationships with clients by remembering spouses’ and kids’ names or favorite sports teams, but much of that information doesn’t belong in QuickBooks.
To import data into QuickBooks, you first have to export a delimited text file or a spreadsheet from the other program (Importing Data from Other Programs). The data is compartmentalized by separating each piece of information with commas or tabs, or by cubbyholing them into columns and rows in a spreadsheet file.
An exported delimited file isn’t necessarily ready to import into QuickBooks. Headings in the delimited file or spreadsheet might identify the field names in the program that held the information, but QuickBooks has no way of knowing the relationship between the other program’s fields and its own.
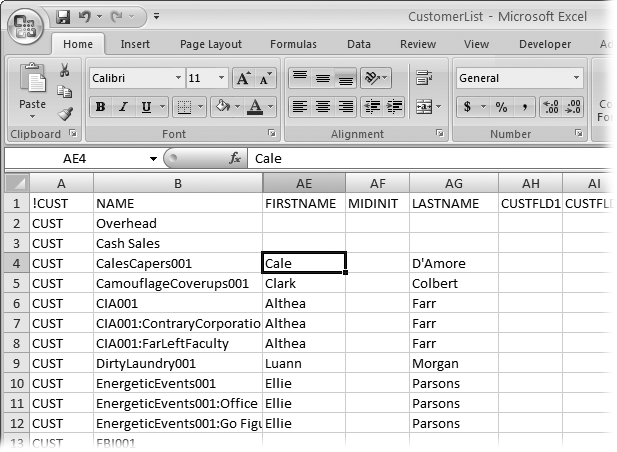
QuickBooks looks for keywords in the import file to tell it what to do, as shown in Figure 4-7. As a result, you’ll need to rename some headings to transform an export file produced by another program into an import file that QuickBooks can read. QuickBooks’ customer keywords and the fields they represent appear in Table 4-1. Fortunately, Excel and other spreadsheet programs make it easy to edit the headings in cells. The box on Importing and Exporting Customer Information describes how to use spreadsheets for other data tasks. When your exported file looks something like the file in Figure 4-7, save it in Excel 2007 by clicking the Office button and then choosing Save (in Excel 2003, choose File → Save).
Tip
To see how QuickBooks wants a delimited file to look, export your current QuickBooks customer list to an .iif file (Exporting a text file) and then open it in Excel.
|
Keyword |
Field contents |
|
NAME |
(Required) The Customer Name field, which specifies the name or code that you use to identify the customer. |
|
BADDR1 | |
|
BADDR2 |
The second line of the customer’s billing address. |
|
BADDR3 |
The third line of the customer’s billing address. |
|
BADDR4 |
The fourth line of the customer’s billing address. |
|
BADDR5 |
The fifth line of the customer’s billing address. |
|
SADDR1 |
The first line of the customer’s shipping address. |
|
SADDR2 |
The second line of the customer’s shipping address. |
|
SADDR3 |
The third line of the customer’s shipping address |
|
SADDR4 |
The fourth line of the customer’s shipping address. |
|
SADDR5 |
The fifth line of the customer’s shipping address. |
|
PHONE1 |
The number stored in the Phone Number field. |
|
PHONE2 |
The customer’s alternate phone number. |
|
FAXNUM |
The customer’s fax number. |
|
|
The customer’s email address. |
|
NOTE |
Despite the keyword, this field is the name or number of the account, stored in the Account No. field. To set up a customer as an online payee, you have to assign an account number. |
|
CONT1 |
The name of the primary contact for the customer. |
|
CONT2 |
The name of an alternate contact for the customer. |
|
CTYPE |
The customer type category. If you import a customer type that doesn’t exist in your Customer Type List, QuickBooks adds the new customer type to the list. |
|
TERMS |
The payment terms by which the customer abides. |
|
TAXABLE |
Y or N indicates whether you charge sales tax to the customer. |
|
SALESTAXCODE |
The code that identifies the sales tax to charge. |
|
LIMIT |
The dollar amount of the customer’s credit limit with your company. |
|
RESALENUM |
The customer’s resale number. |
|
REP |
The representative who works with the customer. The format for a rep entry is name:list ID:initials, such as “Saul Lafite:2:SEL.” Name represents the name of the representative; the list ID equals 1 if the rep name belongs to the Vendor List, 2 for the Employee List, or 3 for the Other Names List. Initials are the rep’s initials. |
|
TAXITEM |
The name of the type of tax you charge this customer. The name you enter has to correspond to one of the sales tax items on your Item list (described on Sales Tax Item). |
|
NOTEPAD |
This field is your chance to wax poetic about your customer’s merits or simply document details you want to remember. |
|
SALUTATION |
The salutation or title to prefix to the contact’s name, such as Mr., Ms., or Dr. |
|
COMPANYNAME |
The name of the customer’s company, as you want it to appear on invoices or other documents. |
|
FIRSTNAME |
The primary contact’s first name. |
|
MIDINIT |
The primary contact’s middle initial. |
|
LASTNAME |
The primary contact’s last name. |
|
CUSTFLD1-CUSTFLD15 |
Custom field entries for the customer, if you’ve defined any. To learn how to create custom fields, see Hiding and Deleting List Entries. |
|
HIDDEN |
This field is set to N if the customer is active in your QuickBooks file. Inactive customers are set to Y. |
|
PRICELEVEL |
The price level for the customer. |
Exporting Customer Information
QuickBooks lets you do lots of cool things with customer information, but say you have a mail merge already set up in FileMaker Pro, or you want to transfer all of your customer records to Access to track product support. You have to export your customer data out of QuickBooks into a file that the other program can read and import.
To extract customer information from QuickBooks, you have three choices:
Export your customer information directly to Excel if you’re not sure what information you need, and you’d rather delete and rearrange columns in a spreadsheet program. QuickBooks exports every customer field. Then, you can edit the spreadsheet all you want and transfer the data to yet another program when you’re done. (The one downside to this approach is that the spreadsheet includes blank columns between each field column.)
Create a report when you want control over exactly which fields to export. By creating a customized version of the Customer Contact List report, you can export the same set of records repeatedly, creating delimited files, spreadsheets, and so on.
Export a text file of your customer data if you need a delimited text file to load into another program. The delimited file lists each customer in its own row with each field separated by tabs.
Exporting to Excel
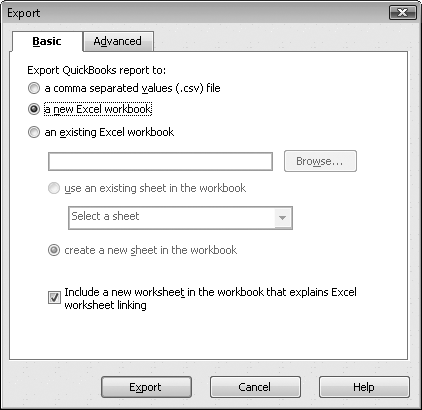
In QuickBooks, exporting the Customer List to Excel is a snap, as Figure 4-8 shows. To export all the customer data stored in QuickBooks to an Excel file, in the Customer Center icon bar, click Excel, and then choose Export Customer List to open the Export dialog box. The Excel menu also contains commands for exporting transactions and for importing spreadsheet data into QuickBooks.
Customized exports using the Contact List report
By modifying the settings for the Contact List report, you can export exactly the fields you want for specific customers. For example, storing emails in QuickBooks is perfect when you email invoices to customers, but you probably also want customer emails in your email program for the steady stream of communication you exchange with customers about the work you’re doing for them. Exporting the entire Customer List is overkill when all you want is the contact name and email address; that’s where exporting a report shines.
Out of the box, QuickBooks’ Customer Contact List report includes the Customer Name, Bill To address, Contact, Phone, FAX, and Balance fields. Here’s how you transform the Contact List report into an export tool:
Choose Reports → Customers & Receivables → Customer Contact List.
The Customer Contact List report window opens.
In the report window tool bar, click Modify Report.
The Modify Report:Customer Contact List dialog box that appears lets you customize the report to filter the data that you export. See Customizing Reports to learn about other ways to customize the report.
To choose the report fields to export, select the Display tab. In the Columns section, choose the fields you want to export in the report.
The Contact, Phone, and FAX fields might be a good start for the fields you want to export. Then again, they might not. You can add or remove a few fields in the report or make wide-scale changes to the list of fields.
To change the fields that appear in the report, you need to click every field you want to add or remove from the list. Clicking a field in the Columns list toggles the field on and off. If there’s a checkmark in front of the field name, that field appears in the report. If there’s no checkmark, the report doesn’t include a column for that field.
To produce a report for only the customers you want, select the Filters tab. In the Filter list, choose Customer. In the Customer drop-down list, choose “Multiple customers/jobs” to select the customers you want to export.
In the Select Customer:Job dialog box, the Manual option is selected automatically, which is what you want.
In the name list, click each customer you want to export, and then click OK. Then, in the Modify Report dialog box, click OK.
You see the report with the modifications you’ve made.
In the report window toolbar, click Export.
The Export Report dialog box opens. To create a new Excel workbook, simply click Export. Excel launches and displays the report in a workbook.
Tip
Saving the modified report reduces the number of steps you have to take the next time you export. Make the changes you want in the Modify Report dialog box and click OK to display the customized report. Then, in the Customer Contact List window, click Memorize. In the Memorize Report dialog box, type a name for the report and then click OK.
Exporting a text file
To create a delimited text file of the entire Customers & Jobs List (or any other QuickBooks list), choose File → Utilities → Export → “Lists to IIF Files”. The first Export dialog box that appears includes checkboxes for each QuickBooks list, as described in detail on Exporting QuickBooks Data. Turn on the checkboxes for the lists you want to export. If you want to export only customer names and addresses to a tab-delimited file, choose File → Utilities → Export → “Addresses to Text File”.
Creating Jobs in QuickBooks
Project-based work means that your current effort for a customer has a beginning and an end, even if it sometimes seems like your project will last forever. Whether you build custom software programs or apartment buildings, you can use QuickBooks’ job tracking to analyze financial performance by project.
If you sell products and don’t give a hoot about job tracking, you can simply invoice your customers for the products you sell without ever creating a job in QuickBooks. On the other hand, suppose you want to know whether you’re making more money on the mansion you’re building or the bungalow remodel. What’s more, you want to know the percentage of profit you made on each project. These financial measures are the reason you create jobs for each project you want to track.
In QuickBooks, jobs cling to customers like baby possums to their mothers. A QuickBooks job always belongs to a customer. In fact, if you try to choose the Add Job command before you create a customer, you’ll see a message box telling you to create a customer first.
Creating a New Job
Because jobs belong to customers, you have to create a customer before you can create any of that customer’s jobs. Follow these steps to add a job to an existing customer:
In the Customer Center, right-click the customer you want, and then choose Add Job from the shortcut menu.
You can also select the customer in the Customers & Jobs tab, and then, in the Customer Center toolbar, choose New Customer & Job → Add Job.
In the Job Name box, type a name for the job.
The name that you type appears on invoices and other customer documents. You can type up to 41 characters in the Job Name box. The best names are short but easily recognizable by both you and the customer.
QuickBooks fills in most of the remaining job fields with the information you entered for the customer who owns the job. You can skip the fields on these tabs unless the information on the Address Info, Additional Info, and Payment Info tabs is different for the job. For example, if materials for the job go to a different shipping address than the one stored with the customer, type the job shipping address in the fields on the Address Info tab.
If you want to add information about job type, dates, or status, in the New Job dialog box, click the Job Info tab and enter values in the fields.
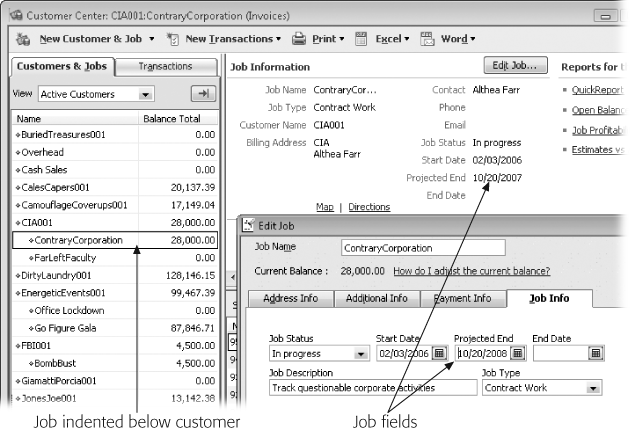
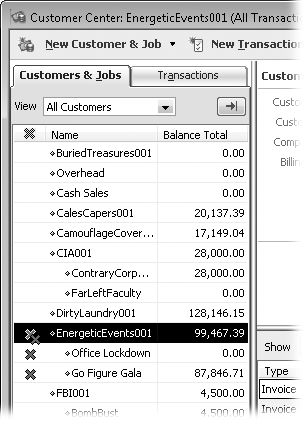
If you add job types, you can analyze jobs with similar characteristics, no matter which customer hired you to do the work. Fill in the Job Status field so you can see what’s going on by scanning the Customer Center, as shown in Figure 4-9. If you want to see whether you’re going to finish the work on schedule, you can document your estimated and actual dates for the job in the Date fields. (The box on Modifying Customer and Job Information tells you more about these fields.)
Figure 4-9. When you select a job in the Customer Center (jobs are indented below the customers to whom they belong), the Job Information section displays Job Status, Start Date, Project End, and End Date. If you want to edit job fields, double-click a job to open the Edit Job dialog box.Note
To change the values for Job Status, modify the status text in Preferences (see Jobs & Estimates).
After you’ve filled in the job fields, click Next to create another job for the same customer, or click OK to save the job and close the New Job dialog box.
Modifying Customer and Job Information
As long as you enter a customer name when you create a new customer, it’s fine to leave the remaining customer fields blank. You can change customer information at any time to add more data or to change what’s already there. Similarly, you can create a job with only the job name and come back later to edit or add more. To modify a customer or job, open the Customer Center and then double-click the customer or job you want to edit.
Note
If you don’t like double-clicking, select the customer or job you want to edit and then press Ctrl+E. If you can’t remember keyboard shortcuts, right-click the customer or job and then choose Edit Customer:Job on the shortcut menu. Or, on the right side of the Customer Center, click Edit Customer (or Edit Job).
In the Edit Customer dialog box, you can make changes to all customer fields—except for the customer balance, that is. QuickBooks pulls the customer balance from the opening balance (if you provide one) and shows any unpaid invoices for that customer. Once a customer exists, creating invoices (Creating Invoices) is your only way of reproducing the customer’s current balance.
Similarly, all the fields in the Edit Job dialog box are editable, except for the customer balance. Remember that the changes you make to fields on the Address Info, Additional Info, Payment Info, and Job Info tabs apply only to the job, not the customer.
You can’t change the currency assigned to a customer if you’ve recorded at least one transaction for that customer. If the customer moves from Florida to France and starts using euros, you need to close the customer’s current balance (by receiving payments for outstanding invoices). Then, you can create a new customer in QuickBooks and assign the new currency to it. After the new customer record is ready to go, you can make the old customer record inactive (Hiding and Restoring Customers).
Warning
Unless you’ve revamped your naming standard for customers, don’t edit the value in a customer’s Customer Name field. Because this field uniquely identifies your customers, you might customize QuickBooks based on that field. For example, if you created a customized report filtered by a specific customer name, the report isn’t smart enough to take on the new customer name. If you do modify the Customer Name, make sure to modify any customization to use the new name.
Adding Notes About Customers
Attention to detail. Follow through. These are a few of the things that keep customers coming back for more. Following up on promises or calling if you can’t make your meeting is good business. But sending reorder brochures after customers have made purchases can just make them mad. If you use another program for customer relationship management, you can track these types of details there. But if you prefer to use the smallest number of programs, QuickBooks’ notes can help you stay in customers’ good graces by tracking personal information and customer to-do lists. When you select a customer on the left side of the Customer Center window, that customer’s information appears on the right side of the window.
To add a note to a customer or job record, follow these steps:
In the Customers & Jobs tab in the left pane of the Customer Center, select the customer or job to which you want to add a note.
The customer’s or job’s information appears in the right pane of the Customer Center.
In the right pane, click Edit Notes.
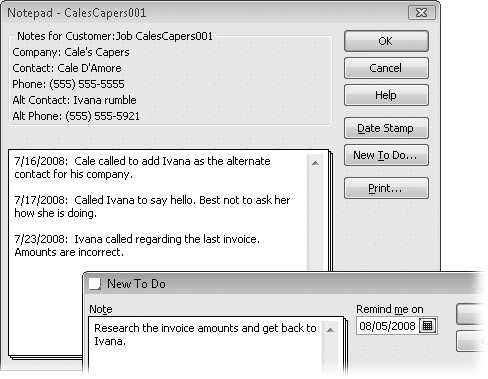
The Notepad window appears and displays all the notes you’ve added for the selected customer, as shown in Figure 4-10. The insertion point is at the beginning of the text box, ready for you to type.
To keep track of when conversations happen, click Date Stamp before you begin typing a note.
If you’re adding a note about something that happened on a day other than today, you have to type in the date.
Type the note you want to add.
If you want to add information somewhere else in the notes, first click to position the insertion point where you want to type.
When you’ve added the note, click OK.
QuickBooks adds the note to the Notes area in the Customer Information (or Job Information) pane on the right side of the Customer Center window.
Merging Customer Records
Suppose you remodeled buildings for two companies run by brothers: Morey’s City Diner and Les’ Exercise Studio. The brothers conclude that their businesses have a lot of synergy—people are either eating or trying to lose weight, and usually doing both. To smooth out their cash flow, they decide to merge their companies into More or Less Body Building and All You Can Eat Buffet. You have to figure out how to create one customer in QuickBooks from the two businesses, and you also want to retain the jobs, invoices, and other transactions that you created when the companies were separate.
If you don’t use a standard naming convention as recommended on Creating a New Customer, you could end up with multiple customer records representing one real-life customer, such as Les’s Exercise Studio and LesEx. You can merge these doppelgangers into one customer just as you can merge two truly separate companies into one.
When you merge customer records in QuickBooks, one customer retains the entire transaction history for the two original customers. You don’t so much merge two customers as turn one customer’s records into those of another’s.
Merging customers in QuickBooks won’t win any awards for best intuitive process. You merge two customers by renaming one customer to the same name as another. But that’s not all: The customer you rename can’t have any jobs associated with it. If your customers have jobs associated with them, you have to move all the jobs to the customer you intend to keep before you start the merge. Subsume the customer with fewer jobs so you don’t have to move as many jobs. If you don’t use jobs, subsume whichever customer you want.
Note
If you work in multi-user mode (described in Chapter 25), you have to switch to single-user mode for the duration of the merging operation. Warn your fellow QuickBooks users and then choose File → “Switch to Single-user Mode”. When you’re done, switch back to multi-user mode and tell your colleagues they can work in QuickBooks again.
To merge customers with a minimum of angry outbursts, follow these steps:
Open the Customer Center.
In the QuickBooks icon bar, click Customer Center or, on the left side of the QuickBooks Home page, click Customers.
If the customer you’re going to merge has jobs associated with it, on the Customers & Jobs tab, position the mouse pointer over the diamond to the left of the job you want to reassign.
Jobs appear indented beneath the customer to which they belong. If you have hundreds of jobs for the customer, moving them is tedious at best—but move them you must.
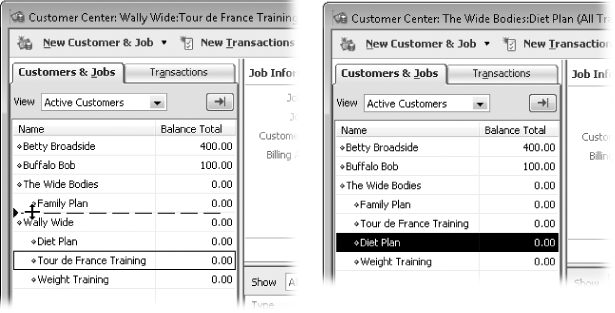
When the pointer changes to a two-headed arrow, drag the job under the customer you plan to keep after the merge, as shown at left in Figure 4-11.
Repeat steps 2 and 3 for each job that belongs to the customer you’re going to merge.
On the Customers & Jobs tab, right-click the name of the customer you’re going to merge and, on the shortcut menu, and choose Edit Customer:Job.
You can also edit the customer by selecting the customer name on the Customer & Jobs tab. Then, when the customer information appears on the right side of the Customer Center, click the Edit Customer button.
Either way, the Edit Customer dialog box opens.
In the Edit Customer dialog box, change the name in the Customer Name field to match the name of the customer you intend to keep. Click OK.
QuickBooks displays a message letting you know that the name is in use and asks if you want to merge the customers.
Click Yes to merge the customers.
In the Customer Center, shown in Figure 4-11, the customer you renamed disappears and any customer balances now belong to the remaining customer.
Hiding and Deleting Customers
Hiding customers isn’t about secreting them away when the competition shows up to talk to you. Because you can delete customers only in very limited circumstances, hiding customers keeps your list of customers manageable and your financial history intact.
Deleting Customers
You can delete a customer only if there’s no activity for that customer in your QuickBooks file. If you try to delete a customer that has even one transaction, QuickBooks tells you that you can’t delete the record.
If you create a customer by mistake, you can remove it, as long as you first remove any associated transactions—which are likely to be mistakes as well. But QuickBooks doesn’t tell you which transactions are preventing you from deleting this customer. To delete transactions that prevent you from deleting a customer, do the following:
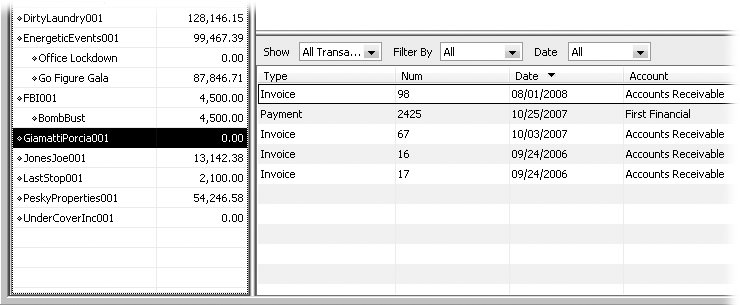
View all the transactions for the customer by selecting that customer in the Customer Center, and then setting the Show box to All Transactions and the Date box to All, as shown in Figure 4-12.
You can also view transactions by running the “Transaction List by Customer” report (Reports → Customers & Receivables → Transaction List by Customer).
In the Customer Center or the report, open the transaction you want to delete by double-clicking it.
The Create Invoices dialog box (or the corresponding dialog box) opens to the transaction you double-clicked.
Choose Edit → Delete Invoice (or Edit → Delete Check, or the corresponding delete command).
In the message box that appears, click OK to confirm that you want to delete the transaction. Repeat steps 2 and 3 for every transaction for that customer.
Back on the Customers & Jobs tab, select the customer you want to delete. Press Ctrl+D or choose Edit → Delete Customer:Job.
If the customer has no transactions, QuickBooks asks you to confirm that you want to delete the customer. Click Yes. If you see a message telling you that you can’t delete the customer, go back to steps 2 and 3 to delete any remaining transactions.
Hiding and Restoring Customers
Although your work with a customer might be at an end, you still have to keep records about your past relationship. But old customers can clutter up your Customer Center, making it difficult to select your active customers. Hiding customers is a better solution than deleting them. It retains the historical transactions for a customer, so you can reactivate them if they decide to work with you again. And hiding removes customer names from all the lists that appear in transaction windows so you can’t select them by mistake. Figure 4-13 shows you how to hide and reactivate customers.
To hide a customer, in the Customer Center, right-click the customer and, from the shortcut menu, choose Make Customer:Job Inactive. The customer and any associated jobs disappear from the list.
Get QuickBooks 2009: The Missing Manual now with the O’Reilly learning platform.
O’Reilly members experience books, live events, courses curated by job role, and more from O’Reilly and nearly 200 top publishers.

