You may be fond of strutting around your sales department proclaiming, “Nothing happens until somebody sells something!” As it turns out, you can quote that tired adage in your accounting department, too. Whether you sell products or services, the first sale to a new customer can initiate a flurry of activity, including creating a new customer in QuickBooks, assigning a job for the work, and the ultimate goal of all this effort—invoicing your customer (sending a bill—a.k.a. invoice—for your services and products that states how much the customer owes) to collect some income.
The people who buy what you sell have plenty of nicknames: customers, clients, consumers, patrons, patients, purchasers, donors, members, shoppers, and so on. QuickBooks throws out the thesaurus and applies one term—customer—to every person or organization that buys from you. In QuickBooks, a customer is a record of information about your real-life customer. The program takes the data you enter about customers and fills in invoices and other sales forms with your customers’ names, addresses, payment terms, and other info. If you play it safe and define a credit limit, QuickBooks even reminds you when orders put customers over their limits.
Real-world customers are essential to your success, but do you need customers in QuickBooks? Even if you run a primarily cash business, creating customers in QuickBooks could still be a good idea. For example, setting up QuickBooks records for the repeat customers at your store saves you time by automatically filling in their information on each new sales receipt, so you have time to do more important things. (If you have a point-of-sale system, like QuickBooks POS, you can track customer sales there instead and leave customers out of QuickBooks completely.)
If, on the other hand, your business revolves around projects, you can create a job in QuickBooks for each project you do for a customer. To QuickBooks, a job is a record of a real-life project that you agreed (or perhaps begged) to perform for a customer—remodeling a kitchen, designing an ad campaign, or whatever. Suppose you’re a plumber and you regularly do work for a general contractor. You could create several jobs, one for each place you plumb: Smith house, Jones house, and Winfrey house. In QuickBooks, you can then track income and expenses by job and gauge each one’s profitability. However, some organizations don’t track jobs, and if your company is one of those, you don’t have to create jobs in QuickBooks. For example, retail stores sell products, not projects. If you don’t need jobs, you can simply create your customers in QuickBooks and then move on to invoicing them or creating sales receipts for their purchases.
This chapter guides you through customer and job creation. It also helps you decide how to apply QuickBooks’ customer and job fields in your business.
Alas, you still have to convince customers to work with your company. But once you’ve cleared that hurdle, creating those customers in QuickBooks is easy. The box on Making Customers Easy to Identify provides some hints on keeping customers straight in QuickBooks.
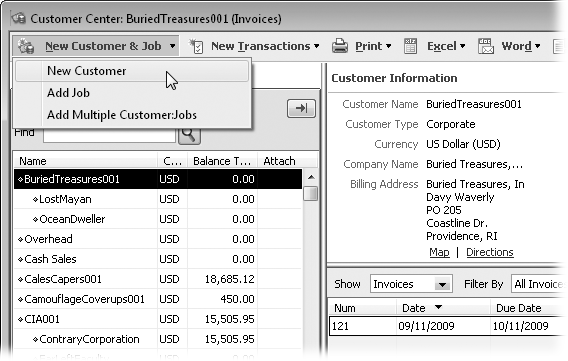
The Customer Center (Figure 4-1) is your starting point for creating, modifying, and viewing customers and jobs. QuickBooks gives you four easy ways to open the Customer Center window:
From anywhere in the program, press Ctrl+J.
On the left side of the QuickBooks Home page, click Customers.
On the icon bar, click Customer Center. (If you don’t see a Customer Center item on the icon bar, see Customizing the Icon Bar to learn how to add it.)
On the QuickBooks menu bar, choose Customers→Customer Center.
Figure 4-1. To create a new customer, click New Customer & Job and then choose New Customer. To view details and transactions for a customer, click the customer’s name in the Customers & Jobs list on the left side of the window.
QuickBooks is quite accommodating when it comes to creating customers. If you run a mom-and-pop shop and don’t add customers very often, you can create a customer when you create that customer’s first invoice. The handy <Add New> menu command in every drop-down list of customers and jobs is your ticket to just-in-time customer and job type creation.
If you sign new customers up all the time or you want to copy customer data into QuickBooks in a jiffy, creating customers in batches is much more efficient. With the Add/Edit Multiple List Entries feature (Adding and Editing Multiple Customer Records), you can paste data from Microsoft Excel or copy values from customer to customer. The New Customer dialog box also lets you create several customer records in one session without closing the dialog box in between each customer creation.
Tip
QuickBooks doesn’t care if you create customers and jobs without any forethought, but it pays to take the time to set them up properly. For example, you can create customers and jobs without classifying them in any way. However, you might want to categorize your customers and jobs so you can send customized communications to each type or determine which types are the most profitable. If you want to categorize your customers from the get-go, turn to Categorizing Customers and Jobs to learn how to set up customer and job types and different ways to use them.
Here’s the short and sweet method to creating a customer in QuickBooks:
In the Customer Center toolbar, click New Customer & Job→New Customer.
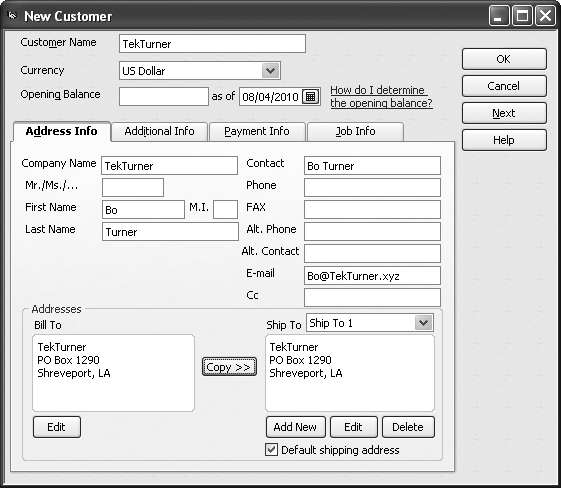
The New Customer dialog box opens (Figure 4-2).
In the Customer Name field, type a unique name or code for this customer, following the customer naming convention you’ve chosen, as described in the box on Making Customers Easy to Identify.
The Customer Name field is the only field you have to fill in—the rest are optional.
To save that customer’s record and create another one, click Next.
To save that customer and close the New Customer dialog box, click OK instead.
Tip
To create a job for a customer, you have to close the New Customer dialog box and open the New Job dialog box. So unless opening and closing the New Customer and New Job dialog boxes gives you a feeling of accomplishment, create all your customers first and then add the jobs for each one.
The box on How Many Names? tells you how to prevent your QuickBooks’ customer list from growing out of control.
Figure 4-2. Although the Opening Balance box beckons from below the Customer Name field in the New Customer dialog box, it’s better to leave it blank. The box on page 64 explains the best way to define a customer’s opening balance.
If you turn on QuickBooks’ multiple currency option (Multiple Currencies), the Currency box appears below the Customer Name box. QuickBooks automatically fills in this box with your home currency, so you usually don’t have to change this value. If the customer pays in a foreign currency, choose it in the Currency drop-down list. QuickBooks creates a separate Accounts Receivable account (Viewing Account Names and Numbers) for each currency you use.
If you plan to bill your customers, ship them products, or call them to make them feel appreciated, address and contact information is important. You record this info on the New Customer dialog box’s Address Info tab. Here’s a guide to the tab’s fields and what they’re good for:
Company Name. Unlike Customer Name, which acts as an identifier, the Company Name field is nothing more than the customer’s name as you want it to appear on invoices and other forms you create. QuickBooks automatically copies what you type here into the Bill To box below.
Contact. To address invoices, letters, and other company communications, enter the primary contact’s salutation or title, first name, middle initial, and last name in the appropriate fields. QuickBooks automatically copies the salutation and name you type in these fields into the Bill To and Contact boxes.
Tip
Your primary contact may not be the go-to person who reliably gets things done. If this turns out to be the case, you can always make this dependable resource your primary contact (by entering her info in the First Name and Last Name fields) and make the figurehead your alternate contact (by entering his name in the Alt. Contact field).
Bill To address. To complete the address for invoices, click the Edit button below the Bill To field, and then type the street address, city, state, country, and postal code, or copy that info from another program (Adding and Editing Multiple Customer Records). In the Edit Address Information dialog box, QuickBooks automatically turns on the “Show this window again when address is incomplete or unclear” checkbox, which tells the program to notify you when you forget a field like the city or when the address is ambiguous. For example, if the address of your biggest toy customer is Santa Claus, North Pole, QuickBooks opens the Edit Address Information dialog box so you can flesh out the address with a street, city, and arctic postal code.
Tip
You can enter addresses and contact info for all your customers more quickly by importing data from another program (Saving changes) or using QuickBooks’ Add/Edit Multiple List Entries command (Adding and Editing Multiple Customer Records).
Ship To address. If you don’t ship products to this customer, you can skip the Ship To field altogether. If the billing and shipping addresses are the same, click “Copy>>” to replicate the contents of the Bill To field in the Ship To field. (The greater-than symbols on the button indicate the direction that QuickBooks copies the address—left to right.) Otherwise, click Add New and fill in the Add Shipping Address Information dialog box.
Tip
You can define more than one Ship To address for a single customer, which is perfect if that customer has multiple locations. To add another Ship To address, click the Add New button below the Ship To box and fill in the boxes. Once you’ve added shipping addresses, you can choose the one you want in the Ship To drop-down list. When the shipping address you use most often is visible, turn on the “Default shipping address” checkbox to tell QuickBooks to pick that address automatically. Click the Edit or Delete buttons to modify or remove a shipping address, respectively.
Other contact information. QuickBooks gets you started by copying the contents of the First Name and Last Name fields into the Contact field. If you plan to look up info like phone numbers and email addresses in QuickBooks rather than in a contact program (Outlook, for example), fill in the other fields on the Address Info tab to specify the contact’s phone, fax, and alternate phone numbers, email address, and an email address to carbon copy.
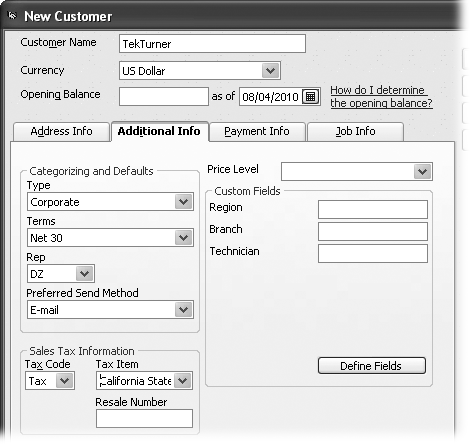
The New Customer dialog box’s Additional Info tab (Figure 4-3) serves up several fields that categorize your customers and simplify your bookkeeping. Although they’re optional, some of these fields speed up entering transactions down the road by storing the values you use most frequently. Other fields appear or disappear depending on the preferences you choose (preferences are the topic of Chapter 23). For example, if you charge sales tax, you need to turn on QuickBooks’ Sales Tax preferences if you want the Additional Info tab to include the Tax Code, Tax Item, and Resale Number fields.
Figure 4-3. Most of the fields on the Additional Info tab use QuickBooks’ lists. To jump directly to the entry you want in long lists, in any text box with a drop-down list, type the first few characters of that entry. QuickBooks selects the first entry that matches the characters you’ve typed and continues to reselect the best match as you continue typing. You can also scroll to the entry in the list and click to select it. If the entry you want doesn’t exist, click <Add New> to create it.
Here are the fields you might see on the Additional Info tab and some ways you can use them:
Type. Categorize this customer (see Categorizing Customers and Jobs) by choosing from the Type drop-down list, which displays the entries from your Customer Type List, such as government, health insurance, or private pay, if you run a healthcare company.
Terms. What you select here represents the payment terms the customer has agreed to. The entries you see in this drop-down menu come from the Terms List (Vendor Type List), which QuickBooks uses for both payment terms for your customers and the ones you accept from your vendors. QuickBooks lists several of the most common payment terms, such as “Due on receipt” and Net 30, but you can choose <Add New> at the top of the drop-down list to define additional payment terms in the Terms List. If you leave this field blank in a customer’s record, you have to choose the payment terms every time you create an invoice for that customer.
Rep. Choosing a name in this field links a customer to a sales representative, which is helpful if you want to track sales reps’ results. But reps don’t have to be sales representatives: One of the best ways to provide good customer service is to assign a customer service rep to a customer. When you choose <Add New> to create a new Rep entry (Sales Rep List), you can select existing names from the Employee List, Vendor List, and the Other Names List, or even add a new name to one of those lists to use as a rep.
Preferred Send Method. Choose E-mail, Mail, or None to identify the method that your customer prefers for receiving information. If you choose E-mail, QuickBooks automatically turns on the E-mail checkbox when you create forms (such as invoices) for this customer. The Mail method uses an add-on QuickBooks service to mail invoices. Choose None if you typically print documents and mail them the old-fashioned way. You can’t add a new entry to the Preferred Send Method list, so if you use carrier pigeons to correspond with your incarcerated customers, you’ll just have to remember that preference.
Sales Tax Information. The Sales Tax Information section appears only if you turn on the Sales Tax preference (Sales Tax). If the customer pays sales tax, choose an entry in the Tax Item drop-down list, which specifies the tax rate percentage. See Setting Up Sales Tax for instructions on setting up sales tax items and Entering Invoice Line Items for the full scoop on charging sales tax.
Customers who buy products for resale usually don’t pay sales tax because that would tax the products twice. (Who says tax authorities don’t have hearts?) To bypass the sales tax, choose Non (for “nontaxable sales”) in the Tax Code drop-down list, and then type the customer’s resale number in the Resale Number field. That way, if tax auditors pay you a visit, the resale number tells them where the sales-tax burden should fall.
Price Level. More often than not, customers pay different prices for the same product. Consider the labyrinth of pricing options for seats on airplanes. In QuickBooks, price levels represent discounts or markups that you apply to transactions. For example, you might have one price level called Top20, which applies a 20 percent discount for your best customers, and another price level called AuntMabel that extends a 50 percent discount to your Aunt Mabel because she fronted you the money to start your business. See Price Levels to learn how to define price levels.
Custom Fields. QuickBooks offers 15 custom fields, which you can use to store important info that QuickBooks didn’t see fit to give you out of the box. Because custom fields don’t use drop-down lists, you have to type your entries and take care to enter values consistently. Hiding Entries has more about custom fields.
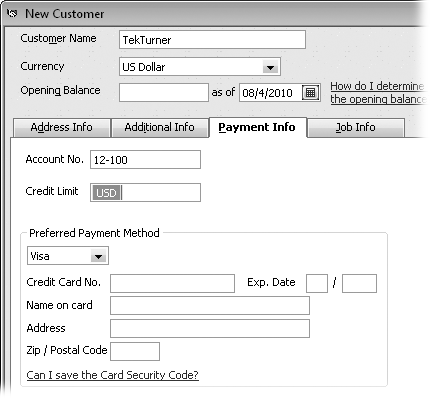
That’s right: The New Customer dialog box has still more fields for storing customer information—but you can skip them if you want. The Payment Info tab, shown in Figure 4-4 is the place to indicate how the customer pays and how much credit you’re willing to extend.
You can use the following fields to specify the customer’s payment info:
Account No. Account numbers are optional in QuickBooks. Large accounting programs often assign unique account numbers to customers, which greatly reduce the time it takes to locate a customer’s record. In QuickBooks, the Customer Name field works like an identifier, so you’re best off reserving the Account No. field for an account number generated by one of your other business systems.
Credit Limit. You can specify a dollar value of credit that you’re willing to extend to the customer. If you do, QuickBooks warns you when an order or invoice exceeds this customer’s credit limit, but that’s as far as it goes—it’s up to you to reject the order or ship your products COD. If you don’t plan to enforce the credit limits you assign, don’t bother entering a value in this field.
Preferred Payment Method. Choose the payment method that the customer uses most frequently. The drop-down list includes several common methods such as Cash, Check, and Visa, but you can add others by choosing <Add New>. The payment method you specify appears automatically in the Receive Payments window (Receiving Payments for Invoiced Income) when you choose this customer. If a regular customer forgets her checkbook and pays with cash, you can simply replace Check with Cash as you create the sales receipt in QuickBooks.
Credit card information. For credit card payments (see Importing a Delimited File to learn about QuickBooks’ credit card processing service), you can specify the customer’s credit card number, the name that appears on the card, the billing address for the card, the Zip/postal code, and the expiration date. (You can enter only one credit card number for each customer.) But before you enter this sensitive and valuable information into QuickBooks, check for government and merchant card provider restrictions on storing credit card numbers. For example, QuickBooks doesn’t let you store the card’s security code (the three-digit code on the back of the card) as a security precaution. Even if you can legally store the numbers, consider whether your security procedures are sufficient to protect your customers’ credit card information.
Note
The New Customer window includes a Job Info tab, which (not surprisingly) has fields for job-related information. If you don’t track jobs, you could use the Job Status field to store the overall status of your work for the customer, although a contact-management or project-management program is probably more useful. And if a customer hires you to do more than one job, skip the Job Info tab, since you’ll create separate jobs to track their info, as described on Exporting a text file.
Get QuickBooks 2011: The Missing Manual now with the O’Reilly learning platform.
O’Reilly members experience books, live events, courses curated by job role, and more from O’Reilly and nearly 200 top publishers.


