A company file is where you store your company’s financial records in QuickBooks, so it’s the first thing you need to work on in the program. You can create a company file from scratch or convert records that you previously kept in a different small-business accounting program, Quicken, or even another edition of QuickBooks like QuickBooks for Mac.
If you’re new to bookkeeping, another approach is to use a file that someone else created. For example, if you’ve worked with an accountant to set up your company, she might provide you with a QuickBooks company file already configured for your business so you can hit the ground running.
This chapter begins by explaining how to launch your copy of QuickBooks. Then, if you need to create your company file yourself, you’ll learn how to use the QuickBooks Setup dialog box or the EasyStep Interview to get started (and find out which other chapters explain how to finish the job). If you’re converting your records from another program, this chapter provides some hints for making the transition as smooth as possible. Finally, you’ll learn how to open a company file, update one to a new version of QuickBooks, and modify basic company information.
Here are the easiest ways to open QuickBooks:
Desktop icon. Double-click the desktop shortcut that QuickBooks created during installation.
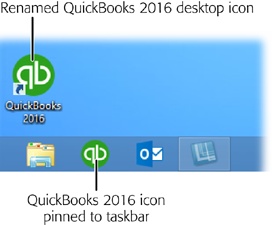
Windows taskbar. The fastest way to open QuickBooks is to click its icon on the Windows taskbar, shown in Figure 1-1—but first you have to put it there. To do that in Windows 7 and Windows 8.1, right-click the QuickBooks desktop icon and then, on the shortcut menu that appears, choose “Pin to Taskbar.” If you’re still using Windows 8 (not 8.1), pinning the QuickBooks desktop icon to the taskbar takes a few more steps: Point the cursor at the screen’s upper-right corner to display the Charms menu, click the Search icon (the magnifying glass), type quickbooks in the Search box, and then press Enter. When you see the QuickBooks icon, right-click it, and then choose “Pin to Taskbar.”
Figure 1-1. Windows’ taskbar keeps your favorite icons near at hand. The taskbar is easy to reach, because program windows don’t hide it the way they do desktop shortcuts. You can rename desktop icons, as was done here. To do that, right-click the icon, and then, on the shortcut menu, choose Rename. Type the label you want to use, and then press Enter.
Start menu. You can also launch QuickBooks from the Start menu. In Windows 7, click Start→QuickBooks Pro 2016 (or QuickBooks Premier 2016). If QuickBooks isn’t already listed in the Start menu, choose Start→All Programs→QuickBooks→QuickBooks Pro 2016 (or QuickBooks Premier 2016). In Windows 8, point the cursor at the screen’s upper-right corner to display the Charms menu, click Start, and then click the QuickBooks icon on the screen’s right. And in Windows 8.1, you can right-click the QuickBooks desktop icon and choose “Pin to Start.”
The first time you launch QuickBooks, you’re greeted by the QuickBooks Setup dialog box, whose sole purpose is to help you create a company file in one way or another. The rest of this chapter explains how to create a company file, and then how to open company files you create. After that, you’ll be ready to dive into bookkeeping.
Note
After you create your company file and set up accounts, vendors, customers, and other QuickBooks lists, your setup is almost complete. Online Appendix I, “Setting Up Existing Records in a New Company File,” guides you through the rest of the steps for setting up your financial records: defining account opening balances, entering open transactions like unpaid bills and invoices, recording year-to-date income and expenses, verifying your records, and so on. Download Appendix I from this book’s Missing CD page at www.missingmanuals.com/cds.
To keep your entire financial history at your fingertips, you need to put every transaction and speck of financial information in your QuickBooks company file. But you have better things to do than enter years’ worth of checks, invoices, and deposits, so the comprehensive approach is practical only if you just recently started your company.
The more realistic approach is to enter your financial data into QuickBooks starting as of a specific date and, from then on, add all new transactions to QuickBooks. The date you choose is called the start date. (The start date isn’t something that you enter in a field in QuickBooks; it’s simply the earliest transaction date in your company file.) You should choose it carefully. Here are your start date options and the ramifications of each one:
The day you start your company. If you just started your business, the start-date decision is easy: it’s the day you start your company.
The last day of the previous fiscal year. If your business has been running for a while, the best approach is to fill in your records for the entire current fiscal year. To do that, use the last day of your company’s previous fiscal year (or December 31, if you use the calendar year) as the company file’s start date. That way, the account balances on your start date are like the ending balances on a bank statement, and you’re ready to start bookkeeping fresh on the first day of the fiscal year.
Yes, you have to enter checks, credit card charges, invoices, payments, and other transactions that have happened since the beginning of your fiscal year (see online Appendix I available from this book’s Missing CD page at www.missingmanuals.com/cds), but that won’t take as much time as you think. And you’ll regain those hours when tax time rolls around, as you nimbly generate the reports you need to complete your tax returns.
If more than half of your fiscal year has already passed, the best approach is to be patient and postpone your QuickBooks setup until the next fiscal year. (Intuit releases new versions of QuickBooks in October or November each year for just that reason.) But waiting isn’t always feasible. In cases like that, go with the next option in this list.
The last day of the previous fiscal period. The next best start date is the last day of the previous fiscal quarter (or fiscal month, at the very least). Because your company file won’t contain a full year’s worth of detail if you go this route, you might have to switch between QuickBooks and your old filing cabinets to prepare your tax returns and look up financial information.
Keeping books requires accuracy, attention to detail, and persistence—hence the customary image of spectacled accountants scanning row after row of numbers. QuickBooks can help you keep your books without ruining your eyesight—as long as you start your company file with good information. If you want to practice with QuickBooks, you can experiment with a sample file, as the box below explains.
QuickBooks makes it easy to create a company file from scratch. (The box on Getting Help Creating a New Company File tells you how to find someone who can help you create one.) You can opt for a short and sweet process, which asks you for the bare minimum of info before it creates your file. Or you can use a wizard that guides you through the process with a series of questions that takes about 15 minutes to answer. The questions cover the basics of creating and customizing a company file to fit your business. QuickBooks needs to know some company information, the industry you’re in, and the features you want to use. The program then sets your preferences and creates a few accounts (like basic income and expense accounts and your checking account). The box on What’s Next? lists additional setup tasks you need to perform to flesh out your company file—and where in this book to learn more about those tasks.
You can create a company file in several ways, and the QuickBooks Setup dialog box—which opens automatically the very first time you start QuickBooks—is your ticket to all of them. If you don’t see this dialog box, choose File→New Company (or click “Create a new company” in the No Company Open window). The dialog box takes up most of the screen, so you can stay focused on creating your company file.
The three basic approaches to creating a company file are covered by the QuickBooks Setup dialog box’s two buttons:
Start Setup. This button is in pole position because it’s the best option if this is your first time creating a company file. If you go this route, QuickBooks launches QuickBooks Setup and asks for a few bits of info at a time before moving to each new screen. If you stop filling in information before QuickBooks creates your company file, the program won’t save any of the values you entered. So make sure you have at least 15 minutes to complete the first set of steps. Instructions for the basic setup begin on Using QuickBooks Setup.
Advanced Setup. If you’ve been around the QuickBooks block before, click the Other Options button and then choose this entry to launch the EasyStep Interview window, which asks for more information on each screen than the Start Setup approach does. If you need help during the process, you can always click the “Get answers” link at the top right of the window. You can also use Advanced Setup to go back and modify info you entered previously, whether you entered it using QuickBooks Setup or the EasyStep Interview. (The instructions for the EasyStep Interview begin on Using the EasyStep Interview.)
Other Options. The other entries on this button’s drop-down menu cover the rest of the bases. You can use it to open an existing company file or convert existing records that are in Quicken or another accounting program (Converting from Another Program to QuickBooks) for use in QuickBooks.
Note
If you use QuickBooks Accountant edition, you can create a company file from an existing file by choosing File→“New Company from Existing Company File.”
Whether you use QuickBooks Setup or the EasyStep Interview, you tell QuickBooks the basic 411 about your company, such as its name and tax ID. (If any of the fields confuse you, try clicking the “Help me choose” links or help icons (a white question mark within a blue circle) to the right of the text boxes in the QuickBooks Setup dialog box, or the “Get answers” link in the upper-right corner of the EasyStep Interview window.) The next section has the full scoop on the information you need to provide.
When you click Start Setup in the QuickBooks Setup dialog box, the program gets you going as quickly as possible by asking for the minimum amount of info (you can fill in the details later). To use it, choose File→New Company and then, in the QuickBooks Setup dialog box, click Start Setup. The “Glad you’re here!” screen appears, and you can begin entering info. This section explains what the program needs to know to create your company file.
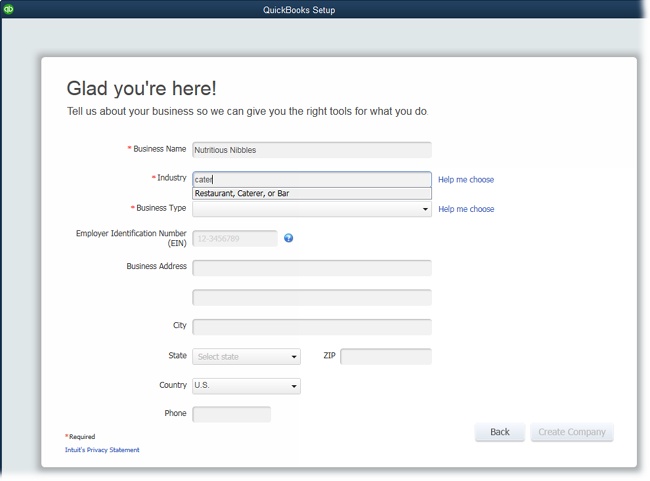
On the “Glad you’re here!” screen, shown in Figure 1-2, you need to cough up only a handful of answers, but these responses are the foundation of many of the preferences that QuickBooks sets:
Business Name. Type the name you want to appear on invoices, reports, and other forms. (QuickBooks also uses the name you type here to name your company file.) Later on, you can specify your company’s legal name (Modifying Company Info).
Industry. Start typing your industry in this box (as shown in Figure 1-2) and see if QuickBooks finds a match. If not, to the right of this field, click “Help me choose” to see all your options. If you don’t see an obvious choice in the Industry list, scroll to the bottom and choose either General Product-based Business or General Service-based Business.
Figure 1-2. QuickBooks’ list of industries is robust, so chances are good you’ll find one that’s close to what your company does. You can start typing an industry like cater, and the program displays options that match what you’ve typed so far, such as the industry “Restaurant, Caterer, or Bar” shown here. Or you can click the “Help me choose” link to see all the industries the program offers.
Choose your industry carefully. QuickBooks adjusts its preferences and chart of accounts based on your choice to match how your business operates. For example, the program creates income and expense accounts for your type of business and automatically turns on features like sales tax and inventory if your industry typically uses them. If QuickBooks makes assumptions you don’t like, you can alter your preferences (Chapter 25) and accounts (Creating Accounts and Subaccounts) later.
Business Type. The tax form you use depends on the type of business entity you have. This drop-down list contains the most common types, from sole proprietorships and partnerships to corporations and nonprofits. When you select a type, QuickBooks assigns the corresponding tax form to your company file. After you finish creating your company file, you can see the tax form the program selected by choosing Company→My Company, which brings up the dialog box shown in Figure 1-7 (Modifying Company Info). The Income Tax Form Used box at the bottom of that dialog box lists the tax form for your company type.
Employer Identification Number (EIN). This box is for the federal tax ID number you use when you file taxes. You don’t have to enter it now, but you’ll need it come tax time. You’ll use a federal EIN if your company is a corporation or partnership, you have employees, or fit a few other criteria (go to www.irs.gov to see if you need an EIN). Otherwise, your tax ID is your Social Security number or Individual Tax Identification Number (ITIN).
The Business Name, Industry, and Business Type boxes are the only ones that QuickBooks requires. After you fill them in, the Create Company button becomes active. However, you might as well fill in the remaining boxes with your business address and telephone number.
Click Create Company to open the QuickSetup dialog box, and then navigate to the folder where you want to save your file. QuickBooks automatically fills in the “File name” box with the business name you typed and sets the “Save as type” box to QuickBooks Files (*.QBW, *.QBA). Click Save to create your company file. A Working message box appears to show QuickBooks’ progress in creating your file; you’ll know it’s finished when the “You’re all set!” screen appears. Click the Start Working button at the bottom right to open the file in QuickBooks.
The EasyStep Interview also guides you through the setup process, but it gives you more control over setting up your company file than QuickBooks Setup’s basic approach does. For example, you can provide more info about your company up front and choose which features to turn on.
To access the EasyStep Interview, choose File→New Company and then, in the QuickBooks Setup dialog box, click the Other Options button, and then, from the drop-down menu, choose Advanced Setup. The “Enter your company information” screen appears. As you enter the following info, click Next to proceed to each new screen:
Name and contact info. The first screen wants to know the name of your company, its legal name, its tax ID, and your contact info. The “Company name” field is the only one that’s required—you can fill in the other fields later on as described on Modifying Company Info.
Industry. On the “Select your industry” screen, choose the industry closest to yours. That way, most of the settings the program chooses will be what you want.
Type of company. On the “How is your company organized?” screen, select the option for your business type. This setting determines which tax form, accounts, and tax form lines you’ll use to prepare your business tax return.
First month of fiscal year. When you start a company, you choose a fiscal year. On the “Select the first month of your fiscal year” screen, QuickBooks automatically sets the “My fiscal year starts in” box to January because so many businesses stick with the calendar year for simplicity. If you start your fiscal year in another month, choose it from the drop-down list.
Administrator password. The administrator can do absolutely anything in your company file: set up other users, log in as other users, and access any area of the company file. Although QuickBooks lets you click Next and skip right past the “Set up your administrator password” screen, this is no time for shortcuts, as the box below explains. Type the password you want to use in both the “Administrator password” and “Retype password” boxes, and then keep the password in a safe but memorable place. (Setting Up the Administrator explains how to change the administrator name and password.)
After you set the administrator password and click Next, the “Create your company file” screen appears. (If you’re new to QuickBooks, click the “Where should I save my company file?” link, which opens a Help Article dialog box that explains the pros and cons of storing company files in different places.)
When you’re ready to create the file, on the “Create your company file” screen, click Next to wrap up the creation process by specifying the filename and location. QuickBooks opens the “Filename for New Company” dialog box, which is really just a Save As dialog box. Navigate to the folder where you want to store your company file. QuickBooks automatically sets the “File name” box to the company name you entered, and the “Save as type” box to “QuickBooks Files (*.QBW, *.QBA).” Here are some guidelines for naming and saving your company file:
If you want to call the file something other than the company name you entered earlier in the interview, simply type a new name in the “File name” box. For example, you may want one that’s shorter or that better identifies the company’s records within.
Consider storing your company file in a folder with the rest of your company data so that it gets backed up along with everything else. For example, if you’re the only person who uses QuickBooks, you could create a Company Files folder inside your Documents folder. See Storing Company Files on a Network for more about choosing a location for company files.
When you click Save in the “Filename for New Company” dialog box, QuickBooks may take a minute or so to create the new file. In the meantime, a message box with a progress bar appears. When the company file is ready, the “Customizing QuickBooks for your business” screen appears. Click Next to dig in.
Tip
At this point, the progress bar in the left margin of the EasyStep Interview window is depressingly short because you still have to do the bulk of the company file setup. If you need a break before continuing, at the bottom of the window, click Leave. The next time you open that company file, the EasyStep Interview continues where you left off.
Click Next on the “Customizing QuickBooks for your business screen” to see a series of EasyStep Interview screens that ask questions about your business. Your answers to these questions help QuickBooks decide which features to turn on, what to include on your Home Page, and so on. The interview displays “(recommended for your business)” next to the options that are typical for a company in your industry, as shown in Figure 1-3.
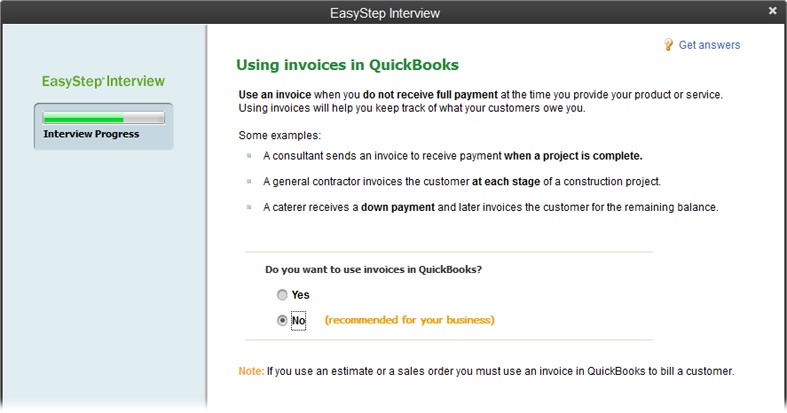
Figure 1-3. The EasyStep Interview sticks to the basics, so you’ll have more setup to do later. As you step through the screens in this section, make a list of the features you’re turning on (and the corresponding page numbers in this book) for reference. If you decide to change any of these settings later, Chapter 25 tells you how.
Here are some guidelines for answering the questions on the various screens:
The What do you sell? screen is where you tell QuickBooks whether you offer services, products, or both. When you choose one of these options, the program figures out which types of income accounts you need. If you select “Products only” or “Both services and products,” another screen later in the interview asks whether you want to track inventory.
The Do you charge sales tax? screen has only two options: Yes and No. If you’re one of the unfortunate souls who has to navigate the rocky shoals of sales tax, select Yes. If you don’t charge sales tax, select No. For detailed instructions on dealing with sales tax in QuickBooks, see Chapter 21.
On the Do you want to create estimates in QuickBooks? screen, choose Yes or No to turn the estimate feature on or off. If you prepare quotes, bids, or estimates for your customers and want to do so in QuickBooks (Estimating Jobs), select Yes.
Note
If you use QuickBooks Premier, the “Tracking customer orders in QuickBooks” screen appears, asking whether you want to use sales orders to track backorders (Using Sales Orders for Backorders) or other orders that you plan to fill at a later date. QuickBooks Pro doesn’t include sales orders.
The Using statements in QuickBooks screen is where you tell the program whether you generate statements to send to customers (Generating Statements). For example, your wine-of-the-month club might send monthly statements to its members. Or if you’re a consultant, you could send invoices for work performed and then send a statement that summarizes the fees, payments, and outstanding balance.
The Using invoices in QuickBooks screen appears only if you chose No on the “Do you want to create estimates in QuickBooks?” screen. (If you chose Yes on that screen, QuickBooks automatically turns on the invoicing feature.) Select Yes to tell the program that you want to use invoices, which you probably do because invoices are the most flexible sales forms (Choosing the Right Type of Form). If you answer No (if, for example, you own a restaurant), QuickBooks jumps to the “Managing bills you owe” screen.
If you answer Yes on the “Using invoices in QuickBooks” screen, the Using progress invoicing screen asks whether you invoice customers based on the percentage you’ve completed on a job. See Comparing Estimates to Actuals to learn why (and how) you might use this feature.
The Managing bills you owe screen asks whether you plan to write checks to pay bills immediately (select No) or enter bills in QuickBooks and then pay them later (select Yes). You can read about bill preferences on Bills and payment preferences on Multiple Currencies.
Tip
Entering bills in QuickBooks (Entering Bills) requires more steps than simply writing checks without entering the bills in QuickBooks, but there’s a benefit to the extra effort: The program can remind you when bills are due or qualify for timely payment discounts, and it can keep track of the total you owe.
The Tracking inventory in QuickBooks screen is where you tell the program whether you keep track of the products you have in stock. This screen provides a few examples of when to track or bypass inventory, and Should You Track Inventory with Items? has info about how to decide whether tracking inventory makes sense for your business.
Tracking time in QuickBooks is ideal if you bill by the hour or pay people based on the number of hours they work. In that case, select Yes on this screen to track the hours people work and create invoices for their time. Chapter 8 explains how to set up time tracking.
The Do you have employees? screen is where you specify whether you want to use QuickBooks’ payroll and 1099 features. If you do, select Yes and turn on the appropriate checkbox(es). If you use non-Intuit services to run payroll or to generate contractors’ 1099s, select No.
When you click Next on the “Do you have employees?” screen, you see the “Using accounts in QuickBooks” screen, and the progress bar indicates that you’re almost done with the interview. Click Next to set these final options:
The Select a date to start tracking your finances screen summarizes what you learned about start dates on Choosing a Start Date. To start at the beginning of this fiscal year (which QuickBooks can figure out using the current calendar year and the starting month you select), choose the “Beginning of this fiscal year: 01/01/15” option. (The year you see listed depends on the current calendar year.) If you’ve decided to start on a different date, select the “Use today’s date or the first day of the quarter or month” option instead. You can then type or choose any date you want in the box, such as the last day of the previous fiscal period.
The Review income and expense accounts screen (Figure 1-4) lists the accounts typically used by companies in your industry.
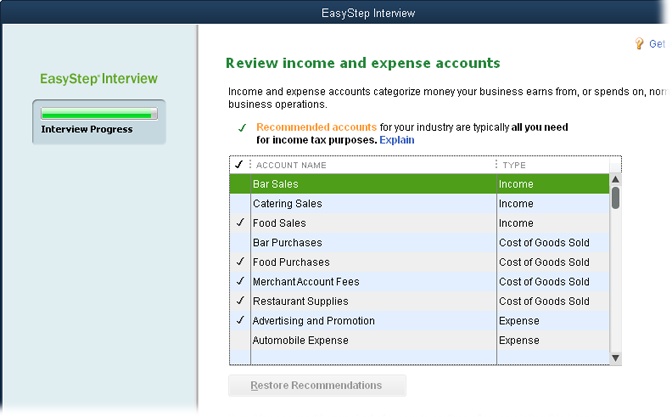
Figure 1-4. QuickBooks places a checkmark in front of the accounts that are typical for your industry. Click an empty checkmark cell to add an account that the program didn’t select, or click a cell with a checkmark to turn that account off. You can also drag your cursor over checkmark cells to turn several accounts on or off.
When you click Next, you see a bright orange—but premature—“Congratulations!” You still have a few more steps to complete before you can open your company file. Click “Go to Setup,” and then read the next section.
After you create your company file with the EasyStep Interview, you’ll see the “Get all the details into QuickBooks” screen, which is where you can perform additional steps, such as adding people you do business with, items you sell, and bank accounts.
If you want to dive into your work without QuickBooks’ help on these steps, at the bottom right of the window, click Start Working and jump to Modifying Company Info. If you want step-by-step guidance through these processes, click the Add buttons in these sections (if your lists already contain people and items, you’ll see Add More buttons instead):
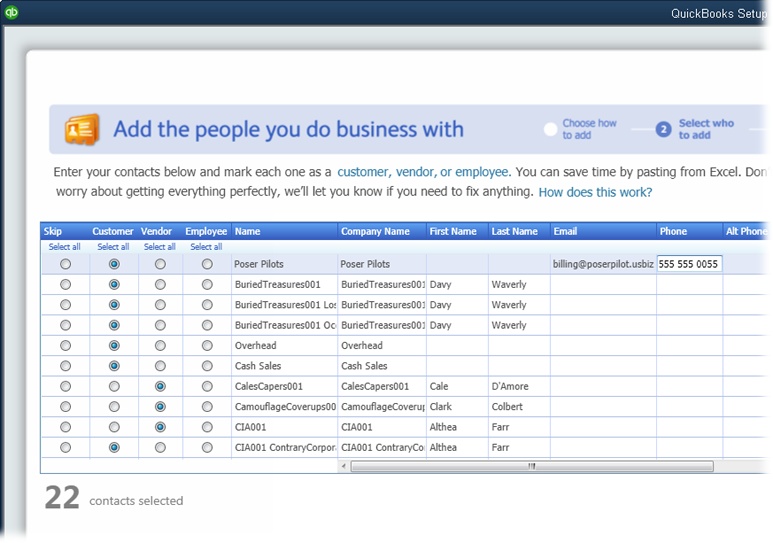
Add the people you do business with. Adding these folks is a snap. Click the first Add button, and then you can import names from your email program (Outlook, Yahoo, or Gmail), paste data from an Excel workbook, or enter info manually. If you select one of the import options and then click Continue, you’ll see a table with the names from your email program, as shown in Figure 1-5.
Figure 1-5. Initially, QuickBooks selects the Skip option (the far-left column) for all the names. That way, you can select the option in the Customer, Vendor, or Employee column for each name you want to import to designate whether it’s a customer, vendor, or employee. You can also select a cell with info in it (like a name or an email address) to edit the info within it.
Add the products and services you sell. When you click the Add (or Add More) button in this section, you first choose either the Service or “Non-inventory part” option, because you fill in different fields for each type of item. Select the Service option to set up services you sell or the “Non-inventory part” option to create products you sell (see When You Don’t Need Items to learn about products you keep in inventory), and then click Continue. Fill in the names, description, and prices, and then click Continue again to save your items.
Add your bank accounts. For bank accounts, you fill in the account name, account number, opening balance, and opening balance date.
Tip
If you’re in the middle of entering names, products and services, or bank accounts and want to get back to the “Get all the details into QuickBooks” screen, click Cancel. You can return to this screen at any time by choosing Company→Bulk Enter Business Details.
Whether you finish or skip these additional steps, click Start Working to jump to the Home Page, which includes icons for the features that QuickBooks turned on during setup.
If you launched your small business from your basement and kept your records with Quicken Home & Business, your accountant has probably recommended that you make the leap to QuickBooks. Or maybe you used another accounting program like Peachtree or Small Business Accounting and have decided to move to QuickBooks. Or perhaps you’re switching from QuickBooks for Mac to QuickBooks for Windows. Whatever your situation, this section tells you how to prep your file for a smooth conversion and bring it over into QuickBooks for Windows.
Quicken doesn’t report your business performance in the way that most accountants want to see, nor does it store your business transactions the way QuickBooks does. Bottom line: You have to prep your Quicken file before you convert it to QuickBooks.
To make the conversion proceed as smoothly as possible, some cleanup of your Quicken file is in order. For example, record overdue scheduled transactions and send online payments before you convert your Quicken file. Also, in Quicken, delete accounts you no longer need, because after they’re in QuickBooks, you can’t delete them if they contain any transactions. And make sure that customer names are consistent and unique.
QuickBooks doesn’t support repeating online payments, so you also have to tell Quicken to delete any repeating online payments you’ve set up. In addition, you need complete reports of your past payrolls because Quicken payroll transactions don’t convert to QuickBooks.
Intuit publishes a detailed guide to help you prepare for a Quicken conversion. Go to http://tinyurl.com/pu6vntq and follow the instructions there.
When your Quicken file is ready for conversion to QuickBooks, you have two options in QuickBooks:
Note
If you cleaned up your Quicken file but you run into conversion problems in QuickBooks, check the QuickBooks company file for errors by choosing File→Utilities→Verify Data, as described on Verifying Your QuickBooks Data. Another potential solution is to remove transactions prior to the current fiscal year in Quicken before converting the file.
Now that your Quicken data is resting comfortably in a QuickBooks file, you might think you’re ready to begin using QuickBooks. However, there are some post-conversion steps you should take to get your newly minted company file into shape:
Enter your company information in QuickBooks. Info like your company’s legal name and address, federal Employer Identification Number, and business type don’t come over with your Quicken data. See Modifying Company Info to learn how to add them to your company file.
Set up your bank feeds in QuickBooks. Exchanging Data with Your Bank tells you how to get your QuickBooks bank accounts and your real-world bank accounts talking.
Change Quicken names to QuickBooks customers, vendors, and employees. When you convert from Quicken to QuickBooks, QuickBooks adds all the converted names to its Other Names List. See Customer Type List to learn how to move these names to other lists.
Tip
If your Quicken data file has tons of names, an easy way to convert them is to export them to a spreadsheet and then import them using QuickBooks’ Add/Edit Multiple List Entries feature (Adding and Editing Multiple Records).
Set up Accounts Payable in QuickBooks. If your Quicken file contained unpaid bills, simply write checks (Producing Checks) to pay them in QuickBooks. After your vendor balances are zero, you’re ready to enter new bills in QuickBooks. When you record your first bill, the program automatically adds a new account called Accounts Payable to your chart of accounts.
Moving a file from QuickBooks for Mac to QuickBooks for Windows is mainly about getting the file into a QuickBooks for Windows format. To do that, simply create a backup of the file in QuickBooks for Mac, and then restore that backup (Restoring Backups) in QuickBooks for Windows.
To convert files created in other accounting programs, like Peachtree or Small Business Accounting, you have to download a conversion tool from the Intuit website. In QuickBooks, choose File→Utilities→Convert, and then choose the program you want to convert from. In the browser window that opens, scroll down to the “Are you ready to convert your data?” section, click the “Convert from Peachtree, Microsoft SBA, & Microsoft Office Accounting” link, and then click the Download button that appears. In the File Download dialog box that opens, click Save to download QuickBooksConversionToolSetup.exe to your computer.
After you’ve opened a company file in one QuickBooks session, the next time you launch the program, it automatically opens that same company file. If you keep the books for only one company, you might never have to manually open a QuickBooks company file again.
But if you’re an irrepressible entrepreneur or a bookkeeper who works on several companies’ books, you can open another company file in QuickBooks anytime, and the program automatically closes the previous one. Because QuickBooks stores data in a database, you don’t have to save a company file before you close it. (And if you use QuickBooks Accountant edition, you can have two company files open at the same time, as the Tip that follows explains.) The following sections describe the different ways to open a company file.
Tip
With QuickBooks Accountant and QuickBooks Enterprise, you can have two company files open at the same time, although the second file that you open has some restrictions. (To learn about these restrictions, search QuickBooks Help for “second company.”) To open a second company file, choose File→Open Second Company, and your computer launches a new instance of QuickBooks. In the new window, double-click the name of the file you want to open. The second company file opens with the text “(Secondary)” after the company name in the title bar of the QuickBooks window. (In the first QuickBooks window, the text “(Primary)” appears after the company name.)
If you work on more than one company file, you may frequently switch between them. The easiest way to open a recent file is to choose File→Open Previous Company, and then choose the file you want to open, as shown in Figure 1-6. If the Open Previous Company submenu doesn’t list the file you want, follow the steps in the next section instead.
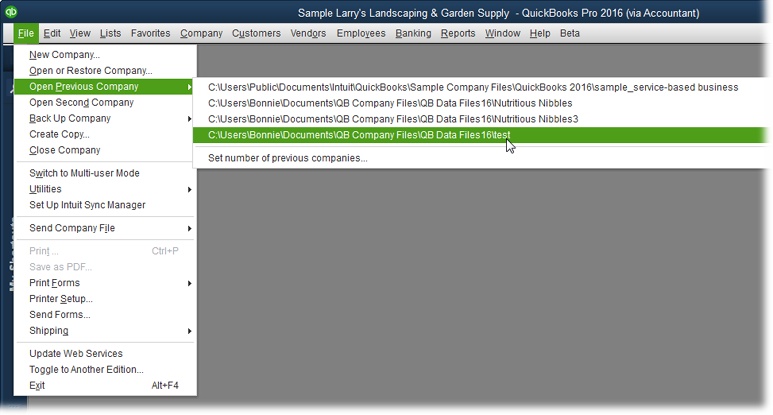
Figure 1-6. To open a company file you’ve worked on recently, click it in the Open Previous Company submenu. If the No Company Open window (not shown here) is visible, you can open a recent file by double-clicking its filename in that window’s list. (Opening a sample file is the only task the No Company Open window performs that you can’t also perform via the File menu.)
Sometimes, a company file you want to open falls off the recent-file list. (The box on Fast Access to Several Companies explains how to tell QuickBooks how many files to include on the File→Open Previous Company submenu.) Say your bookkeeping business is booming and you work on dozens of company files every month. Or maybe you want to update a file from a previous version of QuickBooks (see the box on Updating a QuickBooks File). Here’s how to open any company file, no matter how long it’s been since you last used it:
Choose File→“Open or Restore Company.”
If the No Company Open window is visible, you can click “Open or restore an existing company” instead.
In the “Open or Restore Company” dialog box, select the “Open a company file” option, and then click Next.
QuickBooks closes your current company file and then opens the “Open a Company” dialog box.
Navigate to the folder with the company file you want and double-click the file’s name.
You can also click the filename and then click Open.
If the QuickBooks Login window appears (which it will if you’ve assigned a password to the Administrator user account or set up multiple users), type your user name and password.
If the Administrator is the only user, the Password box is the only one that appears. But if you have more than one user for the company file, both the User Name and Password boxes appear.
Click OK.
QuickBooks opens the company file, and you’re ready to keep the books.
Note
Backup files are the answer to the adrenaline rush you get when you do something dumb with your company file, when your hard drive crashes, or when a plume of smoke wafts up from your computer. To learn how to create or restore backup files, see Backing Up Files or Restoring Backups, respectively.
A portable file is a special type of file that makes QuickBooks company files compact so you can email them more easily. These files take up less space because they don’t contain other files related to your company file, like letters, templates, logos, and images. A portable file also doesn’t contain a transaction log (.tlg file), which Intuit Technical Support can use to restore transactions if your file is damaged in some way.
Opening a portable file is similar to opening a regular company file:
Choose File→“Open or Restore Company.”
The “Open or Restore Company” dialog box opens.
Select the “Restore a portable file” option, and then click Next.
The Open Portable Company File dialog box opens. QuickBooks automatically sets the “Files of type” box to “QuickBooks Portable Company Files (*.QBM).”
Navigate to the folder with the portable file and double-click its filename.
QuickBooks opens the file.
When you use the basic setup process or the EasyStep Interview, QuickBooks gets the basic facts about your company in small chunks. But after you create your company file, you can easily view and edit any of this information. Here’s how:
Choose Company→My Company or click the My Company entry in the icon bar (Menus and the Icon Bar).
The My Company window opens. As shown in Figure 1-7 (background), your company info appears on the left and info about your copy of QuickBooks appears on the window’s right. Apps, services, and subscriptions that you’ve signed up for (like accepting credit cards, payroll, and so on) appear below your company info. Other products that Intuit would like to sell you appear at the bottom of the window.
To edit your company info, click the edit icon at the window’s top right (it looks like a pencil).
The Company Information dialog box opens with your company information grouped into several categories (see Figure 1-7, foreground).
Figure 1-7. Some bits of company information change more often than others. For instance, you might relocate your office or change your phone number, email address, or website address. But stuff like your company’s legal name and address, federal Employer Identification Number, and business type (corporation, sole proprietorship, and so on) usually stays the same.
To edit your company’s contact info, in the Company Information dialog box, click the Contact Information category on the left, and then make the changes you want.
This category includes fields for your company address, phone number, email address, and website.
To change your company’s legal name and address, click the Legal Information category.
Remember, your company’s legal name and address are the ones you use on federal and state tax forms.
To edit the tax identification number you use, click the Company Identification category.
This category includes the federal Employee Identification Number (EIN) and Social Security Number (SSN) fields. Fill in (or edit) the one that you use for your company.
To specify info for reports you generate, click the Report Information category.
You can specify the starting month for both your fiscal year and your tax year. In addition, this category is where you set the tax form you use for your company tax return.
If you have payroll, click the Payroll Tax Form Information category and make the changes you want.
You can fill in the name, title, and phone number for the person who prepares and signs your company payroll forms; this way, QuickBooks can fill those fields in automatically when you use an Intuit payroll service.
When you’re done editing, click OK.
The Company Information dialog box closes. Click the X at the top right of the My Company window to close it, too.

Get QuickBooks 2016: The Missing Manual now with the O’Reilly learning platform.
O’Reilly members experience books, live events, courses curated by job role, and more from O’Reilly and nearly 200 top publishers.

