Chapter 4. Banking, Credit Cards, and Cash
As you run errands, you probably write a few checks, swipe your credit card, and hand over some coins and bills. When you get home, you can record all your transactions to keep your Quicken account balances in sync with your wallet and the accounts at your financial institutions. You can create Quicken transactions as easily as handwritten ones—easier, in fact, since the program automatically completes entries for you, lets you schedule transactions to happen automatically, or downloads them from your bank.
You can take even more work off your plate by automating transactions in Quicken. With scheduled transactions, you don’t have to remember when bills or deposits are due—Quicken reminds you and fills in all the fields for you. Although automation requires a bit of setup, the time you save down the road makes it all worthwhile.
This chapter describes how to record your daily cash flow transactions and how Quicken features can make short work of them. You’ll also learn how to handle other common transaction tasks, like transferring money between accounts, voiding transactions, or finding transactions you recorded a while back.
Transaction Basics
You’ll learn best how transactions work when you enter some yourself, as you’ll learn in this section. Later, when you take advantage of automatic features like scheduled transactions, you’ll understand exactly what Quicken’s doing. You record Quicken transactions in a register that looks much like the paper type. Each account you create in Quicken has its own register.
Getting to the Register
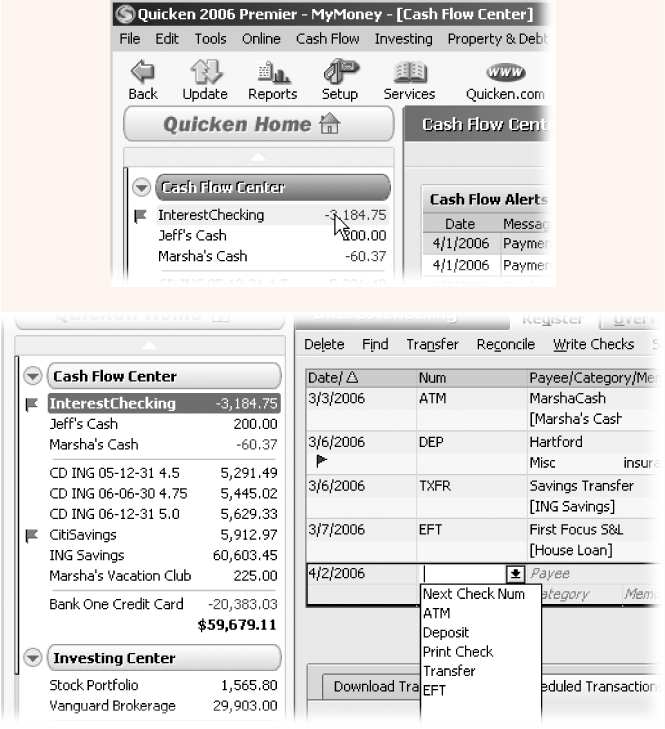
The Account Bar is the fastest way to open up a register—simply click the account name. If the Cash Flow Center is visible, you can click an account name there as well. From the Quicken menu bar, choose Cash Flow → Cash Flow Accounts, and then choose the account. Figure 4-1 shows one way to open an acount register and some of the helpful features you’ll find when you do.
Navigating a Transaction
Here are some keystrokes that will move you through the fields of a transaction faster than grain through a goose:
Move to a new transaction. In the register, press Ctrl+N or Ctrl+End to jump to the first blank row in the register. You’re ready to record a new transaction.
Move to the next field. If you’re creating a transaction directly in the register, pressing Tab is the fastest way to move to the next field and display its QuickFill options. You can skip fields by pressing Tab several times in succession or by clicking the next field you want to enter.
Record a transaction. As soon as all the fields you want have values, click or press Enter to record the transaction. Keyboard shortcut mavens can press Alt+T to record a transaction at any time.
Quicken’s Quicker with QuickFill
Before you learn how to record a transaction from A to Z, you can bask in the knowledge that you rarely have to do it. Quicken works hard to do as much of your transaction data entry as it can, and, most of the time, it does an outstanding job. Every time you create a transaction, Quicken remembers what you did and fills in your next transaction for the same payee. In no time, you can add transactions by typing just the date and a few letters of the payee’s name. Quicken takes care of the rest.
The first time you record a transaction for a payee, Quicken memorizes almost everything about it to the Memorized Payee List (Section 1.5.8): the payee, amount, categories, and memo text. For new transactions, you still have to fill in the date, and, for check transactions, the check number.
Then, when you record a new transaction and choose a payee, the QuickFill feature automatically fills in all the other transaction fields for you, as demonstrated in Figure 4-2.
Recording Checks
Quicken provides three ways to record checks. Fortunately, your choice is easy because it depends on how you produce your check:
Register. The register is the easiest and fastest way to record checks that you’ve written by hand. See Section 4.1.2 for several ways to open an account register.
Write Checks window. If you plan to print your checks in Quicken, the Write Checks window’s Print button makes it easy to queue up checks for printing (see “Recording Printed Checks” on Section 4.3.2). Open the Write Checks window by choosing Cash Flow → Write Checks or by pressing Ctrl+W.
Online Center window. You can generate electronic payments directly in the register, but the Online Center window’s Payments tab (Section 6.5.1) is the easiest way to create and send electronic payments.
Recording a Check in the Register
With a combination of keyboard shortcuts, clicks, and the occasional typed character, you can make short work of recording checks in the register. Remember to press Tab (or Enter, as explained in the box on Section 4.2) to move to the next field. Here are the steps:
To create a new transaction in the register, press Ctrl+N.
If you’ve been scrolling through past transactions, pressing Ctrl+N takes you to the end of the register and places the pointer in a blank transaction. You can also jump to a new transaction at the end of the register by pressing Ctrl+End.
In the Date field, enter the date you want for the check.
Quicken automatically fills in today’s date and if you want a date that’s only a few days away, press – to move back one day at a time, or + to advance one day at a time.
For other dates, Quicken assumes the current year so you can type just the month, a slash (/), and the day (12/4, for example). If you’re overwriting the entire date, you don’t have to type any slashes in a date. As you type numbers, Quicken automatically moves to the month and then year. For example, to change the date to November 15, 2006, you can type 111506. Appendix C includes additional keyboard shortcuts for selecting dates.
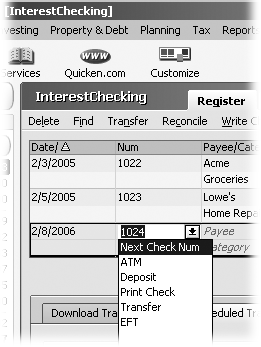
In the Num field, type N (for Next Check Num) to automatically fill in the next check number in sequence, as demonstrated in Figure 4-3 .
When you choose Next Check Num in the Num field drop-down menu, Quicken fills in a check number that’s one higher than the previous one. If the next check number that Quicken fills in doesn’t match the one on your next paper check, don’t panic (or look for another box of paper checks). Simply double-click the check number and type the number that’s on the paper check.
If you’re recording checks that you plan to print on preprinted checks, choose Print.
Tip
If details like missing check numbers drive you mad, you can check for them by scanning the check numbers in the register as you go. Or choose Reports → Banking → Missing Checks to produce a report of check numbers that don’t appear in your Quicken data file. The report lists all your transactions, but you’ll see entries like *** Missing Check 2452 ***.
Figure 4-3. In the Num field drop-down menu, type the first letter of a transaction type to choose that type. For example, type N to fill in the next check number in sequence.The Num field indicates the type of transaction, and you need to type no more than the first letter of the type of transaction. Type A to specify an ATM withdrawal or D for a Deposit. You can also create Transfers (type T), Electronic fund transfers (type E), or specify a check to Print (type P). If your account is set up for online banking, type S to Send an online payment.
In the Payee field, start typing the payee’s name.
If this transaction is the first for a payee, you must type the entire name. Otherwise, as you type letters, Quicken scans the names in your Memorized Payee List and the QuickFill feature displays a drop-down menu of the names that match the letters you’ve typed so far. As soon as the program selects the one you want, press Tab to move to the Payment field.
In the Payment field, change the amount for the check if the value isn’t what you want. Click or press Enter when you’re done.
QuickFill automatically fills in the last values you used for that payee and selects the payment value so you can type a different amount. You can enter numbers from the keyboard or the numeric keys on the keypad. If the amount is the same each time, you can move to the next field or click Enter to record the check. If the transaction’s a check, Quicken advances to the Category field when you press Tab.
You don’t have to precede the value with $, but Quicken does require a decimal point to separate dollars and cents (or corresponding denominations in other currencies). The maximum amount for a transaction in Quicken is $9,999,999.99. (Apparently, Intuit is optimistic about its customers’ financial success.)
Tip
A new feature in Quicken 2006 can add the decimal point automatically: Choose Edit → Preferences → Quicken Program and, in the Select preference type list, choose Register. Turn on the “Automatically place decimal point” checkbox. In transaction value fields, you can type all the digits for dollars and cents without hunting for the decimal point key.
If the Category field doesn’t show the correct category, begin typing the category you want.
You can click this field and choose a category, but you rarely have to. QuickFill automatically fills in the last category you used for the payee you’ve chosen. Quicken even has a database of commonly used payees and the most likely categories for them. The first time you type one of these payees (Safeway, for example), Quicken fills in the category as well (Groceries).
If QuickFill doesn’t take care of picking the category, type a few letters until Quicken chooses the right category—or at least gets close. You can press the up or down arrow keys (or + or – keys) to move up or down in the list.
To add a reminder about what the check’s for, type a brief description in the Memo field.
For many transactions, you can skip the Memo field entirely. The date of the check and the payee usually tell the whole story, like a check to Cingular on June 20 for the June telephone bill.
On the other hand, the Memo field can contain up to 63 characters, so you can record important details about purchases or payments. For example, you can store the brand, model, and serial number of major purchases in the Memo field. You can also use Quicken’s Find feature to search for Memo text when you’re trying to find a check. For example, search for “Panasonic” if you need to locate the check you wrote for that widescreen TV.
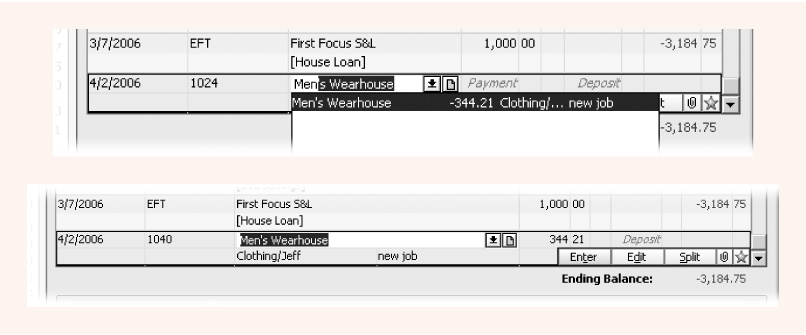
Out of the box, Quicken uses two lines of the register to show each transaction. The date, check number, payee, and amount show up on the first line, whereas the longer entries for category and memo appear on the second line. If you’d rather see more transactions (and rarely refer to the Memo field anyway), you can make the register show just one line per transaction, as shown here.
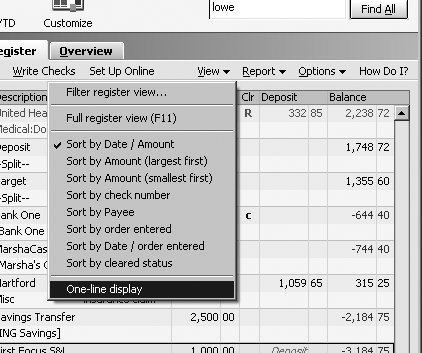
To switch to one line for each transaction, in the Register menu bar, choose View → One-line display to place a checkmark in front of the option. To switch back to a roomier view or to see memos again, choose View → One-line display once more.
The standard sort order for transactions —first by date and then by amount—isn’t all that helpful. Sorting by cleared status (choose View → Sort by cleared status) keeps you focused on transactions that aren’t yet reconciled. This sort order displays reconciled transactions first, followed by cleared transactions, and finally uncleared. For example, if you see an older check that isn’t cleared, you can follow up to see if the payee received your payment.
You can temporarily switch to other sort orders for troubleshooting. For example, to look for missing or duplicate check numbers, sort by check number. Or, to spot missing monthly payments, sort by payee. Besides the View menu, you can change the field Quicken sorts by simply by clicking a column heading above the register.
Tip
On the right side of a transaction, you will see a button with a blue star. If you want to rate the payee for the transaction, either to laud their customer service or warn other customers away, click this button to launch a browser window that takes you to the Zipingo.com Web site. You’ll also find customer reviews on that site that may help with your own buying decisions.
If you use Tab to move between fields, press Enter to record the check.
If you use Enter to move between fields, press the Enter key one more time or (in the transaction row) click Enter to record the check (see the box on Section 4.2).
Quicken calculates the new balance to reflect the check you wrote and—if sounds are turned on—makes a cash register sound to indicate success. (If all this racket scares the cat off the windowsill in the next room, see the box on Section 4.3.2.1 to turn the sounds off.)
Note
When you create transactions, Quicken skips over the Clr field, which shows the status of a transaction as uncleared, cleared, or reconciled. Reconciling (Chapter 7) and downloading transactions (Chapter 6) changes the Clr value automatically. The rest of the time, you’re better off leaving this field alone.
Recording Printed Checks
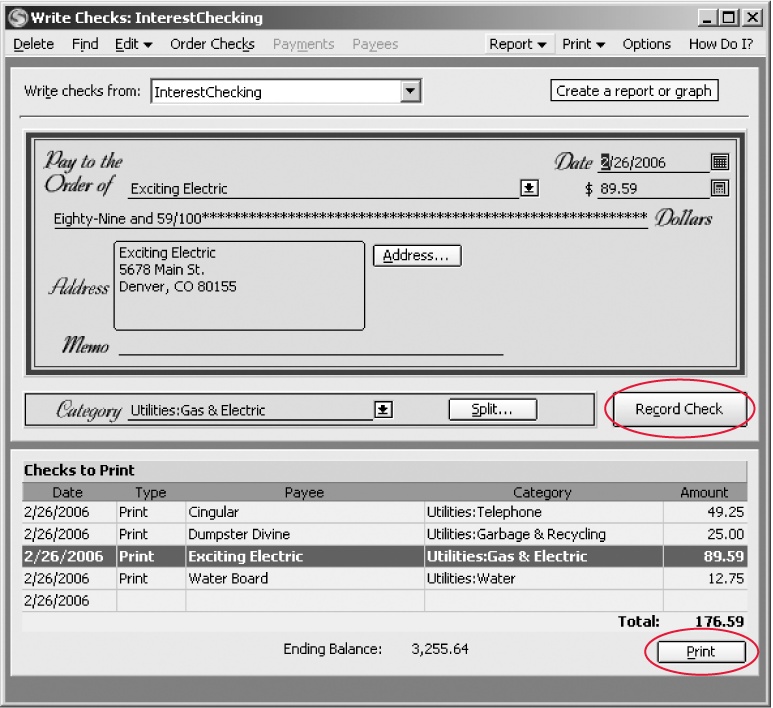
You can print checks right from the register by choosing Printed Check in the Num field, but if you’re printing a lot of checks at once, you can have the Write Checks dialog box automatically put them in the printer queue. When you choose Cash Flow → Write Checks (or, if you’re keyboard shortcut savvy, press Ctrl+W), the Write Checks dialog box appears. Not surprisingly, it looks like a paper check, as you can see in Figure 4-4. You can fill in check fields and then click Record Check to add the check to the list of payments waiting to print. When you’ve recorded all the checks, clicking Print sends them to a printer, which hopefully you’ve already loaded with preprinted checks. (Full printing instructions begin on Section 4.3.3.)
Using the Write Checks dialog box not only tells Quicken what to print on each check, it also enters the transaction in the Quicken register for you. If you can’t see the register, drag the Write Checks dialog box off to the side or minimize it.
Choose the checking account
You create a check in the top half of the Write Checks dialog box much as you would write a check by hand. The one important difference is that the Write Check dialog box doesn’t belong to a specific account, so the first choice you must make is in the “Write checks from” drop-down menu.
If you have only one checking account, Quicken automatically selects that account. However, if you write checks from a checking account most of the time and a money market account every once in a while, choose the correct account for the checks you’re about to write.
Filling in check fields
As in the register, you can press Tab to move from field to field (Section 4.2), entering the date, payee, and amount. QuickFill and other data entry shortcuts also work exactly as in the register.
The one field you don’t see in the Write Checks dialog box is the check number. Printed check forms are prenumbered, since banks can’t process stop payments properly without preprinted numbers. Unprinted checks appear in the Quicken check register with the word “Print” in the Num field. Later, when you send the checks to print, you provide the first preprinted check number, and then Quicken adds check numbers to the transactions.
QuickFill usually takes care of filling in the category. If the Category field is still blank after you’ve chosen the payee, move to the Category field and start typing the name of the category. When Quicken chooses the category you want, click Record Check.
Note
You can split a check between multiple categories. Say you’re buying a T-shirt from your favorite nonprofit organization and making a tax-deductible donation at the same time, but paying with only one check. At the bottom of the drop-down category list, click Split, and follow the instructions on Section 4.3.1. (If the category drop-down menu isn’t visible, look to the lower right of the window, below the transaction. There’s a Split button there, too.)
Mailing addresses
If you use window envelopes to mail your checks, the first time you write a check to a payee, be sure to click Address and enter the mailing address for that payee. Quicken opens the Edit Address Book Record dialog box, in which you can provide the mailing address and other contact information. When you print checks, Quicken prints the address on the check to show through the window on the envelope.
Reviewing the checks to print
At the bottom of the Write Checks dialog box, Quicken lists the checks you’ve queued up to print. Before you send these checks to the printer and chew through several preprinted check forms, review your checks for accuracy.
If you find a mistake in the Checks to Print list, select the check with the error. Quicken displays the check in the top half of the dialog box. Correct your mistake and click Record Check to record the revised transaction.
Note
If you created a check by mistake but haven’t yet printed it, you can choose Delete in the Write Checks menu bar to completely remove that check. However, once you’ve printed a check, you must void it in the register as described on Section 4.10.
When you’re working in the register, it’s easy to avoid bouncing checks. Quicken updates the account balance as you add transactions, as shown in Figure 4-1. In the Write Checks dialog box, you have to look a little harder: There are two crucial numbers at the bottom of the window. Below the Amount column, Quicken displays the total amount for all the checks you’ve queued up to print, shown in Figure 4-4. In the bottom right corner, you find the Current Balance, which is the balance in the account as of today. If the Total for the checks you’re printing is greater than the Current Balance, you must deposit or transfer money into the account to cover your checks.
Printing Checks
If you write dozens of checks each month, printing to preprinted computer checks saves both time and your writing hand. You must perform some setup the first time around, but from then on, you simply load preprinted checks into your printer and press a few keys.
Setting up Quicken to print checks
The first step to a successful check printing experience is telling Quicken what type of preprinted checks you use and whether you want to save paper by printing partial pages of checks. The program remembers these settings, so you need to go through this process only once. After you’ve specified your check printing settings, Quicken fills them in automatically in the Print dialog box. (You can always edit these options before you print).
Here’s how you set up Quicken to print checks:
Choose File → Printer Setup → For Printing Checks.
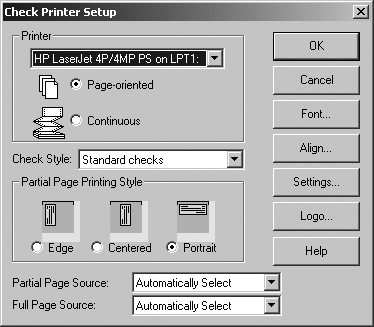
The Check Printer Setup dialog box appears, shown in Figure 4-5, which provides all the settings you need to match Quicken’s printer options with the preprinted checks you’ve purchased.
In the Printer box, choose the printer you want to use to print checks.
The Printer drop-down menu contains all the printers that Quicken finds connected to your PC. For example, if you use a laser printer or inkjet printer, Quicken automatically selects the Page-oriented option to feed one sheet at a time to the printer. If you use a printer that feeds paper from a roll, the program chooses the Continuous option.
Tip
If you print checks on continuous feed paper, the alignment of the paper in the printer is critical. You can save time and a lot of wasted checks by aligning the paper before you print batches of checks, as described in the box on Section 4.3.3.2.
In the Check Style drop-down menu, choose the style of checks you purchased.
Quicken chooses Standard Checks, which are plain checks without a voucher or extra stub. Standard Checks are popular because they use the smallest amount of paper. Your Quicken data file contains the record of your check.
Voucher Checks are forms that contain a check and a detachable voucher that contains complete check information including category and class. Pick this check style if you want a record beyond the electronic one in your Quicken data file. Furthermore, because voucher checks come one to a page, you don’t have to bother with feeding partial pages of checks as described in step 4. Wallet Checks print complete check information on a stub on the form’s left side.
For page-oriented printers loaded with either Standard or Wallet Checks, choose the option for how you want to feed partial pages of checks into the printer.
Quicken chooses the Portrait option automatically, which means feeding the top edge of a check into the printer first. If you want to feed the left edge of a check into the printer, choose the Edge option to align the checks to the left edge of the feeder (or choose Centered to center a partial page of checks in the feeder). Because option names aren’t all that helpful for visualizing the check orientation, the window includes a graphic example of how to feed the check, which you can see in Figure 4-5.
Tip
For printers with multiple feed mechanisms or trays, you can choose which feeder to use in the Partial Page Source and Full Page Source dropdown menus. For example, you can feed full pages of checks through the regular feed tray. But when you print partial pages, you can specify Manual Feed to use the sheet that you insert into the manual feed slot.
Click OK to save the settings for check printing.
The next section tells you how to print your checks.
The slightest gap between what Quicken prints and the corresponding field on a preprinted check can make printed checks hard to read. Unfortunately, printers and preprinted forms sometimes need a little nudge before they play well together. Before you print a big batch of checks, it’s a good idea to check the alignment of your preprinted check forms with a test page.
If you’re using a page-oriented printer, in the Check Printer Setup dialog box, click Align. In the Align Checks dialog box, click Full Page of Checks. In the File Alignment dialog box (shown here), type distances to adjust where Quicken prints vertically and horizontally. The numbers in Vertical and Horizontal boxes represent hundredths of an inch. So, to realign printing 1/10 of an inch down and to the right on the checks, for instance, type 10 in both boxes. Click Print Sample to test the alignment. Lather, rinse, and repeat until Quicken prints values in the right spot on the preprinted form.
Aligning forms in continuous feed printers varies depending
on how badly the alignment is off. The first step is the same: In
the Check Printer Setup dialog box, click Align. With the
Continuous option set, the dialog box that opens includes a Coarse
button and a Fine button. If your checks are off by more than one
line of text, click Coarse. After the sample form prints, you see
instructions on the screen for adjusting the coarse alignment.
Once the vertical alignment is close, click Fine to display the
same Fine Alignment dialog box that you see for page-oriented
printers (shown here).
Printing to preprinted checks
With check printing settings in place and a list of checks waiting to print, you’re finally ready to watch Quicken print your checks in one fell swoop. Here’s what you do:
Load your printer with preprinted checks.
Getting preprinted checks loaded into continuous feed printers is easy: Line up the holes in the paper with the pins in the printer and make sure that the preprinted side of the check faces up. You may have to experiment a bit if you’ve never loaded preprinted forms into your printer’s tray. The manual that comes with your printer should include instructions for loading paper.
To print the checks-in-waiting, in the Write Checks dialog box, click Print.
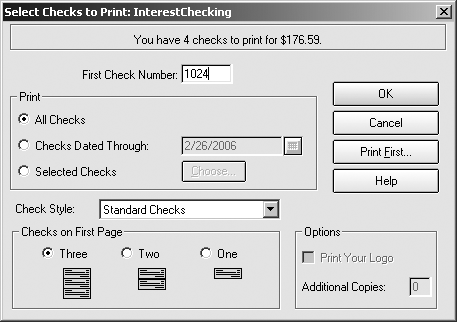
If the Write Checks dialog box isn’t open, press Ctrl+P or choose File → Print Checks. Quicken opens the Select Checks to Print dialog box. As you can see in Figure 4-6, the dialog box title also shows the name of the checking account you’re using.
In the First Check Number box, type the check number on the first preprinted check you’re using.
Quicken uses this number to fill in the Num fields on this batch of checks.
Choose an option to specify the checks you want to print.
Quicken automatically selects the All Checks option, which prints all the checks in the queue regardless of their dates. If you tend to queue checks long before you want to pay them, select the Checks Dated Through option and specify the check date.
Figure 4-6. If necessary, in the First Check Number box, type the number on the first preprinted check loaded in your printer. Make sure you check all the settings before you click OK, because that’s the signal for Quicken to send the checks to the printer.The Selected Checks option lets you choose individual checks to print, for instance to hold off printing a credit card payment until your next paycheck has cleared.
Make sure the Check Style matches the checks you’ve loaded in your printer.
Quicken uses the Check Style that you set in the Check Printer Setup dialog box (Section 4.3.3.1). If you’ve changed check styles, choose the new style here.
For page-oriented printers, choose the option for the number of checks on the first page.
Quicken automatically selects Three, which represents a full page of checks. If the first page has only one or two checks, choose the corresponding option.
Note
If you use the Voucher Checks style, you can use the Additional Copies box. You can type a number in this box if you want Quicken to print extra copies of the voucher. Those copies come in handy if someone you’ve paid claims that your check was incorrect. You can review the information on your voucher copy to resolve the problem.
Click OK or Print First.
To print all the checks, click OK. To print only the first partial page of checks, click Print First. After Quicken prints the checks on a partial page, it updates the number in the First Check number box and changes the Checks on First Page option to Three. Now, you can click OK to print the remaining full pages of checks.
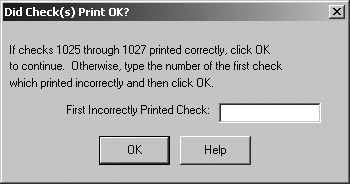
Quicken sends the checks to the printer and displays a dialog box, asking whether the checks printed correctly. Before you click OK, inspect the checks that come off the printer. If something didn’t work right, try again as described in Figure 4-7.
If your checks printed correctly, click OK and you’re done.
Quicken adds the check numbers for the printed checks to the transactions in the checking account register. Now, all you have to do is sign the checks, stuff them in envelopes, and get them in the mail.
Recording Deposits
Recording a deposit into an account is almost identical to recording a check. Figure 4-8 shows an example of a deposit being entered. Follow the steps starting on Section 4.3.1, but with the following adjustments:
In the Num field, choose Deposit (or type D) instead of entering a check number. When you choose Deposit, Quicken changes the order in which you tab through fields to match the task at hand. The program automatically jumps to the Deposit field instead of the Payment field for deposit transactions, to stop you from accidentally recording the deposit as a payment.
Here are the fields and the order in which Quicken moves through them:
Date
Payee
Deposit
Category
Memo
In the Deposit field, type how much money you’re depositing.
Like checks, deposits can belong to categories, but there are some special considerations, as described in the box on Section 4.5.1.
Paying with a Credit Card
Credit cards have become many people’s favorite way to pay. Some folks like the convenience of swiping a card out at the gas pump and avoiding the junk food inside the station. Others like the airline miles or cash back they receive. And of course, some people seem to enjoy paying obscenely high interest rates on the balances they carry on their cards. In Quicken, there are two ways you can track your credit card charges: Create a cash flow account to record each credit card charge, or record just the payments to the credit card company in your Quicken check register. As you’ll see in this section, though, tracking each credit card charge individually offers so many advantages, it’s almost a no-brainer.

How to Track Credit Card Charges
The best way to track what you charge to your credit card is to record individual charges every few days and assign each charge to a category in Quicken. Then, when your credit card statement arrives, you can reconcile the account (see Chapter 7) and record the check you write to pay your credit card bill (see Section 4.3.1). This approach has two huge advantages:
Complete spending records. If you pay for a lot of what you buy with your credit card, you can assign every charge to one or more categories and know exactly how you spend your money. With doctors, dentists, and just about everyone else accepting credit cards for payment, you’ll also have complete records of your tax deductions.
Spending red flags. If you feel as if credit card charges somehow don’t use real money, tracking individual charges as you make them keeps the cash you owe in plain sight. Swiping your card at the store is still incredibly easy, but the alarming increase in your credit card balance may diminish your yearning for that five-way massage chair. (For more tips on keeping charges under control, see the box on Section 4.6.1.)
In Quicken, recording credit card charges is just as easy as recording checks. If you set up your credit card for online downloads, you don’t have to record charges, although manual recording using your charge slips as references is a great way to catch erroneous or fraudulent charges on your credit card statement. For example, after entering your charges manually, you can download the charges from your credit card company (Section 6.5) and compare them. If you see extra charges that don’t match the ones you entered, either you forgot to record a charge or someone’s buying stuff with your card. If you check your charges every few days, you can report the activity to your credit card company before the thieves have too much fun at your expense.
Note
Don’t even think about bypassing individual credit card transactions by recording only the check you write to pay your credit card bill. You’ll have a much harder time trying to split your check transaction across lots of categories than creating many individual transactions. Moreover, if you have a problem with a charge, you’ll have a really hard time finding the original charge among all those splits.
Recording Credit Card Transactions
Recording credit card transactions is mostly the same as recording checks and deposits in other accounts. The basic steps are described on Section 4.3–Section 4.3.2. You specify the date, payee, amount, category, and optionally a memo. A credit card register, though, has a Ref (for reference) field instead of the Num field. Quicken includes this field on the off chance that you want to type the terribly long identification strings that you see on your credit card statement. Just press Tab to move past the Ref field and choose the payee.
Credit card transactions come in a few flavors. Figure 4-9 and the list that follows show how you handle each one:
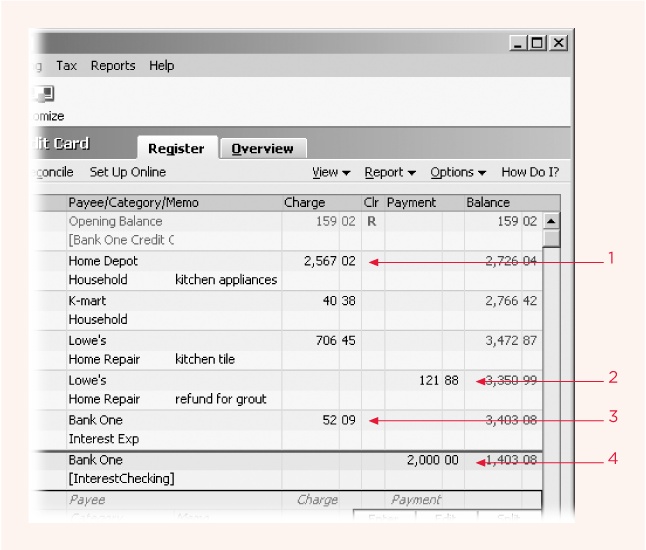
Charges. Create credit card charges in the register. The merchant who accepted your credit card is the payee. Type the amount in the Charge column.
Payments. Typically, you’ll create a credit card payment by recording a check in your checking account. In the check transaction, when you assign the Xref Acct (the account to which you’re transferring funds, as described on Section 4.8.2) to your credit card account, Quicken automatically records the payment in your checking account register and deposits the payment amount in your credit card register.
Other credits. If you return the Vespa scooter you bought because you don’t like bugs in your teeth, the Vespa dealer might post a credit to your credit card account. To enter a credit, fill in all the fields as you would for a charge, except for the amount field. Type the amount in the Payment field instead of the Charge field.
Finance charges and fees. If you don’t pay your balance each month, the credit card company charges you interest—and usually lots of it. For a finance charge transaction, type the name of the credit card company in the Payee field, and then choose a category like Interest Exp.
Credit card rebates. If you use a credit card that pays some sort of rebate, the technique for recording the rebate depends on the rebate and your preference. For example, if the credit card company sends you a check, you can record the deposit as you would any other. One way to categorize the rebate is to use an income category, perhaps one dedicated to rebates.
If the card pays a rebate on specific types of purchases, you can record the deposit against the corresponding category. For example, if you receive a rebate for auto fuel, you can use the Auto:Fuel category for your deposit, which reduces your total fuel expenses.
Paying with Cash
You can withdraw money from an ATM, spend it, and, within hours, have not the foggiest idea how you spent it. Unfortunately, Quicken doesn’t improve your memory for petty cash expenditures in the least, so your memory’s the deciding factor in how you track what you buy with cash. This section outlines two of the most popular methods.
Cash Tracking for Photographic Memories
If you remember every dime you’ve spent since the first grade and you want to track your cash expenditures, here’s the rigorous way to track cash:
Create a cash flow account for the cash in your wallet.
For a refresher on creating accounts, see Section 2.3.1 in Chapter 2.
When you withdraw money from the ATM, the drive-through window, or even inside at a teller window, record that withdrawal in Quicken as a transfer to your cash account.
The transfer reduces the balance in your checking or savings account and increases the amount of money in the cash account.
Every few days, create transactions in the cash account to reflect what you’ve purchased—cappuccinos, video rentals, or that tasteful tattoo.
If the balance in the Quicken cash account matches the money in your wallet, you’re all set.
Tip
You can even reconcile your cash account in Quicken to the cash you have in your wallet (see Section 7.4). (If you actually do that, though, you may need counseling for obsessive financial tracking.)
No matter how close your habits resemble Felix Unger’s, you will forget how you spent cash every now and then. Don’t panic. Just assign the money to a category like Cash. Likewise, you probably don’t care about change spent on a newspaper or chewing gum. When you compare your cash on hand to your Quicken cash account balance, create one catch-all transaction assigned to the Cash category to square things up.
When Your Memory Is Like a Sieve
If remembering how you spent your cash is a lost cause or you use cash very rarely, you can take a much simpler approach in Quicken. You can treat your wallet like a “payee” instead of creating a separate cash flow account.
When you withdraw spending money, create a transaction using ATM in the Payee field. Name the payee something like Cash or Mad Money. Assign the transaction to a catch-all category (Quicken automatically creates one called Cash).
At the end of the year, run an Itemized Categories report (Chapter 10) to see how much cash you spent. If your unaccounted spending amounts to the gross national product of a small nation, you might consider saving all your receipts or capturing cash spending in a notebook or PDA, and then recording transactions for cash spending in Quicken.
Splitting Transactions
Most of the time, a check or a credit card charge applies only to one category. Life is simple: You create the transaction, pick the category, and Quicken tracks how you spent that money. But more often than you might think, a transaction applies to more than one category. For example, you deposit a mélange of checks—a birthday present from your favorite aunt, a health insurance reimbursement, and the $20 prize you won in a pie-eating contest. The popularity of monumentally huge supermarkets also means that one check may cover groceries, auto supplies, running shoes, and a photo of your baby. Quicken handles these multipurpose payments with splits—transactions that you split among several categories.
Another fine use of a split transaction is when you want to deposit only part of a check amount in the bank and take the rest in cash. Simply record the check deposit into the bank account as one part of the transaction and a transfer to your Quicken cash account as another.
Adding Multiple Categories to a Transaction
To split a transaction, begin creating the transaction as you normally would, by typing the payee name and the amount.
Then follow these steps to split a payment among several categories:
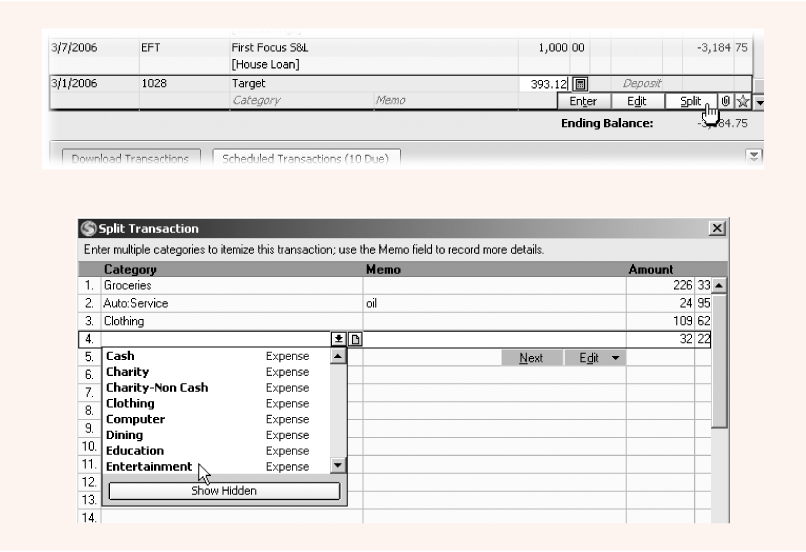
In the register, select the transaction you want to split, and then click the Split button (Figure 4-10, top) or press Ctrl+S.
The Split Transaction dialog box opens with the insertion point in the first row in the Category column.
You can also open the Split Transaction dialog box from the Category field. Click the down arrow and then, at the bottom of the Category drop-down menu, click the Split button or press Ctrl+S.
Figure 4-10. Top: Click Split (indicated by cursor) to open the Split Transaction dialog box. You can also click Split at the bottom of the Category drop-down menu. Bottom: You don’t have to enter the amount for the last split, because Quicken calculates how much of the payment’s still unassigned after each split (in this case, it’s 32.22).In the Category field, choose the category you want.
The Category fields in the Split Transaction dialog box work the same way as the Category field in a transaction. You can type the first few letters of a category name and let Quicken fill in the category. Or, you can scroll through the Category drop-down menu to choose the one you want.
Press Tab to move to the Amount field, and then type the amount that belongs in this category.
Press Tab once more to move to the next row. Quicken automatically subtracts the amount for the category from the total transaction amount and fills in the Amount field in the new row with the unassigned amount (Figure 4-10, bottom). If the amount for the category doesn’t match the remaining unassigned amount, double-click the Amount field and type the new value.
Repeat steps 2 and 3 for each additional category.
For the last category, the remaining unassigned amount should match the amount intended for that category, if you did your math right.
To save the splits, click OK.
Back in the register in the Category field, you see “--Split--,” but you’re not quite done.
Click Enter to record the transaction.
Now you’re done.
Editing Splits
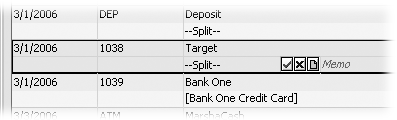
You can tell that a transaction has splits when you see “--Split--” in the Category field. Quicken also displays two new buttons (Figure 4-11), which you can use to view or edit the splits:
Green checkmark. Click this button to open the Split Transaction dialog box. You can view and edit the splits.
Red X. Click this button to clear all categories and split values. If you confirm that you want to remove the splits, Quicken removes all categories and split values.
Handling Remaining Amounts
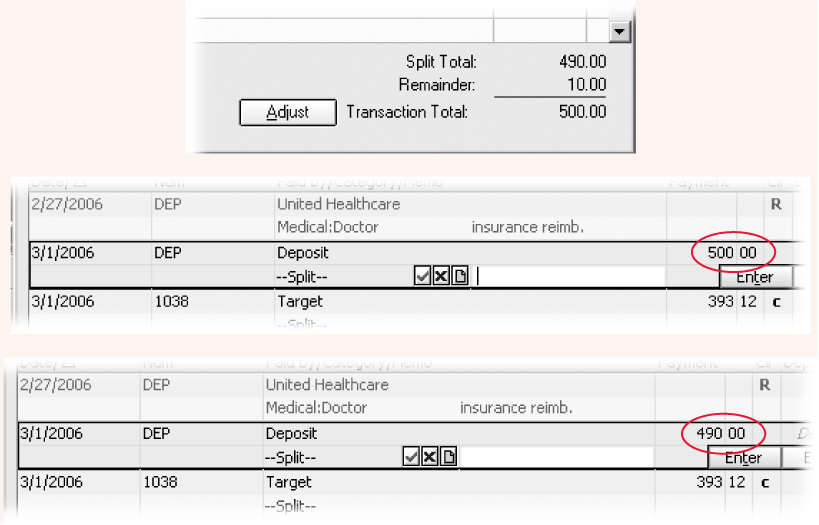
Every once in a while, you’ll end up with a Remainder value, which is the difference between the total that Quicken calculates from all your splits and the total amount for the transaction, which you entered in the register in the Payment or Deposit field. For example, suppose you create a deposit transaction and enter 500 in the Deposit field. In the Split Transaction dialog box, you then enter each check you have to deposit and they total only $490. Quicken calculates the Remainder value of 10.00.
With a Remainder value, you have two choices:
Adjust the transaction total. If the values of all your splits are correct and the transaction total is the number that’s wrong, click Adjust. This move keeps your splits as they are and changes the value for the transaction, as you can see in Figure 4-12.
Correct the split values. If you’re missing a category or split values are incorrect, make the changes until the Remainder value is 0.00. Then click OK to save the splits.
Transferring Money Between Accounts
Chances are you transfer money between accounts all the time. For example, you keep your cash in a savings account where it earns interest and transfer it to your checking account only when it’s time to pay the plumber. (What are those pipes made out of, anyway—gold?) Anyway, you can have Quicken record the movement of money between accounts by using transfer transactions. When you tell Quicken to transfer money from savings to checking, for example, the program removes the money from your savings account and adds it to your checking account. The clever thing about Quicken transfers is that the category you assign isn’t a category like Groceries but the account to which you’re transferring money. This section shows you how the whole process works.
Recording a Transfer Between Accounts
Recording a transfer between accounts is much like recording a check, with a few minor differences. You can use Quicken’s Transfer dialog box, which provides some handholding to help you get the transfer the right way ‘round, but the quickest way to record a transfer is directly in the account register. Here are the steps:
Open the register for the account from which you’re transferring money.
For example, if you’re transferring money from your checking account to savings, open the register for your checking account. When you open a register, Quicken automatically positions the insertion point in a blank transaction.
In the Date field, choose the date for the transfer.
If your financial institution has rules about when transfers occur, you can keep your account balances more accurate by using the date when the money will actually move between accounts.
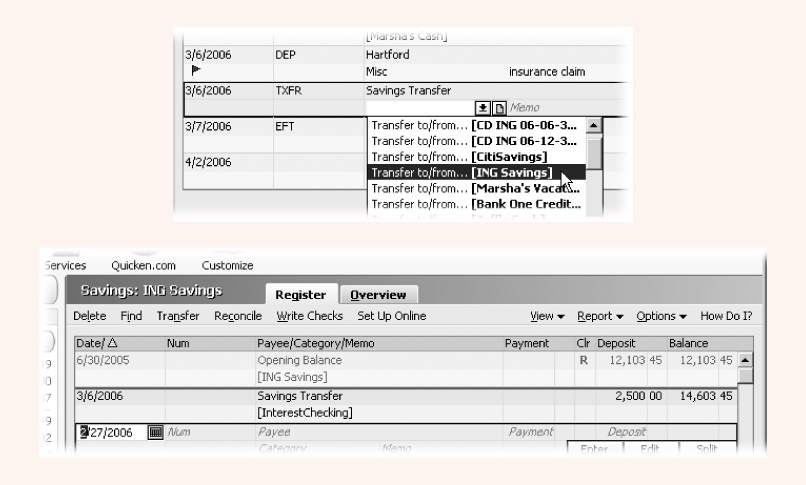
In the Num field, type T to make the transaction a Transfer (Figure 4-13).
As soon as you choose Transfer in the Num field, Quicken changes the name of the Payee field to Description and the Category field to Xfer Account.
Figure 4-13. Top: When you choose Transfer in the Num field, Quicken automatically displays accounts in the Category field. Bottom: After you record a transfer in the account from which you remove money, you can view the other half of the transfer in the register for the account that receives the money.In the Description field, type a name for the transfer you’re making.
Because Quicken memorizes payees, you can use this description to recall the values for this transfer the next time you move money between accounts. For example, when you type Savings Transfer in the description field, Quicken automatically chooses your savings account and the amount of the transfer.
In the Payment field, type the amount you’re transferring out of the account.
Most people think of transfers as moving money out of one account and into another, typing the transfer amount in the Payment field, as in this example. But it’s perfectly fine to do it the other way: You’d create the transaction in the register for the account that’s receiving the money and type the transfer amount in the Deposit field. The result is the same either way. (For example, the transfer into savings shown at the bottom of Figure 4-13 shows the amount in the Deposit field.)
In the Xfer Account field, choose the account that receives the money for the transfer.
As soon as you press Tab or click to move into the Xfer Account field, Quicken displays a drop-down menu of accounts, as you can see in Figure 4-13. Although Quicken shows you the account names within brackets, you can quickly choose an account by typing the first character or two of the name.
Press the Enter key or click Enter to save the transfer.
That’s it! Quicken knows your money has switched to another account.
Seeing the Other Side of a Transfer
For transfers, Quicken actually creates a second transaction in the account at the other end of the transfer. In the register, right-click a transfer transaction and, on the shortcut menu that appears, choose “Go to matching transaction.” If you use Quicken’s standard keyboard mapping (Section 1.5.2.3), you can press Ctrl+X to jump to the other end of the transfer.
Transfers Masquerading as Checks
Sometimes, checks that you write act like transfers in Quicken. For example, consider the check you write to pay your credit card bill. In the real world, the credit card company cashes your check and credits your account with the payment. In Quicken, the check transfers money out of your checking account to reduce the balance on your credit card account. Similarly, the check you deposit into your money market account transfers money from your Quicken checking account to your Quicken money market account.
When you record a check in Quicken, you can transform the check transaction into a transfer simply by choosing the appropriate account in the Category field. You have to scroll to the very bottom of the drop-down menu to find them, but, because Quicken encases accounts in square brackets, you can type [ (an open bracket) to jump to the first account on the Category drop-down menu.
Editing Transactions
If you notice a mistake in a transaction (the wrong amount, the wrong payee, or a check you wrote for dog food assigned to the Interest Exp category), you can simply go back to the transaction and change those details, as described in this section.
You can edit freely as long as you haven’t yet reconciled the transaction. Quicken doesn’t stop you from editing a reconciled transaction, but you must do so with the utmost care or your next account reconciliation will be fraught with problems. See the box on Section 4.9.2 for more information.
Editing a Field in a Transaction
Editing a transaction in the account register is simple. Click the transaction field that contains the mistake, correct the information, and then click Enter.
If you click another transaction without first clicking Enter, Quicken displays a message box that asks you if you want to save the changes to the transaction. Click Yes to save the changes. Click No to discard them. If you were distracted by a phone call and can’t remember which transaction you were working on, you can click Cancel until you remember what you were doing.
Tip
If you want to replace many occurrences of a value in transactions, try using the Find/Replace command, described on Section 4.11.4.
Recategorizing Transactions
The day may come when you realize that your Category List isn’t quite what you need. For example, you start with Medical:Doctor and Medical:Medicine, but at tax time you see that you can declare deductions for doctor visits, medicines, dentistry, eyeglasses, and more. You dive in and create several new categories only to be disappointed by reports for tax-deductible expenses that don’t look any different. Quicken isn’t a mind reader. You have to reassign your existing transactions to the new categories. Fortunately, the Recategorize command does just what you want. Here’s how you put it to work:
If a category that you intend to use doesn’t exist, create it before choosing the Recategorize command.
The Recategorize command doesn’t include an option to add a category. You must create all the new categories (as described on Section 2.7.3) to which you want to reassign transactions before you open the Recategorize dialog box.
Choose Edit → Find & Replace → Recategorize.
Quicken opens the Recategorize dialog box with the insertion point in the Search Category box.
If you want to look for specific types of transactions, in the Recategorize menu bar, click Find, and then choose the type of transaction.
Quicken automatically chooses Transactions, which searches all transactions in all accounts. To limit the search to payees you use frequently, try choosing Memorized Payee. You can also limit the search to scheduled transactions, for instance to find all instances of a scheduled transaction that you miscategorized when you set it up last year.
In the Search Category drop-down menu, choose the category you want to change.
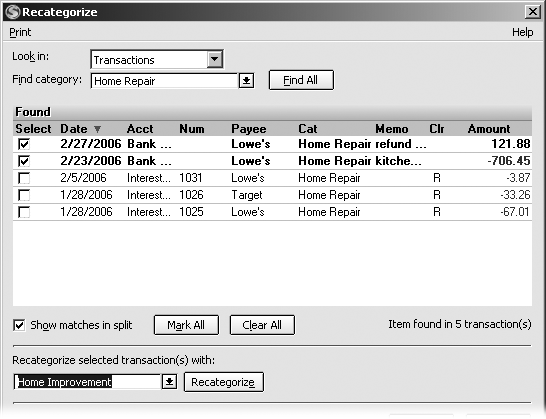
Choose a category even if you’re planning to change only some of the transactions in that category. As you can see in Figure 4-14, you can select individual transactions to recategorize.
Click Find All.
Quicken displays all the transactions assigned to the category you chose and activates the Replace With box.
In the Replace With drop-down menu, choose the new category.
For example, to break your medical expenses into doctor’s and dentist’s expenses, in the Replace With drop-down menu, choose Medical:Dentist.
To select a transaction to recategorize, click the first column in the row for the transaction.
Quicken adds green checkmarks to transactions that you select. To reassign all transactions in the list, click Mark All. Click a green checkmark to unselect a transaction.
Click Recategorize.
A confirmation box appears, asking if you’re sure that you want to make the replacement. Click OK to continue. Click Cancel if you have a change of heart. When you click OK, Quicken immediately changes the transactions listed in the dialog box, so you can review the results before continuing.
Click Close to close the dialog box.
The Recategorize dialog box remains open after you replace a category. If you want to recategorize more transactions, repeat steps 3 through 8. If you’re done, click Close.
Voiding Transactions
Occasionally, you may want to cancel a transaction but keep a record of it in Quicken. For instance, if you write a check to the Princess Telephone Historical Society and think better of your donation, you can tear up the paper check and void the check transaction in Quicken. You’ll still see the transaction and the check number, so you’ll be able to remember what happened and know that you didn’t drop a paper check on the street by accident. But Quicken changes the amount to zero so it doesn’t affect your account balance.
The quickest way to void a transaction is to right-click the transaction in the register and then, on the shortcut menu that appears, choose “Void transaction(s)”. When you void a transaction, Quicken makes the following changes to the transaction:
Adds the word “Void” to the beginning of the Payee field.
Changes the status of the transaction to cleared, indicated by a checkmark in the Clr field.
Changes the field containing the transaction amount to zero. Quicken also zeroes out any categories and splits.
If you use the Quicken Standard keyboard mapping, you can also void a transaction by selecting it and then pressing Ctrl+V.
Searching for Transactions
Before you know it, your Quicken registers will be teeming with transactions. You can scroll through the register or press the Page Up and Page Down keys to sift through the register as if you’re thumbing through the dog-eared pages of a paper register. But Quicken has easier ways to find a specific transaction, like the check you wrote that piqued the IRS’s interest. The program includes several features that help you track down transactions that you want to look at or edit— including a one-click method that’s new to Quicken 2006.
Finding Recent Transactions with One Click
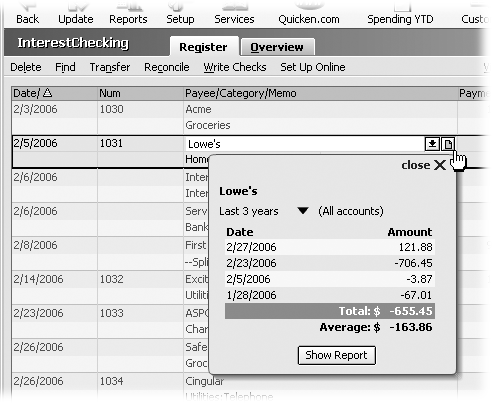
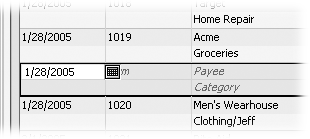
A new, if tiny, icon appears to the right of the Payee and Category drop-down arrows in all transactions in Quicken 2006. Clicking these buttons lets you review recent transactions for payees and categories across all your accounts, as shown in Figure 4-15. For instance, you can check to see whether you paid the electric bill or find out how much your husband has spent on lawn maintenance this summer.
When you click the little piece of paper next to the Payee arrow, Quicken opens a box showing the last several transactions for the payee in any account. Review those transactions to make sure you’ve paid a bill, to see how much you’ve spent during a certain time period, or to look for trends in spending. To see previous transactions for a category in any account, click the icon next to the Category drop-down arrow.
In the pop-up transaction list, you see a time period immediately below the payee or category name. To change the period, click the down arrow to the right of the date range and choose from the drop-down menu. You can set the range from as short as the last 30 days to the last 3 years. To see more detail about these transactions, click Show Report, and Quicken generates a report showing the transactions for the payee or category for the last 12 months.
Finding All Transactions
To search for payments and deposits regardless of which account they’re in, use the text box and the Find All button in the upper right corner of Quicken’s main window (Figure 4-16). Although the tip text in the text box initially says “Find Payment or Deposit,” you can type text or values in the box to search every field of payment, deposit, and transfer transactions. You can type a portion of the text or value you want to find. Quicken searches for transactions in all the accounts listed in the Cash Flow Center that contain the search text anywhere in a field. Click Find All to open the Search Results window, which lists all the matching transactions that Quicken locates.
If you want to change a value in one or more transactions, first select the transactions you want to edit by turning on their checkboxes. Then, click Edit Transaction(s) to open the Find and Replace dialog box (see the next section for instructions).

Finding Transactions
If you’re sure the transaction you’re looking for is in the open register, you can limit your search to that register by using Find instead of Find All. The Find and Find Next commands work together to locate transactions in the active account that contain the value you specify in the transaction field that you choose. Quicken’s Find feature isn’t sophisticated, but you’ll quickly learn how to find the transactions you’re looking for. Here’s what you do:
Press Ctrl+F to open the Quicken Find dialog box.
In the register menu bar, you can also choose Find. Or, in the Quicken main window, choose Edit → Find & Replace → Find.
Tip
If you right-click a field in a transaction and, on the shortcut menu, choose Find, Quicken uses the value in the field to fill in the Search field and Find field in the Quicken Find dialog box. For example, if you right-click the Category field for a transaction that’s assigned to Home Repair, Quicken sets the Search field to Category/Class and the Find field to Home Repair.
In the Search drop-down menu, choose the field you want to search.
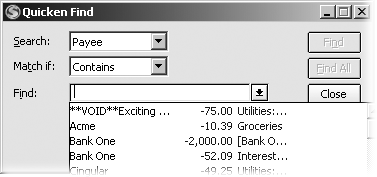
Quicken fills in all the boxes of the Quicken Find dialog box with your last search criteria and positions the insertion point in the Find box, as shown in Figure 4-17.
If you want to search for a value in all transaction fields instead of just one, choose All Fields. This choice is incredibly helpful if you know that the transaction you want includes a word, like “market,” but you can’t remember in which field it appears.
If you want to broaden or narrow the search, in the “Match if” drop-down menu, choose how precisely the results must match the value in the Find box.
Quicken automatically chooses Contains, which is the most relaxed match. Contains says that the value you’re looking for appears somewhere in the result. For example, if you type “Bank” in the Find box, the Contains criterion can find Citibank, Bank One, and First National Bank of Saskatchewan.
Figure 4-17. Quicken fills in the search criteria with the last criteria you used (in this case, Payee), making it easy to choose a different payee name or value. Once you’ve selected or modified your search criteria, the Find button becomes available. Click it to launch your search.At the other end of the spectrum, choosing Exact tells Quicken to return only transactions that exactly match the value in the Find box. For example, if you’re looking for the amount 100.50, Exact finds only amounts equal to 100.50, not one like 1100.50.
Starts With and Ends With are ideal for looking for text at the very beginning or very end of an entry. For numbers, you can also choose Greater, Greater or Equal, Less, and Less or Equal, which work just like they did in your elementary school math classes. (To see how to use wildcards to determine a match, see the box on Section 4.11.3.)
In the Find box, type the value you’re looking for, or choose it from the drop-down menu.
If you choose the transaction field in the Search drop-down menu first, Quicken automatically fills the Find drop-down menu with appropriate choices. For example, if you choose Payee in the Search box, the Find dropdown menu includes your payee names. Choosing Category in the Search box fills the Find Drop-down menu with the entries in your Quicken Category List.
If you want to search into the future, turn off the Search Backwards checkbox.
Quicken automatically turns on the Search Backwards checkbox, because you’re usually looking for transactions in the past. Searching forward comes in handy if you want to search between a specific date and today. For example, suppose you want to find all the money you’ve spent on gas since you started your new job. To move to the first transaction for that time frame, press Ctrl+G, and then type your hire date. Then, in the Quicken Find dialog box, turn off the Search Backwards checkbox and search for the Auto:Fuel category.
Tell Quicken to start searching.
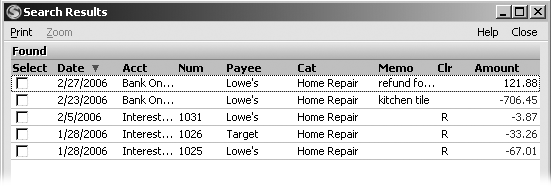
To look for the first transaction that matches your criteria, click Find. If you want to see all the transactions that match in all of your accounts, click Find All. Quicken opens the Search Results window with the matching transactions it found as illustrated in Figure 4-18.
If you clicked Find and want to find the next matching transaction, click Find again.
Click Find as many times as it takes to find the transaction you want. If you click Find All, you can scan the results for the transaction.
When you perform a search, Quicken remembers your search criteria for the remainder of your Quicken session. The Find Next command repeats your last search. To issue Find Next, right-click a transaction and, on the shortcut menu, choose Find Next. For fast access, press Shift+Ctrl+F.
Finding and Replacing Values
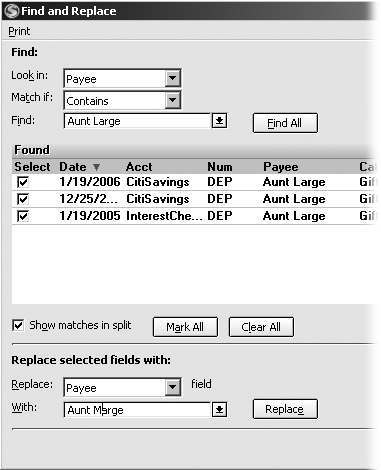
Find/Replace finds every occurrence of one value in all your accounts and replaces it with another. Suppose an unfortunate typo has created several transactions with a payee Aunt Large, when it should be Aunt Marge. Find/Replace can correct this gaffe in a jiffy.
Tip
Although Find/Replace can replace transactions that you’ve categorized incorrectly, the Recategorize feature (Section 4.9.2) provides a more streamlined process for that task.
Here’s how you use Find/Replace:
Choose Find & Replace → Find/Replace.
As you can see in Figure 4-19, Quicken opens the Find and Replace dialog box, which looks like an amalgamation of the Quicken Find dialog box on top with the Search Results window hanging off the bottom.
At the top of the Find and Replace dialog box, fill in the Search, Match if, and Find boxes to specify your search criteria.
Section 4.11.3 explains how to set these criteria.
Click Find All.
At the bottom of the Find and Replace dialog box, Quicken displays all matching transactions.
In the Replace box, choose the field that you want to replace.
Although you can search for transactions based on a matching value in all transaction fields, you can replace in only one field at a time. If you chose All Fields in the Search drop-down menu to find the value “Aunt Large” in every transaction field, you’ll have to repeat the replace operation, each time choosing a different transaction field. For example, you’ll repeat it in the Payee field first and then in the Memo field.
In the With box, type the replacement value.
For example, if you searched the Payee field for “Aunt Large,” typing Aunt Marge in the With box replaces all occurrences of Aunt Large with Aunt Marge.
To select all matching transactions, click Mark All.
Quicken adds green checkmarks to transactions that you select. You can click a checkmark to unselect a transaction or click an empty row to add a checkmark.
Click Replace.
A confirmation box appears asking if you’re sure that you want to make the replacement. Click OK to continue. Click Cancel if you’ve decided not to replace the values. When you click OK, you immediately see the changes in the transactions listed in the dialog box.
Click Close to close the dialog box.
The Find and Replace dialog box remains open after a replace operation. If you want to perform another find and replace, repeat steps 2 through 7. If you’re done, click Close.
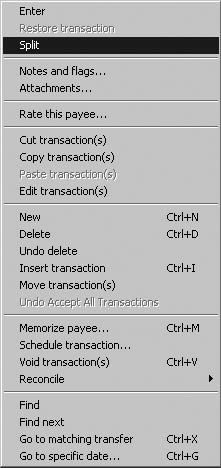
The Transaction Edit Menu
You can do just about any transaction-related task you want from the Edit shortcut menu, shown in Figure 4-20. To pop it up, right-click a transaction or click its Edit button. Some of these commands you use all the time, like New, which takes you to a blank transaction as if you pressed Ctrl+N. Other commands don’t see nearly as much action, but you can get to them just as easily from this same shortcut menu.
Most of the commands on the transaction Edit menu are covered throughout this chapter, as the choices on this menu vary depending on which transaction field you right-click. Think of this section as a cheat sheet. The following list explains what each command does and where you can find out more about it.
Enter. Records the active transaction. Does the same thing as clicking the Enter button in the transaction row or pressing Enter.
Restore transaction. If you edit a transaction and want to undo the changes you’ve made, choose this command. It undoes any changes you’ve made as long as you haven’t yet clicked Enter.
Split. Choose this command (or press Ctrl+S) to open the Split Transaction dialog box for the current transaction (Section 4.7).
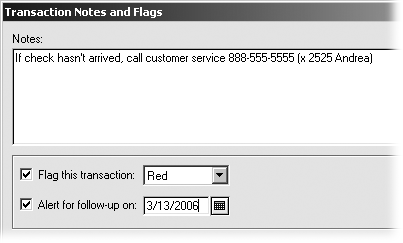
Notes and Flags. New to Quicken 2006, this feature attaches notes and reminders to transactions, as shown in Figure 4-21. For example, when you record a payment for a magazine renewal, you can add a note that indicates when it’ll be time to renew so you can ignore premature requests. Or you may add a note to check that your credit card company reversed the late charges it levied.
The advantage to using a note instead of text in the Memo field is that you can add a visual cue that a note exists by turning on the “Flag this transaction” checkbox. In the register, a flag appears below the transaction’s Date field. If you turn on the “Alert for follow-up on” checkbox and choose a date, Quicken adds an alert to the list in the Quicken Center panel (Online Appendix F).
Attachments. In Quicken 2006, you can attach electronic images of checks, receipts, bills, or even digital pictures to your transactions. Choose this command to open the Transaction Attachments window (see the box on Section 4.3.1).
Rate this payee. In Quicken 2006, you can click this command to open a browser window to Zipingo.com (Section 4.3.2). On this Web site, you can rate businesses you’ve used and view ratings from other customers.
Cut transaction(s). This command removes the transaction or transactions that you’ve selected and places them on a clipboard, in exactly the same way that pressing Ctrl+X in Windows adds what you cut to the Windows clipboard. If you want to remove several transactions from a register, use this command. (Delete only deletes the current transaction.)
Note
If you want to move one or more transactions from one account to another, choose “Move transaction(s)”, as described on Section 4.12.
Copy transaction(s). If you want to copy one or more transactions, for instance to quickly duplicate several transactions you forgot to add last month, this command is the one to choose. Quicken leaves the originals in the register but places copies on a clipboard. To add the copies to the register, follow this command with “Paste transaction(s)”.
Paste transaction(s). To copy the transactions on the clipboard to the register, choose this command.
Edit transaction(s). To edit one or more transactions in the Find and Replace dialog box, select the transactions, right-click them, and then choose this command.
New. If you’re far from the bottom of the register but can’t remember any keyboard shortcuts, choosing this command places the insertion point in a fresh blank transaction at the bottom of the register. It’s just like pressing Ctrl+N.
Delete. This command removes all traces of a transaction from your Quicken data file. This command is perfect if you created a duplicate of an existing transaction. If you want to eliminate a transaction but keep a record of it, choose “Void transaction(s)” instead (see Section 4.13).
Undo delete. With the Delete command right below the New command, inadvertently deleting a transaction is almost inevitable. You can recover the deleted transaction by choosing “Undo delete” immediately. (That is, before you issue any other command.)
Insert transaction. If you select an existing transaction, “Insert transaction” adds a blank transaction immediately below it, with the same date, as shown in Figure 4-22. Note the difference from the New command, which places you at the bottom of the register and automatically selects today’s date. With “Insert transaction,” you can easily go back and fill in a transaction that you missed.
Move transaction(s). If you put a transaction (or several) in the wrong account (deposited money in the wrong savings account, say), simply select the misplaced transactions and then choose “Move transaction(s).” In the dialog box that appears, in the “Move to account” drop-down menu, choose the correct account, and then click OK.
Undo Accept All Transactions. If you download transactions and choose Accept All, you can choose this command to return the transactions to their original downloaded state, as described on Section 6.5.
Memorize payee. Quicken comes with the “Automatically memorize new payees” feature turned on, so that Quicken automatically memorizes every new payee you enter. If you turn this checkbox off (in QuickFill preferences), you can handpick the payees to add to the Memorized Payee List (Section 4.13.1). For instance, if the current transaction is for a payee you’ll do business with again, choose “Memorize payee” to add the payee to the Memorized Payee List.
Schedule transaction. If you want to schedule the selected transaction to repeat in the future or recur on a set schedule, choose this command. See “Scheduling Transactions” on Section 4.14 for detailed instructions.
Void transaction(s). If you want to eliminate a transaction but keep a record of it, choose this command (see “Voiding Transactions” on Section 4.10).
Reconcile. If a transaction’s status isn’t correct—Unreconciled, Cleared, or Reconciled—choose this command, and then choose a different status from the submenu. (For full details on reconciling accounts, see Chapter 7.)
Find. Choose this command (or press Ctrl+F) to open the Find dialog box, described in detail on Section 4.11.3.
Find next. To find the next occurrence of the current search criteria, choose this command.
Go to matching transfer. If the selected transaction is a transfer, choosing this command jumps to the transaction at the other end of a transfer. For example, if the selected transaction is a transfer from checking to savings, choosing “Go to matching transfer” opens the register for the savings account and selects the corresponding deposit.
Go to specific date. This command delivers you to the first transaction on any date you specify. Choose this command and, in the Go To Date dialog box, select the date you want. When you click OK, Quicken jumps to the first transaction that occurred on that date and highlights it. This command comes in handy for things like reviewing your end-of-the-year tax activity.
Managing Memorized Payees
Without any help from you, Quicken’s QuickFill feature usually does a fine job filling in transaction information for you, almost as if the program had ESP. As explained on Section 4.3, though, there’s no magic involved, just a list of values stored in Quicken’s electronic brain—the Memorized Payee List. All the software does is find matches based on your first few keystrokes, one of the things software does really well, and really fast.
Of course, even Quicken’s ESP isn’t perfect. Sometimes the information it memorizes is incorrect, or outdated, or just not what you want—like when Quicken memorizes “RBROS7537-2XX-CANL” instead of “Rocha Brothers Market (Canal St).” With a little human input, you can make QuickFill even better. You can perform some electronic brain surgery, so to speak, to improve Quicken’s psychic abilities. All you have to do is open up the Memorized Payee List and edit away. This section shows you how.
Removing Payees from the Memorized Payee List
One downside to this automatic memorization is that Quicken can be overly enthusiastic about memorizing payees. Before you know it, the program has memorized every Tom, Dick, and Harry—and Sally, Teresa, Bubba, and so on. If your Memorized Payee List has bloated to a startling degree, you’ve got three strategies:
Limiting the length of Quicken’s memory
The easiest way to keep your Memorized Payee List under control is with a Quicken Register preference (Section 1.5.6). Choose Edit → Preferences → Quicken Program, and then click Register. By turning on the “Remove memorized payees not used in last” checkbox and typing a number (in months), you tell Quicken to continually review your Memorized Payee List and toss out any payees that you haven’t used in that time frame.
If you have companies that you pay once a year, like your insurance company or the septic tank cleaner, type, say, 14 in the months box. By giving yourself a few extra months, Quicken won’t remove memorized payees before you’ve had a chance to reuse them.
Turning off automatic memorization
Another way to keep your Memorized Payee List down to size is to prevent Quicken from memorizing one-hit wonders and other unimportant payees in the first place. In this scheme, you tell Quicken to not memorize payees at all, and then add individual payees to the list yourself. This method is more work for you, but it gives you the most control over the Memorized Payee List.
In the Quicken Preferences dialog box, in the “Select preference type” list, click QuickFill. Turn off the “Automatically memorize new payees” checkbox. Then, to memorize a payee you do want, select a transaction that uses that payee and press Ctrl+M.
Deleting memorized payees
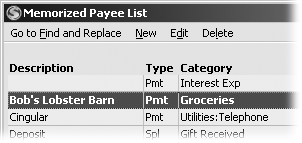
If your Memorized Payee List is already cluttered with names you never want to see again, you can excise these entries from the list. Open the Memorized Payee List by pressing Ctrl+T or choosing Tools → Memorized Payee List. (Deleting memorized payees doesn’t remove them from previously recorded transactions.)
To delete memorized payees, select one or more payees and, in the Memorized Payee List menu bar, choose Delete (Figure 4-23). Quicken displays a confirmation box asking if you’re sure you want to delete the payees. Click OK to delete. Click Cancel to spare them.
You don’t have to delete only one memorized payee at a time. You can click one entry and then Shift+click another entry several rows down to also select all the memorized payees in between. For more individualized selections, Ctrl+click each memorized payee you want to trash. When you click Delete, the program deletes all the selected payees.
Locking a Memorized Payee
When Quicken memorizes payees, it stores them in an unlocked state, which means that Quicken can overwrite the values for the memorized payee when you create a new transaction. For example, if your electric bill is different every month, the amount of the previous month’s payment always appears in the Payment field.
If you want to keep a memorized payee the same, regardless of what you do with it in a new transaction, you can lock the entry so that the Memorized Payee List remembers the same value no matter what. For example, suppose you have a memorized payee for your cable TV bill. Every month, you pay $36.95 for the privilege of surfing through 150 channels of reruns, so you lock the entry at that amount. One month the bill is only $20 because you received a credit for a week’s service outage, so you edit the amount for that transaction. But when you create the payment next month, the regular amount of $36.95 pops up again.
In the Memorized Payee List window, the fastest way to lock an entry is to click in its row in the Lock column. You’ll know that an entry is locked by the gold padlock in the Lock column. To unlock an entry, click its padlock icon.
Scheduling Transactions
Often, bills are due at the same time every month, and some are even the same amount every month. For example, your electric bill is due the 19th of the month, but the amount varies each time. Your mortgage may be due on the 5th, and it’s the same amount every month. Scheduled transactions are perfect for payments like these. You set up scheduled transactions with the same information you provide for a check you record in the register, and you also tell Quicken when and how often you make this payment.
Not only can the program create future transactions for you, but Quicken also doesn’t forget that they’re due. When it’s time to make a payment or deposit, Quicken reminds you of the task. If the amount is the same each time, you can tell Quicken to create the transaction automatically. With one additional step to set up scheduled transactions as repeating online payments (see Chapter 6), you can turn off your computer, drop the cat off at a neighbor’s, and take a month’s sabbatical to study reef winkles in Tahiti, confident that your mortgage is paid on time. (After you send the instructions for repeating online payments to your financial institution, it sets up all your future payments automatically and processes them without further action on your part. See “Setting Up a Repeating Online Payment” on Section 6.9.3 to learn more.)
You can schedule a transaction to happen just once to make sure that you don’t forget to pay it (perhaps for the down payment on the Ferrari that’s on sale until March 31), but scheduled transactions are even better for transactions that occur again and again. They work equally well for checks, transfers, and deposits you make on a periodic basis, from the garbage bill to a disability benefit. In fact, unless you have a scheduled transaction for every transaction you make regularly, you’re cheating yourself out of Quicken’s most timesaving—and potentially money saving—feature.
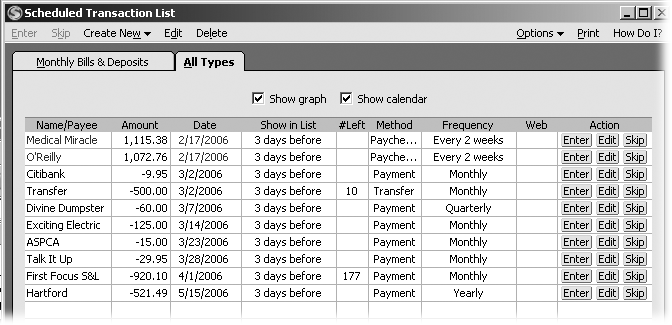
The Scheduled Transaction List is a one-stop shop for working with scheduled transactions. Whether you want to set up, edit, delete, or record scheduled transactions, press Ctrl+J or choose Tools → Scheduled Transaction List to open the window shown in Figure 4-24. In the Cash Flow Center, you can open the Create Scheduled Transaction dialog box directly by clicking Add a Transaction.
Setting Up a Scheduled Transaction
The Create Scheduled Transaction dialog box may seem daunting at first, but the top half is nothing more than the same fields you fill in when you record a check in an account register. The bottom half of the dialog box is where you set up the schedule. To open the Create Scheduled Transaction dialog box, in the Scheduled Transaction List menu bar, choose Create New → Scheduled Transaction. This section explains how to use each section to its fullest.
Note
The other command on the Create New menu is Paycheck, which you can choose to set up and schedule your paychecks (see Section 4.15).
Transaction values
The top half of the Create Scheduled Transaction dialog box, shown in Figure 4-25, has the same fields as an account register, plus a few more bells and whistles. Unlike transactions you create in an account register, QuickFill doesn’t work in this dialog box. You must choose values from drop-down menus or type the values you want.
Here’s how you use the boxes and options Quicken offers:
Account to use. Choose the account to which you make a payment or receive a deposit. This account is the one whose register you would open to record the transaction.
Transaction method. These are equivalent to the selections in the Num field in an account register. For example, Payment is equivalent to Next Check Num; the only difference being Quicken won’t know the next check number until it’s time to make the payment. Deposit and Transfer are available, and the Printer Check method from the register is named Printed Check for a scheduled transaction.
Repeat this online payment automatically even if I don’t go online. For accounts that are set up to process online payments, you can turn on this checkbox (Figure 4-25) to create a repeating online payment—the ultimate in transaction convenience. When you turn on this checkbox, Quicken sends the instructions for the repeating online payment to your bank. A month before the payment is due, your bank queues up a payment according to the schedule you set. The next time you launch Quicken and go online, the program downloads the transaction for the next installment of your repeating online payment into your account register.
Figure 4-25. Although most of the boxes emulate their register counterparts, you can turn on the “Repeat this online payment automatically even if I don’t go online” checkbox to set up a fully automated payment that requires no further effort on your part. The Amount section includes an option that sets up a credit card payment whose Amount equals the balance on your credit card.Payee. This familiar field works the same as in a register transaction.
Address. Clicking Address opens the Edit Address Book Record, just as clicking Address in the Write Checks window does.
Category. Choose from this drop-down menu of all categories.
Split. Because the Category drop-down menu in this dialog box doesn’t include the Split button (Section 4.7), you click this button to split a scheduled transaction among categories.
Amount. The Amount section includes three options. Quicken automatically selects the first, which is simply a text box for entering the amount for the transaction.
The Estimate from last _ payments option calculates a rolling average from past payments. That is, it adds up the last three amounts and divides by three. If you’re whittling down a big credit card balance, you might choose this option to set up a regular payment based on your recent payment amounts.
The Use full credit card balance option is available if you choose a credit card account. It schedules payments that automatically pay the entire outstanding balance on the card. (And quite possibly give you the best credit rating in the known universe.)
Memo. This field is the same as in the register. If your scheduled transaction repeats regularly, remember that the memo will also be the same each time.
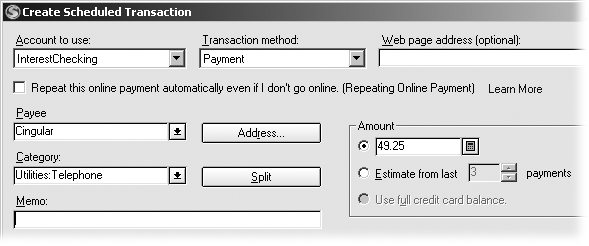
Scheduled transaction frequency
The fields in the Scheduling section of the Create Scheduled Transaction dialog box tell Quicken when it should record your scheduled transactions. Among its advantages, setting up a schedule for transactions lets you:
Record transactions ahead of time.
Set reminders based on how often you use Quicken.
Be sure to record transactions.
The bottom half of the Create Scheduled Transaction dialog box looks awfully busy, but it boils down to three ways to control your transaction schedule.
Start on. In the “Start on” box, choose the date for the future transaction (or the first of many recurring transactions). Quicken chooses Remind Me, which displays a reminder when it’s time to actually record the transaction. If the amounts are the same each month, you can choose Automatically Enter and let Quicken add the transactions without any effort on your part.
The number of days in advance depends on how addicted you are to Quicken. If you launch Quicken every day without fail, you can set the number of days somewhere between 1 and 3. If you use Quicken off and on, you should set the number of days box to a higher number, so you’re more likely to see the reminder before it’s too late.
Frequency. Choose Only Once for a one-time transaction or choose one of the time frames, like Weekly or Yearly. There’s also an Estimated Tax choice for setting up estimated tax payments on the 15th of January, April, June, and September. You can specify the day of the month or choose a specific weekday. For example, if your investment club meets on the second Tuesday of each month, you can schedule your contribution to match.
Ending on. If you choose the No end date option, the scheduled transaction keeps going like the Energizer bunny—until you delete the scheduled transaction. If you choose the On option, you can specify the ending date. The After option is the most popular. For example, you can use it to set up a transfer to pay off a home equity line of credit over, say, two years: Simply choose After and type 24 in the times box.
Paying and Skipping Scheduled Transactions
You can wait until Quicken reminds you to pay a scheduled transaction, or even pay a scheduled transaction before its scheduled time. This second option is especially handy if you’re leaving for an extended vacation and don’t want your car repossessed before you return. To manually record a scheduled transaction regardless of when it’s due, in the Scheduled Transaction List window (press Ctrl+J), click the Enter button in the transaction row.
On the other hand, if you take a temporary assignment in Katmandu and put your cable service, ISP, and garbage pickup on hold, you want to skip some of your scheduled payments. To skip one transaction of the schedule, in the Scheduled Transaction List window, click Skip in the transaction’s row.
Automating Your Paycheck in Quicken
Paychecks seem to grow more complicated every year, what with pre-tax medical and retirement deductions, taxes, and after-tax deductions (like your voluntary contribution to your company’s executive legal defense fund). Whether you’re content to let your employer summarize your payroll on a W-2 each year or you want to track your paycheck to the penny, the Set Up Paycheck tool can simplify your record keeping. This section explains how to set up paychecks and add them to your account register.
Note
If you already have a paycheck set up, choosing Cash Flow → Banking → Set Up Paycheck opens the Manage Paychecks dialog box, in which you can add, edit, or delete paychecks (see Section 4.15.4).
Basic Paycheck Fields
The first time you choose Cash Flow → Banking Activities → Set Up Paycheck, Quicken displays the Paycheck Setup wizard. On the first screen, you can first read about all the great things that you can do with a paycheck in Quicken, or you can click Next to get started. Then follow these steps:
Choose Cash Flow → Banking Activities → Set Up Paycheck.
Another way to open the Paycheck Setup wizard is via the Scheduled Transaction list window. In that window’s menu bar, choose Create New → Paycheck.
When you click Next, the screen shows options for your and your spouse’s paychecks.
Choose the option for the person whose paycheck you’re creating.
In the Company Name text box, type the name of the employer.
You don’t need the full legal name of the company. What you type in the Company Name box is what you’ll see when you create a paycheck transaction, so you can make it short—but recognizable. Click Next to continue.
Choose the option for the level of detail you want to track.
Quicken automatically selects the “I want to track all earnings, taxes, and deductions” option. If you want to use Quicken to help minimize the taxes you pay or keep track of company benefits, you want to choose this option. For example, you’ll know how much money is available in your flexible spending account.
For folks who just want to know how much money goes into the checking account to pay bills, the “I want to track net deposits only” option may be a better choice. You don’t get the benefits of tracking all paycheck deductions, but setup is much simpler.
Click Next to begin the paycheck setup in earnest.
The Set Up Paycheck dialog box that appears depends on which level of detail you chose. The “I want to track net deposits only” option opens a compact dialog box with a few boxes for the net deposit and scheduling frequency. If you see a Set Up Paycheck dialog box that runs from the top of your screen to the bottom, you know you’re about to track full detail. See the next section for steps to complete paycheck setup.
Setting Up Paycheck Details
If you choose the “I want to track net deposits only” option, the Set Up Paycheck dialog box includes a place to enter the value of your net paycheck and fields to specify when and how often you get paid. This option is easy to set up, but it doesn’t give you the sort of information you need if you want Quicken to help with tax-related tasks—one of the main benefits of electronic personal finance.
If you choose the “I want to track all earnings, taxes, and deductions” option, the Set Up Paycheck dialog box includes sections, boxes, and buttons for specifying every last item on your pay stub. Although Figure 4-26 shows only a portion of this behemoth, running through all the options is quite simple. To add a paycheck item, you click one of the “Add” buttons and choose the type of earning, tax, or deduction. For each, a small dialog box opens with a few text boxes, most of which Quicken fills in for you. After you’ve added all items on your pay stub, click Done.
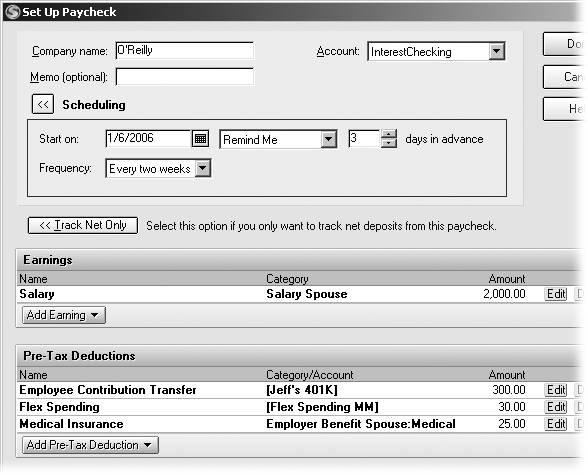
As soon as you click Done to save a new paycheck, Quicken opens the Enter Year-to-Date Information dialog box and asks if you want to enter the year-to-date amounts for the paycheck. The program automatically selects the “I want to enter the year-to-date information” option, which is the only logical choice if you want complete tax records for the year. This option opens the Paycheck Year-to-Date Amounts dialog box. Grab your most recent pay stub and use its year-to-date amounts to fill in the values for each paycheck item.
Account and scheduling
The first section in the Set Up Paycheck dialog box identifies the account to which you deposit your check and tells Quicken when and how often you’re paid. Here are the boxes you fill in:
Account. In the drop-down menu, choose the account to which you deposit your paycheck (whether you hand-deliver it to the bank, mail it, or use your employer’s auto-deposit).
Start on. Choose the next date that you’ll receive a paycheck. If you’re setting up Quicken to fill in your data from the beginning of the year, you can choose the first payday of the current year.
Remind Me. Quicken automatically chooses Remind Me, which reminds you to enter your paycheck transaction several days in advance. When the program reminds you to add your paycheck transaction, you have a chance to make any adjustments to match your pay stub. If you receive one of those rare paychecks whose values never vary, you can choose Automatically Enter, which tells Quicken to add the paycheck transaction without asking for permission.
Days in advance. Choose how many days in advance you want to record your paycheck. Quicken sets this box to 3, mainly because employers often hand out pay stubs a few days before the pay date. If you like to plan your cash flow in advance, you can choose a higher number to add your paycheck transaction to the register earlier. (Although the transaction shows up in the register earlier, the transaction date is still based on your Start on date. On the other hand, if you tend to spend the money you can see, you can set this value to 1 to hide your income as long as possible.)
Frequency. Quicken can handle almost any paycheck schedule, unless your employer pays you as soon as there’s enough cash to cover payroll. Choose from Weekly, Every two weeks, Twice a month, Every four weeks, Monthly, and so on.
Adding and editing paycheck items
Quicken makes adding and editing earnings, tax, and other deductions as easy as possible, a real boon when your paycheck seems to have more entries than the local phone book. Paycheck items are grouped into four categories, shown in Figure 4-27.
When you choose a paycheck item on one of the drop-down menus, a small dialog box opens for setting up that item. Quicken fills in most of the boxes for you, as the Add 401(k) Deduction dialog box in Figure 4-28 illustrates. Quicken fills in the Name box with a generic name, which you can change to be more descriptive. For example, the Quicken name for a 401(k) deduction is Employee Contribution Transfer, but you can rename it 401k Spouse if you like. The program often fills in the Category box with one of its built-in Categories. For most items, you have to provide only the amount and click OK to save it.
Entering a Paycheck Transaction
As you can see from the scheduling options in the Set Up Paycheck dialog box, Quicken sets up your paycheck as a scheduled transaction (Section 4.14). In addition to receiving a reminder to enter your paycheck, a scheduled paycheck transaction takes only a couple of clicks to complete.
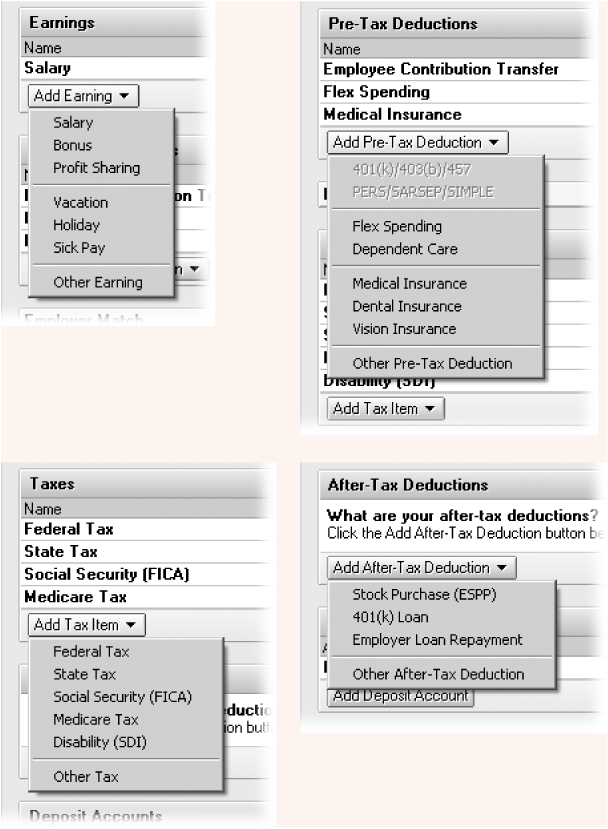
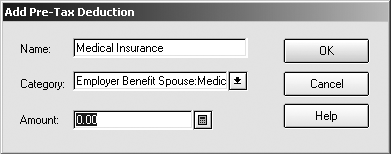
If Quicken Home includes Bills and Scheduled Transactions, you can enter a scheduled paycheck transaction by clicking Quicken Home and then clicking your paycheck’s Enter button, as demonstrated in Figure 4-29. The “Edit Current Paycheck and Enter into Register” dialog box opens. If your pay stub shows different values, make those changes first, and then click Enter to record the paycheck.
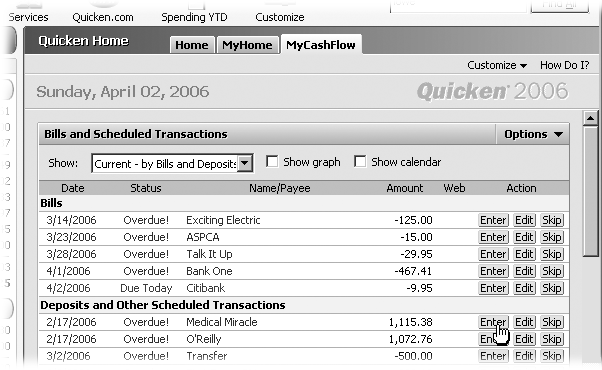
Tip
Although the values in the dialog box don’t look like text boxes, you can click a value to make it editable.
You can also easily enter a paycheck if you press Ctrl+J to open the Scheduled Transaction List window, and then click the Enter button for the paycheck you want to enter.
Managing Your Paychecks
Since life is rarely simple, the meticulous paycheck setup you’ve just gone through won’t last forever. Even minor changes in your family or job situation can alter the numbers on your paycheck. At least in Quicken the necessary adjustments are easy to make. When you have one or more paychecks set up, choosing Cash Flow → Banking Activities → Set Up Paycheck opens the Manage Paychecks dialog box. Here’s what you can do:
New. To create a new paycheck, for example to add the paycheck for the second job you’ve taken on, click New. Quicken opens the Paycheck Setup dialog box. See Section 4.15 for the step-by-step details.
Edit. Select one of the paychecks in the list and then click this button to open the Edit Future Paychecks dialog box. This dialog box is the same as the Set Up Paycheck dialog box, except that it makes changes only to paychecks you record in the future.
Delete. If you quit a job and no longer receive a scheduled paycheck, select the paycheck in the list, and then click Delete.
Get Quicken 2006 for Starters: The Missing Manual now with the O’Reilly learning platform.
O’Reilly members experience books, live events, courses curated by job role, and more from O’Reilly and nearly 200 top publishers.

