Chapter 4. Action Controller
Introduction
In the Rails architecture, Action Controller receives incoming requests and hands off each request to a particular action. Action Controller is tightly integrated with Action View; together they form Action Pack.
Action Controllers, or just “controllers,” are classes that inherit from ActionController::Base. These classes define
the application’s business logic. A real estate web application might
have one controller that handles searchable housing listings, and
another controller devoted to administration of the site. In this way,
controllers are grouped according to the data they operate on.
Controllers often correspond to the model that they primarily operate
on, although this doesn’t have to be the case.
A controller is made up of actions, which are the public methods
of a controller class. To process incoming requests, Action Controller
includes a routing module that maps URLs to specific actions. By
default, a request to http://railsurl.com/rental/listing/23
tries to invoke the listing action of
the RentalController controller,
passing in an id of 23. As with much
of the Rails framework, if this behavior doesn’t fit your application’s
requirements, it’s easy to configure something different.
After Action Controller has determined which action should handle the incoming request, the action gets to perform its task: for example, updating the domain model based on the parameters in the request object. When the action has finished, Rails usually attempts to render a view template with the same name as that action. There are several ways this normal process can be altered, though; an action can redirect to other actions, or it can request that a specific view be rendered. Eventually, a template or some form of output is rendered, completing the request cycle.
Understanding that business logic belongs in the controller rather than in the view and that domain logic should be separated into the model, is the key to maximizing the benefits of the MVC design pattern. Follow this pattern, and your applications will be easier to understand, maintain, and extend.
Accessing Form Data from a Controller
Problem
You have a web form that collects data from the user and passes it to a controller. You want to access that data within the controller.
Solution
Use the params hash. Given
the form:
app/views/data/enter.rhtml:
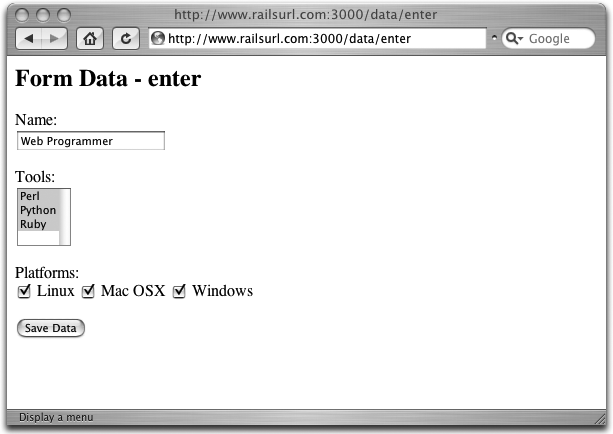
<h2>Form Data - enter</h2>

<% form_tag(:action => "show_data") do %>

  <p>Name:
  <%= text_field_tag("name","Web Programmer") %></p>

  <p>Tools:
  <% opts = ["Perl", "Python", "Ruby"].map do |o|
    "<option>#{o}</option>"
  end.to_s  %>
  <%= select_tag("tools[]", opts, :multiple => "true") %></p>

  <p>Platforms:
  <%= check_box_tag("platforms[]","Linux") %> Linux
  <%= check_box_tag("platforms[]","Mac OSX") %> Mac OSX
  <%= check_box_tag("platforms[]","Windows") %> Windows</p>

  <%= submit_tag("Save Data") %>
<% end %>
When the form has been submitted, you can access the data using
the params hash within your
controller.
app/controllers/data_controller.rb:
class DataController < ApplicationController

  def enter
  end

  def show_data
    @name = params[:name]
    @tools = params[:tools] || []
    @platforms = params[:platforms] || []
  end
end
Discussion
The web server stores the elements of a submitted form in the
request object. These elements are available to your application
through the params hash. The
params hash is unique because you
can access its elements using strings or symbols as keys.
Figure 4-1 shows the form; it has three different types of HTML elements.
The following view displays the data that the form collects. The
last line is a call to the debug
template helper, which displays the contents of the params hash in yaml format:
app/views/data/show_data.rhtml:
<h2>Form Data - display</h2>

Name: <%= @name %>;
Tools: <%= @tools.join(", ") %>;
Platforms: <%= @platforms.join(", ") %>;

<hr>
<%= debug(params) %>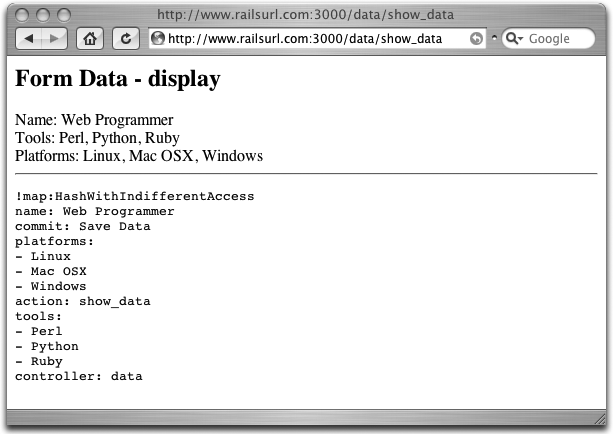
Figure 4-2 shows the rendered view.
To access the name field of
the form, use :name as the key to
the params hash (e.g., params[:name]). The selected elements of the
multiselect list and the checkboxes are stored in the params hash as arrays named after their
associated HTML element names.
For example, if you submit the form in the solution with Python
and Ruby selected for Tools and Mac OS X checked for Platforms, the
params hash contains the following
arrays:
{ "tools"=>["Python", "Ruby"], "platforms"=>["Mac OSX"] }This behavior is triggered by appending [] to the name of an
element that can have more than one value. If no items are selected,
there will be no variable in params
corresponding to that element.
Form data can also be structured as an arbitrarily deeply nested
tree of hashes and arrays within the params hash. Hashes are created by placing the name of the nested
hash between the square brackets at the end of the field name. The
following hidden form fields illustrate a nesting that is up to three
levels deep (i.e., params contains
a student hash, which contains a
scores hash, which contains a
:midterm array with values and
:final key with a value).
<input type="hidden" name="student[scores][midterm][]" value="88">
<input type="hidden" name="student[scores][midterm][]" value="91">
<input type="hidden" name="student[scores][final]" value="95">
If you add these hidden fields to the solution’s form, you get
the following student data
structure params hash:
"student"=> {
    "scores"=> {
        "final"=>"95",
        "midterm"=> [
            "88",
            "91"
        ]
    }
}
Here’s how to access the student’s second midterm scores:
params[:student][:scores][:midterm][1]
Changing an Application’s Default Page
Problem
By default, when a browser requests http://railsurl.com, that request is mapped to public/index.html. Instead, you’d like such requests to call a specific action.
Solution
First, you need to rename or move public/index.html.
Then edit config/routes.rb to map URLs into the appropriate controllers and actions:
config/routes.rb:
ActionController::Routing::Routes.draw do |map|

  map.connect '', :controller => "customer", :action => "welcome"

  map.connect ':controller/service.wsdl', :action => 'wsdl'
  map.connect ':controller/:action/:id'
end
Be sure that the line you add is the first call to map.connect in
this file.
Discussion
The routes.rb file is at the heart of the Rails routing system. This file contains rules that try to match the URL path of a request and determine where to direct that request. The rules are tested in the order that they’re defined in the file. The first rule to match a request’s URL path determines the fate of that request.
The rules in routes.rb are calls to
map.connect. The first argument of
map.connect describes how the URL
path must be structured for this rule to be used. The remaining
arguments are key/value pairs that specify how the request is routed
to your application. Once a request matches a rule in this file, all
remaining map.connect rules are
ignored.
So, the rule we added has an initial argument of ''. This says, “Match any request where the
URL path is empty.” The second argument specifies the controller to
use and the third, the action. The entire rule states that requests
with no URL path are to use the welcome action of the BooksController.
Finally, requests with an empty URL are really a special case because Rails directs them to /public/index.html. If that file exists, the rules in routes.rb do nothing; otherwise, the rules are evaluated.
Clarifying Your Code with Named Routes
Problem
You are using link_to
throughout your application to generate URLs programmatically, but you
still find that there’s duplication across these calls for URLs that
you use often. You want a shorthand way to refer to the most common
routes in your application.
Solution
Use named routes.
Discussion
In your application’s config/routes.rb
file, you can create named routes simply by replacing map.connect with map. name, where name can be a descriptive name
for that specific route definition.
Here’s a named route, called admin_report, that routes a request to the
report action of the Admin
controller:
map.admin_report 'report/:year',
                 :controller => 'admin',
                 :action => 'report'
Having this named route in routes.rb tells
Rails to create two new methods associated with this route: admin_report_url and hash_for_admin_report_url. You use the first
method, admin_report_url, to
reference this route anywhere that Rails requires a URL. The latter
method just returns the routing
hash for that route. With this named route defined, we can now use
admin_report_url in a link_to helper:
<%= link_to "Administrative Report", admin_report_url(:year => 2005) %>
Internally, admin_report_url
is a call to url_for that’s passed
the hash from the route definition. Any additional hash entries can be
passed as arguments to admin_report_url; these entries are merged
with the hash from the route definition, and are dealt with according
to the rules defined by that route. In this example, the year for the
report is passed as an argument to the admin_report_url method.
It’s common to define a named route for the main page of your
application. Here’s how to define such a route called home that takes you to the page managed by
the Main controller:
map.home '', :controller => "main"
You can use this route in a redirect within a controller:
redirect_to home_url
Configuring Customized Routing Behavior
Problem
You need precise control over how Rails maps URLs into controllers actions. By
default, a request to http://railsurl.com/blog/show/5
calls the show action of the Blog
controller with an id of 5 (i.e.,
:controller/:action/:id, which you
can see in the last map.connect line in
config/routes.rb). You want Rails to route URLs
constructed from date information directly to articles. But http://railsurl.com/blog/2005/11/6
requests the 2005 action of the
Blog controller, which makes little sense. How do you map URLs with
dates into meaningful controllers and actions?
Solution
Add the following as the first rule in config/routes.rb:
ActionController::Routing::Routes.draw do |map|map.connect 'blog/:year/:month/:day',:controller => 'blog',:action => 'display_by_date',:month => nil,:day => nil,:requirements => { :year => /\d{4}/,:day => /\d{1,2}/,:month => /\d{1,2}/ }map.connect ':controller/service.wsdl', :action => 'wsdl' map.connect ':controller/:action/:id' end
With display_by_date defined
in the Blog controller:
app/controllers/BlogController.rb:
class BlogController < ApplicationController

  def display_by_date
    year = params[:year]
    month = params[:month]
    day = params[:day]
    day ='0'+day if day && day.size == 1
    @day = day
    if ( year && month && day )
      render(:template => "blog/#{year}/#{month}/#{day}")
    elsif ( year )
      render(:template => "blog/#{year}/list")
    end
  end

end
Discussion
The solution routes a request to http://railsurl.com/blog/2005/11/6
directly to the display_by_date
method of the BlogController. The
display_by_date method receives the
following parameter hash:
params = { :year => 2005,
            :day => 6,
            :month => 11 }
When presented with these values, display_by_date retrieves the blog entry
from November 6, 2005. This method has some additional display
functionality as well, which we’ll get to in a moment.
Here’s how our map.connect
rule works:
The first argument of map.connect is a pattern that describes the
URL path that we’re looking for this rule to match. In this case, when
we see a URL path of the form /blog/2005/6/11, we
create a hash with :year =>
2005, :month => 6, and
:day => 11. (All this really
matches is the /blog///; the stuff between the
last three slashes is added to the hash.) This does nothing to
guarantee that the stuff between the slashes has anything to do with
an actual date; it just matches the pattern and adds key/value pairs
to the hash.
The initial argument does not add :controller or :action keys to our hash. Without a
controller specified, Rails produces a routing error. If we specify
the Blog controller but no action, Rails assumes an action of index or throws an error if no index method is defined. So we’ve added
:controller => 'blog' and
:action => to explicitly
tell Rails to use the 'display_by_date'display_by_date method of the Blog
controller.
The next two arguments in our rule, :month => nil and :day => nil, set a default of nil to the
:month and :day keys of the hash. Keys with nil values
won’t get included in the params
hash passed to display_by_date.
Using nil values lets you specify the year but omit the month and day
components of the URL path. display_by_date interprets the lack of month
and day variables as a special request to display all blog entries for
the specified year.
The last argument assigns a subhash to the :requirements key. This subhash contains
specifics about what we’re willing to accept as a valid date. We use
it to provide regular expressions that tell us whether we’re actually
looking at a year, month, and a day—the value assigned to year must
match /\d(4)/ (i.e., a string of four digits)—and
so on.
See Also
Displaying Alert Messages with Flash
Problem
You’ve created an informative message while processing the current request. You want this message to be available for display during the next request. Additionally, the message should cease to be available following the next request.
Solution
You have a form that requests the user to enter a password that meets a certain criteria.
views/password/form.rhtml:
<h2>Please choose a good password:</h2>

<p style="color: red;"><%= flash[:notice] %></p>

<% form_tag(:action => 'check') do %>

  <input type="text" name="pass">
  <input type="submit">
  <p>(8 character minimum, at least 2 digits)</p>

<% end %>
The form submits to the Check controller, which strips the password candidate of all whitespace, and then a couple of regular expressions test that the password meets the criteria. The tests are broken up to provide more specific error message notifications.
If both matches succeed, the request is redirected to the
success action and passed along to
:pass for display. If either check
fails, the request redirects back to the form action.
app/controllers/password_controller.rb:
class PasswordController < ApplicationController

  def form
  end

  def check
    password = params['pass'].strip.gsub(/ /,'')
    if password =~ /\w{8}/
      flash[:notice] = "Your password is long enough"
      if password =~ /\d+.*\d+/
        flash[:notice] += " and contains enough digits."
        redirect_to :action => 'success', :pass => password
        return
      else
        flash[:notice] = "Sorry, not enough digits."
      end
    else
      flash[:notice] = "Sorry, not long enough."
    end
    redirect_to :action => 'form'
  end

  def success
    @pass = params['pass']
  end
end
Upon success, the user is redirected to success.rthml
, and his password is displayed (without any whitespace it
may have contained):
views/password/success.rthml:
<h2>Success!</h2>
<% if flash[:notice] %>
  <p style="color: green;"><%= flash[:notice] %></p>
<% end %>
Discussion
Building a usable web application hinges on keeping the user
informed about what’s going on, and why things happen. Communicative
alert messages are an integral part of most good applications.
Displaying such messages is so common that Rails has a facility for
doing so called the flash.
Internally, the flash is just
a hash stored in the session object. It has the special quality of
getting cleared out after the very next request (though you can alter
this behavior with the flash.keep
method).
Redirecting with redirect_to
is often used to display a new URL in the location bar of the browser,
somewhat hiding the inner workings of an application. Because messages
stored in the flash are just stored
in the session object, they are available across such redirects,
unlike instance variables. And since they last only for one more
request, hitting the refresh button makes the message disappear. From
the user’s perspective, this is usually the ideal behavior.
If you find yourself tempted to use the flash to store more than just user
notification messages (e.g., object IDs), make sure to consider
whether using the standard session object would work as well or
better.
Extending the Life of a Flash Message
Problem
You’ve created a flash message and are displaying it to the user. You’d like to extend the life of that message for one more request than would normally exist.
Solution
You can call the keep method
of the Flash class on a specific entry, or the entire contents of the
flash hash. This technique is
useful for redisplaying flash messages in subsequent requests without
explicitly recreating them.
To demonstrate this, create the following Rental Controller:
app/controllers/rental_controller.rb:
class RentalController < ApplicationController

  def step_one
    flash.now[:reminder] = 'There is a $20 fee for late payments.'
    flash.keep(:reminder)
  end

  def step_two
  end

  def step_three
  end
end
And create the following three views:
app/views/rental/step_one.rhtml:
<h1>Step one!</h1>
<% if flash[:reminder] %>
  <p style="color: green;"><%= flash[:reminder] %></p>
<% end %>
<a href="step_two">step_two</a>
app/views/rental/step_two.rhtml:
<h1>Step two!</h1>
<% if flash[:reminder] %>
  <p style="color: green;"><%= flash[:reminder] %></p>
<% end %>
<a href="step_three">step_tree</a>
app/views/rental/step_three.rhtml:
<h1>Step three!</h1>
<% if flash[:reminder] %>
  <p style="color: green;"><%= flash[:reminder] %></p>
<% end %>
<a href="step_one">step_one</a>
Discussion
As you can see in the solution, the controller creates a flash message only in the action called step_one.
From a browser, in the first step you see the reminder on the screen. When you click on the link at the bottom of the page, you call step_two. Now the flash message is shown a second time.
Step three is like step two, but we didn’t call the flash.keep in this method, and the message
doesn’t reappear. The keep method
holds the reminder for only one request.
See Also
Following Actions with Redirects
Problem
Submitting a form in your application calls an action that updates your model. You want this action to redirect to a second action that will handle rendering. This way, when the response is sent, the user will see a new URL; refreshing the page will not re-initiate the first action.
Solution
Call redirect_to, as in the
following controller’s new
action:
app/controllers/password_controller.rb:
class AccountController < ApplicationController

  def list
  end

  def new
    @account = Account.new(params[:account])
    if @account.save
      flash[:notice] = 'Account was successfully created.'
      redirect_to :action => 'list'
    end
  end
end
Discussion
The solution defines a new
method that attempts to create a new account. If a newly created
account is saved successfully, the new method stores a flash notice and calls
redirect_to to redirect to the
controller’s list action.
redirect_to takes an options hash as an argument. Internally,
this hash is passed to url_for to
create a URL. If it’s passed a string that begins with protocol
information (e.g., http://), it
uses the string as the entire relocation target. Otherwise, it
interprets the string as a relative URI. Finally, redirect_to can be passed the symbol
:back, which tells the browser to
redirect to the referring URL or the contents of
request.env["HTTP_REFERER"].
Redirection works by sending the browser an HTTP/1.1 302 Found status code, telling the browser
that “the requested resource resides temporarily under a different
URI,” or simply that it should redirect to the URI supplied in this
response. This prevents users from creating duplicate accounts with
their refresh button, because refreshing only reloads the list
template.
A common question on the rubyonrails
mailing list is when to use render,
instead of redirect_to. As this
solution demonstrates, if you don’t want a refresh to re-initiate an
action that makes changes to your model, use redirect_to. If you want a search form URL,
such as /books/search, to remain the same, even
when results of the search are displayed by a new action, use render. (When running in development mode,
renders are faster than redirects because they don’t reload the
environment.)
See Also
Generating URLs Dynamically
Problem
There are many places in your code where you supply URLs to Rails methods that link to other parts of your application. You don’t want to lose the flexibility Rails’ Routes provide by hardcoding URL strings throughout your application, especially if you decide to change how routing works later. You want to generate URLs within your application based on the same rules that Routes uses to translate URL requests.
Discussion
Let’s say your default route (as defined in config/routes.rb) is as follows:
map.connect ':controller/:action/:id'
Then a call to url_for, such
as:
url_for :controller => "gallery", :action => "view", :id => 4
produces the URL http://railsurl.com/gallery/view/4,
which is handled by the default route. If you don’t specify the
controller, url_for assumes you
want the current controller (the controller to which Rails delegated
the current HTTP request).
This default behavior is useful because you’re often calling
url_for to create a URL for another
action in the current controller.
The same default behavior applies to the action and the ID: if
you do not specify new ones, url_for defaults to the current one. Thus,
for any of the components of the URL that you don’t explicitly
specify, Rails attempts to use values from the current request to
construct a possible route mapping.
As soon as url_for finds one
component that is different from the current request, it essentially
slashes off all components to the right of it in the URL and no longer
uses them as defaults. So, if you specify a different controller that
of the current request, then neither the action nor any of the other
parts of the current URL will be used to construct the new URL.
If the specified controller name begins with a slash, no
defaults are used. If the controller changes, the action defaults to
'index' unless you specify a new
one.
How the defaults work can get a little complicated, but url_for is usually intuitive. If you’re
having trouble with unpredictable defaults, you can render the
generated URL with render_text
temporarily:
render_text url_for :controller => "gallery", :action => "view", :id => 4
If you want to replace certain parts of the current URL without
affecting any of the other parts of it, use the :overwrite_params option. For instance, if
you want to change the current action to 'print', but keep the controller and the ID
the same, use:
url_for :overwrite_params => { :action => 'print' }This takes the current URL, replaces only the :action, and returns it as the new
URL.
Inspecting Requests with Filters
Problem
You have taken over development of a Rails application, and you are trying to figure out how it processes requests. To do so, you want to install a logging mechanism that will let you inspect the request cycle in real time.
Solution
Use an after_filter
to invoke a custom logging method for each request.
Define a CustomLoggerFilter
class:
app/controllers/custom_logger_filter.rb:
require 'logger'
require 'pp'
require 'stringio'

class CustomLoggerFilter

  def self.filter(controller)
    log = Logger.new('/var/log/custom.log')
    log.warn("params: "+controller.params.print_pretty)
  end
end

class Object
  def print_pretty
    str = StringIO.new
    PP.pp(self,str)
    return str.string.chop
  end
end
Install the logger in the AccountsController by passing it as an
argument in a call to after_filter:
app/controllers/accounts_controller.rb:
class AccountsController < ApplicationController

  after_filter CustomLoggerFilter

  def index
    list
    render :action => 'list'
  end

  def list
    @account_pages, @accounts = paginate :accounts, :per_page => 10
  end

  def show
    @account = Account.find(params[:id])
  end

  def new
    @account = Account.new
  end

  def create
    @account = Account.new(params[:account])
    if @account.save
      flash[:notice] = 'Account was successfully created.'
      redirect_to :action => 'list'
    else
      render :action => 'new'
    end
  end

  def edit
    @account = Account.find(params[:id])
  end

  def update
    @account = Account.find(params[:id])
    if @account.update_attributes(params[:account])
      flash[:notice] = 'Account was successfully updated.'
      redirect_to :action => 'show', :id => @account
    else
      render :action => 'edit'
    end
  end

  def destroy
    Account.find(params[:id]).destroy
    redirect_to :action => 'list'
  end
end
Discussion
Rails filters allow you to do additional processing before or
after controller actions. In the solution, we’ve implemented a custom
logging class that is invoked after calls to any actions in the
Accounts controller. Our logger opens a filehandle and prints a
formatted version of the params
hash for easy inspection.
With the logger in place, you can use the Unix tail command to
watch the logfile as it grows. You’ll see what happens to the params hash with every action that’s
called:
tail -f /var/log/custom.log
For the AccountsController in
the solution, you can watch the log as you list, create, and destroy
accounts.
params: {"action"=>"list", "controller"=>"accounts"}
params: {"action"=>"new", "controller"=>"accounts"}
params: {"commit"=>"Create",
 "account"=>{"balance"=>"100.0", "first_name"=>"John", "last_name"=>"Smythe"},
 "action"=>"create",
 "controller"=>"accounts"}
params: {"action"=>"list", "controller"=>"accounts"}
params: {"action"=>"destroy", "id"=>"2", "controller"=>"accounts"}
params: {"action"=>"list", "controller"=>"accounts"}
Rails comes with a number of built-in logging facilities. This approach gives you an easy way to add logging to a controller with only one line of code. You can also limit what actions of the controller the filter is applied to.
See Also
Logging with Filters
Problem
You have an application for which you would like to log more information than you get from the standard Rails logging facilities.
Solution
Use the around_filter to
record the times before and after each action is invoked, and log that
information in your database.
First, create a database table to store the custom logging;
we’ll call that table action_logs.
Here’s a migration to create it:
db/migrate/001_create_action_logs.rb:
class CreateActionLogs < ActiveRecord::Migration
  def self.up
    create_table :action_logs do |t|
      t.column :action,     :string
      t.column :start_time, :datetime
      t.column :end_time,   :datetime
      t.column :total,      :float
    end
  end

  def self.down
    drop_table :action_logs
  end
end
Then create the class named CustomLogger. This class must have before and after methods, which are called before and
after each action of the controller that you’re logging. The before method records the initial time; the
after method records the time after
the action has completed, and stores the initial time, the final time,
the elapsed time, and the name of the action in the action_logs table.
app/controllers/custom_logger.rb:
class CustomLogger

  def before(controller)
    @start = Time.now
  end

  def after(controller)
    log = ActionLog.new
    log.start_time = @start
    log.end_time = Time.now
    log.total = log.end_time.to_f - @start.to_f
    log.action = controller.action_name
    log.save
  end
end
Next, apply the filter to the actions. Add the following line to the beginning of your controller:
around_filter CustomLogger.new
Now, when you use your site, you’ll be logging data to the
action_logs table in your database.
Each log entry (start, finished, and elapsed times) is associated with
the name of the method that was executing:
mysql> select * from action_logs;
+----+-------------+---------------------+---------------------+-----------+
| id | action      | start_time          | end_time            | total     |
+----+-------------+---------------------+---------------------+-----------+
|  1 | index       | 2006-01-12 00:47:52 | 2006-01-12 00:47:52 |  0.011997 |
|  2 | update_each | 2006-01-12 00:47:52 | 2006-01-12 00:47:54 |   1.75978 |
|  3 | update_all  | 2006-01-12 00:47:54 | 2006-01-12 00:47:54 | 0.0353839 |
|  4 | reverse     | 2006-01-12 00:47:55 | 2006-01-12 00:47:55 | 0.0259092 |
|  5 | show_names  | 2006-01-12 00:47:55 | 2006-01-12 00:47:55 | 0.0264592 |
+----+-------------+---------------------+---------------------+-----------+
5 rows in set (0.00 sec)
You can see that the controller is spending a lot of its time in
the update_each method; that method
is therefore a target for optimization.
Of course, you can do much better than this; you can write a Rails application to display the results or write some other application to analyze the data.
Discussion
around_filter requires that
the object passed to it as an argument implement a before and an after method. The CustomLogger class records the current time
in its before method. The after method creates a new ActionLog object and records the start and
end times as well as the difference between the two. The other filters
in Rails allow you to include or exclude the actions of the controller
that they apply to. The around_filter
doesn’t allow for such granularity and operates on all
actions invoked by each request.
To be more specific about what actions the around_filter is applied to, wrap your code
so that it executes only when the action matches a particular pattern.
Doing this is simple, because the controller.action_name property tells you
what action is being called. The following version of the after method shows how you can log only
those actions whose names begin with the string update. If the action name doesn’t match
this string, after just terminates,
without recording any data:
def after(controller)
  if controller.action_name =~ /^update/
    log = ActionLog.new
    log.start_time = @start
    log.end_time = Time.now
    log.total = log.end_time.to_f - @start.to_f
    log.action = controller.action_name
    log.save
  end
endRendering Actions
Problem
You have an action that has gathered some data from your model, perhaps based on a user-defined query, and you want to render another action to display the results.
Solution
Use render :action =>
'action_name', where action_name is the name of the action that
displays the result. The search
method in CategoriesController does
just that:
app/controllers/categories_controller.rb:
class CategoriesController < ApplicationController

  def search_form
  end

  def search
    @categories = Category.find(:all,
                                :conditions =>
                                    ["name like ?", "%#{params[:cat]}%"])
    if @categories
      render :action => 'search_results'
    else
      flash['notice'] = 'No Category found.'
      render :action => 'search_form'
    end
  end

  def search_results
    @category = Category.find(params[:id])
  end
end
Discussion
In the solution, if the find
call in search action successfully
returns a category, the search_results
action is rendered. At that point, Rails looks for a template file
named after that action, under a directory named after the controller,
i.e.,
app/views/categories/search_results.rhtml.
This is probably the most common pattern of control flow in Rails: you perform a query, or some other immutable action, and then you display the results of that action with a second action. Ideally, these actions are separate because they do distinctly different tasks (the first allows the user to make a query; the second displays the results), and combining the two actions into a single method inhibits code reuse.
The solution calls render only once,
whether or not a category is found in the database. It’s possible to
render an action that renders another action, and so on, but you’ll
get a DoubleRenderError if you try
to render twice within the same action. Rails 0.13 added this error
message to help avoid confusing side effects of parallel render
attempts.
An action can continue processing after a call to render, but it usually makes more sense to
call render at the end of the
action (just before the return
statement, if there is one). This way, the rendered action can
communicate success or failure to the user.
Rails renders actions within the layout that is associated with
the action’s controller. You can optionally render with no layout by
specifying :layout=>false:
render :action => "display", :layout => false
Or you can specify another layout by supplying the name of that layout:
render :action => "display", :layout => "another_layout"
See Also
Restricting Access to Controller Methods
Problem
By default, all public methods in your controller can be
accessed via a URL. You have a method in your controller that is used
by other methods in that controller or by subclasses of that
controller. For security reasons, you would like to prevent public
requests from accessing that method.
Solution
Use Ruby’s private or protected methods
to restrict public access to controller methods that should not be
accessible from outside the class:
app/controllers/controllers/employee_controller.rb:
class EmployeeController < ApplicationController

  def add_accolade
    @employee = Employee.find(params[:id])
    @employee.accolade += 1
    double_bonus if @employee.accolade > 5
  end

  private
    def double_bonus
      @employee.bonus *= 2
    end
end
Discussion
Ruby has three levels of class method access control. They are
specified with the following methods: public, private, and protected. Public methods can be called by
any other object or class. Protected methods can be invoked by other
objects of the same class and its subclasses, but not objects of other
classes. Private methods can be invoked only by an object on
itself.
By default, all class methods are public unless otherwise specified. Rails defines actions as public methods of a controller class. So by default, all of a controller’s class methods are actions and available via publicly routed requests.
The solution shows a situation in which you might not want all
class methods publicly accessible. The double_bonus method is defined after a call
to the private method, making the
method unavailable to other classes. Therefore, double_bonus is no longer an action and is
available only to other methods in the Employee controller or its
subclasses. As a result, a web application user can’t create a URL
that directly invokes double_bonus.
Likewise, to make some of your class’s methods protected, call
the protected method before
defining them. private and protected (and, for that matter, public) remain in effect until the end of
the class definition, or until you call one of the other access
modifiers.
Sending Files or Data Streams to the Browser
Problem
You want to send e-book contents directly from your database to the browser as text and give the user the option to download a compressed version of each book.
Solution
You have a table that stores plain text e-books:
db/schema.rb:
ActiveRecord::Schema.define(:version => 3) do

  create_table "ebooks", :force => true do |t|
    t.column "title", :string
    t.column "text", :text
  end

end
In the Document Controller, define a view that calls
send_data if the :download parameter is present, and render if it is not:
app/controllers/document_controller.rb:
require 'zlib'
require 'stringio'

class DocumentController < ApplicationController

  def view
    @document = Ebook.find(params[:id])
    if (params[:download])
      send_data compress(@document.text),
                :content_type => "application/x-gzip",
                :filename => @document.title.gsub(' ','_') + ".gz"
    else
      render :text => @document.text
    end
  end

  protected
    def compress(text)
      gz = Zlib::GzipWriter.new(out = StringIO.new)
      gz.write(text)
      gz.close
      return out.string
    end
end
Discussion
If the view action of the
Document Controller is invoked with the URL http://railsurl.com/document/view/1,
the e-book with an ID of 1 is rendered to the browser as plain
text.
Adding the download parameter
to the URL, which yields http://railsurl.com/document/view/1?download=1,
requests that the contents of the e-book be compressed and sent to the
browser as a binary file. The browser should download it, rather than
trying to render it.
There are several different ways to render output in Rails. The most common are action renderers that process ERb templates, but it’s also customary to send binary image data to the browser.
Storing Session Information in a Database
Problem
By default, Rails uses Ruby’s PStore mechanism to maintain session information in the filesystem. However, your application may run across several web servers, complicating the use of a centralized filesystem-based solution. You want to change the default store from the filesystem to your database.
Solution
In environment.rb, update the session_store option by making sure it’s set
to :active_record_store and that
the line is uncommented:
config/environment.rb:
Rails::Initializer.run do |config|
  # Settings in config/environments/* take precedence to those specified here

  config.action_controller.session_store = :active_record_store

end
Run the following rake command to
create the session storage table in your database:
~/current$ rake create_sessions_table
Restart your web server for the changes to take effect.
Discussion
Rails offers several options for session data storage, each with its own strengths and weaknesses. The available options include: FileStore, MemoryStore, PStore (the Rails default), DRbStore, MemCacheStore, and ActiveRecordStore. The best solution for your application depends heavily on the amount of traffic you expect and your available resources. Benchmarking will ultimately tell you which option provides the best performance for your application. It’s up to you to decide if the fastest solution (usually in-memory storage) is worth the resources that it requires.
The solution uses ActiveRecordStore, which is enabled in the Rails environment configuration
file. rake’s create_sessions_table
task creates the database table that Rails needs to store the session details.
If you’d like to reinitialize the session table, you can drop the current one with:
rake drop_sessions_table
Then recreate the table it with the rake command, and restart your web
server.
The session table that rake
creates looks like this:
mysql> desc sessions;
+------------+--------------+------+-----+---------+----------------+
| Field      | Type         | Null | Key | Default | Extra          |
+------------+--------------+------+-----+---------+----------------+
| id         | int(11)      |      | PRI | NULL    | auto_increment |
| session_id | varchar(255) | YES  | MUL | NULL    |                |
| data       | text         | YES  |     | NULL    |                |
| updated_at | datetime     | YES  |     | NULL    |                |
+------------+--------------+------+-----+---------+----------------+
4 rows in set (0.02 sec)
The following line fetches an Active Record User object and stores it in the session hash.
session['user'] = User.find_by_username_and_password('rorsini','elvinj')You can use the debug helper function <%=debug(session) %> to view session
output. A dump of the session hash
shows the contents of the current session. Here’s a fragment of the
dump, showing the User
object:
!ruby/object:CGI::Session
data: &id001
  user: !ruby/object:User
    attributes:
      username: rorsini
      id: "1"
      first_name: Rob
      password: elvinj
      last_name: Orsini
The same session record can be viewed directly in the sessions table, but the serialized data will
be unreadable. The updated_at field
can be helpful if you find the sessions table getting large. You can use
that date field to remove sessions that are more than a certain age
and thus no longer valid.
mysql> select * from sessions\G
*************************** 1. row ***************************
        id: 1
session_id: f61da28de115cf7f19c1d96beed4b960
      data: BAh7ByIJdXNlcm86CVVzZXIGOhBAYXR0cmlidXRlc3sKIg11c2VybmFtZSIM
cm9yc2luaSIHaWQiBjEiD2ZpcnN0X25hbWUiCFJvYiINcGFzc3dvcmQiC2Vs
dmluaiIObGFzdF9uYW1lIgtPcnNpbmkiCmZsYXNoSUM6J0FjdGlvbkNvbnRy
b2xsZXI6OkZsYXNoOjpGbGFzaEhhc2h7AAY6CkB1c2VkewA=

updated_at: 2006-01-04 22:33:58
1 row in set (0.00 sec)
See Also
Tracking Information with Sessions
Problem
You want to maintain state across several web pages of an application without using a database.
Solution
Use Rails’s built-in sessions to maintain state across multiple pages of a web application, such as the state of an online quiz.
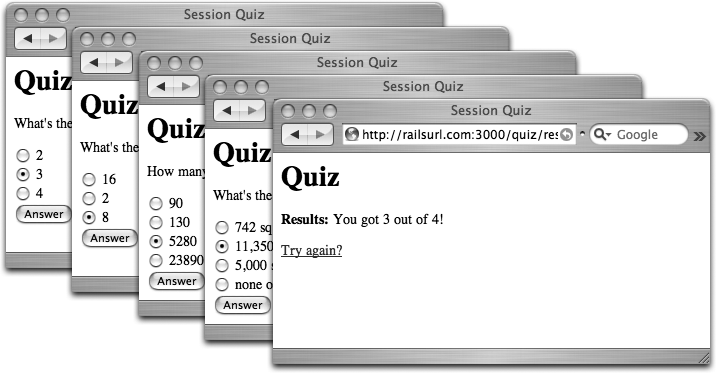
Create an online quiz that consists of a sequence of questions, one per page. As a user proceeds through the quiz, her score is added to the total. The last screen of the quiz displays the results as the number correct out of the total number of questions.
Create a Quiz Controller that includes a data structure to
store the questions, optional answers, and correct answers for each
question. The controller contains methods for displaying each
question, checking answers, displaying the results, and starting
over.
app/controllers/quiz_controller.rb:
class QuizController < ApplicationController

  @@quiz = [
    { :question => "What's the square root of 9?",
      :options => ['2','3','4'],
      :answer => "3" },
    { :question => "What's the square root of 4?",
      :options => ['16','2','8'],
      :answer => '16' },
    { :question => "How many feet in a mile?",
      :options => ['90','130','5,280','23,890'],
      :answer => '5,280' },
    { :question => "What's the total area of irrigated land in Nepal?",
      :options => ['742 sq km','11,350 sq km','5,000 sq km',
                                                'none of the above'],
      :answer => '11,350 sq km' },
  ]

  def index
    if session[:count].nil?
      session[:count] = 0
    end
    @step = @@quiz[session[:count]]
  end

  def check
    session[:correct] ||= 0
    if params[:answer] == @@quiz[session[:count]][:answer]
      session[:correct] += 1
    end
    session[:count] += 1
    @step = @@quiz[session[:count]]
    if @step.nil?
      redirect_to :action => "results"
    else
      redirect_to :action => "index"
    end
  end

  def results
    @correct = session[:correct]
    @possible = @@quiz.length
  end

  def start_over
    reset_session
    redirect_to :action => "index"
  end
end
Create a template to display each question along with its optional answers:
app/views/quiz/index.rhtml:
<h1>Quiz</h1>

<p><%= @step[:question] %></p>

<% form_tag :action => "check" do %>
  <% for answer in @step[:options] %>
    <%= radio_button_tag("answer", answer, checked = false) %>
      <%= answer %>;
  <% end %>
  <%= submit_tag "Answer" %>
<% end %>
At the end of the quiz, the following view displays the total score along with a link prompting to try again:
app/views/quiz/results.rhtml:
<h1>Quiz</h1>

<p><strong>Results:</strong>
  You got <%= @correct %> out of <%= @possible %>!</p>

<%= link_to "Try again?", :action => "start_over" %>
Discussion
The Web is stateless, which means that each request from a browser carries all the information that the server needs to make the request. The server never says, “Oh, yes, I remember that your current score is 4 out of 5.” Being stateless makes it much easier to write web servers but harder to write complex applications, which often need to remember what went before: they need to remember which questions you’ve answered, what items you’ve put in your shopping cart, and so on.
This problem is solved by the use of sessions. A session stores a unique key as a cookie in the user’s browser. The browser presents the session key to the server, which can use the key to look up any state that it has stored as part of the session. The Web interaction is stateless: the HTTP request includes all the information needed to complete the request. But that information contains information the server can use to look up information about previous requests.
In the case of the quiz, the controller checks the answers to
each question and maintains a running total, storing it in the
session hash with the :correct key. Another key in the session hash is used to keep track of the
current question. This number is used to access questions in the
@@quiz class variable, which stores
each question, its possible answers, and the correct answer in an
array. Each question element consists of a hash containing all the
information needed to display that question in the view.
The index view displays a form for each question and submits the
user’s input to the check action of
the controller. Using session[:count], the check action verifies the answer and
increments session[:correct] if
it’s correct. Either way, the question count is incremented, and the
next question is rendered.
When the question count fails to retrieve an element—or
question—from the @@quiz array, the
quiz is over, and the results view is rendered. The total correct is
pulled from the session hash and
displayed with the total number of questions, which is determined from
the length of the quiz array.
A quiz such as this lends itself reasonably well to the convenience of session storage. Be aware that sessions are considered somewhat volatile and potentially insecure, and are usually not used to store critical or sensitive information. For that type of data, a traditional database approach makes more sense.
Figure 4-3 shows the four steps of the session-driven online quiz.
Rails session support is on by default. As the solution
demonstrates, you can access the session hash as if it’s just another
instance variable. If your application doesn’t need session support,
you can turn it off for a controller by using the :disabled option of Action Controller’s
session method in the controller’s
definition. The call to disable session support for a controller may
also include or exclude specific actions within a controller by
passing a list of actions to session’s :only or :except options. The following disables
session support for the display
action of the News Controller:
class NewsController < ActionController::Base
  session :off,  :only => "display"
end
To turn session support off for your entire application, pass
:off to the session method within your ApplicationController definition:
class ApplicationController < ActionController::Base
  session :off
end
Using Filters for Authentication
Problem
You want to authenticate users before they’re allowed to use certain areas of your application; you wish to redirect unauthenticated users to a login page. Furthermore, you want to remember the page that the user requested and, if authentication succeeds, redirect them to that page once they’ve authenticated. Finally, once a user has logged in, you want to remember his credentials and let him move around the site without having to re-authenticate.
Solution
Implement an authentication system, and apply it to selected
controller actions using before_filter.
First, create a user database to store user account information and login credentials. Always store passwords as hashed strings in your database, in case your server is compromised.
db/migrate/001_create_users.rb:
class CreateUsers < ActiveRecord::Migration
  def self.up
    create_table :users do |t|
      t.column :first_name,      :string
      t.column :last_name,       :string
      t.column :username,        :string
      t.column :hashed_password, :string
    end

    User.create :first_name => 'Rob',
                :last_name => 'Orisni',
                :username => 'rorsini',
                :hashed_password =>
                       '5baa61e4c9b93f3f0682250b6cf8331b7ee68fd8'
  end

  def self.down
    drop_table :users
  end
end
In your ApplicationController, define an authenticate method that checks if a user is
logged in and stores the URL of the page the user initially
requested:
app/controllers/application.rb:
# Filters added to this controller will be run for all controllers in the
# application.
# Likewise, all the methods added will be available for all controllers.
class ApplicationController < ActionController::Base
  def authenticate
    if session['user'].nil?
      session['initial_uri'] = request.request_uri
      redirect_to :controller => "users", :action => "login"
    end
  end
end
To make sure the authenticate
method is invoked, pass the symbol :authenticate to before_filter in each controller that gives
access to pages requiring authentication. Here’s how to make sure that
users are authenticated before they can access anything governed by
the ArticlesController or the
BooksController:
app/controllers/articles_controller.rb:
class ArticlesController < ApplicationController

  before_filter :authenticate

  def admin
  end
end
app/controllers/books_controller.rb:
class BooksController < ApplicationController

  before_filter :authenticate

  def admin
  end
end
Now, create a login form template to collect user credentials:
app/views/users/login.rhtml:
<% if flash['notice'] %>
  <p style="color: red;"><%= flash['notice'] %></p>
<% end %>

<% form_tag :action => 'verify' do %>

  <p><label for="user_username">Username</label>;
  <%= text_field 'user', 'username'  %></p>

  <p><label for="user_hashed_password">Password</label>;
  <%= password_field 'user', 'hashed_password'  %></p>

  <%= submit_tag "Login" %>
<% end %>
The User sController defines login, verify, and logout methods to handle the authentication
of new users:
app/controllers/users_controller.rb:
class UsersController < ApplicationController

  def login
  end

  def verify
    hash_pass = Digest::SHA1.hexdigest(params[:user][:hashed_password])[0..39]
    user = User.find(:first,:conditions =>
                      ["username = ? and hashed_password = ?",
                       params[:user][:username], hash_pass ])
    if user
      session['user'] = user
      redirect_to session['initial_uri']
    else
      flash['notice'] = "Bad username/password!"
      redirect_to :controller => "users", :action => "login"
    end
  end

  def logout
    reset_session
    # Redirect users to Books#admin, which in turn sends them to
    # Users#login, with a refering url of Books#admin:
    redirect_to :controller => "books", :action => "admin"
  end
end
Next, provide a mechanism for users to log themselves out if
they’re not comfortable letting their session time out on its own.
Create a "logout" link with a named
route using logout_url:
app/views/articles/admin.rhtml:
<h1>Articles Admin</h1>

<%= link_to "logout", :logout_url  %>
app/views/books/admin.rhtml:
<h1>Books Admin</h1>

<%= link_to "logout", :logout_url  %>
Finally, define the "logout
" named route with its URL
mapping:
config/routes.rb:
ActionController::Routing::Routes.draw do |map|

  map.logout '/logout', :controller => "users", :action => "logout"

  # Install the default route as the lowest priority.
  map.connect ':controller/:action/:id'
end
Discussion
Adding authentication to a site is one of the most common tasks in web development. Almost any site that does anything meaningful requires some level of security, or at least a way to differentiate between site visitors.
The Rails before_filter lends
itself perfectly to the task of access control by invoking an authentication method just before controller
actions are executed. Code that is declared as a filter with before_filter has access to all the same
objects as the controller, including the request and response objects,
and the params and session hashes.
The solution places the authenticate filter in the Book and Article
controllers. Every request to either controller first executes the
code in authenticate. This code
checks for the existence of a user
object in the session hash, under
the key of user. If that session key is empty, the URL of the request
is stored in its own session key, and the request is redirected to the
login method of the User
controller.
The login form submits the username and password to the Login controller, which looks for a match in the database. If a user is found with that username and a matching hashed password, the request is redirected to the URL that was stored in the session earlier.
When the user wishes to log out, the logout action of the User controller calls
reset_session, clearing out all the
objects stored in the session. The user is then redirected to the
login screen.
Get Rails Cookbook now with the O’Reilly learning platform.
O’Reilly members experience books, live events, courses curated by job role, and more from O’Reilly and nearly 200 top publishers.

