Chapter 10. Motors
10.0. Introduction
In this chapter, you will investigate the use of many different types of motors with the Raspberry Pi.
10.1. Controlling Servo Motors
Note
Be sure to check out the accompanying video for this recipe at http://razzpisampler.oreilly.com.
Problem
You want to use a Raspberry Pi to control the position of a servo motor.
Solution
Use PWM to control the width of pulses to a servo motor to change its angle. Although this will work, the PWM generated is not completely stable, so there will be a little bit of jitter with the servo.
You should also power the servo from a separate 5V power supply because peaks in the load current are likely to crash or overload the Raspberry Pi.
To make this recipe, you will need:
- 5V servo motor (see Miscellaneous)
- Breadboard and jumper wires (see Prototyping Equipment)
- 1kΩ resistor (see Resistors and Capacitors)
- 5V 1A power supply or 4.8V battery pack (see Miscellaneous)
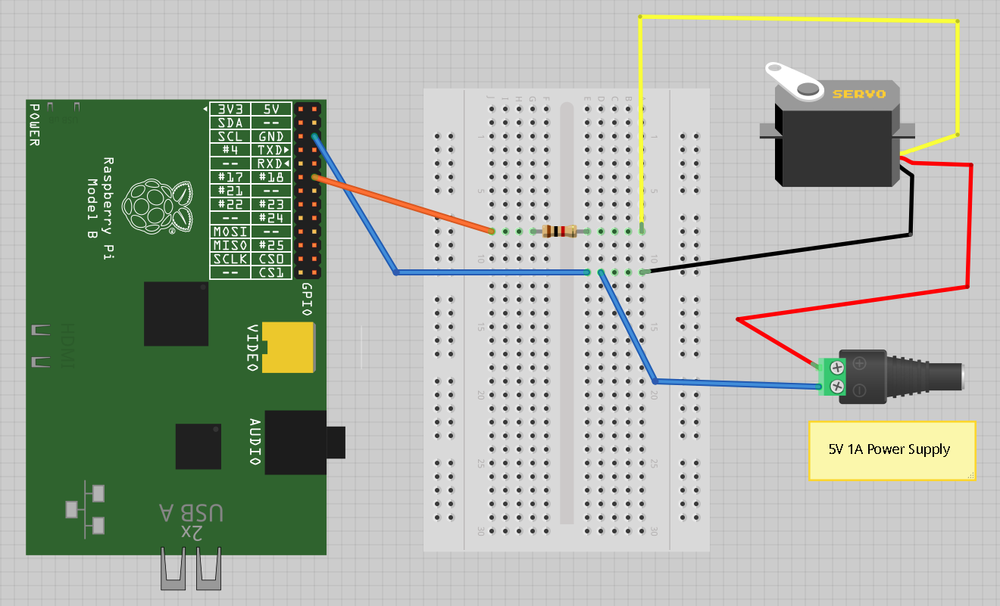
The breadboard layout for this is shown in Figure 10-1.

The 1kΩ resistor is not essential, but it does protect the GPIO pin from unexpectedly high currents in the control signal, which could occur if a fault developed on the servo.
The leads of the servo may not be the same as the colors indicated in Figure 10-2. It is common for the 5V wire to be red, the ground brown, and the control lead orange.
You can, if you prefer, power ...
Get Raspberry Pi Cookbook now with the O’Reilly learning platform.
O’Reilly members experience books, live events, courses curated by job role, and more from O’Reilly and nearly 200 top publishers.

