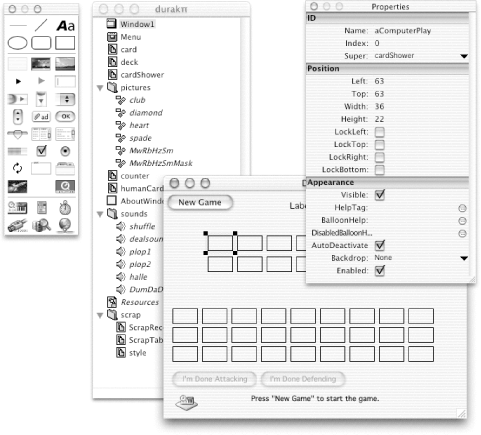
This chapter introduces the REALbasic workspace, also called the IDE (for integrated development environment; see Section P.2 in the the preface). We’ll tour the IDE’s various windows and talk about what they do and how you work with them. By way of illustration, we’ll actually build a working application. So you might want to follow along on your computer, with REALbasic running. You’ll discover that writing an application with REALbasic can be almost effortless, involving just a few swift, easy moves on your part, and that the IDE is extremely simple, consisting of a very small number of windows and menus. (Figure 1-1 shows the REALbasic IDE in action. Don’t worry, this is not the working application we’ll be building in this chapter! If you’re curious, it’s my Durak card-playing program, which you can download from my web site.)
When you start up REALbasic by opening it from the Finder, two windows occupy the center of your screen, as shown in Figure 1-2.
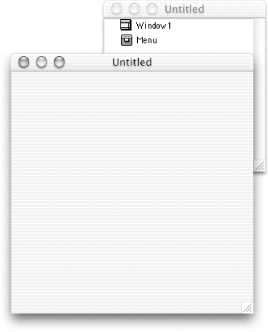
The rear window is the Project Window. If you close the Project Window, or if you don’t see it, you can open it and bring it to the front by choosing Window → Project. The Project Window represents your project, and provides access to its components.
What is a project? Simply put, it’s a REALbasic document file on disk. Every application that you create with REALbasic is represented by, and will ultimately be generated from, a single REALbasic project document. The project file is not, itself, the application you’re planning on creating; it’s a much smaller file where you tell REALbasic all about that application. With REALbasic, you work on a project file; when it’s ready, you tell REALbasic to generate (or build) your application from it.
In Figure 1-2, REALbasic was started up directly from the Finder without specifying an existing project file, so a new project has been created automatically. No project file exists yet; that’s why the Project Window’s title is Untitled. Once the project is saved to disk, by choosing File → Save, the Project Window will take on the name assigned to the project file. (For instance, one might save this project as My First Project.) A project file on disk works like any document file: it can be opened by choosing File → Open within REALbasic, or it can be opened from the Finder, which will also start up REALbasic if necessary; and you can create a new project by choosing File → New. To keep things simple, exactly one project can be open at a time; when REALbasic is running, and you open a project or create a new one, the currently open project will be closed (REALbasic will offer to save it first).
The Project Window lists, and provides access to, the components of your project. Such components include one menubar object, plus all the types of window your application is to be able to show, plus any classes and modules you’ve created for encapsulating pieces of your code, plus any external files associated with the project.[5]
The Project Window in Figure 1-2 shows the project’s menubar object and one window type, called Window1. REALbasic has created this window type automatically, because in REALbasic’s object model, an application usually has a default window type. In a new project, Window1 is your project’s default window type.
To access a component of your project, double-click its listing in the Project Window, or select its listing in the Project Window and hit Return. If, in Figure 1-2, you bring the Project Window to the front and double-click Window1, the other window in the figure returns to the front. That’s because this other window is Window1—or, more properly, it is the Window Editor for Window1 (we’ll talk more about Window Editors in a moment). You can hide the Window1 Window Editor in the usual ways (by choosing File → Close, or by clicking its go-away box), and you can make it reappear by again double-clicking Window1 in the Project Window.
Each project component listing in the Project Window has a contextual menu, which you access in the usual way (by holding down the Ctrl key and then clicking on a listing). The precise contents of this contextual menu depend upon the nature of the component. For Window1, your options are to edit it, which is exactly the same as double-clicking Window1, or to encrypt it (encryption is discussed later in this chapter). If any external components were listed in the Project Window, your options in their contextual menus would be quite different.
Some components of your project may be ancillary external files that REALbasic will need in order to build your application. The project file alone is sufficient for creating a minimal application, but if your application is to contain any pictures, sounds, movies, or other resources, or if you want to extend REALbasic’s functionality by means of compiled code fragments, those items must be made available through external files, separate from your project file. To alert REALbasic that such a file is to be associated with the project, you import the file: either drag-and-drop the file’s icon from the Finder into REALbasic’s Project Window, or choose File → Import in REALbasic and select the desired file. An italic listing for the file will then appear in the Project Window, showing that the file’s contents are available to your project’s code.[6] (Figure 1-1 shows many such italic listings.)
Figure 1-3 shows a schematic of the relationship between REALbasic, a project file, some external files, and the final built application. What this diagram tries to show is that REALbasic and the project file “belong” to one another, like a word-processing application and document. External files are imported into the project, meaning only that the project file maintains an internal reference to them; the contents of the external files are not incorporated into the project. When editing ends, all of these assets are assembled into the independent built application, meaning that their contents are incorporated directly into it. The external files are thus not needed by the built application; it is a standalone application. Therefore, once the application has been built for the last time, if you know that you will never edit the project and build the application again, you can throw away the external files.
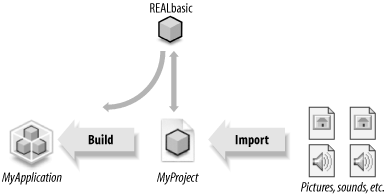
When you import an external file, you don’t really import anything from the external file into the project file; that is, the contents of the external file are not added to the project file. Instead, what happens is merely that an internal reference is created within the project file, pointing to the external file. This means that the external file, even after it has been imported, is still needed in order for you to build your application; therefore it must, throughout the development process, continue to exist where the project file can find it. (The exception is cursors, which are in fact added to the project file when they are imported.)
Rather confusingly, the rules about how the project file’s internal references are maintained depend upon the nature of the external file. If the external file is a picture, a sound, or a movie, the reference is maintained in two ways: by its pathname and, if the external file is located at any depth within the same folder as the project file, by a relative pathname. This means that you can move the project file, and the project file will still be able to find the external file using the full pathname, and you can move the folder containing the project file and (at some deeper level) the external file, and the project file will still be able to find the external file using the relative pathname. But if you move just the external file, the project will lose track of it and will no longer work properly. For other kinds of external file, the internal reference is maintained as an alias. This means that you can move the external file anywhere within the same volume and the project will still be able to find it, but if you move the external file to a different volume (and delete the original) the project will lose track of it and will no longer work properly.
It is, however, by no means a disaster for a project to lose track of an external file, since if REALbasic can’t find an external file when you open a project, it will simply ask you where it is, offering you a chance to repoint its internal reference. Furthermore, as soon as you show REALbasic where any of a project’s lost external files are, it will automatically try to find all of them there; so a reasonable strategy is to keep all of a project’s external files in a single folder, since the penalty for moving that folder is merely to have to show the project where it is, once. Still another option is to keep any external files in the same folder as the project file, because a REALbasic project file will always look for its external files in the same folder as itself, automatically, as a last resort.
An external file’s listing in the Project Window can be double-clicked, or you can select it and hit Return, to view the contents of the external file inside REALbasic if this is possible. In the case of a sound, the sound is played. In the case of a picture, the picture is shown. In the case of a movie, the first frame of the movie is shown, along with a movie controller with which you can run the movie but on Mac OS X, movies can’t be previewed in this way—at least, it doesn’t work on my machine. On the other hand, trying to “open” an AppleScript or a Resource file in this way opens the file in an external editor, not in REALbasic itself; and trying to open an XCMD does nothing. An external file’s listing in the Project Window also has a contextual menu where various operations can be performed on it; these include opening or showing the external file itself from the Finder, and viewing or changing the project’s internal path to the file. To delete an external file’s listing from the Project Window, select it and hit Delete, or choose Delete from the contextual menu; this deletes the listing only (that is, it breaks the association between the project file and the external file), with no effect upon the external file itself.
If your project contains more than a few components, you may wish to organize them within the Project Window. Unfortunately, this is not simple to do; you cannot, for example, just drag the component listings within the Project Window to rearrange them. You can, however, distribute the components amongst “folders” inside the Project Window. These are not real folders; they have no significance except as organizational and navigational devices. To create a folder within the Project Window, choose File → New Folder. (To change the name of the resulting folder, use its Name entry in the Properties Window, as discussed later in this chapter.) You can drag a component listing into or out of a folder; you can click a folder’s disclosure triangle, or double-click its listing, to expand or collapse your view of its contents. (Figure 1-1 contains some folders.)
You can’t rearrange component listings inside a folder, any more than you can within the Project Window. Folders do, however, remember the order in which you add items to them—the last item added to a folder is the last item listed within it—and the same is true of the Project Window itself. This means that by dragging component listings into and out of folders, you can eventually achieve the desired order. It can be a clumsy, tedious process, reminiscent of one of those puzzles where you have to slide one square out of the way in order to slide another into place; but it’s better than nothing. Personally, I often find it more straightforward to export the whole project as XML, rearrange the items in folders in a text editor, and reimport; XML exporting is discussed later in this chapter.
It may surprise you to learn at this point that, although you haven’t edited your new project at all, you can already build a working application. To do so, you’ll probably wish to save the project file if you haven’t already; then choose File → Build Application, specify a name for the built application in the dialog (or just accept the default name, AppName), and click the Build button. Note that the application will be created in the same folder as your project file, and that you cannot elect to create it anywhere else. (If you don’t save the project file before building, the application is created in the same folder as REALbasic.) Then, in the Finder, look in that folder; lo and behold, there’s now an application called AppName (or whatever you decided to name it). Open this icon from the Finder to run the application.
Warning
The Build Application dialog does not warn you before replacing an existing file with the specified name when you hit the Build button (though it will refuse to replace a running application). There’s a good reason for this: you can expect to build the same application many times in the course of development, and it would drive you mad to have to jump each time through any more hoops than you must do already (indeed, in time you’ll probably resent even the Build Application dialog). So take care when specifying the name of an existing file, as REALbasic will happily (and silently) overwrite it.
One might be tempted to dismiss the resulting application as useless—which, indeed, it is. It does nothing. It consists entirely of an empty window; click the window’s go-away box, and it consists of nothing at all. But although it has no functionality, this application is hardly inconsiderable. The application puts up a window; the window redraws itself properly when covered and uncovered by another application’s window; the window can be moved or dismissed; the application runs, harmlessly, among the other applications on your computer, and you can switch between applications as usual; the application has two menus, a File menu and an Edit menu; and the File menu contains a Quit item, which works, either by choosing it manually or by hitting Command-Q. (On Mac OS X, the Quit item is in the system’s application menu; for example, if your application is called AppName, then there’s a Quit AppName item in the AppName menu.)
That’s hardly trivial, as anyone knows who has tried to accomplish the same thing by writing and compiling an application from scratch in Pascal or C. But you didn’t have to accomplish any of it; REALbasic accomplished it for you. REALbasic is an application framework; it knows how to construct an application. It also knows how to implement the basic elements of an application’s interface, as we shall now see.
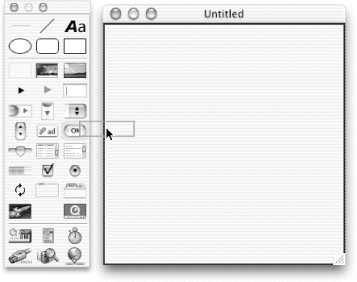
Towards the left of the screen in the IDE is a floating window consisting of a couple of dozen icons. This is the Tools Window. If the Tools Window is closed, it can be opened by choosing Window → Show Tools. The orientation of the Tools Window may be toggled between vertical and horizontal by clicking its zoom box. The icons in the Tools Window correspond to types of interface element that you can place into a window of your application (see Figure 1-4).[7]
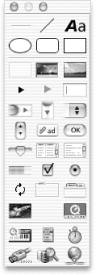
(Time out for some technical talk. An interface element in a window is called a control, so the icons in the Tools Window all represent built-in control types. Within REALbasic’s class hierarchy, there is also a Control class; most of the icons in the Tools Window represent subclasses of the Control class, but some do not.)
The Tools Window may look like a palette for choosing a tool “mode,” as in a draw program, but it isn’t; you don’t click an icon. All you ever do with the Tools Window is to drag-and-drop an icon from it into a Window Editor , thus adding to the window a control of that type.
Let’s try it. Suppose you want your window to contain a button. Click and hold the mouse on the PushButton icon in the Tools Window (it’s the one containing the letters OK), and, with the mouse still down, drag the dotted rectangle into the Window1 Window Editor; then release the mouse. At that spot in the window, a button appears, with the caption Untitled.
You have just performed what I like to call the “fundamental act” of REALbasic (illustrated in Figure 1-5): grab a control from the Tools Window, drag it into a Window Editor, and drop it. The change made in the Window Editor will be reflected in the built application. If you choose File → Build Application and run the built application, you’ll see that the window now contains a button.
In a Window Editor, you can manually edit the position and appearance of a control. It can be repositioned by dragging it (or by selecting it and then using the arrow keys); most controls can be resized by dragging one of the four selection handles that appear at its corners when it is selected. In the case of a control with a textual component, you can edit the text by typing. For instance, after selecting a button, you can type to replace the caption that appears inside it; hit Return or Enter afterward, to “set” what you have typed as the actual caption. (If you start typing with no control selected, you’ll edit the title of the window itself.) In the case of a button, you can also choose from the Font, Size, and Style submenus of the Format menu to change the caption’s appearance. If you’ve been following along with the hands-on example, you might want to experiment with your window’s new button; try changing its caption to something meaningful and inviting, such as Push Me.
To help you manipulate controls, Window Editors have the capabilities of a rudimentary draw program. You can select controls by clicking, Shift-clicking, or dragging. You can change the layering order of controls, and align them automatically, through commands in the Format menu. You can copy-and-paste controls, and duplicate them so that the new copies appear evenly spaced. You can remove a selected control by cutting it, or by hitting Delete to clear it completely. Such physical editing methods are similar to those employed by most draw programs, and there’s no need to detail them further here. Experimentation will rapidly bring familiarity. A few additional tips appear in the last section of this chapter.
Another way to edit a control’s appearance is by way of the Properties Window, which appears initially to the right of the screen (see Figure 1-6). If the Properties Window has been closed, it can be opened by choosing Window → Show Properties. The contents of the Properties Window change to reflect whatever is selected in the IDE—not just controls, but also windows and other Project Window listings.
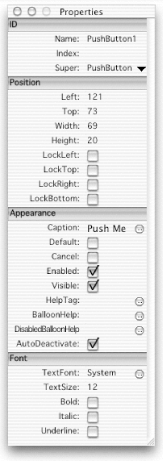
Each line of the Properties Window, except for the outdented bold lines (they are just convenient organizational labels), represents a predefined feature, or property, of the selected entity; on the left side of the window is shown the name of the property, and on the right side is shown its value. What properties are listed in the Properties Window depends upon the type of entity that is selected at that moment; each entity type has its own predefined property set. The individual properties will be discussed in later chapters, in connection with each particular type of entity.
The value of a property can be changed by working directly in the Properties Window. The Properties Window is also “live,” so if you edit a control physically in its Window Editor, the corresponding values in the Properties Window change simultaneously. For example, as you move a button within a Window Editor, the Top and Left values in the Properties Window change to match. Just the other way, with a button selected, you can type a new Top or Left value in the Properties Window, and when you hit Return to “set” the new value, the button moves to the designated position in its Window Editor. This provides a way to position the button with numerical precision.
Values in the Properties Window are displayed, and edited, in five ways:
Values that can be only true or false (booleans) appear as checkboxes, which can be either checked or not.
Values that can be only one of certain predetermined alternatives appear as popup menus (distinguished by a downward triangle to their right); you click, the menu appears, and you choose an item.
Text values (strings) and numeric values are edited by selecting and then typing, cutting, pasting, and so forth (and then hitting Return).
Some text values (such as the Caption property in Figure 1-6) have an ellipsis button at the far right end; clicking this brings up a dialog, which may be more convenient for editing lengthy values than the Properties Window itself.
Color values can be edited by clicking, which brings up the Color Picker dialog. (For an example of a color value, select the window—not the button—and look at its BackColor property.) Another option is to show the Color Window, by choosing Window → Show Colors, and drag a color from there into the property value area. To create or edit a color in the Color Window, click it to bring up the Color Picker. The Color Window, whose state is saved with its project, is useful as a way of maintaining a palette of consistent colors that you intend to apply more than once within the project.
Thus far, we’ve concentrated on our application’s physical appearance; we’ve caused the application to have a window containing a button. When the application runs, you can press the button, but nothing happens. We haven’t given the button any functionality; indeed, we haven’t given any part of our application any functionality. The application runs, and it looks nice, but aside from the functionality automatically built in by the REALbasic framework, such as the ability to quit, it doesn’t do anything.
To give our application more functionality, we write code. As explained in the Preface, Section P.2, REALbasic is object-oriented, so that writing code consists not merely of dictating actions that the application should perform, but of associating those actions with the appropriate objects. The integrated nature of the IDE, and the intuitive, natural structure of REALbasic’s object model, make this easy to do.
Suppose we want our application to react when the user presses the button in the window; let’s say we want it to beep and put up a dialog box that says: “Sorry, this application doesn’t do much!” The way to code this action is as follows :[8]
beep
msgBox "Sorry, this application doesn't do much!"
Since this action is to be a response to pressing the button, it makes sense for the object with which we shall associate the code to be the button. To edit code associated with the button, double-click the button in its Window Editor. A new window opens; it is a Code Editor (see Figure 1-7).
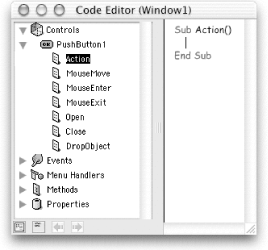
The Code Editor in Figure 1-7, as its titlebar says, belongs to our Window1 window. Each window, class, and module listed in the Project Window has a Code Editor of its own.[9] The association of code with an entity is performed by entering the code in that particular entity’s Code Editor. In this way, REALbasic forces your code into an object-oriented organization, and clarifies that organization physically: all the code associated with a particular object is bundled into that object’s Code Editor, and that Code Editor is accessed by way of the object’s physical avatar—either its Window Editor (in the case of a window), or its listing in the Project Window.
Opening the Code Editor may cause some of the other windows, such as the Properties Window and the Tools Window, to vanish; they reappear when the Code Editor is closed or is no longer frontmost. This behavior, called autohide, makes sense, since the Tools Window is useful only when a Window Editor is frontmost, and the Properties Window is useful only with regard to the current selection in the Project Window or the Window Editor. Nevertheless, all this vanishing and appearing of windows may be distracting. You can change REALbasic’s auto-hide behavior in the dialog that appears when you choose Edit → Preferences (in Mac OS X, it’s REALbasic → REALbasic Preferences). Incidentally, this dialog is also where you set the font and size for code in the Code Editor.
A Code Editor is divided into two parts. On the left is a browser, allowing navigation to each of the snippets of code, or handlers, that this Code Editor contains. The actual code appears, and is edited, on the right. Think of a handler as a drawer or a pigeonhole, where a piece of code can be stored. Each Code Editor can have many handlers; on the left, in the browser, you can see all their names, but you can see and work on the code inside only one handler at a time, on the right.
The browser’s contents are bundled into categories. Each category listing has a disclosure triangle; to expand or collapse your view of the browser’s content, click a disclosure triangle, or double-click a category listing. A window’s Code Editor has five top-level categories: Controls, Events, Menu Handlers, Methods, and Properties. These are all categories of handler, except for Properties which is a different category of entity altogether.
Within each category, any existing handlers (or, in the case of the Properties category, any existing properties) are listed by name. In the Controls category, each control in the window is listed, and is itself a category containing that control’s handlers. Clicking a handler listing in the browser causes the code of that handler to appear on the right, so you can read and edit it. Once any code has actually been added to a handler, its browser listing on the left becomes bold, as do its containing category listings; this makes it easy to know where the code is. Another option is to “winnow” the listings on the left by clicking the second button at the bottom of the Code Editor window; this toggles between a state where all handlers are listed and a state where the listings for any handlers or controls that lack code (and so are not bold) are omitted.
In Figure 1-7, although Pushbutton1 has some handlers and so does Events, there are no handlers under Menu Handlers or Methods, and no properties under Properties. That’s because you haven’t defined any; as we shall see, REALbasic provides control handlers and event handlers, but any menu handlers, methods, or properties are supplied by the programmer.
Let’s now enter our code to be executed when the user clicks the button. If you have been exploring the Code Editor browser, arrange it so it looks like Figure 1-7—so that we are working with PushButton1, which is our button, and in particular with the handler called Action, which is the code that runs when the user pushes the button. Then, on the right side of the Code Editor, enter the code so it looks like Figure 1-8. You may have to widen the window to see what you’re doing; unfortunately, the Code Editor does not wrap long lines, and you cannot split a long line into multiple lines—REALbasic code has no " continuation character.”
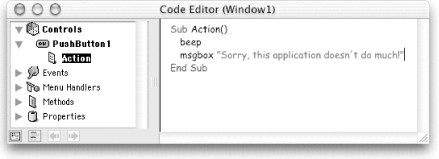
As you’re typing code, REALbasic tries to guess what you’re going to say and shows its guesses by offering to complete the current word in dimmed letters to the right of where you’re typing. This is REALbasic’s " intelligent typeahead” feature. To accept REALbasic’s guess, hit Tab; to reject it, just keep typing. If REALbasic displays ellipsis marks at the end of its guess, that means it can think of more than one alternative for how you might continue typing at that point; if you tab into the ellipsis marks, a list of those alternatives appears, and you can select among them using the up and down arrow keys, accept the current selection by hitting Tab, Return, or right arrow, or hide the list by hitting Esc, Delete, or left arrow. (Or you can use the mouse: click an alternative to accept it, click outside the list to hide it.)
Another “intelligent” feature of code entry is that lines are automatically pretty-printed: REALbasic uses its knowledge of its own keywords and syntactic structures to color-code words and indent lines in such a way as to clarify their linguistic status. So don’t indent lines yourself by adding spaces or tabs (in fact, you can’t type a tab character into the Code Editor); let REALbasic do it for you.
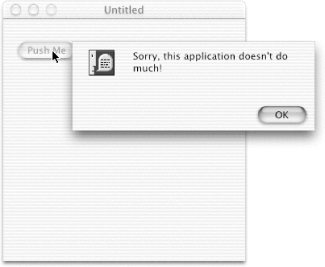
The desired functionality having been added in the correct place, we can now execute it within the built application. First, you’ll probably wish to save the project by choosing File → Save; it’s not a bad idea to save your project fairly frequently in REALbasic, and before building is a good time. Now build the application, and open the built application from the Finder to run it. The application puts up a window containing a button, as before. Press the button. You hear the beep, and you see the dialog, as in Figure 1-9. It works! You’ve written an application that does something interesting (provided, of course, you’re easily interested).
As your project grows, the organizational convenience of having the code broken up into separate handlers in separate Code Editors may be outweighed by the difficulty of achieving a clear conspectus of the code as a whole. REALbasic offers various techniques to assist with this problem.
Recall that within the same Code Editor you can view only one handler’s code at a time; this restriction can be rather inconvenient, since not infrequently you want to cut and paste code between one handler and another, or your understanding or intended modification of one handler depends upon being able to study some of the others, in the same Code Editor. To help with this problem, every time you view a handler’s code in a Code Editor, it is added to that Code Editor’s internal “history list”; and you can navigate this list, moving between handlers that you’ve recently viewed, using the arrow buttons at the bottom of the Code Editor (think of them as being like the Back and Forward commands in a web browser).
Code can also be exported in its entirety. Choose File → Export Source; all code in the project will be assembled into a single textfile, which can then be studied in any word processor. An alternative is to choose File → Save As and elect to save the file as XML; this is rather more tricky to edit, but it has the two advantages that the whole project is exported as text, not just its code but also all the information about its windows and controls and so forth, and that the edited XML, if you decide to change it, can then be opened directly by REALbasic as if it were a project file. One convenient way to view the exported result is to give the name of the exported XML file a suffix .xml and then open it with BBEdit, which can parse XML and presents it with nice indentation and syntax coloring; another approach is to use a dedicated XML editor if you have one. The rules for how a project is structured as XML are not difficult to deduce.
Code can also be searched within the IDE. Choose Edit → Find to bring up the Find dialog. The three Find Scope buttons determine what region of the project to search, in decreasing size order: Project means the entire project; Module means the current Code Editor; Source means the current handler. Finding is slightly clumsy—for example, Source finding doesn’t wrap within the current handler, so you have to position the insertion point manually first, and you can’t specify that you want to find whole words—but it’s much better than nothing.
Internal project components listed in the Project Window—menubar, window types, classes, modules, and folders—can be exported and imported as units. This makes it easy to reuse pieces of your code in another project, or to borrow pieces of code released by other users. (If you organize your project properly, you’ll often be able to reuse its pieces in other projects.) To export a component, just drag-and-drop it from the Project Window into the Finder, or choose File → Export Component; actually, the menu item, which is the one below Export Source, changes its name depending on the component type. Folders can be exported only by drag-and-drop, and folder export consists simply of creating a folder in the Finder and exporting the REALbasic folder’s contents into the Finder folder. An exported project component can be imported into another project, by you or another REALbasic user, by drag-and-drop from the Finder into the Project Window, or by choosing File → Import. If you wish to share a project component with other users without their being able to examine your code, you can elect to encrypt it before exporting it, using its contextual menu in the Project Window or by choosing Edit → Encrypt; an encrypted exported component can be imported and used in a different project, but it cannot be opened (for example, if it is a window type, neither its Window Editor nor its Code Editor can be viewed).
A project file may also be saved in its entirety as a stationery file. When you open a stationery file, the IDE divorces the resulting project from the stationery file, so when you save for the first time, you are prompted for a new name and location for the project file, just as if you had chosen File → Save As. Thus, the use of stationery is a way of omitting a step, and of protecting a project file which you’d like to be able to reuse without accidentally altering it. The REALbasic package includes a couple of sample stationery files, which you can use as the basis of new projects. To make a new stationery file from a project file, choose File → Save As and, in the Format popup menu, choose Stationery Option. (In Mac OS X, just save the project normally and convert it to stationery in the Finder’s Info window.) Stationery files may be kept anywhere; but a stationery file called Default New Project in a folder called Stationery in the same folder as REALbasic will automatically be used for all new projects (when you choose File → New or start up REALbasic).
We’ve seen that the IDE provides three ways of editing an interface element such as a window or a control: the Properties Window, the Window Editor, and the Code Editor. In this section, we’ll pause to clarify the relationship between them. Figure 1-10 provides a schematization of the relationship between the three editors and the values of object properties. The rest of this section explains in words what the figure is trying to show in pictures.
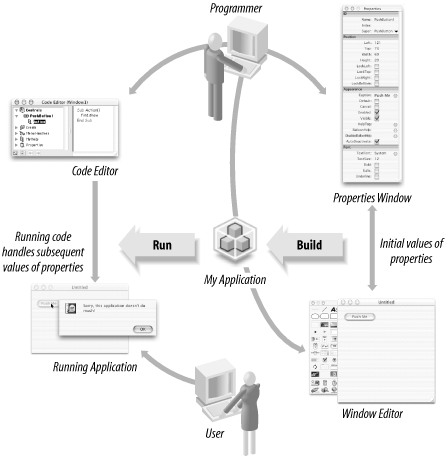
The Window Editor and the Properties Window edit exactly the same thing—an entity’s predefined properties. They simply visualize those properties in two different ways. The Window Editor offers a physical representation of a subset of the very same information that is represented through name-value pairs in the Properties Window.
Consider, for instance, a window that contains a button. In the window’s Window Editor, it is evident that the window has a certain size and a certain title. But this information is also present among the values in the window’s Properties Window, as its Width, Height, and Title properties. Similarly, the Window Editor shows the button as having a certain position and size, and a certain caption in a certain font; and again, this same information is also represented in the values in the button’s Properties Window, as its Left, Top, Width, Height, Caption, and Font properties. But the Properties Window also lists some properties that have no physical representation in the Window Editor, or which cannot be edited there, such as the window’s Placement property, or the button’s Enabled property.
When you set the values of an object’s properties in the Window Editor or the Properties Window , what you’re setting are the values that those properties will have just at the moment the object first comes into being in the running application. For example, when you start up our sample application with the window containing a button, the window appears immediately, and that’s the moment those objects first come into being, so that’s the moment when the properties of those objects take on the values you previously set in the Window Editor and the Properties Window.
But after that, as your application continues to run, those properties could change. We’ve all seen buttons, for example, that change their caption. Think of an application that connects to the Internet; it might have a Connect button, which, once the user clicks it to make the connection, changes to read Disconnect, so that the user knows to click the same button to break the connection. Clearly, to accomplish the same thing in a REALbasic application, you’d need to change the value of the button’s Caption property.
How would you change it? Clearly not in the Window Editor or the Properties Window; those merely set the initial value of the button’s Caption property. Once the application is running, everything that happens is determined by its code; so it’s the code, which you write in the Code Editor, which must see to it that the button’s Caption property is changed at the appropriate moment. For the most part, REALbasic code has access to all the same object properties that you have access to in the IDE; it can examine them, and it can change them. So, in the Window Editor and the Properties Window, you initialize your object properties, that is, you state what their values are to be at the moment they come into existence; in the Code Editor you write instructions for what you want done with those values after that. In a nutshell: the IDE proposes, the application disposes.
To experiment with initial versus subsequent property values, go back to our project with the window containing a button and change the button’s Action handler to read:
beep
msgBox "Sorry, this application doesn't do much!"
pushbutton1.caption = "Push Me Again"
You might wish to increase the button’s width as well, so the new longer caption will be legible. Build and run the application, press the button, and you’ll see the button change its caption. This line:
pushbutton1.caption = "Push Me Again"
uses the assignment operator, which looks like an equals sign, to alter the Caption property of the PushButton whose name is PushButton1. In effect, the code has done, some way into the running of the program, the very same thing we were doing by typing into the Caption value of the button’s Properties Window in the IDE. Before the application started running, the settings we made in the IDE were in charge; once the application was actually running, the code was in charge, and was able to alter what we had done in the IDE.
Actually, it isn’t just code that may change an object’s properties as the application runs; in certain cases the user can do so, too. For example, when the user types in an editable text field (an EditField), its Text property is altered. Part of what makes writing a good application difficult (or fun, depending on your point of view) is that you cannot know in advance just what the user will do at any given moment, so you must try to prepare your code for any contingency.
The Properties Window also lets you set some properties that the running code cannot subsequently access. We may think of these as invariant properties of the object. Technically, these are not properties of the object at all; they are a completely different kind of feature of an entity. But since they are listed in the Properties Window, I have coined the term “invariant property.” (We’ll just have to hope no computer science majors are watching.) The invariant properties are the ones that appear at the top of the Properties Window, under the ID heading.
The most important invariant property is the object’s Name. Note that this is not necessarily the same as any label the user will ever see; the name of a button is not its caption (the text that appears within it), and the name of a window is not its title (the text that appears in its titlebar). Rather, the name is the identifier that the code will use to refer to the object. The code can’t change that name, because the object’s identifier needs to be unambiguous and unique, at all moments and in every handler, while the application is running. But you can change the name, in the IDE; and you should feel free to do so, in such a way as to make coding easier. In particular, you may well find that names descriptive of objects’ functionality contribute to more understandable and maintainable code.
For example, the button referred to in the code fragment from the previous section is called PushButton1, because this is the name assigned to the button when it was initially created in the Window Editor; but clearly this is not a particularly descriptive name, so you might rename it UselessButton. To do so, you would select the button in the Window Editor, and alter the Name value in the Properties Window. Your code can use the new name to refer to the button; indeed, it must do so—the code as it stands no longer works; if you’ve changed the button’s name, you’ll need to change its Action handler code to match:
beep
msgBox "Sorry, this application doesn't do much!"
uselessButton.caption = "Push Me Again"
There is no button called PushButton1 any more; instead, that button’s name is UselessButton. So you must refer to it in code as UselessButton, not as PushButton1.
Not only controls in Window Editors, such as our button, but also all project file components listed in the Project Window (except for the Menu) are objects with a Name property that can be changed through the Properties Window. For example, if you add a folder to your Project Window, it is initially called Folder1 or Folder2 or some such; that’s not very helpful when the purpose of a folder is to group project components meaningfully. Similarly, project components pointing to external files are initially given a name derived from the name of the external file; that name might not be useful when we come to refer to the project component in code, so you might wish to change it. When you select a listing in the Project Window, its name appears as the Name value in the Properties Window, and you can select and change that value. This action is so common that there’s a shortcut: select a listing in the Project Window and hit the Tab key, and the Name value in the Properties Window is selected, ready for you to type a new name; then hit Return to make it “set.” (Unfortunately, there is no parallel shortcut for renaming an object in a Window Editor; hitting Tab in that case selects a different object.) If you’d like to test this in our example project, try changing the name of Window1 to MainWindow.
As we saw when changing the name of PushButton1 to UselessButton, object name changes do not propagate automatically through code. After changing an object’s name, it is up to you to change any existing code references to that object manually from the old name to the new. The Find dialog can be a big help here. Even better, if you’re going to change an object’s name, try to do so before you’ve written any code that refers to it. On the other hand, object name changes do propagate through the physical part of the IDE. For example, if you make the changes described earlier in this section, the main window is immediately listed in the Project Window and in the titlebar of its own Code Editor as MainWindow, and the button is listed in the MainWindow Code Editor as UselessButton.
Warning
Do not assign a name containing a space to a picture or other external file listed in the Project Window; the Properties Window will permit you to do this, but this should be considered a bug, because afterward your code will be unable to refer to the object. In general, make sure that names contain no spaces, that they start with a letter, not a number, and that they are unique. REALbasic ought to help you with this, but it doesn’t.
The only way to know whether your application works as desired is to test what happens when you run it. Even a simple application may call for extensive testing, if only because what happens as your application runs depends not only upon your code but also on what the user does at any given moment. Also, you may find that the easiest way to develop your application is to “grow” it gradually, first implementing some small part of its functionality, testing to make sure it’s working properly, then adding some more functionality, and so on. So doubtless you’ll want to experiment constantly to make sure whatever code you’ve written so far is behaving correctly, and that it can handle whatever contingencies the user may throw at it. You’ll test your application, then edit the project to cope with problems or to add functionality, then test again, then edit again, over and over as the application takes shape and becomes increasingly robust.
Up to now, we’ve been testing our application by building it and then running the built application from the Finder. If this were the only way to test, the edit-run-edit cycle would be rather clumsy. In actual fact, though, you mostly won’t have to build the application in order to test it; instead, you’ll run it in a kind of simulated state within REALbasic itself. To do this, simply choose Debug → Run. Your project is now running in the IDE. The application’s window and menubar appear, and you can interact with it just as you would the genuine built application. When you quit the running project, you fall back into REALbasic’s editing environment.
Running the project in the IDE is in some ways better and in some ways worse than running the genuine built application. It is certainly much quicker and more convenient to edit your project, run it in the IDE, test, and quit back into REALbasic, than it is to have to juggle three processes at once (REALbasic, the Finder, and the built application). Also, running in the IDE has the decided advantage that if an error occurs, you fall back into the IDE, which shows you what the error was; whereas, if an error occurs in the built application, it may quit, or crash, leaving you none the wiser as to what went wrong. On the other hand, although running in the IDE is a good simulation of how your built application will behave, it is just a simulation; the only truly reliable way to test your application is to build it and run it.
The state that REALbasic enters when you’re running in the IDE can be rather confusing. The IDE itself changes. Everything except the Project Window and any Code Editors vanishes, and two new windows — the Variables Window and the Stack Window — may appear. The running project is layered in front of the IDE, partially obscuring your view of it, and if you switch back to the IDE by clicking in one of its windows, you may not be able to switch back to the running project by clicking at all. If this happens, you can return to the running project by choosing Debug → Run again (don’t worry, this won’t restart it). To some extent, you can edit your project with the running version still running, but to some extent you can’t, and some editing windows will be unavailable. To quit your running project from within itself, you choose File → Quit or however one normally quits your application; to quit your running project from the editor, you choose Debug → Kill or File → Quit (don’t worry, REALbasic itself won’t quit if a project is running in the IDE).
Eventually, you’ll get the hang of moving between the editable project and the running project (and knowing which one you’re presently in), and you’ll develop an intuition as to whether you need to quit running the project in order to edit it. Running in the IDE is more fully discussed in Chapter 8.
REALbasic provides online help through the Language Reference window; to see it, choose Help → Language Reference. The online help consists of pages devoted to the elements of the REALbasic language, one page per element; in essence it is a presentation of REALbasic’s reference manual, also available in PDF and printed form. (This results in some anomalies, such as the online help’s references to pictures it can’t display.) The online help’s importance won’t really emerge until you start working with the language, beginning in the next chapter; but since we’re describing the IDE, this is the place to discuss the online help.
The Language Reference window is organized rather like a Code Editor. Down the left side runs a browser listing the names of the REALbasic language’s operators, keywords, built-in classes, global methods, and error message types. Clicking a browser listing shows the corresponding page of information on the right side of the window. The browser listing can be shown in two ways: if you click the Alpha button at the top of the browser, you see all the pages listed alphabetically; if you click the Theme button, you see them grouped thematically. The window works like a web browser in other ways as well; pages contain hyperlinks to related pages, and there are Back and Forward buttons for moving among the pages you’ve visited, as in a Code Editor window. Example code (shown by a dotted rectangular outline) can be copied elsewhere, such as into a Code Editor, by drag-and-drop.
One of the Language Reference window’s most important features is its ability to search. The text field at the top uses intelligent typeahead, which works just as in a Code Editor. The button to its right alternates between Search and Go, depending on whether you hold the down the Option key. (Which of the two possibilities is represented by the button’s default state depends upon a setting in the Preferences dialog.) Pressing Search reduces the browser listing on the left to just those pages that might be relevant to what’s in the text field. Pressing Go shows the page named by what’s in the text field, without reducing the browser listing.
Another nice feature of the Language Reference is that it tries to
guess from the context what you might be wanting help on. In a Code
Editor, select the word msgBox and open the
Language Reference; you’ll see the help page on MsgBox. In a
Window Editor, select a PushButton and open the Language Reference;
you’ll see the help page on PushButton.
This completes the tour of the REALbasic workspace. What follows is a summary of nonobvious shortcuts for navigating and working in the IDE. Some of them we’ve met earlier in the chapter; others are new.
- To open a window’s Window Editor
If you’re in the Project Window, double-click the window’s listing; or select the window’s listing and hit Return; or bring up the contextual menu associated with the window’s listing and choose Edit. If you’re in the window’s Code Editor, hit Option-Tab, or press the first button at the bottom of the Code Editor window.
- To add a control to a Window Editor
Drag the control’s icon from the Tools Window into the Project Window, or copy-and-paste or duplicate an existing control. (In Chapter 3, we will learn that there is another way: you can drag a class listing from the Project Window into the Window Editor.)
- In a Window Editor, to select the next control
Hit Tab. This can be particularly useful when controls obscure one another or are otherwise difficult to select; it works even when the control is located beyond the bounds of the Window Editor and is therefore invisible. It is helpful also as a way of changing what object’s properties show up in the Properties Window.
- In a Window Editor, while positioning a control, to disable “intelligent” alignment
Hold Command while dragging the control, or position it using the Properties Window.
- In the Properties Window, to “set” a string or number value
Hit Return or Enter.
- In the Properties Window, to cancel a change to a string or number value
Hit Esc (before hitting Return).
- In the Properties Window, to navigate to the next/previous text-editable property
Hit Tab/Shift-Tab.
- In the Properties Window, to set a font property to the System font
Enter the word “System.” The idea here is to give you a way to specify that the object’s font should be whatever the System font is on the machine where the application runs; this is needed because you can’t know in advance what the System font will be. If you set the font size to
0it will end up at the default size for whatever platform the application is built for.- In the Project Window, to remove an item
Select it, then hit Delete. Be careful; whatever code is associated with the item is also deleted.
- In the Project Window, to rename an item
Select it, then hit Tab. This selects the value of the Name property in the Properties Window, ready for you to type a new name.
- In the Project Window, to view an external file
Double-click the item’s listing; or select it, then hit Return; or use the item’s contextual menu.
- In the Project Window, to navigate among project components
Use the up and down arrow keys.
- To open a Code Editor
In the case of a class or module, or of a window when the project is running in the IDE, double-click its listing in the Project Window, or select its listing in the Project Window and hit Return.
In the case of a window when the project is not running in the IDE, select its listing in the Project Window, or bring its Window Editor to the front, and hit Option-Tab. Or, double-click within its Window Editor, or select in the Window Editor and hit Return; this causes the Code Editor to appear showing a handler associated with the particular control that was selected (or with the window, if no control was selected).
- To toggle between a Window Editor and the corresponding Code Editor
Hit Option-Tab.
- In a Code Editor, to navigate quickly to a handler
Control-click to bring up a contextual menu listing the handler.
- In a Code Editor, to toggle the focus between browser and code
Hit Shift-Tab. When the browser has focus, up and down arrow keys navigate, and you can hit Delete to remove a property or a handler that wasn’t inserted by REALbasic.
- In a Code Editor, to resize the browser
Drag the divider bar that separates the two halves. You can drag it all the way to the left to remove the browser completely; the divider bar then appears as a small square in the lower left of the window. You can still navigate among handlers, by using the contextual menu and the history buttons; but unfortunately there’s no way to know what handler you’re actually in, so this mode is largely useless.
- In a Code Editor browser, to expand or collapse a category
Click the category’s triangle; double-click the category; or select and hit Command-right-arrow or Command-left-arrow (starting in REALbasic 3.2, it appears that this works only when the browser has the focus).
- In a Code Editor, to select a word or a line
Double-click to select a word. Triple-click to select a line. Double-click-drag and triple-click-drag to extend by word or line.
- In a Code Editor, to append copied material to the clipboard
Hold Shift while copying or cutting.
- In a Code Editor, to copy any visible word to the insertion point
Hold Option and single-click the word. The word to be copied can appear in the code of the same handler, or it can appear on the left side of the window, in the browser, for instance as the name of a property, a control, a method, or an event. The copied word is inserted at the current insertion point or replaces the current selection, without passing through the clipboard. Option-click-drag does not extend the amount of material copied.
- In the Language Reference, to alternate between Search and Go
Hold Option.
- To accept a proposed “intelligent” typeahead
Hit Tab. If the proposed completion consist of ellipsis marks, this brings up a list of possible completions; up and down arrow keys navigate, Return or Tab or right arrow accepts, Esc or Delete or left arrow dismisses the list.
- To change your mind about practically anything
Choose Edit → Undo. REALbasic maintains an effectively infinite Undo list, and you can work your way back to an earlier state by choose Undo multiple times (and then, if you change your mind about changing your mind, you can work your way forward again by choosing Redo multiple times).
[5] External files are discussed in Section 1.1.3. You needn’t concern yourself yet over what classes and modules are. Classes, including windows, are discussed in Chapter 3; modules, and the creation of new classes, are discussed in Chapter 4. Chapter 6 explains how to work with the menubar object. The default window is treated in Chapter 3, Chapter 7, and Chapter 9.
[6] Each of these types of entity is discussed later, in the chapter describing how to manipulate it in code.
[7] To learn the meaning of each icon in the Tools Window, hover the mouse over it (on Mac OS Classic, turn on balloon help first). In REALbasic 3.5, several new icons will be added, and the layout will look somewhat different from Figure 1-4.
[8] REALbasic’s dialect of the BASIC programming language is
described starting with Chapter 2. Built-in
commands such as beep and
msgBox are explained in subsequent chapters
according to their functionality.
[9] You might wonder why, to associate code with a button, we work in a Code Editor associated with a window. The reason will become clear in Chapter 3, when we examine the details of the REALbasic object model of classes and instances; in essence, controls have no existence independent of the window that contains them, so they have no Code Editor of their own. Then in Chapter 4, we will learn how to escape this restriction, by subclassing a control class.
Get REALBasic: TDG, 2nd Edition now with the O’Reilly learning platform.
O’Reilly members experience books, live events, courses curated by job role, and more from O’Reilly and nearly 200 top publishers.

