Use your Dreamcast to relive your childhood or play homebrewed games.
Can it be a coincidence that the current explosion of emulator popularity didn’t take off until a few years after the Sega Dreamcast hit the market? Sure, you could run Nintendo games on your PC for a long time, but there was something even more appealing about playing old-school console games on an actual gaming console. Though the Xbox is the modern console gamer’s choice for emulation [Hack #23] , the first console to be blown open by hackers was the venerable (though not especially impregnable) Sega Dreamcast.
So, why did emulation take off along with the Dreamcast? It was all a matter of timing. There were a few emulators for consoles prior to the Dreamcast, but they usually required special equipment and were thus only popular among a few hackers. With the release of the Dreamcast, hobbyists were handed a game console that was not only incredibly powerful, but was also produced with off-the-shelf parts that were well-documented. All that was needed was a way to test the game code on an actual system.
By default, the Dreamcast would only boot software that was recorded on Sega’s custom GD-ROM discs. Since Sega was the only source of those discs, booting homebrew software was a pipe dream until a creative coder discovered a back door. In 1999, an enhanced audio CD format was released in Japan called MilCD. These CDs included extra features, like photo and video files, that would be available if you inserted the CD into a computer.
It was soon discovered that the Dreamcast would attempt to boot the extra features on MilCDs. Creative hackers soon began writing CDs in the MilCD format that booted on unmodified retail Dreamcasts, replacing the MilCD data with Dreamcast code. Since these CDs could be burned to standard CD-R media, this blew the doors open for the first major homebrew scene.
Creating your own Dreamcast CD from scratch is a rather involved process, requiring a fairly in-depth knowledge of how audio and data tracks are laid out on a disc. For most common software though, there is no need to go through the hassle of creating a custom CD image, as the major Dreamcast sites have already done the work for you. In most cases, using an emulator is as simple as downloading a single CD image file and burning it to a disc. What could be simpler?
Due to the esoteric format required for Dreamcast CDs, most of the software images on the Net are images designed for the CD duplication software DiscJuggler. They use the extension .cdi. The best software for the task, at least when running Windows, is a tool called Alcohol 120% (http://www.alcohol-soft.com). A thirty-day free trial is available for download from the site; the full version costs about $55.
When it comes to homebrew Dreamcast software, the selection is quite widespread. In fact, the hardest part can be deciding what to choose first! In the next section, I’ll cover the NES emulator NesterDC and the homebrew fighting game Beats of Rage, but you can find much more software by exploring the following web sites:
Of all the homebrew Dreamcast software, one of the most robust programs available is NesterDC, a full-featured Nintendo emulator. Capable of running nearly every game for the classic 8-bit powerhouse, NesterDC is a true blast from the past. Here’s what you’ll need to do to download, burn, and run it.
Here’s how to burn the CD:
You can download NesterDC from http://www.dcemulation.com/dcemu-nesterdc.htm. Choose the Disk Juggler version.
Once you have the file on your system you will need to extract NesterDC7.1DJ.cdi from the Zip file. (The actual file name may vary depending on the version of NesterDC.)
Start Alcohol 120% and click on Image Burning Wizard.
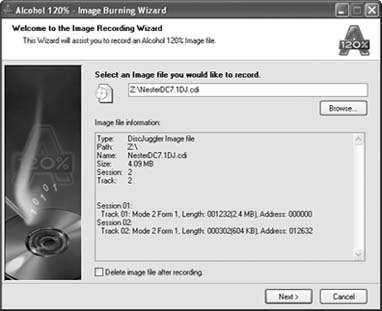
Click on Browse and navigate to the image file. Click Open and you will see the screen in Figure 4-46.
Click Next.
On the following screen, leave the settings at their default values and click Start.
Insert a disc and wait for the burn to finish. Because the image is very small (around 5 MB in size) it should only take a few minutes.
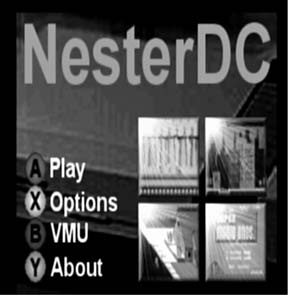
Test the disc in your Dreamcast. Simply place it in the system and turn it on. If everything worked correctly, you should see the title screen in Figure 4-47.
You’ve created a functional emulator disc, but now you need the software to play on it. If you already have a Nintendo emulator for your PC [Hack #38] , you can use the same ROM files. Preparing them to run with NesterDC is easy; you need only burn them to a second CD-R. NesterDC has a built-in file manager that you can use to navigate a standard CD and choose from any ROM file available on the disc.
Once the program has loaded the main menu, you can eject the NesterDC disc and insert your CD-R containing the ROM files.
Press the A button to bring up the file manager.
Press the Y button to reach the root directory on the CD. You will see /cd at the top of the screen if you are in the right place.
Now, use the D-pad to navigate up and down and use the A button to choose a directory.
Once you have found a ROM file you wish to play, highlight it and then press the Start button on the Dreamcast controller.
After a brief pause, the game will load and you will be playing just as though the Dreamcast were a Nintendo. Use the D-pad for control, the X and A buttons for A and B and the Y button for Select.
When you are finished playing you can press the L, R, and Start buttons simultaneously to return to the NesterDC main menu.
Tip
If you really crave old-school style, you may want to use the classic rectangular Nintendo controllers on your Dreamcast. It takes some soldering, but it can be done! See http://devcast.dcemulation.com/mods/madnes/nes2.php for a fully illustrated tutorial.
Although NesterDC is a great place to start, there are many more emulators. Everything from Super Nintendo to Genesis to Neo-Geo Pocket to MAME can be downloaded and used on your Dreamcast. Check out http://www.dcemulation.com for more.
Created as an homage to the Sega classic Streets of Rage, Beats of Rage is an entirely user-created game with a well-documented (and freely modifiable) side scrolling beat-em-up engine. Produced by a group known as Senile Team, Beats of Rage was the first major Dreamcast homebrew title.
You can download the full version of Beats of Rage at http://senileteam.segaforums.com, which also contains information on the many available modifications. In addition, there are PC and PlayStation 2 versions of the game available (although you can’t play the latter without a mod chip). There’s even a portable version for the GP32 handheld [Hack #49] .
—Adam Pavlacka
Get Retro Gaming Hacks now with the O’Reilly learning platform.
O’Reilly members experience books, live events, courses curated by job role, and more from O’Reilly and nearly 200 top publishers.


