The OAE project has been design-led from the outset. Getting the aesthetic right makes the user experience flow more easily. This chapter introduces you to CSS, label display, language localization, modifying the category metadata, and modifying the landing page widget. The technical work is the easy part in many ways. Designing and deciding all the visual and navigational elements of your instance of OAE requires time and expertise. Be sure to bring in a talented designer, and once you do, remember to listen to her.
To make look-and-feel changes, configure the running server to look at the UI code you unzipped in Building from Source. Changes to CSS, labels, and language localizations are all done in the unzipped UI code. When you’re happy with your changes, then you can rebundle the system to make the UI permanent.
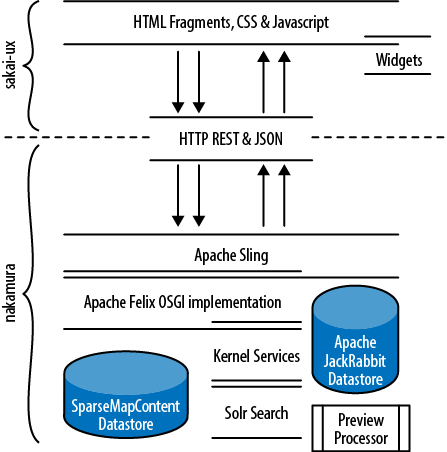
Ready for some acronyms? Okay. Sakai OAE is built on the Apache
Felix implementation of the OSGi framework. It further relies on the
Apache Sling OSGi bundles for RESTful implementation of HTTP request
handling. To some extent these framework selections derive from an earlier
architecture that anticipated full reliance on JSR-170, the Java content
repository, to serve all the content needs of Sakai OAE. In pilot
deployments, it became apparent that the needs for concurrent reads and
writes on a shallow, broad tree structure in Sakai OAE were in contention
with how JCR optimized. This brought about the development of the
sparsemapcontent storage API layer and
solr indexing to improve performance under heavy load.
(See Figure 4-1.)
The view layer is implemented in CSS and JavaScript, with heavy reliance on the jQuery library. Customization handling differs slightly if it’s at the CSS and properties layer from if it’s at the JavaScript layer.
In order to customize anything, Nakamura needs to know where to look
for your customizations. Open a browser to http://localhost:8080/system/console. The default username
and password are admin/admin. You are now looking at the dashboard to
the guts of the Sakai OAE system. Click the Configuration button to get over to the Sling
configuration manager. Modules are listed alphabetically. Scroll down
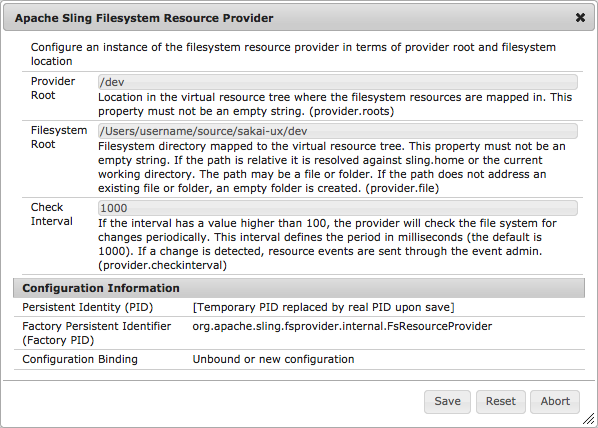
until you find the Apache Sling Filesystem
Resource Provider. Click the plus (+) button to create an entry
that overrides the packaged frontend code location.
For Provider root, enter:
/dev
For Filesystem root,
enter:
/Users/username/source/sakai-ux/dev
Leave the other values at their defaults and click Save. (See Figure 4-2.)When you add a new Resource
Provider, the Felix interface doesn’t necessarily update immediately to
show you the new entry. If you want to confirm that your new entry took,
refresh your browser and scroll back down to the Apache Sling Filesystem Resource Provider. Under
the Filesystem Resource Provider heading you’ll see an entry for org.apache.sling.fsprovider.internal.FsResourceProvider
with a unique suffix string.
Before getting down to real work, do something quick and destructive to show that you have control of the user interface code now.
Change to your dev directory:
cd
          /Users/username/source/sakai-ux/dev
Move your index.html file to a safe backup copy:
mv index.html index.html.bakCreate a new index.html with an unmistakable message:
echo I 0wn the UI >
          index.html
Connect to http://localhost:8080 to see the fruits of your labor (see Figure 4-3).
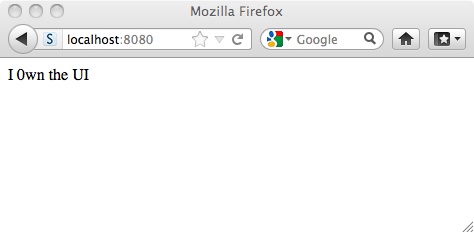
Changes made in HTML files take effect as soon as you connect to OAE.
Now put it all back:
mv index.html.bak
    index.html
and reload your browser. Phew. No harm done. If you have done harm,
just unzip the frontend code again and rename the directory to match what
you put in the Sling console for the Filesystem Resource (e.g., /Users/username/source/sakai-ux).
When you connect to Sakai OAE now notice that you are the admin user. When you log in as admin to the console, you end up with all possible rights and privileges in the OAE system. To log out, you have to close and restart your browser. Use this knowledge carefully. With great power comes great responsibility.
Close and restart your browser, then create yourself a new user to test with.
Most elements displayed in the user interface of Sakai OAE are just labels for variables. Modifying the text displayed is as straightforward as changing the label in the default properties file. The file default.properties in sakai-ux/dev/bundle contains all the customizable display text in OAE. It’s an alphabetically ordered monster of a properties file. For the most part, the variable names match the initial English label values displayed out of the box. As you make changes to default.properties keep a copy of the original version around as a reference.
To see it in action, change the heading for Basic
Information in the user profile section. Login to the web
interface at http://localhost:8080 and expand the
My profile section. Notice that the
lefthand navigation shows the section heading for the first section as
Basic information. Open up the
default.properties file and modify
the display value for PROFILE_BASIC_LABEL. Change:
PROFILE_BASIC_LABEL = Basic
    information
to:
PROFILE_BASIC_LABEL = Name, email,
    stuff
and save the file. Refresh your browser. The first section under
My profile now displays as Name, email, stuff.
Changes you make in default.properties are automatically adopted the next time anyone loads a page.
The display labels in Sakai OAE can not only be customized, they can also be translated and internationalized. Localization property files are stored in sakai-ux/dev/bundle alongside the default.properties file. Sakai OAE ships with limited translations for Spanish, American and British English, Dutch, Magyar, and Chinese.
A localization file can contain just a subset of labels; it need not exhaustively translate the labels in default.properties. As an example, crack open the en_GB.properties files in sakai-ux/dev/bundle. The only two labels customized out of the box are those containing the word acknowledgements. In the States, this word is acceptably spelled acknowledgments, whereas in Great Britain only acknowledgements is correct.
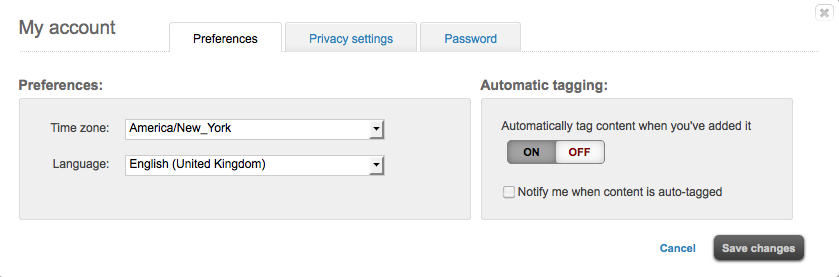
Start by setting your account language preference to English (United Kingdom).
Login at http://localhost:8080 and select
My accountfrom the top-right drop-down list associated with your name.On the
Preferencestab, selectEnglish (United Kingdom)forLanguageand clickSave changes, as shown in Figure 4-4.
The web browser will automatically refresh with the United Kingdom
localization. You won’t notice many changes. The
Language listed at the bottom right of your browser
screen will update to show you are now set to English (United Kingdom). Modify the properties
file to localize a third display label. For our British version of OAE,
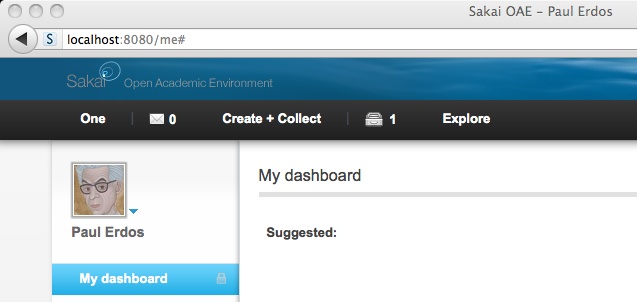
replace the You menu with the more
generic label One. In the file
en_GB.properties add the line:
YOU = One
and save the file. Order is not meaningful in the properties files, so technically you can place the new label value anywhere. As these grow though, it’s good to have the values alphabetized by variable, so drop the new line in at the end of the en_GB.properties file.
Refresh your browser and the new menu name One displays in place of You in the upper-left of the browser screen. (See Figure 4-5.)
Introducing a new localization requires creating a fresh properties
file for the region, and also making a modification to add a new option to
the My account drop-down list of
Languages. The config.js file in sakai-ux/dev/configuration maintains the
Languages drop-down list. This will be
your first look at the JavaScript layer of customization in OAE.
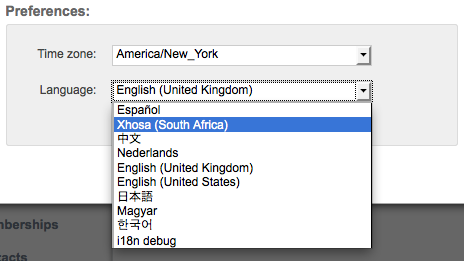
Create a new file in sakai-ux/dev/bundle with the name zu_ZA.properties. zu-ZA is the i18n code for the Xhosa language in the South African geographic region.
Modify the display label for the You menu to the Xhosa word for hello, by adding the following line to your new zu_ZA.properties file:
YOU = MoloChange to the sakai-ux/dev/configuration directory and take a quick backup of the config.js file. It’s easy to mess up the JavaScript syntax, and you can accidentally white-bomb your OAE install with a stray semicolon:
cp -p config.js
          config.js.bak
Locate the
Languagessection in the config.js file, about line 1511. Add a block for the new localization option:{ "country": "ZA", "language": "zu", "displayName": "Xhosa (South Africa)" },The Xhosa option will turn up in the position in which you place it relative to the other language options in the menu. Be careful with your brackets and commas as you place it in the list.
JavaScript content is eagerly cached in the browser in order to improve the performance of OAE. To see the new localization option, refresh the cache in your browser.
In Firefox:
Preferences→Advanced→Network, then inCached Web ContentclickClear Now. In Safari:Safarimenu→Empty Cache→Empty.Select
My accountfrom the top-right drop-down list associated with your name, then on thePreferencestab, selectXhosa (South Africa)for Languages and clickSave changes. (See Figure 4-6.)The top-left menu changes from You (or One) to Molo. (See Figure 4-7.)
If the Xhosa option doesn’t turn up, make sure you’ve saved the zu_ZA.properties file and the revised config.js file and try refreshing your cache again.

If you are ever scratching your head for what the underlying label
name is for a bit of display text, you can use the special language
setting i18n debug to see the labels in
place in the UI. In the My account
menu, click the Preferences button,
then select the last of the language settings, i18n debug. When the window refreshes, all the
display text is replaced with the corresponding label names. Before you
roll OAE into production, remove the i18n
debug option from the Language list. See Reducing the JavaScript Debug Logging for details on getting production
ready.
Sakai OAE is entirely styled with Cascading Style Sheets. You can customize the look of the system for your local environment by providing your own stylesheets, overriding the selectors with custom properties and values.
The default CSS files for OAE are stored in sakai-ux/dev/css. The bulk of the CSS files of interest are in the sakai directory under css. The two other directories in this location are FSS and lib. The FSS stylesheets come to OAE from the Fluid project, which enables a high level of customization to individuals for accessibility purposes. Inclusion of the Fluid skinning system in Sakai OAE allows people with visual or other impairments to alter the display of OAE, making content accessible to them that might otherwise be unavailable.
In the lib directory is a single stylesheet for tweaking the jQuery-based AutoSuggest display.
The styles you’ll want to get familar with are all in .css files located in dev/css/sakai:
- sakai.corev1.css
The primary stylesheet, providing the main layout for all pages defining columns, content areas, and header areas.
- sakai.base.css
The primary element styling file, all 2,700 lines of it. This is the most important stylesheet in the system. All the s3d consolidated styles are defined here. The sections are commented to guide you to what is being styled by the selectors that follow (e.g., global rules, drop-down menus, links, buttons, search boxes). The Mozilla Firebug plug-in is invaluable in picking out the selector names for rules you’d like to change.
- main.css
The aggregating master file. The main.css imports the Fluid skinning system base classes, the jQuery AutoSuggest tweak from the local CSS library and a jQuery gritter stylesheet for popping up alert messages. It imports the two key OAE specific stylesheets: sakai.base.css and sakai.components.jq_pager.css.
- sakai.explore.css
Styles the Search results page, whether reached via the Explore menu or by entering something in the search box. This stylesheet also covers the category and subcategory displays, and the index page (conceptualized as exploring categories from the root). The sakai.explore.css file overrides some of the styles defined in sakai.base.css and sakai.corev1.css.
- sakai.create_new_account.css
Styles the Sign Up page at http://localhost:8080/register, overriding the base styles as needed.
- sakai.createnew.css
Styles the Create Group, Create Course, and Create Research project pages, overriding just one base style.
- sakai.group.css
Style for group sites, whether a straight up group, a course, or a research project.
- sakai.content_profile.css
Styles the content profile pages, overriding the base styles as needed.
- sakai.error.css
Styles the 403, 404, and 500 error pages.
The standard for customizing the skin is to add a directory for your own CSS files to the skin directory at sakai-ux/dev/skins. You could change the main CSS files, but keeping track across upgrades is really painful. Just start out by doing the right thing right now. You’ll thank yourself later.
For the directory name, pick a convenient shorthand to represent
your institution. Three to five characters is a good rule of thumb. These
examples use the shorthand myedu, which should
be replaced. Under sakai-ux/dev/skins/myedu
create a new .css file with the name myedu.skin.css and
an images directory .
The reason you can pull this off is that CSS uses a single
namespace. The upside is that if you use the right name for a CSS style,
you override the default style without any additional effort. The downside
is that it’s one namespace and it’s not totally documented. The safest
thing to do (and the standard practice in the OAE community) is to prefix
any new style name with your institution’s shorthand name. A new link type
styling for your institution would be named myedu.newlinknewlink. Even if newlink doesn’t exist as a global style today it
might be added in the future, introducing strange and undocumented pain
later on:
sakai-ux/dev
/css
/FSS
/lib
/sakai
/skins
/default
skin.css
/myedu
myedu.skin.css
/imagesIn your new myedu.skin.css file
add the contents:
/* Pink Links */
a {
color: #E00333;
}
.s3d-add_another_location {
color: #E0039C;
}
.s3d-regular-links, span.s3d-regular-links, .s3d-regular-links a,
button.s3d-regular-links, .s3d-regular-links button,
.contentauthoring_cell_element a {
color: #E683bc;
}
.s3d-widget-links, span.s3d-widget-links, .s3d-widget-links a,
button.s3d-widget-links, .s3d-widget-links button {
color: #E683bc;
}
.s3d-regular-light-links, .s3d-regular-light-links a,
.s3d-regular-light-links button {
color: #E58EC4 !important;
}
.s3d-content-type-link a {
color: #EFB3D2;
}
.s3d-tab-active a {
background-color: #E00FFF !important;
color: #000 !important;
border-color: #E00DDD #E00DDD #E00EEE;
}
/* new path used when creating pages */
.content_container .new_page_path {
color: #E00999;
}
/* Vicious Selector Ordering */
a.s3d-regular-links,
.s3d-regular-links a,
button.s3d-regular-links,
.s3d-regular-links button,
button.s3d-link-button,
.s3d-button.s3d-overlay-button,
.addarea_contents_list_item,
#selecttemplate_container h2,
#selecttemplate_preview_dialog_container h2 {
color:#E7068c !important;
}This CSS takes each of the link assocated selectors in sakai.base.css and shifts them from the blue range to the much more attractive pink and magenta range. The new colors won’t take effect though until you direct OAE to the custom CSS file instead of the default one.
This brings us to the config_custom.js file for the first time. The config_custom.js is stored in the same location as config.js, but is a much smaller file, specifically intended for taking local configuration information. (It was a bit of hacking around to add a language set to config.js in the localization section at Internationalization and Localization.)
Head over to sakai-ux/dev/configuration and take a look at
the contents of config_custom.js. It
has a grand total of 34 lines, none of which are active out-of-the-box.
Uncomment the config.skinCSS setting
and edit the path to point to your new skin:
config.skinCSS = ["/dev/skins/myedu/myedu.skin.css"];
Save the config_custom.js file, then empty your browser cache and reload the page (see Figure 4-8). Because this change is to a JavaScript file, it’s necessary to flush the browser cache and reload. If you want to make subsequent changes to your CSS, you can just reload the page from here on in because CSS files are not cached.
To see that in action, paint the links black now. Replace the
contents of your myedu.skin.css with
the below:
/* Black & Grey Links */
a {
color: #000000;
}
.s3d-add_another_location {
color: #696969;
}
.s3d-regular-links, span.s3d-regular-links, .s3d-regular-links a,
button.s3d-regular-links, .s3d-regular-links button,
.contentauthoring_cell_element a {
color: #D3D3D3;
}
.s3d-widget-links, span.s3d-widget-links, .s3d-widget-links a,
button.s3d-widget-links, .s3d-widget-links button {
color: #D3D3D3;
}
.s3d-regular-light-links, .s3d-regular-light-links a,
.s3d-regular-light-links button {
color: #C0C0C0 !important;
}
.s3d-content-type-link a {
color: #DCDCDC;
}
.s3d-tab-active a {
background-color: #2F4F4F !important;
color: #000 !important;
border-color: #778899 #778899 #708090;
}
/* new path used when creating pages */
.content_container .new_page_path {
color: #696969;
}
/* Vicious Selector Ordering */
a.s3d-regular-links,
.s3d-regular-links a,
button.s3d-regular-links,
.s3d-regular-links button,
button.s3d-link-button,
.s3d-button.s3d-overlay-button,
.addarea_contents_list_item,
#selecttemplate_container h2,
#selecttemplate_preview_dialog_container h2 {
color:#696969 !important;
}Once you save the myedu.skin.css file, do a simple refresh in your browser to see the changes take effect.
You’ll notice that in both set ups, there is some fairly vicious selector override material at the end of the file. Because order matters in CSS, sometimes the color you expect won’t load because a subsequently defined style is being applied (thus the cascading in CSS). The selector ordering override is less than ideal, but it gets the job done.
The other less than ideal item to call out here is the heavy use of
the rule !important . The OAE
developers’ guidelines states fairly clearly that “!important should be
avoided where possible.” In practice, it’s the big hammer everyone pulls
out when a style just won’t override. Try to avoid it, and if you can’t
avoid it, concede and hit the stylesheet with !important.
The OAE Widget SDK has some good CSS guides and guidelines in development on the Sakai Project website at http://oae-widgets.sakaiproject.org/sdk/codestyleguide/css. That’s a good starting point. If you get stumped, the community is always open to questions in IRC and on its mailing lists. Check http://oae-widgets.sakaiproject.org/sdk/contact for pointers on where to find live human beings who might be able to help.
Flip the look and feel back to the default by recommenting the
config.skinCSS line in your config_custom.js file. Refresh your browser
cache and everything will go back to an aesthetically pleasing
state.
In some places, it may not be sufficient to change the display labels or the color scheme. You might need to change the number of options presented in a drop-down list, or even change the variable name used in the default.properties and localized .properties files. In the current version of OAE, you can reduce the number of options presented in a drop-down list, but not expand it.
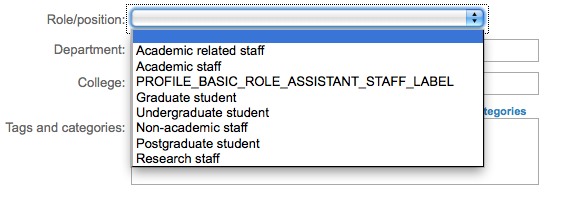
The Role/position listing is a
good example, as this is a list often requiring modification to match
local vocabulary. Login and navigate to your account’s My profile Name, email,
stuff section (this will still be the Basic information section if you didn’t change
it in section Modifying Labels in the User Interface). The Role/position drop-down list provides nine
options by default: Academic related staff, Academic staff, Assistant
staff, Graduate student, Undergraduate student, Non-academic staff,
Postgraduate student, Research staff, and Other. Each of these has a
corresponding variable name and value defined in the default.properties file in sakai-ux/dev/bundle. Just as with changing the
Basic information display label to
Name, email, stuff, you can change any
of the display values in the drop-down list by just modifying the value
associated with a variable name:
PROFILE_BASIC_ROLE_ACADEMIC_RELATED_STAFF_LABEL = Academic related staff PROFILE_BASIC_ROLE_ACADEMIC_STAFF_LABEL = Academic staff PROFILE_BASIC_ROLE_ASSISTENT_STAFF_LABEL = Assistant staff PROFILE_BASIC_ROLE_GRADUATE_STUDENT_LABEL = Graduate student PROFILE_BASIC_ROLE_LABEL = Role/position PROFILE_BASIC_ROLE_NON_ACADEMIC_STAFF_LABEL = Non-academic staff PROFILE_BASIC_ROLE_OTHER_LABEL = Other PROFILE_BASIC_ROLE_POSTGRADUATE_STUDENT_LABEL = Postgraduate student PROFILE_BASIC_ROLE_RESEARCH_STAFF_LABEL = Research staff PROFILE_BASIC_ROLE_UNDERGRADUATE_STUDENT_LABEL = Undergraduate student
However, it may be that these roles just don’t make any sense in your environment. If remapping the provided labels isn’t sufficient for you, then it’s time to dig a little deeper into customization. Change over to the sakai-ux/dev/configuration directory, and take another look at the config.js file. This is the same file where you added a language choice to the localization menu in section Internationalization and Localization This time we’re going to keyhole in on the Roles dropdown list. About line 309 is the entry for the Role/position section of the Profile:
"role": {
"label": "__MSG__PROFILE_BASIC_ROLE_LABEL__",
"required": false,
"display": true,
"type": "select",
"select_elements": {
"academic_related_staff":
"__MSG__PROFILE_BASIC_ROLE_ACADEMIC_RELATED_STAFF_LABEL__",
"academic_staff":
"__MSG__PROFILE_BASIC_ROLE_ACADEMIC_STAFF_LABEL__",
"assistent_staff":
"__MSG__PROFILE_BASIC_ROLE_ASSISTENT_STAFF_LABEL__",
"graduate_student":
"__MSG__PROFILE_BASIC_ROLE_GRADUATE_STUDENT_LABEL__",
"undergraduate_student":
"__MSG__PROFILE_BASIC_ROLE_UNDERGRADUATE_STUDENT_LABEL__",
"non_academic_staff":
"__MSG__PROFILE_BASIC_ROLE_NON_ACADEMIC_STAFF_LABEL__",
"postgraduate_student":
"__MSG__PROFILE_BASIC_ROLE_POSTGRADUATE_STUDENT_LABEL__",
"research_staff":
"__MSG__PROFILE_BASIC_ROLE_RESEARCH_STAFF_LABEL__",
"other":
"__MSG__PROFILE_BASIC_ROLE_OTHER_LABEL__"
}
},The label name from default.properties appears in config.js prefixed with a double underscore,
the flag MSG and another double
underscore, then suffixed with a final double underscore. This is the
convention Sakai OAE uses for identifying display values which should be
localized. Any string bracketed by __MSG__ and __ gets checked against the active account’s
language setting. If the variable has a corresponding entry in the
language specific .properties file then that value is
displayed, otherwise the entry from default.properties is taken.
In config.js you can change the label names and you can reduce the size of the display list. What you can’t do, without going a lot deeper into the system, is change the internal names of the options (e.g., ‘academic_related_staff,’ ‘academic_staff’).
We’ll do both as examples, correcting that confounded spelling error
in the label name for PROFILE_BASIC_ROLE_ASSISTENT_STAFF_LABEL and
dropping the Other option from the
overall list. Again, take a back up of the config.js file before you start work. You can
always unpack another clean copy from the ZIP file you downloaded, but
having one handy makes it easy to check your work and revert if something
goes wildly off kilter. Part of being a good technologist is managing your
own distress when you mess a system up.
Modify the assistant staff line to correct the spelling error in just the parameter key:
"assistent_staff": “__MSG__PROFILE_BASIC_ROLE_ASSISTANT_STAFF_LABEL__”,
Sadly, we can’t also correct the internal value from assistent_staff to assistant_staff. Something deeper in the system
is expecting assistent to be consistently
misspelled.
Remove the line for the "other"
entry and the preceding comma, so that "research_staff" is the last item in the list.
Save the config.js file.
Before you finish the assistent spelling
correction pop back over to your web browser, clear your cache and refresh
the My profile screen (see Figure 4-9). There are two
things to notice: first, the Other
option is now gone from the Role/position drop-down list. Anyone who had
selected Other as their role will continue to have
that role associated with their profile, but no one will be able to select
it afresh. The value persists on the backend, even though you’ve removed
it from the list of options on the display end.
The other thing to note is that the drop-down list now displays the
raw label string PROFILE_BASIC_ROLE_ASSISTENT_STAFF_LABEL where
the more pleasant Assistant staff
should display. If the JavaScript provides a variable name for which there
is no entry in an appropriate .properties file, OAE
just delivers the unmatched label to the user interface.
Open up the default.properties file in sakai-ux/dev/bundle and change it to the following:
PROFILE_BASIC_ROLE_ASSISTANT_STAFF_LABEL = Assistant staff
Save this file and refresh the My
profile view in your browser. This time the change will take
without requiring that you refresh the browser cache. Cache refreshes are
needed only when you modify a JavaScript file.
Refreshing Cache
Many of the OAE frontend developers keep caching turned off in their browsers while they work on the frontend in order to reduce the annoyance of hunting a bug that is just in an inconsistent cache state. Keep in mind that your users won’t be configured to always reconsult the server for fresh code (indeed you wouldn’t want them to; it would needlessly load up your server). When troubleshooting a real person’s problems, always make emptying the browser cache the first step in diagnosis.
Why would you want to change a label name if you can’t modify the internal reference? Changing the label names can reduce confusion if you want the display values to be maintained by non-technical or minimally technical members of staff. The OAE development team thought the parameter names were a good idea when they got started on the profile functions, but that doesn’t mean they’re intuitive in your environment. By making the key names closer to your organization’s internal vocabulary you can move the decision making out to the people who are responsible for those decisions, rather than gating everything on someone with appropriate operating system privileges. Those privileges are for solving technical problems, not for creating bottlenecks. Of course, if you’re a power hungry system admin feel free to keep this material obscured from the prying eyes of mere mortals.
There is an equally compelling argument in favor of keeping a gatekeeper in the middle who controls the .properties files: every change you make to the JavaScript files today will have to be maintained by the technical staff across upgrades of the code. If you have a solid code control, build management, and QA process in your IT department, then it can make sense to customize the parameter names. If you are likely to have to recode these JavaScript message strings by hand each time you upgrade, it’s probably better to leave the JavaScript as close to the out-of-the-box version as possible.
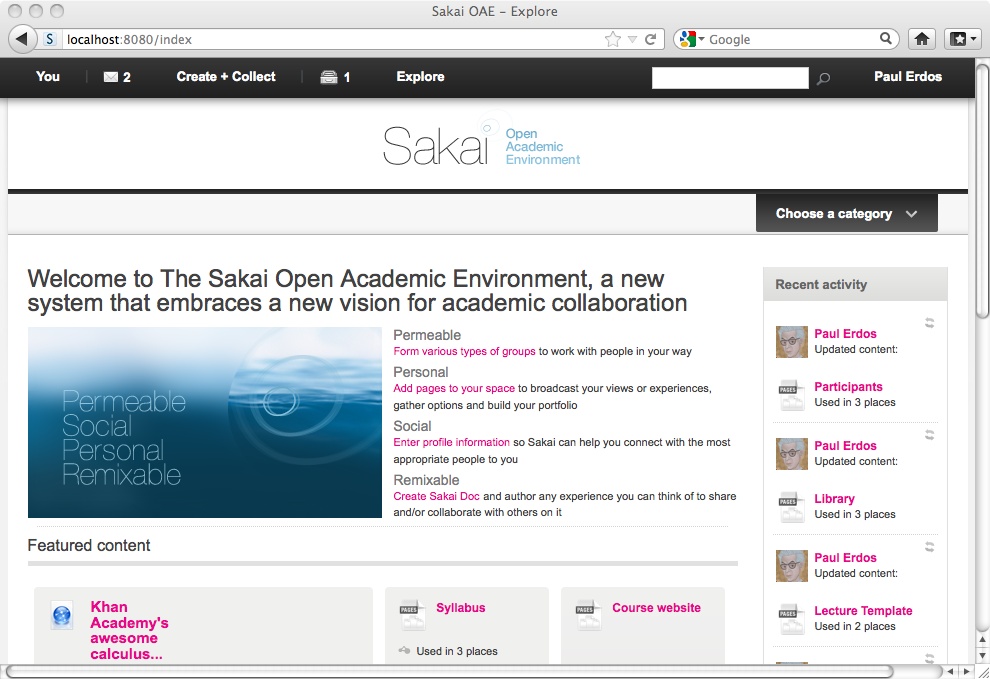
The public browsing views of Sakai OAE provide visitors with a view
into the people, research, and groups at your institution. Any element of
OAE that’s been marked public and had a category assigned will turn up
here, ordered
according to the categories tree. Like the values for the Role/position drop-down list, two levels of
customization can be done here. In the default.properties file, the display values can
be modified. In the config.js file,
options can be removed and parameter key names can be changed. Unlike
other parameters that are more tightly bound to the backend, display
categories and subcategories can also be added as well as removed. The
categories are one of the highest stakes configurations you’ll make to the
Sakai OAE system, as this is fundamentally an identity activity for your
institution. When visitors land at your OAE instance how do you want to
guide them through the publicly available materials? When students decide
to make their essays public, how do you want them to characterize their
work?
In order to see the effects of category changes, whip up the
Partial Derivative for Dreamers course, just as you
did in Chapter 2 and assign it the category
Medicine & Dentistry >> Pre-clinical
Medicine. Make sure to set the course to be discoverable by the
public, so it turns up in the public Explore
space.
Start with one quick improvement to the defaults provided when you install OAE: removing excess verbiage in the Other listings. The hierarchy is built into the label keys; it need not be displayed to people as if they, too, were computers.
In the directory sakai-ux/dev/bundle, edit default.properties. Update a couple of the
other category display values to simply say Other. For example change Others in Medicine and Dentistry and Others in Biological Sciences to just Other.
From:
MEDICINE_AND_DENTISTRY_OTHERS = Others in Medicine and Dentistry … BIOLOGICAL_SCIENCES_OTHERS = Others in Biological Sciences
to:
MEDICINE_AND_DENTISTRY_OTHERS = Other … BIOLOGICAL_SCIENCES_OTHERS = Other
Save the file and direct your browser to the public browsing page at
http://localhost:8080/categories. Clicking through
on the Medicine and Dentistry or
Biological Sciences categories will now
show the last subcategory listed as simply Other. Click on the Other section in Biological Sciences and the URL shows that
you’re still in the Biological Sciences category
area, as does the lefthand navigation. As subcategories are consistently
displayed in the context of their parent, you can safely shorten the
display names to take advantage of that context.
In the current version of OAE, the category infrastructure is pretty resilient, it just hasn’t had a pretty configuration interface written yet. You can remove categories and subcategories, change internal names as well as display names and the system automatically detects your new scheme. Removing a category wholesale, and introducing a new one, doesn’t present a significant challenge.
To remove a category, open up our old friend, the config.js file in sakai-ux/dev/configuration. All the display
JavaScript for the categories is in the Directory: section, starting about line 1009. To
remove the entire “Medicine and Dentistry” category, delete all the lines
from medicineanddentistry down to but
not including the next category header, biologicalsciences. To remove the single
botany subcategory from the
Biological Sciences section, delete the three lines
for that subcategory:
botany: {
title: "__MSG__BOTANY__"
},You want to end up with a Directory section with the first 10 lines:
Directory: {
biologicalsciences: {
title: "__MSG__BIOLOGICAL_SCIENCES__",
children: {
biology: {
title: "__MSG__BIOLOGY__"
},
zoology: {
title: "__MSG__ZOOLOGY__"
},Before adding anything new in, test this out. Save the config.js file, empty your browser cache and
reload the browsing page at http://localhost:8080/categories. The Medicine and Dentistry section is now gone.
Clicking in to the Biological Sciences
section shows that the Botany
subcategory is gone as well.
If you search for a course tagged with one of the categories we’ve
removed you’ll find that it now displays with the confusing tag: false >> false. Select Courses from the Explore menu and you’ll see the
Partial Derivatives for Dreamers course with this
false tag value. Click on the tag and the URL will show an attempt to
search with the original category values, but the system will deliver a
404 error. As mentioned the category subsystem is resilient, but it’s not
exactly robust. When you first deploy Sakai OAE it’s best to start with a
small selection of categories and subcategories, then expand, rather than
starting broad and having to sort out how to manage category removals
after they’ve been used.
Adding a category requires entries is both config.js and default.properties files. When you create a new category, prefix the internal name and the label key with the short term for your institution. This will prevent potential name clashes down the line. Like CSS style names, all label keys exist in a single namespace. If a future version of OAE introduces a parameter key you’re already using it will be a pain to make the name localization at that time. Do the right thing now. Your future self will thank you.
Let’s say your university has introduced a new Nanotechnology
department. The first step is to add it to the Directory section in config.js. The categories display in the same
order they are listed in JavaScript. The provost wants to feature the
nanotechnology category, so add it directly after Directory and before the biologicalsciences entry. The first 14 lines of
your new Directory section should look like this:
Directory: {
myedunanotech: {
title: "__MSG__MYEDU_NANOTECH__",
children: {
myedunanotechbio: {
title: "__MSG__MYEDU_NANOTECH_BIO__"
},
myedunanotechsynth: {
title: "__MSG__MYEDU_NANOTECH_SYNTH__"
}
}
},
biologicalsciences: {
title: "__MSG__BIOLOGICAL_SCIENCES__",Now, enter the corresponding parameter keys and values to your
default.properties file on /source/sakai-ux/dev/bundles. The parameter key
is the title value stripped of the
leading __MSG__ and the trailing
__. Add the following lines to your
default.properties:
MYEDU_NANOTECH = Nanotechnology MYEDU_NANOTECH_BIO = Nanobiotechnology MYEDU_NANOTECH_SYNTH = Synthetic Nanotechnology
Save the config.js and default.properties files, empty your browser’s cache and reload the Categories page (see Figure 4-10). The Nanotechnology category is now the first box on the All categories page.
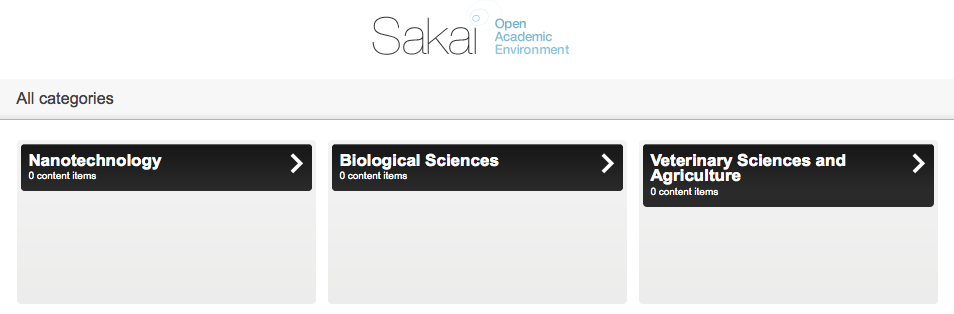
Modifying the config.js file in general, and the directory section in particular, is a bit of tricky business. Here are a couple of troubleshooting tips:
- Nothing changes
Always remember to empty your browser cache. Sakai OAE caches eagerly in order to improve performance. Make sure the language setting in your Sakai OAE account matches the .properties file you’re working with on disk. Set your account to a language with minimal or no localization in its corresponding .properties file in order to make sure you’re picking up the display values from default.properties.
- An all-cap string appears in the web browser
Double check the correspondence between the title value in your config.js file and the parameter key in your default.properties file. Transposed letters are particularly hard to see when you’re in all caps in a fixed font. Trying doing a strict copy and paste from one file to the other, remembering to strip out the prefixing
__MSG__and trailing__from the config.js title before adding it to default.properties. Next, double check the format of the title value in config.js. If there are single underscores where there should be double underscores OAE will display the parameter without substituting the display value.- A weird mix of a display value and an all capital string appears in the web browser
You may have double underscores in the title value where you meant to have single underscores. Sakai OAE parses the key parameter as whatever is sandwiched between the prefix
__MSG__and the next following double underscore, then just coughs up everything that comes after it.- A display value shows in the web browser, but it’s not the one you expect
Double check that you haven’t accidentally reused a parameter key already in use. For example, if your library studies school has a subcategory key of
COLLECTIONSit will clash with the OAE key for localizing the name of the Collections functionally. The standard practice is to prefix your institution’s label keys with a short form of the institution name in order to reduce namespace collisions (e.g.MYEDU_COLLECTIONSinstead ofCOLLECTIONS).- Everything’s gone white (the tragic white-bomb)
If nothing will load in the browser, not even an error page, then you’ve got a syntax error in your config.js file. Restore a clean back up of the config.js file and start over. It’s probably a stray comma or a missing bracket. This is one of the challenges of working directly in the JavaScript. Future versions of OAE will have a configuration tool to simplify the category management process. In the meantime, tread carefully and test like crazy before you touch your production system.
When people first visit Sakai OAE, the landing page introduces some key themes about OAE. The area that displays the Permeable/Social/Personal/Remixable image is actually a widget, a small block of customized code that runs inside the Sakai OAE environment. In order to start customizing a widget, OAE needs to know where to find the revised widget. Just like the CSS and JavaScript file location indication done in section Configure OAE for CSS, Property, and JavaScript Changes, the widget location is indicated with a new Filesystem Resource Provider.
Open your browser to http://localhost:8080/system/console and login again with
the default username and password admin/admin. Click the Configuration button to get over to the Sling
configuration manager. Click the plus (+) button next to Apache Sling Filesystem Resource Provider to
create an entry overriding the devwidget location.
For Provider root, enter:
/devwidgets
For Filesystem root, enter:
/Users/username/source/sakai-ux/devwidgets
Leave the other values at their defaults and click Save. Refresh your browser and scroll back down
to the Apache Sling Filesystem Resource
Provider. Under the Filesystem Resource Provider heading there
are now two entries for org.apache.sling.fsprovider.internal.FsResourceProvider
with unique sufffix strings: one for your local dev location and now another for your local
devwidgets location.
The welcome screen widget is located in sakai-ux/devwidgets/welcome.
In the welcome.html file, substitute a new image for the landing page:
<img src="/devwidgets/welcome/images/sakai_default.png" alt="__MSG__KEYWORDS__">
change to:
<img src="http://farm8.staticflickr.com/7013/6620145495_c5208b58de_n_d.jpg" alt="__MSG__KEYWORDS__">
In the default.properties file, provide some new keywords for the alternate text for screen readers:
KEYWORDS = Sakai: Permeable, Social, Personal, Remixable
change to:
KEYWORDS = St. Paul's doorway image courtesy of Ian Dolphin, used under the Creative Commons Attribution, Noncommercial, No Derivative works license.
Also change the first set of display text and link:
WELCOME_ITEM1_TITLE = Permeable WELCOME_ITEM1_LINK = /create#l=group WELCOME_ITEM1_LINK_TEXT = Form various types of groups WELCOME_ITEM1_OTHER_TEXT = to work with people in your way
change to:
WELCOME_ITEM1_TITLE = Open WELCOME_ITEM1_LINK = /categories WELCOME_ITEM1_LINK_TEXT = Explore WELCOME_ITEM1_OTHER_TEXT = all the public work at our institution
Fnally, make a quick and dirty change to make this first link active
for anyone who visits OAE, not just to people who are currently logged in.
In welcome.html, modify the two
if statements associated with the first welcome link
to always be true by changing {if
!anon} to {if true}.
This section of code will now look like the following:
<h2>__MSG__WELCOME_ITEM1_TITLE__</h2>
{if true}
{if '__MSG__WELCOME_ITEM1_LINK__'.substr(0,1) === '#'}
<button class="s3d-link-button"
data-trigger="${'__MSG__WELCOME_ITEM1_LINK__'.substr(1)}">
{else}
<a class="s3d-regular-links" href="__MSG__WELCOME_ITEM1_LINK__">
{/if}
{else}
<span class="s3d-regular-links">
{/if}
__MSG__WELCOME_ITEM1_LINK_TEXT__
{if true}
{if '__MSG__WELCOME_ITEM1_LINK__'.substr(0,1) === '#'}
</button>
{else}
</a>
{/if}
{else}
</span>
{/if}
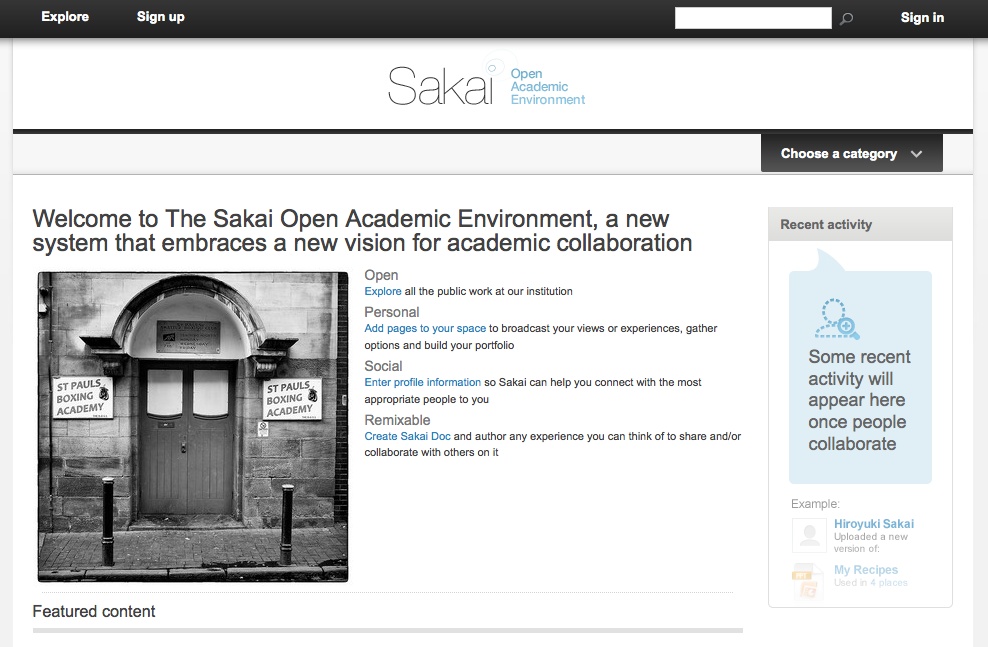
<span> __MSG__WELCOME_ITEM1_OTHER_TEXT__</span>Sign out of OAE (if you’re signed in) and refresh the landing page at http://localhost:8080. (See Figure 4-11.)
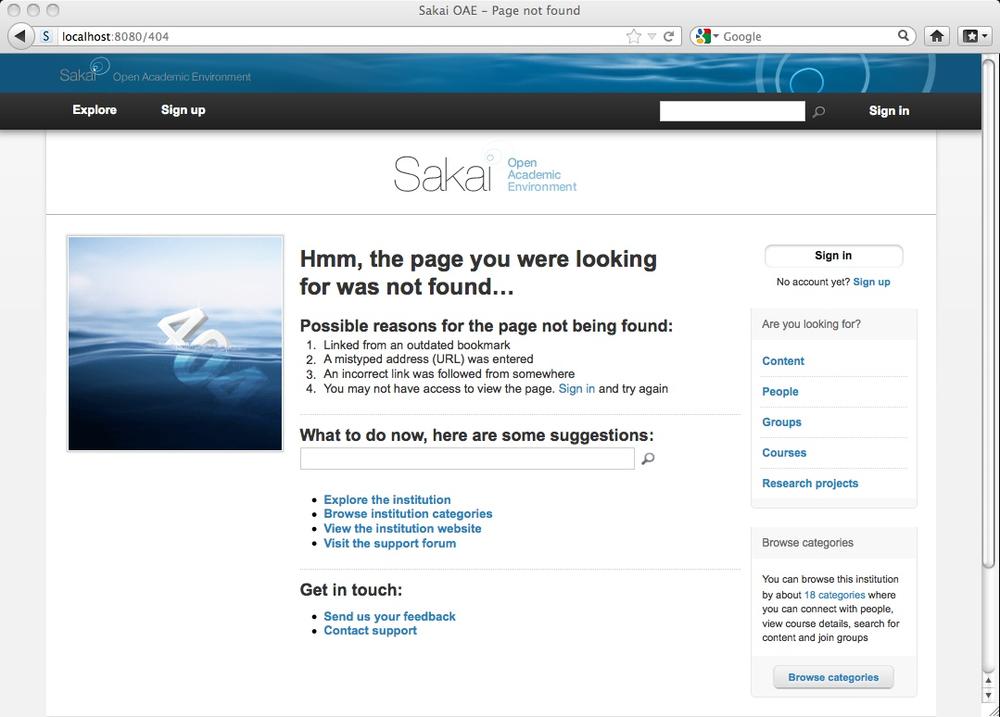
The Sign Up page and the various error pages can be modified using
the approaches from this chapter (see Table 4-1). To
modify or localize the display labels, modify your account language to
i18n debug and access the corresponding
URL. The all-cap labels that render in i18n
debug mode can have their corresponding display values changed
in default.properties for the general
case, and in the language specific .properties file
in the localized cases. Styles can be overriden with local CSS styles per
section Configure OAE for CSS, Property, and JavaScript Changes, and if necessary, the whole
HTML page can be customized. If you do reach into the HTML, be sure to
have a code control process in place so subsequent upgrades of the OAE
software don’t overwrite your hard work.
Table 4-1. Customization Reference for Sign Up and Error Files
| Page | URL | HTML | CSS |
|---|---|---|---|
| Sign Up | http://localhost:8080/register | sakai-ux/dev/create_new_account.html | sakai-ux/dev/css/sakai/sakai.create_new_account.css |
| Access forbidden | http://localhost:8080/dev/403.html | sakai-ux/dev/403.html | sakai-ux/dev/css/sakai/sakai.error.css |
| Page not found | http://localhost:8080/dev/404.html | sakai-ux/dev/404.html | sakai-ux/dev/css/sakai/sakai.error.css |
| Internal Server Error | http://localhost:8080/dev/500.html | sakai-ux/dev/500.html | sakai-ux/dev/css/sakai/sakai.error.css |
One thing that can’t be changed is the recaptcha inclusion in the Sign Up page. While it can be removed as such from the HTML page associated with registration, the user creation kernel services expect a captcha, and won’t create a user account without one. (See Figure 4-12 for the error message.)
When you’re ready to commit to your interface changes, rebundle the OAE code into a single deployable jar:
Shut down any running instance of OAE.
Change into your frontend code directory and rebuild the code to use your customized files:
cd source/sakai-ux
mvn clean install
This will take about a minute to complete, and produces a new .jar file in your local Maven repository corresponding to the UX.
Change into your backend code directory and rebundle the full system. The bundle parameter directs maven to wrap up the jars insteading of rebuilding them all:
cd source/nakamura
mvn -Pbundle clean install
This rebundling will take about five minutes. When it completes, you’ll have a new nakamura .jar file in your nakamura/app/target directory. Calling the tools/run_production.sh script on *nix or tools\run_debug.bat on Windows will pull up this new jar with the customizations built in to it.
To sanity check your rebuilt OAE in development and confirm that it properly includes the intended customizations, just copy it to a new directory on your development machine and fire it up, being mindful to shut down any other instance of OAE first.
In development, use the File System
Resource settings to direct the OAE instance at your local dev
and devwidgets directories. In stage, test against a freshly deployed
.jar, with the dev and devwidget materials built in,
then deploy that wholly contained jar out to production.
Get Sakai OAE Deployment and Management now with the O’Reilly learning platform.
O’Reilly members experience books, live events, courses curated by job role, and more from O’Reilly and nearly 200 top publishers.

