Load balancing allows you to distribute the workload evenly across multiple CouchDB nodes. Since CouchDB uses an HTTP API, standard HTTP load balancing software or hardware can be used. With simple load balancing, each CouchDB node will maintain a full copy of your database through replication. Each document will eventually need to be written to every node, which is a limitation of this approach since the sustained write throughput of your entire system will be limited to that of the slowest node. You could replicate only certain documents using filter functions or by specifying document IDs, as discussed in Chapter 3. This approach to clustering could get complicated very quickly. See Chapter 5 for details on an alternative way to distribute your data across multiple CouchDB nodes.
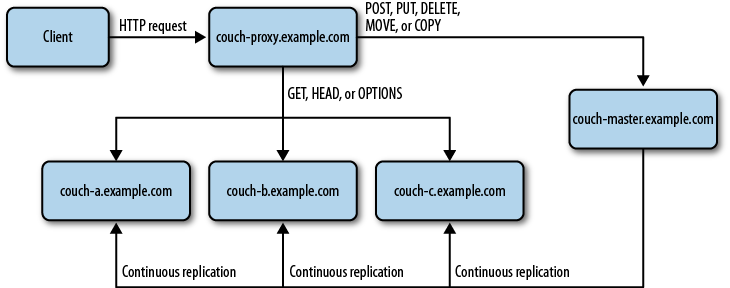
In this scenario, we will set up a write-only master node and three
read-only slave nodes. We will send all “unsafe” HTTP write requests
(POST, PUT, DELETE,
MOVE, and COPY) to the master node and load balance all
“safe” HTTP read requests (GET, HEAD, and OPTIONS) across the three slave nodes. We will set
up continuous replication from the write-only master to each of the
read-only slave nodes. See Figure 4-1 for a diagram
of the configuration we will be creating in this chapter.
Note
MOVE and COPY are non-standard HTTP methods. Only
versions 0.8 and 0.9 of CouchDB supported the MOVE HTTP method. The MOVE HTTP method was removed from CouchDB since
it was really just a COPY followed by a
DELETE, but implied that there was a
transaction across these two operations (which there was not). Assuming
you are using a newer version of CouchDB, then there’s no need to concern
yourself with the MOVE HTTP
method.
There are many load balancing software and hardware options available. A full discussion of all the available tools and how to install and configure each on every available platform is beyond the scope of this book. Instead, we will focus on installing and configuring the Apache HTTP Server as a load balancer. We’ll be using Ubuntu, but these instructions should be easily adaptable to your operating system.
Warning
You may want to consider having multiple load balancers so that you can remove the load balancer as a single point of failure. This setup typically involves having two or more load balancers sharing the same IP address, with one configured as a failover. The details of this configuration are beyond the scope of this book.
Apache was chosen as the load balancer for this scenario because it is relatively easy to configure and has the basic capabilities needed. Other load balancers you may want to consider are HAProxy, Varnish, Pound, Perlbal, Squid, nginx, and Linux-HA (High-Availability Linux) on Linux Standard Base (LSB). This example illustrate a basic load balancing setup. Hardware load balancers are also available. Your hosting provider may also offer its own, proprietary load balancing tools. For example, Amazon has a tool called Elastic Load Balancing and Rackspace provides a service called Rackspace Cloud Load Balancers (in beta as of this writing).
In the following scenario, we will send write requests to one master
node with a domain name of couch-master.example.com and distribute read
requests to three nodes on machines
with domain names of couch-a.example.com, couch-b.example.com, and couch-c.example.com. Install CouchDB on the
master node and on all three slave nodes:
sudo aptitude install couchdb
We need to configure CouchDB to allow connections from the outside
world. On all four nodes, configure CouchDB to bind to each server’s IP
address by editing the [httpd] section
of /etc/couchdb/local.ini as follows,
replacing <server IP address>
with your server’s IP address:
Warning
Unless your server is behind a firewall, this configuration change will allow anyone to access your CouchDB database. You will likely want to configure authentication and authorization. For information on this, see Chapter 22 in CouchDB: The Definitive Guide (O’Reilly).
[httpd]
; port = 5984
bind_address = <server IP address>
; Uncomment next line to trigger basic-auth popup on unauthorized requests.
;WWW-Authenticate = Basic realm="administrator"
If your server has multiple IP addresses, you can use 0.0.0.0 as the bind_address to bind on all IP addresses.
Restart CouchDB on all four nodes:
sudo /etc/init.d/couchdb restart
Test all four nodes by trying to connect to each from a different machine:
curl -X GET http://couch-master.example.com:5984/
curl -X GET http://couch-a.example.com:5984/
curl -X GET http://couch-b.example.com:5984/
curl -X GET http://couch-c.example.com:5984/
The response to each request should be:
{"couchdb":"Welcome","version":"1.0.1"}If you can’t connect remotely to one or more of the CouchDB nodes,
then double-check that the bind_address
in /etc/couchdb/local.ini is set to
each machine’s correct IP address, respectively, and that you have
restarted CouchDB.
Create a database named api on
all four nodes:
curl -X PUT http://couch-master.example.com:5984/api
curl -X PUT http://couch-a.example.com:5984/api
curl -X PUT http://couch-b.example.com:5984/api
curl -X PUT http://couch-c.example.com:5984/api
The response to each request should be:
{"ok":true}At this point we have four CouchDB databases, on four different nodes, running independently. If we write data to the master node, it will not be replicated to any of the slave nodes yet.
Get Scaling CouchDB now with the O’Reilly learning platform.
O’Reilly members experience books, live events, courses curated by job role, and more from O’Reilly and nearly 200 top publishers.

