This section describes the third remote administration solution—one that is based on a variety of freely available components.
The Secure Shell (SSH) is a suite of programs that allows a user to log on to, or execute commands on, another computer over the network. SSH also allows copying files from and to a remote host. This is all done in a secure manner — hence the name Secure Shell. SSH is intended as a replacement for the notoriously unsecure Berkeley “r” commands: rlogin , rsh/remsh , and rcp.
There are SSH implementations available for many platforms. These implementations allow, for example, accessing the Windows NT command prompt from a computer running Unix or vice versa. They even allow getting a remote Windows NT graphics console with mouse and keyboard in a secure manner from a Unix box; I describe this later, in Section 4.3.6.”
SSH was developed by Tatu Ylönen. Originally it was free software, but after Version 1.2.12 the license was made more restrictive. The current reference implementations of SSH can’t be used for commercial use without getting a license from Datafellows (http://www.datafellows.com/ ). Another problem with the reference implementations is that they use patented algorithms like IDEA and the RSA cryptosystem (but note that RSA’s U.S. patent expired on September 20, 2000); see Section 1.5 in Chapter 1 for a summary of cryptographic algorithms commonly used in Windows NT systems.
A Swedish programmer, Björn Grönvall, started to fix bugs in the
last free 1.2.12 release of SSH in late 1999. He called this effort
OSSH. The OpenBSD team
became aware of OSSH and started a project called
OpenSSH
based on Grönvall’s work. The first release of OpenSSH
(http://www.openssh.com/ ) was
available for OpenBSD 2.6 only two months later. Other groups have
become interested in OpenSSH and have started porting it to other
operating systems. OpenSSH for Windows NT/2000 is available from the
Franken Archives FTP site
(ftp://ftp.franken.de/pub/win32/develop/gnuwin32/cygwin/porters/Vinschen_Corinna/V1.1.1/
). OpenSSH re-quires a
POSIX [40] emulation layer called Cygwin to run on Windows NT/2000.
The OpenSSH source code is publicly available. The availability of the code allows anyone to analyze the code to find possible exploits, weaknesses in the protocol itself, and ordinary bugs in the code.
The main benefits of OpenSSH are:
OpenSSH is free for commercial use.
There are no patented algorithms in the source tree. OpenSSH relies on the OpenSSL library (http://www.openssl.org/ ) for many of its cryptographic features.
OpenSSH supports both Version 1 and Version 2 of the SSH protocol.
The SSH protocol provides session encryption. This means all SSH network sessions are protected by encryption. The default encryption algorithm is 3-DES (Triple DES), but OpenSSH also supports Blowfish using a fallback mechanism. The secure session setup takes place before the user authenticates (see How SSH Session Setup Works“). This ensures that no usernames or passwords are transmitted in cleartext over the network.
SSH allows access to a command prompt on a remote Windows NT server, and also the copying of files from and to a remote server.
Tip
These examples won’t work until SSH is installed and configured. There are instructions for installing and configuring SSH later in this chapter, in Section 4.3.3.
To start a remote console session, type:
C:\> ssh -l username hostname
To copy boot.ini from a remote server, type:
C:\> scp administrator@remote:/boot.ini /temp
Another powerful feature available with SSH is the ability to redirect TCP connections through the SSH session connection. This makes it possible to use SSH authentication and encryption with almost any TCP-based application. An example of this is securing an SQL connection, as illustrated in Figure 4.14.
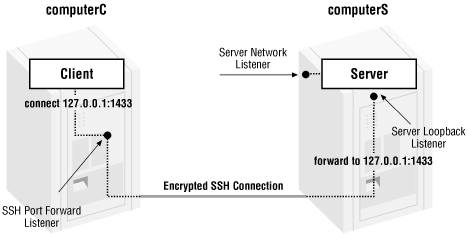
As shown in the figure, establish an SSH port forwarding connection from the client computer “computerC” to the server computer “computerS” by executing the following command on computerC:
C:\> ssh -l stnor -L 1433:127.0.0.1:1433 computerS
SSH prompts you for the password of the “stnor” user account at computerS, and if the authentication succeeds, you will get an interactive shell session. SSH also forwards all data that gets sent to the local port 1433 on computerC to port 127.0.0.1:1433 at computerS.
You are now able to connect with the SQL client software to the local port 1433 on computerC, and get connected to the remote SQL server at computerS via the SSH port forwarding mechanism. All data is tunneled in the SSH connection. As a result, the SQL connection now is encrypted.
Cygwin is a free, open source Win32 porting layer for Unix applications, originally developed in 1995 by Cygnus Solutions (now a part of Red Hat, Inc.). The Cygwin library brings to Windows the Unix system calls and an environment that Unix programs expect. This makes it fairly easy to port Unix applications without having to make extensive changes to the source code. The Cygwin library is implemented as a user mode Win32 DLL that emulates a Unix environment. We need Cygwin here because it allows us to compile and run the SSH Unix code (discussed earlier) on Windows.
Warning
Cygwin is a work in progress; in the current implementation the Cygwin “kernel” uses shared memory to store information about its processes. As a result, a malicious Cygwin user may be able to make other Cygwin processes behave unexpectedly. For this reason it’s very important that any additional Cygwin utilities (other than the ones described in Section 4.3.2.2, later in this chapter) are not installed on a bastion host.
If you have a Unix background, you might be interested to know that the Cygwin package also includes the GNU development tools (gcc, make, diff, etc.) and a set of other popular Unix tools like awk, grep, and sed.
When an application is built with the Cygwin tools, the executable is linked to the Cygwin library (cygwin1.dll ). If the application is run on another host, make sure that the correct version of the library is installed on that host. Otherwise, the application may run incorrectly or may not start at all.
One important thing to be aware of is that applications linked to the
Cygwin library think they are running on Unix. This introduces some
caveats; for example, Unix uses slashes instead of backslashes in
file paths, and there are no drive letters (C:,
D:, and so on) in Unix. How does this affect us?
Well, we’ll just have to learn some Unix!
For example, if I want to use my recently complied version of
scp.exe (the copy program in SSH), I have to use
Unix syntax:
C:\> scp /winnt/system32/notepad.exe computerB:/temp
This copies the local
\winnt\system32\notepad.exe to
%SystemDrive%\temp on computerB.
More details on the Cygwin library are available at the Red Hat web site ( http://sources.redhat.com/cygwin/ ).
Under normal circumstances, you’d want to install the whole Cygwin package in one automated procedure, but, as you should know by now, you want to keep your bastion host as clean as possible. You definitely don’t want to install any tools on the host that could be of help to an intruder. Moreover, the bastion host has no use for most of the utilities that come with Cygwin. As a result, you’ll have to install and configure the Cygwin library manually.
Tip
These instructions are only applicable if OpenSSH is built according to the instructions in Appendix C, or if a precompiled version is downloaded from the O’Reilly web site.
Follow these steps:
Copy the following files to the
\winnt\system32directory:The Cygwin library DLL (cygwin1.dll ) and Zlib (a data compression library) DLL (libz.dll ).
The ash shell (sh.exe).
The Cygwin utilities mkpasswd.exe and mkgroup.exe. These utilities are used to generate Unix-style user and group database files.
The Cygwin utilities mount.exe and umount.exe. These utilities are used to manage Windows NT-to-Unix filesystem mappings.
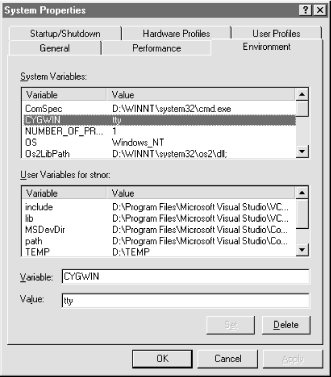
Set the system environment variable called CYGWIN to the value
ttyto enable extra support for Unix-likettys. This is done by right-clicking on My Computer → Properties → Environment, and then highlighting any variable name in the System Variables scroll box. Replace whatever is in the Variable text box with CYGWIN, typettyin the Value text box, and click on the Set button. Now you should see a CYGWIN entry in the System Variables scroll box, as shown in Figure 4.15. Close the window by clicking OK.
Create home directories on the system drive for the users that should have remote access:
C:\> md \home
C:\> md \home\stnor
Create Unix filesystem mappings using the following mount commands:
C:\> mount -t %SystemDrive% /
C:\> mount -t %SystemRoot%\system32\drivers\etc /etc
C:\> mount -t -s %SystemDrive% /
C:\> mount -t -s %SystemRoot%\system32\drivers\etc /etc
Verify the drive mappings by executing mount:
C:\> mount
Device                          Directory           Type         Flags
C:                              /                   user         textmode
C:\winnt\system32\drivers\etc   /etc                user         textmode
Optionally, additional mappings can be created if there are multiple drive letters on the bastion host. I suggest mounting
D:as/d,E:as/e, and so on, as follows:C:\> mount -t D: /d C:\> mount -t -s D: /d
Change your working directory to
%SystemRoot%\system32\drivers\etcand run:C:\> mkpasswd -l > passwd
This command dumps the local SAM database to a Unix-style password file. The
passwdfile contains the following fields of information for each user:Login name.
Reserved field for encrypted Unix passwords. This is not used by the Cygwin SSH port; it calls the native Win32 API function LogonUser( ) instead. This field should contain an asterisk (*) on Windows NT.
Numeric user ID.
Numeric group ID.
Reserved field, which can be used for identification. It holds the user’s SID.
Initial working directory.
Program to use as shell.
A colon separates the fields, and a valid entry looks like this:
stnor:*:1001:513:S-1-5-21...:/home/stnor:/winnt/system32/sh
Edit the password file to remove any user accounts that shouldn’t be granted remote access.
For the remaining users, remember to put an asterisk in the password fields, and edit the shell entry to make the users’ shell
/winnt/system32/sh. The shell has to be sh; if it isn’t, the scp program won’t function properly.Define a home directory for each user. The home directory should be a separate directory such as
/home/username(i.e.,C:\home\usernameor whatever you want to map/mount /home to).When you are done with the password file, run the following:
C:\> mkgroup -l > group
This creates a Unix group file from the groups available in the SAM database. You don’t need to edit this file.
Create a text file containing the text
execcmd, and save it as%SystemRoot%\system32\drivers\etc\profile. The command specified after theexeckeyword is executed in place of the shell process. This makes our effective shell the NT command prompt — even though the specified shell in/etc/passwdis the Unix shell (sh).Set permissions on the password, group, and profile files to:
Administrators: Full Control Everyone: Read An optional “message of the day” file can also be added as
%SystemRoot%\system32\drivers\etc\motd. The contents of this file are displayed after a successful logon takes place.
The Secure Shell server program is called the SSH daemon (sshd). A daemon is the equivalent of an NT service process — a process running in the background, often providing some form of network-based service.
Follow these steps to configure the SSH daemon:
Start by copying the SSH binaries to the
system32directory. The SSH binaries are shown in Table 4.4.
As mentioned earlier, each SSH server computer has a unique host key used to identify itself. Create this key by issuing the following command:
C:\>ssh-keygen -f /etc/ssh_host_key -N ''
Generating RSA keys:  .........ooooooO.....................................ooooooO
Key generation complete.
Your identification has been saved in /etc/ssh_host_key.
Your public key has been saved in /etc/ssh_host_key.pub.
The key fingerprint is:
d0:36:d2:0f:fe:b5:ba:4f:be:1d:b0:b9:d2:64:eb:8c stnor@CARTMAN
This creates an RSA key-pair (with an empty passphrase) for the server host. The passphrase needs to be empty to allow unattended operation for the daemon.
After the key-pair is generated, the private key is written to
%SystemRoot%\system32\drivers\etc\ssh_host_keyand the public host key is written to%SystemRoot%\system32\drivers\etc\ssh_host_key.pub.To use SSH protocol v2, a DSA server key also must be created:
C:\>ssh-keygen -d -f /etc/ssh_host_dsa_key -N ''
Generating DSA parameter and key.
Your identification has been saved in /etc/ssh_host_dsa_key.
Your public key has been saved in /etc/ssh_host_dsa_key.pub.
The key fingerprint is:
92:9c:d6:4c:cb:7a:91:29:07:cc:ca:c3:8d:4e:8f:6d stnor@CARTMAN
Set the following permissions on the private keys:
Administrators: Full Control SYSTEM: Read Set the following permissions on the public keys:
Administrators: Full Control Everyone: Read Configure the server daemon. This is done in the server configuration file (
C:\etc\sshd_config), as shown in Example 4.1. (Note that this file must be created.)
Example 4-1. A Sample SSH Server Daemon Configuration File
# This is the ssh server systemwide configuration file.
Port 22
Protocol 2,1
ListenAddress 0.0.0.0
HostKey /etc/ssh_host_key
ServerKeyBits 768
LoginGraceTime 600
KeyRegenerationInterval 3600
PermitRootLogin yes
IgnoreRhosts yes
StrictModes yes
X11Forwarding no
PrintMotd yes
KeepAlive yes
RhostsAuthentication no
RhostsRSAAuthentication no
RSAAuthentication no
PasswordAuthentication yes
PermitEmptyPasswords no
CheckMail no
UseLogin no
Set the permissions on the configuration file to the following:
| Administrators: Full Control |
| Everyone: Read |
For more information on the settings in this file, refer to the
sshd
manpage (http://www.openbsd.org/cgi-bin/man.cgi?query=sshd
). Note that not all directives are relevant on the Windows/Cygwin
platform.
In order to be able to test an actual SSH login, the SSH daemon must run with the following privileges:
Act as a part of the operating system
Increase quotas
Replace a process-level token
The user account definitely shouldn’t have these privileges. However, if the SSH daemon is started without these privileges, the client gets an “authentication failed” error message when trying to log on. Therefore, you need to start the daemon as Local System. Do this by following these steps:
Enable and start the Schedule service (running as Local System):
C:\> net start schedule
Schedule a job to start a command prompt the next minute or two:
C:\> time /t
21:45

C:\> at 21:47 /interactive cmd.exe
Added a new job with job ID = 1
Wait for the command prompt to pop up and set its title to be able to identify it later on:
C:\> title LOCAL SYSTEM
Now you can test the server configuration file by starting the daemon in debugging mode from the Local System command prompt to check for configuration errors as follows:
C:\> sshd -d
debug: sshd version OpenSSH-2.1
debug: read DSA private key done
debug: Seeding random number generator
debug: Bind to port 22 on 0.0.0.0.
Server listening on 0.0.0.0 port 22.
Generating 768 bit RSA key.
debug: Seeding random number generator
debug: Seeding random number generator
RSA key generation complete.
Make sure to check the output and the NT event log for possible errors. The SSH daemon logs events to the Application event log. Start the Event Viewer and check for any errors or warnings from
sshd.exe. If you want more information to be included in the event log, setLogLeveltodebugin the server configuration file. Doing so will cause the server to log at the debug level to the event log.Try to log on using SSH from the same host:
C:\> ssh -l username 127.0.0.1
When everything looks good and you’re able to log on via SSH, you’re ready to install the SSH daemon as an NT service process.
The SSH daemon is not actually designed to run as an NT service. The operating system expects a service process to behave in a certain way. For example, it should be able to declare what state (starting, running, stopping, etc.) it’s currently in. Nevertheless, it’s possible to make the SSH server daemon run as a service in spite of its design. Do this by using the srvany and instsrv tools from the Windows NT Resource Kit. Unfortunately, this is a hack. For example, it’s not possible to stop the daemon in this configuration. Even if the service is stopped, the daemon keeps running. But at least it’s started at boot, which is good.
Kill the SSH daemon by running Task Manager
(taskmgr.exe) using the Schedule service (the
Schedule service runs as Local System and therefore has the right to
kill the SSH daemon, which also runs as Local System):
C:\> at <time> /interactive taskmgr
To be able to log users on, the SSH daemon needs to be able to create
an NT access token. The Cygwin port of SSH does this by calling the
LogonUser( ) API call. To use this API call, you
have to have the following privileges:
| SeTcbPrivilege |
| SeAssignPrimaryTokenPrivilege |
| SeIncreaseQuotaPrivilege |
The SeTcbPrivilege corresponds to the “Act as part of the operating system” user right. When a process has this privilege, it can do just about anything. Therefore, there’s no point in creating a separate user account for the SSH service. For this reason, make the service run as Local System.[41] (This is the default.)
Perform the following steps to install SSH as a service:
|
Value Name |
Type |
Value |
|---|---|---|
|
HKLM\System\CurrentControlSet\Services\sshd\Parameters\Application |
REG_SZ |
%SystemRoot%\system32\sshd.exe |
If everything looks good in the event log, try to connect in verbose mode (
-v):C:\>ssh -v -l root 10.0.0.43 SSH Version OpenSSH-2.1, protocol versions 1.5/2.0. Compiled with SSL (0x00905100). debug: ssh_connect: getuid 500 geteuid 500 anon 1 debug: Connecting to 10.0.0.43 [10.0.0.43] port 22. debug: Connection established. debug: Remote protocol version 1.99, remote software version OpenSSH-2.1 debug: Local version string SSH-1.5-OpenSSH-2.1 debug: Waiting for server public key. debug: Received server public key (768 bits) and host key (1024 bits). The authenticity of host '10.0.0.43' can't be established. RSA key fingerprint is 54:23:f1:61:cc:3a:fe:de:f1:ed:69:dd:db:00:45:0d. Are you sure you want to continue connecting (yes/no)? yes debug: Seeding random number generator debug: Encryption type: 3des debug: Sent encrypted session key. debug: Installing crc compensation attack detector. debug: Received encrypted confirmation. debug: Doing password authentication. root@10.0.0.43's password: debug: Requesting pty. debug: Requesting shell. debug: Entering interactive session. ************************************************* Securing Windows NT/2000 Servers for the Internet ************************************************* Microsoft(R) Windows NT(TM) (C) Copyright 1985-1996 Microsoft Corp. E:\home\root>exit exit Connection to 10.0.0.43 closed. debug: Transferred: stdin 5, stdout 253, stderr 33 bytes in 225.8 seconds debug: Bytes per second: stdin 0.0, stdout 1.1, stderr 0.1 debug: Exit status 0
If you want to connect using SSH protocol v2, you have to add the
-2flag:C:\>ssh -2 -l root 10.0.0.43 The authenticity of host '10.0.0.43' can't be established. DSA key fingerprint is bb:c1:cf:e5:ca:7c:2d:1f:d3:c3:d8:64:19:a7:d8:a3. Are you sure you want to continue connecting (yes/no)? yes root@10.0.0.43's password: ************************************************* Securing Windows NT/2000 Servers for the Internet ************************************************* Microsoft(R) Windows NT(TM) (C) Copyright 1985-1996 Microsoft Corp. E:\home\root>exit exit Connection to 10.0.0.43 closed.
Tip
If the server host key isn’t on the client when you try to connect to a server, the client shows a warning message. This display is to make sure that you are, in fact, connected to the right host. You can either download the server’s public host key the first time you connect to it or manually copy it using a floppy and install it to the client’s known hosts database.
Congratulations! You now have a bastion host with an SSH daemon accepting incoming connections.
OpenSSH provides support for the TCP Wrappers package.
Wietse Venema created TCP Wrappers back in 1990 in an attempt to track down a Dutch hacker who was attacking computers at Eindhoven University in the Netherlands. The TCP Wrappers software makes it possible to log the client hostname of incoming connection requests, and also provides access control based on IP addresses. The idea is as simple as it is elegant. When an incoming FTP connection occurs, the internet daemon (inetd ) starts the wrapper instead of the FTP daemon. The wrapper logs the connecting host’s IP address to a file and checks to see if the particular host has permission to use the service. If permission is granted, the wrapper starts the real FTP daemon. This behind-the-scenes operation is transparent to the connecting host.
The wrapper package also has an API provided in a library. This makes it possible for a programmer to link code to the wrappers library and get native wrapper support in the product.
Although SSH has its own IP address-based access control mechanism, many people tend to use TCP Wrappers instead because it isn’t application-specific.
The OpenSSH binaries on the O’Reilly web site are compiled with TCP Wrappers. As a result, you can control access to the SSH daemon on a host-by-host basis. Typically, you only want to allow SSH connections to the bastion host from one or two designated management stations.
The hosts.allow
and the hosts.deny
files in the /etc directory are used to
configure the IP address-based access control. The syntax of the file
contents is either the process name (e.g., sshd
), or ALL followed by a list of IP addresses or hostnames (or ANY,
indicating any address or hostname).
The most common setup is to list what hosts are allowed to use
services on the host and then deny everything else. For example,
suppose the hosts.allow file contains the
following:
sshd: 10.0.0.5
and the hosts.deny file contains:
ALL: ANY
This configuration allows the client with IP address 10.0.0.5 to access the sshd daemon on this host. All other IP addresses are denied access.
The DACL on both of these files should be:
| Administrators: Full Control |
| Everyone: Read |
To set up the SSH client on a management station, install
Cygwin just as you did on the server, and copy the SSH binaries to
the system32 directory.
Sometimes, a text-based remote console just doesn’t do the job. Windows NT was designed to be administered from a graphical user interface, not from a text-based shell like SSH. Often there’s no way to perform simple administrative tasks from the command line.
There are several good commercial applications (such as Symantec’s pcAnywhere, described earlier in this chapter) that address this problem by providing a remote GUI over the network.
There’s also a noncommercial product called Virtual Network Computing (VNC), which was invented by Olivetti Research Labs (ORL) in Cambridge, UK. AT&T acquired ORL in early 1999 to create AT&T Laboratories Cambridge. The VNC source code and precompiled binaries are available at their web site ( http://www.uk.research.att.com/vnc/ ).
VNC offers three main advantages over its commercial competitors:
It’s open source
It’s platform-independent
It’s free
VNC consists of two components: a client with a very small footprint (about 170 KB), and a display server. The Windows NT port of the server is very nice. It can run as a service and is configured via a tray icon. It also comes with a setup program. Just follow these steps:
Run the VNC setup program.
Install the default registry settings: go to the Start menu, and click Programs → VNC → Administrative Tools → Install Default Registry Settings.
Install VNC as a service: go to the Start menu, and click Programs → VNC → Administrative Tools → Install WinVNC service.
Start the WinVNC service.
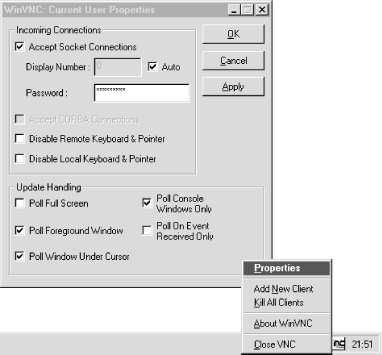
Set the VNC password in the VNC Properties dialog box that pops up. This dialog box, shown in Figure 4.16, can be accessed at any time using the WinVNC tray icon. Note that the tray icon won’t show until you log out and log in again.
The server listens for two types of connections:
The VNC client uses the VNC protocol to connect to the server (usually tcp/5900).[42]
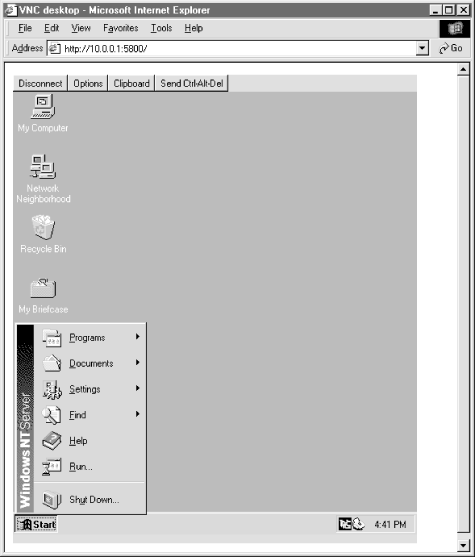
If the VNC client is not handy, you can also connect with a Java-enabled web browser.
The VNC server includes a minimal web server that listens on port tcp/5800. When a browser connects, it downloads a Java version of the VNC viewer. The Java VNC viewer then connects to tcp/5900 as usual, as shown in Figure 4.17.
VNC runs on almost every platform available (including most flavors of Unix, Palm OS, Windows CE, VMS, and Java, to name but a few). This means that you can remote control your NT systems from just about anywhere, including your Palm Pilot!
The VNC story might seem almost too good to be true. VNC works well, but it also presents two real security-related issues:
To resolve these issues, the Win32 port of VNC introduced a feature in Version 3.3.3r1 called LoopbackOnly. This setting makes the VNC server only bind the listener to the loopback (127.0.0.1) address instead of to all available (0.0.0.0) IP addresses. This forces the remote users to use SSH port forwarding, which ensures better access control (username, password, and IP address), as well as encryption.
You need to make the following change to the registry:
When restarting the VNC server, it listens only on the loopback address. Verify this by running:
C:\> netstat -an
The netstat output should contain two lines like this:
Proto  Local Address          Foreign Address        State
TCP    127.0.0.1:5800         0.0.0.0:0              LISTENING
TCP    127.0.0.1:5900         0.0.0.0:0              LISTENING
instead of the normal configuration output:
Proto  Local Address          Foreign Address        State
TCP    0.0.0.0:5800           0.0.0.0:0              LISTENING
TCP    0.0.0.0:5900           0.0.0.0:0              LISTENING
The following example shows how to connect to a remote computer with VNC and SSH port forwarding:
Set up an SSH tunnel to the server you want to administer. Do this by issuing the following command:
C:\> ssh -l stnor -L 5900:127.0.0.1:5900 10.0.0.43
stnor@10.0.0.43's password:

Microsoft(R) Windows NT(TM)
(C) Copyright 1985-1996 Microsoft Corp.

C:\home\stnor>
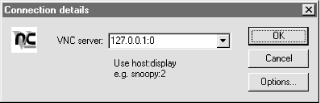
Now, run the VNC viewer and connect to the local end of the SSH tunnel. You are presented with a dialog box such as the one shown in Figure 4.18.
If you want to set up several concurrent SSH tunnels for VNC connections to different hosts, use the next available display port on the local computer. In this particular case, set the second tunnel’s local endpoint to tcp/5901, and connect to 127.0.0.1:1 with the VNC viewer to access the second computer’s console:
C:\> ssh -l stnor -L 5901:127.0.0.1:5900 10.0.0.44
[40] Portable Operating System Interface (POSIX) is a set of standard operating system interfaces based on the Unix operating system. POSIX-compliant source code will compile and run on any operating system supporting the POSIX standards. The POSIX subsystem included with Windows NT and Windows 2000 is very limited and is not able to run SSH.
[41] The Cygwin SSH service should not be accessible from an external network. This minimizes the risk of anyone exploiting a bug in it (breaking into the system and gaining Local System privilege).
[42] VNC has support for several “displays.” The first display server, (0), is on port tcp/5900, the second on tcp/5901, and so on. This support is not applicable on the Windows NT VNC server, since NT does not provide support for multiple concurrent interactive users.
Get Securing Windows NT/2000 Servers for the Internet now with the O’Reilly learning platform.
O’Reilly members experience books, live events, courses curated by job role, and more from O’Reilly and nearly 200 top publishers.

