Whenever data is stored on physical media, it has the potential to become compromised. For example, secret notes between Napoleon and his generals were compromised and led, in part, to his defeat. Napoleon’s secret notes were written on leather or paper and sent by fast riders. In a computer context, those secret notes are stored on a hard drive and either used locally or transmitted across a network to a friend, coworker, Internet site, or other location beyond your server or organization. In this chapter, you’ll see who can access those secret notes on the local hard drive and how to ensure only the desired people and groups can access them. Techniques for ensuring that your data remains secret when transmitted on a network will be covered in subsequent chapters.
The use of long-term computer data storage, whose benefits are numerous, raises special security consideration for the system administrator: how do you protect data so that only the intended user has access while ensuring some level of recoverability over time? In this chapter, you’ll learn how to use file permissions and EFS—the two main file protection mechanisms provided by Windows Server 2003—to control user access to files. You’ll see how to use these mechanisms appropriately and how they are often misconfigured in ways that prevent desired access. You’ll also learn how to plan for a number of special security concerns specific to the use of portable computers. These plans may include Syskey, a special tool for protecting the account database, which I show you how to use properly.
The primary technique for protecting data on a hard drive is to use the built-in NTFS file permissions to allow or restrict specific users and groups. A user could allow his user account to access his personal research data while restricting other users. He could also designate some files as readable by all users but writable by only his coworkers and manager. At home, he could restrict certain folders so that only he could read their contents, while allowing only himself and his wife to read others. You may want to share files on Windows Server 2003 and allow only the HR group access. File permissions are configurable and flexible enough to work in many different scenarios.
When a user logs into a Windows system, as described in Chapter 7, an access token is granted to the user’s session, which the operating system uses to prove her identity to local and network resources. Every access token contains the security identifier (SID) of the user as its key component and the SIDs of the groups she belongs to. This information allows operating system components that are concerned about security to simply check to see whether any of the SIDs provided in the access token have been granted or denied access to their data or services.
File permissions simply attach a list of SIDs and the access rights granted or denied for each SID to a file or directory. This list of SIDs is known as an access control list (ACL), and each entry in the list is an access control entry (ACE). An ACL is composed of one or more ACEs. Whenever a user or process makes a request to access a file or directory, NTFS retrieves the corresponding ACL for that object. It then runs down the list of ACEs on the object, comparing each to every SID in the access token of the requesting entity (usually a user). NTFS accumulates the permissions it finds and determines whether the permissions are enough to meet the requested needs of the requester. If the permissions are sufficient, the process succeeds and the requester accesses the object. When all the requested permissions are not granted, the request fails.
Tip
Permissions can be set on individual files or on the folders that contain them. When permissions are set on files, there is no effect on the other files in the same folder. Setting permissions on folders allows NTFS to configure all subfolders and files with the same permissions. This also ensures that new files within that folder inherit the same permissions. This can be beneficial when setting up secure file shares and when one wants to ensure that both existing and new files have appropriate permissions configured.
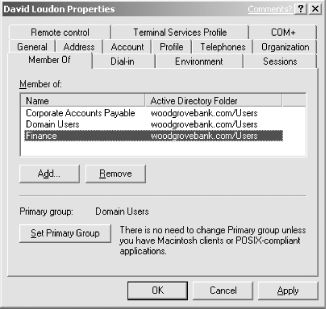
Consider our user David Loudon. David has an account in an Active Directory domain that he logs into daily to perform his work. David is a member of several security groups, as shown in Figure 4-1.
David wants to open a file on the local hard drive called
Super Secret
Info.txt
. Because David is
concerned with security, he sets permissions on it. He
doesn’t want any other users, including domain
administrators, to access the file. He configures the file with the
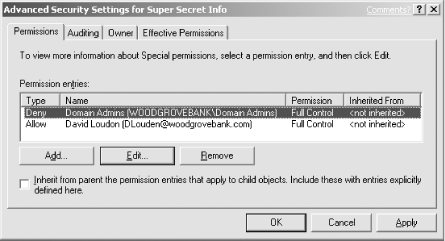
permissions shown in Figure 4-2.
David now has full control of the file, and members of the Domain
Admins group are explicitly denied access. Notice that there are no
other entries in the ACL. Because the default behavior of Windows
Server 2003 is to deny permission unless granted, any user that is
not on the list will be denied access to Super Secret
Info.txt. David doesn’t need to add a
Deny ACE for every user or group in the domain. He simply needs to
ensure that no unintended users or groups are granted permission.
Let’s assume that at some point David is promoted or
transferred into a job that requires him to have different permission
on the domain. Don, our security administrator, adds David to the
Domain Admins group to ensure he has the proper permissions. David
thinks nothing of this change, as he is being granted additional
permissions that should allow him to perform any task on any computer
within the domain. However, when David attempts to open
Super Secret Info.txt, he gets an
“Access denied” error message. This
is because NTFS considers the Deny permission to be most important.
Whenever an ACL is interpreted, an explicitly denied permission takes
precedence over all other permissions. If David or any group he is a
member of is explicitly denied permission, he is denied permission to
access the file, even in the case of conflicting levels of
permission.
Tip
A good administrative practice is to add groups, not individual users, to permissions for file and folder objects. Then you can rely on proper group maintenance to ensure that access is maintained.
A quick way to verify David’s access to the file is the Effective Permissions tab of the Advanced Security Settings dialog box shown in Figure 4-2. This tab allows an administrator to type a username and view the effective permissions that the user will receive. In this case, providing David’s name would show that he has no access. This tab is currently available only in Windows Server 2003.
To allow David to access his file again, Don temporarily removes him from the Domain Admins group.
Tip
Even though David is getting an access denied message, security is working properly. This concept will be detailed later in this chapter.
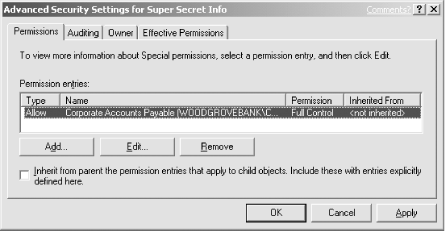
David may have another file that he wants to share among his peers. He wants to ensure that only his group has access. He also wants to avoid ongoing maintenance of the ACL on this file, allowing users who enter and leave his workgroup to be automatically added and removed from the file permissions. He sets security on the file as shown in Figure 4-3. This security has no permissions for individual users, only the Corporate Accounts Payable group. So as long as the group membership is maintained, the file will be accessible by the appropriate users.
This configuration works well for David. Because only the Corporate Accounts Payable group is given access to the file, only members of that group can access the file. All other users receive the default permission, which is no access. As users join and leave the corporate accounts payable staff, the group is updated by human resources and the IT department’s Domain Admins groups. David needs to take no action to maintain access on the file now that it is configured correctly.
You learned in the previous section that setting appropriate file permissions is not terribly difficult when some basic guidelines are considered. These guidelines can be summarized as follows:
Apply only granted permissions whenever possible. Avoid Deny permissions, as they override all other permissions and can be difficult to implement when many permissions are assigned to one file.
Use the Deny—Full Control permission sparingly for the same reason. This is especially true when you think about assigning Deny to Everyone. At that point, you’ve essentially rendered the data inaccessible to anyone except administrators, who can manually take ownership and reestablish the proper permissions on the object.
Permit groups of users instead of individual users when possible. This permits you to allow and deny user access to files by simply modifying a group’s membership, rather than having to reapply permissions to all files and folders.
Permit access to folders instead of individual files.
Imagine an employee of your company, David, asks you to set up a place where he can share files within his branch office. He plans to store a few spreadsheets and documents on this share, consuming a minimum of space. He wants the files to remain confidential to only the employees at his branch. While he is not the least-savvy computer user in the organization, you do not want him to have to maintain any of this security manually.
To set up the file share and configure it for the appropriate level of security, you would perform these tasks:
Create a folder on the appropriate hard drive using Windows Explorer. This can be right off the root directory or in a subdirectory based on organizational boundaries, geographical region of the user, and so on. The location of the directory does not matter.
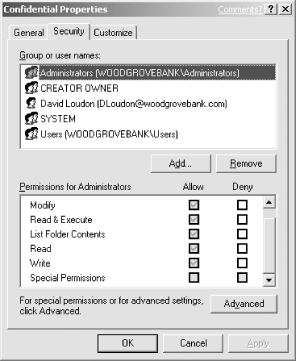
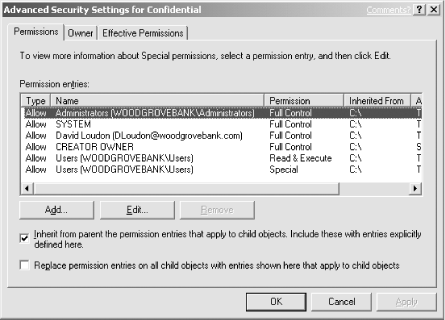
Right-click the folder, click Properties, and then click Security. The default ACL for folders on this drive is displayed as shown in Figure 4-4.
Click Advanced to display the advanced folder permissions dialog as shown in Figure 4-5.
Deselect the option of “Inherit from parent the permission entries that apply to child objects. Include these with entries explicitly defined here.” Deselecting this option allows explicit ACLs to be set on this folder without inheriting other ACLs from the parent folder. This is not required but allows Don, the administrator, to ensure that even administrators do not have access to this folder.
Click Remove on the dialog box that appears for all the existing ACEs. The ACL will now be blank.
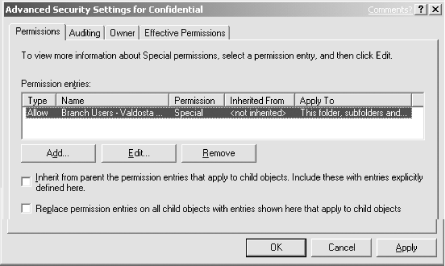
Add the desired groups and users as shown in Figure 4-6. In our example, David Loudon’s branch users in Valdosta are the only users with access permission. Because this group is administered by the IT and HR departments, we can configure the folder so that it will not require maintenance every time an employee joins or leaves the branch.
Click OK to finish configuring the file permissions. Click Sharing to share this folder on the network. Select Share This Folder and click OK.
You will notice that permissions can also be set on the share. These permissions are similar to the permissions you just set on the folder, although folder permissions are more granular. The difference is that you configured the folder permissions so that access is restricted both locally and on the network. Although share permissions can be set to be similar to the file and folder permissions, it is not required to meet the goal of securing the files.
Tip
Deciding whether to use NTFS or share permissions is a bit like deciding which hair color is best. There’s no perfect answer, and whichever option suits you and meets the security goal should be used. The most important thing to remember is that NTFS permissions apply both locally and over the network, while share permissions affect only network access. While many argue that this means NTFS permissions are universally a better practice than share permissions, I leave it to you to decide. Personally, I apply both just to be sure.
Now the folder is secure. David’s group can access the folder and all its files and subfolders. No other users can access the contents, as they are not explicitly granted permissions. The permissions will dynamically change as David’s group grows or shrinks, because the group membership is managed separately. No further security maintenance on this folder is needed to ensure its security.
Frequently, computers are shared by two or more users. This is often the case in manufacturing departments with multiple shifts when it makes no sense to provide individual computers for each shift worker.
Consider a fictional company, Woodgrove Bank. In Woodgrove Bank, two or three receptionists share one computer during the day. One receptionist, Brian Valentine, wants to keep personal data on the local computer but protect it from being accessed by the other receptionists. Because the data is of a personal nature, he wants to ensure that the most security possible is applied to these files.
Brian can use the following procedure to apply strong security to his local folder and its contents:
Create a folder on a local hard drive or choose an existing folder with the files already in place. The location of the directory does not matter.
Right-click the folder, click Properties, and then click Security. The default ACL for folders on this drive is displayed.
Click Advanced to display the advanced folder permissions dialog.
Deselect the option to “Inherit from parent the permission entries that apply to child objects. Include these with entries explicitly defined here.” Deselecting this option allows explicit ACLs to be set on this folder without inheriting other ACLs from the parent folder.
Select the option to “Replace permission entries on all child objects with entries shown here that apply to child objects.” This ensures that all existing files and subfolders receive the new ACL.
Click Remove on the dialog box that appears for all the existing ACEs. The ACL will now be blank.
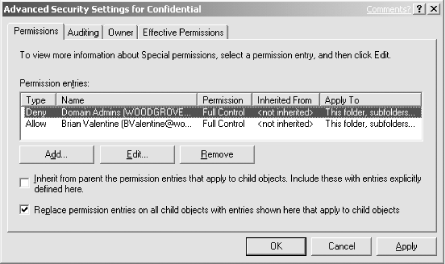
Add only Brian’s account with Full Control configured as Allow. Because Brian is a bit paranoid, also add Domain Admins with Full Control configured as Deny. This is shown in Figure 4-7.
Click OK to finish configuring the permissions.
Tip
I said earlier that setting Deny permissions on files and folders is a bad idea. If Brian is ever added to the Domain Admins group, he will be denied access to the files in this folder. Because this is highly unlikely, Brian will probably never encounter problems with this permission.
The result of this procedure is that Brian is the only user who has access to his folder and its contents. Any other user attempting to view his data will receive an “Access denied” message. However, an administrator could still gain access by simply adding himself to the ACL list. Because Brian is not a local administrator, he cannot prevent this possibility.
Get Securing Windows Server 2003 now with the O’Reilly learning platform.
O’Reilly members experience books, live events, courses curated by job role, and more from O’Reilly and nearly 200 top publishers.
