EFS protects files on the hard disk against attack, but the storage location of the private keys for the EFS-protected files presents unique challenges for the system administrator.
As previously discussed, EFS files are encrypted with a FEK that is itself encrypted with the user’s public key. The user must possess the corresponding private key to decrypt that data. During normal operation, that private key must obviously be stored somewhere on the hard drive—if it were stored only in protected volatile memory, EFS files would not be accessible once a computer was restarted.
The location of a user’s private keys is not a big secret,
although it is obfuscated to keep casual attackers away. The keys are
stored in a protected key store database. These keys are all
protected by a single key
called a master key.
Other keys used by the system for various cryptographic operations,
called protection keys, are also stored in a
similar fashion.
Because an attacker who is able to obtain the master key for that account can decrypt the stored private keys, it must be protected. To counter this type of attack, Microsoft provides a utility called Syskey.
When activated as shown later, the Syskey utility simply encrypts the
private key store and the SAM using a 128-bit symmetric key called
the system key, or syskey. The syskey must be
read into system memory during boot to decrypt the SAM and private
key store to allow the operating system to start. Without this
information, the operating system itself cannot start and will fail.
This is a minor benefit, as failure to boot may thwart lightweight
attackers. Syskey also prevents offline attackers from copying the
SAM and using brute force attacks against stored passwords.
Tip
One other very important piece of information protected by Syskey is the administrator’s safe mode password. If you are unable to provide the information necessary for Syskey to start the operating system (in mode 2 or 3, described in this section), safe mode will not be available. This is done to ensure that data is not compromised by a specific attack against the safe mode password.
The syskey must be stored somewhere, just as the master and protection keys are stored somewhere. Syskey allows you to choose one of three methods, or modes, of protection. These modes correspond to different locations and protection levels for the 128-bit syskey. These modes are:
- Mode 1
The syskey is stored on the local computer in the registry. It is hidden from casual access, but a dedicated attacker can quickly access the key. This mode is the most insecure, as the key is stored with the data it is protecting. However, it is the simplest from a user’s perspective. There is no additional interaction or change of functionality from the user’s perspective when Syskey mode 1 is enabled.
- Mode 2
The syskey is generated from a user-supplied password. This password and its derivitave key are never stored on the hard disk. The user must supply the password during system startup. This provides a huge benefit over mode 1, because the cryptographic key is never stored with the data—in fact, it’s never stored on disk at all. The downside is that if the user forgets the password, all data protected by the syskey, including the master key and all protection keys, is lost forever. In addition, someone must type the password onto the local console whenever the computer is restarted This can be problematic if the computer is in a remote data center.
Tip
Syskey mode 2 allows you to specify any password. There are no minimum criteria applied, even if you have applied password policy on your domain user accounts. This does not mean that Syskey passwords should be any shorter or less complex than your domain user accounts. Passwords should be as long and complex as possible while remaining easily remembered. Because this password is supplied only once per operating system boot, a more aggressive Syskey password shouldn’t present usability issues.
- Mode 3
A pseudorandom syskey is generated and stored on a floppy disk. The mechanism behind this is very simple: a file is created on the disk that contains only the syskey. During system startup, the user inserts the disk and the syskey is read into memory to decrypt the data. This mode provides the same benefits as mode 2 and also eliminates the need for a user to memorize a static password. However, the user must be very careful with the floppy disk. The disk should never be stored in or near the computer, as this would reduce the security to the same as mode 1 (by storing the key and data together). Also, floppy disks have a tendency to fail over time. A backup of the disk should be made and stored securely in case it’s needed.
Tip
Syskey mode 3 requires a floppy disk. No other type of removable media is supported for syskey storage.
Syskey does not take the place of other data protection mechanisms such as EFS or NTFS permissions. It is a complementary technology that protects the operating system against a different type of attack. Syskey primarily prevents an attacker from conducting an offline brute force attack against its password database. Other data, such as confidential documents and email, must be protected using the other security mechanisms described earlier in this chapter.
Rather than showing you how to use Syskey as a standalone utility, it’s much more useful to look at it as a part of a complete security solution. The following example shows how Syskey is used as part of an end-to-end procedure for protecting the information on a portable computer.
A number of techniques should be used to stop theft of data from laptop computers. I described in great detail earlier how vulnerable these objects are. But one single solution will never be enough to stop a motivated attacker. You need to provide multiple complementary layers of security. One of the most important, Syskey, is described in the previous section. I’ve summarized many of the other important ones later.
Consider a user, David, who has had a company-owned laptop running Windows XP Professional for a year. David hasn’t traveled as part of his job; he uses a portable computer because that’s what he was allocated. His manager has determined that he’ll be going on a series of short business trips over the following months. He’d like your help to ensure that the data on his laptop is secure. David does keep some confidential files on his laptop. His laptop is joined to your company’s domain and he logs in using a domain account. He does not share this laptop with other users.
The first step in securing David’s computer is to run Syskey to prevent any offline attacks against his SAM and private key information. You determine that Syskey mode 2 or 3 would be best, as mode 1 is not secure enough for a portable computer. You also determine that traveling with a floppy disk is not a preferred option, as David may either lose or damage the disk or potentially leave it in the laptop at all times. Therefore, you decide to implement Syskey mode 2. You take the following steps:
Back up all important data and store it in a secure location.
Run a command prompt.
Type
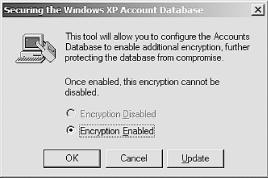
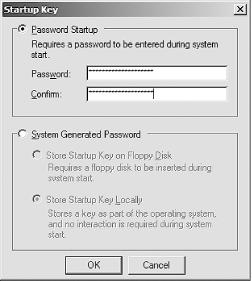
Syskey.exeand then press Enter. The Syskey dialog box, as shown in Figure 4-12, appears.Click Encryption Enabled to activate Syskey, then click OK. The account database key dialog box, as shown in Figure 4-13, appears.
Click Password Startup, then provide the password used for Syskey mode 2. This can be up to 128 characters.
Reboot the computer to begin Syskey protection and ensure that the password is working correctly.
Figure 4-12. The initial Syskey dialog allows you to enable Syskey; however, once enabled, it can never be disabled
The user should select the Syskey password. It should be a strong password but one that the user remembers easily. In some cases, IT departments keep a secure log of Syskey passwords for recoverability. Since domain membership and other security policies do not give the network administrators the ability to recover Syskey passwords, this may be a good strategy. Extreme caution should be exercised in the employment of such a database to ensure that only authorized security personnel are able to access the passwords.
Although you could encrypt all data on the hard drive, this would be an enormous waste of resources. Instead, all datafiles that David uses should be kept in a specific directory or set of directories. Those directories should be protected using EFS. For simplicity (which is beneficial in providing security), one directory with multiple subdirectories is the desired configuration.
Why not use both NTFS and EFS? David is the only user of this laptop. David will normally be the only user attempting to access the data. The only time another user will open the files is when the computer is compromised and an attacker is seeking access. In that case, NTFS permissions are not going to stop the attacker. Although NTFS permissions might provide some protection against some attacks, only the encryption provided by EFS will protect the data against this type of physical attack. So although EFS is more effective against different types of offline attacks, using both NTFS and EFS may hinder the attacker more than using one or the other.
You protect the datafiles by completing the following process:
Create a new directory.
Move all files from their current locations to the new directory or a subdirectory.
Ensure David has received the domain policy that contains your designated EFS recovery agents.
Have David mark the new directory for encryption and apply the encryption to existing files within the directory.
The procedures for the preceding steps are all documented earlier in this chapter. Once the files are centrally stored and encrypted, they can be accessed only by David or a designated EFS recovery agent.
Because David has been using the laptop for some time without using
EFS, a large amount of
unencrypted
data almost certainly resides on his hard drive. Although
you’ve encrypted his files, the remnants of the
unencrypted files could reside on the disk for a long time. You can
ensure that an attacker cannot make use of these unencrypted remnants
by running cipher /w. You take the following
steps:
Run a command prompt.
Type
cipher.exe /w:c:\, then press Enter.
This process will take a very long time, depending on the size of the hard drive and the amount of free space. I recommend you do this in the evening, lock the computer, and go home. The process should be completed by morning.
Get Securing Windows Server 2003 now with the O’Reilly learning platform.
O’Reilly members experience books, live events, courses curated by job role, and more from O’Reilly and nearly 200 top publishers.


