Types attain their full power as an integration mechanism when they are packaged in a form that can be easily transported from machine to machine and reconstituted safely. The CLI devotes a great deal of its design to enabling exactly this scenario, using a packaging
approach based on assemblies
. Assemblies are central to understanding components, since as we saw in the discussion of metadata, the component architecture of the CLI is data-driven: the data found in assemblies is a blueprint for all of the types that will populate the execution engine at runtime. Although such metadata can be synthesized directly at runtime, it is far more common to find it in the form of a file on disk, in which form it can propagate from machine to machine and from microprocessor to microprocessor, via traditional disk-to-disk copy or via network download.
Assemblies are the basic unit of packaging and code security for the CLI runtime. The requirement that most influenced their design was the need for packaging that would allow self-contained components to be moved easily from location to location and yet still interoperate with high fidelity. To accommodate this, assemblies took on the following characteristics , which will serve to guide us further in our examination of the CLI:
- Assemblies are self-describing
Assemblies, to enable data-driven execution, are completely self-descriptive and preserve full-fidelity metadata.
- Assemblies are platform-independent
The CLI achieves a good measure of platform independence by ensuring a well-known, standard format for assemblies.
- Assemblies are bound by name
Clients locate assemblies by querying for a four-part tuple that consists of a human-friendly name, an international culture, a multipart version number, and a public key token.
- Assembly loading is sensitive to version and policy
Assemblies are loaded using tunable binding rules, which allow programmers and administrators to contribute policy to assembly-loading behavior.
- Assemblies are validated
Each time an assembly is loaded, it is subjected to a series of checks to ensure the assembly’s integrity.
We’ll examine each of these concepts in turn.
Assemblies contain blueprints for types in the form of metadata and CIL, which are referred to as modules . A module is a single file containing the structure and behavior for some or all of the types and/or resources found in the assembly. An assembly always contains at least one module but has the capacity to include multiple modules if desired, usually to gain packaging and performance flexibility.
The types exposed by an assembly are actually represented in the metadata as redirections to the modules that contain the types; it is not possible to expose types without modules. Allowing multiple modules in a single assembly makes it easier to isolate changes as requirements evolve. In particular, resources or types that are either infrequently accessed or are frequently changed can be contained in separate files.
As you can see from Figure 4-1, the modules in an assembly can also contain resources, which is a squishy term for passive data (meaning anything that isn’t intended as executable code or metadata). Resources are typically packaged as part of the assembly to take advantage of its namespace, as well as the locality and trust that come from being within, rather than outside, its logical boundaries. Both types and resources are optional; assemblies that contain types with no resources are common, while assemblies that contain resources can be useful only for tasks such as localization.
Like the type-describing modules that they contain, assemblies themselves have metadata that describe their structure. This metadata takes the form of a manifest that itemizes the contents of the assembly, contains the compound name for the assembly, describes public types that the assembly exports, and describes types that the assembly will import from other
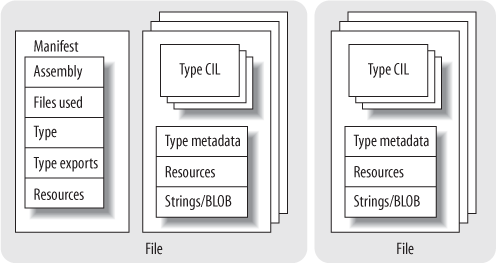
assemblies. Manifests are built using the same metadata table mechanisms that are used to describe types—to see this in action, look in assembly.cpp and assemblymd.cpp in the sscli/clr/src/vm directory.
Note
As we’ve already seen, there are several tools that are part of the SSCLI distribution whose implementation can help illuminate the structure of modules and assemblies. The first of these is ildasm.exe, the CIL disassembler, whose code can be found in sscli/clr/src/ildasm. The job of ildasm is fairly simple: take a file and disassemble it into its component parts. All source is displayed as CIL, and complete metadata tables can be dumped. As a development and diagnostic tool, ildasm is peerless. More importantly, however, to the Rotor experimenter, ildasm provides the ability to examine CLI metadata from both a black-box and white-box perspective; developers can use it to examine the metadata of compiled assemblies, as well as use the code that comprises ildasm as a template from which to build their own unmanaged applications and tools that examine CLI executables. Another useful tool to examine is al.exe, the assembly linker, which is used to piece together different modules into a single assembly and whose code can be found in sscli/clr/src/csharp/alink.
Usually, the assembly manifest is built when the source is compiled; to see this in action, take the Echo component from Chapter 3 and compile it into a library using the C# compiler. After it has successfully compiled, run the metainfo tool against the single-module assembly contained in echo.dll by typing:
> metainfo -assem echo.dllThe -assem switch restricts the output of metainfo to show only assembly metadata, which means that you’ll see something similar to the following:
    Microsoft (R) Shared Source CLI Runtime Meta Data Dump Utility
    Version 1.0.0002.0
    Copyright (C) Microsoft Corporation 1998-2002. All rights reserved.
    ////////////////////////////////////////////////////////////////

    File echo.dll:
    Assembly
    -------------------------------------------------------
        Token: 0x20000001
        Name : echo
        Public Key    : 00 24 00 00 04 80 00 00  ...
        Hash Algorithm : 0x00008004
        Major Version: 0x00000001
        Minor Version: 0x00000000
        Build Number: 0x00000000
        Revision Number: 0x00000000
        Locale: <null>
        Flags : [SideBySideCompatible] [PublicKey]  (00000001)
        CustomAttribute #1 (0c000001)
        -------------------------------------------------------
                CustomAttribute Type: 0a000001
                CustomAttributeName:
                  System.Reflection.AssemblyKeyFileAttribute ::
                                        instance void .ctor(class /
                                          System.String)
                Length: 13
                Value : 01 00 08 65 63 68 6f 2e  73 6e 6b 00 00 > echo.snk <
                ctor args: ("echo.snk")

        CustomAttribute #2 (0c000002)
        -------------------------------------------------------
                CustomAttribute Type: 0a000003
                CustomAttributeName:
                  System.Diagnostics.DebuggableAttribute ::
                                        instance void .ctor(bool,bool)
                Length: 6
                Value : 01 00 01 01 00 00                       >          <
                ctor args: ( <can not decode> )
This dump shows the values of the assembly’s attributes. If you instead run the following against the component, you’ll see a great deal more of the metadata:
> ildasm -metainfo echo.dllThe results are too lengthy to include here, but in the ildasm output, you’ll be able to see assembly versioning and dependency information, in addition to imported and exported types. If this were a multimodule assembly spread out over several files, you would get information for every module.
Note
The ildasm program provides a superset of the functionality found in metainfo. As is the case with many small utility programs, each has its role, and this role is governed by programmer taste. Some think that the -assem switch, for example, is the easiest way to get to assembly attributes. Playing with each comparatively is a fine way to fritter away a few moments of free time.
Assemblies are, at their core, the metadata that comprises their manifests (which, of course, transitively include type metadata and behavior, as well as resources). The distinction between an assembly and a module is important; in particular, it must be stressed that “assembly” and “file” are not equivalent terms. The CLI is built on top of abstractions that can be used in many different situations on many different platforms, and because of this, there are cornerstone concepts that do not correspond directly to common operating system abstractions. Since assemblies can be made up of multiple files, one cannot always point to a file that corresponds to the assembly. In our example, Echo.dll happens to be a file that comprises the entire assembly and contains both the singleton module and the assembly manifest, but this will not always be the case. You might decide to split the implementation into two modules, one for backward compatibility and one containing new code, for example. Or you might decide to localize using a separate module to contain resources. The important thing to remember is that assemblies and their manifests always refer to modules.
On-disk assemblies can be successfully loaded on many different machine architectures. This isn’t magic, but it is fundamental to portability. An easy-to-try experiment is to compile an assembly using the SSCLI on Windows, and then load and run it on FreeBSD, and vice versa. You should also be able to take an assembly produced using the SSCLI and examine it using the .NET Framework SDK tools. Using a shared format is a venerable and well-understood way to begin a quest for interoperability.
The persistent structure for an assembly and its types is very different than what it will eventually become in memory. In the Chapter 2 tutorial, we briefly saw that the file format is based on the PE/COFF executable format, but most of the interesting structure is entirely contained within a single opaque .text section. Because of this, the ECMA format does not rely heavily on the PE/COFF headers and file structure.
Note
The Microsoft Portable Executable (PE) file format is the format used by Microsoft Win32-based operating systems for storing executable resources (DLLs and EXEs). PE depends, in turn, on the Common Object File Format (COFF) , which is an even older executable format. A complete description of the PE/COFF format, besides being excruciatingly dull, is beyond the scope of this book; however, the segmented format is well-documented in a specification that can be found on Microsoft’s MSDN web site.
Within the Rotor code base, the task of loading, parsing, and verifying the PE file structure falls to a single class called (cleverly enough) PEFile
, located in sscli/clr/src/vm/pefile.h and pefile.cpp. A PEFile instance is a C++ class wrapper around a Portable Executable image. This image doesn’t have to exist on disk; it can in fact be created around an image that the program hosting the execution engine has mapped into memory already or created directly. The PEFile itself is fairly simple: once created, the PEFile provides an easy way to obtain various headers—the Win32 headers (an instance of an IMAGE_NT_HEADERS struct), the COR headers (an instance of an IMAGE_COR20_HEADERS struct), and instances to metadata objects (an instance of an IMDInternalImport interface).
Examining the PEFile class doesn’t take long; there’s not much to PEFile beyond verifying the structural integrity of the file and then using it to obtain the sections of a file to be picked apart further by hand. Within Rotor, the principal aim is to get at the part of the PE file where the IMAGE_COR20_HEADER
lives, as shown in Example 4-1 (which is defined in clr/src/inc/corhdr.h).
Example 4-1. The IMAGE_COR20_HEADER
typedef struct IMAGE_COR20_HEADER
{
    // Header versioning
    ULONG                   cb;
    USHORT                  MajorRuntimeVersion;
    USHORT                  MinorRuntimeVersion;

    // Symbol table and startup information
    IMAGE_DATA_DIRECTORY    MetaData;
    ULONG                   Flags;
    ULONG                   EntryPointToken;

    // Binding information
    IMAGE_DATA_DIRECTORY    Resources;
    IMAGE_DATA_DIRECTORY    StrongNameSignature;

    // Regular fixup and binding information
    IMAGE_DATA_DIRECTORY    CodeManagerTable;
    IMAGE_DATA_DIRECTORY    VTableFixups;
    IMAGE_DATA_DIRECTORY    ExportAddressTableJumps;

    // Precompiled image info (internal use only - set to zero)
    IMAGE_DATA_DIRECTORY    ManagedNativeHeader;
} IMAGE_COR20_HEADER;
PEFile has a method called GetCORHdr that can be used to obtain this simple header, which further segments the mapped file using the following typedef:
    typedef struct _IMAGE_DATA_DIRECTORY {
        ULONG   VirtualAddress;
        ULONG   Size;
    } IMAGE_DATA_DIRECTORY, *PIMAGE_DATA_DIRECTORY;
Important fields include the version numbers and the entry point, as well as the segment addresses for the metadata, the resources, and the digital signature, if present. Note that there is no segment address for the code itself; the entrypoint token will be resolved like every other metadata token, via the metadata segment, by the ExecuteMainMethod method of ClassLoader. The token is resolved to a MethodDef, its calling convention and signature are verified, and, eventually, the method is given control by the execution engine.
Assemblies are as self-contained as possible to impart independence and maximize their chances at being versionable. The types in an assembly are exposed as public or are purely internal to the assembly; there are no friend constructs to complicate binding relationships. To ensure adaptability, they attach to their surrounding environment at runtime by binding to names, rather than addresses or offsets.
Types are the universal abstraction that drives execution in the CLI, and types use other types by referring to them by name. Fully qualified type names combine the assembly name and the base type name, plus an optional namespace prefix, if present. The name of the type is scoped by the assembly, and types are joined together (or bound) by name.
Warning
Although the namespaces that components populate appear to be hierarchically structured, they are not. (This differs, in particular, from Java, in which package structure is mapped directly to the filesystem.) The namespace prefix in a fully qualified name is just an optional string that can precede a type’s name and typically follows a hierarchal naming convention used by developer tools to group types together. They are purely conventional, and they are not isolated; multiple assemblies can contribute to the same namespace.
The loose coupling that comes from name-based binding is consistent with adaptability over time. To remain viable over time, the assembly must be capable of propagating itself through future generations, no matter how harsh conditions become. The best way to do this robustly in the face of changing conditions is to meticulously describe all parts of the system and develop ways to make small changes, while still remaining compatible with the overall system. It is precisely this ability to make small changes transparently and swap component implementations in and out behind names that enables clever programmers to ensure good release-to-release binary compatibility.
Example 4-2 shows how assembly names are represented in the System.Reflection namespace.
Example 4-2. The elements of assembly names (simplified from clr/src/bcl/system/reflection/assemblyname.cs)
public sealed class AssemblyName : ICloneable,
                                   ISerializable, IDeserializationCallback
{
  private String          _Name;
  private byte[]          _PublicKey;
  private byte[]          _PublicKeyToken;
  private CultureInfo     _CultureInfo;
  private String          _CodeBase;        // Location for file
  private Version         _Version;

  private StrongNameKeyPair            _StrongNameKeyPair;
  internal Assembly                    _Assembly;
  private AssemblyHashAlgorithm        _HashAlgorithm;
  private AssemblyVersionCompatibility _VersionCompatibility;
  private AssemblyNameFlags            _Flags;
}
The full name of an assembly includes four parts; all but the base name itself are optional. A full assembly name typically consists of the filename minus its extension plus version information in a format that concatenates major version, minor version, build number, and revision number into a dot-separated string. After this, the localized culture of the assembly can be referenced by including a two-character abbreviation (dictated by IETF RFC-1766). Culture information is particularly important when resources or localizable strings are included as part of the assembly. Finally, a public key or a public key token (an abbreviated form of the public key formed using a cryptographic hash) that identifies the developer of the assembly can be included. This is used when exploiting the CLI’s support for cryptographic strongnames
. When the parts of the full name are combined in a canonical way, the result is called the displayname of the assembly. Displaynames can be either complete or partial. Strongnames are optional, and if they are used, they have a radical effect on the binding regimen used; the rules for finding strongnamed libraries supplement the rules for finding libraries without strongnames, and enable sharing scenarios that wouldn’t otherwise exist.
An assembly’s display name can be seen within managed code by interrogating the FullName property of the System.Reflection.Assembly instance for the assembly. Printed, it appears as "assembly-name, Version=x.x.x.x, Culture=culture, PublicKeyToken=token“; the assembly for the Echo component, for example appears as:
echo, Version=0.0.0.0, Culture=neutral, PublicKeyToken=null
when displayed. As you can see, the assembly is unsigned, and no version number has been assigned to it.
To set the other three parts of the assembly name, the SSCLI uses assembly-level custom attributes to directly emit the values into the assembly manifest.
Note
The implementation of assembly-level attributes is strictly a compiler convention, ad can be found in assemblyattributes.cs in the bcl/system/reflection directory. Assembly-level attributes are not implemented in the same way as custom attributes, which is a shortcoming of the current CLI specification. It is possible to use the more general custom attribute mechanism for module-level attributes, but not for assembly level attributes.
So to set the version and strongname signature of the Echo component, you could use the following attributes at the top of the Echo.cs file:
    [assembly: AssemblyVersion("1.0.0.0")]
    [assembly: AssemblyKeyFile("echo.snk")]
in which echo.snk is a file containing a cryptographic public key/private key pair generated by the sn.exe utility. This would then change the display name of Echo to:
echo, Version=1.0.0.0, Culture=neutral, PublicKeyToken=fcd14a8abe06f0d2
Of course, the value of PublicKeyToken will vary given unless readers use the exact same public key/private key token file used to generate the example. Throughout this chapter, whenever we show a public key token, you should assume that your own will differ.
Assembly names were constructed with as many parts as they have to support versioning and side-by-side loading. Embedding the version number into the name permits the CLI to highlight dependencies as part of its component-to-component contract.
Alternatively, public key tokens allow two assemblies of the same name from different parties to coexist. There are repercussions to this technique, however; in the presence of many versions of a single assembly, name resolution and binding rules become quite complex.
Of course, it is possible to manually load assemblies from code using the Load or LoadFrom methods of the Assembly type, but the more normal case is that assemblies are loaded as they are needed. The assembly loading code, like so many of the other portions of the CLI, follows the principle of deferred actions: by deferring a costly action until it is actually needed, you can avoid performing it unnecessarily. If an application rarely calls a method or rarely accesses a named resource, the assembly will rarely be loaded. In fact, an application can be built to run successfully with assemblies that are referenced, but not deployed. Debugging code, or optional features, might benefit from this treatment.
Once a call is made to a method in an assembly, the first step in binding is to decide what version of the assembly, containing the type, should be used. To determine this, the execution engine consults the manifest of the assembly that made the call, where it can find an exact version specifier in the table of external references. Once this version number is procured, the CLI hunts down a file that corresponds to it using the loosely defined runtime service that is referred to in the SSCLI code base as fusion.
Note
“Fusion” was the codename for the assembly loader at the development of the Microsoft .NET Framework, and because of this, you will see many comments and variable names that contain the word. There is also a directory in the SSCLI distribution, named sscli/clr/src/fusion, in which you’ll find some of the code used during assembly loadtime. (This code is deployed as the fusion.dll shared library that is dynamically loaded by the SSCLI at runtime.) However, the configuration and loading code that can be found in this library is augmented by a fair amount of code that resides in the execution engine directory (sscli/clr/src/vm). Like many projects, the SSCLI has accreted partial layers of imperfectly factored subsystems over time. When searching for implementation details, one way to approach the division of code between fusion and the execution engine is to remember that the CLI is concerned with loading types from assemblies, while fusion is concerned with locating and loading files.
The execution engine checks to see whether the appropriate assembly is already loaded, since once an assembly is loaded, it can never be reloaded within a given application domain. (Application domains will be discussed later in this chapter.) If the assembly is not loaded, but is strongly named and fully qualified, a machine-wide cache, called the Global Assembly Cache (GAC), is checked. Details about the GAC are, for the moment, irrelevant—just recognize it as a common place for assemblies to live. If the assembly is found in the GAC, it is loaded; otherwise, the execution engine then searches for codebase elements in configuration files, which specify locations from which assemblies can be loaded. If no codebase locations are provided, the execution engine will look in the appbase as a last resort, which is a variety of likely locations in the filesystem. By default, the appbase is the relative root directory from which the application was executed.
The CLI supports the use of cryptographic signatures as a way to uniquely identify assemblies. The presence of the AssemblyKeyFileAttribute
in an assembly’s metadata denotes that it is strongly named, and that this attribute will be used as a part of the loading process to verify that the assembly being loaded is identical to the referenced assembly. It is possible to turn off this verification, and during development, this is an important configuration option, since code under development is usually both trusted and broken at the same time, and the time spent signing and verifying strongnames could almost certainly be better be spent fixing bugs!
The verification mechanism for strongnames requires the build process to have access to both the public and private elements of a cryptographic key pair at the time that it builds an assembly. The public key becomes part of the assembly name, and a cryptographic hash of the metadata of the assembly is calculated using the private key and is inserted into the assembly. At load time, the execution engine uses the public key to extract a hash value for the assembly being verified that is then compared against a direct cryptographic hash of the metadata, proving that the producer of the assembly had access to the private key. The implementation of the strongname crypto code can be found in strongname.cpp in the clr/src/dlls/mscorsn directory. It is used by the execution engine from files such as assembly.cpp.
Warning
The Shared Source CLI is not intended for use as a secure environment, although the source code does provide a good example of how a secure execution environment might be built. For example, strongname verification is turned off by default in the SSCLI for several important public keys, which means that no assembly built as part of the SSCLI can be trusted with respect to origin. Since you have control of access to the Rotor source code on your machine, you are the only person who understands the level of trust to impart to your own build output. If you want to make Rotor secure, you will need to audit source code modifications, restrict access to keypairs used to build the execution engine, do the work necessary to establish trust relationships between the execution engine and its assemblies, and, in general, pay a lot of attention to the process used to build and deploy the executables that comprise the built output of the distribution.
The GAC, as mentioned previously, is part of the extended search path for assemblies. To be found in the GAC, an assembly must have a public key. Public keys are normally attached by dropping an AssemblyKeyFile attribute into a C# source file and compiling; the C# compiler will extract the key pair from the key file and sign the assembly. (An assembly with a public key does not have to be signed to be in the GAC, although such a delay signed assembly must still have a public key attached. Since it cannot be safely loaded, it can be used only with verification turned off.) In the SSCLI implementation, which supports running many different versions of the CLI on a single machine, the GAC is implemented as a subdirectory of the build directory; in the SSCLI, the GAC is tied to the directory structure of the particular version of sscoree.dll that is being used.
The GAC essentially represents a machine-wide library of assemblies for use by any CLI process. It is, in essence, the communal pool of shared assemblies. Like any communal resource, there are strict rules for use, to protect the peace and to ensure correct behavior. If a programmer doesn’t wish to play by these rules or has no need to share an assembly, then she may simply place her assembly in the same directory as the managed executable that needs it, and it will be found and loaded from there.
Within the Rotor source base, as mentioned previously, the GAC is implemented as a subdirectory of the build tree. In particular, the Rotor binaries will be in a directory named something like v1.x86chk (with the directory name changing according to version, platform, and the kind of build being used). The GAC subdirectory will be in the assembly subdirectory underneath that location. Exploring this subdirectory reveals that each assembly is placed into further subdirectories, first separated by the assembly name as a subdirectory, then the assembly’s version number and public key token. For example, the GAC directory looks something like the following on Windows:
    Directory of C:\sscli\build\v1.x86fstchk.rotor\assembly\GAC

    11/02/2002  02:53 AM    <DIR>         .
    11/02/2002  02:53 AM    <DIR>         ..
    11/02/2002  02:53 AM    <DIR>         ISymWrapper
    11/02/2002  02:53 AM    <DIR>         Microsoft.JScript
    11/02/2002  02:53 AM    <DIR>         Microsoft.Vsa
    11/02/2002  02:53 AM    <DIR>         System
    11/02/2002  02:53 AM    <DIR>         System.Runtime.Remoting
    11/02/2002  02:53 AM    <DIR>         System.Runtime.Serialization.
    Formatters.Soap
    11/02/2002  02:53 AM    <DIR>         System.Xml
These are the assemblies that ship with Rotor out of the box. Drilling down into the System directory, you’ll find something like this:
    Directory of C:\sscli\build\v1.x86chk.rotor\assembly\gac\system

    11/02/2002  02:53 AM    <DIR>         .
    11/02/2002  02:53 AM    <DIR>         ..
    11/02/2002  02:53 AM    <DIR>         1.0.3300.0_  _b77a5c561934e089
Drilling down one level further:
    11/02/2002  02:53 AM    <DIR>         .
    11/02/2002  02:53 AM    <DIR>         ..
    11/02/2002  02:53 AM          675,840 System.dll
    11/02/2002  02:53 AM              203 _  _AssemblyInfo_  _.ini
And, sure enough, running ildasm on the System.dll contained in this directory reveals that the version number of System.dll is 1.0.3300.0, and its public key token matches that of the other half of the subdirectory name. (The .ini file is just text information about the assembly, and doesn’t contain anything magical or, in fact, particularly interesting. It is simply information about the assembly that can, for the most part, already be obtained by the assembly metadata itself or easily computed. It is used as a cache.)
Having demonstrated this implementation detail, however, it is important to once again note that the GAC is communal property, and dropping compiled assemblies into this GAC subdirectory without using the proper utility program is strongly discouraged; the mechanism chosen by a CLI implementer is entirely in his hands and is almost guaranteed to vary from one platform to the next.
To manage moving assemblies in and out of the GAC, the Rotor code base ships with a utility that eases management details, known creatively as gacutil. (The source for gacutil can be found in the directory sscli/clr/src/tools/gac; examining the source reveals that it is actually a thin wrapper around the IAssemblyCache and IAssemblyEnum interfaces.) This utility provides the ability to install, remove, and enumerate the various assemblies stored in the GAC, as well as the ability to manage traced reference counts, which keep assemblies from being accidentally uninstalled. Example 4-3 is an example of how to enumerate the assemblies currently in the GAC by using its -l option.
Example 4-3. Using gacutil to examine the default shared assemblies in the SSCLI
> gacutil -l

Microsoft (R) Shared Source CLI Global Assembly Cache Utility.
  Version 1.0.0003.0
Copyright (C) Microsoft Corporation 1998-2002. All rights reserved.

The Global Assembly Cache contains the following assemblies:
        ISymWrapper, Version=1.0.3300.0,
          Culture=neutral, PublicKeyToken=b03f5f7f11d50a3a, Custom=null
        Microsoft.JScript, Version=7.0.3300.0,
          Culture=neutral, PublicKeyToken=b03f5f7f11d50a3a, Custom=null
        Microsoft.Vsa, Version=7.0.3300.0,
          Culture=neutral, PublicKeyToken=b03f5f7f11d50a3a, Custom=null
        System, Version=1.0.3300.0,
          Culture=neutral, PublicKeyToken=b77a5c561934e089, Custom=null
        System.Runtime.Remoting, Version=1.0.3300.0,
          Culture=neutral, PublicKeyToken=b77a5c561934e089, Custom=null
        System.Runtime.Serialization.Formatters.Soap, Version=1.0.3300.0,
          Culture=neutral, PublicKeyToken=b03f5f7f11d50a3a, Custom=null
        System.Xml, Version=1.0.3300.0,
Culture=neutral, PublicKeyToken=b77a5c561934e089, Custom=nullFor many programmers, strict versioning, strongnames, the GAC, and domain-based isolation are unfamiliar ground. Many developers are still living the “good ol’ days” of C++, in which the results of running any given program are configuration-dependent and, as a result, trying to make sense of the CLI approach to management, deployment, and loading policies is
bewildering. Using the Echo component that we’ve been developing so far as an example will help demonstrate how versioning the GAC and the loading policies of the CLI can serve useful and beneficial purposes.
The first step is, of course, to establish the baseline functionality with which most programmers are familiar. In this case, this is the standard “everything-in-one-directory” scenario used up until this point for all code examples. Echo.cs is compiled into Echo.dll and rests in the current directory:
    using System;

    namespace SampleEcho {
      public enum EchoVariation { Louder, Softer, Indistinct }
      public struct EchoValue {
          public string theEcho;
          public EchoVariation itsFlavor;
      }
      public interface Echoer {
          void DoEcho(out EchoValue[] resultingEcho);
      }

      public class Echo : Echoer {
        private string toEcho = null;
        private static int echoCount = 0;
        private const System.Int16 echoRepetitions = 3;

        public delegate void EchoEventHandler(string echoInfo);
        public event EchoEventHandler OnEcho;

        public Echo(string initialEcho) {
          toEcho = initialEcho;
        }
        public string EchoString {
          get { return toEcho; }
          set { toEcho = value; }
        }
        public void DoEcho(out EchoValue[] resultingEcho) {
          if (toEcho == null) {
            throw(new Exception("Alas, there is nothing to echo!"));
          }
          resultingEcho = new EchoValue[echoRepetitions];
          for (sbyte i = 0; i < echoRepetitions; i++) {
            resultingEcho[i].theEcho = toEcho;
            switch (i) {
              case 0: resultingEcho[i].itsFlavor = EchoVariation.Louder; break;
              case 1: resultingEcho[i].itsFlavor = EchoVariation.Softer; break;
              default: resultingEcho[i].itsFlavor = EchoVariation.Indistinct;
    break;
            }
          }
          if (OnEcho != null) {
            OnEcho(System.String.Format("Echo number {0}", echoCount));
          }
          echoCount++;
          return;
        }
      }
    }
MainProgram.cs is compiled, referencing Echo.dll as part of the compilation step, and also resides in the current directory:
    using System;
    using SampleEcho;

    namespace MainSampleProgram {
      class EchoProgram {
        static void Main(string[] args) {
          SampleEcho.Echo myEcho;
          SampleEcho.EchoValue[] result;

          if (args.Length > 0)
            myEcho = new SampleEcho.Echo(args[0].ToString(  ));
          else
            myEcho = new SampleEcho.Echo("Hi mom!");

          // Set up an event handler and hook to component
          SampleEcho.Echo.EchoEventHandler handler =
            new SampleEcho.Echo.EchoEventHandler(CallMe);
          myEcho.OnEcho += handler;

          try {
            myEcho.DoEcho(out result);
            System.Console.WriteLine("Main program received echo!");
            for (int i = 0; i < result.Length; i++)
              Console.WriteLine("{0}: {1}, {2}", i,
                                result[i].theEcho, result[i].itsFlavor);
          }
          catch (System.Exception e) {
            System.Console.WriteLine("Caught exception: {0}", e.Message);
          }
        }

        static void CallMe(string msg) {
          System.Console.WriteLine(msg);
        }
      }
    }
Executing MainProgram.exe produces what we’d expect:
    > clix mainprogram
    Echo number 0
    Main program received echo!
    0: Hi mom!, Louder
    1: Hi mom!, Softer
    2: Hi mom!, Indistinct
The Echo.dll assembly could also be placed into a subdirectory whose name is the same as the assembly (minus extension), from which it would also be successfully loaded.
The Echo component has turned out to be an extremely useful component, so much so that Echo needs to be shared with other assemblies that also desire echoing behavior. Echo could be copied into private code bases for each application, but this loses a large part of the benefit of shared libraries; instead, we want to share it from a single place, the GAC. To do this, Echo needs to be installed into the GAC:
    > gacutil -i echo.dll

    Microsoft (R) .NET Global Assembly Cache Utility.  Version 1.0.1.0
    Copyright (C) Microsoft Corporation 1998-2002. All rights reserved.

    Failure adding assembly to the cache: Attempt to install an assembly
    without a strong name
Recall that in order for an assembly to be stored into the GAC, it needs to be either strongly named or partially signed with verification turned off. Both of these options are most easily accomplished by creating a keypair using the sn utility and referencing the keyfile from Echo.cs. (There are also command-line options on the C# compiler and the al assembly linker to do this.) Add this line to Echo.cs and generate a key with sn -k echo.snk:
    // Echo.cs

    [assembly: System.Reflection.AssemblyKeyFile("echo.snk")]

    // rest as before
Recompiling Echo.cs, gacutil will now accept the assembly as installable. Unfortunately, running MainProgram yields an exception, since the assembly it was compiled against was “echo, Version=0.0.0.0, Culture=neutral, PublicKeyToken=null,” and there is no assembly that matches that criteria. MainProgram needs to be recompiled against the new, strongly named Echo.
Once that’s done, to prove that MainProgram will in fact pull the component out of the GAC, try deleting Echo.dll from the current directory; MainProgram should still run. In fact, once the assembly has been put into the GAC, it will be preferentially loaded from the GAC rather than from the local directory.
Having deployed the Echo component into the public arena, however, another concern arises—what happens if and when Echo needs to support new functionality? This is precisely what versioning
and versioning-aware load policies are for. Add a version number to Echo.cs, Version 1.0, and recompile it:
    // Echo.cs

    [assembly: System.Reflection.AssemblyVersion("1.0.0.0")]
    // rest as before
To test versioning-bound load policies, it’s helpful to make sure the version (which will be changing in just a moment to illustrate the side-by-side capabilities of the CLI) is what’s expected; to do this, MainProgram will display the complete display name of the Echo assembly when it first references Echo:
    // MainProgram.cs, in class EchoProgram

        static void Main(string[] args) {
          Console.WriteLine("Echo assembly: " +
                            typeof(SampleEcho.Echo).Assembly.FullName);
          // . . . as before . . .
        }
Recompile MainProgram, install echo v1.0.0.0 into the GAC, delete the local Echo.dll, and run MainProgram. It works as expected.
Echo has reached a state where it needs to be versioned; it now looks to echo messages back five times, instead of the previous version’s three (the echoRepetitions field, a constant, has been changed from 3 to 5). To do this, the AssemblyVersion attribute changes its value:
    // Echo.cs

    [assembly: System.Reflection.AssemblyVersion("2.0.0.0")]
    // ...

    public class Echo : Echoer {
      // ...
      private const System.Int16 echoRepetitions = 5;
      // ...
    }

    // rest as before
Again, recompile Echo.cs and install the new echo component into the GAC.
As a point of experimentation, before moving on, consider what’s just taken place: there are now two entirely different (as far as the CLI is concerned) versions of the same component now living in the GAC; running gacutil -l proves this. And, if the CLI supports version-aware binding, then MainProgram, which was originally compiled against v1.0.0.0 of the Echo component, should still load and run against the still-installed echo.dll v1.0.0.0 version, which it will.
Warning
If you’re using Windows, don’t forget to run MainProgram.exe and MainProgramv1.exe under clix. In many cases, you can run SSCLI assemblies at the Windows command prompt without clix (this runs them using the .NET CLR). However, the examples in this chapter need to bind against assemblies that can only be found in the SSCLI’s GAC, and if you run them with the .NET CLR, it will not find them. This also raises the question of which version of gacutil you’re running. If you see “Shared Source CLI Global Assembly Cache Utility” in the banner when you run it, you’ve got the right one. If not, run env.bat to make sure your environment is properly set up for the SSCLI.
Save the current MainProgram to MainProgramv1.exe or something similar, and recompile MainProgram against v2 of echo.dll. Delete echo.dll out of the current directory, and each version of MainProgram in turn binds to the current version of echo stored in the GAC. It should be noted before moving on that versioning the main program and its libraries, as shown here, does not need to be done at the same time; it is also certainly possible to version them one at a time, in an uncoordinated fashion.
In addition to the very complete versioning scheme detailed previously, administrators and developers can add their own configuration guidance into the mix. The policy used when binding to an assembly can be specified on a per-application, per-assembly, or per-machine basis.
The need for this is obvious. Frequently, developers won’t make the final determination about which component version an application needs to work correctly. Service packs, bug fix releases, and product upgrades all occur long after the developer has shipped the product to manufacturing for release. One of the key weaknesses, in fact, that most shared library systems have is the evolutionary nature of the machines on which they exist. On Windows platforms, this phenomenon is known by the unpleasant name “DLL Hell ,” but it exists quietly in every software environment that relies on shared, dynamically loaded libraries.
Developers, administrators, and users must all occasionally influence how their assemblies load. They need the ability to not only upgrade an assembly to a later version, but also to revert from an upgraded assembly back to the original version (due to unworkable bugs found in the new release, or even just incomplete backwards incompatibility).
When components are loaded from their dormant state, the loading process takes local environmental information into account, as well as information provided by the programmer and by the administrator of the system. Because the CLI doesn’t mandate any specific mechanism, different CLI implementations are left up to their own devices. By default, the SSCLI examines the runtime version number that has been placed in the metadata header by the compiler, and uses this hint to first load the correct version of the CLI, and then load the assembly into it.
Warning
Rotor expects to find v1.0.0 in the assembly’s metadata header, which is a special number that should also be supported by other CLI implementations. If this number isn’t supported, executables that run on the SSCLI won’t load into other CLI implementations. This is because other CLI implementations will first attempt to match the assembly to their execution engine. Only after this fails will they fall back to using v1.0.0.
The simplest form of configuration in Rotor takes the form of XML configuration files . There are also many settings of interest to developers that can be configured by using either XML files or environment variables; these are listed in Rotor’s online documentation. The XML files are the most important of the two mechanisms because they allow an administrator or developer to influence binding policy in a structured way.
Configuration files are named, by convention, using the same name as the entry point assembly that they configure, with the extension “.config”. For example, a configuration file for the MainProgram.exe assembly from the previous example would be MainProgram.exe.config. In addition, the SSCLI offers the ability to provide publisher policy configuration information on a per-assembly basis and machine policy configuration information that applies to the entire machine.
Note
Because there can be multiple versions of the SSCLI running side-by-side, machine-wide policy is per-installation, and the configuration file for machine policy is stored in the machine.config file in the config subdirectory of the version-specific SSCLI build directory.
The basic format of the part of a configuration file used to configure binding parameters looks something like the following:
    <configuration>
      <runtime>
        <assemblyBinding xmlns="urn:schemas-microsoft-com:asm.v1">
          <!-- assembly-related configuration goes here -->
        </assemblyBinding>
      </runtime>
    </configuration>
Other sections (such as system.runtime.remoting configuration elements) appear as children of the configuration root element. Note that the namespace declaration on the assemblyBinding element is crucial, since Microsoft CLI implementations look specifically for assembly-related configuration elements that use this namespace.
Services and applications are also free to store their own private information within configuration files, much as .properties files are used in Java or .ini files are used in Windows.
Users and administrators can drive the assembly-binding policy in a configuration file by creating dependentAssembly elements as children of the assemblyBinding element that in turn contain assemblyIdentity elements to identify which assembly they wish to influence and bindingRedirect elements to indicate the versioning redirection. Multiple dependentAssembly elements can be declared as children of the assemblyBinding element, but each dependentAssembly element can describe only one assembly.
To see this in action, recall that the MainProgram.exe application from the previous example currently uses Version 2.0.0.0 of the Echo component. Unfortunately, Version 2.0.0.0 has a horrible bug within it, and the developer of MainProgram cannot (or will not) release a version of MainProgram that depends on Version 1.0.0.0 of Echo. The administrator or user needs to essentially redirect MainProgram’s load-request for 2.0.0.0 of Echo back to Version 1.0.0.0. To do so, the administrator writes MainProgram.exe.config, similar to the following:
    <configuration>
      <runtime>
        <assemblyBinding xmlns="urn:schemas-microsoft-com:asm.v1">
          <dependentAssembly>
            <assemblyIdentity name="echo"
                              publicKeyToken="fcd14a8abe06f0d2"
                              culture="neutral" />
            <bindingRedirect oldVersion="2.0.0.0"
                             newVersion="1.0.0.0" />
          </dependentAssembly>
        </assemblyBinding>
      </runtime>
    </configuration>
Once again, remember that public key tokens will differ from what is printed.
When run, MainProgram, even though its assembly reference indicates that it requires the use of “echo, Version=2.0.0.0, ...” will in fact load and run “echo, Version=1.0.0.0,” and only echo three times instead of five (which was version 2’s behavior):
    > ildasm MainProgram.exe

        //  Microsoft (R) .NET Framework IL Disassembler.  Version 1.0.1.0
        //  Copyright (C) Microsoft Corporation 1998-2002. All rights reserved.

        .assembly extern mscorlib
        {
        .publickeytoken = (B7 7A 5C 56 19 34 E0 89 )
        .ver 1:0:3300:0
        }
        .assembly extern echo
        {
        .publickeytoken = (FC D1 4A 8A BE 06 F0 D2 )
        .ver 2:0:0:0
        }
        .assembly MainProgram
        {
        .hash algorithm 0x00008004
        .ver 0:0:0:0
        }

        (dump elided for clarity)

        > clix MainProgram.exe

        Echo assembly: echo, Version=1.0.0.0, Culture=neutral,
        PublicKeyToken=fcd14a8abe
        06f0d2
        Echo number 0
        Main program received echo!
        0: Hi mom!, Louder
        1: Hi mom!, Softer
        2: Hi mom!, Indistinct
This is powerful and is important to the successful evolution of a system over time. Versioning is a constant balancing act between the robust, conservative policy of always binding to the original versus the “politically correct” policy of binding to a version that contains fixes (such as security patches) or new features. Unfortunately, no one has discovered how to make this choice automatic; the best that can be done is to offer control over the configuration of the binding process.
Since the CLI uses a data-driven architecture for its services, there are many codepaths in the SSCLI that perform consistency checks on data. When we examine JIT compilation, for example, we will see how the metadata for individual types is validated and how the CIL is verified. Each layer of data that drives the execution engine must be loaded and checked before it is used so that the next layer can be guaranteed a good-clean life.
Keeping with this principle, assemblies are loaded from disk in a way that guards against changes, malicious or unintentional, made while the assembly has lain dormant. When they are loaded, they are first checked for consistency by the PEVerifier class, the code for which is shown in Example 4-4.
Example 4-4. PEVerifier validation (simplified from clr/src/vm/peverifier.cpp)
    BOOL PEVerifier::Check(  )
    {
    #define CHECK(x) if ((ret = Check##x(  )) == FALSE) goto Exit;

    #define CHECK_OVERFLOW(offs) {                                      \
        if (offs & CLR_MAX_RVA)                                         \
        {                                                               \
            Log("overflow\n");                                          \
            ret = FALSE;                                                \
            goto Exit;                                                  \
        }                                                               \
    }

      BOOL ret = TRUE;
      m_pDOSh = (PIMAGE_DOS_HEADER)m_pBase;
      CHECK(DosHeader);

      CHECK_OVERFLOW(m_pDOSh->e_lfanew);
      m_pNTh = (PIMAGE_NT_HEADERS) (m_pBase + m_pDOSh->e_lfanew);
      CHECK(NTHeader);

      m_pFh = (PIMAGE_FILE_HEADER) &(m_pNTh->FileHeader);
      CHECK(FileHeader);

      m_nSections = m_pFh->NumberOfSections;

      m_pOPTh = (PIMAGE_OPTIONAL_HEADER) &(m_pNTh->OptionalHeader);
      CHECK(OptionalHeader);

      m_dwPrefferedBase = m_pOPTh->ImageBase;

      CHECK_OVERFLOW(m_pFh->SizeOfOptionalHeader);
      m_pSh = (PIMAGE_SECTION_HEADER)((PBYTE)m_pOPTh + m_pFh->SizeOfOptionalHeader);

      CHECK(SectionHeader);
      CHECK(Directories);
      CHECK(ImportDlls);
      CHECK(Relocations);
      CHECK(EntryPoint);

    Exit:
      return ret;

    #undef CHECK
    #undef CHECK_OVERFLOW
    }
The CHECK macro in this code simply results in calls to segment-specific verification functions, all of which are also found in peverifier.cpp. They each encode very specific rules, depending on the segment; this is a useful file to read if you are looking for specifics of the CLI format.
PE validation, which is what check does, is distinct from metadata validation, which is also very important. Metadata tokens are essentially a form of indirect addressing, and because they are directly embedded into both CIL and attribute values for assemblies, they must be consistent with the tokens found in their assemblies to be valid. CIL and the metadata tables themselves are checked for consistency in several stages. We will take a careful look at how this is done in Chapter 5.
Get Shared Source CLI Essentials now with the O’Reilly learning platform.
O’Reilly members experience books, live events, courses curated by job role, and more from O’Reilly and nearly 200 top publishers.

