Chapter 4. Adding Stakeholders to the PMIS
Poor communication is probably the single most significant contributor to project failure.
Good two-way communication between all project stakeholders is key to project success. Solid project communication forestalls surprises, prevents duplication of efforts, and helps the project manager and the team reveal omissions and misallocation of resources early enough to permit corrections.
The question is, as a project manager, how can you ensure that only relevant project information goes out to the appropriate stakeholders?
If members of the executive management team on your project don’t care about detailed project information, but they are interested in having updates about milestone-level project status, high-level budget information, and overall project health, how do you ensure they receive that information in a timely fashion? On the other end of the spectrum, the project team is more likely to be interested in the project details specific to what they are working on, as well as what affects them. Again, how do you ensure they receive timely and relevant project information?
Project Communications Plan
Creating the project communications plan is an important step in sound project planning. The communications plan facilitates effective and efficient communications with all project stakeholders, describing how project communications will occur while project work is being done. A good communications plan generally includes the following elements:
Communication objectives
Targeted project stakeholders
Key communications format and content
Communication methods and frequency
Why is having a project communications plan necessary? Because part of setting up a PMIS is defining who has access to that PMIS and the level of access that they can have. Table 4-1 summarizes the communication needs of the SharePoint Dojo project.
Stakeholder | Project information requirements |
Chief executive officer | Regular email updates on project milestones and risks |
Chief financial officer | Access to project budget information and the ability to review and update any change to project finances |
Chief compliance officer | Ability to monitor project process compliance and review and update project risks |
Program manager | Ability to review project tasks, milestones, and risks |
Other project managers | Ability to review and update project information from other teams to share lessons learned and satisfy continuous improvement process |
Knowing which pieces of information are required by different stakeholders will help you create appropriate levels of information access and appropriate methods of delivery for those stakeholders. For example, you wouldn’t expect the CEO to regularly check the PMIS for updates; he or she wants the updates sent via email on a regularly scheduled basis. You can configure the PMIS to send the relevant updates automatically. Wouldn’t that be beneficial? Instead of manually emailing status data to the CEO, you can focus on more important aspects of your project. To learn how to set up automated alerts, see the Subscribing to Alerts” section in Chapter 7.
Site Access in SharePoint
Unlike typical websites, you can’t just go to any SharePoint site, register, create an account, and become a site member. It is the responsibility of the site owner to define who the PMIS site members are and to either provide or deny site access to users who request it.
In addition, through site permissions, the site owner specifies the type of access that site members have, including which content site members can view and which actions they can perform within the site. SharePoint comes with default site permission levels:
- Full control
By default, the site owner has this permission. Any user with full control can add, update, and delete site components, site members, and list content.
- Design
This permission level allows users to customize pages, as well as to add, update, and delete list and library content.
- Contribute
This is the most common type of permission granted to project stakeholders. Users with this permission level can add, update, and delete list and library content.
- Read
This level grants read-only access to the site.
Creating SharePoint Groups
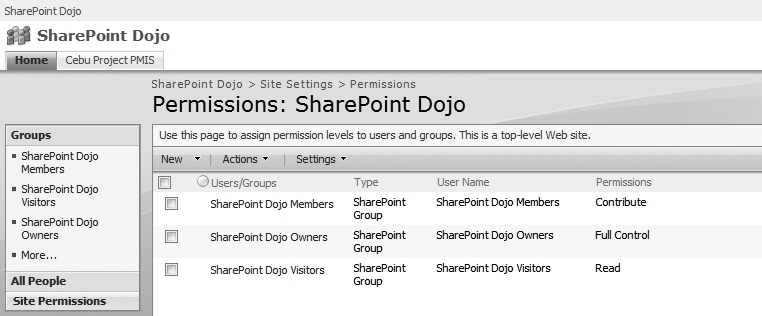
By default, whenever a site is created in SharePoint, SharePoint groups are automatically created. SharePoint groups are a way to easily group a specific set of users with the same set of site permissions (see Figure 4-1). These are the three default SharePoint group types:
- Site owners
This group has full control permissions. The site owner is assigned to this group.
- Site members
This group has contribute permissions. Most of the site members will be assigned to this group.
- Site visitors
This group is intended for site visitors who can only have read-only permissions.
Adding Site Members
Before you can add project stakeholders as members of your PMIS, you have to be familiar with how your SharePoint environment is set up. This is a good opportunity to contact your IT/IS department and ask how users are added to SharePoint sites. If you are using a Microsoft environment, users are usually identified in SharePoint by their respective Windows accounts.
Once you know how user accounts are set up in your SharePoint environment, you are ready to add site members to your PMIS. Site members can be added to SharePoint either manually (adding them yourself) or by requesting site access (users request that they be added as site members to the PMIS).
Adding members manually assumes that the site owner has identified the stakeholders who will access the site and already knows the associated SharePoint username of every stakeholder. If you don’t have this information, ask the IT/IS department to assist you in identifying the usernames.
These are the basic steps for manually adding site members:
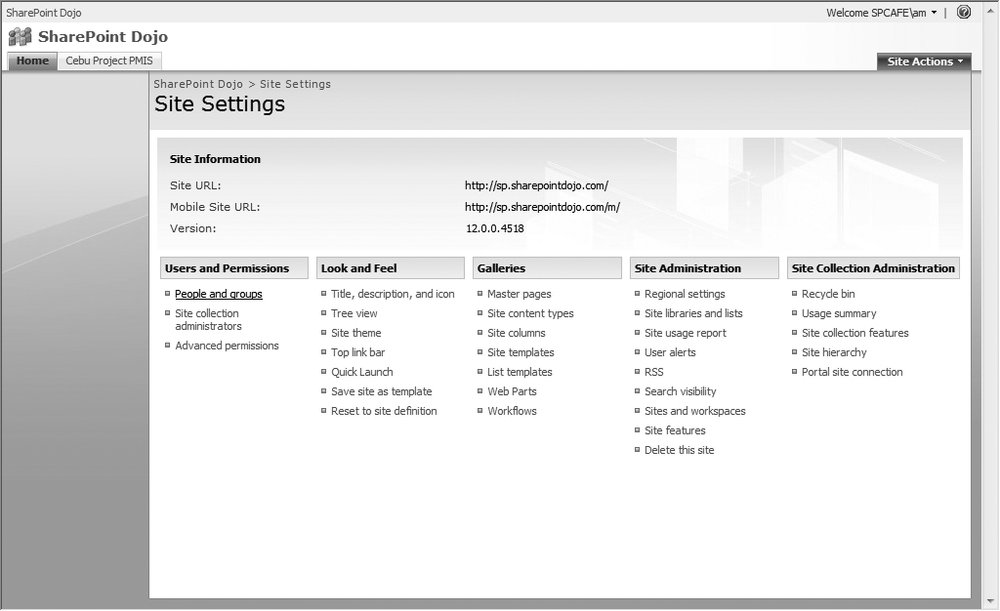
Access the Site Settings page (Figure 4-2).
In the Users and Permissions column, click People and groups.
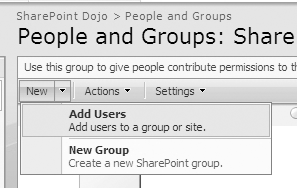
Click New→Add Users (Figure 4-3).
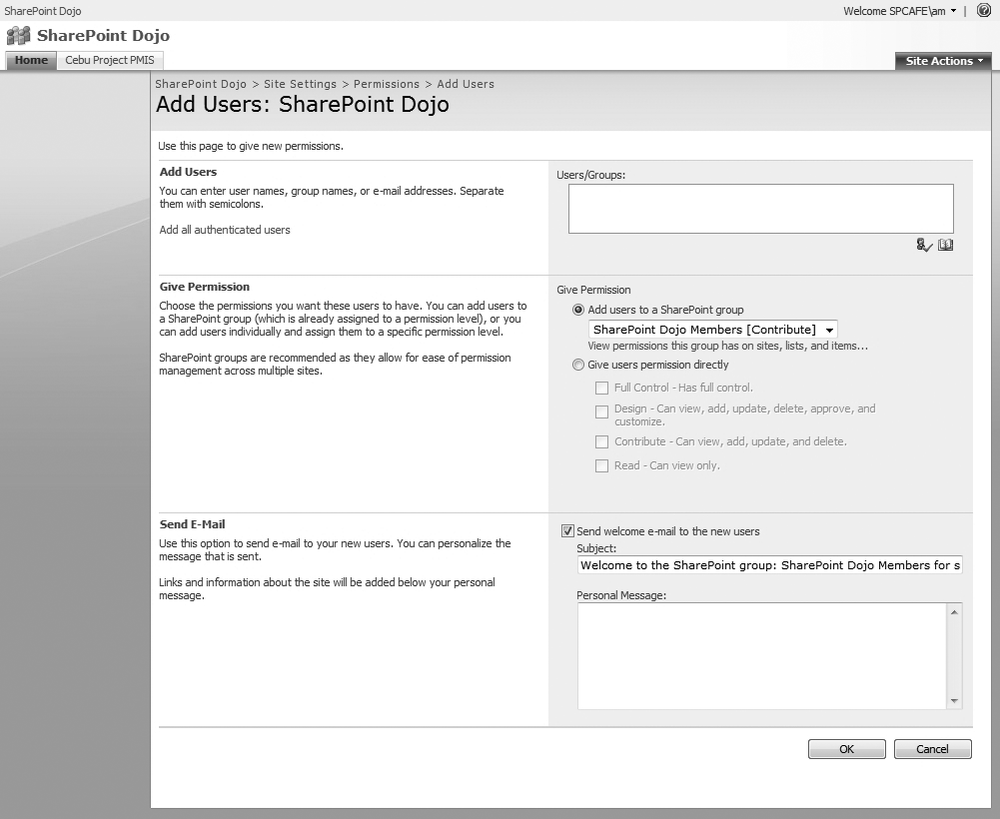
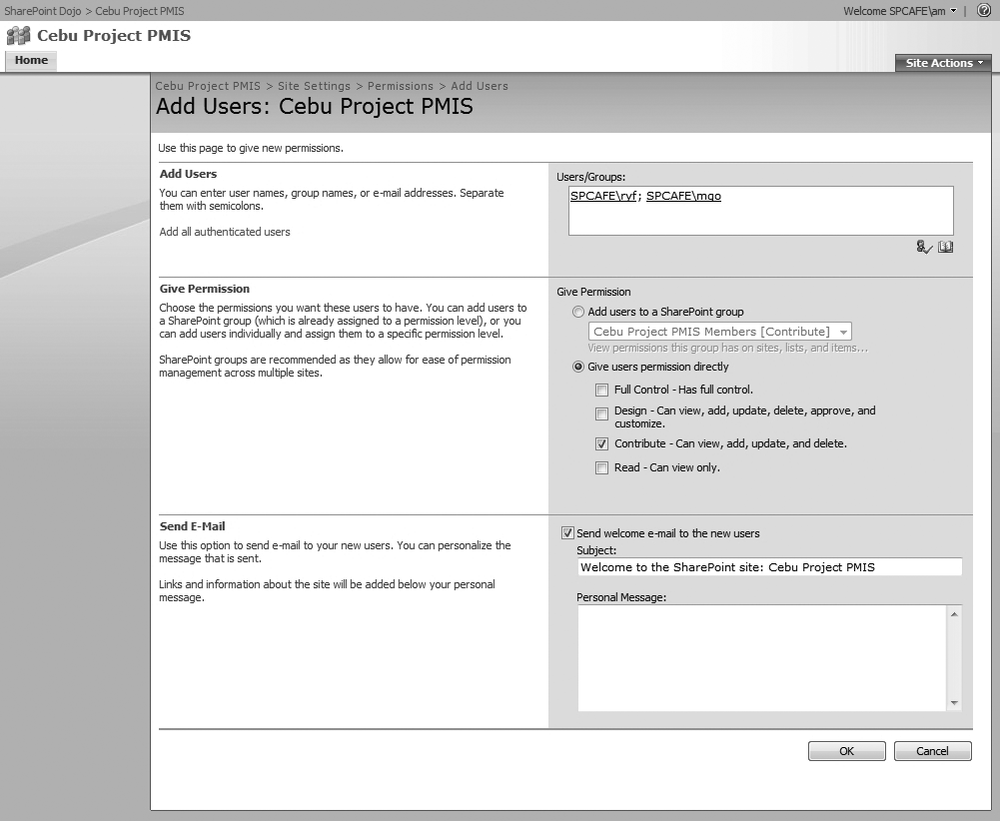
The Add Users page will be displayed (Figure 4-4). Complete the following fields:
- Add Users
Enter the Windows username (typically, you will use existing Windows accounts to add users in SharePoint).
- Give Permission
Assign the user to a SharePoint group with a predefined permission set or define permission level directly.
- Send Email
Specify whether a confirmation email will be sent to the user and, if so, enter the message that will be sent. (Remember, sending email only works if the IT/IS department has enabled this feature on the SharePoint server.)
Click OK to finish adding the member.
The second method for adding site members is to have the stakeholder access the PMIS and request access. Anytime a user tries to access a SharePoint site that he doesn’t have permission to access, an error page (see Figure 4-5) will be displayed containing a link to request access (if the access request feature is enabled). If the access request feature is not enabled, the only way for an individual to gain access to a PMIS is by having the site owner add the site member manually.
Access requests from users will be sent via email to the site owner, who can grant or deny access. Use the following steps to enable the access request feature:
Access the Site Settings page.
In the Users and Permissions column, click Advanced Permissions.
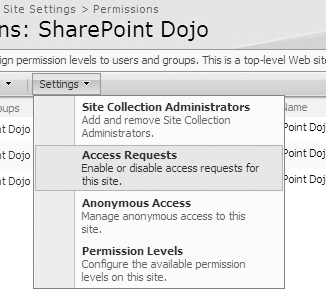
Click Settings→Access Requests (see Figure 4-6).
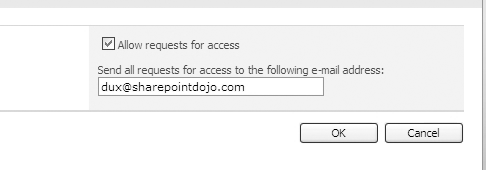
Enable the “Allow requests for access” feature and specify the email address of the site owner (see Figure 4-7).
Customizing Permissions
Defining permissions in SharePoint can be done at the site level. Permissions can also be customized for a list, a library, a list item, or a specific document.
Defining site access requires you to consider which site member(s) require what level of access to the contents of the site. For example, suppose that a stakeholder already has the contribute permission for the entire site, but you want to limit his access to the document library to read-only access. You can do this by updating the list permission of the document library. To update this permission for the library or for a list, you:
Access the appropriate document library.
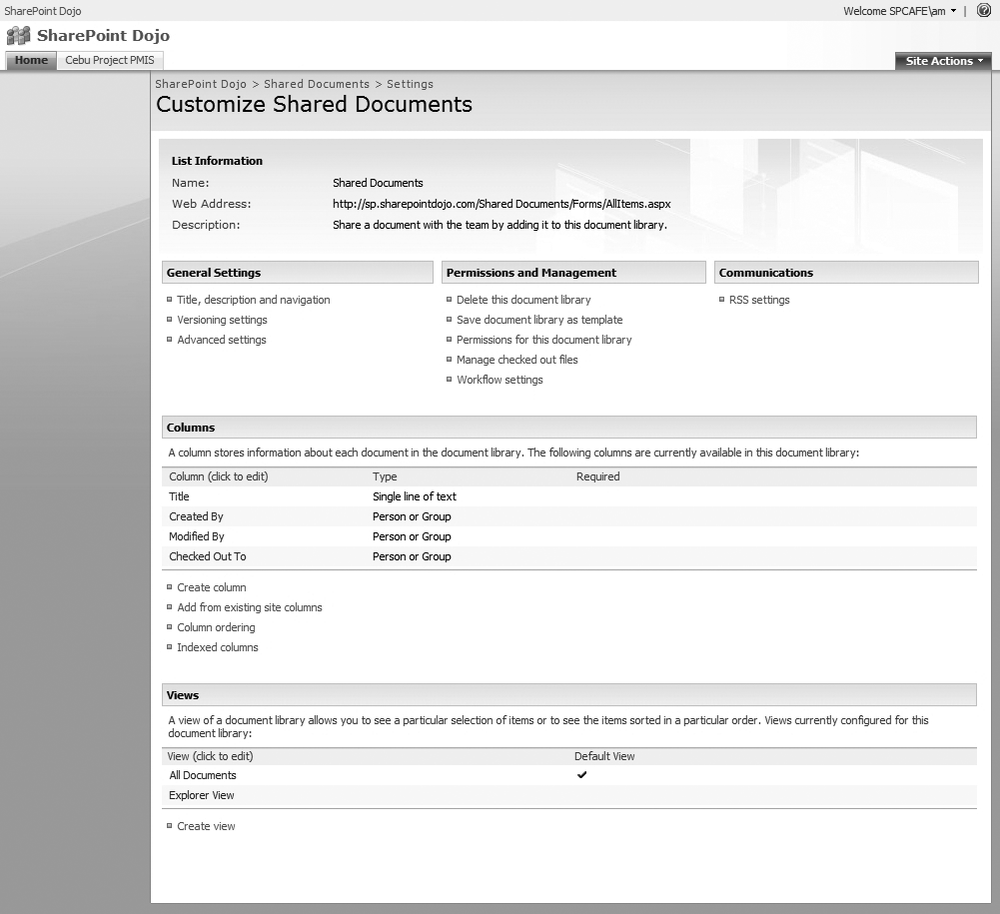
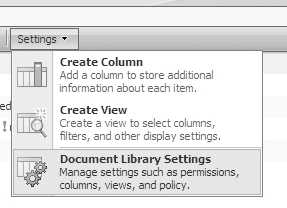
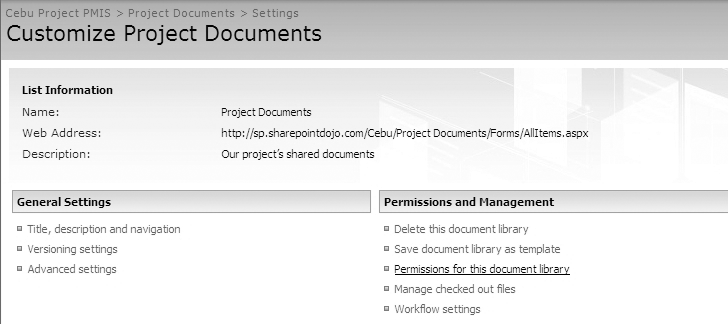
In the List toolbar, select Settings→Document Library Settings. This will open the document library settings page (Figure 4-8), where you can manage the document library’s settings.
In the Permissions and Management section, click “Permissions for this document library.”
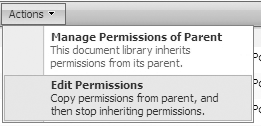
Click Actions→Edit Permissions.
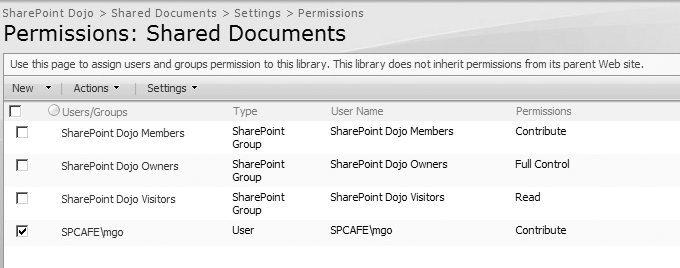
Enable the checkbox of each SharePoint group or site member that you wish to assign to this document library (Figure 4-9).
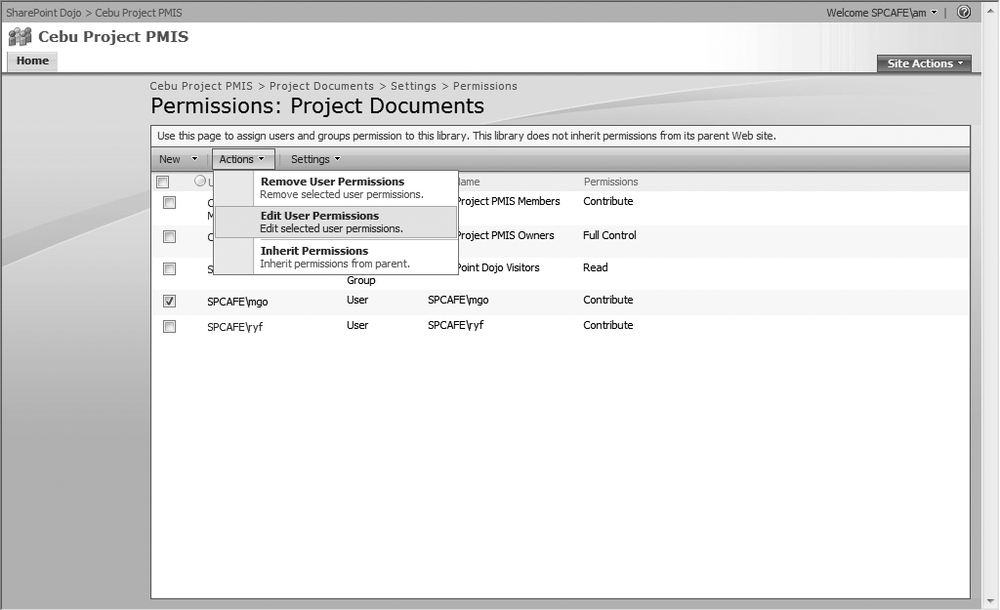
Click Actions→Edit User Permissions.
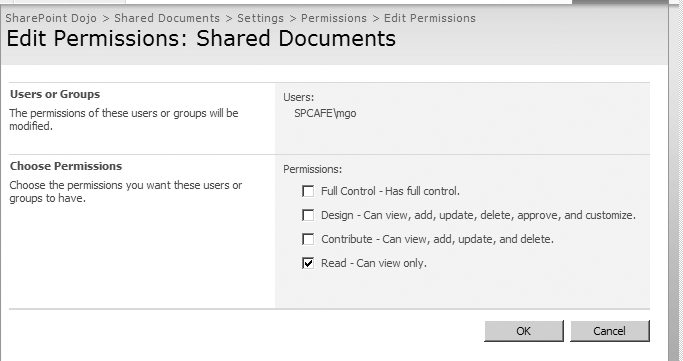
Update the permission settings (Figure 4-10).
Click OK.
You can further refine access restrictions by setting permissions for individual items in the library:
Access the appropriate document library.
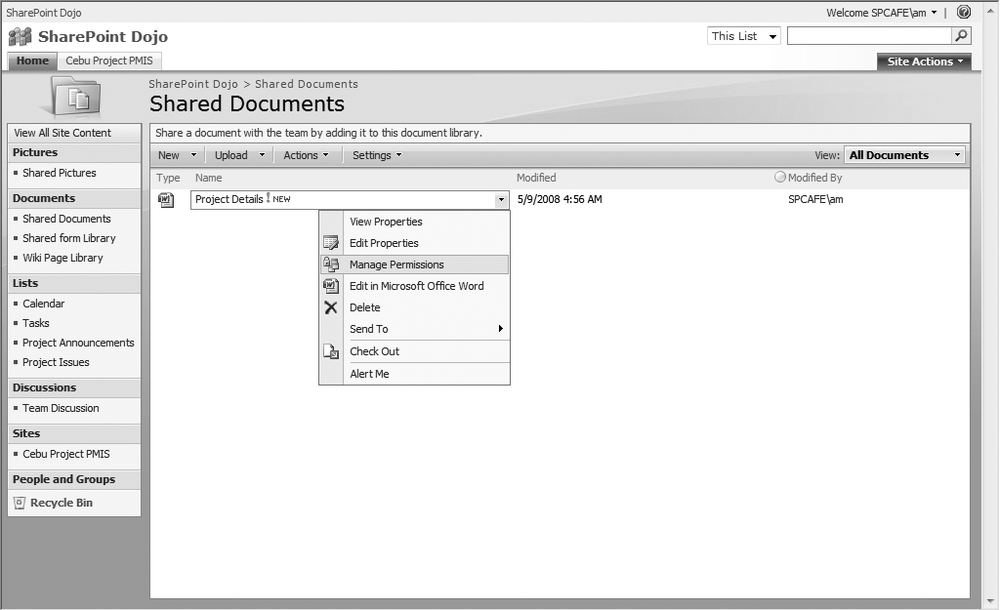
Hover the mouse over the desired document and click the drop-down menu (Figure 4-11).
Click Manage Permissions.
Click Actions→Edit Permissions.
Select the site member(s) or group(s) that will have access to this library item.
Select the desired permission level.
Workshop 4.1: Adding Site Members
In this workshop, you will add members to your PMIS and customize their access privileges. To complete this workshop, you will have to add at least two existing SharePoint users into your PMIS. You might have to coordinate with your IT/IS department and confirm whether the users you would like to add are already part of your SharePoint environment.
For fields and settings that aren’t mentioned in the workshop steps, accept the default settings.
A video demonstration of this workshop is available at http://www.spforpm.com.
Part 1: Add Site Members
In this part, you will add site members and grant permissions directly to them, rather than associating them with SharePoint groups. Later you will change their permissions at the document library level:
Access your SharePoint PMIS. Click Site Actions→Site Settings.
In the Users and Permissions column, click People and groups.
In the list toolbar, click New→Add Users. The Add Users page will be displayed (Figure 4-12).
Use one of the following methods to add two users from your organization as site members of your PMIS (the users should already be valid users in your SharePoint environment):
Click the address book icon in the Users/Groups field to search for and select the desired users.
Type the usernames of each member, separated by a semicolon, in the space provided in the Users/Groups section, then click the checkmark icon to verify that these are recognized usernames in the system.
In the Give Permission section, select “Give users permission directly,” and then enable Contribute.
In the Send Email section, enable the “Send welcome email to the new users” feature and enter the Subject and Personal Message.
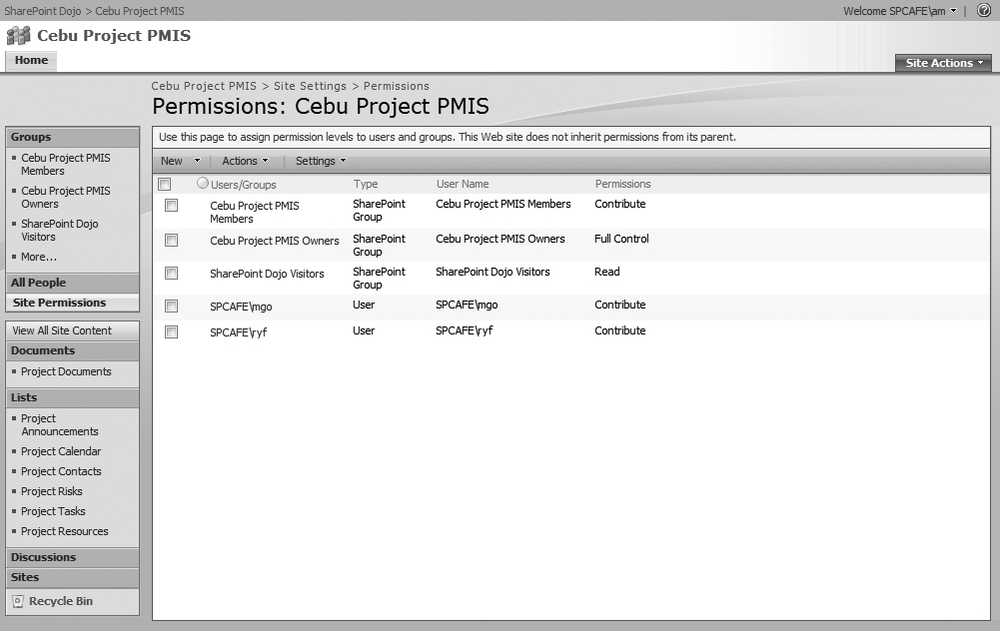
Click OK. The Permissions page will be displayed, including the two new site members (Figure 4-13).
Part 2: Customize List Permissions
SharePoint does a great job of allowing project managers to restrict access to project information with its capability to customize permissions at the list, library, list item, or library item level. In order to do this, perform the following steps:
On the Quick Launch, click Project Documents (see Figure 4-14).
In the Library toolbar, click Settings→Document Library Settings (Figure 4-15).
In the Permissions and Management section, click “Permissions for this document library” (see Figure 4-16).
On the Project Documents Permissions page, click Actions→Edit Permissions (Figure 4-17).
Click OK to dismiss the warning.
Select one of the site members you added in the previous part and in the toolbar, click Actions→Edit User Permissions (Figure 4-18).
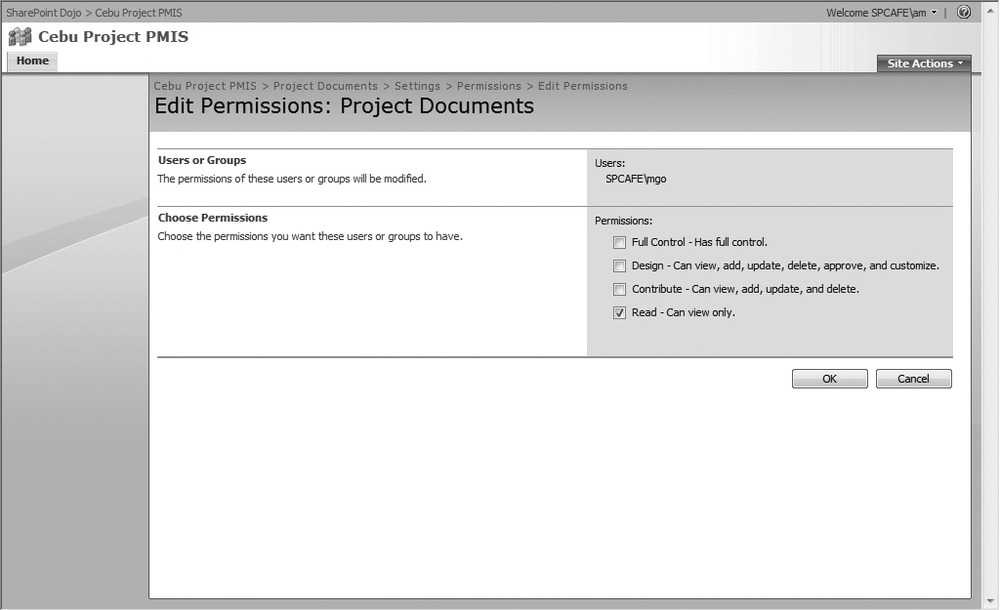
The Edit Permissions page will be displayed (Figure 4-19). In the Permissions section, enable Read and disable Contribute.
Click OK.
You have now restricted one of the site members to have read-only access to the Project Documents document library of your PMIS. This change will be reflected on the Permissions page.
Congratulations! You have successfully added and customized access privileges for your site members.
Workshop 4.1 Debrief
In the first section of the workshop, you added two site members and gave them contribute permissions, which will allow them to contribute to any of the lists in your PMIS.
In Part 2, you modified the permission of a specific site member to have read-only access to the Project Documents document library. This means that even if the site member has contribute permissions throughout the site, she can only look at documents in the document library.
Best Practices Checklist
Coordinate with your IT/IS department to make SharePoint accounts available for your project stakeholders
Most stakeholders will only require contribute permissions
Be very careful in customizing permissions at the list, library, list item, or library item levels
Summary
SharePoint users typically come from the existing Windows user environment.
SharePoint comes with default permission levels that can be customized.
SharePoint groups are a convenient way to manage users.
Get SharePoint for Project Management now with the O’Reilly learning platform.
O’Reilly members experience books, live events, courses curated by job role, and more from O’Reilly and nearly 200 top publishers.
