Chapter 4. Advanced UI
Graphics aren’t just about pretty pictures. By giving users more attractive and interesting interface elements, you enable them to interact with your pages more effectively. In this chapter, we’ll discover how to mitigate the limitations of HTML form elements by using libraries or custom-coded elements to improve the user experience in your applications.
HTML5 Forms
HTML5 introduces a number of new form elements that offer increased functionality, taking some of the load off the web designer in terms of form validation and specialized widget rendering. These features enable a richer browsing experience with (in theory) no additional client-side programming required.
Warning
Of course, while having validation on the client side is convenient, it’s easy to create a spoof form that sends invalid data to a server. All form inputs should also be validated on the server side to avoid the security ramifications of malicious or junk data being processed.
The new HTML5 inputs include the following types:
emailtelurlnumberrangesearchcolordateweekmonthtimedatetimedatetime-local
Implementing these new input types is no different than implementing
existing input types like hidden,
text, or password:
<input type='date'>
Although these HTML5 facilities are a step in the right direction for cross-browser rich form elements, there are some limitations:
Browser support is patchy, to say the least, with unsupported elements being replaced by regular
<input>tags.Appearance and behavior will vary from browser to browser. This is important if you require a consistent look and feel for a website.
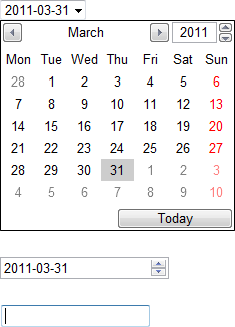
Figure 4-1 shows how an HTML5 date input element looks in Opera, Chrome, and Firefox. Opera shows a full calendar with various bells and whistles, whereas Chrome keeps things basic with just up and down buttons to increase or decrease the date. Firefox shows nothing but a regular input.
Opera’s is obviously the best attempt at a date input (although the presentation is less than inspiring), while Chrome’s looks like an afterthought. This kind of inconsistency is frustrating, and until these new HTML5 inputs produce reasonably consistent results on a cross-browser basis, we have to rely on JavaScript to create the results we want. In reality, this is not a bad thing, as JavaScript offers more exciting possibilities than the standard browser offerings.
The next section investigates popular JavaScript user interface libraries, which you can use to create highly functional web applications that look just like (or even better than!) traditional native desktop applications. Even if it is not possible to store a user’s application data on a remote server, some modern browsers such as Google Chrome offer local database storage facilities as a viable alternative. You will need to keep an eye on the latest developments in this area, as support for local storage is not standardized and will be patchy.
Using JavaScript UI Libraries
While HTML5 rich input elements might currently be a little too raw to use reliably, we can use JavaScript to provide attractive and consistent results across browsers. There are two approaches to doing this: use an existing JavaScript user interface library, or create user interface widgets from scratch.
In this section, I will give you a brief overview of two of the most popular JavaScript user interface libraries, jQuery UI and Ext JS. Some people may see these two libraries as competing products (and there is invariably some overlap), but take a closer look and you’ll see that they are (arguably) quite different in their intended uses. For example, if you were developing an ecommerce web application, you might find the lighter jQuery UI suitable for the frontend, customer-facing side, and Ext JS suitable for the complex backend, administration side. One big difference between the two, and an indicator of where these projects are going, is the size of the full zipped downloads (including samples and documentation): jQuery UI weighs in at a lightweight 1 MB, whereas Ext JS is a meaty 13 MB.
Using jQuery UI for Enhanced Web Interfaces
The jQuery UI library is built on top of jQuery to provide additional user interface elements. Certainly, anyone using jQuery is well advised to investigate jQuery UI, as a large chunk of the code—jQuery itself—will already be loaded on the page. You can find jQuery UI at http://www.jqueryui.com.
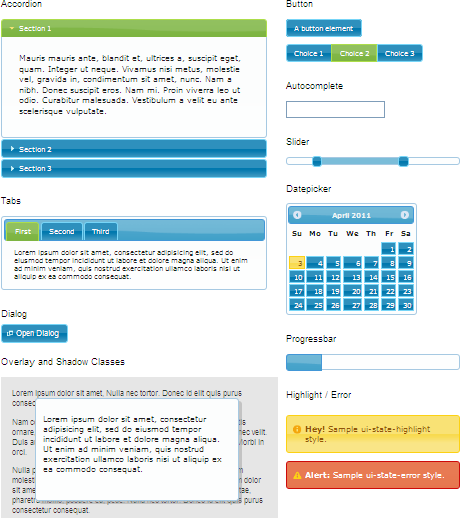
Figure 4-2 shows various jQuery UI elements styled with one of the attractive 24 themes available. In this example, we are using the Start theme. With a few minor variations, all of these elements will display correctly and consistently on virtually all browsers.
jQuery UI currently features the following user interface elements:
This is not a vast selection, but the widgets are attractive and stable, and additional widgets are in the pipeline. The library is easy to use, relatively lightweight, and suitable for most basic form-related and page layout tasks. To gain a realistic expectation of the library, think about it as offering an enhanced website experience rather than a heavy-duty application experience.
As well as user interface widgets, jQuery UI provides useful lower-level interactions that you can apply to arbitrary DOM elements:
You can use these to create your own specialized widgets.
Loading and using jQuery UI
Installing and using jQuery UI is straightforward, with a just few JavaScript and CSS includes at the top of the page. All of the required files—jQuery, jQuery UI, and CSS themes with related imagery—can be conveniently loaded from the Google content delivery network (CDN), although you can install everything on your own web server if desired.
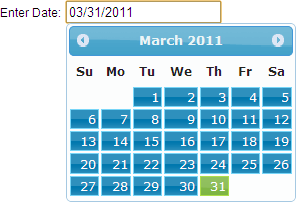
Example 4-1 shows how to set up a basic jQuery UI page with a single date picker widget. Figure 4-3 shows the output.
<!DOCTYPE html>
<html>
<head>
    <title>jQuery UI</title>
    <meta http-equiv="Content-Type" content="text/html; charset=utf-8">

    <!--    jQuery UI font sizes are relative to document's,
            so set a base size here. -->
    <style type="text/css">
        body {
            font-size: 12px;
            font-family: sans-serif
        }
    </style>

    <!-- Load the jQuery UI style sheet. -->
    <link rel="stylesheet" href="
        http://ajax.googleapis.com/ajax/libs/jqueryui/1.8.11/themes/start/jquery-ui.css"
        type="text/css" media="all" />

    <!-- Load jQuery. -->
    <script src="http://ajax.googleapis.com/ajax/libs/jquery/1.5.1/jquery.min.js"
        type="text/javascript"></script>

    <!-- Load jQuery UI. -->
    <script src="http://ajax.googleapis.com/ajax/libs/jqueryui/1.8.11/jquery-ui.min.js"
        type="text/javascript"></script>


    <script>
        // On DOM loaded, initialize a date picker widget on the input element
        // with id of 'datepicker'.
        $(function() {
            $("#datepicker").datepicker();
        });
    </script>

</head>
<body>
    <!-- The following input element will be turned into a date picker. -->
    <p>Enter Date: <input type="text" id="datepicker"></p>
</body>
</html>Theming jQuery UI
It’s easy to use one of the other jQuery UI themes if the Start theme doesn’t suit your needs. On the line that loads the jQuery UI CSS style sheet file, change the /start/ part of the path to one of the other theme names; for example:
| ...ajax/libs/jqueryui/1.8.11/themes/ui-lightness/jquery-ui.css |
or:
| ...ajax/libs/jqueryui/1.8.11/themes/le-frog/jquery-ui.css |
Where a theme name contains a space—for example, UI Lightness—substitute a hyphen instead and convert the name to lowercase: ui-lightness.
For a full list of the 24 available standard themes, visit http://jqueryui.com/themeroller/.
As mentioned previously, in addition to linking directly to the themes via Google’s CDN, you can download the themes and store them on your own server if desired.
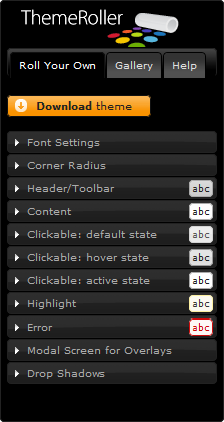
As well as the standard themes, the Page Themes page also contains a ThemeRoller application (Figure 4-4), which allows you to modify existing themes or create new ones from scratch. You can then download and use these custom themes instead of the standard ones. Note that the jQuery UI font sizes are relative to the page’s base font size, so it’s worth setting up a default font size for the page; otherwise, fonts may appear too large.
Heavy Duty UI with Ext JS
In contrast to jQuery UI, Ext JS offers a full-on, heavy-duty user interface system. It offers a seemingly endless array of user interface functionality built into a more rigidly defined application framework. Ext JS enables the development of web applications that are virtually indistinguishable from native operating system GUI applications. It’s suitable for complex backend administration interfaces (e.g., ecommerce administration) or elaborate frontend web applications (e.g., an art package). The flip side is that using Ext JS might be like cracking a nut with a sledgehammer if all you want is a couple of extra widgets and some tabbed content. Take a look at jQuery UI if your requirements are lighter.
You can find Ext JS on the Sencha website: http://www.sencha.com.
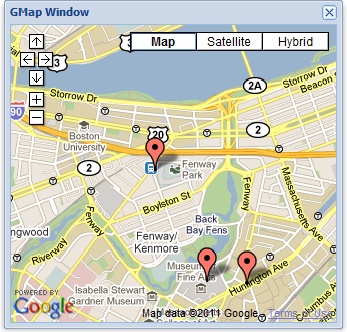
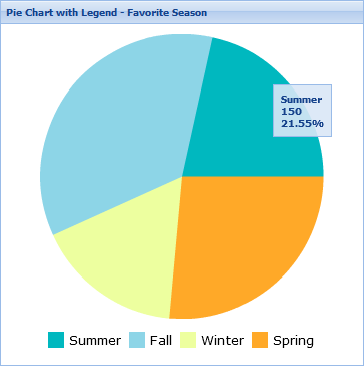
It is almost pointless to list the full functionality of Ext JS, as there is very little it doesn’t do. Some examples on the Sencha website go way beyond basic widgets and include applications such as entire web desktops, complex data grids, and forum browsers. There are layout managers to split up and organize UI page content, as well as facilities to bind various widgets to remote data sources. Some unexpected Ext JS features include Google Maps and chart windows (Figure 4-5 and Figure 4-6).
Loading and using Ext JS
Like the jQuery UI, loading the resources for Ext JS is straightforward, with the convenience of a content delivery network version of the required CSS and JavaScript files. These files are hosted on the Cachefly network, but you can install them on your own server if desired.
Although you can use Ext JS to manipulate DOM elements directly like jQuery, the Ext JS “way” is naturally more biased toward creating objects and having them magically appear on the page. In many regards, working with Ext JS is more akin to traditional, non-DOM-based application development. This method of working may have some benefits in terms of readability in larger projects. Ultimately, whether you prefer the Ext JS or jQuery way is largely a matter of personal taste.
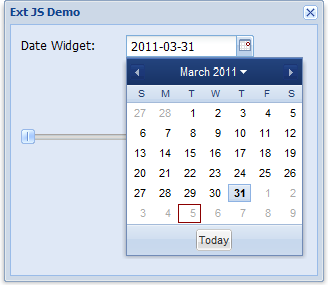
Example 4-2 creates a window object (not to be confused with the standard DOM window) and attaches a date widget, a spacer object, and a slider widget (Figure 4-7).
<!DOCTYPE html>
<html>
<head>
    <title>Ext JS</title>
    <meta http-equiv="Content-Type" content="text/html; charset=utf-8">

    <!-- Load the Ext JS CSS. -->
    <link rel="stylesheet" type="text/css"
        href="http://extjs.cachefly.net/ext-3.3.1/resources/css/ext-all.css" />

    <!-- Load the Ext JS base JavaScript. -->
    <script type="text/javascript"
        src="http://extjs.cachefly.net/ext-3.3.1/adapter/ext/ext-base.js">
    </script>

    <!-- Load the rest of Ext JS.  -->
    <script type="text/javascript"
        src="http://extjs.cachefly.net/ext-3.3.1/ext-all.js">
    </script>

    <script type="text/javascript">

    // Tell Ext JS where to find a transparent gif image
    // (used for rendering various elements).

    Ext.BLANK_IMAGE_URL =
        'http://extjs.cachefly.net/ext-3.0.0/resources/images/default/s.gif';

    // Ext JS onReady is called when the DOM has loaded,
    // similar to jQuery's $(function(){}).
    Ext.onReady(
        function(){

            // Create a DateField object.
            var dateField = new Ext.form.DateField({
                fieldLabel: 'Date Widget',
                emptyText:'Enter date...',
                format:'Y-m-d',
                width: 128
            }),

            // Create a Slider object.
            slider = new Ext.Slider({
                width: 280,
                minValue: 0,
                maxValue: 100,
                plugins: new Ext.slider.Tip()
            }),

            // Create a Spacer object.
            space = new Ext.Spacer({
                height:64
            }),

            // Create a Window object to attach all of the above.
            win = new Ext.Window({
                title: 'Ext JS Demo',
                bodyStyle:'padding: 10px',
                width:320,
                height:280,
                items:[dateField, space, slider],
                layout:'form'
            });

            // Show the window.
            win.show();
        }
    );
    </script>
</head>
    <body>
    </body>
</html>Creating UI Elements from Scratch
Using existing UI libraries makes perfect sense in many applications, but there are times when only a completely custom-coded widget will do. Frameworks like jQuery make this sort of thing a lot easier to develop, and you can tweak the element’s appearance and behavior in a completely free manner without having to worry about it “fitting in” with a UI framework.
You can also employ some of the techniques used in the sprites and games sections of this book to create dynamic widgets; for example:
Absolutely positioned DOM elements (
position: absolute) for free-roaming widget elementsTimers for animation (
setInterval(),setTimeout())Background image position manipulation to reveal limited portions of a larger bitmap image
jQuery does have some animation facilities, as you’ll see in the TilePic game in Chapter 9, but writing customized animation code gives you the flexibility to apply more interesting effects. The following section describes how to create a 3D carousel widget that uses custom animation to scale and move elements in elliptical paths.
Creating a 3D Carousel
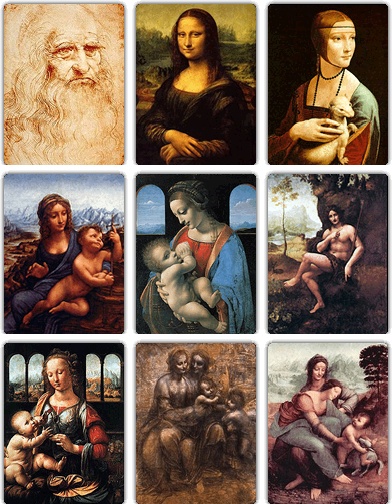
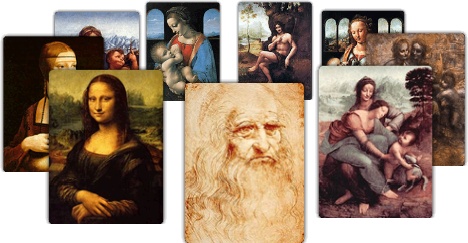
In this section, we will develop a carousel widget plug-in from scratch using jQuery. It takes a bunch of regular HTML images on a page (Figure 4-8) and transforms them into a spinning carousel widget with a 3D scaling effect (Figure 4-9).
Why would we want to do this?
It looks nice and adds visual interest.
Groups of images can take up less space.
It allows a varying number of images to occupy the same space.
Carousel specifications
When developing a user interface element like this, we need to take into account the diversity of target browsers and circumstances under which the page may be viewed. For example:
The user should be presented with the regular images (or text
equivalents from alt tags) if the
carousel cannot be initialized. It is up to the carousel plug-in to
take these normal images and turn them into something more interesting
if the browser environment facilitates this. It’s unacceptable for the
images to simply disappear in their entirety if the carousel cannot be
initialized. Also, the page’s HTML should not have to be compromised
in terms of WC3 validation or semantics in order to use the
carousel.
Although it’s not one of our deliberate goals, the carousel should work with older browsers such as IE6/7. Although the popularity of these insecure browsers is (thankfully) declining, there is still a substantial minority of people using them. According to Microsoft’s IE6 Countdown website (http://www.theie6countdown.com), a site designed to discourage use of IE6, 11.4% of Internet users were using IE6 as of April 2011.
Note
Although the carousel works with IE6, the PNG images used in the following example do not render correctly. If this is an issue, the simple fix is to instead use JPEG images, which render correctly on all browsers.
There should be no limit to the number of carousels that can be
visible on the page. This means that we’ll need to develop the widget
with nice encapsulated code that can be instanced an unlimited number
of times. Implementing the carousel as a jQuery plug-in makes it easy
to initialize multiple carousels. We just need to wrap the carousel
images in elements that jQuery can identify, and apply the plug-in
call to them. For example, the following code initializes a carousel
on all wrapping elements with a CSS class of carousel3d:
$('.carousel3d').Carousel();These additional specifications will also improve the look and feel of the carousel:
All images should retain their attributes and any event-based functionality attached to them.
Links surrounding the images should not be affected by the carousel.
The appearance of the carousel should be flexible in terms of the overall dimensions and scaling of the carousel items.
The carousel will automatically evenly space a variable number of elements.
The carousel elements should neatly fade in when their images load, avoiding any flickering or jerking effects as the DOM is changed.
When the user hovers his mouse over carousel items, the carousel will stop spinning, and start again when he moves the mouse away. This will make it easier to select items.
Carousel image loading
For the carousel to be initialized correctly, we must know the
width and height of the image items in order to perform all the
calculations related to carousel item positions and scaling. In an
ideal world, we’d know the sizes of all images being used in the
carousel before they’re loaded. In practice, this won’t necessarily be
the case, but we can find the size of an image once it has loaded by
reading its width and height properties.
However, detecting when an image has loaded
is a more frustrating task than you might expect. It is not as simple
as attaching a load event to an
image and acting when the event occurs. Unfortunately, image load
events are inconsistent across different browsers. Browsers may or may
not trigger the load event for
image loading, and if they do, they may not trigger the event when the
image is loaded from the browser cache instead of the network. One
fail-safe way of ensuring that images have been loaded is to listen
for the window load event. When
this event is fired, it means that all the page assets have been
loaded. The drawback of this method is that the entire page must be
loaded before the user can start interacting with the contents.
It might seem wasteful to trigger the loading of images that are
already specified within image
elements in the DOM. In fact, there is very little overhead involved,
as the images will be obtained from the browser cache if they have
been loaded previously.
The following loadImage()
function facilitates image-loading initialization and detection. It
takes into account the various browser idiosyncrasies, enabling image
loading to be initialized and executing a callback function when the
image has arrived either from the network or browser cache. The
function works with existing image elements already in the DOM, or
with image elements created with new
Image(). loadImage()
expects an image element, the source URL of the image, and a callback
function as arguments.
// Function to execute a callback when an image has been loaded,
// either from the network or from the browser cache.

var loadImage = function ($image, src, callback) {

    // Bind the load event BEFORE setting the src.
    $image.bind("load", function (evt) {

        // Image has loaded, so unbind event and call callback.
        $image.unbind("load");
        callback($image);

    }).each(function () {
        // For Gecko-based browsers, check the complete property,
        // and trigger the event manually if image loaded.
        if ($image[0].complete) {
            $image.trigger("load");
        }
    });
    // For Webkit browsers, the following line ensures load event fires if
    // image src is the same as last image src. This is done by setting
    // the src to an empty string initially.
    if ($.browser.webkit) {
        $image.attr('src', '');
    }
    $image.attr('src', src);
};
Notice how the event is bound before the image source is set. This prevents a load event from being triggered for instantly loaded cached images before the event handler has been set up.
Carousel item objects
The carousel is composed of several carousel items that spin
around a central point, shrinking into the distance to create a 3D
effect. Each carousel item is treated as an individual object
instance, created via the createItem() function. This function
performs various tasks related to handling a single carousel
item:
It triggers the initial image loading (via l
oadImage()) for the item (the image may already be in the browser cache).Once the image has loaded, it fades in, and saves the width and height (
orgWidth,orgHeight) for the scaling calculations in theupdate()function.The
update()function alters the item’s position, scale, and z depth according to the item’s rotation angle.
// Create a single carousel item.
var createItem = function ($image, angle, options) {
    var loaded = false, // Flag to indicate image has loaded.
        orgWidth,       // Original, unscaled width of image.
        orgHeight,      // Original, unscaled height of image.
        $originDiv,     // Image is attached to this div.

        // A range used in the scale calculation to ensure
        // the frontmost item has a scale of 1,
        // and the farthest item has a scale as defined
        // in options.minScale.
        sizeRange = (1 - options.minScale) * 0.5,

        // An object to store the public update function.
        that;

    // Make image invisible and
    // set its positioning to absolute.
    $image.css({
        opacity: 0,
        position: 'absolute'
    });
    // Create a div element ($originDiv). The image
    // will be attached to it.
    $originDiv = $image.wrap('<div style="position:absolute;">').parent();

    that = {
        update: function (ang) {
            var sinVal, scale, x, y;

            // Rotate the item.
            ang += angle;

            // Calculate scale.
            sinVal = Math.sin(ang);
            scale = ((sinVal + 1) * sizeRange) + options.minScale;

            // Calculate position and zIndex of origin div.
            x = ((Math.cos(ang) * options.radiusX) * scale) + options.width / 2;
            y = ((sinVal * options.radiusY) * scale) + options.height / 2;
            $originDiv.css({
                left: (x >> 0) + 'px',
                top: (y >> 0) + 'px',
                zIndex: (scale * 100) >> 0
            });
            // If image has loaded, update its dimensions according to
            // the calculated scale.
            // Position it relative to the origin div, so the
            // origin div is in the center.
            if (loaded) {
                $image.css({
                    width: (orgWidth * scale) + 'px',
                    height: (orgHeight * scale) + 'px',
                    top: ((-orgHeight * scale) / 2) + 'px',
                    left: ((-orgWidth * scale) / 2) + 'px'
                });
            }
        }
    };

    // Load the image and set the callback function.
    loadImage($image, $image.attr('src'), function ($image) {
        loaded = true;
        // Save the image width and height for the scaling calculations.
        orgWidth = $image.width();
        orgHeight = $image.height();
        // Make the item fade-in.
        $image.animate({
            opacity: 1
        }, 1000);

    });
    return that;
};
The image element passed to the createItem() function is the original one
from the DOM. Apart from some minor CSS changes and being attached to
a “handle” div element, the image
element retains any events attached to it, and any wrapping anchor
elements will still work.
The carousel object
The carousel object is the “brains” of the carousel, performing various initialization and processing tasks to handle the individual carousel items:
It iterates through all the image children of a wrapping element, initializing a carousel item for each image. It stores a reference to each carousel item in the
items[]array.It listens for
mouseoverandmouseoutevents that bubble up from the carousel items. When it detects amouseoverevent on an image, the carousel pauses. When it detects amouseoutevent, the carousel restarts after a small delay; the delay prevents sudden stop-start behavior as the user moves her mouse over the gaps between carousel items.
Finally, we create a setInterval() loop that updates a carousel
rotation value and passes this to each carousel item by calling its
update() function. The carousel
performs this action every 30ms (or as specified in the options in the
frameRate property). The default
value of 30ms ensures smooth animation. Larger values will be less
smooth but tax the CPU less; they may be suitable if the page contains
several carousels.
// Create a carousel.
var createCarousel = function ($wrap, options) {
    var items = [],
        rot = 0,
        pause = false,
        unpauseTimeout = 0,
        // Now calculate the amount to rotate per frameRate tick.
        rotAmount = ( Math.PI * 2) * (options.frameRate/options.rotRate),
        $images = $('img', $wrap),
        // Calculate the angular spacing between items.
        spacing = (Math.PI / $images.length) * 2,
        // This is the angle of the first item at
        // the front of the carousel.
        angle = Math.PI / 2,
        i;

    // Create a function that is called when the mouse moves over
    // or out of an item.
    $wrap.bind('mouseover mouseout', function (evt) {
        // Has the event been triggered on an image? Return if not.
        if (!$(evt.target).is('img')) {
            return;
        }

        // If mouseover, then pause the carousel.
        if (evt.type === 'mouseover') {
            // Stop the unpause timeout if it's running.
            clearTimeout(unpauseTimeout);
            // Indicate carousel is paused.
            pause = true;
        } else {
            // If mouseout, restart carousel, but after a small
            // delay to avoid jerking movements as the mouse moves
            // between items.
            unpauseTimeout = setTimeout(function () {
                pause = false;
            }, 200);
        }

    });

    // This loop runs through the list of images and creates
    // a carousel item for each one.
    for (i = 0; i < $images.length; i++) {
        var image = $images[i];
        var item = createItem($(image), angle, options);
        items.push(item);
        angle += spacing;
    }

    // The setInterval will rotate all items in the carousel
    // every 30ms, unless the carousel is paused.
    setInterval(function () {
        if (!pause) {
            rot += rotAmount;
        }
        for (i = 0; i < items.length; i++) {
            items[i].update(rot);
        }
    }, options.frameRate);
};
The jQuery plug-in part
We initialize carousels via a standard jQuery plug-in function. This allows carousels to be initialized on any selector in the usual way. We could define the HTML layout of a five-element carousel and three-element carousel like this:
<div class="carousel" ><!-- This is the wrapping element -->
    <img src="pic1.png" alt="Pic 1"/>
    <img src="pic2.png" alt="Pic 2"/>
    <img src="pic3.png" alt="Pic 3"/>
    <img src="pic4.png" alt="Pic 4"/>
    <img src="pic5.png" alt="Pic 5"/>
</div>

<div class="carousel" ><!-- This is the wrapping element -->
    <img src="pic1.png" alt="Pic 1"/>
    <img src="pic2.png" alt="Pic 2"/>
    <img src="pic3.png" alt="Pic 3"/>
</div>
Notice the use of a wrapping div to define which elements are actually
part of the carousel. In this example, we’ve applied the CSS class
carousel to identify the wrapping
elements, but you could use any other combination of selectors. You
could wrap the individual image elements with link anchor elements, or
bind events to them. Links and events will continue to work when the
images become part of a carousel.
To initialize the two carousels, we make a standard jQuery plug-in call:
$('.carousel').Carousel();Or with options:
$('.carousel').Carousel({option1:value1, option2:value2...});Here is the plug-in code:
// This is the jQuery plug-in part. It iterates through
// the list of DOM elements that wrap groups of images.
// These groups of images are turned into carousels.
$.fn.Carousel = function(options) {
    this.each( function() {
        // User options are merged with default options.
        options = $.extend({}, $.fn.Carousel.defaults, options);
        // Each wrapping element is given relative positioning
        // (so the absolute positioning of the carousel items works),
        // and the width and height are set as specified in the options.
        $(this).css({
            position:'relative',
            width: options.width+'px',
            height: options.height +'px'
        });
        createCarousel($(this),options);
    });
};
We also define a set of default options. You can override these when initializing the carousel.
// These are the default options.
$.fn.Carousel.defaults = {
    radiusX:230,   // Horizontal radius.
    radiusY:80,    // Vertical radius.
    width:512,     // Width of wrapping element.
    height:300,    // Height of wrapping element.
    frameRate: 30, // Frame rate in milliseconds.
    rotRate: 5000, // Time it takes for carousel to make one complete rotation.
    minScale:0.60  // This is the smallest scale applied to the farthest item.
};
Carousel page layout
The following page layout (Example 4-3) defines a single carousel
with nine carousel items. For demonstration purposes, one of the items
is a link (the Leonardo da Vinci self-portrait), and one has a
click event bound to it (the
Mona Lisa).
<!DOCTYPE html>
<html>
<head>
    <meta http-equiv="Content-Type" content="text/html; charset=utf-8">
    <title>Carousel</title>
    <style type="text/css">
        img { border:none;}
    </style>
    <script
        src="http://ajax.googleapis.com/ajax/libs/jquery/1.5.1/jquery.min.js">
    </script>

    <script type="text/javascript">

    // Start of jQuery carousel plug-in.
    (function($) {

        // Function to execute a callback when an image has been loaded,
        // either from the network or from the browser cache.
        var loadImage = function ($image, src, callback) {
            /*** CODE REMOVED FOR CONCISENESS ***/
        };

        // Create a single carousel item.
        var createItem = function ($image, angle, options) {
            /*** CODE REMOVED FOR CONCISENESS ***/
        };
        // Create a carousel.
        var createCarousel = function ($wrap, options) {
             /*** CODE REMOVED FOR CONCISENESS ***/
        };

        // This is the jQuery plug-in part. It iterates through
        // the list of DOM elements that wrap groups of images.
        // These groups of images are turned into carousels.
        $.fn.Carousel = function(options) {
              /*** CODE REMOVED FOR CONCISENESS ***/
        };

        // These are the default options.
        $.fn.Carousel.defaults = {
            /*** CODE REMOVED FOR CONCISENESS ***/
        };
    })(jQuery);
    // End of jQuery carousel plug-in.

    $(function(){
        // Create a carousel on all wrapping elements
        // with a class of .carousel.
        $('.carousel').Carousel({
            width:512, height:300,  // Set wrapping element size.
            radiusX:220,radiusY:70, // Set carousel radii.
            minScale:0.6           // Set min scale of rearmost item.

        });

        // Bind a click event to one of the pictures (Mona Lisa)
        // to show events are preserved after images become
        // carousel items.
        $('#pic2').bind('click', function() {
            alert('Pic 2 clicked!');
        });
    });
    </script>

</head>
<body>

    <div class="carousel" ><!-- This is the wrapping element -->
        <a href="http://en.wikipedia.org/wiki/Self-portrait_(Leonardo_da_Vinci)"
            target="_blank">
            <img src="pic1.png" alt="Pic 1"/>
        </a>
        <img id="pic2" src="pic2.png" alt="Pic 2"/>
        <img src="pic3.png" alt="Pic 3"/>
        <img src="pic4.png" alt="Pic 4"/>
        <img src="pic5.png" alt="Pic 5"/>
        <img src="pic6.png" alt="Pic 6"/>
        <img src="pic7.png" alt="Pic 7"/>
        <img src="pic8.png" alt="Pic 8"/>
        <img src="pic9.png" alt="Pic 9"/>
    </div>

</body>
</html>
Try adjusting the code to include additional carousels with varying numbers of elements. Add more click functionality to some of the other images, or create links out of them.
The days of web applications looking like an inadequate homage to fancy native desktop applications is long gone. With all the tools currently available, there is no reason why a modern web application cannot look even better than its desktop equivalent. Indeed, with ever-improving browsers, JavaScript performance, and libraries, cloud-based web applications are a viable alternative to traditional native applications in many situations. And with the web-based approach, users get the added benefit of being able to keep their software up to date without any client installation and update hassles.
Get Supercharged JavaScript Graphics now with the O’Reilly learning platform.
O’Reilly members experience books, live events, courses curated by job role, and more from O’Reilly and nearly 200 top publishers.
