There is functional testing, as opposed to environmental testing, which is different from launch survivability testing—oh my, so many tests. Functional testing is where you verify whether a component works or not, either isolated or when integrated into your overall satellite. All the steps laid out previously provide you with a functional test schedule.
Environmental testing is where you test that a working component continues to work even when subject to the rigors of space. This primarily means vacuum testing and thermal testing. A homemade thermal vacuum chamber will do nicely. This testing should be done for each of the isolated components. Vacuum testing is a pain, because you had to:
- Insert the part into your thermal vacuum chamber
- Set up some test measurement system
- Get to vacuum, run the test
- Repressurize
- Test the component once it comes out of thermal vacuum chamber, to ensure repressurizing didn’t damage everything
I recommend you do thermal vacuum chamber testing after you’ve finished your functional testing. You will have to break down your full assembly and retest each component in isolation, which is tedious. However, you will already have verified your original design and assembly and integration, so the bulk of this book is the test of survivability. Further, because you know integration works, you can reduce the number of test steps while maintaining accuracy.
NASA has one formal specification (among many) from their Launch Services Program titled “Program Level Poly-Picosatellite Orbital Deployer (PPOD) and CubeSat Requirements Document” (http://www.nasa.gov/pdf/627972main_LSP-REQ-317_01A.pdf). This short document (nearly shorter than its title, at just 14 pages) gives a set of NASA specifications on the requirements for CubeSat and PPOD (CubeSat deployment racks). They include vibration, shock, and thermal requirements as well as broader categories like power limits during phases of launch. If your satellite matches these requirements, you can likely be permitted on a NASA rocket. If you fulfill the NASA requirements, you likely can fulfill any private launcher’s requirements as well.
Among their requirements are several policy-level issues that are worth examining when you are designing your payload. The following are forbidden: pressurized vessels, propulsion systems, radioactive materials, explosive devices (including release bolts to open or expand mechanical assemblages). Several picosatellite teams are specifically using picosatellites to develop ion drive or pulsed plasma propulsion systems, so be aware that you may need to negotiate with your rocket provider if you are moving into territory this one set of NASA requirements forbids. That doesn’t mean you can’t do your experiment, but it does tell you that you will have to do additional justification and testing.
Other requirements are operational requirements. CubeSats under this spec must be powered off from the time of delivery until after deployed in-orbit (no power on during launch). Likewise, they cannot radiate RF (radiofrequency emission, either as radio signal or electronics noise) until 45 minutes after being deployed in-orbit. NASA under this spec presumes the payload is a CubeSat being deployed via a PPOD deployment mechanism. Again, you can do another plan, but the more you drift from this spec, the more paperwork you will incur.
In favor of picosatellites and standardization is that you can escape some of the risks that larger, more complicated missions face. Picosatellites are compact and minimalist payloads. I think most TubeSats and CubeSat are more resilant than a larger traditional satellite payloads (that might have extendable solar panels, optical benches, alignment requirements of 1mm, etc.), so such homebuilt tests in this book (I am hoping) will be sufficient pre-tests for most DIY satellite projects. Folks doing plasma drives or that require alignment can chime in with a rebuttal, since they’re doing more mechanically precise work.
The primary limitation in home test gear is we cover only a partial span of the entire range of potential launch problems that can occur. For example, our homemade shake table, built with an orbital sander on a router control, can span vibration frequencies up to 250 Hz. While that covers only the lower end of all possible rocket launch vibrations, it does a good enough job at breaking poor soldering joints such that a payload that survives that will likely survive launch. Similarly, you can get 3G of false gravity from the home centrifuge we offer here—lower than the 10G limit a rocket potentially might have, but certainly good enough to do your primary structural testing.
Just as important is that this book’s tests will let you quickly find problems and faults early in your build. We do not guarantee passing our tests ensures your satellite will survive every disaster launch might bring, but we can say with certainty that these tests will let you quickly find and fix early stage problems that would otherwise render your satellite dead on arrival.
A sample test schedule would include:
- I: Survival test and primary outgassing
- Place each board alone into chamber, run thermal vacuum cycle, remove boards and retest in isolation. This ensures that the conditions of space did not permanently destroy or distort any part of the board. It also allows for primary outgassing—the initial vaporization of any solvents, chemicals, or other contaminants on your boards. Since materials outgas in space, you want to let each board outgas on its own, so its outgassing components (if any) do not contaminate another board. See a sample schedule in NASA Bakeout.
- II: Full system test
Re-integrate your components, ensure they work on the lab bench, make sure your battery is charged, then run a full system thermal vacuum test. This complete test lets you use your existing comm system on the satellite to monitor your spacecraft’s functionality as it experiences the vacuum and thermal cycles. This is a pass/fail test. If your spacecraft passes this test, you are in great shape and ready to move on.
If your spacecraft fails this test, much like the extended analogy of a dead PC, you now have a lot of work to do isolating components and retesting. The general procedure if you fail this full system test is, first, test it fully assembled but out of vacuum.
If it doesn’t work outside of the chamber, that means vacuum or thermal conditions broke something. Go back to your build-and-integrate steps, find the bad component, fix, and repeat. If your new build works, you’re set! If you keep breaking the same component in thermal vacuum testing, that means a design flaw and you have a design that isn’t space worthy, and thus you must redesign that component before proceeding.
Did it fail testing after you took it out of thermal vacuum? If so, there’s a part that’s failing due to space conditions. That is a serious problem. There are three approaches to solving this: brute force, stepwise integration, or better testing.
For brute force, you simply test your flight spare instead and hope it works. If it does, your original had some subtle manufacturing or assembly defect, so toss it aside (with red stickers indicating DOA so you don’t accidentally use it!) and move on.
Stepwise integration is an approach you can immediately do instead of brute force, or the first thing to try if brute force failed (if the flight spare had the same thermal vacuum failure to operate). In this, you separate then slowly re-integrate each item in a series of thermal vacuum steps. A suggested sequence uses a truncated version of the original integration tests. I recommend:
- Power + comm system to test that it can send signals (functionality retained in thermal vacuum)
- Power + comm + CPU to test full functionality is maintained in thermal vacuum
- Power + comm + CPU + sensors
- All components, mounted in the skeleton: full build test
A better testing approach requires you incorporate test gear into your thermal vacuum chamber. The intent here is that you can test each piece in isolation while it is within the thermal vacuum chamber. Typically, this means creating an extra port on your chamber so you can run your lab bench test leads (whatever you used to test it earlier) into the chamber. Then, you go through the full build-and-integrate test schedule, only this time in thermal vacuum, in order to precisely determine the point of failure. Armed with this information, you can then assess whether it is a manufacturing defect or a design flaw.
From this, we get our set of required tests:
- Vacuum testing I: Primary outgassing
- Vacuum testing II: Surviving in an airless environment
- Vacuum testing III: Thermal vacuum testing
- Vibration and shake testing: Simulating a rocket launch
- G-forces: Simulating the thrust of a rocket launch
- Drop test: Simulating a drastic quick shift in position
- Electromagnetic interference testing: Shielding and noise response in your circuits
A “risk” is the term for something that could go wrong. A formal look at risk analysis (part of systems engineering) deals with concepts such as risk categories, bundling risks, availability analysis, and making requests for changes (RFCs). The first step is to categorize a given risk as technical, schedule, or cost risk.
- Technical
- Product may not be satisfactory
- Schedule
- An essential milestone may not be met
- Cost
- Cost budget may be exceeded
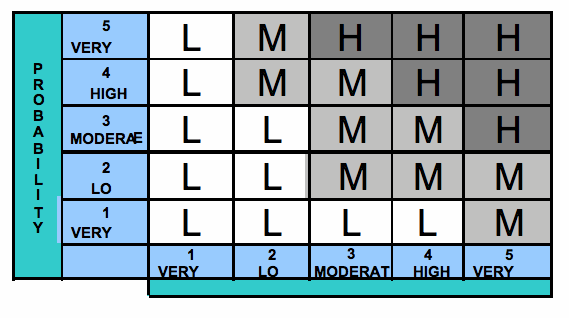
Risks are ranged by their likelihood of occurrence (low/medium/high) versus the consequences if risk is realized (low/medium/high). This gives you the overall severity (small, medium, large), often plotted as a 5x5 matrix (Figure 4-1).
Availability analysis looks at mean time between failures (MTBF) and mean time to restore (MTTR) where availability A = MTBF/(MTBF+MTTR). For example, given a time between failures MTBF=400 hrs and a time to restore MTTR=2 hrs, we get an availability A=0.995, or during 1 year the system is unavailable 16.7 times for a total of 43.8 hrs.
Going deeper, formal Failure Modes, Effects, and Criticality Analysis (FMECA) is a process. In NASA’s MIKL-STD-1629A, “Procedures for performing a Failure Mode and Effects Analysis”:
- Define conditions and constraints for each component
- Define what constitutes failure
- Assign probabilities and severities
Once you have a failure occur—an anomaly—you need to resolve it. The fundamental rule in anomaly resolution is that an anomaly, no matter how complex, has one and only one cause. The corollary: multiple failures don’t occur unless they cascade from a single root cause. From a testing point of view, this means that, if a component is not working or has a fault, you need to keep drilling down until you find a single root cause.
To give an example, if you plug in a TV and it doesn’t turn on, the problem could be the power, the on button, the TV’s display panel, or a variety of other causes—but it’s not all of them. Your job in testing and anomaly resolution is to find the one thing that went bad and caused the failure.
Note
Fun fact: a survey of 13 spacecraft over 2 years indicates anomalies occur about every 7 months of spacecraft operations, with 1 lost during launch. For picosatellites with a lifetime in weeks, this figure isn’t useful. If your satellite is going to stay up for years, however, then you need to accept from the start that there will be anomalies.
The bulk of anomalies for satellites occur during launch and early orbit. This is the unproven time, the portion where a new satellite is experiencing the rigors of space and being powered up and operated for the first time in orbit. A short list of possible disasters to expect during launch and early orbit includes (from Squibb, Boden & Larson, Cost-Effective Space Mission Operations, 2006, pg 314):
- Increased volume (3x) of real-time events
- Volume of commanding (amount of instructions being received and run by the spacecraft computers)
- Amount of data processing for engineering telemetry
- Number of people involved in operations
- Number of activities that must be scheduled, checked, and conducted
- Shortened cycle times (doing more in less time; less time to move from activity to activity)
- Increased risk
- Tremendous forces on the rocket during its ascent
- Many firsts associated with each activity and subsystem
- Rapid sequential activities
- Single-point failures in the system design
- Demands on the ops team’s reaction (human factor)
- Launch and deployment
That’s a lot that can go wrong. Let’s start building gear to help launch-proof and orbit-harden our satellite on the ground, while it’s still in our hands.
Get Surviving Orbit the DIY Way now with the O’Reilly learning platform.
O’Reilly members experience books, live events, courses curated by job role, and more from O’Reilly and nearly 200 top publishers.

