Chapter 4. Using Linux on Your Laptop
Laptops present special challenges, not only for Linux but for all operating systems. They often have special low-power versions of standard chipsets that have in the past presented a major obstacle to getting Linux installed and running properly. Nowadays, laptops are mainstream and hardware support in Linux is excellent. Nonetheless, there remain a few challenges, which I discuss in this short chapter—configuring power management to conserve battery life, using wireless and Bluetooth connectivity, and synchronizing the files on your laptop with those on your desktop system.
Configure Laptop Power Management
The term power management refers to a group of techniques that (for the most part) are designed to reduce the power consumption of a PC (particularly a laptop running on battery power). These techniques include suspend-to-disk, suspend-to-RAM, processor frequency scaling (reducing the processor clock speed), spinning down the hard disk, and thermal management (starting the fans).
Linux support for power management on laptops lagged behind Microsoft Windows support for many years. It has come a long way in the last few years; however, it is still considered experimental in the current kernel. Before playing with any of the settings here, make sure that everything is backed up.
How Do I Do That?
In theory, three suspend modes are supported:
- Suspend-to-disk
Saves the actual state of the machine to disk and powers it down entirely. When the machine is next booted, the previous state is restored and the computer resumes where the suspend was triggered. The ACPI term for this is ACPI S4. (Suspend-to-disk is the most reliable of the three modes and is considered “mainstream.” It works fine on my laptop; however, it’s the slowest to suspend and resume.)
- Suspend-to-RAM
The machine state is saved in RAM, most of the devices in the computer are powered down, and only the memory is powered to keep its contents. The ACPI term for this is ACPI S3. Suspend-to-RAM is still considered experimental. On my laptop, the suspend is very quick, but unfortunately the machine won’t come back up again without forcing a power on/off cycle. Your mileage may vary.
- Standby
Processes are stopped, and some hardware is deactivated. The ACPI term for standby is ACPI S1. On my laptop, this works and is quite quick, but the LCD screen is not powered down.
Because these features are still experimental, you need to enable them explicitly in YaST. From YaST’s main screen, select System from the left pane, then Power Management from the righthand pane. On the main Power Management Settings screen, click Suspend Permissions. Here you can specify which of the three modes to allow. To exit, click OK and then Finish.
Once the modes are enabled, to enter one of the power-save
modes, click on the kpowersave icon
(it looks like a small electric plug when running on electric power,
and a battery when on battery power, and should appear on the KDE
panel).
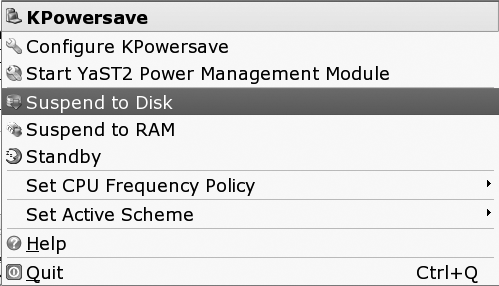
From the KPowersave menu, shown in Figure 4-1, you can suspend the machine using any of the enabled modes. The first time you do this, take care to save any work and open files, as you may end up forcing a reboot to recover. From this menu, you can also select which power management scheme (policy) is currently in effect. I discuss these schemes later.
Warning
Please note that if you use suspend-to-disk on a machine that is set up to dual boot and that shares partitions between the operating systems, it is essential to make sure that only one operating system can edit a partition at a time. For example, if you suspend Windows to disk (called hibernation in Windows parlance) and then boot into Linux, you must ensure that you do not change any data on the Windows partition. Similarly, if you suspend Linux to disk while a FAT32 or NTFS partition is mounted, you must ensure that you do not change any data on the partition when you boot back into Windows. If you do not do this, it is almost certain that you will corrupt the filesystem and lose data.
Fortunately, the default configuration with SUSE Linux 10.0 is to try to unmount any FAT32 partitions before entering suspend-to-disk. If it fails to unmount all the FAT32 partitions, it will refuse to suspend. This will not protect you if Windows is suspended, or if you are dual-booting multiple Linux installations. You have been warned!
From the YaST Power Management Settings screen, you can also configure how the system will respond when one of the power management buttons is pressed. To do this, click the button labeled ACPI Settings. On the next screen, labeled ACPI Buttons, you’ll see three drop-down lists that configure the response of the system to the power button, the sleep button, and the little switch that detects when you close the laptop lid. The default setting for the power button is to initiate a shutdown. You may find it convenient to change this to initiate a suspend-to-disk, or you may prefer to use the laptop lid button for this purpose.
How It Works
Most power management is performed by the daemon powersaved, which is started at boot time in runlevels 2, 3, and 5.
A number of configuration files in the directory
/etc/sysconfig/powersave are consulted when the
daemon is started. These are the files that are edited by the YaST
power management module. They are plain text files and heavily
commented. The easiest way to hand-edit these settings is with the
sysconfig editor module in YaST
(System → /etc/sysconfig Editor). The files that define the power
management schemes are also in this directory:
# ls /etc/sysconfig/powersave/
.        common   events              scheme_powersave     thermal
..       cpufreq  scheme_acoustic     scheme_presentation
battery  disk     scheme_performance  sleep
Behind the scenes, the daemon relies on the use of one of two possible standards for interacting with the power management hardware of your computer: Advanced Power management (APM) and the later, more configurable Advanced Configuration and Power Interface (ACPI).
To see which one is controlling your machine, run this command as root:
# powersave -Sand it will tell you.
One of the key differences between APM and ACPI is that with APM, the BIOS is responsible for putting the machine in a state such that suspend-to-disk or suspend-to-RAM will work. With ACPI, it is the operating system that must prepare itself to be able to be suspended. Consequently, the older APM suspend modes tend to work better. However, ACPI gives much finer control of the hardware and helps to prolong battery life. Note that ACPI is not specific to Linux. It is a PC industry standard that specifies how an operating system should interact with power management features in the BIOS and PC hardware.
What About...
...configuring the power management policy? The power management software is configured using a named scheme or policy, which determines how aggressive the power saving will be, and, broadly, trades off performance against power saving. There are four predefined schemes, but you can edit them or add your own if you want. The schemes are:
- Acoustic
Scheme designed to make the machine run as quietly as possible.
- Performance
Scheme designed to let the machine run on maximum performance. This is the preferred scheme for a machine running on AC power.
- Powersave
Scheme designed to minimize power usage. This is the preferred scheme for a machine running on battery power.
- Presentation
In this scheme, display standby mode and screensaver are disabled.
From the YaST Power Management Settings screen, you can specify which scheme will be used in AC-powered mode, and which scheme will be used in battery-powered mode. To change the schemes, click on Edit Scheme, then select a scheme and click Edit. From here, a sequence of two screens allows you to specify:
A name and text description for the scheme.
The use of frequency scaling and throttling of the CPU (dynamic frequency scaling automatically reduces the CPU clock frequency if the system is lightly loaded).
How aggressively the system will spin the hard disk down to conserve power. (You will notice 1- to 2-second delays if the system has to wait for the disc to spin up. Also keep in mind that spinning up a stationary disk uses significant power, and constantly stopping and starting the disk may reduce its working life, so there’s a balance to be struck here.)
The cooling policy. There are two options; if the machine temperature rises, the active policy turns on the fans first and reduces the CPU frequency only if this isn’t sufficient; the passive policy reduces the CPU frequency first and turns the fans on as a last resort.
The action to be taken if the machine overheats.
Finally, there are even more power-save parameters that you can change using KPowersave. Click on its icon (the little plug, remember?), then select Configure KPowersave from the menu. From here, a rather confusing tabbed dialog lets you turn on auto-suspend mode (if the user remains idle for a specified time) and select sound effects that will accompany specific events such as AC power on and AC power off.
Where to Learn More
There’s a good description of the powersave daemon on your
system at /usr/share/doc/packages/powersave/powersave_manual.html.
You might also read the manpages for powersave and powersaved.
You can find the ACPI specification here: http://www.acpi.info/.
There’s a lot of work on powersave going on at the moment that should soon lead to very intelligent power management and even better battery life than in Windows. The project is hosted at http://forge.novell.com/modules/xfmod/project/?powersave.
Configure Wireless Networking
Wireless networks in Linux are one of those areas that generally either work perfectly straight out of the box, or don’t work straight out of the box and give you hours of grief. This lab is mostly dedicated to the poor souls (like myself) whose experiences fall into the second category.
How Do I Do That?
From the YaST main screen, select Network Devices from the pane on the left, then Network Card from the pane on the right. From the command line, you can go straight to the screen you need with:
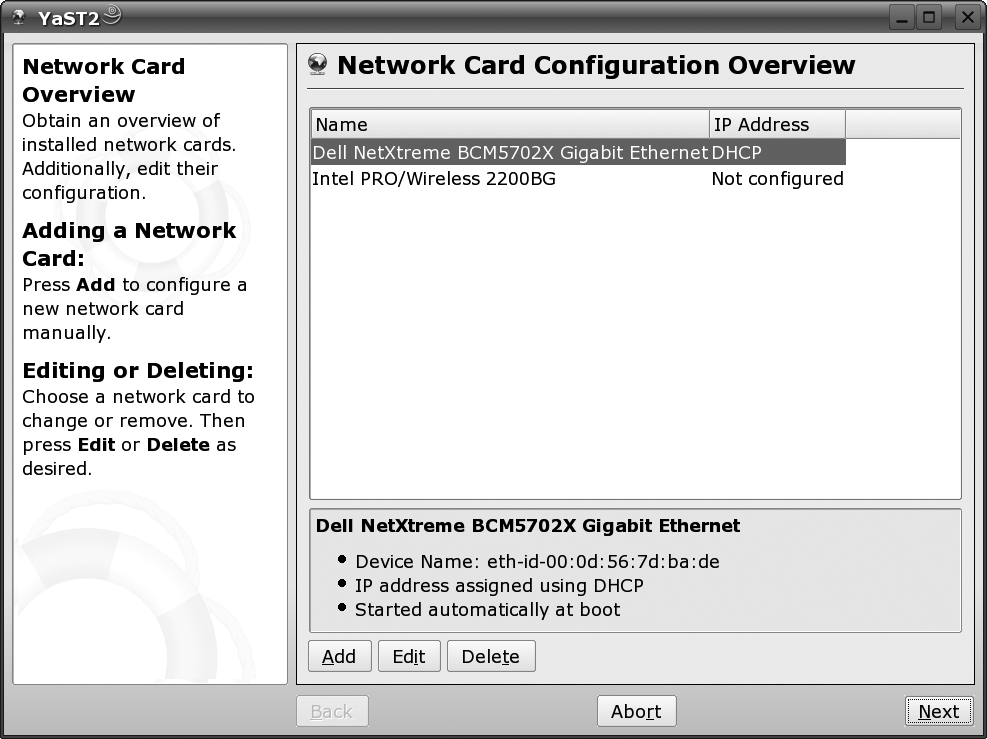
# yast2 lanIf your wireless card shows up in the list at the top (see Figure 4-2), then the odds are good that you are going to belong to the first, luckier group of people. It’s not completely plug-and-play, though—most cards need firmware loaded to make them work, because most wireless LAN manufacturers don’t put the intelligence into the actual driver. How you obtain and load the firmware depends on the card. Some cards will prompt, as you configure them to install the appropriate RPM, others will require a download via YOU (YaST Online Update), and some may require that you manually track down the firmware.
To configure your card, select it from the list and click Edit. In the case of the Intel IPW2200 card shown in Figure 4-2, YaST will prompt you, if necessary, to install the RPM that contains the firmware binaries. This should be included on your installation media. An RPM containing firmware for the Atmel AT76C50X card is similarly available.
For “legal reasons” (I am left pondering the concept of an “illegal reason”), firmware for other wireless cards is not included in the distribution but is available via YaST Online Update. (See Lab 5.5, "Perform an Online Update" for information about YOU.) This includes firmware support for ACX100, ACX111, and PrismGT wireless LAN cards.
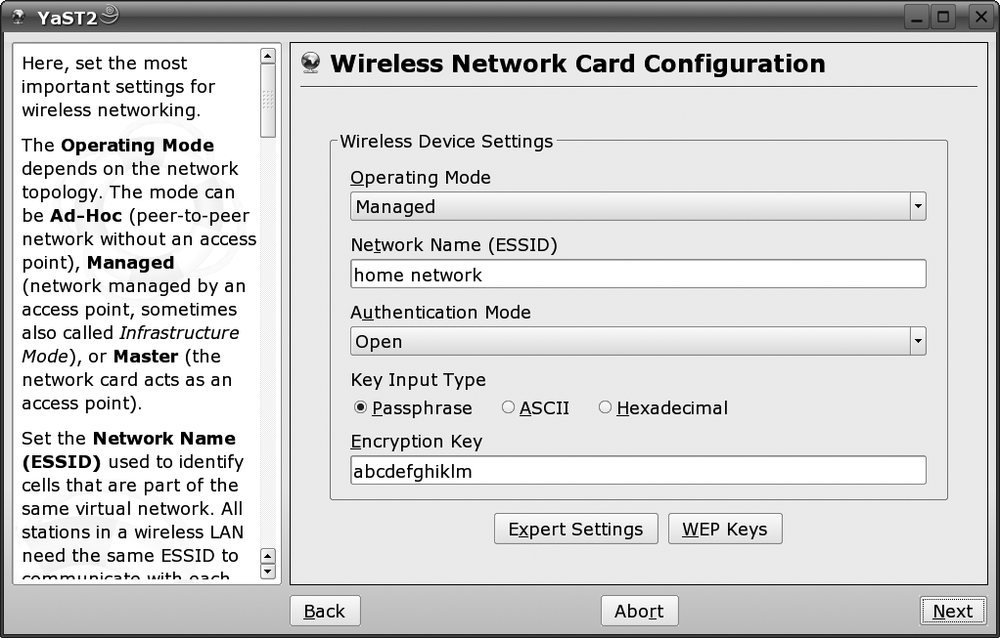
Once the firmware is downloaded, you’ll see the standard YaST network configuration screen. Here you can configure your IP address settings (probably you’ll want Automatic). Clicking Next will get you to the wireless configuration screen, shown in Figure 4-3.
Here you can set your wireless settings. If you have multiple WEP keys, click on the WEP Keys button; otherwise, just add your main key under Encryption Key. Once it’s all filled in, click Next a couple more times and YaST should set everything up and close.
If you have both wired and wireless network connections, just unplugging your network card probably won’t result in your wireless network automatically being selected. To swap successfully to wireless, start the network selector applet (from the main menu, select System → Desktop Applet → Network Selector Panel Applet). This applet lets you choose between your various network connections.
How It Works
Behind the scenes, iwconfig
is the backend program that configures the wireless
card settings. It can be very useful for differentiating between IP
network problems and wireless networking problems. Just run iwconfig, and you should see something like
this:
# iwconfig
lo        no wireless extensions.

sit0      no wireless extensions.

eth0      no wireless extensions.

eth2      IEEE 802.11b  ESSID:"home network"
          Mode:Managed  Frequency:2.412 GHz  Access Point: 00:60:B3:78:38:AB
          Bit Rate=11 Mb/s   Tx-Power=20 dBm
          Retry limit:7   RTS thr:off   Fragment thr:off
          Encryption key:off
          Power Management:off
          Link Quality=95/100  Signal level=-31 dBm  Noise level=-82 dBm
          Rx invalid nwid:0  Rx invalid crypt:0  Rx invalid frag:0
          Tx excessive retries:0  Invalid misc:37   Missed beacon:0
As you can see, the output shows you exactly which card is your wireless card. It also shows your ESSID and other useful information. If your wireless card has successfully associated with an access point, then you can see the MAC address of the access point. If you need to try a different WEP key or ESSID, you can set these from the command line; for example:
# iwconfig eth2 enc "abaa6533aa8d"You can also enter the key as an ASCII string using the s: prefix:
# iwconfig eth2 enc s:keyhereTo set your ESSID, use
# iwconfig eth2 essid "home network"This approach is much quicker than going in and out of YaST all
the time. After changing the settings, run iwconfig again to see whether your system
has now associated with an access point. If it has, then you can enter
the values into YaST, and hopefully everything will work.
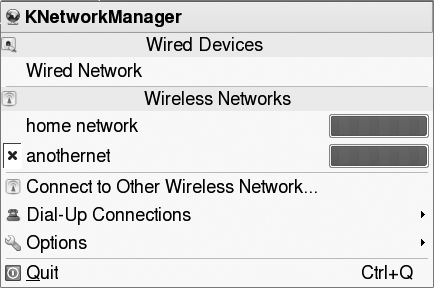
In SUSE 10.1, you may prefer to do all of this with NetworkManager. Using NetworkManager, it is still necessary to specify the key and ESSID of each wireless network you use the first time you connect, but thereafter NetworkManager will automatically switch to the best wireless network (the one with the strongest signal) as your laptop changes location. See Figure 4-4.
What About...
...cards that don’t have Linux drivers? There is a solution to this, but it’s not pleasant. Because not all wireless manufacturers produce Linux drivers, and because the interface between a Windows network driver and Windows is well documented and understood, someone decided it might be possible to emulate that small part of Windows so the driver thinks it’s running in Windows. For this purpose, NdisWrapper was born.
NdisWrapper is not an elegant solution. The word “kludge” comes to mind. (To quote the inspired Wikipedia, a kludge is similar in spirit to a workaround, only without the grace.) You end up with code written for one operating system running in the kernel address space of another. Any bugs in the Windows drivers will, in all probability, crash Linux. Of course, it also encourages wireless manufacturers to be lazy and not produce Linux drivers.
Tip
As an example of the kind of problems you can end up with, I had a situation where NdisWrapper would work correctly if the laptop also had a Bluetooth chip on the motherboard. If the laptop didn’t, then with NdisWrapper configured, the machine would cold-boot only while on AC power. It would crash every time it was powered on while running on battery.
If you really need to use NdisWrapper, read on.
First, you need to track down the Windows drivers for your card. That in itself can be a problem. Some drivers work better than others, and there are often many versions of the driver available from the manufacturer’s web site. The NdisWrapper wiki has a good list of cards that work, and the best driver for them—see http://ndiswrapper.sourceforge.net/mediawiki/index.php/List.
Once you’ve located the driver files (probably a .inf file and a .sys file), download them and save them to a temporary directory. Then, open two terminal windows (as root). In one, run:
# tail -f /var/log/messagesso that you can see what’s being written to the system log. In the other window, run:
#ndiswrapper -ifoo.inf#rmmod ndiswrapper#modprobe ndiswrapper
substituting your actual driver name for
foo.inf.
Among the lines of detail that scroll up the message window, you should see the MAC address of the adapter. Expect something like this:
Nov 20 14:14:13 linux kernel: ndiswrapper: device wlan0 removed
Nov 20 14:14:13 linux kernel: ACPI: PCI interrupt for device 0000:02:03.0 disabled
Nov 20 14:14:13 linux kernel: ndiswrapper: module not supported by Novell,
                              setting U taint flag.
Nov 20 14:14:13 linux kernel: ndiswrapper version 1.2 loaded (preempt=no,smp=no)
Nov 20 14:14:13 linux kernel: ndiswrapper: driver bcmwl5a (Broadcom,04/09/2004,
                              3.40.69.0) loaded
Nov 20 14:14:13 linux kernel: ACPI: PCI Interrupt 0000:02:03.0[A] -> Link [LNKB]
                              -> GSI 5 (level, low) -> IRQ 5
Nov 20 14:14:13 linux kernel: ndiswrapper: using irq 5
Nov 20 14:14:14 linux kernel: wlan0: ndiswrapper ethernet device
                              00:90:4b:69:c1:4e using driver bcmwl5a,
                              configuration file 14E4:4324.5.conf
Nov 20 14:14:14 linux kernel: wlan0: encryption modes supported: WEP, WPA with
                              TKIP, WPA with AES/CCMP
The line to look for is the one showing the card’s MAC address. If this is in there, then in all probability the card will work. If it’s not there, then before you start trying other drivers, make sure that the card isn’t disabled in the BIOS of the machine, or turn it on with the function keys (for example, you can toggle the WiFi card on and off with Fn-F2 on Dell notebooks). Each time you try to reload NdisWrapper to try a new driver, remember to unload it first.
If you have a stubborn built-in wireless chipset that just won’t cooperate, consider getting a PC Card wireless adapter that is known to work with Linux. For example, Ralink makes an 802.11g chipset with GPL drivers (see http://rt2400.sourceforge.net). If you’re feeling adventurous, you may be able to pick up a Mini-PCI version of a supported card, and replace the wireless card that came with your notebook computer.
If you do see the MAC address, you can run iwconfig to see whether you can find your
access point (see the previous explanation). If that all works,
run:
# ndiswrapper -mwhich adds an alias to /etc/modprobe.d so that NdisWrapper is loaded automatically when wlan0 is accessed. Then, go into YaST, as discussed earlier in this lab, and configure the network card permanently as follows:
Click Add.
Under the “Device type” drop-down menu, select Wireless.
Under Module Name, enter
ndiswrapperand then click on Next.Enter the IP address, or select Automatic if you have DHCP.
Click Next, and enter your wireless details (see the previous discussion), then click Next, and Next.
That’s about it!
Where to Learn More
For information about firmware and the command-line wireless networking tools, see the files in /usr/share/doc/packages/wireless-tools. Also read Chapter 22 (“Wireless Communication”) of the SUSE Linux Documentation, available under SUSE Help Center.
For information about NdisWrapper, chek out http://ndiswrapper.sourceforge.net/mediawiki/index.php/Main_Page.
The Linux Wireless Howto is at http://www.hpl.hp.com/personal/Jean_Tourrilhes/Linux/Wireless.html.
For detail on Linux wireless networking, Bluetooth, and infrared, try the book Linux Unwired, by Weeks et al. (O’Reilly).
Configure Bluetooth Devices
Bluetooth is a short-range wireless protocol used to connect devices such as mobile phones, PDAs, and computers. It is named, so I’m told, after King Harald Bluetooth, who united Denmark and Norway. (This was back in about 950 AD, so you may be forgiven if your memory of it is hazy.) Anyway, the idea is that Bluetooth as a personal network technology can unite digital devices.
In reality, there can often be problems getting your phone working with your hardware and doing everything that the feature list says it should be able to. This is true for Windows as well as Linux. There are many features that may work on Bluetooth, and potentially many devices you might interact with, but in this lab we’ll concentrate on interacting with a phone. That should be enough to get you going with other Bluetooth-enabled devices.
How Do I Do That?
First things first—check to see whether your laptop or PC has
recognized the Bluetooth device. Many laptops now come with these as
standard, but if not, you can also get USB-capable Bluetooth devices,
which generally work fine. You should also make sure you have the
packages bluez-libs and bluez-utils installed. (Bluez is the
Bluetooth protocol stack used by SUSE.)
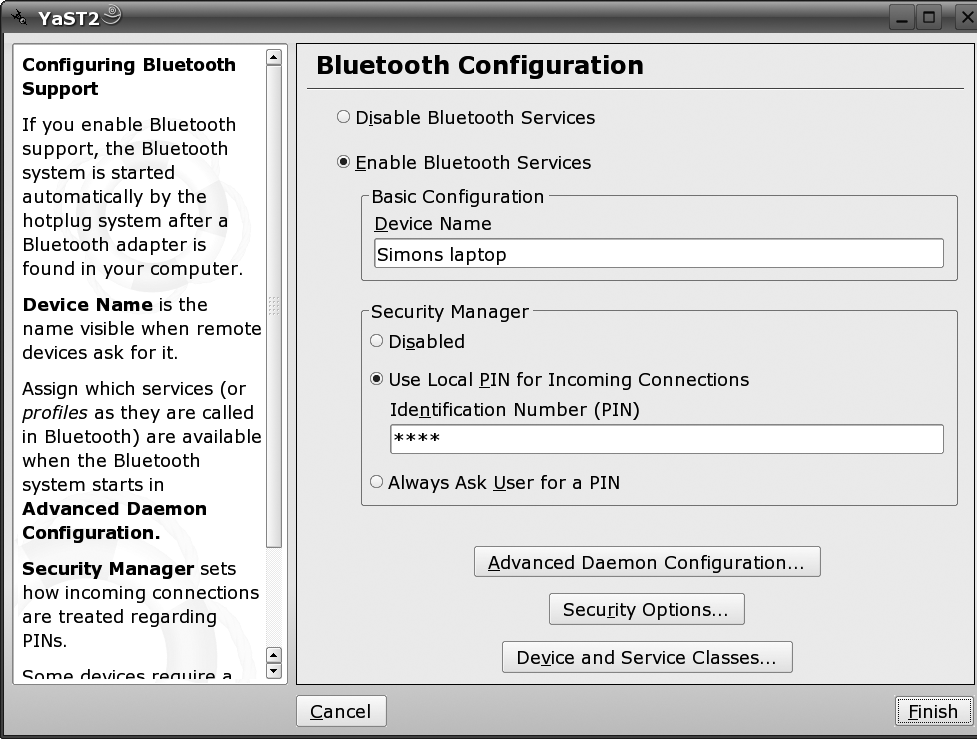
To configure Bluetooth using YaST, from the main YaST screen click on Hardware in the panel on the left, then Bluetooth in the panel on the right. This will bring you to the main Bluetooth screen shown in Figure 4-5.
On this screen, you can enable the Bluetooth service. You also
need to enter the name your laptop will be known as. There are a
couple of shorthand items that you can use here: %h stands for the hostname of the system,
and %d stands for the interface
number (in case you have more than one Bluetooth adapter). On this
screen you can also enter the PIN code that your laptop will ask for
whenever a device is trying to connect with it, or you can configure
it so that it always asks you for a PIN. This option allows you to use
different PINs for different devices.
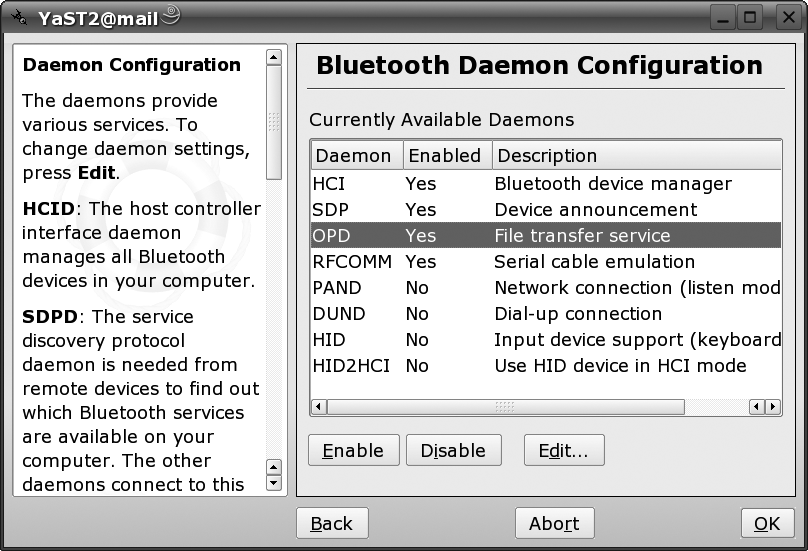
If you click on Advanced Daemon Configuration, you can configure the various Bluetooth services (called profiles in Bluetooth-speak) on your machine, as shown in Figure 4-6.
If you look at the figure, you’ll see that I’ve enabled only the first four services. This is enough to get images and ring tones onto your phone, and to use your phone as a modem. The PAND daemon is interesting—it allows your computer to connect to Ethernet networks using Bluetooth—but is more relevant for PDAs. DUND (the Bluetooth dial-up networking daemon) isn’t necessary, in my experience.
Back at the main Bluetooth configuration screen, click on Security Options. While we’re getting this working, it is best to disable Authentication and Encryption on this page. Make sure Inquiry Scan and Page Scan are selected.
The Device and Service Classes page allows you to change what kind of device your laptop will announce itself as to other Bluetooth devices. Generally, Object Transfer is the useful one, although you may wish to experiment with Information and Networking at some time. You can select multiple classes.
Once the basic configuration is complete, start Konqueror and
enter the URL bluetooth:/ (or
click on the Bluetooth item in the system tray, if you have one).
Konqueror should show you all the Bluetooth devices in range—hopefully
one of them is your phone. If not, check the Bluetooth settings on the
phone and make sure that Bluetooth is enabled.
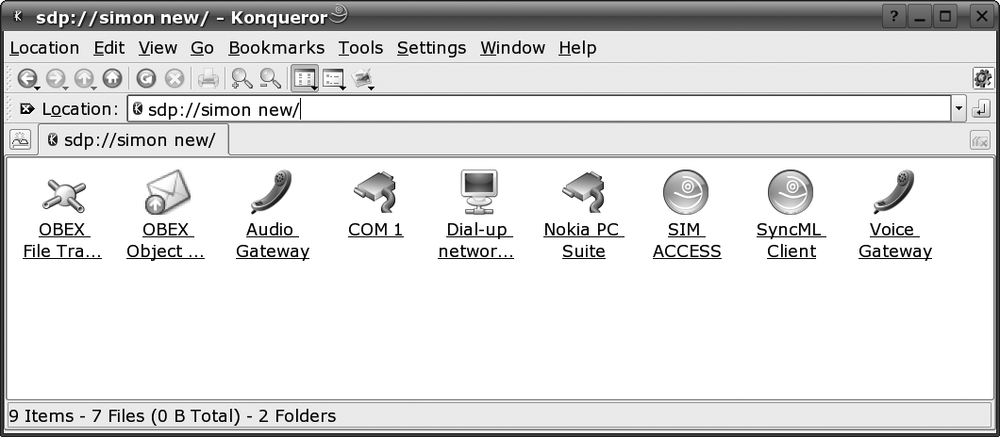
If you click on the Konqueror icon representing your phone, you should see a list of services similar to the one shown in Figure 4-7.
At this point, you might be thinking “Great, it all looks very easy.” Sadly, it’s not. Currently (as of SUSE Linux 10.1), Konqueror understands only the first object, OBEX File Transfer. If you click on that, your laptop should try to contact and pair with your phone. What you’ll see on the phone at this point varies from phone to phone—every phone is different, even from the same manufacturer. On my phone, I see a message “Exchange Data with Simons Laptop?” and I select “Accept.” I am then prompted to enter a PIN into the phone. This can be any PIN. On the laptop I am then prompted to enter the same PIN. Then I see a folder view of the phone’s pictures, ringtones, videos, and so on. It’s then easy to drag and drop things from the phone to your PC or, indeed, drag and drop content back onto the phone. On the phone, you can normally select “Auto connect without confirming” (or something similar) to simplify this process.
How It Works
The underlying configuration files for Bluetooth are in /etc/bluetooth, together with the file /etc/sysconfig/bluetooth.
The Konqueror plug-ins are essentially frontends for hcitool and obexftp. hcitool is used to configure Bluetooth
connections and (to quote the manual page) “send some special command
to Bluetooth devices.” One of the most useful commands is:
# hcitool scanwhich shows all devices in range.
ObEx is the Object Exchange protocol. The obexftp command allows you to send and
receive files from your phone using this protocol. It is part of the
obexftp package; this may not be
installed by default. The command:
# obexftp -bsearches for Bluetooth devices that understand the Object Exchange protocol. The command:
# obexftp -b 00:11:22:33:44:55 -l(with your phone’s Bluetooth address substituted) lists all the files in the top-level directory of the phone. The command:
# obexftp -b 00:11:22:33:44:55 -l Imageslists the Images directory, and finally, the command:
# obexftp -b 00:11:22:33:44:55 -g Images/Image010.jpgwould grab the specified picture from your camera phone.
What About...
...accessing contacts or PIM information? There are many synchronization tools included with SUSE Linux—in fact, some days it seems hard to move around without bumping into one—but none of them seems to work with mobile phones. MultiSync (http://multisync.sourceforge.net) looks the most promising, as it has a SyncML plug-in available. However, the SyncML plug-in expects to talk to a SyncML server in one way or another, and so does the SyncML client on the phone. To add to the complications, most phones that support SyncML allow syncing to a SyncML server only over-the-air (such as via a GPRS or EDGE connection), and if your telecom provider doesn’t offer a SyncML server, you’ll need to either set up your own SyncML server (see http://www.funambol.com/opensource/) or set up an account with a third-party provider. To use SyncML, you must configure your phone and your SUSE Linux system (via MultiSync) to sync to the same SyncML server.
So, the best quick-and-dirty tool for backing up your contact
information at the moment is gnokii, a text mode application that can interact with the
phone over serial connections, Bluetooth, or infrared. A little
configuration is required to make this work. First, run hcitool to find out the phone’s Bluetooth address:
# hcitool scan
Scanning...
        00:11:9f:03:1a:50       Simons phone
Now copy the sample gnokii configuration file to your home directory:
$ cp /usr/share/doc/packages/gnokii/sample/gnokiirc ~/.gnokiirc
then edit this file and replace the following settings to match your phone:
  port = 00:11:9f:03:1a:50
  model = 6510
  connection = bluetooth
You may have to experiment to find a model number that works. Both 9510 and 6310i seem to work well for most Nokia phones. If nothing else works, use ATGEN.
Now run gnokii --identify to
confirm that your laptop can talk to your phone. You should see
something like:
$ gnokii --identify
GNOKII Version 0.6.8
IMEI         : 351457203296651
Manufacturer : Nokia
Model        : NPL-1
Revision     : V 5.22
If all’s well, you should now be able, for example, to upload the phone’s address book book:
$ gnokii --getphonebook ME 1 end -r > myphonebookHere I’ve redirected the output to a file. The format is suitable for downloading back into the phone:
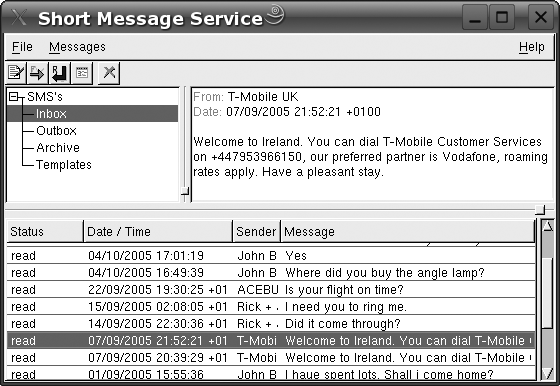
$ gnokii --writephonebook -o -m PE < myphonebookDepending on your phone, you may have some, little, or no success in saving PIM entries, speed dial settings, to-do lists, calendar entries and so on. Read the gnokii manual page for details of other command options. There’s also a graphical frontend to this, called xgnokii (installed as a separate package), which provides screens to view and edit your phone’s contact list, calendar, and SMS texts. A sample screen from xgnokii is shown in Figure 4-8.
I have had reasonable success with xgnokii, but have seen some strange behavior, too.
What About...
...using your phone as a modem? This is quite simple to do. Once your phone and laptop are paired, edit the file /etc/bluetooth/rfcomm. Make sure you have an entry that looks something like this:
rfcomm0 {
        # Automatically bind the device at startup
        bind yes;

        # Bluetooth address of the device
        device 00:11:9f:03:1a:50;

        # RFCOMM channel for the connection
        channel 3;

        # Description of the connection
        comment "Simons phone";
}
Next, ensure that RFCOMM is
set to Yes in the advanced section
of YaST’s Bluetooth configuration screen (discussed earlier), and
restart Bluetooth with:
# rcbluetooth restartTest your configuration with:
#rfcomm release rfcomm0#rfcomm connect rfcomm0
If that works, run:
# rfcomm bind allThis command associates all device names listed in /etc/bluetooth/rfcomm with their respective Bluetooth devices. There is only one in the preceding example: /dev/rfcomm0. The kernel will now automatically connect to the Bluetooth phone when the device is opened. You should then be able to use any appropriate application, such as Minicom, to open up /dev/rfcomm0 and dial out. You can also use YaST to set up the modem and associate an Internet service provider with it. Just use /dev/rfcomm0 as the modem name. (To my astonishment, this worked the first time for me!)
Although you can dial a modem with a cellular phone, you will find that it’s very slow. Typically, speeds are limited to 9,600 bits per second. However, most cellular carriers offer packet data plans, sometimes for a reasonable flat rate, sometimes for a per-kilobyte charge, which can be substantial. If you use a GSM phone (as do most European carriers, and Cingular and T-Mobile in the United States), you should ask your cellular carrier about their GSM or EDGE data plans. If you use a CDMA phone (such as Sprint and Verizon in the United States), you’ll need to ask about 1xRTT or 1xEV-DO data plans.
Typical speeds are about 40 kbps for GSM, 50–130 kbps for EDGE and 1xRTT, and 300 kbps and higher for 1xEV-DO (although the 1xEV-DO upstream speed is limited to 1xRTT speeds).
Make sure you get a complete explanation of the pricing structure of the data plan before you use it—it is possible to rack up thousands of dollars in charges if you are on a per-kilobyte plan. (Even on a flat rate plan, roaming charges can be very high when you are in another country.)
Although these data plans make a packet data connection to the cell tower, they still use PPP as the primary interface. The key difference is that you’ll dial a pseudo phone number: usually *99# for GSM and EDGE, and #777 for 1xRTT and 1xEV-DO. For more information, including some tips on creating scripts to automate the process, see this article on O’Reilly’s Linux DevCenter: http://www.linuxdevcenter.com/pub/a/linux/2004/02/05/linux_cellular.html.
Where to Learn More
For more detail on configuring Bluetooth, read Chapter 22 of the
SUSE Linux documentation. There are manual pages for command-line
tools such as hcitool, gnokii, pand, dund, and rfcomm. There’s more information about
gnokii at http://www.gnokii.org. There are links to a
great collection of Bluetooth “howto” documents at http://www.holtmann.org/linux/bluetooth.
Synchronize Files with Your Desktop
I envy people who have only one computer. (Sometimes I really envy people who don’t have a computer at all, but that’s another story.) Those of use who routinely use two (or three, or four...) computers face the problem of synchronization—making sure that the most recent version of whatever document we’re working with is actually on the machine we’re working at. Without tools to help, it’s very easy to lose track of where things are and discover you’ve just spent an hour editing a file that’s two weeks out of date compared to the copy on your other computer.
Data synchronization between two or more machines can be tricky to
manage. There’s the problem of how to actually copy the data from one
machine to another, and then there’s the problem of deciding which files
actually need to be copied. The first problem is easily solved; using
tools like scp and rsync, it’s quite easy to move data around.
Deciding what needs to be copied is harder, and traditionally requires
the discipline to update your central repository every time you update a
file—otherwise, you may update a file in two places, and then you are
almost bound to lose data.
How Do I Do That?
Novell sells a mature synchronization product called iFolder. Using iFolder, users keep personal data files within one or more nominated directories (which they call their iFolders) on their personal machine(s). At regular intervals (usually every few minutes), their iFolder client connects to the iFolder server (which maintains a central repository of their iFolder files) and figures out which files have been updated and need to be uploaded or downloaded. Of course, even when the personal machine is offline, the local copies of the files continue to be available. Multiple users can subscribe to the same iFolder, so that the product allows file sharing amongst user communities who are often working offline. Beyond some initial setup, the service is completely automatic and needs no intervention. This commercial product is based around a closed source server and open source clients. However, iFolder3 is an open source server implementation that runs on Mono (in case you don’t know, Mono is a cross-platform implementation of Microsoft’s .NET Framework). iFolder3 is still in early development, and it is significantly more limited than the commercial server from Novell, but it should do the job.
Tip
I don’t know who made up the name “iFolder,” but because the implementation presumably relies on comparing the time stamps on files, I can’t help but wonder if it was originally called “if older.”
This lab is more bleeding edge than the others in this book. The problem isn’t in the iFolder client (which ships as part of the SUSE Linux distribution); it’s in the server. It’s an example of an open source project at an early stage of its life cycle, before it has been built as a binary RPM and put onto the distribution media. Be warned that iFolder3 is a work in progress, so you should make sure that you have backups of your critical data before installing it. Also, the code may have changed significantly since this was written. Please check the URLs listed in this lab to see if there are any simpler or better instructions.
First, you need to get the server working. You need to do this
only on one, central machine. There are some prerequisites to
download. First, you’ll need the latest Mono, from http://www.mono-project.com/Downloads. You can
either download the binary installer, download the RPMs, or even use
the Red Carpet Update tool, rug:
#rug sa http://go-mono.com/download#rug sub mono-1.1-official#rug in mono-complete
Now download the latest version of log4net. It should be here (check for later
versions): http://forgeftp.novell.com/ifolder/required/log4net/linux/.
Then, install it with a command of the form:
# rpm -i ~/downloads
/log4net-1.2.9-1.i586.rpm
(By the way, there are labs on package management in Chapter 5 to help you with these commands.)
Next, you need to download the source code for iFolder3. Some
projects will release snapshot versions of software that are (at least
in theory) stable. The simple iFolder server isn’t that mature yet, so
you need to check out the source direct from the developers’ code
repository, which uses an open source revision control system called
subversion. The command-line client
for subversion is svn. You have two
options here. You can grab the version of the source that is exactly
the same as the version I used to write these instructions, or you can
grab the latest and greatest. I’d suggest using the same version I
used, and if that works, try again with the latest version. The
commands you need will look something like this:
#cd /usr/local/src#mkdir ifolder#cd ifolder#svn checkout svn+ssh://anonymous@forgesvn1.novell.com/svn/simias/trunk \-r "{"20051218"}"
The password for the svn
login is “anonymous”. If you want to check out the latest version,
just remove the -r option from the
svn command:
# svn checkout svn+ssh://anonymous@forgesvn1.novell.com/svn/simias/trunkNormally, you would build your source as a nonroot user, and you would run the service as a nonroot user, but right now there seem to be some problems with the simple server if you do this. So, you should continue as root:
#cd trunk/simias#./autogen.sh -prefix=/opt/simias#make#make install#cd other/SimpleServer#make install-simpleserver
There’s one other thing to do before starting the server: you need to configure the user accounts that are allowed to log into your server. Edit the file /opt/simias/etc/SimpleServer.xml, supplying usernames and passwords as required. The format should be fairly self-explanatory. Make sure you remove the default users! I also suggest changing both the domain name and description to something relevant to your site. Here’s a minimal version of the file:
<?xml version="1.0" encoding="utf-8" ?>
<Domain Name="SimpleServer" Description="Simon's Simple Server">
        <Member Name="simon" Password="novell" Owner="true">
                <First>Simon</First>
                <Last>Crute</Last>
        </Member>
</Domain>
Tip
Yes, this is a rather primitive way of defining user accounts. The commercial iFolder server integrates with Novell’s eDirectory (LDAP), so iFolder accounts are synced with LDAP/eDirectory accounts.
Now you’re ready to start the iFolder server:
# /opt/simias/bin/simpleserver --startAnd you can stop it with:
# /opt/simias/bin/simpleserver --stopThere’s no manpage for the server, but the following command should help:
# /opt/simias/bin/simpleserver --helpNote in particular the --datadir option to change the location of
the data store.
Now I’ll turn my attention to the client. You need to install
this on every machine you want to sync. There is an iFolder client
shipped with SUSE Linux (package ifolder3); for other platforms, download the
client straight from the iFolder site: http://www.ifolder.com/index.php/Download.
There are clients for Linux, Windows 2000 and XP, and Mac OS X. This
lab looks at only the SUSE Linux version of the client.
Start your iFolder client from the main menu at Start → Internet → Data Exchange → iFolder 3, or enter the command:
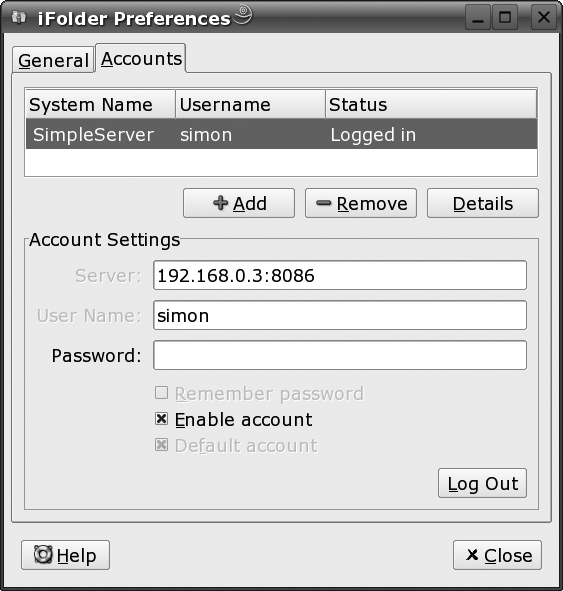
# /opt/novell/ifolder3/bin/ifolderYou should see a yellow folder with an “I” on it, on the task bar. Right-click it, and select Accounts from the pop-up menu. Here you can enter the name or IP address of the server, the port number, and your user ID and password, as shown in Figure 4-9.
Finally, you’ll need to mark at least one of your directories as an iFolder. Right-click the iFolders icon again, and select iFolders from the pop-up menu. Click New. Type in the name of the directory you want to become an iFolder (or browse to it), and click OK. Be aware that when you initially establish a directory as an iFolder, the entire folder content will be copied onto the server; this may take some time. Subsequent synchronizations will be quicker, as only the differences are propagated. The directory then becomes an iFolder, and files you put in this directory are made available to anyone else who has shared that iFolder.
Once you’re successfully logged into the iFolder server, and have defined which directories are to be your iFolder, synchronization is automatic.
How It Works
The iFolder client detects any changes to any of the files in the iFolders you are sharing. It then copies those changes (or the entire file) to the server. The server then notifies all the other iFolder clients that are subscribed to that iFolder that the file has changed, and the clients can then download the changes (or the entire file). If anyone deletes a file from the iFolder, it will be deleted from the iFolder of people who have that iFolder. If two clients update the same file, the following happens: the server accepts the update from the first client to connect to it. The second client is then notified about a conflict and is given a choice which version of the file to accept. It would be prudent at this time to make a backup of the conflicting file, so you can manually reconcile the changes.
If you want to share an iFolder between multiple users, not just multiple machines, make sure the user is defined in the SimpleServer.xml file, then go into the iFolder client, click on the folder, then click on Share. Here you can add any user who is defined to the iFolder server, and select the level of access you want them to have.
What About...
...other synchronization methods? If you don’t want to set up
iFolder, rsync is probably the next best sync method. At its simplest,
rsync is just a remote copy command
(similar to rcp or scp), but it is especially good for
synchronizing large files, as it has some clever algorithms to pass
only the changes between the files. You can either have rsync directly connect to a remote rsync daemon, typically using TCP port 873,
or have it run it over SSH (secure shell) as a transport.
Running it over SSH is the easiest way to get it working. You should first verify that you can perform a normal SSH login to the machine you want to synchronize to. (SSH works out of the box on SUSE Linux, but there is a lab on SSH in Chapter 8 if you need help.)
Here’s a simple rsync command
to copy a single file:
$ rsync test.nbe happy:laptopThat command copies the file test.nbe to
the (existing) directory laptop on the machine
called happy. Here’s another
example:
$ rsync -avz EPIC happy:This command recursively transfers all files from the directory
EPIC on the local machine into your home
directory on the machine happy. The
files are transferred in “archive” mode (-a flag), which ensures that symbolic links,
devices, attributes, permissions, ownerships, and so on are preserved
in the transfer. Additionally, compression (-z flag) will be used to reduce the size of
data portions of the transfer. The -v flag enables verbose mode—files are
listed as they are transferred.
You can, of course, copy files the other way, from the remote machine to the local one. Here’s one more example:
$rsync --delete -av simon@happy:/home/simon/mydata \/home/simon/mydata
This command copies all the files from
/home/simon/mydata on machine happy, into the directory
/home/simon/mydata on the local machine. The
notation simon@ tells rsync to perform an SSH login on the remote
machine as simon. The default
behavior is to log in with whatever name you’re logged in as on the
local machine. The --delete flag
tells rsync to delete files at the
destination that don’t exist on the sender.
Of course, for this approach to work, you need some discipline
in how you use and update files. For example, if you have two machines
(a laptop and a desktop) and you consider the desktop to hold the
master copies of your files, at the beginning of a work session on the
laptop you should rsync the
relevant directories from the desktop, and at the end of the session
you should rsync them back to the
desktop. The rsync solution does
not protect you against the situation where you update two copies of
the same file at different locations.
There is another open source synchronization tool called
Unison that’s worth looking at. It’s from Benjamin Pierce at
the University of Pennsylvania. Unison uses the same update protocol
as rsync (for efficient propagation
of small changes to large files), but is smarter than rsync because it can propagate changes
between two replicas of a filesystem in both directions. Whereas
rsync is a unidirectional mirroring
tool that needs to be told “this machine holds the true copy of the
filesystem; please make the other replica look the same,” Unison is a
true synchronization tool. Like rsync, Unison can run in a simple
client/server mode in which one instance of Unison listens on a socket
and another instance makes a direct TCP connection to it. However,
this mode is insecure, and instead it is preferable to tunnel Unison
traffic over an encrypted SSH connection.
SUSE Linux ships with Unison (simply install the package
unison), but be aware that you need
to be running the same version on each of the machines you want to
synchronize. For example, Unison 2.9.1 (shipped with SUSE 10.0) will
not interoperate with Unison 2.13.16 (shipped with SUSE 10.1).
Fortunately, upgrading the older one is easy: copy across the
executable /usr/bin/unison from the machine with
the newer copy. Alternatively, you can download a prebuilt Linux
executable from http://www.cis.upenn.edu/~bcpierce/unison.
There is no installation procedure, as such; it simply needs to be
uncompressed and copied into /usr/bin.
Once you have Unison installed, try these commands on the local machine as a simple test:
$unison -version$ssh remote_host unison -version
This test will confirm whether the SSH connection is working and that Unison is on the SSH search path on the remote machine. You should also verify that the version number reported by the remote host matches the version number reported locally.
Unison works by synchronizing two replicas. Usually one is local and one is remote. It’s important to note that the synchronization is bidirectional: files that have been created or changed on the local replica will propagate to the remote replica, and files that have been created or changed on the remote replica will propagate to the local replica. Unison will detect and flag cases where the same file has been updated (differently) on the two replicas. It makes no attempt to resolve such conflicts automatically.
You can run Unison very simply from the command line. For example:
$ unison /home/chris ssh:/happy.example.com/This command synchronizes /home/chris (my
home directory on the local machine) with my home directory on the
machine happy.example.com,
using SSH as the transport. You will be prompted for your password or
SSH passphrase. The two arguments supplied here are examples of what
Unison calls a root, which simply means the
top-level directory of a replica. Instead of this simple usage, you
can also build named profiles and specify the
profile name on the command line. A profile can specify, among other
things, the names of the two roots, an explicit list of files and
folders to be synchronized, and a list (using wildcards) of files that
should be ignored.
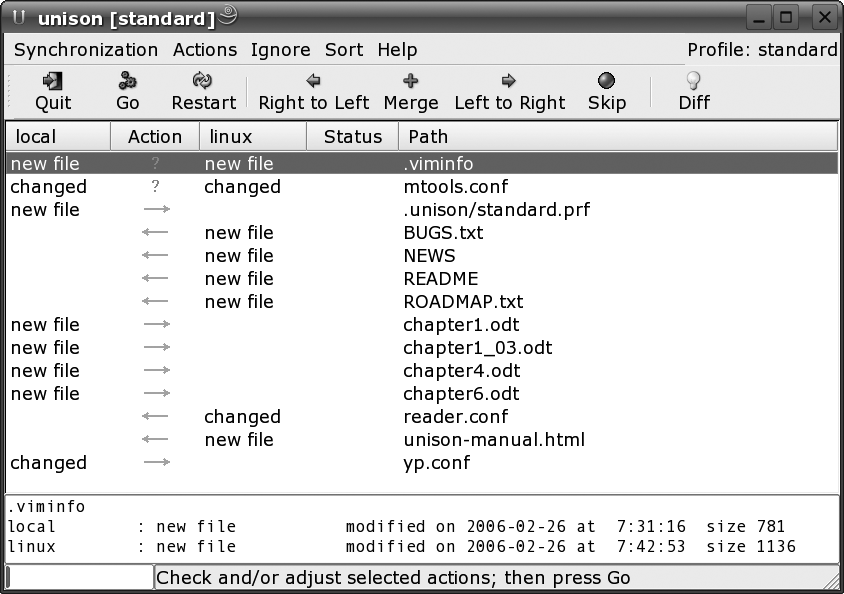
You can also run Unison with a graphical interface. Unison will report the updates it believes are necessary, showing new files, changed files, and conflicts, as shown in Figure 4-10. From this screen, you can manually select exactly which updates you want to propagate.
Where to Learn More
Visit the iFolder3 project page at http://www.ifolder.com.
For information on iFolder clients, visit http://www.ifolder.com/index.php/Download.
The rsync command is
described in the rsync manual
page.
There is an excellent, detailed manual for Unison in the folder /usr/share/doc/packages/unison. The home page is http://www.cis.upenn.edu/~bcpierce/unison.
Get SUSE Linux now with the O’Reilly learning platform.
O’Reilly members experience books, live events, courses curated by job role, and more from O’Reilly and nearly 200 top publishers.
