In Windows, of course, you can operate every menu in every program from the keyboard—and every control in every dialog box—thanks to the power of the Alt key.
Mac OS X offers full keyboard control, too. You can operate every control in every dialog box from the keyboard, including pop-up menus and checkboxes. And you can redefine many of the keyboard shortcuts in Mac OS X and even your programs. In short, if you were a keyboard power-user in Windows, you’ll feel right at home in Mac OS X.
Here are some of the ways you can control your Mac mouselessly. In the following descriptions, you’ll encounter the factory settings for the keystrokes that do the magic—but as you’ll see in a moment, you can change these key combos to anything you like. (The System Preferences→Keyboard→Keyboard Shortcuts tab contains the on/off switches for these features.)
Note
On modern-day aluminum keyboards, the keystrokes described below may not work unless you also press the Fn key simultaneously.
If that seems just a tad clumsy, you can eliminate the Fn-key requirement either by using the “Use all F1, F2, etc. keys as standard function keys” option described in the box in Troubleshooting Moment: A, Side Note about the Aluminum Apple Keyboards—or by choosing a different keystroke altogether (Control Dialog Boxes).
When you press Control-F2, the ![]() menu is highlighted. At this point, you can
“walk” to another menu by pressing the ← or → keys (or Tab and
Shift-Tab). When you reach the menu you want, open it by pressing ↓,
space, Return, or Enter.
menu is highlighted. At this point, you can
“walk” to another menu by pressing the ← or → keys (or Tab and
Shift-Tab). When you reach the menu you want, open it by pressing ↓,
space, Return, or Enter.
Walk down the commands in the menu by pressing ↑ or ↓, or jump directly to a command in the menu by typing the first couple of letters of its name. Finally, “click” a menu command by pressing Return, Enter, or the space bar.
You can also close the menu without making a selection by
pressing Esc or ![]() -period.
-period.
Once you’ve pressed Control-F3, you can highlight any icon on the Dock by pressing the appropriate arrow keys (or, once again, Tab and Shift-Tab).
Then, once you’ve highlighted a Dock icon, you “click” it by
pressing Return or the space bar. Again, if you change your mind,
press Esc or ![]() -period.
-period.
Every time you press Control-F4, you bring the next window forward, eventually cycling through every window in every open program. Add the Shift key to cycle through them in the opposite order.
You may remember that Mac OS X offers a different keystroke
for cycling through the different windows in your
current program (it’s ![]() -~, the tilde symbol at the upper left on your
keyboard). Control-F4, on the other hand, tours all windows in
all programs. Both keystrokes are useful in
different situations.
-~, the tilde symbol at the upper left on your
keyboard). Control-F4, on the other hand, tours all windows in
all programs. Both keystrokes are useful in
different situations.
This one is on the unpredictable side, but it more or less works in most programs that display a Mac OS X–style toolbar: the Finder, System Preferences, and so on.
When you press Control-F5, you highlight the first button on that toolbar. Move the “focus” by pressing the arrow keys or Tab and Shift-Tab. Then tap Return or the space bar to “click” the highlighted button.
In a few programs that feature floating tool palettes, you can highlight the frontmost palette by pressing Control-F6. At this point, use the arrow keys to highlight the various buttons on the palette. You can see the effect when, for example, you’re editing text in TextEdit and you’ve also opened the Font palette. Pressing Control-F6 highlights the Font palette, taking the “focus” off your document.
Here’s a gem you may not have heard about: You can now operate menulets—those menu-bar status indicators for your speaker volume, wireless networks, and so on—from the keyboard, too.
This time, the trick is to hit Control-F8. That highlights the leftmost Apple menulet. Now you can use your ← and → arrow keys to move around the menu bar; when you’ve highlighted the one you want, press Return or the space bar to “click” that menu and open it.
You can also navigate and manipulate any dialog box from the keyboard.
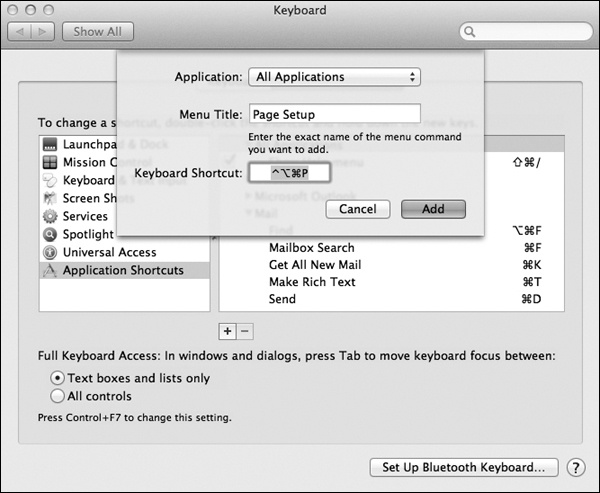
See the dialog box shown in Figure 4-20? If you turn on “All controls” at the bottom, then pressing the Tab key highlights the next control of any type, whatever it may be—radio button, pop-up menu, and so on. Press the space bar to “click” a button or to open a pop-up menu. Once a menu is open, use the arrow keys (or type letter keys) to highlight commands on it, and use the space bar to “click” your choice.
Figure 4-20. If you choose All Applications from the top pop-up menu, you can change the keyboard combo for a certain command wherever it appears. You could, for example, change the keystroke for Page Setup in every program at once. (Beware the tiny yellow triangles; they let you know if a chosen keystroke conflicts with another Mac OS X keystroke.)
Suppose you love iPhoto (and who doesn’t?). But one thing drives you crazy: The Revert to Original command, which discards all the changes you’ve ever made since taking the photo, has no keyboard shortcut. You must trek up to the menu bar every time you need that command.
This is why Mac OS X lets you add keyboard shortcuts to menu commands that lack them—or change the commands in programs whose key assignments break with tradition. (It works in any program that uses the standard Mac OS X menu software, which rules out older versions of Microsoft Office.) Here’s the routine:
Choose
 →System
Preferences→Keyboard. Click
the Keyboard Shortcuts tab, and then click Application Shortcuts
in the left-side list.
→System
Preferences→Keyboard. Click
the Keyboard Shortcuts tab, and then click Application Shortcuts
in the left-side list.You’re shown a list of any keyboard assignments you’ve created so far.
Click the + button just beneath the list.
The dialog box shown in Figure 4-20 appears.
Indicate which program needs behavior modification.
In this example, you’d choose iPhoto from the Application pop-up menu. (If the program’s name doesn’t appear in the pop-up menu, then choose Other; navigate to, and double-click, the program you want.)
Carefully type in the name of the menu command whose keyboard shortcut you want to change or add.
Type it exactly as it appears in the menu, complete with capitalization and the little ellipsis (...) that may follow it. (You make the ellipsis character by pressing Option-semicolon.)
Click in the Keyboard Shortcut box. Press the new or revised key combo you want.
For example, press Control-R for iPhoto’s Revert to Original command. You’ll see the Mac’s notation of your keystroke appear in the Keyboard Shortcut box—unless, of course, the combo you selected is already in use within that program. In that case, you hear only an error sound that means, “Try again.”
Click Add.
The dialog box closes. By scrolling down in your Keyboard Shortcuts list, you see that the keystroke you selected has now been written down for posterity under the appropriate program’s flippy triangle. (To get rid of it, click its name and then click the – button beneath the list.)
The next time you open the program you edited, you’ll see that the new keystroke is in place.
Tip
To delete or change one of your custom menu shortcuts, open System Preferences→Keyboard→Keyboard Shortcuts. Click Application Shortcuts in the list at left. Click the command you’d like to edit. Press Delete to get rid of it; or, to try a different key combo, click where the existing keyboard shortcut appears and then press a new one.
As you’ve no doubt become painfully aware, there are hundreds of keyboard combinations for the various Mac OS X functions and settings. That’s good, because keyboard shortcuts are efficient and quicker than using the mouse. But that’s also bad, because there’s no way you’ll be able to remember all of them—and some of the most useful shortcuts are ridiculous, multikey affairs that you’ll never remember at all.
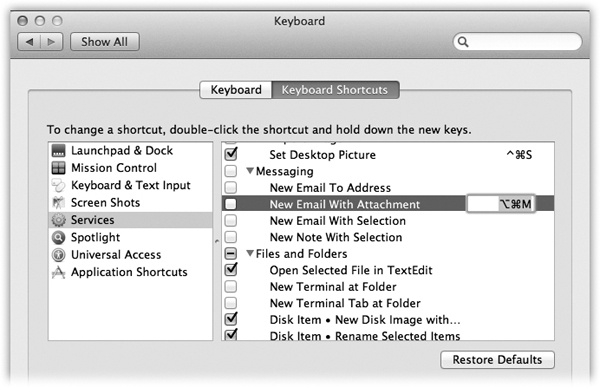
In Lion’s keyboard-shortcut center, shown in Figure 4-21, you can look over all the common Mac OS X hidden keyboard functions—for Mission Control, Exposé, Spotlight, Dashboard, the Dock, and many others—and change them.
Here’s how it goes:
Choose
 →System
Preferences. Click Keyboard. Click the Keyboard Shortcuts
tab.
→System
Preferences. Click Keyboard. Click the Keyboard Shortcuts
tab.You arrive at the dialog box shown in Figure 4-21.
Figure 4-21. The keyboard-shortcut center lets you redefine the keystrokes that trigger many basic Mac OS X features, menu commands in your programs, and software you’ve built yourself using Automator (which is described in the free online Appendix to this chapter; see this book’s “Missing CD” at www.missingmanuals.com.).
In the left-side list, click the category or function you want.
Your choices include Launchpad & Dock, Mission Control, Keyboard & Text Input, and so on. When you click a category name, you see the available keyboard shortcuts.
Click the command you want to change. Then click the current keyboard combination.
Suppose, for example, that you wish the Show Desktop Exposé keystroke were something easier to remember, like Control-D. So in step 2, you’d click Mission Control. In this step, you’d click Show Desktop. Then you’d click where it currently says “F11.”
In this example, you’d press Control-D.
Be careful, though. Mac OS X keystrokes take precedence over all others. So if you choose a keystroke like
 -P for something, well, by golly, you’ll
no longer be able to use
  -P to print anything in any of your
programs. Think before you assign. Run a couple of tests
afterward.
Get Switching to the Mac: The Missing Manual, Lion Edition now with the O’Reilly learning platform.
O’Reilly members experience books, live events, courses curated by job role, and more from O’Reilly and nearly 200 top publishers.


