Every operating system needs a mechanism to associate documents with the applications that created them. When you double-click a Microsoft Word document icon, for example, it’s clear that you want Microsoft Word to launch and open the document.
So how does OS X know how to find a document’s mommy? It actually has two different mechanisms:
File name extensions. A file name extension is a suffix following a period in the file’s name, as in Letter to Mom.doc. (It’s usually three letters long, but it doesn’t have to be.) These play a role in determining which documents open into which programs.
That’s how Windows identifies its documents, too. If you double-click something called memo.doc, it opens in Microsoft Word. If you double-click memo.wri, it opens in Microsoft Write, and so on.
Note
OS X comes set to hide most file name extensions, on the premise that they make the operating system look more technical and threatening. If you’d like to see them, however, then choose Finder→Preferences, click the Advanced button, and then turn on “Show all filename extensions.” Now examine a few of your documents; you’ll see that their names display the previously hidden suffixes.
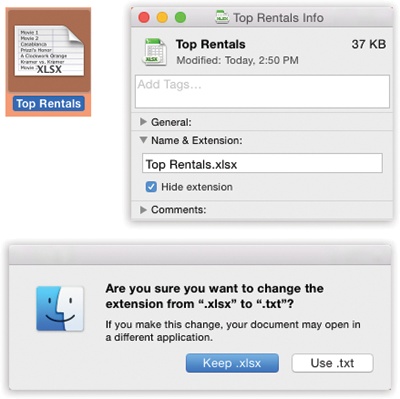
You can hide or show these suffixes on an icon-at-a-time basis, too (or a clump-at-a-time basis). Just highlight the icon or icons you want to affect, and then choose File→Get Info. In the resulting Info window, proceed as shown in Figure 4-23.
Your preferences. If you’ve used the Always Open With command to specify which program opens your document, that’s the one that opens; this preference overrides the file name extension system. OS X memorizes that new pairing.
It’s possible to live a long and happy life without knowing anything about these suffixes and relationships. Indeed, the vast majority of Mac fans may never even encounter them. But if you’re prepared for a little bit of technical bushwhacking, you may discover that understanding document-program relationships can be useful in troubleshooting, keeping your files private, and appreciating how OS X works.
Figure 4-23. Top: In the Info window, open the Name & Extension pane. Now you can see what OS X really thinks your file is called. Turn “Hide extension” on if you’d rather not see the file name suffix in the Finder. Bottom: If you try to add a suffix of your own, OS X objects, in effect saying, “Hey—I’ve already got a file name extension for this, even if you can’t see it. Are you sure you know what you’re doing?” (And you can turn off this warning, if you like. Choose Finder→Preferences→Advanced pane. Turn off “Show warning before changing an extension.”)
Unfortunately, file name extensions aren’t always especially specific. Suppose you’ve downloaded a graphic called Sunset.jpg. Well, almost any program these days can open a JPEG graphic—Photoshop, Pages, Word, Preview, Safari, and so on. How does OS X know which of these programs to open when you double-click the file?
Fortunately, you can decide. You can reassign a document (or all documents of its kind) to a specific program. Here’s the rundown.
Double-clicking a graphics file generally opens it in Preview, the graphics viewer included with OS X. Most of the time, that’s a perfectly good arrangement. But Preview has only limited editing powers. What if you decide to edit a graphics file more substantially? You’d want it to open, just this once, into a different program—Photoshop Elements, for example.
To do so, you must access the Open With command. You can find it in three places:
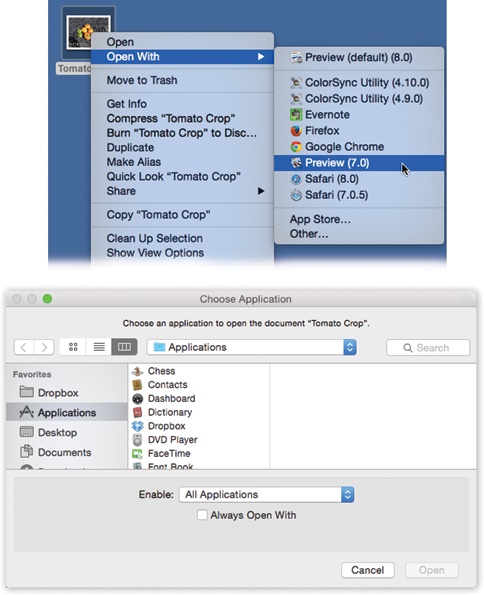
Study the submenu for a moment (Figure 4-24, top). The program whose name says “(default)” indicates which program usually opens this kind of document. From this pop-up menu, choose the name of the program you’d rather open this particular file, right now, just this once.
After opening a TIFF file in, say, Photoshop Elements for editing, you haven’t really made any changes in the fabric of your Mac universe. The next time you double-click that file, it opens once again in Preview.
If you wish this particular file would always open in Photoshop Elements, the steps are slightly different. In fact, there are three different ways:
In the Choose an Application dialog box (the one that appears when you double-click a document whose “parent” program isn’t clear), turn on Always Open With (shown at bottom in Figure 4-24).
Start out with one of the previously described techniques (for example, File→Open With, or right-click the file’s icon and choose Open With)—but after you see the menu, press the Option key, too. Before your very eyes, the Open With command changes to say Always Open With.
Highlight the icon, and then choose File→Get Info. Open the “Open with” pane. Choose a new “parent” program’s name from the pop-up menu. You’ll see that the word “(default)” changes position, now tacking itself onto the name of the program you’ve chosen.
Tip
You can use a similar trick to reassign the parenthood of a whole flock of selected icons at once. Once you’ve selected them, keep the Option key pressed as you choose File→Show Inspector. In the Open With section of this specialized Get Info window, choose a new program from the pop-up menu. The message at the top of the window—“22 items,” for example—reminds you that you’re changing the whole batch at once.
Figure 4-24. Top: The shortcut menu offers a list of programs capable of opening an icon. If you were to press the Option key right now, the words “Open With” would suddenly change to say “Always Open With.” Bottom: If you choose Other, you’re prompted to choose a different program. Turn on Always Open With if you’ll always want this document to open in the new parent program. Otherwise, this is a one-time reassignment.
So much for reassigning one document (or a group of documents) at a time. What if you’re writing, say, a book about OS X, and you’ve been taking a lot of screenshots? OS X saves each captured screen illustration as a graphics file in something called PNG format. That’s all fine, except that every time you double-click one of these, it opens into Preview, where you can’t paint out unwanted details.
You could reassign all these files, one at a time, to a different program, but your grandchildren would have grandchildren by the time you finished. In this case, you want to tell OS X, “For heaven’s sake, make all PNG files open in Photoshop from now on!”
To make it happen, start by highlighting any PNG file. Choose File→Get Info. (The shortcut menus won’t help you in this case.) Open the “Open with” pane.
From its pop-up menu, choose the program you want to open this kind of document from now on.
Tip
If the one you prefer isn’t listed, use the Other option, which opens the Choose an Application dialog box so you can navigate to the one you want, as shown in Figure 4-24 at bottom. Find and double-click the program.
Or, instead of choosing Other, you can also choose App Store. It’s Apple’s way of saying, “Hey—if you don’t have a program that can open this document, maybe you should just go buy one right now!”
This time, follow up by clicking Change All beneath the pop-up menu. (This button is dimmed until you’ve actually selected a different program from the pop-up menu.) Confirm by clicking Continue or pressing Return.
From now on, double-clicking any similar kind of document opens it in the newly selected program.
Get Switching to the Mac: The Missing Manual, Yosemite Edition now with the O’Reilly learning platform.
O’Reilly members experience books, live events, courses curated by job role, and more from O’Reilly and nearly 200 top publishers.


