Screenshots are a staple of articles, tutorials, and books about the Mac (including this one). The Mac has a secret built-in feature that lets you make them—and includes some very cool conveniences. Here’s how to capture various regions of the screen.
Press Shift-⌘-3 to create a picture file on your desktop, in PNG format, that depicts the entire screen image. A satisfying camera-shutter sound tells you that you were successful. Each time you press Shift-⌘-3, you get another file on your desktop.
These files are named after the current time and date. They’re called “Screen shot 2016-01-18 at 5.18.13 PM,” “Screen shot 2016-01-18 at 5.18.32 PM,” and so on.
You can open these files into Preview or any other graphics program, in readiness for editing, printing, or exporting in a different format.
Tip
It doesn’t have to be Shift-⌘-3. You can change any of these screenshot keystrokes to anything you like. Open System Preferences→Keyboard→Keyboard Shortcuts→Screen Shots. Click the keystroke you want to change, press Return to highlight the current keyboard combo, and then press the new keystroke you prefer.
You can capture just a rectangular region of the screen by pressing Shift-⌘-4. Your cursor turns into a crosshairs with two tiny digital readouts—the horizontal and vertical coordinates of your cursor on the screen at this moment. (The numbers are pixels, as measured from the upper-left corner of the screen, which has coordinates 0, 0.)
Now drag diagonally across the screen to capture a rectangular chunk of it. When you release the mouse, you hear the camera-click sound, and the screenshot file appears on your desktop—containing only the rectangle you enclosed.
But that’s just the beginning. Once you’ve begun dragging diagonally, while the mouse is still down, you can press any of these keys for special manipulation effects:
Space bar. While you hold down the space bar with one hand, your selection rectangle is frozen in size and shape. With your mouse, you can move the cursor with the selection rectangle attached, the better to fine-tune your positioning relative to your target.
Shift key. When you hit Shift, you confine the dragging action of your mouse to a single dimension: horizontal or vertical. Which dimension depends on how you move your mouse after you hit Shift. For example, suppose you drag out a two-inch square and then pause. With the mouse button still down, you press Shift. If you now continue to drag downward, the selected area maintains a fixed width; you’re increasing only the rectangle’s height.
Option key. If you hold down Option after beginning to drag, you create a rectangular selection that grows from the center point outward. That is, it treats your initial click as the rectangle’s center point, rather than as a diagonal corner.
Esc. If you change your mind about taking a screenshot, tap Esc. The darkened selection area disappears, and you’ve exited screenshot mode.
Why fuss with cleaning up a screenshot after you’ve taken it? Using this trick, you can neatly snip one screen element out from its background.
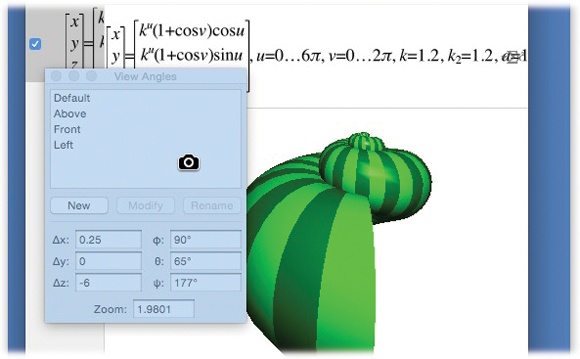
Make sure the dialog box, menu, window, or icon is visible. Then press Shift-⌘-4. But instead of dragging diagonally, tap the space bar.
Your cursor turns into a tiny camera (Figure 4-24). Move it so the misty-blue highlighting fills the window or menu you want to capture—and then click. The resulting picture file snips the window or menu neatly from its background.
Pressing Shift-⌘-4 and then the space bar also captures the Dock in one quick snip. Once you’ve got the camera cursor, click any blank spot in the Dock (between icons).
Tip
If you hold down the Control key as you click or drag, you copy the screenshot to your Clipboard, ready for pasting, rather than saving it as a new graphics file on your desktop.
Figure 4-24. To capture just one dialog box, invoke Shift-⌘-4 and then tap the space bar to produce the camera cursor shown here. Click the element you want to snip from its background. (Press the space bar a second time to exit “Snip one screen element” mode and return to “Drag across an area” mode.)
OS X comes with other ways to create screenshots:
Grab. Grab is a program in your Applications→Utilities folder. Grab’s chief selling point is its timer option, which lets you set up the screen before it takes the shot.
Preview. You can use the File→Take Screen Shot submenu commands to take screenshots (whole screen, selection, just one window) and open the result directly into Preview, rather than dumping the result onto your hard drive. The advantage here is that you can use all of Preview’s image-manipulation skills—changing resolution, cropping, annotating, color-adjusting, exporting in various graphics formats—before committing the thing to your hard drive.
Services. The Capture commands in the Services menu trigger the same screen-capturing function. They work, however, only when your cursor is in a Cocoa program that accepts pasted graphics (TextEdit, Stickies, and Pages, for example).
That’s a lot of flexibility. But if you’re really serious about capturing screenshots, you should opt instead for a program like Snapz Pro X (www.ambrosiasw.com), which can capture virtually anything on the screen—even movies of onscreen procedures, along with your narration—and save it in your choice of graphics format.
Get Switching to the Mac: The Missing Manual, El Capitan Edition now with the O’Reilly learning platform.
O’Reilly members experience books, live events, courses curated by job role, and more from O’Reilly and nearly 200 top publishers.


