Chapter 1. Introduction to Xcode
Developer Registration
The first step in creating and publishing your game to the App Store is registering as an Apple developer. Registration will get you access to technical resources and iOS developer tools. This part of the registration is free but if you want access to Xcode 4, which is used in this book, you will have to grab a copy from the developer website or Mac App Store. In order to publish apps in the App Store, you will need to be registered as a full iOS developer, which costs $99/yr.
Navigate your browser to http://developer.apple.com/programs/register/ in order to start the registration process. You will be prompted to create a new Apple ID or use an existing one. The Apple ID allows you to access Apple information and resources, register for events, and even purchase music and apps from iTunes. Make sure that this is an email address you actively use, as Apple sends email verification and developer correspondence to this account. If you are registering a company, you should use a company email address as your Apple ID.
If you register a new Apple ID, then you will need to create a personal profile. The profile includes an email address and password that will become your Apple ID. You will be prompted for this information to access certain areas of the Apple Developer website. In addition, you will be required to fill out a professional profile, accept the legal agreement, and verify your email address.
Now that you have an Apple ID, you can purchase the iOS Dev Center program and download the latest version of Xcode.
Installation
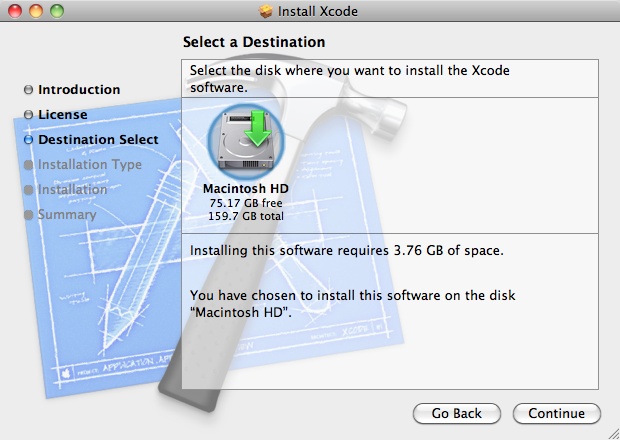
Once Xcode has finished downloading and the image has been mounted, you can proceed to install. Double click on the installer package, agree to licensing terms, and specify where you want to install. Select a drive that has plenty of space (see Figure 1-1), as installation will require over 10 GB of disk space. If needed, you may need to clean up old downloads or empty the trash to free up some space.
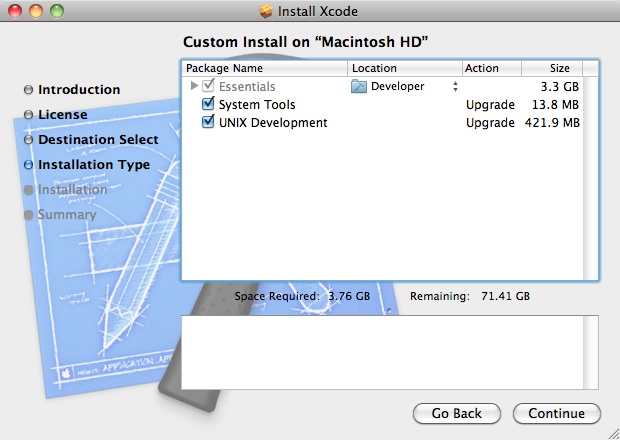
After selecting the disk where you want to install Xcode, click Continue and go to the next screen. If you are installing a fresh copy of Xcode or upgrading from a previous version, you can just accept the default Developer location, as shown in Figure 1-2.
Note
If you would like to have two different versions of Xcode installed, changing the location to something other than the default will allow for this. I typically will install beta versions of Xcode into a different folder but keep the most stable version in the Developer folder. For example, when Xcode 4 was still a developer preview, I specified the folder DeveloperBeta while keeping Xcode 3 in the default Developer directory. This strategy worked well and enabled me to work in both versions of Xcode.
After clicking Continue you will proceed to the installation screen where you will click Install. Once the installation has started, it is a good time to go make a cup of coffee, as it will take a while to complete.
Xcode
Now that Xcode has been installed, we will take a tour and learn a few important features. Launch Xcode by navigating to the folder you specified for Xcode installation and then open the Applications subfolder where you will find the Xcode application. You should go ahead and drag it into your Dock so you can quickly launch it in the future.
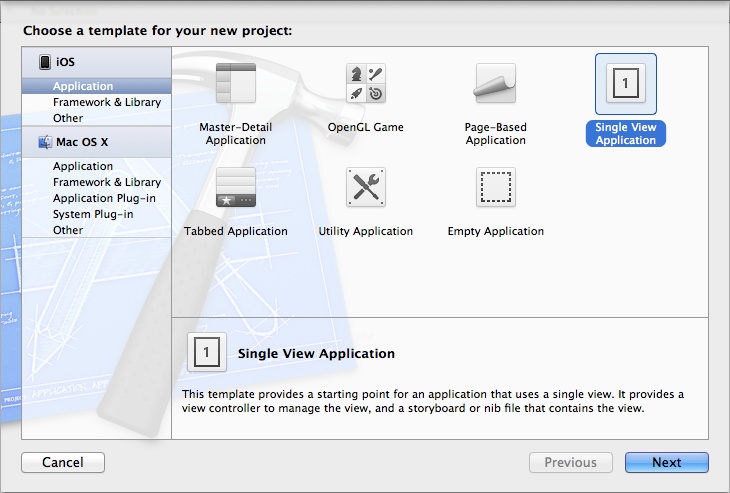
In order to see the Xcode workspace, you will first need to create a new project. Either click on “Create a New Project” from the welcome splash screen, or select File→New→New Project from the menu. At this point you will be presented with numerous project templates (see Figure 1-3) that provide you a starting point for your new application.
Project Types
There are several project templates that you can choose from:
Page-based Application
This includes a page view controller that displays items as pages, allowing you to navigate between items by turning pages.
OpenGL Game
This template provides for an OpenGL ES-based view and a timer that animates the view. Games that use OpenGL ES as a starting point will require much more coding. If you want to use the powerful capabilities of OpenGL ES, you should look at using a library such as cocos2d (http://www.cocos2d-iphone.org/) versus starting with this template.
Master-Detail Application
This is an iPad-specific template that uses the split view controller to display two independently controlled views on the screen. It is similar to the Mail application on iPad, which uses a split view controller to display a list of emails on the left side of the screen and the selected email in the main window area. It also supports all screen orientations.
Tabbed Application
This template provides a Tab bar along the bottom and sets up a view controller for your first Tab bar item. The App Store application is implemented with a Tab bar that provides different ways to view apps in the store.
Utility Application
This template demonstrates how to create two different views that can be flipped between. It sets up an Info button to flip the main view to the flip side view. The flip side view includes a navigation bar with a Done button to flip back. The iBooks application is similar in that you flip between your bookshelf and the iBooks Store.
This template provides a starting point for a single-view app. It includes a view controller to manage the view, and a nib file that contains the view. This is the template you will be using as the starting point for all the projects created in this book.
Empty Application
This is the most basic of all the templates, as it just contains a window and an application delegate.
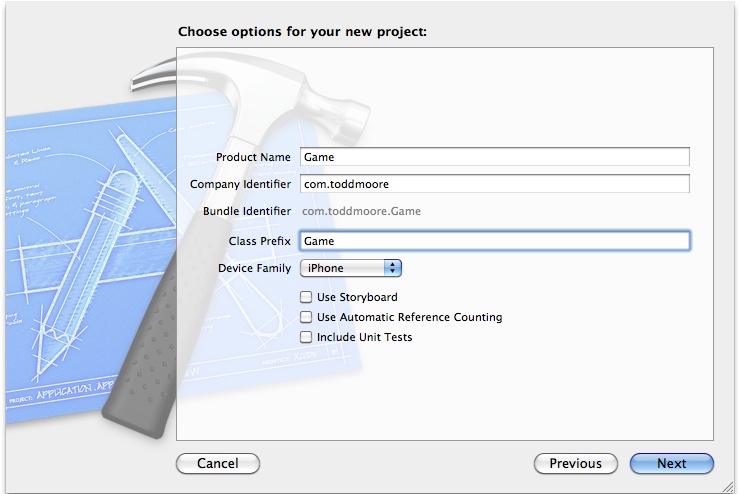
Instead of doing a typical “Hello World” application, you are going to build a really simple game while taking a tour of Xcode. Select the Single View Application as your template, click Next, enter Game as the new name of the project, and then set your Class Prefix to Game as shown in Figure 1-4. Change the company identifier to either reflect your name, website, or company. Keep the device family set to iPhone. I will not be covering Storyboard, Automatic Reference Counting, or Unit Tests in this book, so leave those options deselected. Click Next, which will prompt you for a location to save the project (if you can’t make up your mind where to put it, the Desktop is fine). You also have the option to enable source control by creating a local git repository. Although I will not be covering source control, I highly recommend enabling this feature if you do not already have a server set up. Click the Create button to generate your new Game project.
Now that you have created a project, the Xcode main workspace window is displayed. If at any point you would like to get more information about a certain part of the interface, you can Control-click in a specific area and open up a help option from the menu. We will now explore how to navigate around the Xcode interface.
Xcode Interface
The Xcode interface is divided into four areas: Navigator, Editor, Utility, and Debug (see Figure 1-5). In order to display all the navigation areas, you will need to enable them from the View selector located on the right side of the toolbar. The View selector contains three toggle buttons that either hide or show the Navigator (on by default), Debug, or Utility Areas. The View menu can also be used to show or hide the different areas.
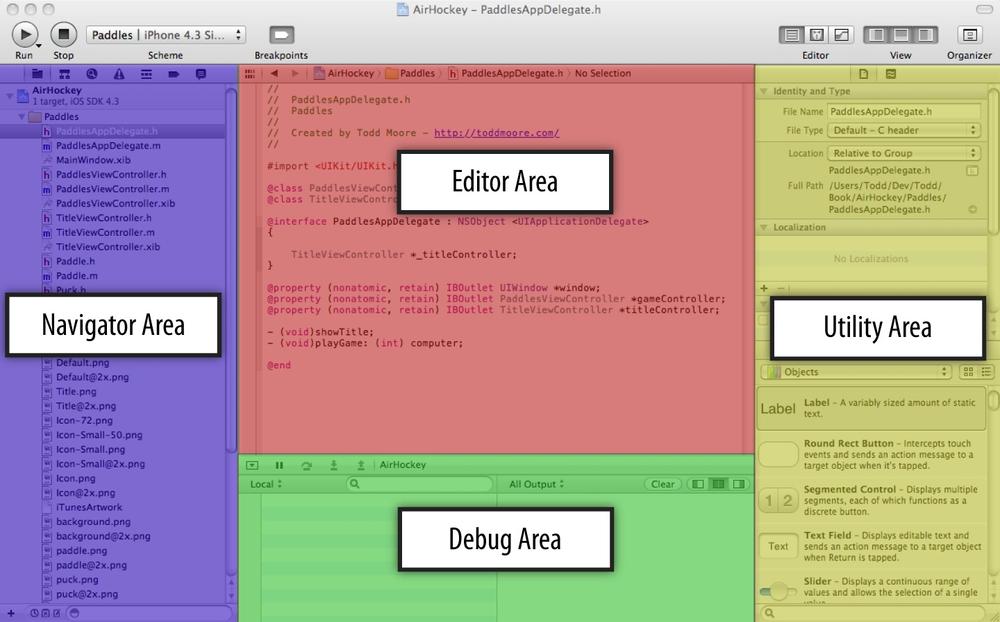
Navigator Area
The Navigator Area is located on the left side of Xcode and allows for project navigation in many different ways. The navigator selector bar along the top of this area allows you to change between the different navigators: Project, Symbol, Search, Issue, Debug, Breakpoint, and Log. Selecting items listed in any of the navigators will open the associated file in the Editor Area. Along the bottom is the filter bar, which displays additional operations such as filtering and searching against the currently selected navigator. The filter bar will change to reflect the operations that the currently selected navigator supports.
The Project navigator, which is shown by default, displays the contents of a project as a list of groups (represented by folder icons) and files. This will probably be your most used view, as it quickly lets you find and open everything used to build your project, including source code and interface files. You may notice it also displays a list of Frameworks that your project is linking against. The filter bar at the bottom of the Project navigator lets you add new files (plus icon) to your project. It supports different filters, such as showing only recently edited files, files with source control status, and files with unsaved changes. In addition there is a search field you can use for keyword searches over the filenames (not the content) included in the view. For example, if you search for “view,” you will see every filename that contains that word, including the GameViewController.h, GameViewController.m, and GameViewController.xib files.
The Symbol navigator lets you browse all the symbols in your project, including classes, protocols, functions, structs, unions, enums, types, and globals. You can view the project symbols as either Hierarchical or Flat. The Hierarchical view will display the entire class hierarchy or inheritance path of every object, which usually means starting with NSObject and navigating down. The Flat view will display each symbol without the hierarchy so every symbol is displayed in a single list. The Flat view is my preferred way of viewing classes, as it makes it easy to quickly locate a symbol. The filter bar supports showing class symbols only (filter everything but class names, including functions, structs, and globals), project-defined symbols only (filter framework classes such as NSString), containers only (hides class methods and variables), and showing symbols with a matching name typed into the search bar. All the listings are sorted alphabetically, which makes it easy to quickly locate methods of a specific class. As such, you may find it useful to enable the class and project symbol filters while leaving the container filter disabled.
The Search navigator lets you find specific text that is contained in any of the project files. Every resulting keyword that matches will be added to the list. The filter bar allows you to filter the search results displayed in the list.
The Issue navigator will display errors and warnings that are generated in the project. Issues can be displayed while you are editing source code or from building the project. They can also be categorized either by file or type of issue. The filter bar supports displaying issues from the latest build only, from the current scheme, showing errors only, and showing issues with matching content.
The Debug navigator is used during the debug of your application, along with the debug area, which we will discuss a little later. By default, the Debug navigator is opened whenever you pause the application or the debugger hits a breakpoint. Each thread in the application and its associated stack frames are visible within this view. The filter bar allows for showing just threads that have crashed or that contain debug symbols. It also includes a slider to control how much of the thread stack is displayed.
The Breakpoint navigator displays all the active and inactive breakpoints that have been added to the project. The filter bar allows you to add a symbolic or exception breakpoint, delete existing breakpoints, show active breakpoints only, and show breakpoints with matching content specified in the search bar. If you Control-click on the project icon, you can disable or delete all breakpoints in the entire project.
The Log navigator displays logs that Xcode created during project activities such as build, debug, and source-control tasks. The filter bar lets you display only recent logs or show logs with a matching name specified in the search bar.
Editor Area
The Editor Area is located in the center of the Xcode workspace and is the place where you will be spending most of your time. The Editor supports modification of many types of data, including source code, property lists (.plist files), and user interface (.xib) files. The Editor includes features that will aid you in writing source code, such as Code Completion and Fix-it suggestions.
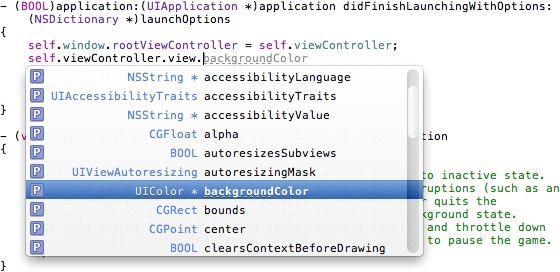
You can bring up Code Completion (Figure 1-6) by pressing Control-space bar whenever you need suggestions on symbol names. Dismiss Code Completion by pressing Control-space bar again. Navigate the suggestions list by using the up and down arrow keys. Press Return when you want to use a symbol suggestion, and if there are parameters to a method name, you can press Tab to fill in each one.
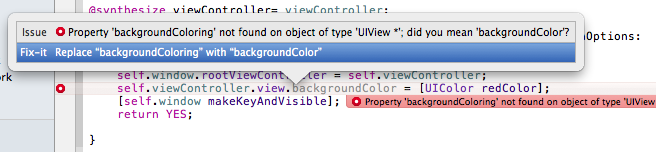
Fix-it (Figure 1-7) scans your source code as you type and marks syntax errors with a red underbar or a caret at the error location. Clicking on the symbol will display a message about the syntax error and in some cases offer a fix. If a fix is offered, you can select the correction and press Return to accept it. Pressing Esc will cancel the operation.
Note
The use of Fix-it requires building the project with the LLVM compiler. This is the default for new projects. However, if you are opening a project created in a prior version of Xcode, you may need to change the compiler in the build settings. Fix-it also requires fully indexing the project before displaying syntax errors. Indexing will start automatically when you first open the project. This process runs in the background and may take a few minutes to complete.
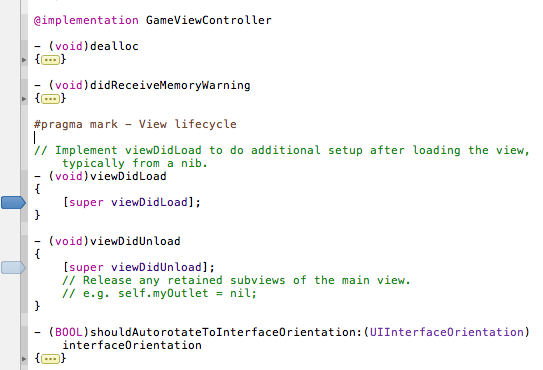
The gutter and focus ribbon are vertical strips running down the left side of the Editor window. The gutter allows you to manage your breakpoints for debugging. Click in the gutter next to a line of source code and a breakpoint will be added at that location. If you click the breakpoint again it will change to inactive. See Figure 1-8 for examples of both active and inactive breakpoints in the gutter. To delete the breakpoint, Control-click on the breakpoint and select Delete Breakpoint from the pop up menu. The focus ribbon is located between the gutter and the editor. It is used to hide or show parts of source code. If you move the mouse pointer over the focus ribbon it will highlight portions of the code that you can fold. Clicking will then hide the code and represent it in the editor as an ellipsis button, shown at the bottom of Figure 1-8. Clicking in the focus ribbon next to the folded code will then make the code visible again. You can also double-click on the ellipsis button in the source code editor to unfold.
Utility Area
The Utility Area is used to supplement the information in the Editor Area. It is located on the right side of Xcode and provides access to various inspectors and libraries. Open up the GameAppDelegate.h file and make sure the Utilities view is shown. You can hide or show the Utilities Area by using the View selector in the toolbar, selecting View→Utilities→Show | Hide Utilities from the menu, or by pressing Option-Command-0. The File Inspector will now display information about the file itself, allowing you to rename it, change its file type, get full path information, modify localization, configure target membership, and modify text settings.
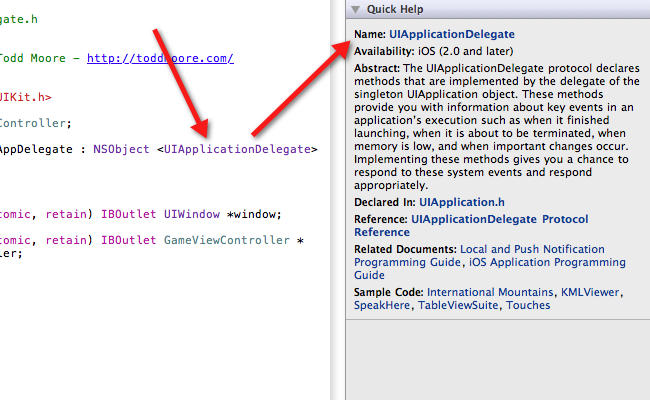
Just above the File Inspector is a pair of icons that let you switch between the File Inspector and Quick Help, which is extremely useful in displaying help information for items in the source editor. Placing the insertion point in an API symbol will display Quick Help information. Give it a try by placing the insertion point in the UIApplicationDelegate protocol of the GameAppDelegate.h file. Quick Help will display information about the UIApplicationDelegate and include links that will open to the full help documentation, as shown in Figure 1-9.
Debug Area
The Debug Area is located along the bottom of Xcode and will open automatically when you are running code or when the debugger stops at a breakpoint. This area allows for control of your program’s execution while viewing variables and console output. The area is divided into three sections, with a debug bar along the top, variables on the left, and console output on the right. Although the view appears automatically, there are times when you may need to make the view visible (use View→Show Debug Area) such as when debugging has finished or when you want to view console output.
Building and Running
In order to build and run the application, you need to set the Scheme that you want to target. This can either be set to the Simulator or a device that you have registered for development.
Simulator
Make sure the Scheme, which is located next to the Run and Stop buttons in the toolbar, is set to iPhone Simulator. Clicking the Run button on the toolbar will build the application, install it in the Simulator, and run it (see Figure 1-10) with the debugger attached. You can also run the application by selecting Product→Run from the menu or by using the Command-R keyboard shortcut.
Congratulations! You just made your first application. Granted, it doesn’t do much, but I’ve seen flashlight apps that didn’t do much more. Now that the Simulator is up and running, let’s go over a few common functions, as shown in Table 1-1, that you will find useful for testing applications.

Description | |
Hardware→Device | Changes the Simulator between iPad, iPhone, and iPhone 4 (Retina display). These devices all have different resolutions, with iPad at 1024×768, iPhone at 320×480, and iPhone 4 at 640×960. |
Hardware→Version | Changes the version of the current Simulator, which allows you to verify the application will run on older versions of iOS. |
Hardware→Rotate Left | Right | Rotates the Simulator into one of the four orientations, including Portrait, Landscape Left, Landscape Right, and Upside Down Portrait. |
Hardware→Shake Gesture | Simulates shaking the device. |
Hardware→Home | Returns to the home screen from an active application. You can also press the home button on the Simulator window. |
Hardware→Lock | This will enable the screen lock, which lets you test when your application goes inactive. |
Hardware→Simulate Memory Warning | Simulates a memory warning, which can cause views in your code to be unloaded. It is extremely useful in testing if your application handles low memory conditions correctly. |
Reduces screen resolution to half the size. You can manually change the scale of the Simulator to 50%, 75%, or 100%. | |
iOS Simulator→Reset Content and Settings | Resets to factory default settings. If at any point your simulator becomes hung up or corrupted then this is your best option to fix it. |
It is important to always test your application on an actual iOS device. The Simulator is just that, a simulation of the device. Nothing can replace running it on the actual hardware that people will be playing your game on. There are also limitations to what you can do within the Simulator, as it doesn’t support the accelerometer or allow for true multi-touch. It is also beneficial to have devices that are not using latest generation hardware because performance can be much different between each generation. I test my apps and games on a lot of different devices and iOS versions, but the one that finds the most issues is my original iPhone running iOS 3.0. If you want to support all versions of iOS back to version 3.0, then an old iPhone is a great device to keep in your testing arsenal. Hopefully you already have an iPod touch, iPhone, or iPad that you can use for testing your applications on a device.
Device
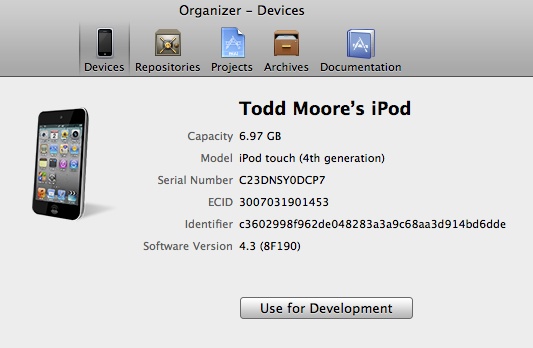
In order to run the application on a device, you need to first connect the device to the Mac using the USB dock connector. Change the current scheme from iOS Simulator to iOS Device. Try running the application. If you have not already registered your device for development, you will get notified that there is no provisioned device available. If that is the case, open the Organizer application by clicking on the Organizer toolbar button on the far right side of the toolbar, or by clicking Window→Organizer from the menu. In the Organizer application, click the Devices tab, and make sure the connected device is selected in the Devices list. Click the Use for Development button (Figure 1-11) and wait until the device is initialized. You may be prompted to log in to your Apple Developer account so that the device can be registered and appropriate information downloaded.
After the device has been successfully registered for development then you can close Organizer and return to Xcode. You should notice that the name of the device now appears in the current scheme.
Run the application and it will build, install, and run it on the connected device. The application can be debugged on device just like it can be in the Simulator. You will also notice when you quit the application that there is now an application icon on the SpringBoard (iOS home screen) just like you downloaded it from the App Store. You will now be able to launch the application on the device without having the dock cable attached. However, in order to debug and view console output from the app, you will need to leave the device connected with the dock connector.
Code Structure
Now that you know the layout of Xcode and are able to run the app in the Simulator and device, let’s walk through the skeleton files that Xcode gave to you when you chose the Single View Application project template. Make sure the Project Navigator is selected in the Navigator Area and the groups are expanded to reveal all the files in the project. Click on each file listed in Table 1-2 to view the file contents in the editor window.
Filename | Description |
GameAppDelegate.h | Interface file for the application delegate, |
GameAppDelegate.m | Implementation file for the application delegate, |
GameViewController.h | Interface file for the game view controller, which is assigned as root view controller for the main window. |
GameViewController.m | Implementation file for the game view controller, which manages interactions with the interface. You will do most of your work in this file. |
GameViewController.xib | User interface file (nib file) for the |
Application info file that specifies a lot of information about the application, including name, version, and which nib file to load for the main window. | |
InfoPlist.strings | This file can be used to specify localized versions of strings used in the application. |
Game-Prefix.pch | Prefix header that speeds up overall build times by precompiling headers specified in this file. The contents of this file and the files it includes should rarely change, in order to speed up compilation. |
main.m | Includes the main function that is implemented to set up memory management by creating an auto release pool. It then calls the |
I will now explore how an application starts up so you can better understand how all of these files relate to each other.
Application States
I’ll show you how an application starts up and goes through the different states by using the NSLog function. This function will log a message to the Apple System Log facility. It supports variable arguments similar to how the printf function works. These messages will appear in the Debug output window and are always logged regardless if running in Debug or Release builds of the application.
All programs start with a main function and iPhone apps are no different. Open up the main.m implementation file, which is usually located in the Supporting Files group in the Project Navigator. The implementation of the main function is pretty small as it only creates an NSAutoreleasePool and then calls the UIApplicationMain function. The autorelease memory pool is used in the management of reference counted objects. You don’t need to worry too much about its function, just know that it is needed to free some objects up when they are no longer needed. The UIApplicationMain function creates the application object, application delegate, and sets up the event cycle. Add a call to the NSLog function, which will report when the program is in the main function of the application. The main function should be modified to appear as follows (the line you must add is shown in bold):
int main(int argc, char *argv[])
{
    NSLog(@"main");
   @autoreleasepool
    {
        return UIApplicationMain(argc,
                                 argv,
                                 nil,
          NSStringFromClass([GameAppDelegate class]));
    }
The main function will now write to the debug window the message "main" as soon as the application starts. You are writing this message to show that the main function does in fact execute prior to any of the application delegate methods. I will investigate each of those methods next.
Open up the application delegate implementation by clicking on the GameAppDelegate.m file in the Project Navigator. A delegate is kept informed about the actions of another object. In the case of the application delegate, it is notified by the application when it goes into different application states. For example, the application delegate is notified when the application first launches as well as when it terminates or goes into the background. The different application states that the application delegate is notified about are listed in Table 1-3.
Notifies the delegate that the app has launched; this is usually the place to initialize application variables and data structures, read in application configuration, and decide which view will appear in the main window. If your application persists its state between launches, you should use this function to restore the application to the previous state. | |
| Notifies the delegate that the application has become active. This will be called any time your application moves from an inactive state to an active state, including when it is first launched. You should restart any tasks that were paused when the application went into an inactive state. |
| Notifies the delegate that the application is now in the background. In iOS 4.0 and later, this method is called instead of the |
| Notifies the delegate that the application is about to enter the foreground. This is typically handled by restoring any tasks that were stopped when the app entered the background state. The |
Notifies the delegate that the application is about to become inactive. This occurs when the application becomes interrupted, the user enables screen lock, or the user quits the application. An application interruption can be caused by an incoming phone call, SMS message, or alarm. | |
| Notifies the application delegate that the app is about to terminate. This gets called for devices that do not support background execution or the device is running iOS 3.x or earlier. |
In order to illustrate the application going through the different application states you should add NSLog messages to each of the delegate methods. You must modify the implementation file (GameAppDelegate.m) to appear as follows:
- (BOOL)application:(UIApplication *)application
  didFinishLaunchingWithOptions:(NSDictionary *)launchOptions
{
    self.window =
        [[UIWindow alloc]
        initWithFrame:[[UIScreen mainScreen] bounds]];

    NSLog(@"didFinishLaunchingWithOptions");

    self.viewController =
        [[GameViewController alloc]
        initWithNibName:@"GameViewController" bundle:nil];
    self.window.rootViewController = self.viewController;
    [self.window makeKeyAndVisible];
    return YES;
}

- (void)applicationWillResignActive:(UIApplication *)application
{
    NSLog(@"applicationWillResignActive");
}

- (void)applicationDidEnterBackground:
    (UIApplication *)application
{
    NSLog(@"applicationDidEnterBackground");
}

- (void)applicationWillEnterForeground:
    (UIApplication *)application
{
    NSLog(@"applicationWillEnterForeground");
}

- (void)applicationDidBecomeActive:(UIApplication *)application
{
    NSLog(@"applicationDidBecomeActive");
}

- (void)applicationWillTerminate:(UIApplication *)application
{
    NSLog(@"applicationWillTerminate");
}
Next, open the GameViewController.m implementation file that is the primary view controller for managing the view in this game. The view controller is notified when certain events happen to the view it is managing. This includes when the view is loaded or unloaded and when the view will appear or disappear. Modify the implementation so the code looks as follows:
- (void)viewDidLoad
{
    NSLog(@"viewDidLoad");
    [super viewDidLoad];
}
- (void)viewWillAppear:(BOOL)animated
{
    NSLog(@"viewWillAppear");
    [super viewWillAppear:animated];
}
- (void)viewDidAppear:(BOOL)animated
{
    NSLog(@"viewDidAppear");
    [super viewDidAppear:animated];
}
- (void)viewWillDisappear:(BOOL)animated
{
    NSLog(@"viewWillDisappear");
    [super viewWillDisappear:animated];
}
- (void)viewDidDisappear:(BOOL)animated
{
    NSLog(@"viewDidDisappear");
    [super viewDidDisappear:animated];
}
- (void)viewDidUnload
{
    NSLog(@"viewDidUnload");
    [super viewDidUnload];
}
Make sure the current scheme is set to run in the iOS Simulator and run the application. Once the application is displayed in the Simulator, look at the output in the Debug window, which shows log messages and the order that each method was called. It should look similar to the following:
2011-04-11 13:02:42.873 Game[22357:207] main
2011-04-11 13:02:43.207 Game[22357:207]
       didFinishLaunchingWithOptions
2011-04-11 13:02:43.208 Game[22357:207] viewDidLoad
2011-04-11 13:02:43.209 Game[22357:207] viewWillAppear
2011-04-11 13:02:43.210 Game[22357:207]
       applicationDidBecomeActive
2011-04-11 13:02:43.209 Game[22357:207] viewDidAppear
Note that after the main function is called, the first application delegate notification is didFinishLaunchingWithOptions. After that, you will receive notifications in the view controller that the view did load (viewDidLoad), will appear (viewWillAppear), and finally did appear (viewDidAppear). The application delegate is notified that the application became active (applicationDid BecomeActive) before the view finally appears.
Now quit the application by pressing the home button on the Simulator. The following messages are logged:
2011-04-11 13:07:00.238 Game[22357:207]
       applicationWillResignActive
2011-04-11 13:07:00.240 Game[22357:207]
       applicationDidEnterBackground
Now relaunch the application from the SpringBoard (home screen) by tapping on the application icon. The following messages appear in the log:
2011-04-11 13:07:01.563 Game[22357:207]
       applicationWillEnterForeground
2011-04-11 13:07:01.565 Game[22357:207]
       applicationDidBecomeActive
You have just walked through all the different application states that the game will go into. You should take note that the application was never shut down and applicationWillTerminate was not called. This will become important later in the development of the game, as you will need to at least handle pausing and resuming the game (especially when an animation timer is used). But I don’t want to jump ahead of myself, as you need to first learn about Interface Builder and how it can be used to build the game interface.
Interface Builder
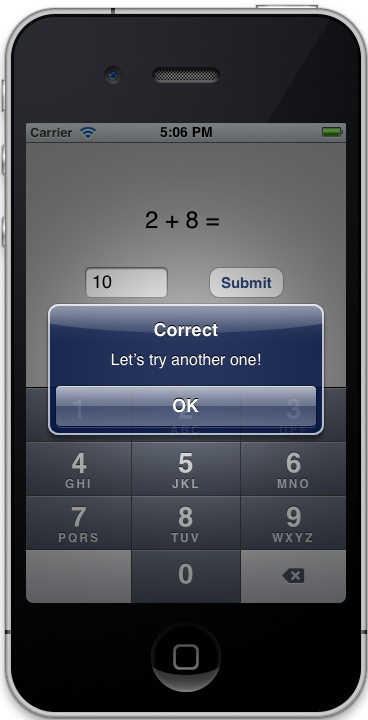
The first game you will create (Figure 1-12) will pose a math problem and allow the user to enter and submit an answer. If the answer is wrong it will let the user try again, and if it is correct then a new math problem will be generated.
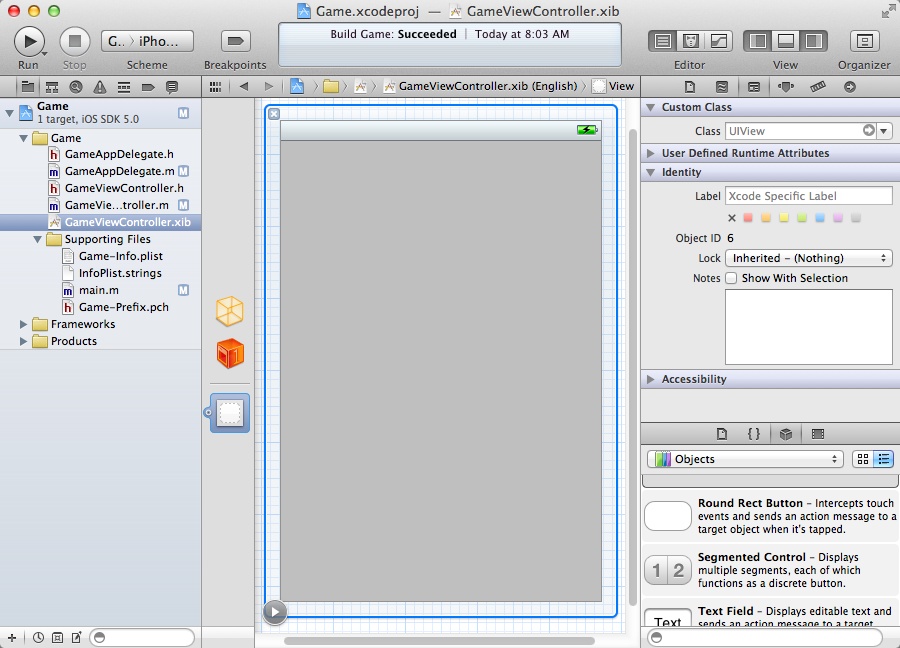
You will use Interface Builder to design the interface and lay out all the controls that you will need. Single click on the GameViewController.xib file in the Project Navigator to display the nib file in Interface Builder, as shown in Figure 1-13. At this time, make sure you have the Utility view open (if it’s not, click View→Utilities→Show Utilities), so you can use the various inspectors required to create interfaces.
You will notice next to the File Inspector and Quick Help that there are new inspectors to use in Interface Builder: Identity, Attributes, Size, and Connection Inspectors. At the bottom of the Utility Area you will find the library pane, which lists various things that can be added to a project. Make sure you’ve selected the Object Library (View→Utilities→Object Library) and you’ll see UI controls that you can add to the view.
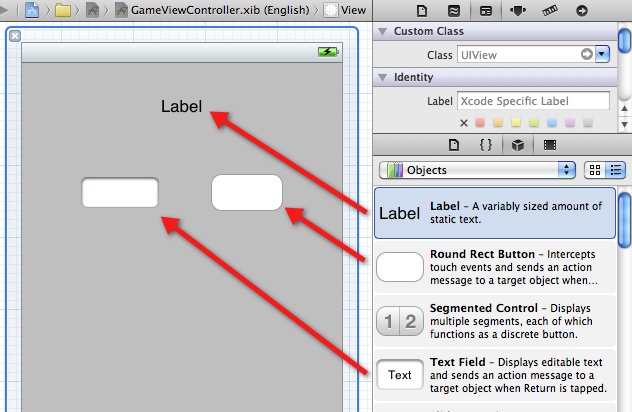
The interface will use a label to ask a question, a text control to receive an answer, and a button to submit and check if the answer was correct. Drag a Label from the Object Library into the top center of the view in the main editor. Drag a Text Field under that and to the left. Drag out a Rounded Rect button to the right of the Text Field. When a Text Field is used for input, a keyboard appears that covers the bottom half of the iPhone screen. Because of this, you need to keep all of these controls located in the top half on the view. Figure 1-14 shows how to add these objects to the view.
Switch to the Attributes Inspector and click on the Label. Change the Text to “Ask Question Here” and then adjust the size of the control so that it spans most of the view width. Change the text alignment to center. The label should now appear centered in the middle of the screen. If needed, you can drag the label around on the screen until you see a blue line appear in the center, which tells you the label is now located in the center of the containing view. Click on the Font button and modify the size to be 24. You may need to adjust the width and height of the control if you find the text getting clipped. I ended up sizing the control to be 280×40. You can also open the Size Inspector if you want specify the exact width and height of the control.
Now click on the Text Field and change the Placeholder text to Answer. The placeholder text displays when text has not been entered into the control and serves as a way to let the user know what type of input should be specified. You can also specify the type of keyboard that gets displayed when the user taps the control. Since the game is asking a math question, it makes since to display only numbers. Scroll down to the Keyboard attribute and change the value to Number Pad. In order to make the answer a little easier to read, let’s adjust the font size to 18.
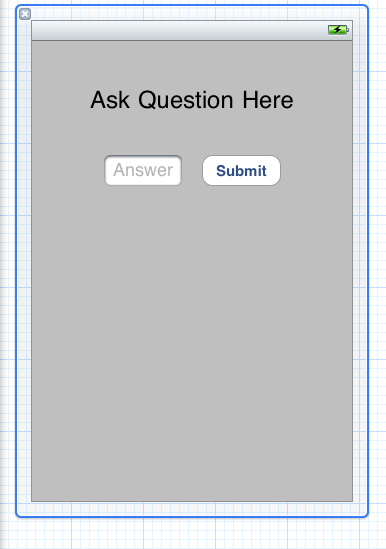
Click on the button and change the Title to display Submit inside of the button. You can also double-click on the button to modify the title in place. Adjust the height of the button to match the size of the text control. The interface should now appear similar to Figure 1-15.
Now that the interface has been created, you need to hook up the controls as properties of the view controller. This will allow you to change the label text, read the answer, and add logic to handle the tapping of the Submit button.
Connections
It is time to bridge the gap between the interface and the code. You do this by creating referencing outlets between the controls contained in the view and the view controller. The easiest way to do this in Xcode is to use the secondary assistant so that both the interface and the header file of the view controller are displayed next to each other. You may need to enable the secondary editor on the Editor segment control located on the toolbar, as shown in Figure 1-16, or by selecting View→Editor→Assistant from the menu.

The secondary editor will display the appropriate file in the secondary area, in this case it will be the GameViewController.h file. If you do not see this file in the secondary editor, you may need to change the editor to Automatic in the jump bar, as shown in Figure 1-17.

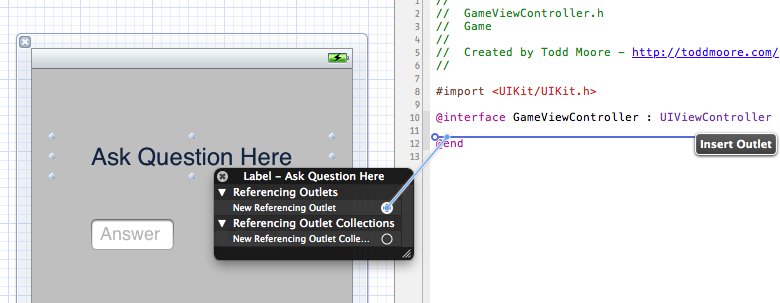
Control-click on the top label to display the label properties for the control. Create a new referencing outlet by clicking in the circle to the right of New Referencing Outlet and dragging to just below the GameViewController interface definition. As you are dragging you will see a line being drawn, as shown in Figure 1-18, and also the location of where the outlet will be inserted.
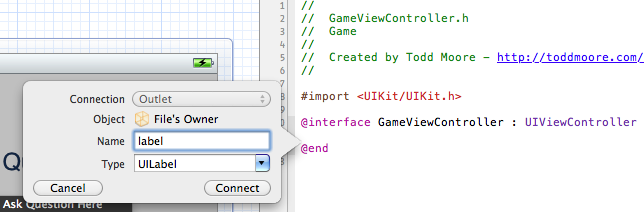
Make sure you release the mouse button when you see the “Insert Outlet” marker displayed before the @end statement. You will now receive a pop-up that allows you to specify the name of the property, as shown in Figure 1-19. Type “label” in as the Name of the property and click Connect.
You will repeat this operation again for the answer text field, but this time will use a shortcut to make the connection. Control-drag directly from the text field (without releasing the mouse button) and draw a line to the interface file right below the previous property definition. Once the insert marker is in the appropriate position, release the drag operation, and when prompted type in “answer” as the Name of this property. If you have done this correctly, the interface file should appear as follows:
@interface GameViewController : UIViewController

@property (retain, nonatomic) IBOutlet UILabel *label;
@property (retain, nonatomic) IBOutlet UITextField *answer;

@end
Now repeat the same operation for the button, but instead of creating a property you will create an action. When the connection pop-up appears, change the connection type from Outlet to Action. Now type in “submit” as the Name of the new method. You should see the following added to the interface file:
- (IBAction)submit:(id)sender;
You have successfully connected the label and text field as properties and added a submit method that will be called when the button is tapped. Xcode has not only been editing the interface file for us, but also adding code into the implementation file. Let’s open up the GameViewController.m file and look at what was added:
- (void)viewDidUnload
{
    NSLog(@"viewDidUnload");
    [self setLabel:nil];
    [self setAnswer:nil];
    [super viewDidUnload];
    // Release any retained subviews of the main view.
    // e.g. self.myOutlet = nil;
}
The viewDidUnload method now sets the label and answer properties to nil. Xcode makes sure the program won’t have a memory leak by setting the properties to nil in the viewDidUnload method, which causes the controls to be released.
The default behavior for low memory conditions is to release views that do not have a superview. This could be views on the screen that are not currently displayed or active. It is extremely important whenever controls are connected as retained properties of the view controller that they are properly released in both the dealloc and viewDidUnload methods. I’ve seen a lot of strange issues occur in apps that were caused by incorrect handling of viewDidUnload. Always make sure retained user interface properties are set to nil so they will be released and memory freed. Also, if you programmatically added views in the viewDidLoad function, then you usually will need to remove those views in viewDidUnload so the view can be properly unloaded. The view controller will reload the view again when it is needed and all properties will be reconnected. Always test low memory conditions in the Simulator by selecting Simulate Memory Warning from the Hardware menu.
Note
As you previously discovered, apps running on iOS 4 do not shut down but instead go into a suspended state. An application that never terminates means you really need to make sure you are allocating and deallocating objects correctly. An application with a memory leak may at some point consume so much memory that it will be killed by the system. This would leave a bad impression on your users, as they would think your application has bugs (which it does!). Interface Builder helps to make the process easier by adding code to release the properties in the dealloc and viewDidUnload functions.
You will also notice a submit method has been stubbed out for us to implement. This method was connected as an action and will be called when the user taps the button:
- (IBAction)submit:(id)sender
{
}
Now that you have created the interface and made all the connections it is finally time to do some coding.
Game Logic
You will write code to ask a math problem and then wait for the user to submit an answer. Once submitted it will alert the user if the provided answer was correct or not. If the answer was correct then a new question is generated. If the answer was wrong then it will allow the user to try again.
You will first create a method that generates a math problem and records the correct answer. Add the following to the GameViewController.m implementation file above the #pragma directive that appears before viewDidLoad function:
- (void)generate
{
    // pick two numbers between 1 and 9
    int a = 1 + arc4random() % 9;
    int b = 1 + arc4random() % 9;

    // calculate the sum
    int sum = a + b;

    // create our question
    label.text = [NSString
    stringWithFormat:
      @"%d + %d = ", a, b];

    // save the answer in the tag property of the label
    label.tag = sum;
}
This function picks two numbers between 1 and 9 using the arc4random() function. The arc4random() function is the preferred way of generating random numbers. It does not require seeding like the rand() or random() functions you may have used if you’ve done any C programming. The sum is then calculated and the text of the label is updated to ask what “a + b =” by creating an NSString and using the stringWithFormat method. This method is very similar to printf (used in C programming) in that variable arguments can be specified in the creation of a string. I am utilizing the tag property of the label to store the answer. The tag variable is available in all UIView derived classes and is mainly used for identification purposes, but you can set it to any integer value because it is there for your use only and has no bearing on the control or its behavior.
Now you need to call the generate function when the view loads. This will make sure the label has a question already loaded before the view actually displays. Modify the viewDidLoad implementation to appear as follows (the line you must add is shown in bold):
- (void)viewDidLoad
{
    NSLog(@"viewDidLoad");
    [super viewDidLoad];

    [self generate];
}
In the submit method you will check if the answer given is the correct one and generate an alert message to the user. Modify the submit function to appear as follows:
- (IBAction)submit:(id)sender
{
    // convert our answer text value into an integer
    int num = [answer.text intValue];

    // check if it is correct by comparing to the label tag
    UIAlertView *alert;
    if (num == label.tag)
    {
         // answer was correct
         alert = [[UIAlertView alloc]
                    initWithTitle:@"Correct"
                    message:@"Let's try another one!"
                    delegate:self
                    cancelButtonTitle:@"OK"
                    otherButtonTitles: nil];

        // use the alert tag to mark that answer was correct
        alert.tag = 1;
    } else
    {
        // answer is incorrect
        alert = [[UIAlertView alloc]
                 initWithTitle:@"Wrong!"
                 message:@"That answer is incorrect."
                 delegate:self
                 cancelButtonTitle:@"Try Again"
                 otherButtonTitles: nil];
    }

    // show and release the alert
    [alert show];
    [alert release];
}
The submit function first retrieves the answer from the text field as an integer value. Since the text property is an NSString, you can use the intValue method to convert the string value into an integer. Now that you have the answer as an integer, you can compare it to the tag property that was set in the label to see if the answer was correct. You then create an alert message with either a correct or incorrect message. I am utilizing the tag property of the UIAlertView to store if the answer was correct or not. The tag is by default set to 0, so you will set it to 1 when the answer is correct.
You will now need to handle when the user dismisses the alert view and check the tag variable to see if the answer was correct. If it was correct then you will generate a new question and clear out the previous answer. Insert this code below the submit method:
- (void)alertView:(UIAlertView *)alertView
             clickedButtonAtIndex:(NSInteger)buttonIndex
{
    if (alertView.tag == 1)
    {
        // generate a new question
        [self generate];

        // reset our previous answer
        answer.text = @"";
    }
}
Now build and run the game either in the Simulator or on the device. Tap the answer control to bring up the keyboard, which will allow you to specify numeric value. Try providing both correct and wrong answers to verify the game logic.
As a final touch, I want to have the keyboard display automatically when the application launches. This way the user can just specify the answer immediately instead of having to tap the control first to display the keyboard. In order to do this, you need to specify that the answer control is the first responder. This has the same effect as tapping on the control, so the keyboard will appear as soon as the view is displayed. Modify the existing viewDidAppear method to the following:
- (void)viewDidAppear:(BOOL)animated
{
    NSLog(@"viewDidAppear");
    [super viewDidAppear:animated];
    [self.answer becomeFirstResponder];
}
And there you have it, you just created a simple math game using only a few lines of code. In the next chapter, you will create a more sophisticated game that uses animation, collision detection, and multi-touch.
Get Tap, Move, Shake now with the O’Reilly learning platform.
O’Reilly members experience books, live events, courses curated by job role, and more from O’Reilly and nearly 200 top publishers.

