So let's get started with using Linux by booting the enclosed CD. Before booting into Move, be sure to plug in and turn on any peripheral devices that are attached to your PC, such as zip drives, printers, scanners, etc., so that Move will have the greatest chance of configuring things automatically. If you have a USB memory key, insert it before the system boots up so that Move can use it to store your configuration.
System requirements
The preface of this book provides all the dirty details about system requirements and the usefulness of having a USB memory key. The short of it is: if your computer can run Windows, it can run Linux. And if you have a USB memory key, you can save data and settings from your Move session.
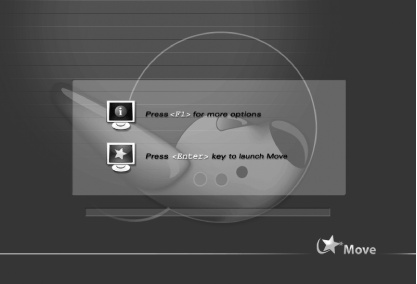
To use the CD, simply insert it into your CD-ROM drive and boot your computer. If your computer is set to boot from the CD drive (and most of them are), you will shortly see a screen that looks like Figure 1-1. If your computer is not set to boot from CD, you'll probably need to make a change in your computer's BIOS. The Appendix provides instructions for doing this. When you see the screen shown in Figure 1-1, simply press Enter to launch Move.
F1 options
The menu options accessible by pressing F1 are for advanced features of the CD. You don't need to use this menu unless referred to it by the troubleshooting steps in the appendix.
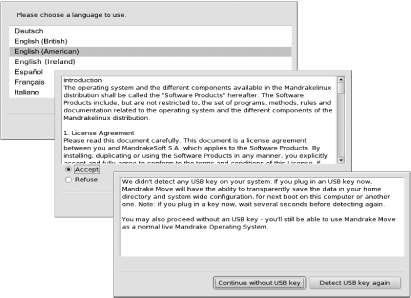
You'll see a few automated screens go by. You'll then be prompted to choose a preferred language, agree to the licensing terms, detect a USB key, choose a login name and password, and so on (Figure 1-2).
Move is completely safe
At no point during this startup is anything being done to your hard drive. Using this CD does not hurt your current computer setup. Also, the length of time it takes to boot Move is not an indicator of the performance of Linux itself. When the entire operating system runs from a CD there are some tradeoffs, one of which is speed.
In the first screen you need to choose a language. Although this CD has support for only a few languages, Linux itself supports more than 70 languages, which is one of the reasons why Linux is so popular outside the United States. Microsoft must have financial reasons to include support for a particular language; Linux needs only the time and interest of someone who can speak the language—one of the many benefits of open source.
In the second screen you need to agree to the licensing terms for Move. If you agree with the terms, check the Accept box and click OK. If not, click Quit to cancel the setup procedure and reboot your computer.
Check out the Linux license
Most people don't read the "click-thru" licenses that appear when they install software. But, just for kicks, you should read Move's license terms and compare them to the terms on a typical Windows program. If you can stomach the legalese, you will come away with a better understanding of the differences between free and proprietary software.
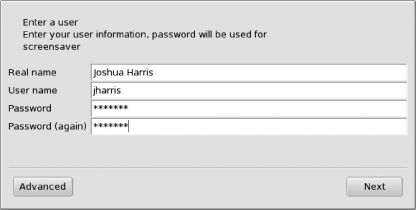
In the third screen you have to set up a user account for Move. Because Linux is designed to be a multiuser operating system, it requires that each user have an account. Each account has its own set of files, preferences, and permissions that is independent of and secured from other users. Move only requires you to set up a single user account. You can press Tab or use your mouse to move between fields on the account creation screen.
First, type your full name into the Real Name field. In the User Name
field type in a nickname or a short version of your full name. It is
traditional, and best, to make your username all lowercase without
any spaces. For example, if your name is Joshua Harris, you would put
Joshua Harris in the Real Name field, and
maybe just jharris in the User Name field.
From here on, the computer will
"think" of you as jharris. You are
asked to enter your password twice, to make sure you
didn't make a mistake the first time you typed it.
Click Next after you fill out all the requested information (Figure 1-3 Figure
1-3).
Advanced choices
The Advanced button lets you select a particular command-line shell to use. Don't worry about this until after you have read Chapter 11. Nearly all Linux users use the recommended default shell bash, which stands for Bourne Again SHell.
If you didn't put in a USB memory key before you booted, the next screen displays a dialog box prompting you to insert a key. If you have one but have not inserted it yet, plug it into any free USB port, wait a few seconds, and click the "Detect USB key again" button. If you don't have a USB key, simply click "Continue without USB key."
USB key problems?
Unfortunately, not all USB memory keys are created equal. Some keys are not recognized by Move. This is a failing of the live CD. An actual installation of Linux on your machine should not have a problem with any USB memory key you can use under Windows.
Depending upon the hardware attached to your computer, some additional screens may appear, perhaps to set up a printer or to configure certain types of mice or keyboards. Responding to these screens should be fairly straightforward. If you're in doubt, the default is probably just fine.
After the initial question-and-answer session is complete, Move attempts to boot into the desktop environment. One minor problem I have noticed on a few computers is that the screen will go blank and won't come back up. If this happens, just press any key on the keyboard and the screen should come back up. After the hardware setup is complete, you are transported to the KDE desktop.
If you encounter any problems getting the CD to boot, the Appendix provides suggestions to solve the most common problems Move users encounter.
Get Test Driving Linux now with the O’Reilly learning platform.
O’Reilly members experience books, live events, courses curated by job role, and more from O’Reilly and nearly 200 top publishers.


