Chapter 1. Getting Started with Tomcat
The first Java servlet container was Sun Microsystems’s Java Web Server (JWS). It was more affordable than most commercial server offerings, but it did not enjoy widespread commercial success. This was due largely to Java’s novelty and the fact that servlets had only recently been introduced. One of JWS’s main outgrowths, however, was the Java Servlet Specification, a de facto standard that Sun documented and made available separately. One big success of JWS was that it put Java servlets in the limelight.
In 1996, a plethora of free Java servlet containers became popular. Apache’s JServ and CERN/W3C’s Jigsaw were two of the earliest open source Java servlet containers. They were quickly followed by several more, including Jetty (http://www.jetty.org), the Locomotive Application Server (see the web archives at http://web.archive.org/web/*/http://www.locomotive.org), Enhydra (http://www.enhydra.org), and many others. At the same time, commercial servlet containers became available as the industry embraced the Java servlet standard; some of these were WebLogic’s Tengah, ATG’s Dynamo, and LiveSoftware’s JRun.
In 1997, Sun released their first version of the Java Servlet Development Kit (JSDK). The JSDK was a very small servlet container that supported JavaServer Pages (JSP) and had a built-in HTTP 1.0 web server. In an effort to provide a reference implementation for developing servlets, Sun made it available as a free download to anyone wanting to experiment with the new Java server-side standard. It also had success as a testing and development platform, in preparation for deployment to a commercial server.
In the first half of 1998, Sun announced their new JSP specification, which built upon the Java Servlet API and allowed more rapid development of dynamic web application content. After the 2.1 release of the JSDK (now called the JSWDK to add “Web” to the name), James Duncan Davidson at Sun rewrote the core of the older JSDK server. At the heart of this new Java servlet engine reference implementation was a brand new servlet container named Tomcat. Its version number started at 3.0 because it replaced JSDK Version 2.1.
As the servlet and JSP specifications’ reference implementation had done, Tomcat evolved rapidly and grew. As the specifications became rich with features, so did Tomcat, and with it the JSWDK. For various reasons, James and Sun wanted to open the code to the JSWDK. This was largely so developers everywhere could examine how servlets and JSP operated. Here’s what Jason Hunter of the Apache Software Foundation says about what happened next:
Sun wanted to spread the adoption of the technology, especially JSP, and Apache was a good venue to enable that. From what James said at the time and since, they wouldn’t have open sourced it on their own except if Apache (with majority web server marketshare) would take the code, well then! What’s funny is Sun gave it for JSP, Apache took it for servlets.
Nevertheless, the open source Tomcat project has enjoyed rapid development in areas including servlets and JSP functionality since its donation to the Apache Software Foundation.
Since it is freely distributable, backed by both Sun and the Apache Software Foundation, is the reference implementation for the Java Servlet Specification, and is all-around “cool,” Tomcat went on to redefine the very meaning of a Java server, let alone a servlet container. Today, it’s one of the most widely used open source software packages and is a collaborative project bustling with activity every day of the year.
As of this writing, there are two production-ready versions of Tomcat in circulation: the widely used initial Release 3, based upon the Sun code; and the newer Release 4, a near-total rewrite code-named “Catalina.” Tomcat 4.0 was released just after we began writing this book, a production-ready 4.1 has also been released, and Tomcat 5 is in early alpha, so this book primarily covers Release 4.x. If you are still running Tomcat 3, this book’s concepts will apply, but the implementation details may be different. You may want to consider upgrading to Tomcat 4 and using this book as your roadmap.
In the Preface, we mentioned that Tomcat lets you run Java-based servlets and JSP. Using servlets or JSP provides performance benefits comparable to traditional CGI programming[1] while still providing Java’s many benefits and a rich API. This performance gain is particularly noticeable with something called Just In Time translation, or JIT, which is part of all modern Java implementations.
Tomcat is a solid standalone web server and servlet container. However, its web server is not as fully featured as many of the more established web servers, such as the Apache web server (for example, Tomcat doesn’t have a large list of optional modules). But Tomcat is free, open source software, and many talented people are contributing to its growth.
Because Tomcat is written in Java, some people assume that you have to be a Java guru to use it. This is not so! While you need to know Java in order to modify the internals of Tomcat or write your own servlet programs, you do not need to know any Java to use Tomcat or write or maintain many JSPs. For example, you can have JSPs that use JavaBeans™ or JSP Custom Tags; in both of these cases, you are simply using Java components that a developer has set up for you.
In this chapter, we explain how to install Tomcat, how to get it running, and how to test it to make sure that it’s functioning properly.
Installing Tomcat
There are several paths to getting Tomcat up and running. The quickest way is to download and run the compiled binary. Tomcat is written in Java, which means you must have a modern Java runtime installed before you can build or test it. Read Appendix A to make sure you have Java installed properly.
One of the benefits of open source projects is that programmers find and fix bugs and make improvements to the software. If you’re not a programmer, there is little to be gained from recompiling the source, since you are not interested in this level of interaction. To get started quickly, download a binary package for your system.
Tip
If you do want some hints on compiling from source, see Chapter 9.
There are two levels of packaging. The Apache Software Foundation publishes binary packages in the form of releases and nightly builds. Other organizations repackage these into RPMs for Linux, packages for BSD, and so forth. The best way to install Tomcat, then, depends on your system. We’ll explain this process on several systems: Linux, Solaris, Windows, Mac OS X, and OpenBSD.
Regardless of your platform, if you choose the Apache Jakarta Tomcat binary release, there are two editions to choose from. Here’s how the Jakarta binary release download page describes each:
- Standard
This is a full binary distribution of Tomcat 4, which includes all optional libraries and an XML parser (Xerces 2.0.1), and can be run on JDK 1.2+.
- JDK 1.4 LE
This is a lightweight binary distribution of Tomcat 4, designed for JDK 1.4. It does not include any of the optional binaries or the necessary XML parser (as these are included in JDK 1.4). All the components of this distribution are open source software.
Tip
LE-style releases do not contain JavaMail, Java Activation Framework, Xerces, Java Naming and Directory Interface (JNDI), or the JDBC Standard Extension.
Installing Tomcat on Linux
Tomcat is available in two different binary release formats for Linux users:
- Multiplatform binary releases
You can download, install, and run any of the Tomcat binary releases from Apache’s Jakarta web site, regardless of the Linux distribution you run. This allows you to install Tomcat into any directory you choose, and you can install it as any user ID in the system. However, because the installation is not tracked by any package manager, it will be more difficult to upgrade or uninstall later.
- RPMs
If you run RedHat Linux (or another Linux that uses the RedHat package manager) you can download a binary RPM package of Tomcat. This allows for easy uninstalls and upgrades via the RedHat Package Manager, plus it installs a Tomcat init script for restarting on reboots. The downsides to this method of installation are that you cannot choose what directory Tomcat is installed into, and you must install the Tomcat RPM package as the
rootuser.
Installing Tomcat from a Jakarta multiplatform binary release
First, switch to the user that you’d like to run
Tomcat as. This will ensure that all of Tomcat’s
files will start out with the correct Unix file permissions. For
security reasons, you should probably run Tomcat as the
nobody user or create a new
tomcat user with similarly low privileges. We
suggest setting that user’s login shell to
/bin/false and locking the
user’s password so that it can’t be
guessed.
Then, download a release archive from the Apache Jakarta binary release page at http://jakarta.apache.org/builds/jakarta-tomcat-4.0/release/.
If you downloaded the jakarta-tomcat-4.1.24.tar.gz archive, for example, decompress it wherever you want Tomcat’s files to reside (see Example 1-1).
jasonb$ cd $HOME
jasonb$ tar zxvf ~jasonb/jakarta-tomcat-4.1.24.tar.gz
Tomcat should now be ready to run, but it will not restart on reboots. To learn how to make Tomcat run when your server computer boots up, see Section 1.3, later in this chapter.
Installing Tomcat from a Jakarta Linux RPM
To download the Jakarta Tomcat RPMs, visit http://jakarta.apache.org/builds/jakarta-tomcat-4.0/release/. Select the version you want to download, and then click on the rpms directory to download the appropriate RPM package. Then, install the RPM as shown in Example 1-2.
# rpm -ivh tomcat4-4.1.24-full.1jpp.noarch.rpm
Preparing...                ########################################### [100%]
   1:tomcat4                ########################################### [100%]

Don't forget to setup vars in /etc/tomcat4/tomcat4.conf to
adapt the RPM to your configuration.
Also edit/create /etc/java.conf to define your default JDK

For security purposes, tomcat4 service is installed
but not activated by default.
use your service installer for such purposes
ie: ntsysv
Don’t worry about the security notice—it’s standard on all systems. By default, Tomcat won’t run when the computer is rebooted; see Section 1.3, later in this chapter, for information on how to change this.
Warning
The Tomcat 4 RPM creates a user and group (both named
tomcat4) and runs Tomcat with that user and group.
The default shell of the tomcat4 user is
/bin/bash. Don’t try to change
this, or Tomcat will stop running correctly.
To install Tomcat’s sample web applications, download another RPM, as shown in Example 1-3.
# rpm -ivh tomcat4-webapps-4.1.9-full.1jpp.noarch.rpm
Preparing...                ########################################### [100%]
   1:tomcat4-webapps        ########################################### [100%]
Tip
You can choose not to install the webapps RPM, but Tomcat will log errors on startup. Tomcat will operate normally, but be aware that these errors indicate that Tomcat is looking for these sample applications.
Next, edit /etc/tomcat4/tomcat4.conf and add a
line defining where JAVA_HOME is on your server
computer:
# you could also override JAVA_HOME here
# Where your java installation lives
# JAVA_HOME="/usr/java/jdk"
# JAVA_HOME="/opt/IBMJava2-131"

# This is our JAVA_HOME, but yours may be different
                  JAVA_HOME="/usr/local/jdk1.4"
You could also add the JAVA_HOME variable
definition to /etc/java.conf if you do not want
to modify any files that are under RPM’s control. If
you do this, be sure that /etc/java.conf has the
proper owner, group, and permissions so that it is readable by the
tomcat4 startup script.
To determine where the RPM put all of the files for Tomcat, run the following command:
$ rpm -ql tomcat4
Tip
If you are looking for more Java components to install, and you want to install them as RPMs, you can find many of them on the JPackage Project page (http://www.jpackage.org).
Installing Tomcat on Solaris
As of this writing, there are no Solaris SYSV packages of recent Tomcat releases, so you will need to install a binary release. These releases work just as well on Solaris as on other platforms, but they provide no integration with the Solaris native package manager.
Note
Solaris 9 ships with an older version of Tomcat. This checks to see if it’s installed:
jasonb$ pkginfo | grep -i tomcat
If this command outputs one or more packages, then a version of
Tomcat is installed. To get more information about the package, use
pkginfo with the -l switch.
For example, if the preinstalled Tomcat package name is
SUNWtomcat:
jasonb$ pkginfo -l SUNWtomcat
Even if Tomcat is installed, it should not cause problems. To be
safe, we suggest uninstalling an existing Tomcat package only if
you’re prepared to deal with any breakage that
removal may cause. If you’re sure the package is
causing you problems, you can remove it as the
root user:
# pkgrm SUNWtomcat
Switch to the user that you’d like to run Tomcat as. This will take care of your Unix file permissions. Then, download a release archive from the Apache Jakarta binary release page at http://jakarta.apache.org/builds/jakarta-tomcat-4.0/release/. Decompress this wherever you want Tomcat’s files to reside (see Example 1-1 in Section 1.1.1, earlier in this chapter).
Once decompression is done, Tomcat is ready to run. To learn how to make Tomcat run when your server computer boots up, see Section 1.3, later in this chapter.
Installing Tomcat on Windows 2000
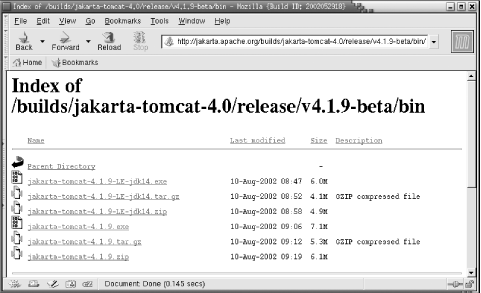
For Windows systems, Tomcat is available as a Windows-style installer. Although you can also install it from a zipped binary release, the Windows installer does a lot of the setup for you and is recommended. Start by downloading the file jakarta-tomcat-4.1.24.exe (or later; unless there is a good reason not to, use the latest available version) from the release directory, as shown in Figure 1-1.
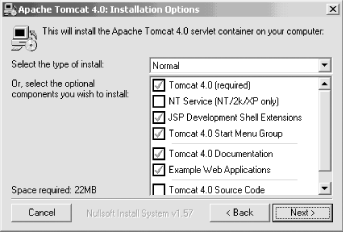
When you download and run this installer program, it will first verify that it can find a JDK and JRE, and then prompt you with a license agreement. This license is the Apache Software License, which allows you to do pretty much anything with the software as long as you give credit where it’s due. Accept the license to get to the Installation Options screen shown in Figure 1-2.
If you want to have Tomcat started automatically and want the ability to control it from the Services Control Panel, check the box to install the NT Service software.
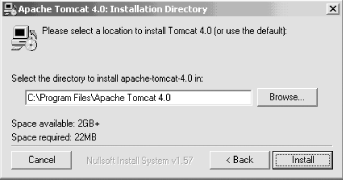
The Tomcat Source Code is optional; if you are into Java development or are just curious, feel free to select it. Then, specify where to install Tomcat. The default is in C:\Program Files\Apache Tomcat 4.0. Change it if you want, as shown in Figure 1-3.
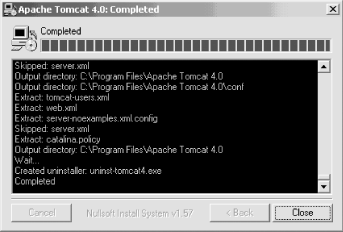
While the installer is running, it quickly prints a list of all the files it installs and provides a gauge indicating its progress. Once the installation completes normally, you should see the message “Completed” at the end of this list, as shown in Figure 1-4.
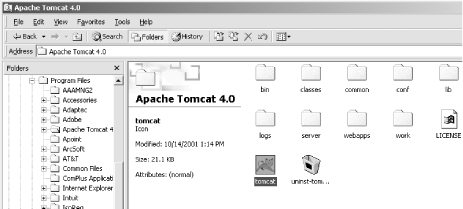
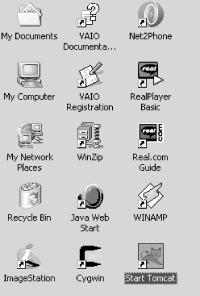
If you explore the resulting folder, you will see the directory structure that was installed, as in Figure 1-5. You will also see a “Start Tomcat” icon on your desktop, as shown in Figure 1-6.
You now need to start the server for initial testing, as described in Section 1.2, later in this chapter.
Installing Tomcat on Mac OS X
Thanks to the wonderful Unix underpinnings of Mac OS X, installing Tomcat on Mac OS X is almost identical to the Linux installation you have already seen. However, before starting your Tomcat installation, you should ensure that you have JDK 1.4 or greater on your system:
[aragorn:~] bmclaugh% java -version
java version "1.4.1_01"
Java(TM) 2 Runtime Environment, Standard Edition (build 1.4.1_01-39)
Java HotSpot(TM) Client VM (build 1.4.1_01-14, mixed mode)
If you do not have at least Version 1.4, you can download it from the Apple Developer Connection (http://connect.apple.com). Register if you have not (it’s free!), and then navigate to the Java downloads section. Having JDK 1.4 saves you a lot of trouble when downloading and running Tomcat on Mac OS X.
Once you have your JDK in place, navigate to the Tomcat downloads section of http://jakarta.apache.org, and select the latest full build in gzipped format. As of this writing, the proper file to download is tomcat-4.1.18.tar.gz. Expand this archive, and place the resulting directory where all administrative users of your system can find it. On my system, I chose /usr/local:
[aragorn:~] root# ls -l
total 24
-rw-r--r--   1 root    wheel      3 Feb 15 05:10 .CFUserTextEncoding
-r--r--r--   1 root    wheel     10 Jul 14  2002 .forward
-rw-------   1 root    wheel   1720 Jan  8 22:38 .nsmbrc
drwx------   4 root    wheel    136 Feb 15 05:09 Library
drwxr-x---  16 nobody  nobody   544 Dec 19 07:51 jakarta-tomcat-4.1.18
Tip
Notice that Tomcat is owned by a low-level, low-permissioned user
(nobody) and has very restrictive permissions for
execution.
Tomcat should now be ready to run, but it will not restart on reboots. To see how to make Tomcat run when your server computer boots up, see Section 1.3, later in this chapter.
Installing Tomcat on OpenBSD
OpenBSD uses packages, which are prebuilt binary files containing all the bits and pieces of a program, along with installation instructions. Reinhard J. Sammer (a Jakarta contributor) has already done the work of fitting Tomcat into the OpenBSD directory tree, allowing you to focus on running Tomcat rather than installing it. Simply type this command if you have already downloaded the package file:
ian$ pkg_add jakarta-tomcat-4.0.1.tgz
If you need to obtain the package as well as install it, use the following command:
ian$ pkg_add $PACKAGE_LOCATION
$PACKAGE_LOCATION should be an FTP site such as
ftp://ftp.openbsd.org/pub/packages/i386/All/jakarta-tomcat-4.0.1.tgz.
This second operation does not save the installer file for later use, which saves disk space. As on Linux, these steps require root privilege, so use the su or sudo command to gain root privilege before attempting these package operations.
The package installs most of its files into /usr/local/jakarta-tomcat-4.1.0, with the expected subdirectories of bin, lib, and conf. However, the files in conf should be treated as read-only. In keeping with OpenBSD’s policy of putting all configuration files into the /etc directory, the package installation copies the configuration files into /etc/tomcat, which should be the only place you edit them. Example 1-4 shows the installation output.
ian$ sudo pkg_add jakarta-tomcat-4.0.1.tgz
+---------------
| The existing jakarta-tomcat-4.0.1 configuration files in
| /etc/tomcat have NOT been changed. You may want to compare
| them to the current samples in
| /usr/local/jakarta-tomcat-4.0.1/conf, and update your
| configuration files as needed. The existing
| jakarta-tomcat-4.0.1 files in /var/tomcat
| have NOT been deleted.
+---------------

For detailed instructions on how to run Tomcat see:
        /usr/local/jakarta-tomcat-4.0.1/doc/uguide/tomcat_ug.html

For more information on application development with Tomcat, see
        /usr/local/jakarta-tomcat-4.0.1/doc/appdev/index.html

Note that Tomcat may be started with the following command:
        /usr/local/jakarta-tomcat-4.0.1/bin/startup.sh

Configuration files are in '/etc/tomcat'.
'$CATALINA_BASE' is '/var/tomcat'.
ian$
While it may seem easier to copy the files directly from the Jakarta web site, this method of installation does customize the package as shown. This has the advantage that when you need to remove Tomcat and reinstall or upgrade to a later version, you can safely remove the package (see Example 1-5) without losing all of your configuration changes.
ian$ sudo pkg_delete jakarta-tomcat-4.0.1

+---------------
| To completely deinstall the jakarta-tomcat-4.0.1 package
| you need to  perform these steps as root:
|
|       rm -rf /etc/tomcat
|       rm -rf /var/tomcat
|
| Do not do this if you plan on re-installing
| jakarta-tomcat-4.0.1 at some future time.
+---------------
ian$
Starting, Stopping, and Restarting Tomcat
Once you have the installation completed, you will probably be anxious to start Tomcat and see if it works. This section details how to start up and shut down Tomcat, including specific information on each supported operating system. It also details common errors that you may encounter, enabling you to quickly identify and resolve any problems you run into.
Starting Up and Shutting Down
There are several scripts in the bin subdirectory that you will use for starting and stopping Tomcat. All the scripts you will need to invoke directly are provided both as shell script files for Unix (.sh) and batch files for Windows (.bat). Table 1-1 lists these scripts and describes each. When referring to these scripts, we have omitted the filename extension because catalina.bat has the same meaning for MS-Windows users as catalina.sh has for Unix users.[2] Therefore, the name in the table appears simply as catalina. You can infer the appropriate file extension for your system.
|
Script |
Purpose |
|
The main Tomcat script, which runs the | |
|
cpappend |
Used internally, and then only on Windows systems, to append items to Tomcat classpath environment variables. |
|
digest |
Makes a |
|
jasper |
The JavaServer Pages compiler script. |
|
jspc |
Calls the JavaServer Pages compiler script with the
|
|
setclasspath |
Used internally to set the Tomcat classpath environment variables. |
|
shutdown |
Aliases to catalina stop, and shuts down Tomcat. |
|
startup |
Aliases to catalina start, and starts up Tomcat. |
|
tool-wrapper |
Used internally by the digest script. |
The main script, catalina, is invoked with one
of several arguments; the most common are
start,
run, and stop. When invoked
with start (as it is when called from
startup), it starts up Tomcat with the standard
output and error streams directed into the file
$TOMCAT_HOME/logs/catalina.out. The
run argument causes
Tomcat to leave the standard output and error streams where they
currently are (such as the console window), which is useful when you
are running it from a terminal and want to see the startup output.
This output should look similar to Example 1-6.
ian:389$ bin/catalina.sh run
Using CATALINA_BASE:
    /usr/home/ian/src/jakarta-tomcat-4.0/build
Using CATALINA_HOME:
    /usr/home/ian/src/jakarta-tomcat-4.0/build
Using CATALINA_TMPDIR:
    /usr/home/ian/src/jakarta-tomcat-4.0/build/temp
Using JAVA_HOME:       /usr/local/java
[INFO] Registry - -Loading registry information
[INFO] Registry - -Creating new Registry instance
[INFO] Registry - -Creating MBeanServer
[INFO] Http11Protocol - -Initializing Coyote
    HTTP/1.1 on port 8080
[INFO] JkMain - -Starting Jk2, base
    dir= /usr/home/ian/src/jakarta-tomcat-4.0/build
    conf=/usr/home/ian/src/jakarta-tomcat-
        4.0/build/conf/jk2.properties
XXX native so /opt/apache2/modules/mod_jk2.so
[INFO] JkMain - -APR not loaded, disabling
    jni components: java.io.IOException:
    no jkjni in java.library.path
[INFO] ChannelSocket - -JK: listening on tcp port 8019
[INFO] ChannelUn - -No file, disabling unix channel
[INFO] JkMain - -Jk running ID=0 ... init time=995 ms
Starting service Tomcat-Standalone
Apache Tomcat/4.1
[INFO] Http11Protocol - -Starting Coyote HTTP/1.1 on port 8080
If you use catalina with the
start option or invoke the
startup script instead of using the
run argument, you see only the first few
Using... lines on your console; the rest of the
output is redirected into the catalina.out log
file. The shutdown script invokes
catalina with the stop
argument, which causes Tomcat to connect to the default port
specified in your Server element (discussed in
Chapter 7) and send it a shutdown message. A
complete list of startup options is listed in Table 1-2.
|
Option |
Purpose |
|
|
Specifies an alternate server.xml configuration file to use. The default is to use the server.xml file that resides in the $CATALINA_BASE/conf directory. See Section 7.1 for more information about server.xml’s contents. |
|
|
Prints out a summary of the command-line options. |
|
|
Disables the use of JNDI within Tomcat. |
|
|
Enables the use of the catalina.policy file. |
|
|
Starts Tomcat in debugging mode. |
|
|
Allows Tomcat to be tested in an embedded mode; usually used by application server developers. |
|
|
Starts Tomcat in a Java Platform Debugger Architecture-compliant debugger. See Sun’s JPDA documentation at http://java.sun.com/products/jpda. |
|
|
Starts up Tomcat without redirecting the standard output and errors. |
|
|
Starts up Tomcat, with standard output and errors going to the Tomcat log files. |
|
|
Environment variables
To
prevent runaway programs from damaging the operating system, Java
runtime environments feature limits such as
"maximum stack size.” These
limits were established when memory was more expensive; for J2SDK
1.3, for example, the default limit is only 32 megabytes. However,
options supplied to the java command let you
control these limits. The exact form depends upon the Java runtime,
but if you are using the standard Sun runtime (JDK 1.3 or 1.4), you
can enter:
java -Xmx=64M MyProg
This will run a class file called MyProg with a
maximum memory size of 64 MB.
These options become important when using Tomcat, as running servlets
can take up a lot of memory in your Java environment. To pass this or
any other option into the java command that is
used to start Tomcat, you can set the option in the environment
variable CATALINA_OPTS before running one of the
Tomcat startup scripts.
Windows users should set this environment variable from the Control Panel, and Unix users should set it directly in a shell prompt or login script:
ian$ export CATALINA_OPTS="-Xmx44M"           Korn and Bourne shell
C:\> set CATALINA_OPTS="-Xmx44M"              MS-DOS
jb $ setenv CATALINA_OPTS "-Xmx44M"           C-shell
You may also wish to set the -server option (in
JDK 1.4) to give Java a hint that you are running a server rather
than a desktop program. Other Tomcat environment variables you can
set are listed in Table 1-3.
|
Option |
Purpose |
Default |
|
|
Sets the base directory where Tomcat will read and write data at runtime. |
|
|
|
This directory is where Tomcat’s startup scripts find the Tomcat distribution on disk so that Tomcat can dynamically load its own code. |
Tomcat installation directory |
|
|
Passes through command-line options to the |
None |
|
|
Sets the directory for Tomcat temporary files. |
CATALINA_HOME/temp |
|
|
Sets the location of the Java environment (typically /usr/java or C:\java\jdk1.3). |
None |
|
|
An alias for |
None |
|
|
Sets the address for the JPDA used with the catalina jpda start command. |
8000 |
|
|
Sets the location of the Java Secure Sockets Extension used with HTTPS. |
None |
Starting and stopping on Linux and Solaris
If you have installed Tomcat on Linux or Solaris via an Apache Jakarta binary release package, change into the directory where you installed Tomcat:
jasonb$ cd jakarta-tomcat-4.1.24
Echo your $JAVA_HOME environment variable, and
make sure it’s set to the absolute path of the
directory for the Java installation you want Tomcat to use. If
it’s not, set it and export it now.
It’s okay if the java interpreter
is not on your $PATH because
Tomcat’s scripts are smart enough to find and use
Java based on your setting of $JAVA_HOME.
Make sure you’re not running a TCP server on port 8080 (the default Tomcat HTTP server socket port) or port 8005 (the default Tomcat shutdown server socket port). Try running telnet localhost 8080 and telnet localhost 8005 to see if any existing server accepts a connection, just to be sure.
Start up Tomcat with its startup.sh script like this:
jasonb$ bin/startup.sh
Using CATALINA_BASE:   /home/jasonb/jakarta-tomcat-4.1.24
Using CATALINA_HOME:   /home/jasonb/jakarta-tomcat-4.1.24
Using CATALINA_TMPDIR: /home/jasonb/jakarta-tomcat-4.1.24/temp
Using JAVA_HOME:       /usr/local/jdk1.3
You should see output similar to this when Tomcat starts up. Once started, it should be able to serve web pages on port 8080 (if the server is localhost, try http://localhost:8080 in your web browser).
Invoke the shutdown.sh script to shut down Tomcat:
jasonb$ bin/shutdown.sh
Using CATALINA_BASE:   /home/jasonb/jakarta-tomcat-4.1.24
Using CATALINA_HOME:   /home/jasonb/jakarta-tomcat-4.1.24
Using CATALINA_TMPDIR: /home/jasonb/jakarta-tomcat-4.1.24/temp
Using JAVA_HOME:       /usr/local/jdk1.3
If you’ve installed Tomcat via the RPM package on Linux, you can test it out like this:
# /etc/rc.d/init.d/tomcat4 start
Starting tomcat4:                                          [  OK  ]
Then check to see if it’s running:
# ps auwwx | grep catalina.startup.Bootstrap
You should see several Java processes scroll by. Another way to check if Tomcat is running is to request a web page from the server over TCP port 8080 with a web browser.
Tip
If Tomcat fails to start up correctly, go back and make sure that the /etc/tomcat4/tomcat4.conf file has all the right settings for your server computer. Also check out Section 1.2.2, later in this chapter.
To stop Tomcat, issue a stop command like this:
# /etc/rc.d/init.d/tomcat4 stop
Starting and stopping on Windows 2000
On Microsoft Windows 2000, Tomcat can be started and stopped either as a Windows service or by running a batch file. If you arrange for automatic startup (detailed later in this chapter), you can manually start Tomcat in the Control Panel. If not, you can start Tomcat from the desktop icon shown in Figure 1-6.
If you have Tomcat running in a console window, you can interrupt it (usually with Ctrl-C), and it will catch the signal and shut down:
Apache Tomcat/4.1
^C
Stopping service Tomcat-Standalone
C:\>
If the graceful shutdown does not work, you need to find the running process and terminate it. The Java Virtual Machine (JVM) running Tomcat will usually be identified as a Java process; be sure you get the correct one if other people or systems might be using Java. Use Ctrl-Alt-Delete to get to the task manager, select the correct Java process, and click on End Task.
Starting and stopping on Mac OS X
Starting and stopping Tomcat on Mac OS X systems is similar to the process used for other Unix-based systems, such as Linux. If you have Tomcat installed in /usr/local/jakarta-tomcat, you would use the following script to start up Tomcat:
[legolas:local/jakarta-tomcat/bin] bmclaugh% sh startup.sh
Using CATALINA_BASE:   /usr/local/jakarta-tomcat
Using CATALINA_HOME:   /usr/local/jakarta-tomcat
Using CATALING_TMPDIR: /usr/local/jakarta-tomcat/temp
Using JAVA_HOME:       /System/Library/Frameworks/JavaVM.framework/Home
A similar script is provided for Tomcat shutdown:
[legolas:local/jakarta-tomcat/bin] bmclaugh% sh shutdown.sh
Using CATALINA_BASE:   /usr/local/jakarta-tomcat
Using CATALINA_HOME:   /usr/local/jakarta-tomcat
Using CATALING_TMPDIR: /usr/local/jakarta-tomcat/temp
Using JAVA_HOME:       /System/Library/Frameworks/JavaVM.framework/Home
It’s somewhat of a hassle to navigate to these directories each time you want to operate upon Tomcat, so you might want to add aliases to these scripts in your ~/.login file, as shown here:
# Java environment
setenv JAVA_HOME /System/Library/Frameworks/JavaVM.framework/Home

# Command aliases
alias start-tomcat /usr/local/jakarta-tomcat/bin/startup.sh
alias stop-tomcat /usr/local/jakarta-tomcat/bin/shutdown.sh
Starting and stopping on OpenBSD
To start
up Tomcat on OpenBSD, first make sure that your
JAVA_HOME and CATALINA_HOME
environment variables are set:
ian$ set JAVA_HOME=/usr/local/java
ian$ set CATALINA_HOME=/usr/local/jakarta-tomcat-4.0.1
ian$ export JAVA_HOME CATALINA_HOME
Then, start Tomcat like this:
ian$ su www ${CATALINA_HOME}/bin/startup.sh
Using CATALINA_HOME:   /usr/local/jakarta-tomcat-4.0.1
Using CATALINA_TMPDIR: /usr/local/jakarta-tomcat4/build/temp
Using JAVA_HOME:       /usr/local/java
[INFO] Registry - -Loading registry information
[INFO] Registry - -Creating new Registry instance
[INFO] Registry - -Creating MBeanServer
[INFO] Http11Protocol - -Initializing Coyote HTTP/1.1
    on port 8080
Starting service Tomcat-Standalone
Apache Tomcat/4.0
[INFO] Http11Protocol - -Starting Coyote HTTP/1.1 on port 8080
Stopping Tomcat is just as easy:
ian$ su www ${CATALINA_HOME}/bin/shutdown.shCommon Errors
There are several common problems that can result when you try to start up Tomcat. While there are many more possible errors, these are the ones we most often encounter.
- Another server is running on port 80 or 8080
Ensure that Tomcat is not already started. If it isn’t, check to see if other programs, such as another Java application server or Apache web server, are running on these ports.
- Another instance of Tomcat is running
Remember, not only must the HTTP port of different Tomcat instances be different, but every port number in the
ServerandConnectorelements in the server.xml files must also be different. For more information on these elements, consult Section 7.1.- Tomcat is missing a JAR file that it needs to run
If you built Tomcat from source (detailed in Chapter 9), you may need to modify the build.properties file that Tomcat uses to locate its Java resources.
Restarting Tomcat
There is no restart script included with the Tomcat 4 distribution. This is because it is tough to write a script that can make sure Tomcat shuts down properly before being started up again. The reasons outlined below for Tomcat shutdowns being unreliable are almost exclusively edge conditions, meaning they don’t usually happen but can occur in unusual situations. Here are some reasons why shutdowns may be unreliable:
The Java Servlet Specification does not mandate any time limit for how long a Java servlet can take to perform its work. Writing a servlet that takes forever to perform its work does not break compliance with the Java Servlet Specification, but it does prevent Tomcat from shutting down.
The Java Servlet Specification also dictates that, on shutdowns, servlet containers must wait for each servlet to finish serving all requests that are in progress or wait a container-specific timeout duration before taking servlets out of service. For Tomcat 4, that timeout duration is a maximum of a half-second per servlet. When a servlet misbehaves and takes too long to finish serving requests, it’s up to Tomcat to figure out that the servlet has taken too long and to forcibly take it out of service so that Tomcat can shut down. This processing takes time, though, and slows Tomcat’s own shutdown processing.
Multithreading in Java virtual machines is specified in such a way that Java code will not always be able to tell exactly how much real time is going by (J2SE is not a real-time programming environment). Also, due to how Java threads are scheduled on the CPU, threads can become blocked and stay blocked. Because of these limitations, the Java code that is called on invocations of shutdown.sh will not always know how long to wait for Tomcat to shut down, nor can Tomcat always know it’s taking too long to shut down. That means that shutdowns are not completely reliable when written in pure Java. In order to rely on an external program that shuts down Tomcat, that external program would need to be written in some other programming language.
Since Tomcat is an embeddable servlet container, it never calls
System.exit(0)when shutting down the server because it does not know what else may need to continue running in the same Java virtual machine. Instead, Tomcat shuts down all of its threads so that the VM can exit gracefully if nothing else needs to run. Because of that, a servlet could spawn a thread that would keep the VM from exiting, even when all of Tomcat’s threads are shut down.The Java Servlet Specification allows servlets to create additional Java threads that perform work as long as any security manager allows it. Once a servlet spawns another thread, that thread can raise its own priority higher than Tomcat’s threads’ priorities (if the security manager allows), which could keep Tomcat from shutting down or from running at all. Usually if this happens, it’s not malicious code, but buggy code. Try not to do this!
To fix some of these problems, you may want to configure and use a security manager. See Section 6.4 for more information on how to place limits on servlets to guard against some of these problems.
Restarting Tomcat on Unix-based systems
The following steps outline how to reliably restart Tomcat on Unix-based platforms.
Issue a shutdown via the shutdown.sh script:
jasonb$ bin/shutdown.sh
Decide how long you want to wait for Tomcat to shut down gracefully, and wait that period of time. Reasonable maximum shutdown durations depend on your web application, your server computer’s hardware, and how busy your server computer is, but in practice Tomcat often takes several seconds to completely shut down.
Use the ps command to look for any remaining Tomcat processes that are on your Tomcat’s JVM:
jasonb$ ps auwwx | grep catalina.startup.Bootstrap            On Linux or *BSD

jasonb$ /usr/ucb/ps auwwx | grep catalina.startup.Bootstrap   On Solaris
If no Tomcat processes are running, skip to step 6. Otherwise, since the Tomcat JVM is not shutting down in the time you’ve allowed, you may want to force it to exit. Send a
SIGTERMsignal to the processes you find, telling the VM to perform a shutdown (ensuring you have the correct user permissions):jasonb$ kill -SIGTERM <process-ID-list>
Do another ps like you did in step 3. If the Tomcat JVM processes remain, repeat step 4 until they’re gone. If they persist, kill them like this instead:
jasonb$ kill -SIGKILL <process-ID-list>
Once you’re sure that Tomcat’s JVM is no longer running, start a new Tomcat process:
$ bin/startup.sh
Usually, the shutdown process goes smoothly and Tomcat JVMs shut quickly. But for situations when they don’t, this procedure should always suffice.
Restarting the Tomcat Windows Service
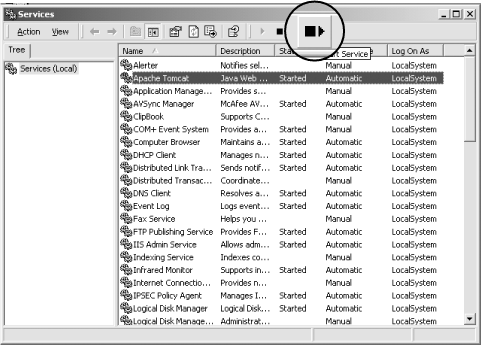
If you have Tomcat running as a Windows Service, you can restart it from the Control Panel. Either right-click on the service and select Restart from the pop-up menu or, if it exists on your version of Windows, use the Restart button near the upper-right corner of the dialog (see Figure 1-7).
Automatic Startup
Once you have Tomcat installed and running, you can set it to start automatically when your system reboots. This will ensure that every time your system comes up, Tomcat will be running and handling requests. Unix users will make changes to their init scripts, and Windows users will need to set Tomcat up as a service. Both approaches are outlined in this section.
Automatic Startup on Linux
If
you’ve installed Tomcat via the RPM, getting it to
run on a reboot is simply a matter of telling your system to run the
tomcat4 service when it enters the multiuser run
level.
Tip
If you know how to use chkconfig, as the
root user you can simply chkconfig
tomcat4 for the run levels of your choice.
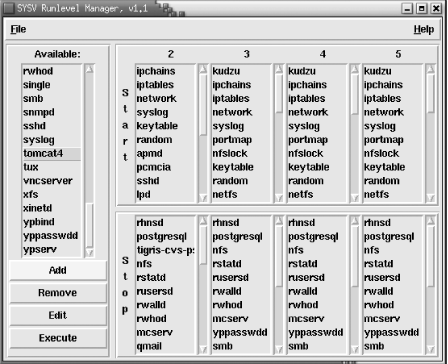
You can use either tksysv or ntsysv to set Tomcat up to start on reboot. tksysv offers a graphical user interface for turning services on and off, and ntsysv offers a text user interface to do the same. Try running tksysv as detailed in the following steps:
Enter tksysv at your command prompt. See Figure 1-8 for a screenshot of tksysv.
# tksysv &
Choose “tomcat4” from the list of available services on the left.
Click the Add button.
Check the “Start tomcat4” checkbox at the top.
Check the “run level 3” checkbox (or whichever run level you wish it to run in; see /etc/inittab for more information about your server computer’s run levels).
Click the Done button.
A new dialog window will pop up; just click the Add button.
Close the tksysv window.
Reboot and see if Tomcat starts up when the system comes back up.
If tksysv isn’t available but ntsysv is, do the following:
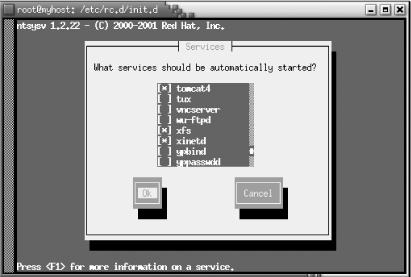
Run ntsysv. See Figure 1-9 for a screenshot of ntsysv.
# ntsysv
Scroll down to the
tomcat4service.Press the spacebar to check the checkbox in front of the
tomcat4listing (an asterisk will appear between the brackets to signify that it is selected).Hit the Tab key, and then the Enter key to accept your selection.
Reboot and see if Tomcat starts up when the system comes back up.
If your machine has neither tksysv nor
ntsysv, use the chkconfig
command to make the tomcat4 service start in the
run level of your choice. Here’s an example of how
to make it start in run levels 3, 4, and 5:
# chkconfig --level 345 tomcat4 on
Query your configuration to make sure that startup is actually set:
# chkconfig --list tomcat4
tomcat4    0:off   1:off   2:off   3:on    4:on    5:on    6:off
Now reboot and see if Tomcat starts up when the system comes back up.
If you didn’t use the RPM installer, you can still set Tomcat up to start on reboots. Tomcat does not come with a Linux init script, but it is simple to create one. Example 1-7 is a Tomcat init script for Linux.
#!/bin/sh
# Tomcat init script for Linux.
#
# chkconfig: 345 63 37
# description: Tomcat Automatic Startup/Shutdown on Linux

JAVA_HOME=/usr/java/j2sdk1.4.1
CATALINA_HOME=/usr/local/jakarta-tomcat-4.1.24
export JAVA_HOME CATALINA_HOME

exec $CATALINA_HOME/bin/catalina.sh $*
Save this script in a file named tomcat4, change
the file ownership and group to root, and then
chmod it to 755:
# chown root.root tomcat4
# chmod 755 tomcat4
Copy the script to the /etc/rc.d/init.d
directory after modifying the JAVA_HOME and
CATALINA_HOME environment variables to fit your
system. Then, set the new tomcat4 service to start
and stop automatically by using tksysv,
ntsysv, or chkconfig as
shown earlier in this section.
Automatic Startup on Solaris
Tomcat does not come with a Solaris init script, but Example 1-8 provides a script that you can use.
#!/bin/sh
# Tomcat init script for Solaris.

JAVA_HOME=/usr/java
CATALINA_HOME=/usr/local/jakarta-tomcat-4.1.24
export JAVA_HOME CATALINA_HOME

exec $CATALINA_HOME/bin/catalina.sh $*
Save the script in a file named tomcat4 and update the file’s permissions:
# chown root tomcat4
# chgrp root tomcat4
# chmod 755 tomcat4
Update the JAVA_HOME and
CATALINA_HOME variables, and copy the file to the
/etc/init.d directory. Then, set the new
tomcat4 service to start and stop automatically by
symbolically linking it into the /etc/rc3.d
directory (as the root user):
# ln -s /etc/init.d/tomcat4 /etc/rc3.d/S63tomcat4
# ln -s /etc/init.d/tomcat4 /etc/rc3.d/K37tomcat4
The numbers S63 and K37 may be
varied according to the other startup scripts you have; the
S number controls the startup sequence, and the
K number controls the shutdown (kill) sequence.
The system startup program init invokes all
files matching /etc/rc3.d/S* with the parameter
start as part of normal system startup, and
start is just the right parameter for
catalina.sh. The init
program also invokes each script file named
rc3.d/K* with the parameter
stop when the system is being shut down.
Automatic Startup on Windows
Under Windows, Tomcat can be run as a Windows Service. Although you can use this to start and stop the server, the most common reason for creating a Tomcat service is to ensure that it is started each time your machine boots up.
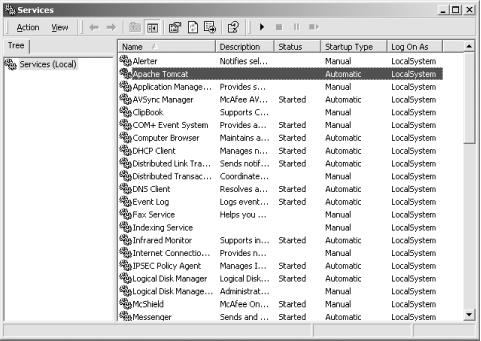
Your first task is to find the Services control panel. On a standard Windows 2000 install, this requires accessing several menus: Start Menu → Programs → Administrative Tools → Services. Alternately, you can go Start Menu → Settings → Control Panel, double-click Administrative Tools, and then double-click Services. Once you have the Services control panel, locate the entry for Apache Tomcat 4 (the entries are normally in alphabetical order) and double-click it, as shown in Figure 1-10.
In the Apache Tomcat Properties dialog, ensure that the startup type is set to Automatic rather than Manual. This will cause Tomcat to start up whenever your machine reboots.
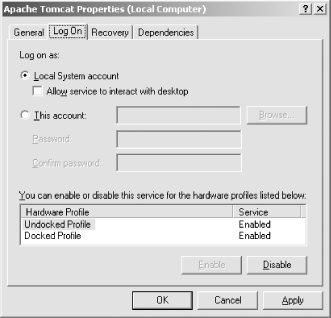
Finally, if you want Tomcat to run with different permissions than Administrator, you can specify that in the Log On tab in the same dialog. It is generally considered a good idea to run large and complex software packages under a user with reduced privileges, so that in the event of security-related bugs in the server, the damage that an attacker can do to your system is minimized. Refer to Figure 1-11; see also Chapter 6.
Automatic Startup on Mac OS X
There are three steps involved in starting up items automatically on Mac OS X:
Create a folder in /Library/StartupItems specific to Tomcat.
Create a shell script that can start, stop, and restart Tomcat within this directory.
Create a Mac OS X property list file for Tomcat.
First, navigate to the /Library/StartupItems directory, and create a new directory there for Tomcat files and startup instructions:
[aragorn:~] bmclaugh% su -
Password:
[aragorn:~] root# cd /Library/StartupItems/
[aragorn:/Library/StartupItems] root# mkdir JakartaTomcat
[aragorn:/Library/StartupItems] root# ls -l
total 0
drwxr-xr-x  2 root      staff   68 Apr 17 12:45 JakartaTomcat
drwxrwxrwx  5 bmclaugh  staff  170 Feb 18 20:01 PACESupport
Now you need to create a script that Mac OS X can use to start, stop, and restart Tomcat. Example 1-9 shows a simple example, where Tomcat is installed in /usr/local/jakarta-tomcat.
#!/bin/sh

# Source common setup options
. /etc/rc.common

StartService() {
  # Don't start unless Tomcat enabled in /etc/hostconfig
  if [ "${TOMCAT:=-NO-}" = "-YES-" ]; then
    ConsoleMessage "Starting Jakarta Tomcat"
    sh /usr/local/jakarta-tomcat/bin/startup.sh &
  fi
}

StopService() {
  ConsoleMessage "Stopping Tomcat"
  sh /usr/local/jakarta-tomcat/bin/shutdown.sh
}

RestartService() {
  if [ "${TOMCAT:=-NO-}" = "-YES-" ]; then
    ConsoleMessage "Restarting Jakarta Tomcat"
    StopService
    StartService
else
    StopService
  fi
}

RunService "$1"
The basic style of this script should look familiar to Unix and Linux
veterans; for particulars, check out Mac OS X for Unix
Geeks, by Brian Jepson and Ernest Rothman
(O’Reilly), which covers this process in greater
detail. Save this script as JakartaTomcat in
your new JakartaTomcat directory. You then need
to make it root-executable:
[aragorn:/Library/StartupItems/JakartaTomcat] root# chmod 700 JakartaTomcat
[aragorn:/Library/StartupItems/JakartaTomcat] root# ls -l
total 8
-rwx------  1 root  staff  567 Apr 17 12:51 JakartaTomcat
You’ll notice that the script will not start up Tomcat unless a specific directive is set; you handle this directive through Mac OS X’s /etc/hostconfig file. Add the following line at the end of that file to enable Tomcat startup:
TOMCAT=-YES-
Using the hostconfig file in this manner makes toggling Tomcat startup a breeze, especially if you need to pass on administrative duties for your Mac OS X box to someone new.
Before testing out your script, though, you must tell the Mac OS X
startup environment where to find a Java interpreter. This is done
through the JAVA_HOME environment
variable—Tomcat will fail to start if this variable is not set.
Notice that the startup script sources the
rc.common file, which is the proper location for
system-wide settings such as JAVA_HOME. Open
/etc/rc.common, and add the following line:
JAVA_HOME=/System/Library/Frameworks/JavaVM.framework/Home
export JAVA_HOME
Now you can test your startup script:
[aragorn:/Library/StartupItems/JakartaTomcat] root# /Library/StartupItems/
JakartaTomcat/JakartaTomcat start
Starting Jakarta Tomcat
[aragorn:/Library/StartupItems/JakartaTomcat] root# Using CATALINA_BASE:
/usr/local/jakarta-tomcat
Using CATALINA_HOME:   /usr/local/jakarta-tomcat
Using CATALINA_TMPDIR: /usr/local/jakarta-tomcat/temp
Using JAVA_HOME:       /System/Library/Frameworks/JavaVM.framework/Home

[aragorn:/Library/StartupItems/JakartaTomcat] root#
Assuming things behave properly, all that is left is the creation of a property list for the Mac OS X system. Example 1-10 shows a sample property list.
<?xml version="1.0" encoding="UTF-8"?>
<!DOCTYPE plist
 SYSTEM "file://localhost/System/Library/DTDs/PropertyList.dtd">

<plist version="0.9">
  <dict>
    <key>Description</key>
    <string>Jakarta Tomcat</string>
    <key>Provides</key>
    <array>
      <string>Jakarta Tomcat</string>
    </array>
    <key>Requires</key>
    <array>
      <string>Network</string>
    </array>
    <key>OrderPreference</key>
    <string>Late</string>
  </dict>
</plist>
Save this file as StartupParameters.plist in your /Library/StartupItems/JakartaTomcat directory. Restart your system, ensure Tomcat comes up, and you’re ready to go.
Automatic Startup on OpenBSD
In the interests of simplicity, we simply added the few lines shown in Example 1-11 to the end of OpenBSD’s system startup script. The normal place for user-added startups is the file /etc/rc.local.
if [ -x /usr/local/sbin/tomcat ]; then
    echo -n ' tomcat'
    (export CALINA_HOME=/usr/local/jakarta-tomcat-4.0.1/
     export JAVA_HOME=/usr/local/java
     exec /usr/bin/su www ${CATALINA_HOME}/bin/startup.sh
    )
fi
You should run the server scripts under an account with fewer
privileges than the root account.
OpenBSD’s emphasis on security led the OpenBSD team
to create a www account standard on all OpenBSD
systems, ready for just such a use. It is normally used for the
Apache web server (httpd), but you can just as
easily use it for Tomcat.
Testing Your Tomcat Installation
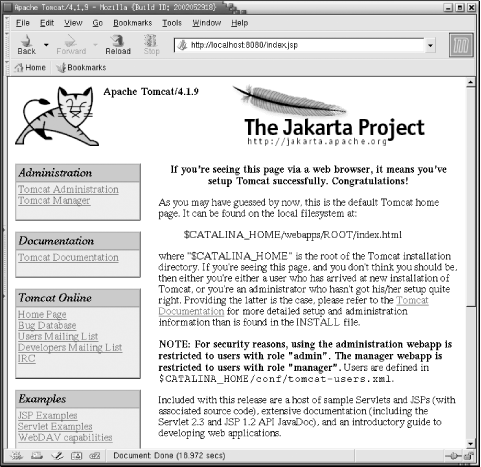
Once you have Tomcat installed and started, you should confirm that it has successfully started up. Open the URL http://localhost:8080 in a browser and verify that you see output like that shown in Figure 1-12.
Now that Tomcat is up and running, you can begin to customize its behavior. This is discussed in Chapter 2.
[1] CGI, the Common Gateway Interface, was the web’s first standard for allowing web servers access to backend programs for filling in forms. CGI is language-neutral; CGI programs were written as batch files or shell scripts, awk, Perl or Python scripts, and even C programs. The drawback in each case is that a relatively expensive operating system-level process was created each time a user clicked on a form, resulting in poor performance.
[2] Unix users may object to the .sh extension for all of the Unix scripts. However, renaming these to your preferred conventions is only temporary, as the .sh versions will reappear on your next upgrade. You are better off getting used to typing catalina.sh.
Get Tomcat: The Definitive Guide now with the O’Reilly learning platform.
O’Reilly members experience books, live events, courses curated by job role, and more from O’Reilly and nearly 200 top publishers.
