Chapter 4. Mobile Ubuntu
Ubuntu is a mobile-friendly Linux distribution. It will detect and configure almost any wireless hardware you can throw at it. In some cases, you will run into some hardware that, because its maker won’t provide open source developers the information they need, can’t run on Ubuntu. However, you can usually fiddle with the proprietary Windows drivers to get it working. And once you do get your wireless adapter up and running, you’ll need to configure it to work with the various Wi-Fi networks you use. The hacks in this chapter cover all these topics and more.
For anyone who spends a lot of time away from a power source, power management is a major concern. This chapter also shows you how to put your computer into sleep and deep sleep, and provides some tricks on prolonging your battery life while you are away from a power source. You’ll also learn how to work with notebook-specific peripherals, such as PC Cards and hotswappable optical drives.
Put Your Laptop to Sleep
Close the lid and save some power.
Part of proper power management is the ability to put your laptop to sleep. ACPI sleep is defined as a state where the system is still technically powered on, but the screen and hard disk are powered down and the computer is using just enough power to keep the contents of RAM alive. The Ubuntu development team has devoted an immense amount of effort toward getting ACPI power management working properly. As it stands, Ubuntu is power-management-friendly right out of the box, thanks to the recent addition of the gnome-power-manager package. It turns out there’s not much required to get most modern laptops to sleep and wake up correctly.
Getting Some Sleep
The Dapper Drake release of Ubuntu Linux includes the new gnome-power-manager package, which enables ACPI sleep much like the system-tray power applet in Windows. Finally, sleep “just works” in Linux. The gnome-power-manager applet is configured to start automatically, and it lives in GNOME’s panel notification area. If you right-click on the little battery icon, you’ll see a menu pop up, as shown in Figure 4-1.

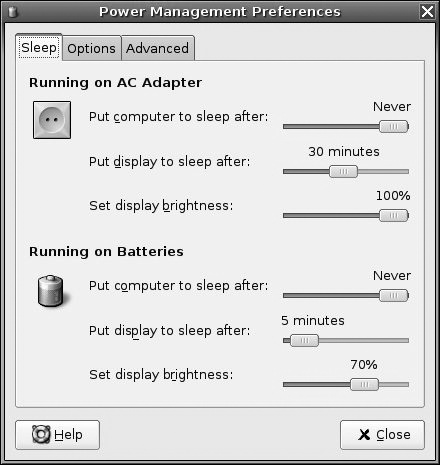
This deceptively simple little application gives you a lot of control over your laptop’s sleep behavior. If you click on Preferences, you’ll see the Power Management Preferences dialog box shown in Figure 4-2. In this dialog’s Sleep tab, you can configure different behavior depending on whether you’re plugged into AC power or running on battery. One of the most interesting features is your ability to control the backlight brightness of your laptop’s screen depending on the machine’s power state. It happens to work out that a large consumer of power in a laptop is the screen’s backlight, so being able to automatically turn down that lamp while on battery will help squeeze more runtime out of the system while it’s unplugged.
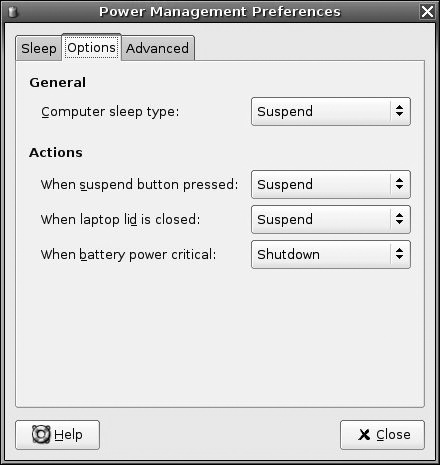
The Options tab (see Figure 4-3) is where you can set the default type of sleep you wish for the system to use, as well as what actions will engage the sleep mechanism. For this hack, the default sleep type is set to Suspend, which refers to ACPI sleep. (Hibernate [Hack #39]">Figure 4-3) is where you can set the default type of sleep you wish for the system to use, as well as what actions will engage the sleep mechanism. For this hack, the default sleep type is set to Suspend, which refers to ACPI sleep. (Hibernate [Hack #39] is a totally different type of sleep mechanism.) If you wish, under the Actions section of the dialog box, you can set the system to automatically sleep when the laptop lid is closed. This is a very handy feature if you’re on the go: simply shut the lid and run off to your next appointment; then open the lid later, and the machine will wake up without any intervention.
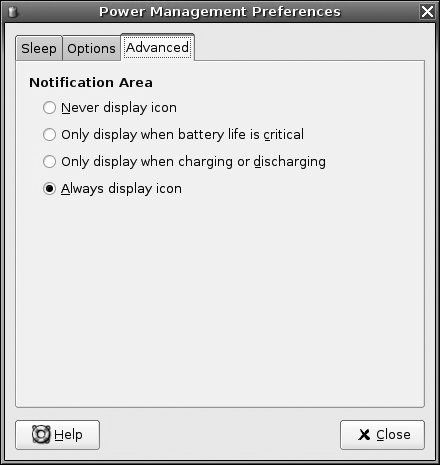
The Advanced tab of the dialog (Figure 4-4) controls the notification icon’s behavior. If you want the icon to appear only when you’re charging or discharging, or you want to turn off the icon altogether, here’s where you change those settings.
Tip
If you’re not seeing the notification icon, perhaps it’s because you’re plugged into AC power. If you’d like to see the applet all the time, unplug your laptop for a moment and the icon should appear. You can then use the Advanced tab to change the notification icon settings.
When you have all your settings configured to your liking, simply click the Close button, and the dialog box will close, saving your configuration changes.
Testing ACPI Sleep
Your system is now ready for you to test sleep mode. Ensure that your system is running on battery; then simply shut the lid of the laptop and see what happens. You should hear the hard disk power down, and one of the power LEDs should indicate a power-state change by blinking or some other method. Hopefully, your machine went to sleep properly. Now you need to see if it wakes up correctly. Simply open the lid, and the computer should start waking up. When it’s ready for use, you’ll be prompted for your system password by gnome-screensaver. Enter your password, and your system should be in the exact same state as it was when you powered it off.
Thanks to the hard work of the Ubuntu developers, something that used to be extremely difficult to accomplish in Linux has been made very easy.
Hibernate Your Laptop
Sleeping is a good way to pause, but it still uses power. Hibernate mode lets you save the contents of memory to disk so you can resume later on.
In “Put Your Laptop to Sleep” [Hack #38], you learned how Ubuntu supports ACPI sleep. However, because ACPI sleep does require a trickle of power to keep the CPU and RAM alive, it may not be desirable in all situations. Hibernate has been designed as the complement to ACPI sleep. It takes the contents of RAM and saves them to the system’s swap partition. As a result, it requires absolutely zero power to maintain that hibernated state. There is a downside to hibernating a machine, however. Due to the fact that the system saves the contents of RAM before powering off, and then loads the contents of RAM after the kernel loads on reboot, it does take a fair amount of time to enter and exit the hibernated state. However, hibernating is still faster than powering off and restarting your machine, and there’s the added benefit of saving application state.
Tip
Since hibernation saves the exact contents of RAM to your swap partition, the size of your swap partition must be larger than the amount of RAM you have in the machine. Ubuntu configures this automatically if you have done a default installation, but if you override the default partitioner during installation, you need to keep this point in mind.
Configuring Hibernation
Since hibernation and sleep are similar and use the underlying Linux ACPI subsystem, they both use gnome-power-manager to configure and control their settings. You can adjust the default type of sleep to be hibernation from within the preferences of gnome-power-manager, but keeping the default set to Suspend makes sense due to the time involved in entering and exiting a hibernated state. If you do decide to adjust this setting, you can right-click on the gnome-power-manager icon, select Preferences, and click on the Options tab (see Figure 4-3 in “Put Your Laptop to Sleep” [Hack #38]">Figure 4-3 in “Put Your Laptop to Sleep” [Hack #38]).
Using Hibernation
Now that you have your preferences set how you like them, it’s time to test hibernation. Assuming you’re using the stock Ubuntu preferences for gnome-power-manager, you’ll need to engage hibernation by right-clicking on the gnome-power-manager applet and selecting Hibernate. Once you do, the system will immediately dim the screen, and you should hear a good deal of hard-disk activity. Once the disk stops churning, the system will power off. At this point, the system is in hibernate mode and can be left in this state indefinitely without using any battery power. To exit the hibernated state, simply power on the system normally. The bootloader will come up, and the kernel will boot normally, until it detects a RAM image on the swap partition. At that point, the system will load up the RAM image and should return to where you left it. Typical times to enter hibernation run between 30 seconds and 1 minute, and times to exit hibernation (including the BIOS test) run about the same.
Between sleep and hibernation, you have all the great power management capabilities at your disposal.
Warning
If your system is configured to boot multiple operating systems, you need to be careful here. In theory, you should be able to hibernate your Ubuntu system and then boot into a different operating system. But this is fundamentally risky: if you change anything on the Ubuntu partition, you’ll be in heaps of trouble. And if you’re sharing a swap partition between Ubuntu and another Linux distribution, you’ll be in a world of trouble if that other Linux distribution boots up, since it will erase your hibernated state (or may itself try to resume from that hibernated state). Play it safe: if you are hibernated, don’t boot into anything except the system you hibernated from.
Prolong Your Battery Life
Throttle your CPU, dim your display, and slow your hard drive to conserve precious battery power.
GNOME has a built-in CPU-frequency-monitor applet that will show you the current speed of your processor. This is great for laptops that have CPUs that can support dynamic frequency scaling. Additionally, the same applet will also let you alter the processor-speed governors and/or lock in the speed at a fixed frequency. This will let you override the built-in processor-speed governors for maximum performance or maximum battery life, depending on your needs at the time. This isn’t overclocking or anything that’s possibly damaging to your CPU; rather, this will let you use the built-in SpeedStep or other CPU-throttling techniques to their maximum.
Tip
This hack does not work for Transmeta-equipped CPUs with LongRun technology. However, Ubuntu does have longrun and other tools available via apt-get for these processors.
To be able to switch CPU speeds, you must set the cpufreq-selector program to be suid root:
bill@defiant:~$ sudo chmod +s /usr/bin/cpufreq-selectorWarning
This may be a slight security issue. If there is a vulnerability in cpufreq-selector, anyone who exploits it has the potential to get root access on the machine. See “Manage Security Updates” [Hack #68] for information on keeping up-to-date with the latest security fixes.
Once you’ve done this, enable the CPU Frequency Monitor if you don’t have it running already. Right-click on your top GNOME panel and select “Add to Panel.” Then select the CPU Frequency Monitor applet from the list and click on Add. The applet will appear in your panel. At this point, you can left-click on the applet and adjust the current CPU speed governor. If you right-click on the applet and select Preferences, you can change the menu that’s displayed from Governors to “Frequencies and Governors.” After setting this, you’ll be able to tailor your CPU speed for any situation you may encounter (see Figure 4-5).
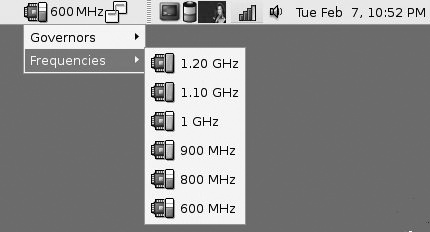
Your choice of Governor puts some constraints on your CPU speed choices. If you want to be able to specify the CPU speed yourself, choose the userspace governor, and then select the desired speed from the Frequencies menu. The ondemand and conservative governors adjust the speed based on demand, but conservative won’t raise the CPU speed as quickly as ondemand. The performance and powersave governors will keep the CPU speed at either the maximum or minimum.
Get Proprietary Wireless Cards Working
If your computer has a Wi-Fi card that’s not Linux-friendly, don’t fret. Ndiswrapper and ndisgtk will let you use that card under Ubuntu by encapsulating the native Windows driver.
In “Roam Wirelessly” [Hack #42], you’ll see that Ubuntu ships with built-in drivers for a good deal of the wireless network cards on the market today, such as the Intel “ipw” line of miniPCI adapters and the Prism 2/3-based PCMCIA network adapters. If you happen to use a computer that’s equipped with such hardware, Ubuntu’s wireless networking will likely “just work” right out of the box. However, systems equipped with Broadcom-based Wi-Fi adapters and the like traditionally don’t work with Ubuntu or other Linux distributions. The primary cause for this is usually that the manufacturer doesn’t release specifications for their hardware, which keeps open source developers from writing drivers for it.
Recently, however, there’s been a development that enables almost any Wi-Fi adapter to work in Linux. It’s known as ndiswrapper, and it works by “wrapping” the manufacturer’s own drivers with a Linux driver layer that the OS can utilize. It’s not ideal, but for obscure and difficult wireless hardware, ndiswrapper is often the way to go.
Tip
If you’re using Linux on a platform other than x86 (such as on a Mac), then ndiswrapper won’t work for you because it uses drivers that are compiled for x86 CPUs. However, there is an open source driver available for some Broadcom chipsets, including the one used in Apple’s AirPort Extreme (802.11g). You’ll still need native drivers for your chipset, though, but only to extract the firmware needed to operate the card correctly. See http://bcm43xx.berlios.de/ for more information.
Installing ndiswrapper and ndisgtk
Start by installing the ndisgtk package, which is a GUI installation program for ndiswrapper. You can open a terminal window and install it from the command line or use your favorite package-management tool. Please ensure you have the universe repository enabled [Hack #60]. (Aptitude will automatically get ndiswrapper-utils, since it’s a dependency for ndisgtk.) Also, make sure you have the Windows drivers for your particular wireless adapter ready, since ndisgtk will prompt you for them later on. If you find that the Windows drivers are trapped in a .cab file, try installing cabextract and unshield and using those to get at the precious drivers trapped within (both of these are available in the universe repository):
conner@firetruck:$ sudo aptitude install ndisgtkWrapping the Windows Drivers
Once that is done, insert or enable your wireless adapter and run ndisgtk from a terminal:
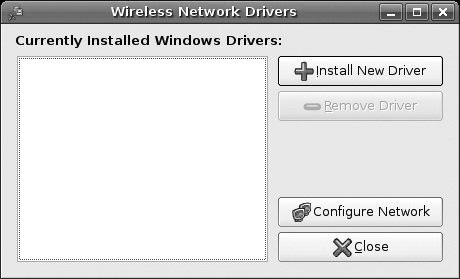
conner@firetruck:$ sudo ndisgtkndisgtk will present you with a window (see Figure 4-6), allowing you to install a new driver.
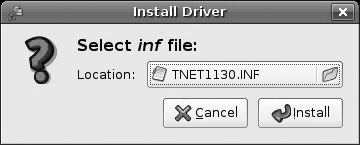
Click on “Install new driver,” and ndisgtk will ask you for the location of your Windows drivers, as shown in Figure 4-7. Choose your Windows drivers in the Location field and click Install.
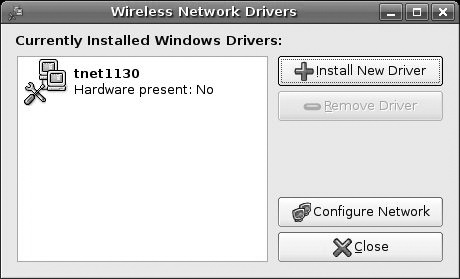
Once ndisgtk is finished copying your drivers and setting up the files, you will see the first window again, but ndisgtk will have populated it with your driver, as shown in Figure 4-8.
Configuring the Adapter
At this point, the wireless adapter is just another piece of Linux-enabled hardware. You can use the standard Ubuntu tools, such as the network wizard in the System menu or NetworkManager [Hack #42], to manage the connection. As a sanity check, you can run dmesg and see if ndiswrapper picked up your adapter:
conner@firetruck:$ dmesg
[4295357.170000] pccard: CardBus card inserted into slot 0
[4295357.181000] ndiswrapper: driver tnet1130 (Texas Instruments,06/17/2004,6.0.5.30) loaded
[4295357.182000] PCI: Enabling device 0000:02:00.0 (0000 -> 0002)
[4295357.182000] ACPI: PCI Interrupt 0000:02:00.0[A] -> Link [LNKD] -> GSI 11 (level, low) -> IRQ 11
[4295357.183000] PCI: Setting latency timer of device 0000:02:00.0 to 64
[4295357.876000] ndiswrapper (IoCreateUnprotectedSymbolicLink:744): --UNIMPLEMENTED--
[4295357.876000] ndiswrapper: using irq 11
[4295358.916000] wlan0: vendor: 'TNET1130'
[4295358.916000] wlan0: ndiswrapper ethernet device 00:12:0e:0d:3c:38 using driver tnet1130, 104C:9066:13D1:AB80.5.conf
[4295358.916000] wlan0: encryption modes supported: WEP; TKIP with WPA
Also, the standard iwconfig command-line tool can be used to configure your adapter, if you’re comfortable with that:
conner@firetruck:~$ iwconfig wlan0
wlan0     IEEE 802.11g  ESSID:"NullDevice.Net"
          Mode:Managed  Frequency:2.462 GHz Access Point: 00:0C:41:6E:98:8E
          Bit Rate:54 Mb/s   Tx-Power:10 dBm  Sensitivity=0/3
          RTS thr:4096 B   Fragment thr:4096 B
          Power Management:off
          Link Quality:100/100  Signal level:-42 dBm  Noise level:-256 dBm
          Rx invalid nwid:0  Rx invalid crypt:0  Rx invalid frag:0
          Tx excessive retries:0  Invalid misc:0   Missed beacon:0
Tip
There is one flaw with ndiswrapper. Due to the way it operates, signal strength meters (such as those provided by NetworkManager [Hack #42] and the command-line iwconfig tool) do not work properly. Those tools will always report 100-percent signal strength.
Don’t let the fear of incompatible wireless network cards keep you from using Ubuntu on your computer. Now you can free yourself and your operating system by using ndiswrapper on Ubuntu!
Roam Wirelessly
Moving from one wireless network to another has traditionally been a pain under Linux. Here’s how you can simplify this aspect of mobile computing using your wireless adapter and NetworkManager.
One of the coolest things about having a laptop that’s Wi-Fi-enabled is being able to go from place to place and freely associate with any hotspots that may be around. If you do this often, it really changes the way you work, as places like your local coffee shop have the potential to become your office. If you use a Windows or Mac OS-equipped laptop, bouncing from place to place isn’t much of a challenge: you simply open up your computer, it tells you what access points are around, you click on one to associate with that network, and you’re off and running. Under Linux, however, that’s been problematic, as there haven’t been any tools that make Wi-Fi easy...until now.
Using Your Wireless Network Card
Ubuntu supports a good number of wireless cards and adapters out of the box; simply plug in your adapter and it should be recognized automatically (if not, see “Get Proprietary Wireless Cards Working” [Hack #41]). To verify your adapter is recognized, open a terminal window and issue the following command:
bill@defiant:~$ iwconfig
lo        no wireless extensions.

eth0 no wireless extensions.

eth1      IEEE 802.11g  ESSID:"Its A Grind"
          Mode:Managed  Frequency:2.412 GHz  Access Point: 00:06:B1:14:C7:49
          Bit Rate=24 Mb/s   Tx-Power=20 dBm
          Retry limit:7   RTS thr:off   Fragment thr:off
          Power Management:off
          Link Quality=53/100  Signal level=-69 dBm  Noise level=-87 dBm
          Rx invalid nwid:0  Rx invalid crypt:0  Rx invalid frag:0
          Tx excessive retries:41  Invalid misc:0   Missed beacon:16
If you see output similar to what’s above mentioning an IEEE interface, then your card is recognized by Ubuntu and you can either use the built-in networking tools (System→Administration→Networking) to manage it, or proceed on with this hack to install NetworkManager. If you don’t see a wireless card listed there, then you’ll need to follow the instructions in “Get Proprietary Wireless Cards Working” [Hack #41] to get your card working using ndiswrapper.
NetworkManager and You
The folks over at Red Hat have come up with a tool that makes Wi-Fi management as easy as a couple of mouse clicks. The tool’s called NetworkManager (see Figure 4-9), and it’s a GNOME applet that sits in your notification area. NetworkManager will not only manage Wi-Fi connections, it’ll automatically hook up your laptop with a wired connection when you plug in an Ethernet cable.
Warning
NetworkManager cannot manage any cards that have entries in /etc/network/interfaces. If you’ve added your network card to that file, make sure you remove it before you start working with NetworkManager.
From the NetworkManager web site:
A laptop user should never need to use the command line or configuration files to manage their network; it should “Just Work” as automatically as possible and intrude as little as possible into the user’s workflow. NetworkManager attempts to make networking invisible. When moving into areas you’ve been before, NetworkManager automatically connects to the last network the user chose to connect to. Likewise, when back at the desk, NetworkManager will switch to the faster, more reliable wired network connection.
So, now that we’ve whetted your appetite, let’s get NetworkManager installed. First, you’ve got to meet a couple prerequisites:
You must have a wireless Ethernet adapter, either built-in or PCMCIA.
NetworkManager works only with DHCP-assigned addresses. If you must have a static IP address, work with your DHCP administrator to get a unique DHCP reservation, or you’ll need to use another tool (such as System→Administration→Networking).
Let’s get NetworkManager installed and working. It’s surprisingly easy.
First, apt-get the packages. From a terminal, run:
bill@defiant:~$ sudo apt-get install network-manager-gnomeThis will install both the NetworkManager daemon (as a dependency) and the nm-applet that sits in the GNOME notification area. You’ll notice that the NetworkManger service gets started when the installation completes. All that remains is to verify that nm-applet has been added to your session and to reboot the system, since changes to HAL (the hardware abstraction layer) were made when the packages installed.
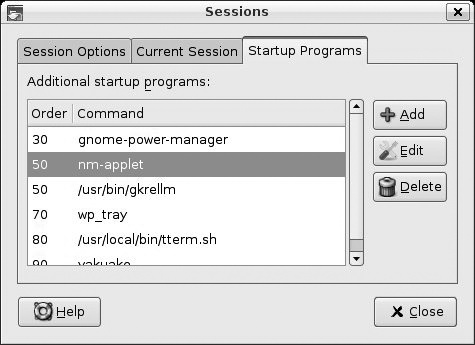
To verify that NetworkManager’s nm-applet program has been added to your autostartup sessions, click on the System Menu in your menu bar, select Preferences, and then click on Sessions. Click on Startup Programs, as shown in Figure 4-10. You should see an nm-applet listing there. If there isn’t one, you can add it by clicking on Add and then by filling out the dialog.
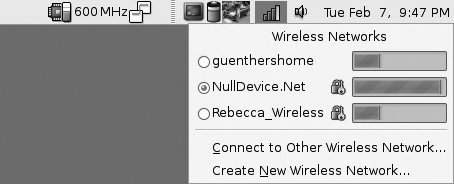
Now all that remains for you to do is to reboot. Once you’ve rebooted and logged in to your machine, you’ll see the NetworkManager icon in your notification area. If you’re plugged into Ethernet, you should see a little “plug” icon. To use Wi-Fi, click on the NetworkManager icon and select the access point with which you want to associate. If the Wi-Fi access point requires an encryption code, you’ll be prompted to enter it. Also, if this is your first time using the GNOME keyring services, you’ll be prompted to select a keyring password. The GNOME keyring caches all the WEP keys for you, so all you need to remember is your GNOME keyring password.
That’s all you need to get wireless roaming working, thanks to NetworkManager!
Make Laptop Settings Roam with Your Network
Use the laptop-net program to configure settings that change as you connect to different networks. Make your work settings follow you to work, and your home settings follow you home.
When you use a laptop, particularly as your primary system, you start to notice some of the ways most systems are biased toward a desktop computer. Primarily, the assumption is that all of your settings will stay the same no matter where you are. Yet, if you take your laptop to and from work you know this simply isn’t the case. Not only do network settings often change, but printers, file shares, and all sorts of other aspects of the system are different depending on where you are. As a laptop user, it would certainly be nice if there were a way to have classes of settings that applied based on where you were. Lucky for you, the laptop-net package takes care of these basic needs and more.
The laptop-net program does a number of things, but the primary thing it allows you to do is to run particular scripts and apply particular settings based on which IP an interface currently has. Even though your home, work, and friend’s house may all use private IP address ranges, they all probably use slightly different schemes, and, more importantly, you probably get assigned a particular IP or range of IPs depending on which network you are on. With laptop-net, you can say “Whenever I have this IP, run these programs and enable these settings.” Because of the way laptop-net is designed, what you can do is limited only by your scripting ability. In this hack, we will describe how to integrate laptop-net into an Ubuntu system and walk you through some common configuration schemes.
Install laptop-net
The first step is to install laptop-net. Using your preferred package manager install the laptop-net and laptop-net-doc packages. Once everything is installed, you will want to reconfigure laptop-net:
$ sudo dpkg-reconfigure laptop-netNow, by default, laptop-net can do a number of nice things such as detect cable insertion and automatically bring up and take down interfaces. We’ve noticed, however, that these automatic functions can sometimes interfere with the way Ubuntu wants to configure the network—especially if you are using a package like NetworkManager—so you need to disable some of this functionality in laptop-net.
As the laptop-net configuration program runs, be sure to tell it that you are going to use DHCP for your network and that your Ethernet adapter does not support MII, even if it does.
Since laptop-net won’t automatically engage
when every interface is brought up, you must add a special script to
/etc/dhcp3/dhclient-exit-hooks.d.
Scripts in this directory are executed when changes occur in dhclient (specifically, when the /etc/dhcp3/dhclient-script runs and
executes the exit_with_hooks
function). Name the following file /etc/dhcp3/dhclient-exit-hooks.d/laptop-net:
if [ $reason = 'BOUND' ]; then
   /usr/share/laptop-net/profile-change $interface
fi
if [ $reason = 'RELEASE' ]; then
   /usr/share/laptop-net/profile-change $interface down
fi
This script will tell laptop-net to change the profile based on the current interface when a new interface gets a lease, and when the DHCP lease is released, it will take that interface down.
We noticed a bug in our version of the package where the /var/run/laptop-net directory was not created, so profiles weren’t being changed. To fix this, we added an extra line to /etc/init.d/laptop-net. Locate the following section in the file:
case "${1}" in
    ("start")
        [ $# -eq 1 ] || usage
        clean_state
        start_ifd
    ;;
and change it to:
case "${1}" in
    ("start")
        [ $# -eq 1 ] || usage
        mkdir -p /var/run/laptop-net
        clean_state
        start_ifd
    ;;
Now restart laptop-net:
$ sudo /etc/init.d/laptop-net restartConfigure laptop-net Profiles
laptop-net does most of its configuration work through different profiles that you need to configure. These profiles reside within the /etc/laptop-net/profiles directory and contain the configuration information for specific modes and networks that you might want to connect to. The /etc/laptop-net/profiles directory will end up containing one directory for each new profile you want to configure. A laptop-net profile itself can contain a number of different configuration files and scripts (check /usr/share/laptop-net-doc/ for more details), but here is a list of the main files:
- patterns
This file contains a list of IP or state patterns to match. If laptop-net matches a pattern in this file, it will then select this particular profile.
- files.d/
This directory contains a subset of your root filesystem. When this profile is selected, laptop-net will copy any files it finds here to the corresponding system directory, overwriting existing files with the same name. For instance, if you add a file in files.d/etc/fstab, when this profile is selected, that file will be copied over the top of the system /etc/fstab.
- after-select
This is an optional shell script that laptop-net will execute after a profile has been selected. If there are any fancy tweaks or service restarts that you want to make, you can put them in this file.
- before-deselect
This script is also optional and is like the after-select script, only it is executed before a particular profile is deselected. You might use this script to undo particular changes you have made to a system before the network interface is taken down.
No matter what networks you want to configure for yourself, there are a couple of default profiles you should set up first: one for when the network is offline and one for when you are on some unknown network.
Configure the offline profile
To configure the offline profile, create a new directory called offline in /etc/laptop-net/profiles and change to that directory:
greenfly@ubuntu:~$sudo mkdir /etc/laptop-net/profiles/offlinegreenfly@ubuntu:~$cd /etc/laptop-net/profiles/offlinegreenfly@ubuntu:/etc/laptop-net/profiles/offline$
Now create a file in this directory called patterns and have it contain the following lines:
down
unknown
Next, create a files.d directory here. Whenever you change system files with other profiles, it’s a good idea to store the original default version of the file in the offline profile; that way, everything will go back to normal when the network is offline, and you won’t risk overwriting a file for good:
greenfly@ubuntu:/etc/laptop-net/profiles/offline$ sudo mkdir files.dThe next step is to create a file called after-select and make it executable:
/etc/laptop-net/profiles/offline$sudo touch after-select/etc/laptop-net/profiles/offline$sudo chmod a+x after-select
This file will run any programs or restart any scripts that you tell it to, but for now you can have it do something basic to give you diagnostic information when it is selected. Add the following lines to the file:
#!/bin/sh

echo "offline" > /tmp/laptop-net-state
Configure the default network profile
The next step is to create a “catch-all” default network profile. This profile will execute any network-based operations you want to perform whenever you have a network connection but don’t quite know which network you are connected to. First, create the profile directory and name it zzz-default. The reason you start with the zzz is that laptop-net goes through the profiles sequentially. Since this profile will match all IP addresses, you want to give your other profiles a chance to be selected first:
greenfly@ubuntu:/etc/laptop-net/profiles/$sudo mkdir zzz-defaultgreenfly@ubuntu:/etc/laptop-net/profiles/$cd zzz-defaultgreenfly@ubuntu:/etc/laptop-net/profiles/zzz-default$
Now create the same files.d directory and patterns file. If there are any configuration settings you want to always have whenever you are connected to a strange network, you can copy them to the files.d directory:
greenfly@ubuntu:/etc/laptop-net/profiles/zzz-default$sudo mkdir files.dgreenfly@ubuntu:/etc/laptop-net/profiles/zzz-default$sudo touch patterns
Place the following line in the patterns file:
*.*.*.*
This line will match any possible IP address.
The final step is to create the after-select script that is run when this profile is selected and to put the following lines in it for diagnostics:
#!/bin/sh

echo "zzz-default" > /tmp/laptop-net-state
Don’t forget to run:
$ sudo chmod a+x after-selectto ensure the script is executable.
Tip
One thing we like to do when our zzz-default profiles are selected is to throw up a very restrictive firewall. Since we’re connected to a presumably unknown network, this ensures that all the shields are up. You could also perform a number of other security-tightening measures in this script.
Test your configuration
With this new configuration in place, restart laptop-net:
$ sudo /etc/init.d/laptop-net restartNow click System→Administration→Networking and deactivate your Ethernet connection (or wireless if that is what you are using). Now check /tmp/laptop-net-state:
$ cat /tmp/laptop-net-state
offline
Now activate your network connection and check again once it comes up:
$ cat /tmp/laptop-net-state
zzz-default
You can also verify what laptop-net is doing by examining the syslog file. laptop-net will log there when it changes network settings, so you can grep the file for laptop-net, which will show you only its log information:
$ grep laptop-net /var/log/syslog
...
Mar  4 16:12:56 ubuntu laptop-net: Selecting network profile "zzz-default"
Mar  4 15:19:42 ubuntu laptop-net: Deselecting network profile "zzz-default"
Mar  4 15:19:42 ubuntu laptop-net: Selecting network profile "offline"
Mar  4 15:24:06 ubuntu laptop-net: Deselecting network profile "offline"
Mar  4 15:24:07 ubuntu laptop-net: Selecting network profile "zzz-default"
Create Personal laptop-net Profiles
Once you have confirmed laptop-net is functioning, it’s time to create specific profiles for networks you commonly connect to. Let’s assume you have two networks, one for home and one for work. To make things simple, you can just copy over the zzz-default profile and use it as a base template for new configurations:
greenfly@ubuntu:~$cd /etc/laptop-net/profiles/greenfly@ubuntu:/etc/laptop-net/profiles/$sudo cp -a zzz-default homegreenfly@ubuntu:/etc/laptop-net/profiles/$sudo cp -a zzz-default work
Configure the patterns file
The first thing you will need to change is the patterns file for each of these new profiles. Let’s assume your home network assigns you an IP address somewhere in the 192.168.0.1 network, no matter whether it is on your Ethernet or wireless card, and your work network always assigns you 10.1.1.50 on your Ethernet card and 10.1.1.100 on your wireless card. You would then edit the patterns file in your home profile and make it contain only the following line:
192.168.0.*
This pattern will match any IP from 192.168.0.1 to 192.168.0.255. Next, you edit the patterns file in your work profile and make it contain two lines:
10.1.1.50
10.1.1.100
When you can, try to be as explicit as possible when defining
patterns. That 192.168.0.*
pattern will match a great number of home networks, so you might end
up setting your home profile when you connect at a friend’s house.
Ideally, you will try to set up your networks so that you get
assigned one or two static IP addresses.
Configure the after-select script
Once the pattern file is set up, edit the after-select script in both the home and work profiles. Change the diagnostic line in that script from:
echo "zzz-default" > /tmp/laptop-net-state
to:
echo "home" > /tmp/laptop-net-state
and:
echo "work" > /tmp/laptop-net-state
in your home and work scripts, respectively. Now add any particular programs you want to run or other things you would like to do in these after-select files.
For instance, if you want your default printer to be set to your home printer when you are at home and your work printer when you are at work, configure your printer settings the way you want them for home, and then copy the /etc/cups/printers.conf file to /etc/laptop-net/profiles/home/files.d/etc/cups/printers.conf (you will need to create the etc and etc/cups directories within the files.d directory). Next, configure the printer settings to suit your work environment and copy the /etc/cups/printers.conf to /etc/laptop-net/profiles/work/files.d/etc/cups/printers.conf. Finally, in the after-select scripts for both home and work profiles, add the line:
/etc/init.d/cupsys restart
to refresh the settings when that profile is selected.
Repeat this process for any other settings you want to change. Copy the relevant settings to the corresponding directory under files.d, and if a change requires the service to be restarted, add the corresponding command to the end of your after-select script.
For more information about configuration options in laptop-net, check out the documentation that was installed under /usr/share/doc/laptop-net-doc/.
Make Bluetooth Connections
Create a personal-area Bluetooth network to exchange files, send messages, and share network connections.
Bluetooth allows you to create short-range (usually 10-meter), low-bandwidth (1-2 megabits per second), ad hoc connections between devices. It’s ideal for sending photos from your camera phone to your computer, or for using the wireless modem found in certain models of cell phones.
To get started with Bluetooth, first make sure it’s working. Some computers have built-in Bluetooth adapters. If you are using an external USB Bluetooth dongle, after you insert it you may need to run this command to reset the Bluetooth Host Controller Daemon:
$ sudo killall -HUP hcidNow, to make sure Bluetooth is really up and running, you need to make sure you have at least one device in the vicinity that is set as “discoverable” (this is a Bluetooth mode that allows devices to find one another). Check your device documentation for details on how to set discoverable mode.
Some devices allow you turn on discoverable mode only for a
limited time (for example, two minutes). So, make sure you execute the
next command quickly. The hcitool utility lets you manage Bluetooth
connections. Run the command hcitool
scan to enumerate the discoverable
devices in your vicinity. Here, hcitool has found
three devices (my Nokia 3650 cell phone, my Mac, and my Palm
Treo):
bjepson@scoobuntu:~$ hcitool scan
Scanning ...
        00:60:57:50:AB:9C       BrianJ3650
        00:14:51:89:4D:C7       Jepstone
        00:07:E0:6A:FE:54       bjepson
Pairing
Now that you know Bluetooth is working, you can pair your Ubuntu system with one of the devices. Pairing creates a bond between the devices so that they can exchange data and connect to one another.
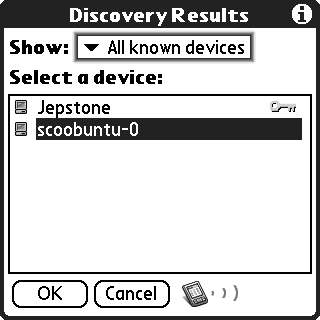
First, initiate pairing from the device you want to use. Each device is different. On the Treo, for example, you need to tap the Bluetooth icon and click Setup Devices→Trusted Devices→Add Device. Figure 4-11 shows my Palm Treo discovering several computers, including scoobuntu-0, my Ubuntu system. Select your Ubuntu system and tap OK. When prompted for your passkey, pick something at random. A dialog should pop up on your Ubuntu system asking for the passkey. Type the same thing into that dialog and click OK.
Manual Pairing
If that dialog doesn’t appear, you will need to take
matters into your own hands. Cancel the pairing procedure on your
device (or wait for it to time out), and go back to your Ubuntu
system. Edit /etc/bluetooth/pin
(you need to use sudo to edit this, as in
sudo vi /etc/bluetooth/pin) and change the PIN code
there to the PIN you want to use as the one-time password for pairing
devices (some devices allow only numeric PINs).
Next, create a script called /usr/local/bin/bluepincat and make it executable:
#!/bin/sh
# file: /usr/local/bin/bluepincat

echo -n "PIN:"
cat /etc/bluetooth/pin
Comment out the existing pin_helper line in /etc/bluetooth/hcid.conf (again, you need
to use sudo to edit this file) and add the
following:
pin_helper /usr/local/bin/bluepincat;
Next, reset the hcid daemon with sudo killall -HUP hcid
and try to initiate pairing from your device again, this time using
the PIN code that you put into /etc/bluetooth/pin as the passkey. Once
you’re done pairing devices, you should restore the original
configuration and reset the hcid daemon again
(this avoids the possibility of someone guessing your PIN and pairing
with your computer without your knowledge or consent).
Bluetooth File Transfer
Suppose you have something on your cell phone, such as a photo you took, that you want to send to your computer. If you install the obexserver package, you can receive files sent over Bluetooth:
$ sudo apt-get install obexserverTo receive files, you need to register the OBEX (Object Exchange) push service. This needs to be done each time you restart your computer (or the Bluetooth subsystem):
$ sdptool add --channel=10 OPUSH
OBEX Object Push service registered
Now, when you want to receive a file, start the obexserver and send the file from the other device. The obexserver will terminate after the transfer:
$ obexserver
Waiting for connection...

...............................................................
...............................................................
...............................................................
...............................................................
...................................................HEADER_LENGTH = 307254
put_done() Skipped header 05
put_done() Skipped header 42
put_done() Skipped header c0
Filename = screenshot0000.bmp
Wrote /tmp/screenshot0000.bmp (307254 bytes)

$
Connect to the Internet
Many Bluetooth phones, including certain Treo models as well as many Nokia and Sony Ericsson phones, can act as a gateway between your computer and the Internet. In this configuration, the phone is commonly thought of as a “wireless modem,” but in fact, the connection between your computer and the Internet is digital all the way. Still, because this configuration uses the same protocol (PPP) as most dial-up connections, it’s easy and sometimes helpful to just think of it as a modem.
Warning
Before you try this, you need to contact your wireless provider to find out whether this service is supported and how much it will cost you. Some providers, such as T-Mobile in the U.S., have inexpensive flat-rate pricing of between $20 and $50 a month, depending on your level of service. But most providers will charge you by the kilobyte if you don’t have a data plan on your account. If you’re not totally clear on how much it will cost, be careful, since cellular bills of hundreds or even thousands of dollars are not unheard of, especially when you throw international roaming into the mix!
To make the connection, you first need to set up a link between
your Ubuntu system and the paired device. Edit (using
sudo) /etc/bluetooth/rfcomm.conf and add an entry
for your device. You’ll need to specify your phone’s device ID (which
you can get with hciutil scan, as shown earlier):
rfcomm0 {
  bind yes;
    # Bluetooth address of the device
    device 00:07:E0:6A:FE:54;
    # RFCOMM channel for the connection
    channel     1;
    # Description of the connection
    comment "My Treo";
}
Next, edit /etc/bluetooth/hcid.conf (using
sudo), scroll to the bottom, and uncomment the
auth and encrypt lines so they look like this:
    # Authentication and Encryption (Security Mode 3)
    auth enable;
    encrypt enable;
Then, run the command sudo
killall -HUP hcid
to reset the hcid daemon.
Next, use the command sudo
rfcomm bind rfcomm0 to make the connection. Now you’ve
got a modem you can use on /dev/rfcomm0. Next, you need to create some
PPP scripts. The first one is a chat script. As
root, create /etc/chatscripts/BluetoothPhone. You will
need to replace APN with the Access Point
Name that your cellular provider uses (contact your cellular provider
to get this information, or check Opera’s list of APNs at http://www.opera.com/products/mobile/docs/connect/):
TIMEOUT 10
ABORT   'BUSY'
ABORT   'NO ANSWER'
ABORT   'ERROR'
SAY     'Starting GPRS connect script\\n'

# Get the modem's attention and reset it.
""      'ATZ'

# E0=No echo, V1=English result codes
OK      'ATE0V1'

# Set Access Point Name (APN)
SAY     'Setting APN\\n'
OK  'AT+CGDCONT=1,"IP","APN"'

# Dial the number
ABORT   'NO CARRIER'
SAY     'Dialing...\\n'
OK      'ATD*99***1#'
CONNECT ''
The next is /etc/chatscripts/BluetoothPhone-Disconnect:
""      "\\K"
""      "+++ATH0"
SAY     "GPRS disconnected."
Finally, you need a PPP peers script (/etc/ppp/peers/BluetoothPhone):
/dev/rfcomm0  # Bluetooth modem
115200        # speed
defaultroute  # use the cellular network for the default route
usepeerdns    # use the DNS servers from the remote network
nodetach      # keep pppd in the foreground
crtscts       # hardware flow control
lock          # lock the serial port
noauth        # don't expect the modem to authenticate itself
local         # don't use Carrier Detect or Data Terminal Ready
replacedefaultroute
debug

# Use the next two lines if you receive the dreaded messages:
#
#    No response to n echo-requests
#    Serial link appears to be disconnected.
#    Connection terminated.
#
lcp-echo-failure 4
lcp-echo-interval 65535

connect "/usr/sbin/chat -V -f /etc/chatscripts/BluetoothPhone"
disconnect "/usr/sbin/chat -V -f /etc/chatscripts/BluetoothPhone-Disconnect"
With all these scripts in place and your rfcomm device connected
using rfcomm bind, run the command sudo pppd
call BluetoothPhone to connect to the Internet
anywhere you have cellular service. When you are done, press Ctrl-C to
terminate the connection.
For more information on working with cellular data connections and Bluetooth, see Linux Unwired by Roger Weeks et al. (O’Reilly).
Brian Jepson
Expand Your Laptop
Expand your laptop’s capabilities through the use of PCMCIA cards.
Most laptops have PCMCIA (also called PC Card) slots for card-based expansion. Under Windows, before you install a PCMCIA card, you usually have to install a software driver in order for the card to operate. Under Ubuntu Linux, however, the drivers are typically built into the operating system, shipped as kernel modules. It’s the job of the PCMCIA subsystem to load and unload these modules when a card is inserted.
Usually, you don’t need to do anything more than insert a card for
the system to recognize it and load the proper driver. If you open a
terminal window and examine the system log, you can see the
card-insertion event and note what driver the PCMCIA subsystem loads.
The system log will also show what new devices were created for that
particular card. You can view the log with the command tail -f
/var/log/messages.
Here, we are inserting a 3Com 10/100 Ethernet adapter into our laptop’s PCMCIA slot while monitoring the log:
Mar  8 23:54:19 localhost kernel: [4554419.074000] PCI: Enabling device 0000:02:00.0 (0000 -> 0003)
Mar  8 23:54:19 localhost kernel: [4554419.074000] ACPI: PCI Interrupt 0000:02:00.0[A] -> Link [LNKA] -> GSI 11 (level, low) -> IRQ 11
Mar  8 23:54:19 localhost kernel: [4554419.074000] 3c59x: Donald Becker and others. www.scyld.com/network/vortex.html
Mar  8 23:54:19 localhost kernel: [4554419.074000] 0000:02:00.0: 3Com PCI 3CCFE575BT Cyclone CardBus at 0x4000. Vers LK1.1.19
Mar  8 23:54:19 localhost pci.agent[17859]:      3c59x: loaded successfully
Mar  8 23:54:19 localhost kernel: [4554419.155000] ACPI: PCI Interrupt 0000:02:00.0[A] -> Link [LNKA] -> GSI 11 (level, low) -> IRQ 11
Once the driver is loaded, we can address this device via /dev/eth2.
Some combination cards are also supported. In this example, we’re inserting a 10/100 Ethernet card and 56K modem combo card:
Mar  8 23:57:29 localhost kernel: [4554609.400000] eth2: NE2000 (DL10019 rev 05): io 0x300, irq 11, hw_addr 00:E0:98:90:D5:3C
Mar  8 23:57:29 localhost kernel: [4554609.442000] ttyS1 at I/O 0x2f8 (irq = 11) is a 16550A
The Ethernet portion of the card is addressable as /dev/eth2 on this machine, and the 56K modem is addressable as /dev/ttyS1.
Some wireless cards, such as the classic Orinoco and Prism 2/3-based adapters, are also supported by the PCMCIA subsystem out of the box. In this case, we inserted an Orinoco adapter. It’s also addressable as /dev/eth2:
Mar 8 23:59:40 localhost kernel: [4554740.196000] eth2: New link status: Connected (0001)
Ubuntu even supports pretty obscure devices. We own an old Iomega Clik PCMCIA 40 MB hard disk and a Socket Communications serial card. Both devices work great under Ubuntu. The Clik drive is mountable as /dev/hdc4, and the serial card shows up as /dev/ttyS0.
Mar  9 00:10:57 localhost kernel: [4555416.871000] hdc: IOMEGA Clik! 40 CZ ATAPI, ATAPI cdrom or floppy?, assuming FLOPPY drive
Mar  9 00:10:57 localhost kernel: [4555417.177000] ide1 at 0x180-0x187,0x386 on irq 3
Mar  9 00:10:57 localhost kernel: [4555417.182000] hdc: 39441kB, 78882 blocks, 512 sector size
Mar  9 00:10:58 localhost kernel: [4555417.185000]  /dev/ide/host1/bus0/target0/lun0: p4
Mar  9 00:10:58 localhost kernel: [4555418.047000] ide-cs: hdc: Vcc = 5.0, Vpp = 0.0
Mar  9 00:11:29 localhost kernel: [4555449.006000] ttyS0 at I/O 0x3f8 (irq = 3) is a 16550A
Just about any device you can put in a PCMCIA slot will work just great under Ubuntu (although some wireless cards need an extra configuration step [Hack #41]). Give it a shot!
Hotswap Your Laptop’s Optical Drive
If you’ve got a laptop with a removable optical drive, you can use the hotswap utility to remove and reinstall it without rebooting.
If you’ve purchased a laptop within the last couple of years, your machine most likely has an optical drive that’s in a removable caddy or drive bay. Typically, these type of drives are enabled under Windows to be removed and replugged with the system power on, but the drivers that allow this haven’t been available in Linux until recently.
The hotswap package included in the universe repository [Hack #60] provides the ability for you to hotswap an optical drive out and insert a battery or other module, and then reinsert the optical drive back into the bay, all without putting the laptop to sleep or shutting it down. To install hotswap, first you must have the universe repository enabled in your /etc/apt/sources.list; then you can install hotswap by using the following command:
gooley@falcon:~$ sudo apt-get install hotswapapt-get, as usual, will take care of all the dependencies and install all the software. Once apt’s completed the download and installation of the software, you can institute a hotswap by running hotswap via sudo. hotswap will autodetect your optical drive and ask you if you wish to remove it. Simply follow the prompts and do what the script says:
gooley@falcon:~$sudo hotswapPassword: I/O warning : failed to load external entity "/etc/hotswaprc" hotswap 0.4.0 Copyright 2001 Tim Stadelmann This program is free software, licensed under the conditions of the GNU General Public License version 2, or (at your option), any later version. The following IDE device is currently configured: HL-DT-STCD-RW/DVD DRIVE GCC-4242N Do you want to remove this device?yYou can now remove the device from the module bay. Would you like to insert an IDE device into the module bay?nAborting
At this point, you can eject and remove the optical drive. To reinsert the drive, simply run hotswap via sudo again (occasionally, hotswap will report an error, as shown here, but it will actually register the drive with the IDE subsystem):
gooley@falcon:~$sudo hotswapI/O warning : failed to load external entity "/etc/hotswaprc" hotswap 0.4.0 Copyright 2001 Tim Stadelmann This program is free software, licensed under the conditions of the GNU General Public License version 2, or (at your option), any later version. There is currently no IDE device configured. (Floppy disk drives, batteries, and 'travel modules' are not managed by this utility. If you want to swap such a module, you should remove it now.) Would you like to insert an IDE device into the module bay?yPlease insert the new device into the module bay and press RETURN. No IDE device has been found in the module bay. If you are sure that the device you want to configure connects to the IDE bus, make sure that the module is inserted completely. Do you want to try again?nAborting
A quick check of dmesg will confirm that the drive did indeed get re-registered with the system:
gooley@falcon:~$ dmesg | tail
[4296527.332000] Probing IDE interface ide1...
[4296527.698000] hdc: HL-DT-STCD-RW/DVD DRIVE GCC-4242N, ATAPI CD/DVD-ROM drive
[4296528.004000] ide1 at 0x170-0x177,0x376 on irq 15
[4296528.008000] hdc: ATAPI 24X DVD-ROM CD-R/RW drive, 2048kB Cache
Tip
Hotswapping the optical drive usually results in a loss of the drive’s DMA settings. As of this writing, the only way to re-enable DMA is to reboot the system.
Hotswapping is one more capability Linux has recently gained on laptops and portable machines. Now you can enjoy another ability that’s been a Windows-only feature!
Get Ubuntu Hacks now with the O’Reilly learning platform.
O’Reilly members experience books, live events, courses curated by job role, and more from O’Reilly and nearly 200 top publishers.

