Chapter 1. Working with Unity
To make things in Unity, it’s important to understand how Unity works and how to work with it as a piece of software. In this chapter, we’ll take a tour through the interface and features of Unity, so that you’ll be ready to start building things in the editor.
Tip
If you’re new to Unity, we recommend reading all the recipes in this chapter, as well as in Chapter 2, before trying other recipes in this book.
This chapter also introduces you to many of the terms used in the Unity ecosystem, which will help you make sense of the rest of this book.
1.1 Getting Around in Unity
Solution
Unity’s user interface is organized along windows of content. Each different view can do different things. In this recipe, we’ll present some of the most important ones and talk about how to arrange the editor to suit your needs.
When you launch Unity and create a new project, you’ll be taken to the editor’s main window (Figure 1-1).

Figure 1-1. The main window of the Unity editor
Tip
When it’s first launched, Unity uses the layout that you see in Figure 1-1. However, you can resize any window by clicking and dragging on its edges. You can also reposition the window by clicking and dragging its tab to somewhere else. If you drag a tab to the edge of another window, it will be placed at that side of the window. If you drag a tab onto the middle of the window, it will be added to the list of tabs at the top of the window.
There are several features that are of particular importance to anyone working in Unity. Let’s take a look at each of them!
Toolbar
The toolbar contains controls that affect Unity as a whole (Figure 1-2). It’s always at the top of the editor window, and can’t be moved.

Figure 1-2. The toolbar
The toolbar, from left to right, contains the following controls:
- Tools palette
-
This palette controls the behavior of the transform controls that appear when an object is selected. Only one mode can be selected at a time; they are:
- Hand tool
-
Clicking and dragging in the Scene view will move your view of the scene.
- Move tool
- Rotate tool
-
Objects that are selected can be rotated around their pivot point or center.
- Scale tool
-
Objects that are selected can be scaled around their pivot point or center.
- Rectangle tool
-
Objects that are selected have a rectangle drawn around them, and can be scaled and repositioned. This tool is largely used for 2D objects like sprites and user interface elements.
- Transform tool
-
This tool combines the Move, Rotate, and Scale tools. Selected objects can be moved, rotated, and scaled.
- Custom tool
-
Any custom tools that are defined by the code in your game will appear in here.
- Pivot/Center toggle
-
This toggle sets whether the transform controls are placed at the local pivot point of the object or in the center of the object’s volume. (This can be different for certain 3D models; for example, models of human characters typically place the pivot point at the character’s feet.)
- Local/Global toggle
-
This toggle sets whether the Transform tool operates in global space or local space. For example, in local space, dragging the blue “forward” arrow of the Move tool moves an object forward based on its own orientation, while in global mode, dragging the blue “forward” arrow ignores the object’s orientation.
- Play button
-
This button starts Play mode, which enters your game. You can click the button again to end Play mode and return to editing.
Warning
You can edit the scene while in Play mode, but any changes you make to the scene will be lost when you end the game. Don’t forget to check if you’re playing the game or not before doing a large amount of work!
- Pause button
-
This button pauses the game. If you’re in Play mode, the game will pause immediately. If you’re not in Play mode, you can still click this button; if you then click the Play button, the game will pause immediately after the first frame.
- Step button
-
This button advances one frame, while keeping the game paused.
Note
To be more specific, stepping forward “one frame” means that Unity will advance the game’s clock by the fixed timestep and then re-render the game. By default, the fixed timestep is 0.02 seconds; you can configure this in the project’s Time settings (from the Edit menu, choose Project Settings → Time).
- Collab menu
-
This menu provides controls for working with Unity Collaborate, Unity’s version control service.
Note
Unity Collaborate is outside the scope of this book, but the Unity manual provides a good introduction.
- Services button
-
This button opens the Services view, which allows you to work with Unity’s web-based services like Cloud Build, Unity Analytics, and more. For more information, see Unity’s Services page.
- Account button
- Layers button
-
With this button you can choose which layers are currently visible or selectable.
- Layout button
-
This button allows you to save and restore a predefined layout of windows. This is useful when you have a layout that works well for tasks like animation, or level layout, and you want to switch between different tasks without having to fiddle with precise window placement.
Scene
The Scene view allows you to view, select, and modify the objects in a scene (Figure 1-3). In the Scene view, you can left-click on any object to select it; when an object is selected, you can move, rotate, or scale it by using the transform controls, depending on which tool you have selected in the toolbar (see Figure 1-4).
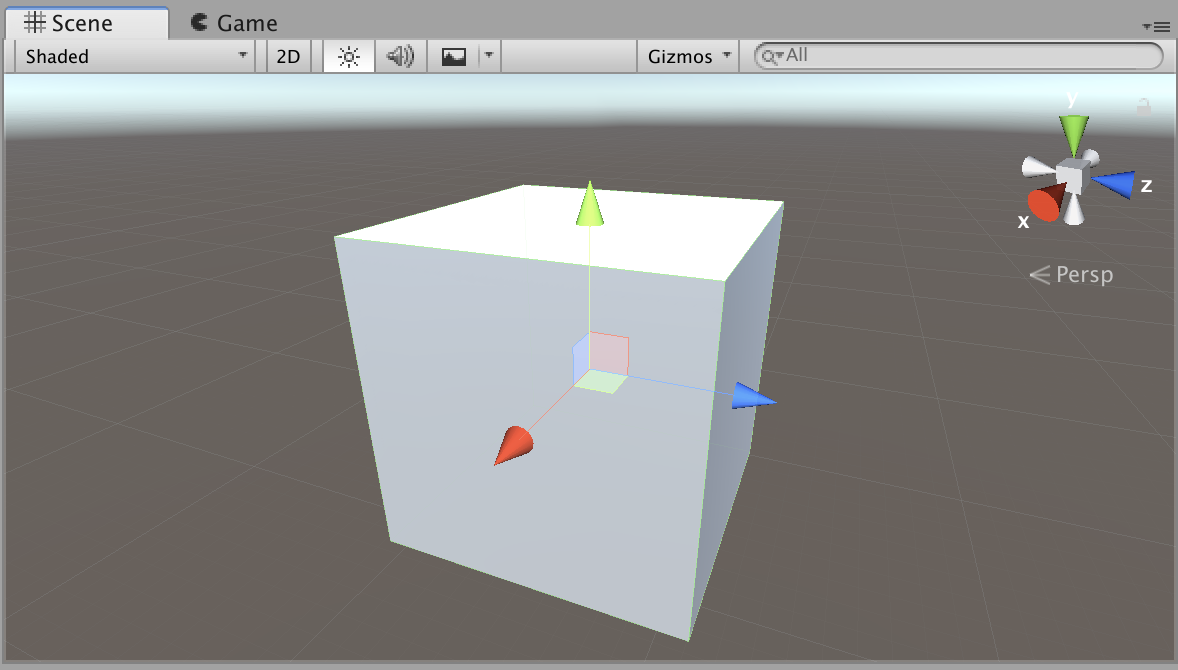
Figure 1-3. The Scene view
To use the transform controls on a selected object, click and drag the arrows (when using the Move tool), circles (the Rotate tool), or boxes (Scale tool) attached to it. Hold down the Shift key to snap the movement, rotate, and scale to a predefined increment. To move around the Scene view, select the Hand tool from the palette at the top left of the view, and click and drag. You can also hold the Alt key (Option on a Mac) to make clicking and dragging rotate the view; Alt-Control (Option-Command) and drag will pan the view around. You can use the scroll wheel on your mouse, or a two-finger gesture on a trackpad, to zoom in and out.
Tip
You can also quickly move the Scene view to focus on the currently selected object. To do this, press the F key.

Figure 1-4. The Transform tool, shown with object selected. In this image a Camera has been selected, and the Transform tool is in Move mode; clicking and dragging the arrows will move the selected object in that direction.
Game
The Game view displays the view through the camera, and shows what the player would see if the game were running outside of Unity (Figure 1-5). The Game view itself isn’t interactive unless the editor is in Play mode.
There are a few controls at the top of the Game view that let you control how the game is presented:
- Display menu
-
Lets you control which display’s contents to show in the view. (In Unity, a camera can be configured to send its results to the main screen, or to an external screen.)
- Resolution menu
-
Lets you specify an aspect ratio or fixed resolution for the game display.
- Scale slider
-
Lets you zoom in on the rendered view of the game.
- Maximize On Play toggle
-
Button, when selected, makes the Game view fill the entire editor window when the game enters Play mode.
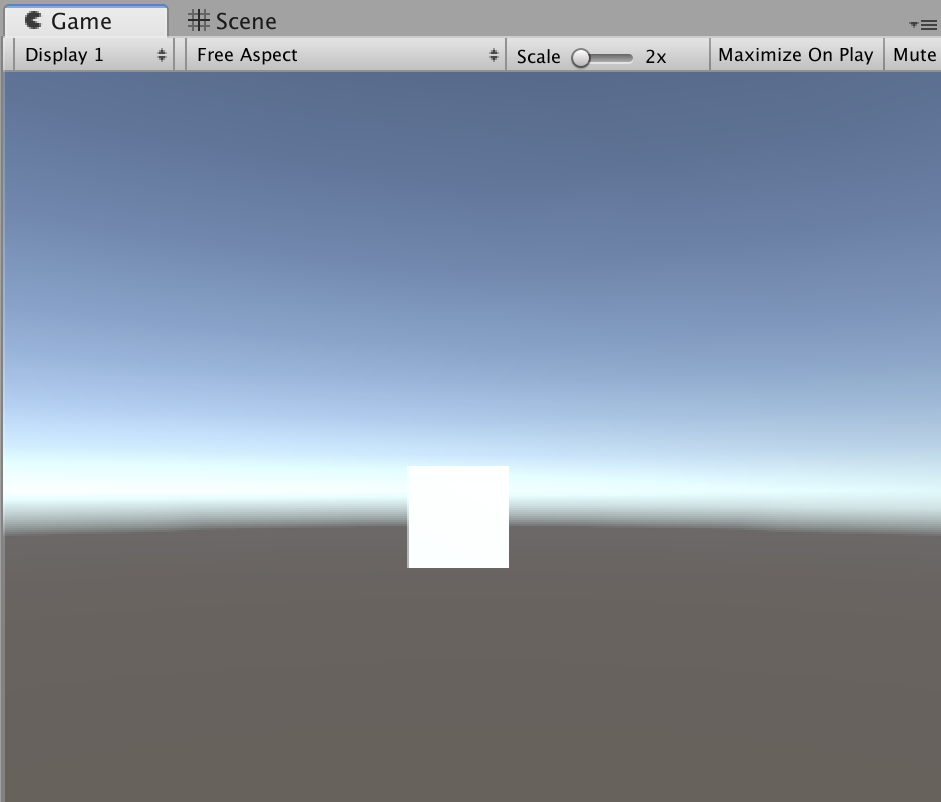
Figure 1-5. The Game view
- Mute Audio toggle
-
Button disables all audio playback from the game. (This is useful when you don’t want the game’s audio to play over the top of your music while you’re working, for example.)
- Stats toggle
-
Button controls whether performance statistics will be displayed in an overlay panel.
- Gizmos button
-
Lets you control whether the gizmos—icons that represent certain objects in the scene, like cameras—appear in the Game view, like they do in Scene view.
Inspector
The Inspector shows information about the objects currently selected (Figure 1-6). From here, you can control every component attached to the game object.
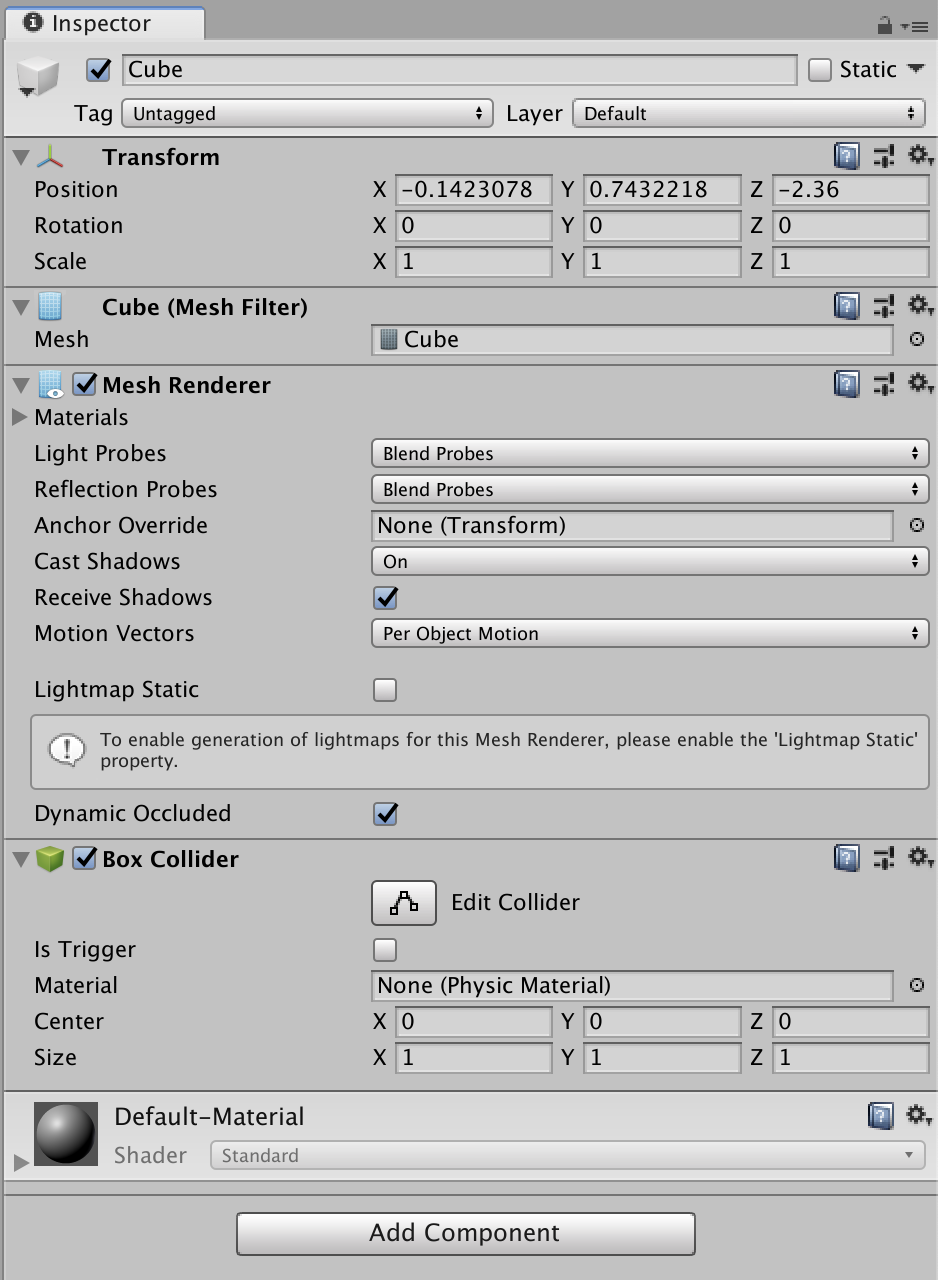
Figure 1-6. The Inspector
Note
Components are a huge part of how Unity works, which means we’ll discuss them in Recipe 1.3, instead of here.
At the top of the Inspector, you can set the name of the currently selected object. You can also set an icon for the object by clicking the icon to the left of the object’s name and choosing a symbol to use. This is useful for game objects that are invisible.
By default, the Inspector will change its contents when the current selection changes. If you don’t want it to do this, you can click the Lock icon at the top-right corner of the Inspector, and it will stay on the object that it’s currently displaying.
Hierarchy
The Hierarchy shows the list of objects in the current scene (Figure 1-7). From here, you can browse through the list of objects in your scene. If you select an item in the Hierarchy, it becomes selected in the Scene view, and vice versa. You can also drag and drop one object on another to make it a child of that second object.
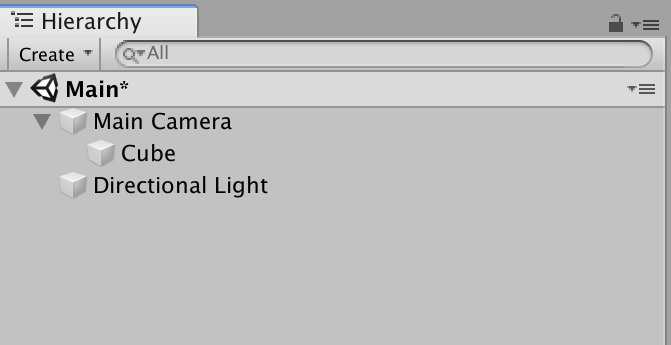
Figure 1-7. The Hierarchy view
Project
The Project view shows the contents of the project’s Assets folder (Figure 1-8). Any files that are in the folder will be visible here; you can also move and rename files.
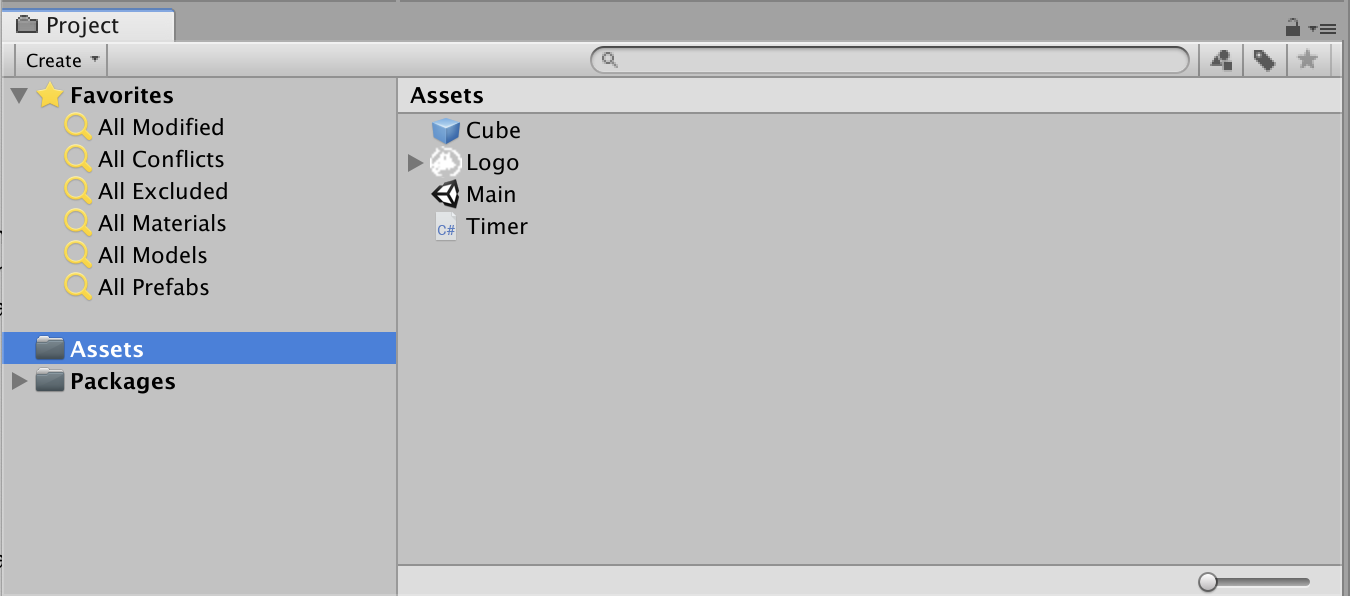
Figure 1-8. The Project view
Warning
When you rename a file, do it inside the Project view, and not outside of Unity. Unity tracks the additional metadata about your assets, such as import settings for textures, by creating a new file with the extension .meta next to each asset file. For example, an asset file called Hero.png would have a file called Hero.png.meta placed next to it. If you rename, move, or delete the asset file inside Unity, Unity will also update the .meta file, but if you rename, move, or delete the asset file outside of Unity, it won’t know what to do, and it will have to recreate the .meta file from scratch (which means that any references to the file are lost, as well as any import settings).
1.2 Working with Game Objects
Solution
To create a new, empty game object, open the GameObject menu, and choose Create Empty. A new, empty game object will be added to the scene. It won’t be visible in the scene, because it won’t have any components that render anything. To learn more about components, see Recipe 1.3.
Tip
You can also press Command-Shift-N (Control-Shift-N on a PC) to create a new, empty game object.
You can rename a game object by selecting it, and changing its name in the Inspector.
Game objects can be the child of other game objects. When a game object moves, rotates, or scales, its children are affected as well. This means that you can create hierarchies of game objects that work together as a system; for example, a car could have each of its four wheels as child objects, which means that they automatically stay in the correct position as the car moves around. To make one game object the child of another, drag and drop it onto another object in the Hierarchy (see “Hierarchy”).
You can also reorder an object by dragging and dropping it in the Hierarchy. As a shortcut, you can make an object move to the end of its siblings by pressing Command-Equals (Control-Equals on a PC), and move to the start of its siblings by pressing Command-Minus (Control-Minus on a PC).
Discussion
You can also create new game objects by dragging and dropping assets into the Scene view. For example, if you drag and drop a 3D model asset into the Scene view, Unity will create a new game object that contains the necessary components for rendering that model.
As a shortcut, you can quickly create an empty game object as a child of the currently selected object by opening the GameObject menu and choosing Create Empty Child. You can also press Option-Shift-N (Alt-Shift-N on a PC).
1.3 Working with Components
Solution
On its own, a game object is just an empty container. It’s the components that make a game object actually do anything useful.
To get started in thinking about components, we’ll create a new game object that comes with some useful components built in: we’ll add a cube to the scene!
To do this, follow these steps:
-
Open the GameObject menu, and choose 3D Object → Cube. A new cube will be added to the scene (Figure 1-9).
-
Select the new cube in the Hierarchy or the Scene view. The Inspector will update to show the list of components attached to it (Figure 1-10).
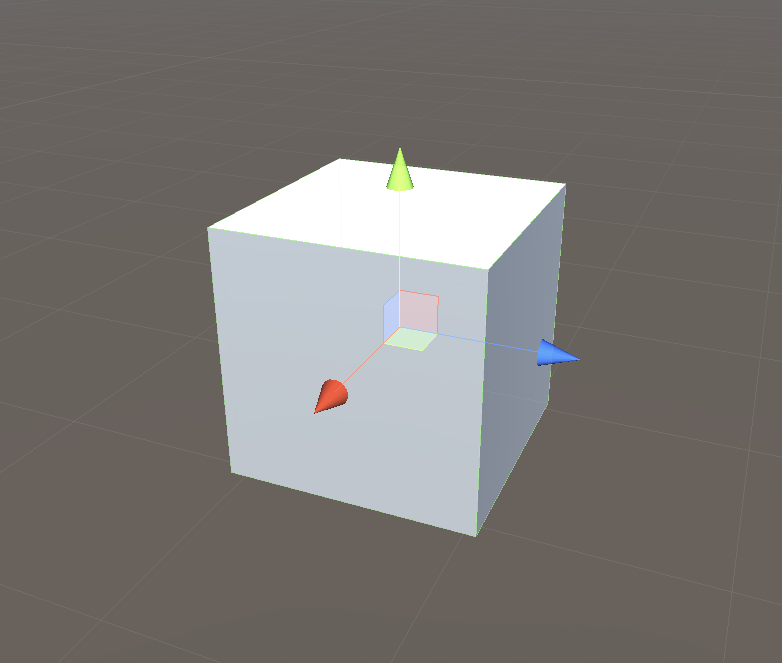
Figure 1-9. A new cube, freshly added to the scene

Figure 1-10. The Inspector for the new cube
Every game object has at least one component: a Transform. The Transform component stores the position, rotation, and scale of an object, and is also responsible for keeping track of the parent of an object. You can’t remove the Transform component.
On the cube, you’ll find several additional components. Each of them do something different:
-
The
MeshFilterloads a mesh from a file on disk for theMeshRendererto use. (For the cube object we’re adding in this recipe, the asset is supplied by Unity; most of the game objects in your games will use assets you add to the project.) -
The
MeshRendererdraws the mesh on the screen, using a Material asset to determine its appearance. -
The BoxColliderdefines the physical shape of the object in the world.
Components let you configure how they work by exposing properties that are listed in the Inspector. For example, the MeshFilter component has a single property: the Mesh that it should be using. This is an example of an object field—it’s a reference to another object that’s part of your project. In the case of the MeshFilter, the field can take any Mesh object; these are found in the assets you add to your project. The type of object that an object field can use is determined by the component; you can’t drop any other kind of object besides a Mesh into this field, for example.
Note
Object fields don’t have to refer to assets—they can also refer to other objects in the scene, too.
To add a component yourself, you can either use the Component menu or click the Add Component button at the bottom of the Inspector. Both of these options will let you specify what kind of component you want to add.
Discussion
You can remove a component by clicking on the Gear icon at the component’s top-right corner, and choosing Remove Component.
To copy a component to another game object, click the Gear icon, and choose Copy Component. Next, go to the object you want to copy the component to, and click the Gear icon on any existing component (if it doesn’t have any, use the Transform tool). Click Paste Component As New, and the component you copied will be pasted.
Scripts (which we discuss in Chapter 2) are components, too, and work in the exact same way as any other component you might attach to a game object.
1.4 Working with Prefabs
Solution
Normally, game objects you add to your scenes are stored entirely within the scene. If you want to define an object ahead of time, and then make multiple copies of it, you can store it as a prefab. A prefab is an asset that stores a game object; you can instantiate the prefab, which creates a copy of it in your scenes.
To make a prefab, first create the original object in the scene. For example, create a new cube by opening the GameObject menu and choosing 3D Object → Cube. The object will appear in both the scene and the Hierarchy.
Next, drag and drop the object from the Hierarchy into the Project view. A new file will be created (Figure 1-11): this is the prefab! You’ll also notice that the cube’s entry in the Hierarchy view has turned blue, which indicates that it’s an instance of a prefab. You can now safely delete the original cube from the scene.
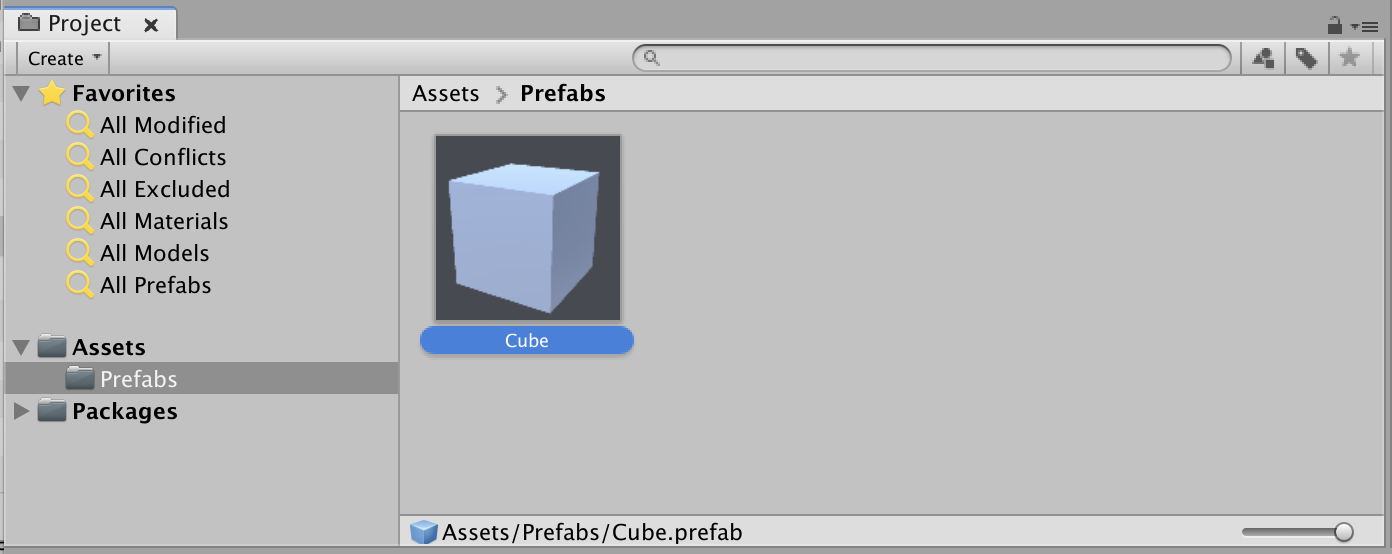
Figure 1-11. The new prefab, created from the cube
You can create an instance of a prefab by dragging and dropping the prefab into the scene. An instance is a copy of the game object and components stored in the prefab.
Edit a prefab by selecting the file in the Project view, clicking Open Prefab in the Inspector, and making changes to it (Figure 1-12).
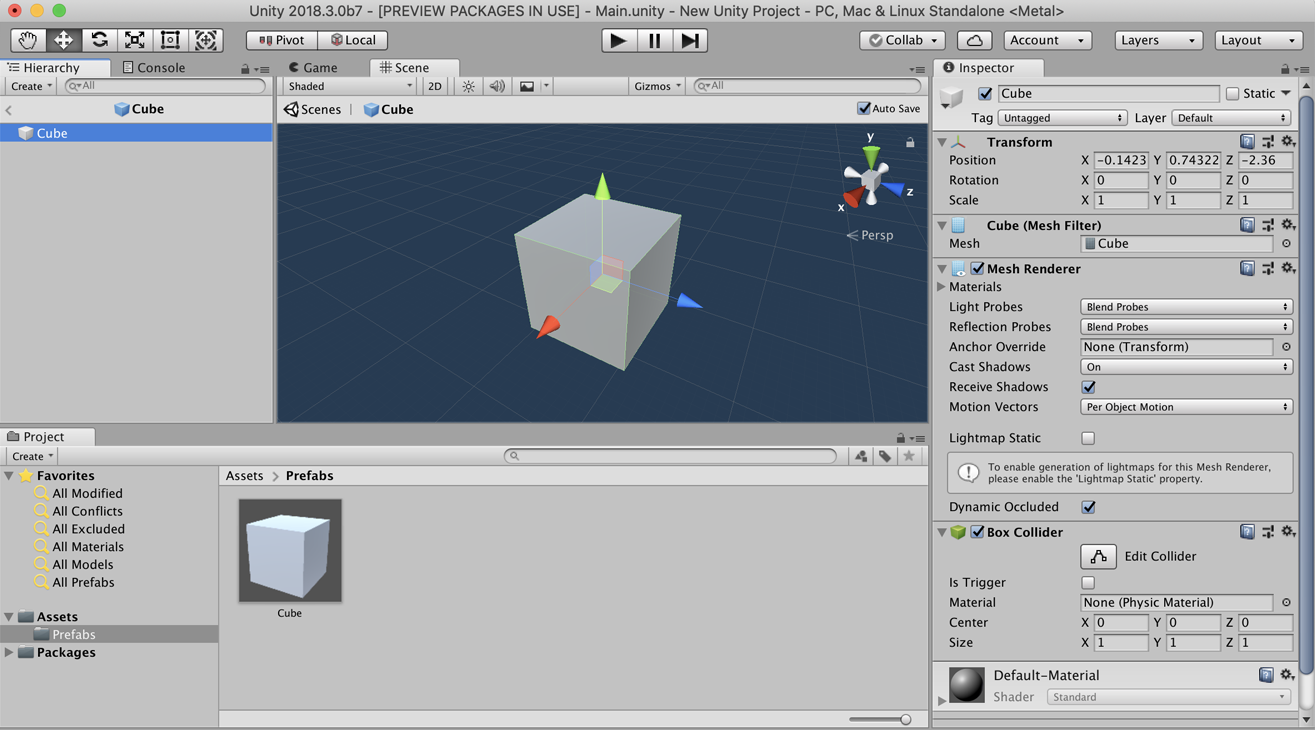
Figure 1-12. Editing the cube prefab
When you’re done, click the back arrow button in the Hierarchy. All instances of the prefab across your entire project will be updated to include your changes.
Discussion
Instantiated copies of prefabs are linked to their original; if you make changes to the prefab, the changes you make apply to any instances of it. The reverse is not true by default: if you make changes to an instance, they won’t apply to the original. For example, if you add an instance of the cube prefab to the scene and modify its Scale property, the changes will apply only to that instance. Additionally, the property that you change will be highlighted in bold, and with a blue line, to make it easier to see.
However, if you do want to apply the changes, right-click the property that you’ve changed, and click “Apply to Prefab.” If you want to apply all of your changes, open the Overrides menu at the top of the Inspector and click Apply All.
1.5 Working with Scenes
Solution
When you create a new project, Unity will create a new, empty scene for you. When you press Command-S (Control-S on a PC), Unity will save the scene file to disk; if this is the first time that the scene has been saved, Unity will ask you where to save it. You can create more scenes by opening the File menu and choosing New Scene; don’t forget to save your new scene to store it on disk.
Discussion
You can use scenes for a variety of purposes. For example, your main menu can be stored as a scene, as well as each of your game’s levels. During gameplay, you can load new scenes via code. We’ll discuss this in Recipe 2.8.
1.6 Managing Assets
Solution
To add a file to your project, simply drag and drop it from the Finder (Explorer on a PC) into the Project view. Unity will import it and make it available to your project.
Once Unity has imported it, you can select the file and configure how Unity imports it by looking at the Inspector. Different file formats have different options; for example, you can configure an image to be imported as a sprite, in which case Unity will generate an additional sprite data asset for use in the sprite system (discussed in Chapter 5), or as one of multiple different types of textures.
Discussion
Unity supports a wide variety of file formats:
-
3D objects (Autodesk FBX, Collada): Unity can also import Maya, Cinema 4D, 3ds Max, Cheetah3D, Modo, Lightwave, Blender, and SketchUp files, if the corresponding software is installed.
-
Audio (WAV, MP3, Ogg, AIFF): Unity also supports a variety of tracker module formats—specifically, Impulse Tracker (.it), Scream Tracker (.s3m), Extended Module File Format (.xm), and Module File Format (.mod).
-
2D textures (Adobe Photoshop, BMP, PNG, JPG, BMP, TGA)
-
Text (.txt, .json)
1.7 Building Unity Projects
Solution
To build your game, open the Build Settings view by opening the File menu and choosing Build Settings (Figure 1-13).
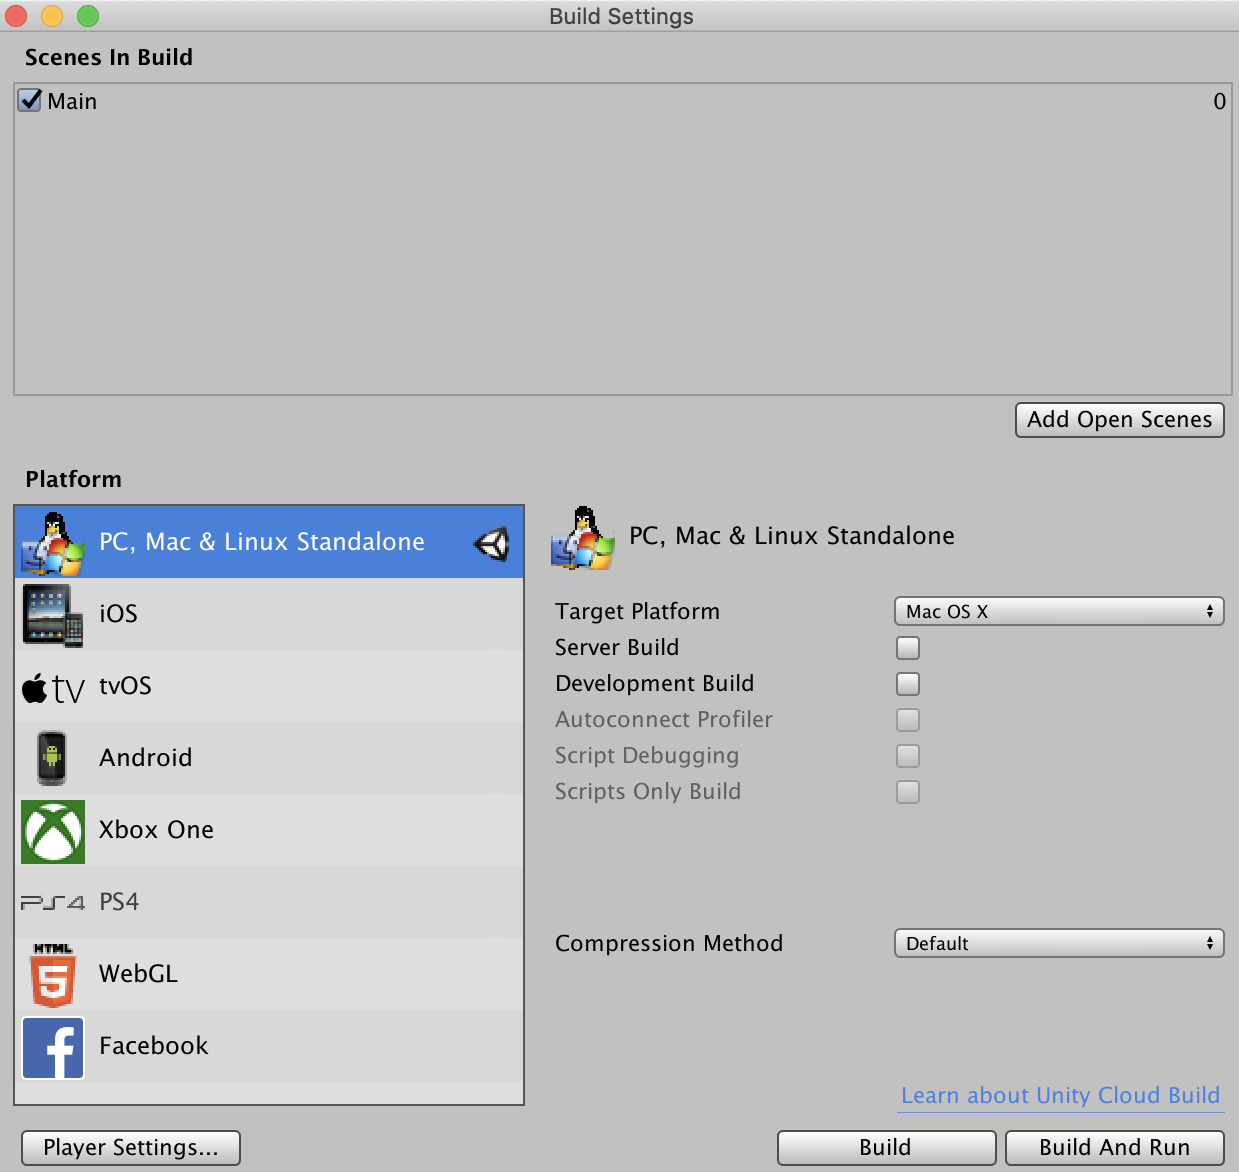
Figure 1-13. The Build Settings view
When you build your game, you specify which scenes should be included. If you haven’t already saved your current scene, you should do so now by opening the File menu, and choosing Save, or by pressing Command-S (Control-S on a PC). You can drag and drop the scenes you want to include into the Scenes In Build list, or you can click the Add Open Scenes button to add all scenes that you have open right now.
Next, you need to select which platform you want to build for. Unity supports a wide range of platforms, ranging from desktop PCs to mobile phones to consoles and more. Only one platform can be selected at a time; the current platform will be marked with a Unity logo next to it. To build for a different platform, select it and click the Switch Platform button.
When you’re ready, click the Build button. Unity will ask you where you want to save the build; once that’s done, Unity will start building.
Discussion
To build for certain platforms, you need to download the appropriate platform support module. If you don’t have the necessary module, you won’t be able to build; to get the module, click the platform and click the Open Download Page button. You’ll be taken to the appropriate web page for downloading the module.
Note
Certain platforms, like consoles, require a special license; see the Unity Platform Installation page for more information.
1.8 Accessing Preferences
Solution
To open the per-project settings, open the Edit menu, and choose Project Settings. The Project Settings view will appear (Figure 1-14).
In the Project Settings view you can configure a wide range of possible settings for your game, including the maximum resolution, build name, graphical quality settings, input, and more.
For settings that affect the entire Unity application itself, access the Preferences view.
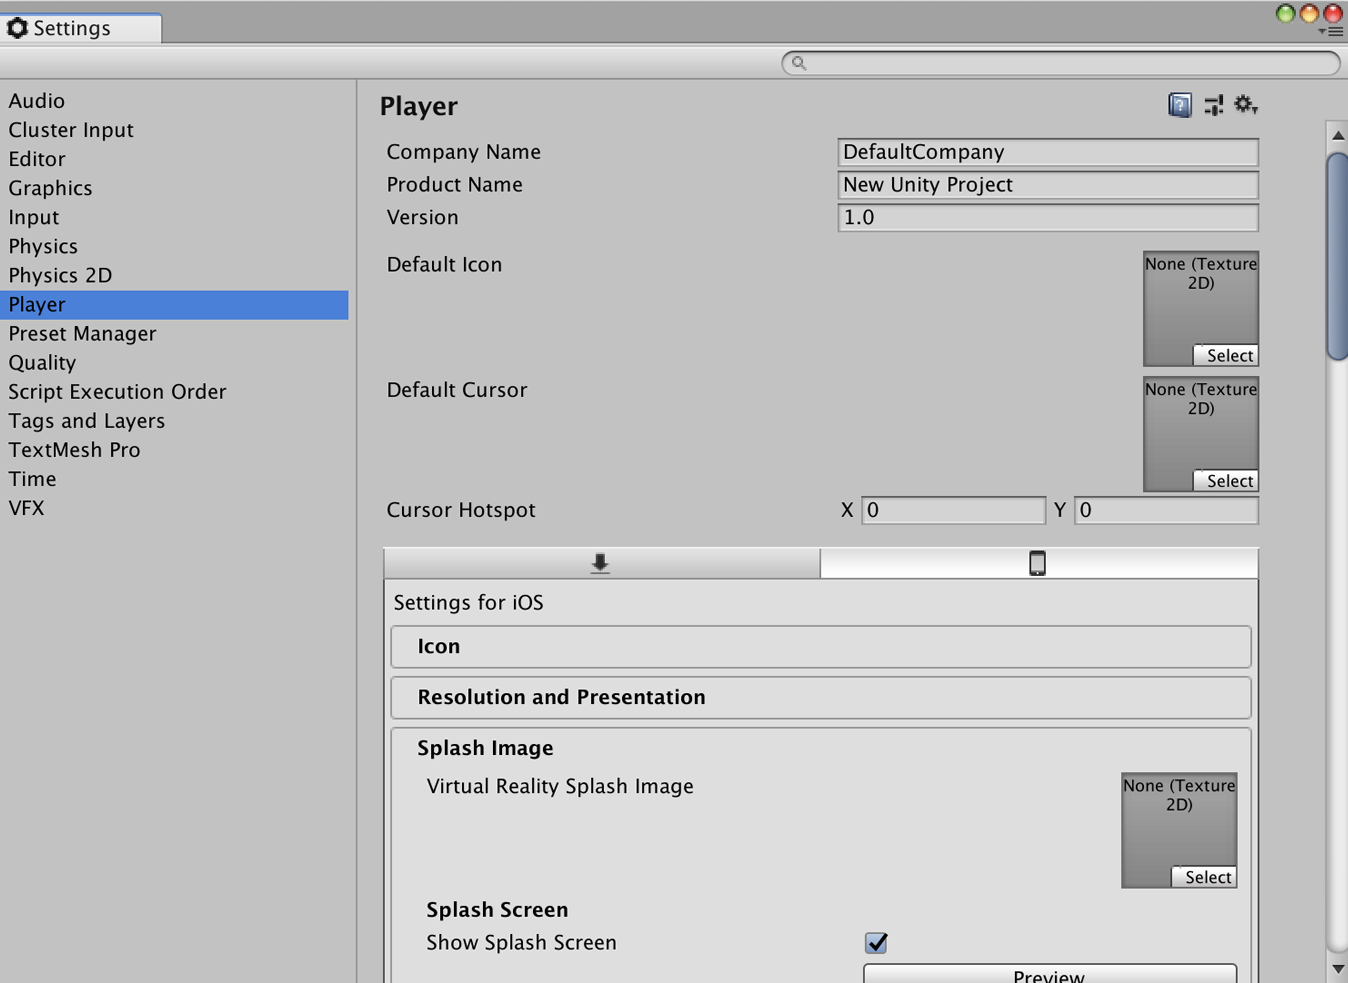
Figure 1-14. The Project Settings view
Discussion
The Preferences view (Figure 1-15) allows you to configure things like colors, hotkeys, and other settings that apply to all projects. Access these settings on a PC by opening the Edit menu and choosing Preferences; on a Mac, open the Unity menu and choose Preferences.
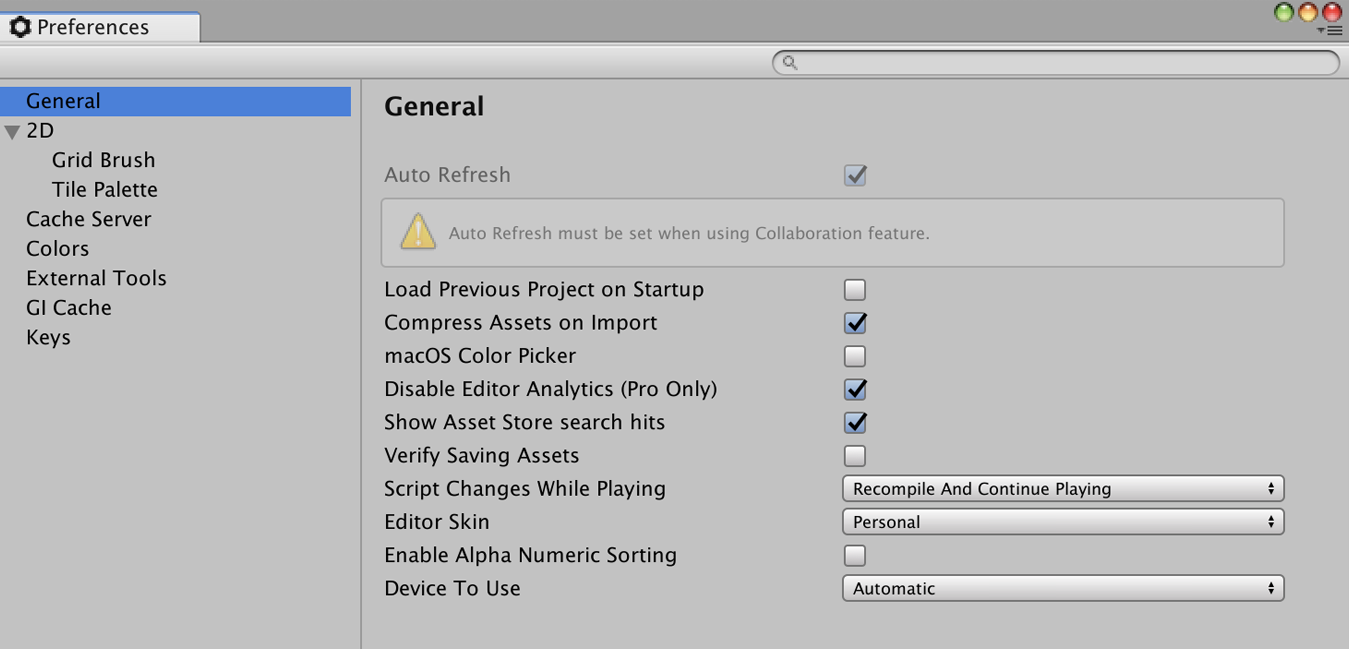
Figure 1-15. The Unity Preferences view
Get Unity Game Development Cookbook now with the O’Reilly learning platform.
O’Reilly members experience books, live events, courses curated by job role, and more from O’Reilly and nearly 200 top publishers.

