
Formatting with tbl
Some information is best presented in tabular format, that is, displayed in rows and columns. You can structure data in columns using tabs, but that can be difficult, especially if the table consists of long lines of text. The tbl preprocessor was designed to make it easier to prepare complicated tables, such as the following.
| Production of Audio Equipment (units: 1000 sets) | ||
| Product | 1984 | 1985 |
| General radio | 8,895 | 8,770 |
| Clock radio | 5,467 | 6,500 |
| Radio/cassette | 29,734 | 27,523 |
| Tape deck | 11,788 | 14,300 |
| Car radio | 9,450 | 10,398 |
| Car stereo | 15,670 | 17,456 |
With tbl, you can center, left justify, and right justify columns of data or align numeric data within a column. You can put headings that span one or more columns or rows, and draw horizontal and vertical lines to box individual entries or the whole table. An entry may contain equations or consist of several lines of text, as is usually the case with descriptive tables. A table can have as many as 35 columns and essentially an unlimited number of rows.
When you use tbl, you should have an idea or, better still, a written design of the table. Then, using a few tbl specifications, you can define how a formatted table should look, The data is entered row by row; each column is separated by ordinary tabs.
For example, the tbl description for the previous table looks like this:
.TS

center,box;

c s s

c s s

c c c

l r r.

Production of Audio Equipment

(units: 1000 sets)

-

Product            1984           1985

-

General radio      8,895          8,770

Clock radio        5,467          6,500

Radio/cassette     29,734 27,523

Tape deck          11,788 14,300

Car radio          9,450         10,398

Car stereo         15,670 17,456

.TE
When tbl processes the specifications, it calculates all the values needed to produce the table and passes these values to nroff or troff, which formats or outputs the final table.
In this chapter, we will show you how to use tbl to specify the general appearance of a table. We begin with some very simple examples, then gradually work up to more complicated ones to show all of tbl’s capabilities.
▪ Using tbl ▪
The tbl description can be written in a file or as part of a larger file that contains other tables and text. You can format a table in a file using the tbl command as in the following:
$ tbl file | troff

$ tbl file | nroff
The tbl command writes its results to standard output. Because you will probably not be interested in the generated formatting requests, you would normally pipe the output to nroff or troff and then to a printer.
The tbl command also accepts a list of filenames as input and processes them one by one in the order in which they are named on the command line. If you don’t give any filenames, tbl reads from standard input. The standard input may also be read in the middle of a list of files by typing a minus sign at the desired place.
If you’re using a line printer that doesn’t have fractional or reverse line motions, use the -T option of nroff and give the type of output device you’re using. This is important when you’re using nroff together with tbl to create boxed tables. For example, if you’re using a regular line printer, the option should read -Tlp. You must also pipe the nroff output to a program called col, which filters the reverse linefeeds. The command line for a table with boxes would then read:
$ tbl file | nroff -Tlp | col
tbl with eqn
When you have equations within your table and you use the eqn preprocessor to format them, invoke tbl before eqn. The tbl command usually executes faster because eqn normally produces a larger amount of output. To use eqn with tbl, use the following command line:
$ tbl file | eqn | troff
There is a possible complication that can occur with any of the preprocessors (tbl, eqn, or pic). If you read in subsidiary files with the .so request, those files will never be passed through the preprocessor, since the .so request has not been encountered yet by the preprocessor. Some UNIX systems support a program called soelim, which works just like cat, except that it reads in files called by .so requests. If any subsidiary files contain data that must be processed, start your command line with soelim:
$ soelim file | tbl | eqn . . . | nroff
▪ Specifying Tables ▪
A table is always indicated by a .TS (table start) at the beginning of the table description and a .TE (table end) at the end. The general format of each table looks like this:
.TS

global options line;

format section.

data

.TE
These delimiters serve two functions. First, they signal to tbl the beginning and end of the table description. The tbl program processes the table, and enables formatting requests into the text of the table. The .TS and .TE lines remain after processing by tbl. This allows them to be used as macro calls by nroff and troff. Both ms and mm define these macros; however, an enterprising user can redefine them, and surround a table with consistent formatting effects. If the macros are undefined, tbl will not suffer in any way because the use of .TS/.TE as delimiters is separate from their secondary use as macros.
As you can see from the general format, tbl sees a table in terms of three distinct parts:
1. The overall layout of the table described in the global options line. For example, this line describes whether the table is to be centered on the page or made as wide as the rest of the document. The global options line is optional.
2. The layout of each column in the table described in the format section. For example, in this section, you specify whether a column is to be left or right justified. The format section is required and may contain one or more format lines.
3. The actual text or numbers, data, to be entered in the table.
▪ A Simple Table Example ▪
Let’s start with a simple table like the following to show the different parts of the tbl description:
1     User console

2     Monochromatic graphics terminal

3     Color graphics terminal

4     Line printer

5     Digitizer

6     Laser printer

7     Unallocated
You can lay out this table using the following tbl requests:
.TS |
Table Start macro |
tab (@); |
Options line |
c l. |
Format line |
1@User console |
|
2@Monochromatic graphics terminal |
|
3@Color graphics terminal |
|
4@Line printer |
|
5@Digitizer |
Table entries |
6@Laser printer |
|
7@Unallocated |
|
.TE |
Table End macro |
Now let?s see what these lines mean:
1. The .TS at the beginning says that a table follows.
2. The options line applies to the layout of the table as a whole. The option tab (@) means that you will be using the @ character as a tab character when you input data to the table. Normally, tbl expects the columns in the table to be separated by actual tabs. But it is much easier to figure out whether you have the right number of columns if you use a visible character that is not part of the data. This i s useful in debugging a table error when the formatted data doesn’t appear in the proper columns. The options line always ends with a semicolon (;).
3. The format section applies to the lines of data in the table. Each format line contains a key letter for each column of the table. The layout of the key letters resembles the layout of actual data in the table.
Each format line corresponds to a single line in the table. However, you can have fewer format lines than lines in the table. In this case, the last line of the description applies to all remaining lines of data. In our example, we have only one format line, so all lines in the table will follow this format. For example:
c l.
means that there are two columns in each line. The first column will be centered (c), and the second left justified (l). The format section ends with a period at the end of the last format line.
4. The data itself. Each line of data corresponds to one line in the table. If you have very long input lines, they can be broken into smaller line segments. A backslash (\) at the end of a line segment means that it continues to the next line and i s part of a longer input line. Each of the columns in our table is separated by an @ sign, which we are using in place of a tab character, as we have specified in the options line.
5. A .TE signals the end of the table description.
▪ Laying Out a Table ▪
The global options line is an optional line that controls the overall appearance of the table. Normally, a table is positioned on the left-hand side of the page. Because the table is probably part of a larger document, you may want to center the table and enclose it in a box to make it stand out. Let’s modify the options line in our example to produce this new layout:
. TS

center, box, tab (@) ; New options line

c l.

1@User console

2@Monochromatic graphics terminal

3@Color graphics terminal

      etc.
When formatted, the table looks like this:
1 |
User console |
2 |
Monochromatic graphics terminal |
3 |
Color graphics terminal |
4 |
Line printer |
5 |
Digitizer |
6 |
Laser printer |
7 |
Unallocated |
8 |
Pen plotter |
9 |
Raster plotter |
10, 11, 12 |
Unallocated |
Now you know how to use three of the option names: center, box, and tab ( ). If you use one or more option names, they must be separated by spaces, tabs, or commas. The options line, if present, must immediately follow the . TS line. There are other options that you can use:
expand |
Make the table as wide as the current line length |
allbox |
Enclose each item in the table in a box |
doublebox |
Box the whole table with a double line |
linesize (n) |
Set lines (for box, allbox, and doublebox) in n-point type |
delim (xy) |
Set x and y as eqn delimiters. See Chapter 9 for information on the equation preprocessor eqn. |
The difference between a table that is centered or left justified and one that is expanded is the amount of space between columns. If you specify center or the default, the width between columns will be three ens. If you specify expand, tbl will expand the width of the overall columns until the table is as wide as the current margins.
If the overall width of the table calculated by tbl is greater than the width of the text, nroff/troff will ignore any positioning option you specify. The table will be printed as is necessary to fit everything, even if the table runs to the edge of the paper.
The linesize option changes the width of the lines used in enclosing tables to a given point size. Normally, the lines are 10 point. You can specify an absolute line size, such as linesize (24), to print thicker box lines, or a relative size, such as linesize (+14), to produce the same effect.
Let’s try one more example by enclosing all the data entries in boxes. The options line for the table now reads:
center, allbox, tab (@);
The new table would look like this:
1 |
User console |
2 |
Monochromatic graphics terminal |
3 |
Color graphics terminal |
4 |
Line printer |
5 |
Digitizer |
6 |
Laser printer |
7 |
Unallocated |
8 |
Pen plotter |
9 |
Raster plotter |
10, 11, 12 |
Unallocated |
The tbl program isn’t very good at keeping boxed tables on one page. If you have a long table, tbl may break it up at an awkward point (for example, placing the last line of a table on another page). To keep a boxed table together on one page, enclose it in a .DS/.DE macro pair (in either ms or mm). Alternatively, you can give tbl the latitude to split a table and print each section with its own table heading using the .TS H macro, as you will see later.
▪ Describing Column Formats ▪
Each column in the table is described by a key letter in the format section. Key letters are separated from each other by spaces or tabs for readability. The basic set of key letters includes:
L or l |
Left justify the data within a column. |
R or r |
Right justify the data within a column. |
C or c |
Center the data within a column. |
S or s |
Extend data in the previous column to this column (horizontal span). |
N or n |
Align numbers by their decimal points. If there are no decimal points, align them by the units digit. |
A or a |
Indent characters in the column from the standard left alignment by one em. |
^ |
Extend entry from previous row down through this row (vertical span). Text will be centered between the specified rows. |
T or t |
Also vertical span, but text will appear at the top of the column instead of midway within the specified area. |
If all columns of the table follow the same format, you need only one format line for the entire table. However, not all tables contain the same number of columns throughout. For example, you might have a table where the upper half consists of three columns, and the lower half contains only two.
The rule in writing format lines is to specify key letters for the largest number of columns in the table and carry that number for all format lines. That way, if you specify three columns, and you’re using only two, you can use two consecutive tab characters (with nothing in between) to denote an empty field for the unused column. The longest format fine defines the number of columns in the table.
Suppose you defined four columns in the first format line, and then defined only three columns in the succeeding lines. The tbl program will still format your table, but it assumes that the undefined column is left justified.
In the following sections, we will show some typical applications of these and other key letters to format table headings and columns of data.
Tables with Headers
You can think of a table header as an extra row of data that may or may not have the same format as the actual data. If the format of the header is different, you must add another line at the beginning of your format section to describe the header.
For example, we’ll change the first column in the previous table to have the header Port and the second to have the header Device, so that we get the following table.
| Port | Device |
| 1 | User console |
| 2 | Monochromatic graphics terminal |
| 3 | Color graphics terminal |
| 4 | Line printer |
| 5 | Digitizer |
| 6 | Laser printer |
| 7 | Unallocated |
| 8 | Pen plotter |
| 9 | Raster plotter |
| 10, 11, 12 | Unallocated |
The relevant lines that produced this table follow:
. TS

center, box, tab (@);

c c

c l.

Port@Device

.SP

1@User console
2@Monochromatic graphics terminal
etc.
The first line of the format description (c c) says that there are two columns of data, each one centered within each column. (Note that there is no period at the end of this line.) Because this is the first line of the format description, it applies to the first line of our data, which happens to be the table heading. This means that the words Port and Device will be centered in each column. The second (and last) format line i s the same as in the previous example and applies to the rest of the table. Note the period at the end of this line.
We used .sp to produce a blank line after the table header. The tbl command assumes that any non-numeric string preceded by a dot is a troff or nroff request and passes it unchanged to the formatter. Thus, you can vary spacing between rows, or use other nroff/troff commands within a table.
Tables with Spanned Headers
Our previous table now contains a header for each column. We now want to have an overall title or header that spans the width of the table. As before, you can think of the spanned header as an extra data line with its own format description.
We want the header to be only one column, centered across the whole table like the following.
| Output Device Configuration | |
| Port | Device |
| 1 | User console |
| 2 | Monochromatic graphics terminal |
| 3 | Color graphics terminal |
| 4 | Line printer |
| 5 | Digitizer |
| 6 | Laser printer |
| 7 | Unallocated |
| 8 | Pen plotter |
| 9 | Raster plotter |
| 10, 11, 12 | Unallocated |
Because we should keep the number of columns the same throughout the table, we use the span format option (s) to tell tbl that the entry in a preceding column continues on to the other columns. The relevant portion of our table description contains the following lines:
.TS

center, box, tab (@) ;

c s

c c

c l.
Output Device Configuration
.sp .5v
Port@Device
.sp .5v
1@User console
etc.
We now have three format lines: the first describes the main header, the second describes each column header, and the third applies to the rest of the data in the table.
Numeric and Alphabetic Columns
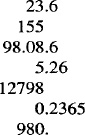
You can align numeric data by the decimal point or the units digit using the key letter n in the format line. When you use n, numbers in a column will be aligned as follows:
You should never enter non-numeric data in a column that is designated as n. On the other hand, you can enter numbers in columns that are aligned using any of the other key letters. The numbers will just be treated as if they were ordinary alphabetic characters. Thus, a column of numbers might also be centered, left justified, or right justified.
You should also avoid putting equations in numeric columns because tbl attempts to split numeric format items into two parts. To prevent this from happening, use the delim (xy) global option. For example, if the eqn delimiters are $$, a delim ($$) option causes a numeric column such as:
79 . 909 $+- .157$
to be divided after 79.909 and not after .157.
Columns designated as a are always slightly indented relative to left-justified columns. If necessary, tbl increases the column width to force this. Data in an a format is positioned so that the widest entry is centered within the column.
A note about n and a: when you have several command lines, do not use both n and a to format different rows in the same column. For example, the format lines:
r n r

r a r
are not allowed. This is because n and a share the same number register location in nroff/troff’s memory.
The special nonprinting character string \& may be used to override the normal alignment of numeric or alphabetic data. For example, if you use \& before a digit, then the digit will line up with the decimal point and \& will not appear in the output. The effect of \& is as follows.
| Input Form | Output |
9.65 |
9.65 |
12.4.8 |
12.4.8 |
15.\&7.32 |
15.7.32 |
2\&0.9.19 |
20.9.19 |
| processor | processor |
half\& |
half |
Vertically Spanned Columns
Let’s see how the vertical span key (^) is used in a table like the following.
| Fuel | Substance | kcal/ gram mol. wt. |
| Gases | Hydrogen Methane Butane Ethane |
68.4 211 680 368 |
| Liquids | Benzene Ethyl alcohol Methyl alcohol |
782 328 171 |
The tb1 description for this table is:
.TS

tab (@);

c c c

^ ^ C

l l n.

Fuel@Substance@kcal/

@@gram mol. wt.

.SP

Gases@Hydrogen@68.4

\^@Methane@211

\^@Butane@680

\^@Ethane@368

.sp
Liquids@Benzene@82

\^@Ethyl alcohol@328

\^@Methyl alcohol@171

.TE
There are three lines in the format section: the first two describe the column headings, and the last describes the format of the data.
We can imagine the first line of the header as consisting of the words Fuel Substance kcall and the second line as Fuel Substance gram mol. wt. The words Fuel Substance don’t actually appear twice, but are centered relative to the two lines that form the third column header. We use the caret key (^) in the second format line to tell tbl that these two column names vertically span their respective columns. Note the first two data lines that correspond to the first two format lines.
We could have also used the same approach to describe the rest of the data, but this would mean writing seven more format lines, one for each of the lines of data. The table really has three columns with the same format throughout, so you can use just one format line to describe all of them. Then you can enter the characters \^ in place of a column entry to tell tbl that the entry in the previous row for that column vertically spans this row also.
You can use the ^ key letter in the format section and at the same time enter \^ in the data section as we did previously. You don't lose anything by doing this and tb1 doesn’t complain.
Another way of describing a vertically spanned column is by using the key letter t (or T) in the format line. Any corresponding vertically spanned item will begin at the top of its range. Thus, if we specify t instead of ^ in the format line, the words Fuel and Substance will be in line with kcall.
Drawing Lines in Tables
Horizontal rules are specified by underscores and by equal signs entered between the appropriate lines of data. An underscore on a line by itself entered between two rows of data produces a single rule running the whole width of the table. An equal sign on a line by itself produces a double rule.
If you want a horizontal rule to be only as wide as the contents of the column, enter an underscore or equal sign in that column as part of the data. The underscore or equal sign must be separated from the other columns by tabs or the tab character we've specified in the options line. To print these characters explicitly, they should be preceded by a \& or followed by a space before the usual tab or newline character.
You can also use these two characters in place of a key letter in the format line. If an adjacent column contains a horizontal or vertical line, the horizontal line is extended to meet nearby lines. If you enter any data in this column, the data will be ignored and you will get a warning message. The following table has a fairly complicated heading:
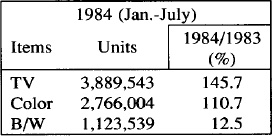
The tbl description for this table looks like this:
.TS

center,box, tab (@);

c s s

c c _

^ ^ I C

^ ^ I C

l r n.

1984 (Jan.-July)

Items@Units

@@1984/1983

@@ (%)

-

TV@3,889,543@145.7

Color@2,766,004@110.7

B/W@1,123,539@12.5

.TE
As you can see from the preceding description, vertical lines are drawn by specifying bars within the format lines. A single vertical bar between two key letters draws a single vertical line between those two columns in the table. You can enter the bar after the first key letter or before the second key letter. A vertical bar to the left of the first key letter or to the right of the last one produces a vertical line at the edge of the table. Two vertical bars (II) draw a double rule.
These characters are really more useful for drawing lines inside the table rather than for manually enclosing a table in a box because there are global options that automatically do this. To draw vertical and horizontal lines in our table “Fuels,” we modify the relevant format and data lines as follows:
c | |C |C

^ | |^ |c

l | |l |n.

Fuel@Substance@kcal/

@@gram mol. wt.

=

Gases@Hydrogen@68.4

       etc.
_
Liquids@Benzene@782
etc.
This input porduces the following table:
| Fuel | Substance | kcal/ gram mol. wt. |
| Gases | Hydrogen Methane Butane Ethane |
68.4 211 680 368 |
| Liquids | Benzene Ethyl alcohol Methyl alcohol |
782 328 171 |
Changing Fonts and Sizes
The tbl program assumes that the table is always set in roman type. However, you can always change the typeface of all entries in a column to italic or boldface. You can add one of the following letters after the column key letter:
fb        fB       b       B       Boldface

fi        fI              I       Italic

fcw       fcw     cw       CW      Constant width
If you want to change the font of only some of the entries, you should use explicit nroff/troff requests rather than specifying the font in the format line. For example, let's change the headers in the previous table to boldface and the words Gases and Liquids to italic. The format lines would look like this:
c | |cB |cB

^ | |^ |cB

l | |1 |n.
Gases will be written as \fIGases\fR and Liquids as \fILiquids\fR. The effect would be as follows:
| Fuel | Substance | kcal/ gram mol. wt. |
| Gases | Hydrogen Methane Butane Ethane |
68.4 211 680 368 |
| Liquids | Benzene Ethyl alcohol Methyl alcohol |
782 328 171 |
The type size in which headings and data are printed is normally 10 points. You can also change the size of the type by using the key letter p and an absolute or relative point size. To specify a change in size relative to the existing point size, use a + or − before the value. For example, a column specification of cp12 or cp+2 will both result in a centered column using 12-point type.
Changing the Column Width
When you’re not using the expand option, the normal spacing between any two columns is three ens. You can change the spacing by specifying a numeric value between the key letters representing those columns. The number specifies the separation in ens. When you’re using the expand option and you specify a column space, the number is multiplied by a constant such that the table is as wide as the current line length.
If you don’t want any spaces between the columns, simply write 0, as in:
r0 l
which yields:
Hydrogen68.4
Methane211
Butane680
These spacings are only nominal spacings. The data may be so irregular in length that no two columns will actually appear to be separated by the specified distance. However, varying the amount of separation between two columns still leaves tbl free to make each column as wide or as narrow as is necessary.
You can specify a minimum width for any column by entering the letter w (or W) after the key letter, followed by the desired width in parentheses. You can use any unit of measurement recognized by nroff/troff when specifying a width dimension. You can also enter a value without a unit of measurement, in which case tbl assumes the value is in ens. Thus. the format:
specifies a column that is 15 ens wide with the text right justified within the column, and:
lw (2 .25 i)
specifies a left-justified column that is 2.25 inches wide.
You can also force tbl to make the width of particular columns equal by using the letter e (or E) after the key letter for those columns. This allows a group of regularly spaced columns.
To show that tbl can be used for any text that needs to be laid out in columns (as opposed to tables), we can print the following text:

using this tbl description:
.TS

expand, tab(@);

cew(l.3i) ce ce.

Signature@@

August 31,@J. White@K. Kimura

1987@@

.TE
In the last format line, we specified that all three columns be 1.3 inches wide. Because all columns will be of equal width, we need to specify the width only once.
Other Key Letters
We already showed you some of the more widely used key letters. Additional features that can be used with the basic set of key letters are:
Key letters for a column can be written in any order. They do not need to be separated, except when you specify both a point size (p) and a column separation number. Thus, a numeric column entered in bold 18-point type with a minimum column width of 1.5 inches and separated from the next column by 12 ens can be written as:
npl8w (1. 5i) B 12
Two or more format lines can also be written on one line by separating them with commas. For example, the format lines:
c c c

l l n.
can be written as:
c c c, l l n.
▪ Changing the Format within a Table ▪
All our examples so far have shown tables that consist of somewhat complicated headings followed by identical rows of data. Thus, we can keep the number of format lines comparatively small. This may not be the case when a table is divided into sections, each of which has its own heading. Let’s look at the following table (from AT&T’s Documenter’s Workbench Text Formatter’s Reference):
It has both a main header and column headers. The body of the table is divided into two parts. The upper part contains two columns, and the lower part contains three. To format each part correctly, we must enter a command line for each row of data so that tbl can keep track of which rows of the table have which format. This process is tedious and prone to error. Fortunately, tbl has a way around this.
To change the format of columns within a table, tbl has the table continue request .T&. We can change the format of a table at any time by entering .T& followed by the new format line(s) and the additional data. The general format for the tbl description is as follows:
.TS

option line;

format section.

data

.T&

new format section.

data

.T&

another new format section.

data

.TE
There are two things we cannot change after a .T& request: the global options line and the number of columns specified. Our original options line holds for the entire table.
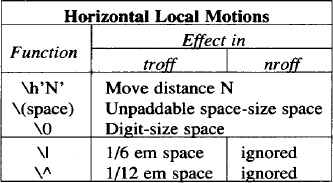
Let’s see how we can use the .T& request to produce the previous table:
.TS

center, box, linesize (6), tab(@);

cB s s.

Horizontal Local Motions

_

.T&

cI | cI s

cI | cI s

cI | cI | cI

c | l s.

Function@Effect in

\e^@_

\e^@troff@nroff

_

\eh'N' @Move distance N

\e (space)@Unpaddable space-size space

\e0@digit-size space

_

.T&

c | l | l.

\e|@1/6 em space@ignored

\e^@1/12 em space@ignored

.TE
We take the largest number of columns in the table, which is three. We have two .T& requests to break up the table into three parts with their own format sections. The first part applies to the main header only. The second describes the column headers and the three-column segment of the table. Finally, the lower part applies to the last part of the table.
Although you can have hundreds of lines in a table, tbl uses only the first 200 lines to set up the table. Any format changes you make after the 200th column will not be processed by tbl. In this case, you should break up the table into smaller table segments.
Should you specify .TS H but forget to follow it with .TH, some strange things will happen. One recent instance of this caused the table to be output in a nearly endless succession of pages. (In troff terms, a diversion created to capture the table heading filled up with the table instead; this caused the first page break that triggered the output of the diversion at the top of the next page; each time the diversion was output, it caused a new page break and the diversion was output again.)
▪ Putting Text Blocks in a Column ▪
Some tables consist of column entries that cannot be conveniently typed as a simple string between tabs. Descriptive tables, for example, require ordinary flowing text justified between the margins of the specific column in which it appears in the table. These sections of flowing text are called text blocks.
Each block of text is preceded by a T{ and followed by a T }. The T{ marker must be at the end of a line, and the T} must be at the start of a line:
. . .T{

Block of

text

T} ...
When a text block is included in a row that contains other columns of data or text, the T{ that marks the beginning of the text block must appear at the end of the line in the text. Even a single blank space following the T{ will cause the table to fail. Likewise, the T} symbol must always begin the line:
... Data@T{

Block of

text

T} @data...
This makes it easy for you to revise text when necessary and also allows you to insert any special nroff/troff commands before or after the text block.
Let’s lay out the following table:
The tbl description of this table is:
.TS

box,tab(@);

cb s

CI| CI

cw(l.25i) | lw(3.25i).

Some Pattern-Matching Characters in \fIvi\fR

_

Special Characters@Usage

_

\fI.\fR@Matches any single character\

except \fInewline\fR.


*@T {

Matches any number (including zero) of the

single character (including

a character specified by a regular expression)

that immediately precedes it.

T}
[...]@T{
Matches any \fIone\fR of the characters enclosed
between the brackets.
A range of consecutive characters can be
specified by separating the
first and last characters in the range with a hyphen.
T}
$@T{
Requires that the preceding regular
expression be found at the end of the line.
T}
\ { \ fIn,m\fR\}@T{
Matches a range of occurrences of the
single character (including a
character specified by a regular expression)
that immediately precedes
it. n and m are integers between
0 and 256 that specify how many occurrences to match.
T}
.TE
What might confuse you about this source text is that each block of text occupies two or more lines. Just think of everything that comes between a T{ and a T} as a single entry that occupies a single column in that row. It is separated from its neighbors by tabs. If you keep track of the tabs, you will be able to sort out quite easily the sequence of columns.
In the previous description, we specified a minimum width for each column. If a width is not given, tbl uses the default:
where L is the current line length, C is the number of table columns spanned by the text, and N is the total number of columns in the table. It is sometimes better to define a column width because tbl might make the table too narrow by default.
You can also use the nroff/troff commands .na and .ad to left justify text blocks if the output doesn’t come out fully justified. The tbl description would be:
... T{

.na

Block of

text

.ad

T}
The nroff and troff formatters can accept only about twenty or thirty small text blocks in a table without exceeding certain internal limits. If the limits are exceeded, you will get error messages like “too many strin/macro names” or “too many number registers.”
In this case, you should divide the table into two or more independent tables, each with its own .TS and .TE requests. The final formatted sections can be “joined” and made to appear as one table by inserting minus .sp requests (such as .sp -12p) between the sections. This will cause the formatter to draw them together.
You can also change the vertical line spacing within a text block using a key letter followed by v (or V) and a number. The number may be a signed digit and is taken as an increase or decrease from the current vertical spacing.
▪ Breaking Up Long Tables ▪
If you have a very long table that will fill many pages, it might be helpful to break up the table into several smaller ones, with the main heading reproduced at the top of each page. Then the reader doesn’t have to keep returning to the first page to see what the columns indicate. The tbl program also automatically breaks a boxed table if it runs over one page.
You can use the .TS H and .TH macros to reproduce the original heading at the top of each page of the table:
.TS H

options;

format section.

main header

.TH

data

.TE
The .TH (table header) macro is a feature of the m s macro package (not tbl). This macro can take the letter N as an argument; this causes the table header to be printed only if it is the first table header on a page. This is useful when you have to build a long table from smaller .TS H/.TE segments. For example:
.TS H

global options;

format section.

main header

.TH

data

.TE

.TS H

global options;

format section.

main header

.TH N

data

.TE
This causes the table header to appear at the top of the first table segment. The header will not appear on top of the second segment when both segments appear on the same page. If the table continues to another page, the heading will still appear at the top of the new page. This feature is useful when breaking a long complex table into segments.
▪ Putting Titles on Tables ▪
The mm macro .TB can be used to automatically number and title a table. All tables with .TB are numbered consecutively. The title is centered above the table if it can fit on one line. If the title is longer than one line, all succeeding lines of the title are indented to line up with the first character of the title. The .TB macro is normally used inside a .DS/.DE pair.
The .TB macro is not part of tbl. Thus, it can be used to generate titles or headers for tables that are created using only tabs and none of the tbl commands. The general format of the .TB macro is:
.TB [title] [n] [flag]
where n is used to override the normal numbering. The flag option can take one of the following values:
0 n is used as a prefix to the normal table number
1 n is used as a suffix to the normal table number
2 n replaces the normal table number
If you put the .TB macro before the .TS macro, the title is placed above the table. You can also put the title below the table by using the .TB macro after .TE.
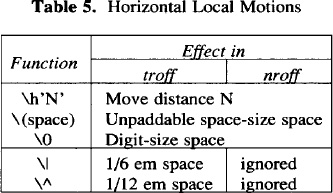
For example, we can modify one of our tables by adding a title and labeling it as Table 5. We add the following lines before the .TS:
And we add a .DE after the .TE. The table now looks like this.
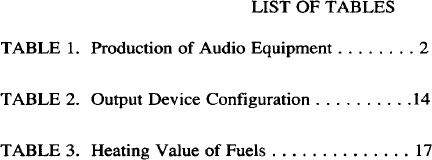
Another useful mm macro is the .TC macro. The .TC macro is placed at the end of the file. When the file is formatted, .TC collects the titles of tables that were generated using .TB for the table of contents. Thus, if we had used .TB to put headers in our examples, the table of contents might look like this:
▪ A tbl Checklist ▪
Most table formatting errors come from specifying too few columns in the format section, forgetting a tab character between column entries in a table, or omitting one or more of the characters that tbl expects in a table description. After you’ve finished laying out a table, check that you have the following:
![]() a
a .TS with a .TE
![]() a
a .TH with a .TS H
![]() a semicolon at the end of the options line (if there is one)
a semicolon at the end of the options line (if there is one)
![]() a period at the end of the last format line (including format sections with a
a period at the end of the last format line (including format sections with a .T&)
![]() in the format section, an item for each column and a format line for each line of the table
in the format section, an item for each column and a format line for each line of the table
![]() a tab symbol for each column in each line of the table, except for the first column when horizontally spanning, and within text blocks
a tab symbol for each column in each line of the table, except for the first column when horizontally spanning, and within text blocks
![]() for text blocks, a
for text blocks, a T{ with every T}
![]() no extra blanks after:
no extra blanks after:
any .TS, .TE, .TS H, .TH, or .T&

the end of the options and format lines

any T{ or T}
![]() no periods at the beginning of any “data” text lines (add a
no periods at the beginning of any “data” text lines (add a \& before the period, if necessary)
![]() a space after each table entry of _and = unless you want the lines to extend across the column
a space after each table entry of _and = unless you want the lines to extend across the column
▪ Some Complex Tables ▪
Surely, the best way to learn more about tbl is to study tables of greater complexity than the ones we’ve look at so far. The tbl article by M.E. Lesk in the UNIX Programmer’s Manual provides many fine examples of difficult tables. Look at the formatted tables and try to “break” the code that produced them. In this section, you’ll find two complicated tables followed by the tbl input for you to decipher.
The weight table shown in Figure 8-1 is taken from a manual that describes the safe operation of mobile cranes. This table was coded by an associate, Daniel Gilly, over several hours. The code is listed in Figure 8-2. Look at how the vertical line indicator (|) is used between entries to draw a line at the end of each column. Note also the use of the alphabetic (a) format specification to produce indented text.
The financial table shown in Figure 8-3 is adapted from a prospectus prepared by troff users at a large New York law firm. The code for this table is listed in Figure 8-4. Note the use of a leader character (\a) in the first entry, coupled with a fixed width specification for the first column, to produce leaders that fill out the column. Also, notice how the table headings are printed in a smaller point size than the rest of the table, using the format specification (p8).
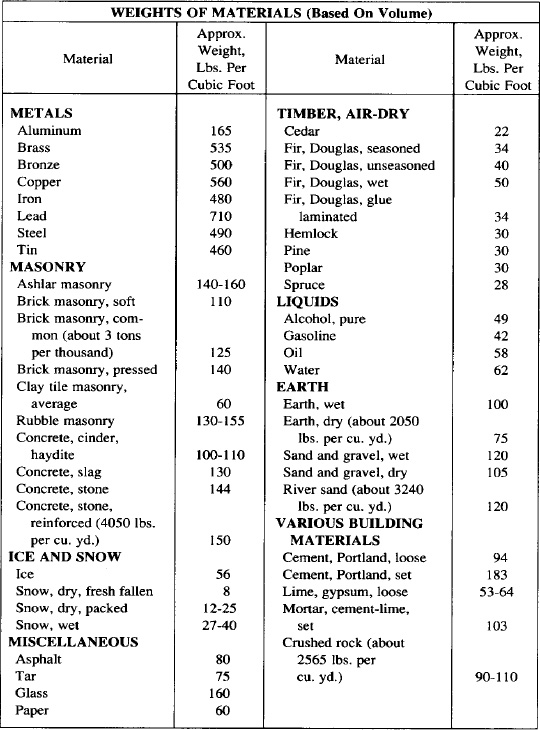
Fig. 8-1. A Complex Table
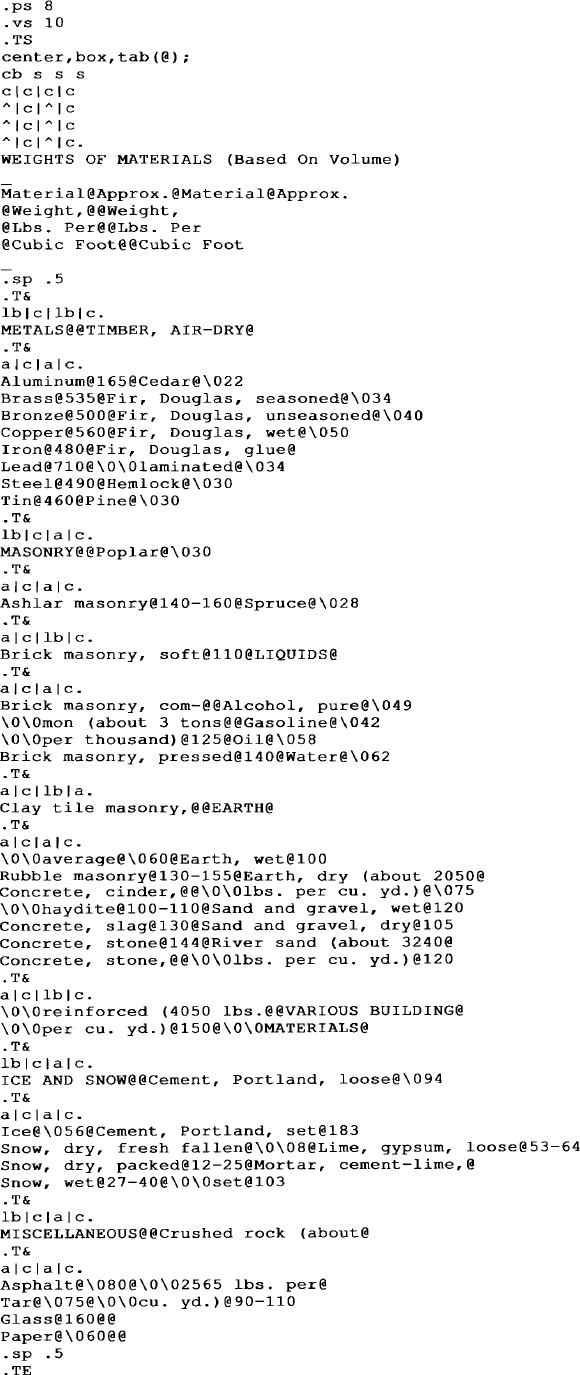
Fig. 8-2. Input for Figure 8-1
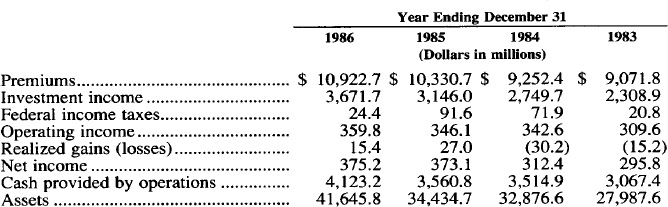
Fig. 8-3. Financial Table
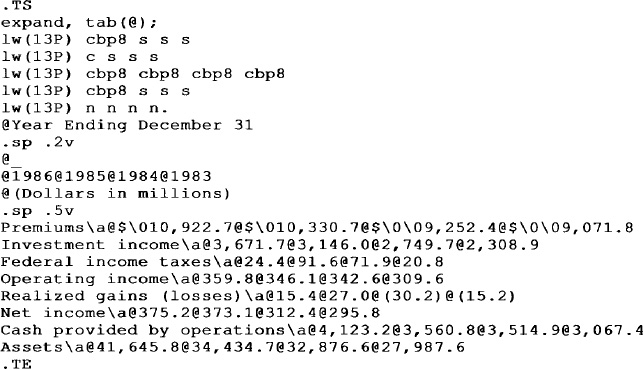
Fig. 8-4. Input for Figure 8-3
Get UNIX° TEXT PROCESSING now with the O’Reilly learning platform.
O’Reilly members experience books, live events, courses curated by job role, and more from O’Reilly and nearly 200 top publishers.

