
Putting It All Together
Before returning to the topic of table of contents and index processing, using shell tools that we will build, let’s review what we’ve covered so far.
We started with a promise to show you how the UNIX environment could support and enhance the writing process. To do that, we’ve had to delve into many details and may have lost the big picture.
Let’s return to that big picture here. First, UNIX provides what any computer with even rudimentary word-processing capabilities provides: the ability to save and edit text. Few of us write it perfectly the first time, so the ability to rewrite the parts of a document we don’t like without retyping the parts we want to keep is a major step forward.
However, no one will argue that UNIX offers better tools at this simple level than those available in other environments. The vi editor is a good editor, but it is not the easiest to learn and lacks many standard word-processing capabilities.
Where UNIX’s editing tools excel is in performing complex or repetitive edits. A beginner may have little use for pattern matching, but an advanced user cannot do without it. Few, if any, microcomputer-based or standalone word processors can boast the sophisticated capabilities for global changes that UNIX provides in even its most primitive editors.
When you go beyond vi, and begin to use programs such as ex, sed, and awk, you have unmatched text-editing capabilities—power, if you will, at the expense of user friendliness.
Second, UNIX’s hierarchical file system, multiuser capabilities, and ample disk storage capacity make it easy to organize large and complex writing jobs—especially ones involving the efforts of more than one person. This can be a major advantage of UNIX over microcomputer-based or dedicated word processors.
Anyone who has tried to write a multiauthor work on a floppy-based system knows how easy it is to lose track of the latest version of a file, and to get lost among a multitude of disks. UNIX makes it easy to share files, and to set up a consistent framework for managing them.
In addition to storing multiple versions of documents on line, you can use the file system to set up specific environments for writing. For example, a separate .exrc file in each directory can define abbreviations and command maps specific to a book or section.
Third, UNIX provides a wide range of formatting tools. Using troff, pic, tbl, and eqn, you can easily typeset books. This is not as unique and powerful a capability as it was even two or three years ago. The advent of low-cost laser printers and wysiwyg “desktop publishing” tools like Microsoft WORD, MacWrite, and Aldus Pagemaker allow PC users to do typesetting as well.
However, despite the glamor of desktop publishing, and the easy-to-use appeal of products for the Macintosh, the UNIX typesetting facilities offer many advantages. Chief among these advantages is the very feature in which troff at first seems much weaker than its low-end competitors, namely, the use of embedded codes to control formatting.
Wysiwyg systems are easy for beginners to use, and they are very satisfying because you can immediately see what you are going to get on the printed page. But have you ever tried to make a global font change in MacWrite? Or had to make a change to a document after it was “pasted up” with Pagemaker? Or had to wait endlessly while Microsoft WORD reformats an entire document after you change the margins?
Because troff codes can be edited, just like any other text in a file, it is very easy to change your mind about formatting and make global changes. And after you have mastered the art of writing macros, it is even easier to change formats simply by changing macro definitions. And because the editing and formatting functions are separate, you don’t have to wait for the computer while you are making those changes—that happens while you print.
This is not to say that troff is superior to the best possible wysiwyg system. High-end systems from companies like Interleaf, Xyvision, and Texet offer power, speed, and ease of use all at once. Unfortunately, the software is costly, and requires the use of high-cost bit-mapped workstations. This can lead to a bottleneck in document production unless you have enough money to spend on hardware. Because troff requires only a standard alphanumeric terminal, it provides much more “bang for the buck.”
There is no question that the publishing system of the future will be a wysiwyg system. But for now, a low-cost UNIX system with vi and troff is still one of the most cost-effective publishing systems around.
This brings us to the final strength of UNIX—its extensibility. More than an operating system or a collection of programs, UNIX is a philosophy of computing. Let’s consider an analogy. The Volkswagen beetle was a unique automobile of the sixties and seventies. Its simple design was one of the reasons that made it popular; the “bug” was user-maintainable. VW owners (“users”) could tinker with their cars, performing such tasks as changing spark plugs by hand. They scoffed at owners of other cars who depended upon mechanics. It is perhaps this same feeling of independence—let me do it myself—that the UNIX environment fosters in its users. There are many quite capable software environments that are packaged to keep users out. In some ways, the secret of UNIX is that its working parts are visible. The UNIX environment, like the VW beetle, is designed so that users can take it apart and put it back together. UNIX is a philosophy of computing. As we’ve stressed again and again, UNIX provides general-purpose tools, all of which are designed to work together.
No single program, however well thought out, will solve every problem. There is always a special case, a special need, a situation that runs counter to the expected. But UNIX is not a single program: it is a collection of hundreds. And with these basic tools, a clever or dedicated person can devise a way to meet just about any text-processing need.
Like the fruits of any advanced system, these capabilities don’t fall unbidden into the hands of new users. But they are there for the reaching. And over time, even writers who want a word processor they don’t have to think about will gradually reach out for these capabilities. Faced with a choice between an hour spent on a boring, repetitive task and an hour putting together a tool that will do the task in a flash, most of us will choose to tinker.
The index and table of contents mechanism in this chapter is a good example of putting together individual UNIX tools to do a job that no one of them can easily do alone. Its explanation is a fitting end to this book, which has tried throughout to put the UNIX text-processing tools in a wider context.
▪ Saving an External Table of Contents ▪
As discussed in the last chapter, troff does provide a mechanism (namely diversions) to collect and process a table of contents directly within the formatter. However, this approach is best suited to short documents, because it requires that the entire document be reformatted to produce the table of contents.
Likewise, you could even produce and sort an index entirely within troff, though the effort required would be large. (In fact, a recent article on Usenet, the online UNIX news network, described an implementation of a sort algorithm using troff macros. It is painfully slow—it was done just to prove that it could be done, rather than for practical application.)
The beauty of UNIX, though, is that you don’t have to stretch the limits of troff to do everything necessary to produce a book. Just as editing is separated from formatting, you can separate processing the table of contents and the index from formatting the rest of the text.
The troff formatter provides the basic mechanisms for producing the raw material—the lists of headings or index terms, accompanied by the page numbers on which they occur. However, the actual saving and processing of the raw material is done with make, sed, awk, sort, and the shell.
In Chapter 12, we began to look at how a shell script (which we called format) could manage the formatting process. We used the programming power of the shell not only to save the user the trouble of remembering command-line options and complicated postprocessor names, but also to apply the power of sed to various ancillary formatting tasks.
The collection of a table of contents and index requires that we first return to this script. As we left Chapter 17, both the table of contents and the index macros simply write data to standard error.
A Bourne shell user can redirect this error output to a file using the following syntax:
$ dittoff file 2> tocfile
The problem is that the table of contents, index entries, and potential formatter error messages are all captured in the same file. We need a mechanism for parsing this file into its separate elements. The user could do this manually, but it is far better to let a program do it.
The first step is to redirect all of the error output from the formatter to a temporary file. After formatting is done, we can use sed to search for the identifying strings that we introduced as part of the “error message” and output the matching lines into separate files. True error messages should be sent back to the screen, and the temporary file removed.
The trick here is naming the files into which the saved data is stored by sed. It is not appropriate simply to append table of contents data to one file, because we are likely to reformat a document many times while rewriting and revising it. Instead, we want to have a unique table of contents file and a unique index file for each source file that we format. The best way to do this without cluttering up the current directory is to create a subdirectory for each type of data we want to save—toc, index, and so on.
Let’s look at how we did these things in the format script:
  roff="ditroff -Tps"; files=""; options="-mS"

  pre="| ditbl"; post="| devps "

  sed="| sed -f /work/macros/new/cleanup.sed"

  pages=""; toc="2>/tmp$$"; lp="| lp -s"

  if [ ! -d index a ! -d toc ]; then

     echo "NO index and toc. Use the buildmake command."

     toc="2>/dev/null"

  fi

  while [ "$#" != "0" ]; do

    case $1 in

      -?) echo "Format Options are:"

          echo "-m*   Specify other macro package (-mm)"

          echo "-s    Use small format (5-1/2 by 8-1/2)"

          echo "-o    Print selected pages"

          echo "-cg   Format for Compugraphic typesetter"

          echo "-E    Invoke EQN preprocessor"

          echo "-P    Invoke PIC preprocessor"

          echo "-G    Invoke GRAP & PIC preprocessors"

          echo "-x    Redirect output to /dev/null"

          echo "-y    Invoke nroff; pipe output to screen";

          echo "-a    Set interactive troff -a option"

          echo "-*    Any troff option"; exit;;

      -m*) options="$1";;
      -s) options="$options -rS1 -rv1";;

      -o) pages="$pages -o$1";toc="2>/dev/null";;

      -cg) roff="ditroff -Tcg86"; post="| ditplus -dtcg86";;

      -E) pre="$pre | dieqn";;

      -P) pre="| pic -T720 -D $pre";;

      -G) pre="| grap | pic -T720 -D $pre";;

      -x) options="$options -z"; post=""; lp="";;

      -y) roff="nroff"; post=""; lp="| col | pg";;

      -a) post=""; options="$options -a";;

      -*) options="$options $1";;

       *) if [ -f $1 ]; then

            files="$files $1"

            txfile="$1"

            if [ -d /print ]; then touch /print/$txfile

          else

            echo "USAGE: format (options) files"

            echo "TO list options, type format -? "; exit

          fi;;

    esac

    shift

  done

  if [ -n "$files" -o ! -t 0 ]; then

  # Use soelim to expand .so's in input files

  #   otherwise use cat to send files down pipe.

   eval "cat $files $sed $pre |

         $roff $options - $toc $post $pages $toc $lp"

  else echo "fmt:  no files specified"; exit

  fi

  if [ -f tmp$$ ]; then

     if [ -d toc ]; then

     sed -n -e "s/^><CONTENTS:\(.*\)/\l/p" tmp$$ > toc/$txfile

     fi

     if [ -d index ]; then

     sed -n -e "s/^><INDEX:\(.*\)/\l/p" tmp$$ > index/$txfile

     fi

     if [ -d figlist ]; then

     sed -n -e "s/^><FIGURE:\(.*\)/\l/p" tmp$$ > figlist/$txfile

     fi

     if [ -d tablist ]; then

     sed -n -e "s/^><TABLE:\(.*\)/\l/p" tmp$$ > tablist/$txfile

     fi

     sed -n "/^></!p"

     rm /tmp$$

  fi

  exit
Now, for example, when we format a file called ch01, a file of the same name will be written in each of the four subdirectories toc, index, figlist, and tablist. Each time we reformat the same file, the output will overwrite the previous contents of each accessory file, giving us the most up-to-date version. When we use the -o option for only partial formatting, writing out of these files is disabled by redirecting error output to /dev/null, so that we don’t end up with a partial table of contents file.
There’s also a -x option, to allow us to format a file to produce the table of contents and index without producing any regular output. This option uses troff’s -z option to suppress formatted output, and sets the post and lp shell variables to the null string.
(You may also notice the -cg option, which specifies a different device to both troff and the postprocessor—in this case, a Compugraphic typesetter instead of an Apple LaserWriter. This is included as an aside, to give you an idea of how this is done.)
The contents of the toc, figlist, and tablist directories can be assembled into a complete table of contents, or formatted on the spot for a chapter-level table of contents. We can use the following simple sequence of commands (which could be saved into a shell script):
echo .ta \n(LLu-5n \n(LLuR  > book.toc

echo .ce >> book.toc

echo \f3TABLE OF CONTENTS\fP >> book.toc

echo .sp 2 >> book.toc

echo "\t\f3Page\fP" >> book.toc

cat  /toc/ch?? /toc/app?  >> book.toc

echo .bp >> book.toc

cat  /figlist/ch?? /figlist/app? >> book.toc

echo .bp >> book.toc

cat  /tablist/ch?? /tablist/app? >> book.toc
The resulting book.toc source file looks like this:
.ta \n(LLu-5n \n(LLuR

.ce

\f3TABLE OF CONTENTS\fP

.sp 2

|_______|\f3Page\fP

.sp 3

Chapter 1  Introduction to Alcuin

.sp 1.5

1.1    A Tradition of Calligraphic Excellence\a\t1-2

1.2    Illuminated Bit-Mapped Manuscripts\a\t1-4

.sp 3

Chapter 2  Getting Started with Alcuin

.sp 1.5

2.1    Objectives of this Session\a\t2-1

2.2    Starting Up the System\a\t2-2
2.2.1      Power-up Procedure\a\t2-2

.

.

.
The index will require more serious postprocessing.
▪ Index Processing ▪
It is relatively simple to assemble the components of a table of contents into sequential order, but it is much more difficult to process the index entries, because they must be sorted and manipulated in a variety of ways.
This is one of the most complex tasks presented in this book. So let’s start at the beginning, with the raw data that is output by troff, and directed to our index subdirectory by the format shell script. For illustration, we’ll assume a sparse index for a short book containing only three chapters.
As you may recall, the user creates the index simply by entering macro calls of the form:
.XX "input devices"
or:
.XX "input devices, mouse"
or:
.XR "mouse (see input devices)"
throughout the text. Both macros write their arguments to standard output; the .XX macro adds the current page number, but the .XR (cross reference) macro does not. The user is responsible for using consistent terminology, capitalization, and spelling. A comma separates optional subordinate entries from the major term.
An index term should be entered on any page that the user wants indexed—at the start and end of a major topic, at least, and perhaps several in between if the discussion spans several pages.
In our example, entries are saved into the three files ch01, ch02, and ch03 in the order in which they appear in the respective input files. The indexing term entered by the user is printed, separated from the current page number by a tab. Certain cross reference entries do not have a page number. The content of the raw index files after chapters 1 through 3 have been formatted follows. (Here, and in the following discussion, a tab is represented by the symbol |______|.)
$ cat index/ch??

Alcuin, overview of|_______|1-1

illuminated manuscripts|_______|1-1

fonts, designing|_______|1-2

Alcuin, supported input devices|_______|1-2

input devices|_______|1-2

input devices, mouse|_______|1-2

input devices|_______|1-2

mouse (see input devices)
input devices, bit pad|_______|1-3

bit pad (see input devices)

input devices |_______|1-3

startup, of system|_______|2-1

power, location of main switch|_______|2-1

power, for graphics display|_______|2-1

startup, of system|_______|2-2

input devices, mouse|_______|2-2

input devices, bit pad|_______|2-3

fonts, selecting|_______|3-1

glyphs, designing|_______|3-2

extra line space|_______|3-3

symbolic names|_______|3-3

@ operator|_______|3-4
To create a presentable index from this raw data, we need to do the following:
![]() Sort the entries into dictionary order, and remove duplicates, if any. (Duplicate entries occur whenever the user enters
Sort the entries into dictionary order, and remove duplicates, if any. (Duplicate entries occur whenever the user enters .XX macros with the same argument over several input pages, and two or more of those entries fall on the same output page.)
![]() Combine multiple occurrences of the same term, appending a complete list of page numbers and properly subordinating secondary terms.
Combine multiple occurrences of the same term, appending a complete list of page numbers and properly subordinating secondary terms.
![]() Introduce formatting codes, so that the resulting file will have a pleasing, consistent appearance.
Introduce formatting codes, so that the resulting file will have a pleasing, consistent appearance.
Just how complex a task this is may not be immediately apparent, but rest assured that it takes the combined operation of sort, uniq, and several different awk and sed scripts to do the job properly.
Fortunately, we can hide all of this complexity within a single shell program, so that all the user needs to type is:
$ cat index/files | indexprog > book.ndx
Sorting the Raw Index
The first part of indexprog processes the index entries before they are passed to awk. The sort program prepares a list of alphabetical index entries; uniq removes duplicate entries.
sort -t\|_______| -bf +0 -1 +ln | uniq
The options to the sort command specify primary and secondary sort operations, affecting the first and second fields separately. The -t option specifies that a tab character separates fields. The primary sort is alphabetic and performed on the indexing term; the secondary sort is numeric and performed on the page number. The primary sort is also controlled by the following options: the -b option (ignore leading blanks in making comparisons) is a safety feature; the -f (fold uppercase and lowercase letters) is more important because the default sort order places all uppercase letters before all lowercase ones; and +0 -1 ensures that the alphabetic sort considers only the first field. The secondary sort that is performed on the second field (+1n) is numeric and ensures that page numbers will appear in sequence.
Now let’s look at the index entries after they have been sorted:
@ operator|_______|3-4

Alcuin, overview of|_______|1-1

Alcuin, supported input devices|_______|1-2

bit pad (see input devices)

extra line space|_______|3-3

fonts, designing 1-2

fonts, selecting|_______|3-1

glyphs, designing|_______|3-2

illuminated manuscripts|_______|1-1

input devices|_______|1-2

input devices|_______|1-3

input devices, bit pad|_______|1-3

input devices, bit pad|_______|2-3

input devices, mouse|_______|1-2

input devices, mouse|_______|2-2

mouse (see input devices)

power, for graphics display|_______|2-1

power, location of main switch|_______|2-1

startup, of system|_______|2-1

startup, of system|_______|2-2

symbolic names|_______|3-3
Multiple entries that differ only in their page number are now arranged one after the other.
The sort command is a simple way to obtain a sorted list of entries. However, sorting can actually be a complicated process. For instance, the simple sort command that we showed above obviously works fine on our limited sample of entries. And while it is designed to process entries with section-page numbering (4-1, 4-2, 4-3), this command also works fine when sorting entries with continuous page numbering (1, 2, 3).
However, section page numbering does present a few additional problems that we did not encounter here, Two-digit section numbers and page numbers, as well as appendices (A-1, A-2, A-3) will not be sorted correctly. For instance, this might cause the indexing program to produce the following entry:
Alcuin, software A-2, 1-1, 1-10, 1-3, 11-5, 2-1
There are two ways to handle this problem. One is to change the indexing macro in troff so that it produces three fields. Then the sorting command can sort on the section number independent of the page number. (Because our awk portion of the indexing program is set up to operate on entries with one or two fields, you’d have to change the program or use a sed script to reduce the number of fields.)
The second method uses sed to replace the hyphen with a tab, creating three fields. Actually, we run a sed script before the entries are sorted and another one after that operation to restore the entry. Then sort will treat section numbers and page numbers separately in secondary numeric sort operations, and get them in the right order.
The only remaining problem is how to handle appendices. What happens is that when a numeric sort is performed on section numbers, lettered appendices are sorted to the top of the list. This requires cloaking the letter in a numeric disguise. Presuming that we won’t have section numbers greater than 99, our sed script prepends the number 100 to each letter; this number is also removed afterwards.
sed '

    s/|_______|\([0-9][0-9]*\)-/|_______|\1|_______|/

    s/|_______|\([A-Z]\)-/|_______|100\1|_______|/' |

sort -t\    -bf +0 -1 +1n +2n | uniq |

sed '

    s/|_______|100\([A-Z]\)|_______|/|_______|\1-/

    s/\(|_______|.*\)|_______|/\1-/'
Now the sorting operation of our index program handles a wider range of entries.
Building the Page Number List
The next step is more complex. We must now combine multiple occurrences of each term that differ only in the page number, and combine all of the page numbers into a single list. The awk program is the tool of choice. We can use a script for comparing and manipulating successive lines similar to the one described in Chapter 13. We begin by building the page number list for each entry.
awk '

BEGIN { ORS = ""; FS = "|_______|" }

NF == 1 { if (NR == 1) printf ("%s", $0);

          else printf ("\n%s", $0) }

NF > 1 {

  if ($1 == curr)

    printf (",%s", $2)

  else   {

    if (NR == 1) printf ("%s", $0)

    else printf ("\n%s", $0)

    curr = $1

    }

}'
First, the program sets the output record separator (ORS) to the null string, rather than the default newline. This means that output records will be appended to the same line, unless we specify an explicit newline.
Second, it sets the field separator (FS) to the tab character. This divides each index entry into two fields: one containing the text, the other containing the page number. (As you may recall, the page number is separated from the text of the entry by a tab when it is output from troff.)
Then, if the number of fields (NF) is 1 (that is, if there is no tab-separated page number, as is the case with cross reference entries generated with .XR), the program prints out the entire record ($0). If this is not the first line in the file (NR = 1), it precedes the record with an explicit newline (\n).
If the number of fields is greater than 1 (which is the case for each line containing a tab followed by a page number), the program compares the text of the entry in the first field ($1) with its previous value, as stored into the variable curr.
The next few lines might be easier to understand if the condition were written in reverse order:
if ($1 != curr)

{ if (NR == 1) printf ("%s", $0)

  else printf ("\n%s", $0)

  curr = $1

}

else printf (", %s", $2)
If the first field is not equal to curr, then this is a new entry, so the program prints out the entire record (again preceding it with an explicit newline if this is not the first line of the file). The value of curr is updated to form the basis of comparison for the next record.
Otherwise (if the first field in the current record is the same as the contents of the variable curr), the program appends a comma followed by the value of the second field ($2) to the current record.
The output after this stage of the program looks like this:
@ operator|_______|3-4

Alcuin, overview of|_______|1-1

Alcuin, supported input devices|_______|1-2

bit pad (see input devices)

extra line space|_______|3-3

fonts, designing 1-2

fonts, selecting|_______|3-1

glyphs, designing|_____|3-2

illuminated manuscripts|_______|1-1

input devices|_______|1-2,1-3

input devices, bit pad|_______|1-3,2-3

input devices, mouse|_______|1-2,2-2

mouse (see input devices)

power, for graphics display|_______|2-1

power, location of main switch|_______|2-1

startup, of system|_______|2-1,2-2

symbolic names|_______|3-3
Subordinating Secondary Entries
The next trick is to subordinate secondary entries under the main entry, without reprinting the text of the main entry. In addition, we want to represent consecutive page numbers as a range separated by two dots (..) rather than as a list of individual pages. We’ll show this script in two sections:
1 awk '

2 BEGIN  { FS = "|_______|"; }

3 {

4 n = split ($1, curentry, ",")

5 if (curentry[1] == lastentry[1])

6   printf ("  %s", curentry[2])

7 else {

8   if (n > 1) printf ("%s\n  %s", curentry[1], curentry[2])

9   else printf ("%s", $1)

10  lastentry[1] = curentry[1]

11  }

12 }
This section of the script uses awk’s split function to break the first field into two parts, using a comma as a separator.
There are several cases that the program has to consider:
![]() The text of the entry does not contain a comma, in which case we can just print the entire first field. See line 9:
The text of the entry does not contain a comma, in which case we can just print the entire first field. See line 9: printf ("%s", $1).
![]() The entry does contain a comma, in which case we want to see if we have a new primary term (
The entry does contain a comma, in which case we want to see if we have a new primary term (curentry [1]) or just a new secondary one (curentry[2]).
![]() If the primary term is the same as the last primary term encountered (and saved into the variable
If the primary term is the same as the last primary term encountered (and saved into the variable lastentry), we only need to print out the secondary term. See line 6: printf ("%s", curentry[2]).
![]() Otherwise, we want to print out both the primary and secondary terms: See line 8:
Otherwise, we want to print out both the primary and secondary terms: See line 8: printf ("%s\n %s", curentry [1], curentry [2]).
For example:
@ operator|_______|3-4

Alcuin, overview of|_______|1-1

Alcuin, supported input devices|_______|1-2
When the first line is processed, the split will return a value of 0, so the entire line will be output.
When the second line is processed, lastentry contains the string @ operator, curentry [1] contains Alcuin, and curentry [2] contains overview of. Because lastentry is not the same as curentry[1], the program prints out both curentry[1] and curentry[2].
When the third line is processed, curentry[1] again contains the word Alcuin, but curentry [2] contains the words supported input devices. In this case, only curentry[2] is printed.
The next part of the script, which follows, looks considerably more complicated, but uses essentially the same mechanism. It splits the second field on the line (the page number list) on the hyphens that separate section number from page number. Then, it compares the various sections it has split to determine whether or not it is dealing with a range of consecutive pages. If so, it prints only the first and last members of the series, separating them with the range notation (..).
If you were able to follow the previous portion of the script, you should be able to piece this one together as well:
NF == 1{ printf ("\n") }

(NF > 1) && ($2 !~ /.*_.*/) {

  printf ("\t")

  n = split ($2, arr, ",")

  printf ("%s", arr[1])

  split (arr[1], last, "-")

  for (i = 2; i <= n; ++i) {

  split (arr[i], curr, "-")

  if ((curr[1] == last[1])&&(curr[2]/1 == last[2]/1+1)) {

    if (i != n) {

      split (arr[i+l], follow, "-")

      if ((curr[1] != follow[1])||(curr[2]/1+1 != follow[2]/1))

        printf ("..%s", arr[i])

    } else printf ("..%s", arr[i])

  } else printf (", %s", arr[i])

  last[1] = curr[1]; last[2] = curr[2]

}

printf ("\n")

}'
The output from this awk program (in sequence with the previous ones) now looks like this:
@ operator|_______|3-4

Alcuin

   overview of|_______|1-1

   supported input devices|_______|1-2

bit pad (see input devices)

extra line space|_______|3-3

fonts

   designing 1-2

   selecting |_______|3-1

glyphs

   designing |_______|3-2

illuminated manuscripts|_______|1-1

input devices|_______|1-2..1-3

   bit pad|_______|1-3, 2-3

   mouse|_______|1-2, 2-2

mouse (see input devices)
power

   for graphics display|_______|2-1

   location of main switch|_______|2-1

startup

   of system|_______|2-1..2-2

symbolic names|_______|3-3
That’s starting to look like an index!
Adding Formatting Codes
We could simply quit here, and let the user finish formatting the index. However, awk can continue the job and insert formatting codes.
We’d like awk to put in headings and divide the index into alphabetic sections. In addition, it would be nice to insert indentation requests, so that we can format the index source file in fill mode so that any long lines will wrap correctly.
Let’s look at the coded output before we look at the script that produces it. Only the beginning of the output is shown:
.ti -4n

@ operator|_______|3-4

.br


.ne 4

.ti -2n

\fBA\fR

.br

.ne 2

.ti -4n

Alcuin

.br

.ti -4n

  overview of|_______|1-1

.br

.ti -4n

  supported input devices|_______|1-2

.br


.ne 4

.ti -2n

\fBB\fR

.br

.ne 2

.ti -4n

bit pad (see input devices)

.br
.ne 4

.ti -2n

\fBE\fR

.br

.ne 2

.ti -4n

extra line space|_______|3-3

.br
Here’s a script that does this part of the job:
awk '

BEGIN {OFS = ""

  lower = "abcdefghijklmnopqrstuvwxyz"

  upper = "ABCDEFGHIJKLMNOPQRSTUVWXYZ"

}

NF > 0 {

  if ($0 !~ /^ .*/) {

    n = l

    while ((newchar = substr($1,n,1)) !~ /[A-Za-z]/) {

      n = n + l

      if (n == 100) {# bad line

        newchar = oldchar

        break

      }

    }

    if (newchar ~ /[a-z]/) {

      for (i = 1; i <= 26; ++i) {

        if (newchar == substr (lower, i, 1)) {

          newchar = substr (upper, i, 1)

          break

        }

      }

    }

    if (substr ($1,1,1) ~ /[0-9]/)

      newchar = ""

    if (newchar != oldchar) {

      printf ("\n\n%s\n", ".ne 4")

      printf ("%s\n", ".ti -2n")

      printf ("%s%s%s\n", "\\fB", newchar, "\\fR")

      printf ("%s\n", ".br")

      oldchar = newchar }

    printf ("%s\n", ".ne 2")

  }

  printf ("%s\n", ".ti -4n")

  printf ("%s\n", $0)
  printf ("%s\n", ".br")

}'
Every line in the input (NF > 1) will be subjected to the last three lines in the program. It will be surrounded by formatting codes and printed out.
printf ("%s\n", ".ti -4n")

printf ("%s\n", $0)

printf ("%s\n", ".br")
The rest of the script checks when the initial character of a primary entry changes and prints a heading.
As you may have noticed, in the output of the previous script, secondary entries were indented by three leading spaces. They can be excluded from consideration at the outset by the condition:
if ($0 !~ /^ .*/) {
All other lines are checked to determine their initial character. The awk program’s substr function extracts the first letter of each line. Then, much as it did before, the program compares each entry with the previous until it detects a change.
The program is basically looking for alphabetic characters, but must test (especially in computer manuals) for strings that begin with nonalphabetic characters. (If it doesn’t do this, it will loop endlessly when it comes to a string that doesn’t begin with an alphabetic character.) If the program loops 100 times on a single line, it assumes that the character is nonalphabetic, breaks out of the loop, and goes on to the next line.
When the program finds a change in the initial alphabetic character, it prints a heading consisting of a single capital letter and associated formatting requests.
Primary terms beginning with nonalphabetic characters are output without causing a change of heading. (Because they are already sorted to the beginning of the file, they will all be listed at the head of the output, before the A’s.)
Final Formatting Touches
Having come this far, it hardly seems fair not to finish the job, and put in the final formatting codes that will allow us to format and print the index without ever looking at the source file (although we should save it to allow manual fine-tuning if necessary).
A simple sed script can be used for these final touches:
sed "li\\

.Se \"\" \"Index\"\\

.in +4n\\

.MC 3.15i 0.2i\\

.ds RF Index - \\\\\\\\n(PN\\

.ds CF\\

.ds LF\\

.na

s/|______|/  /"
Assuming that we’re using our extended ms macros, these initial macros will create the section heading Index, print the index in two columns, and use a page number of the form Index – n. (Note how many backslashes are necessary before the number register invocation for PN. Backslashes must be protected from the shell, sed, and troff. This line will be processed quite a few times, by different programs, before it is output.)
Finally, the script converts the tab separating the index entry from the first page number into a pair of spaces.
Special Cases
But our indexing script is not complete. There are a number of special cases still to consider. For example, what about font changes within index entries? In a computer manual, it may be desirable to carry through “computer voice” or italics into the index.
However, the troff font-switch codes will interfere with the proper sorting of the index. There is a way around this—awkward, but effective. As you may recall, we use a sed script named cleanup.sed called from within format. This script changes double quotation marks to pairs of matched single quotation marks for typesetting, and changes double hyphens to em dashes. We can also use it to solve our current problem.
First, we add the following lines to cleanup.sed:
/^\.X[XR]/{

        s/\\\(fP\)/%%~/g

        s/\\\(fS\)/%%~~/g

        s/\\\(fB\)/%%~~~/g

        S/\\\(fI\)/%%~~~~/g

        S/\\\(fR\)/%%~~~~~/g

        s/\\\(f(CW\)/%%~~~~~~/g

}
Within an .XX or .XR macro, the script will change the standard troff font-switch codes into an arbitrary string of nonalphabetic characters.
Then we add the −d option (dictionary order) to our initial sort command in the index program. This option causes sort to ignore nonalphabetic characters when making comparisons. (The exception will be lines like @ operator, which contain no alphabetic characters in the first field. Such lines will still be sorted to the front of the list.)
Finally, we use the concluding sed script in the indexing sequence to restore the proper font-switch codes in the final index source file:
s/%%~~~~~~/\\\\f(CW/g

s/%%~~~~~/\\\\fR/g

s/%%~~~~/\\\\fI/g

s/%%~~~/\\\\fB/g

s/%%~~/\\\\fS/g

s/%%~/\\\\fP/g
We might also want to consider the case in which a leading period (as might occur if we were indexing troff formatting requests) appears in an index entry. Inserting the following line one line from the end of the last awk script we created will do the trick. These lines insulate troff codes in index entries from the formatter when the index source file is processed by troff for final printing:
if ($0 ~ /^\..*/) printf ("\\&")

if ($0 ~ /^%%~~*\./) printf ("\\&")
Lines beginning with a . will be preceded with a troff zero-width character (\&).
The Entire Index Program
We have broken the indexing process into stages to make it easier to understand. However, there is no need to keep individual awk and sed scripts; they can be combined into a single shell program simply by piping the output of one portion to another, within the shell program.
Here’s the whole program, as finally assembled:
sed '

    s/|_______|\([0-9][0-9]*\)-/|_______|\1|_______|/

    s/|_______|\([A-Z]\)-/|_______|100\1|_______|/' |

sort -t\|_______| -bdf +O -1 +1n +2n | uniq |

sed '

    s/|_______|100\([A-Z]\)|_______|/|_______|\1-/

    s/\(|_______|.*\)|_______|/\1-/' |

awk '

BEGIN { ORS = ""; FS = "|_______|" }

NF == 1 { if (NR == 1) printf ("%s", $0);

          else printf ("\n%s", $0) }

NF > 1{

  if ($1 == curr)

    printf (", %s", $2)

  else  {

    if (NR == 1) printf ("%s", $0)

    else printf ("\n%s", $0)

    curr = $1

    }

}'  | awk '

BEGIN { FS = "|_______|"; }

{

n = split ($1, curentry, ",")

if (curentry[1] == lastentry [1])

  printf (" %s", curentry [2])

else {

  if (n > 1) printf ("%s\n %s", curentry [1], curentry [2])
  else printf ("%s", $1)

  lastentry [1] = curentry [1]

  }

}

Nf == 1{ printf ("\n") }

(NF > 1) && ($2 !~ /.*_.*/) {

  printf ("\t")

  n = split ($2, arr, ",")

  printf ("%s", arr [1])

  split (arr[1], last, "-")

  for (i = 2; i <= n; ++i) {

  split (arr[i], curr, "-")

  if ((curr[1] == last[1]) && (curr[2]/1 == last[2]/1+1))  {

    if (i != n) {

      split (arr[i+1], follow, "-")

      if ((curr[1] != follow[1])||(curr[2]/1+1 != follow[2]/1))

           printf ("..%s", arr[i])

    } else printf ("..%s", arr[i])

  } else printf (", %s", arr[i])

  last[1] = curr[1]; last[2] = curr[2]

}

printf ("\n")

}' | awk '

BEGIN  {OFS = ""

  lower = "abcdefghijklmnopqrstuvwxyz"

  upper = "ABCDEFGHIJKLMNOPQRSTUVWXYZ"

}

NF > 0 {

  if ($0 !~ /^ .*/) {

    n = 1

    while ((newchar = substr ($1,n,1)) !~ /[A-Za-z]/) {

      n = n + 1

      if (n == 100) {# bad line

        newchar = oldchar

        break

      }

    }

    if (newchar ~ /[a-z]/) {

      for (i = 1; i <= 26; ++i) {

        if (newchar == substr (lower, i, 1)) {

          newchar = substr (upper, i, 1)

          break

        }

      }

    }
    if (substr ($1,1,1) ~ /[0-9]/)

      newchar = ""

    if (newchar != oldchar) {

      printf ("\n\n%s\n", ".ne 4")

      printf ("%s\n", ".ti -2n")

      printf ("%s%s%s\n", "\\fB", newchar, "\\fR")

      printf ("%s\n", ".br")

      oldchar = newchar

    }

    printf ("%s\n", ".ne 2")

  }

  printf ("%s\n", ".ti -4n")

  if ($0 ~ /^\-..*/) printf ("\\&")

        if ($0 ~ /^%%~~*\./) printf ("\\&")

  printf ("%s\n", $0)

  printf ("%s\n", ".br")

}' | sed "li\\

.Se \"\" \"Index\"\\

.in +4n\\

.MC 3.4i 0.2i\\

.ds RF Index - \\\\\\\\n(PN\\

.ds CF\\

.ds LF\\

.na

s/%%~~~~~~/\\\\f(CW/g

s/%%~~~~~/\\\\fR/g

s/%%~~~~/\\\\fI/g

s/%%~~~/\\\\fB/g

s/%%~~/\\\\fS/g

s/%%~/\\\\fP/g"
The result of all this processing is source text that can be piped directly to the formatter, saved in a file for later formatting (or perhaps minor editing), or both (using tee to “split” standard output into two streams, one of which is saved in a file).
Assuming that the various raw source files produced by troff are stored in a subdirectory called indexfiles, and that the index script is called indexprog, we can format and print the index as follows:
$ cat indexfiles/* | indexprog | ditroff -mS | ... | lp
The result will look something like this:
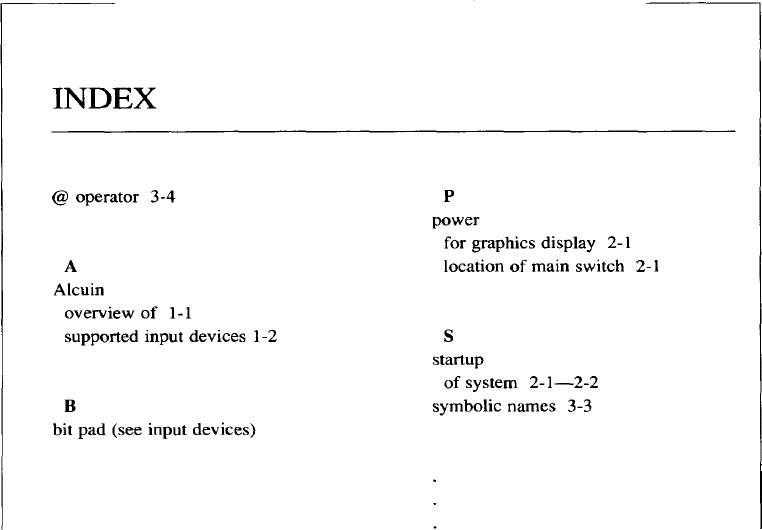
▪ Let make Remember the Details ▪
Even though we’ve hidden the really complex details of index processing inside a shell script, and the format shell script itself handles a lot of the dirty work, there is still a lot for the user to keep track of. The make utility introduced in Chapter 11 can take us a long way towards making sure that everything that needs to happen for final production of the finished book comes together without a hitch.
Here are some of the things we want to make sure have been done:
![]() All of the relevant sections have been printed in their most up-to-date form. Odd as it may seem, it is possible to have last minute changes to a file that never make it into the printed book.
All of the relevant sections have been printed in their most up-to-date form. Odd as it may seem, it is possible to have last minute changes to a file that never make it into the printed book.
![]() The book has been proofed using whatever automatic tools we have provided, including the
The book has been proofed using whatever automatic tools we have provided, including the proof and double shell scripts (or wwb if you have it). All “review notes” embedded in the text must also be satisfied and removed.
![]() An updated table of contents and index have been printed.
An updated table of contents and index have been printed.
You can probably think of others as well.
The make utility is the perfect tool for this job. We’ve already seen in Chapter 11 how it can be used to specify the files (and the formatting options) required for each section of the book. Unfortunately, this part of the job requires that you keep formatted output files, which are quite large. If disk space is a problem, this drawback might lead you to think that make isn’t worth the bother.
However, with a little thought, you can get around this restriction. Instead of keeping the formatted output file, you can keep a zero-length file that you touch whenever you format the source file. You could add the following line to the end of the format script:
touch print/$file
Or, if you use make itself to print your document, you could put the touch command into the makefile. Your makefile might look like this:
book : print/ch01 print/ch02 print/ch03...


print/ch01 : ch01

   sh /usr/local/bin/format -mS -rvl -rS2 ch01

   touch print/ch01


print/ch02 : ch02

   sh /usr/local/bin/format -mS -P -rvl -rS2 ch02

   touch print/ch02

                        .

                        .

                        .
Notice that in order to execute the local formatting shell script, it is necessary to execute sh and specify the complete pathname. The options specified with the format shell script can be specific to each file that is formatted. However, generally you want to use the same options to format all the files that make up a particular document. Using variables, you can create a more generalized makefile that is easier to change.
FORMAT: sh /usr/local/bin/format

OPTIONS: -mS -P -rvl -rS2


book : print/ch01 print/ch02 print/ch03...


print/ch01 : ch01

     $(FORMAT) $(OPTIONS) ch01

     touch print/ch01


print/ch02 : ch02

     $(FORMAT) $(OPTIONS) ch02

     touch print/ch02

                          .

                          .

                          .
The variables used by make are set like shell variables. But when they are referenced, the name of the variable must be enclosed in parentheses in addition to being prefixed with a dollar sign.
A user can now easily edit the OPTIONS variable to add or remove options. You could also place additional options on the command for a particular file. This is not necessary, though, just because some of the files have tables, equations, or pictures and others don’t. Other than the small bit of extra processing it requires, there’s no reason not to run the preprocessors on all files.
Our makefile can be further expanded. To make sure that our index and table of contents are up-to-date (and to automate the process of creating them out of the individual raw output files that the format script creates), we can add the following dependencies and creation instructions:
book: print/ch01 ... proof/ch01 ... book.index book.toc

                               .

                               .

                               .

print/ch01 : ch01

                               .

                               .

                               .

book.index : index/ch01 index/ch02 ...

  cat index/* | sh /usr/local/bin/indexprog > book.index


book.toc : toc/ch01...figlist/ch01...tablist/ch01...

        echo .ta \n(LLu-5n \n(LLuR > book.toc

        echo .ce >> book.toc

        echo \f3TABLE OF CONTENTS\fP >> book.toc

        echo .sp 2 >> book.toc

        echo "\t\f3Page\fP" >> book.toc

  cat toc/ch01...toc/appz >> book.toc

  echo '.bp' >> book.toc

  cat figlist/ch01...figlist/appz >> book.toc

  echo '.bp' >> book.toc

  cat tablist/ch01...tablist/appz >> book.toc


toc/ch01 : ch01

  $(FORMAT) $(OPTIONS) -x ch01

toc/ch02 : ch02

  $(FORMAT) $(OPTIONS) -x ch02

                               .

                               .

                               .

index/ch01 : ch01

  $(FORMAT) $(OPTIONS) -x ch01

                               .
                               .

                               .

figlist/ch01 : ch01

  $(FORMAT) $(OPTIONS) -x ch01

                               .

                               .

                               .

tablist/ch01 : ch01

  $(FORMAT) $(OPTIONS) -x ch01

                               .

                               .

                               .
Because we have directories named toc and index, we give our source files names such as book.toc and book.index.
We can therefore enter:
$ make book.toc
and the table of contents will be compiled automatically. When you enter the above command, the make program recognizes book.toc as a target. It evaluates the following line that specifies several dependent components.
book.toc: toc/ch01 toc/ch02 toc/ch03
In turn, each of these components are targets dependent on a source file.
toc/ch02: ch02

$(FORMAT) $(OPTIONS) -x ch02
What this basically means is that if changes have been made to to ch02 since the file book.toc was compiled, the source file will be formatted again, producing new toc entries. The other files, assuming that they have not been changed, will not be reformatted as their entries are up-to-date.
We can add other “targets”, for instance, to check whether or not every chapter in the book has been proofed since it was last edited. Based on when the dependent components were last updated, you could invoke the proof program on the associated file, grep for Review Note macros, or just print a message to the user reminding him or her to proof the file.
To do this, we create a pseudo-target. If no file with the name proof exists, it can never be up-to-date, so typing:
$ make proof
will automatically force proofing of the document according to the rules you have specified in the makefile.
The print directory also serves as a pseudo-target, useful for printing individual chapters. Users don’t have to remember the formatting options that must be specified for a particular file.
And if all these reasons don’t convince you to learn make and begin constructing makefiles for large documents, perhaps this next benefit will. It gives you a simple two-word command to print an entire book and its apparatus.
When you enter this command, each formatting command as it is being executed will be displayed on the screen. If you wish to suppress these messages while you do other work, invoke make with the -s option or place the line .SILENT: at the top of the makefile.
Building the Makefile
You are limited only by your imagination and ingenuity in organizing your work with a makefile. However, the more complex the makefile, the longer it gets, and the more difficult for inexperienced users to create.
You can get around this problem too—just write a shell script to build the makefile, taking as arguments the files that make up the document. Here’s such a script, called buildmake, that will produce a makefile similar to the one just described. (The make utility requires that the actions to be performed for each target begin with a tab. Such explicit tabs are shown in the following script by the symbol |_____|.)
if [ $ # -eq 0 ]; then

   echo "USAGE: buildmake files"

   echo "(You must specify the files that make up the book)"

   exit

fi

if [ ! -d print ]; then

   mkdir print

   mkdir proof

fi

if [ ! -d index ]; then

   mkdir index

fi

if [ ! -d toc ]; then

   mkdir toc

   mkdir figlist

   mkdir tablist

fi

for x

do

    prifiles="$prifiles print/$x"

    profiles="$profiles proof/$x"

    tcfiles="$tcfiles toc/$x"

    xfiles="$xfiles index/$x"

    fgfiles="$fgfiles figlist/$x"

    tbfiles="$tbfiles toc/$x"

done

echo ".SILENT:" > makefile
echo "FORMAT = sh /usr/local/bin/format" >> makefile

echo "OPTIONS = -mS" >> makefile

echo "INDEXPROG = sh /usr/local/bin/indexprog">>makefile

echo "book : $prifiles $profiles book.toc book.index">>makefile

echo "book.index : $xfiles/" >> makefile

echo "|_______|cat $xfiles | $(INDEXPROG) > book.index">>makefile

echo "|_______|$(FORMAT) $(OPTIONS) book.index" >> makefile

echo "book.toc : $tcfiles" >> makefile

echo "|_______|echo .ta \n(LLu-5n \n(LLuR > book.toc">>makefile

echo "|_______|echo .ce >> book.toc" >> makefile

echo "|_______|echo \f3TABLE OF CONTENTS\fP >> book.toc">>makefile

echo "|_______|echo .sp 2 >> book.toc" >> makefile

echo "|_______|echo "\t\f3Page\fP" >> book.toc" >> makefile

echo "|_______|cat /work/lib/toc_top > book.toc" >> makefile

echo "|_______|cat $tcfiles >> book.toc" >> makefile

echo "|_______|echo .bp >> book.toc" >> makefile

echo "|_______|cat $fgfiles >> book.toc" >> makefile

echo "|_______|echo .bp >> book.toc" >> makefile

echo "|_______|cat $tbfiles >> book.toc" >> makefile

echo "|_______|$(FORMAT) $(OPTIONS) book.toc" >> makefile

for x

do

    echo "print/$x : $x" >> makefile

    echo "|_______|$(FORMAT) $(OPTIONS) $x" >> makefile

    echo "print/$x : $x" >> makefile

    echo "|_______| echo $x has not been proofed" >> makefile

    echo "toc/$x : $x >> makefile

    echo "|_______|$(FORMAT) $(OPTIONS) -x $x" >> makefile

    echo "index/$x : $x" >> makefile

    echo "|_______|$(FORMAT) $(OPTIONS) -x $x" >> makefile

done
To create a complex makefile, all the user needs to do is type:
$ buildmake files
In addition, the user may want to manually edit the first line of the makefile, which specifies formatter options.
▪ Where to Go from Here ▪
Large as this book is, it is far from comprehensive. We have covered the basic editing and formatting tools in some detail, but even there, topics have been glossed over. And when it comes to the more advanced tools, programs not explicitly designed for text processing, much has been left out.
The sheer size and complexity of UNIX is one of its fascinations. To a beginner, it can be daunting, but to an advanced user, the unknown has an appeal all its own. Particularly to a technical writer, for whom the computer is a subject as well as a tool, the challenge of taking more control over the process of book production can be endlessly fascinating. The subject and the method of inquiry become ever more intertwined, until, in Yeats’s immortal phrase:
How can you know the dancer from the dance?
Get UNIX° TEXT PROCESSING now with the O’Reilly learning platform.
O’Reilly members experience books, live events, courses curated by job role, and more from O’Reilly and nearly 200 top publishers.

