Chapter 4. Docker Fundamentals
In this chapter, weâll expand on the fundamental Docker concepts. Weâll start by looking at the overall architecture of Docker, including the technologies it builds on. This is followed by more in-depth sections on building Docker images, networking containers, and handling data in volumes. The chapter concludes with an overview of the remaining Docker commands.
Tip
As this chapter contains a lot of reference material, you may prefer to skim the main points and move onto Chapter 5, referring back to this chapter as needed.
The Docker Architecture
In order to understand how best to use Docker and some of the more unusual behavior in Docker, itâs good to have a rough understanding of how the Docker platform is put together under the covers.
In Figure 4-1, we can see the major components of a Docker installation:
-
At the center is the Docker daemon, which is responsible for creating, running, and monitoring containers, as well as building and storing images, both of which are represented on the right of the diagram. The Docker daemon is launched by running
docker daemon, which is normally taken care of by the host OS. -
The Docker client is on the lefthand side and is used to talk to the Docker daemon via HTTP. By default, this happens over a Unix domain socket, but it can also use a TCP socket to enable remote clients or a file descriptor for systemd-managed sockets. Because all communication must be done over HTTP, itâs easy to connect to remote Docker daemons and develop programming language bindings, but it also has implications for how features are implemented, such as requiring a build context for Dockerfiles, as explained in âThe Build Contextâ). The API used for communication with daemon is well defined and documented, allowing developers to write programs that interface directly with the daemon, without using the Docker client. The Docker client and daemon are distributed as a single binary.
-
Docker registries store and distribute images. The default registry is the Docker Hub, which hosts thousands of public images as well as curated âofficialâ images. Many organizations run their own registries that can be used to store commercial or sensitive images, which also avoids the overhead of needing to download images from the Internet. See âRunning Your Own Registryâ for information on running your own registry. The Docker daemon will download images from registries in response to
docker pullrequests. It will also automatically download images specified indocker runrequests and in theFROMinstruction of Dockerfiles if they are not available locally.
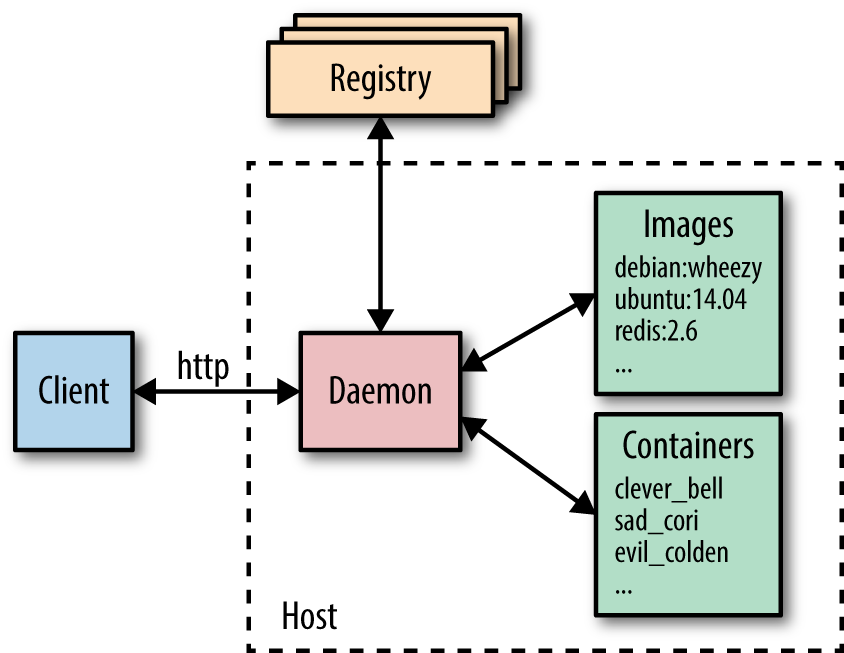
Figure 4-1. High-level overview of major Docker components
Underlying Technologies
The Docker daemon uses an âexecution driverâ to create containers. By default, this is Dockerâs own runc driver, but there is also legacy support for LXC. Note that runc is very closely tied to the following kernel features:
- cgroups
-
Responsible for managing resources used by a container (e.g., CPU and memory usage). They are also responsible for freezing and unfreezing containers, as used in the
docker pausefunctionality. - namespaces
-
Responsible for isolating containers; making sure that a containerâs filesystem, hostname, users, networking, and processes are separated from the rest of the system.
Libcontainer also supports SELinux and AppArmor, which can be enabled for tighter security. See Chapter 13 for more information.
Another major technology underlying Docker is the Union File System (UFS), used to store the layers for containers. The UFS is provided by one of several storage drivers, either AUFS, devicemapper, BTRFS, or Overlay. See the previous discussion of UFS in âImages, Containers, and the Union File Systemâ.
Surrounding Technologies
The Docker engine and the Docker Hub do not in and of themselves constitute a complete solution for working with containers. Most users will find they require supporting services and software, such as cluster management, service discovery tools, and advanced networking capabilities. As described in âPlugins and Plumbingâ, Docker, Inc., plans to build a complete out-of-the-box solution that includes these features but allows users to easily swap out the default components for third-party ones. The âswappable batteriesâ strategy primarily refers to the API levelâallowing components to hook into the Docker Engineâbut can also be seen as allowing supporting Docker technology packaged as independent binaries to be easily replaced with third-party equivalents.
The current list of supporting technologies supplied by Docker includes:
- Swarm
-
Dockerâs clustering solution. Swarm can group together several Docker hosts, allowing the user to treat them as a unified resource. See Chapter 12 for more information.
- Compose
-
Docker Compose is a tool for building and running applications composed of multiple Docker containers. It is primarily used in development and testing rather than production. See âAutomating with Composeâ for more details.
- Machine
-
Docker Machine installs and configures Docker hosts on local or remote resources. Machine also configures the Docker client, making it easy to swap between environments. See Chapter 9 for an example.
- Kitematic
-
Kitematic is a Mac OS and Windows GUI for running and managing Docker containers.
- Docker Trusted Registry
-
Dockerâs on-premise solution for storing and managing Docker images. Effectively a local version of the Docker Hub that can integrate with an existing security infrastructure and help organizations comply with regulations regarding the storage and security of data. Features include metrics, role-based access control (RBAC), and logs, all managed through an administrative console. This is currently the only nonâopen source product from Docker, Inc.
There is already a large list of services and applications from third parties that build on or work with Docker. Several solutions have already emerged in the following areas:
- Networking
-
Creating networks of containers that span hosts is a nontrivial problem that can be solved in a variety of ways. Several solutions have appeared in this area, including Weave and Project Calico. In addition, Docker will soon have an integrated networking solution called Overlay. Users will be able to swap out the Overlay driver for other solutions using Dockerâs networking plugin framework.
- Service discovery
-
When a Docker container comes up, it needs some way of finding the other services it needs to talk to, which are typically also running in containers. As containers are dynamically assigned IP addresses, this isnât a trivial problem in a large system. Solutions in this area include Consul, Registrator, SkyDNS, and etcd.
- Orchestration and cluster management
-
In large container deployments, tooling is essential in order to monitor and manage the system. Each new container needs to be placed on a host, monitored, and updated. The system needs to respond to failures or changes in load by moving, starting, or stopping containers appropriately. There are already several competing solutions in the area, including Googleâs Kubernetes; Marathon, a framework for Mesos; CoreOSâs Fleet; and Dockerâs own Swarm tooling.
All of these topics are covered in more depth in Part III. It is worth pointing out that there are also alternatives to the Docker Trusted Registry, including the CoreOS Enterprise Registry and JFrogâs Artifactory.
In addition to the previously mentioned network driver plugins, Docker also supports volume plugins for integration with other storage systems. Notable volume plugins include Flocker, a multihost data management and migration tool, and GlusterFS for distributed storage. More information on the plugin framework can be found at the Docker website.
An interesting side effect of the rise of containers is the new breed of operating systems designed to host them. While Docker runs happily on most current Linux distributions such as Ubuntu and Red Hat, there are several projects underway to create minimal and easy-to-maintain distributions that are focused entirely on running containers (or containers and VMs), especially within a context of powering a datacenter or cluster. Examples include Project Atomic, CoreOS, and RancherOS.
Docker Hosting
Weâll cover Docker hosting in more detail in Chapter 9, but itâs worth pointing out some of the many choices here. Many of the traditional cloud providers, including Amazon, Google, and Digital Ocean, have brought out some level of Docker offering. Googleâs Container Engine may be the most interesting of these, as it is built directly on top of Kubernetes. Of course, even when a cloud provider doesnât have a specific Docker offering, itâs normally still possible to provision VMs that can run Docker containers.
Joyent has also entered the space with its own container offering, called Triton, built on top of SmartOS. By implementing the Docker API with its own container and Linux emulation technology, Joyent was able to create a public cloud that interfaces with the standard Docker client. Importantly, Joyent believes its container implementation is secure enough to run directly on bare metal rather than having to be placed in VMs, meaning it can result in large efficiency savings, especially in terms of I/O.
There are also several projects that build a PaaS platform on top of Docker, including Deis, Flynn, and Paz.
How Images Get Built
We saw in âBuilding Images from Dockerfilesâ that the primary way to make new images is through
Dockerfiles and the docker build command. This section will look at what
happens here in a little more depth and end with a guide to the various
instructions that can be used in a Dockerfile. Itâs handy to have some
understanding of how the build command works internally, as its behavior can
sometimes be surprising.
The Build Context
The docker build command requires a Dockerfile and a build context (which
may be empty). The build context is the set of local files and directories that
can be referenced from ADD or COPY instructions in the Dockerfile and is
normally specified as a path to a directory. For example, we used the build
command docker build -t test/cowsay-dockerfile . in âBuilding Images from Dockerfilesâ, which
sets the context to '.', the current working directory. All the files and
directories under the path form the build context and will be sent to the Docker
daemon as part of the build process.
In cases where a context is not specified (if only a URL to a Dockerfile is given
or the contents of a Dockerfile are piped from STDIN), the build context is
considered to be empty.
Donât Use / as the Build Context
As the build context is gathered into a tarball and sent to the Docker daemon, you really donât want to use a directory with lots of files in it already. For example, using /home/user, Downloads, or / will result in a long delay while the Docker client bundles everything up and transfers it to the daemon.
If a URL beginning with http or https is given, it is assumed to be a direct link to a Dockerfile. This is unlikely to be very useful, as no context is associated with the Dockerfile (and links to archives are not accepted).
A git repository can also be given as the build context. In this situation, the Docker client will clone the repository and any submodules to a temporary directory that is then sent to the Docker daemon as the build context. Docker will interpret the context as a git repository if the path begins with github.com/, git@, or git://. In general, I would suggest avoiding this method and instead checking out repositories by hand, which is more flexible and leaves less chance for confusion.
The Docker client can also take input on STDIN by giving a "-" as an argument
in place of the build context. The input can either be a Dockerfile with no
context (e.g., docker build - < Dockerfile) or an archive file that
constitutes the context and includes a Dockerfile (e.g., docker build - < context.tar.gz). Archive files can be in tar.gz, xz, or bzip2 format.
The location of the Dockerfile within the context can be specified with the -f
argument (e.g., docker build -f dockerfiles/Dockerfile.debug .). If
unspecified, Docker will look for a file called Dockerfile at the root of the
context.
Use a .dockerignore File
In order to remove unneeded files from the build context, you can use a
.dockerignore file. The file should contain the names of files to exclude,
separated by newlines. The wildcard characters * and ? are allowed. Hereâs an example .dockerignore file:
.git*/.git
*/*/.git
*.sw?
Will ignore a .git file or directory in the root of the build context, but allow it any subdirectory (i.e., .git is ignored, but dir1/.git isnât).
Will ignore a .git file or directory exactly one directory below the root (i.e., dir1/.git is ignored but .git and dir1/dir2/.git arenât).
Will ignore a .git file or directory exactly two directories below the root (i.e., dir1/dir2/.git is ignored but .git and dir1/.git arenât).

Will ignore test.swp, test.swo, and bla.swp but not dir1/test.swp.
Full regular expressions such as [A-Z]* are not supported.
At the time of writing, there isnât a way to match files over all subdirectories (e.g., you canât ignore both /test.tmp and /dir1/test.tmp in one expression).
Image Layers
New Docker users are often thrown by the way images are built up. Each
instruction in a Dockerfile results in a new image layer, which can also be
used to start a container. The new layer is created by starting a
container using the image of the previous layer, executing the Dockerfile
instruction and saving a new image. When a Dockerfile instruction successfully
completes, the intermediate container will be deleted, unless the --rm=false
argument was given.1
Because each instruction results in a static imageâessentially just a filesystem
and some metadataâall running processes in the instruction will be stopped.
This means that while you can start long-lived processes, such as databases or
SSH daemons in a RUN instruction, they will not be running when the next
instruction is processed or a container is started. If you want a service or
process to start with the container, it must be launched from an ENTRYPOINT or
CMD instruction.
You can see the full set of layers that make up an image by running the docker history command. For example:
$ docker history mongo:latest
IMAGE          CREATED      CREATED BY                                      ...
278372cb22b2   4 days ago   /bin/sh -c #(nop) CMD ["mongod"]
341d04fd3d27   4 days ago   /bin/sh -c #(nop) EXPOSE 27017/tcp
ebd34b5e9c37   4 days ago   /bin/sh -c #(nop) ENTRYPOINT &{["/entrypoint.
f3b2b8cf226c   4 days ago   /bin/sh -c #(nop) COPY file:ef2883b33ed7ba0cc
ba53e9f50f18   4 days ago   /bin/sh -c #(nop) VOLUME [/data/db]
c537910de5cc   4 days ago   /bin/sh -c mkdir -p /data/db && chown -R mong
f48ad436057a   4 days ago   /bin/sh -c set -x
df59596772ab   4 days ago   /bin/sh -c echo "deb http://repo.mongodb.org/
96de83c82d4b   4 days ago   /bin/sh -c #(nop) ENV MONGO_VERSION=3.0.6
0dab801053d9   4 days ago   /bin/sh -c #(nop) ENV MONGO_MAJOR=3.0
5e7b428dddf7   4 days ago   /bin/sh -c apt-key adv --keyserver ha.pool.sk
e81ad85ddfce   4 days ago   /bin/sh -c curl -o /usr/local/bin/gosu -SL "h
7328803ca452   4 days ago   /bin/sh -c gpg --keyserver ha.pool.sks-keyser
ec5be38a3c65   4 days ago   /bin/sh -c apt-get update
430e6598f55b   4 days ago   /bin/sh -c groupadd -r mongodb && useradd -r
19de96c112fc   6 days ago   /bin/sh -c #(nop) CMD ["/bin/bash"]
ba249489d0b6   6 days ago   /bin/sh -c #(nop) ADD file:b908886c97e2b96665
When a build fails, it can be very useful to launch the layer before the failure. Hereâs an example Dockerfile:
FROMbusybox:latestRUNecho"This should work"RUN/bin/bash -cecho"This won't"
If we try to build it:
$ docker build -t echotest . Sending build context to Docker daemon 2.048 kB Step 0 : FROM busybox:latest ---> 4986bf8c1536 Step 1 : RUN echo "This should work" ---> Running in f63045cc086b
ID of the temporary container Docker launched to run our instruction in.
ID of the image created from the container.
The temporary container is now deleted.
While, in this case, the problem is fairly clear from the error, we can run the image created from the last successful layer in order to debug the instruction. Note that we are using the last image ID here (85b49a851fcc), not the ID of the last container (e4b31d0550cd):
$docker run -it 85b49a851fcc/ #/bin/bash -c "echo hmm"/bin/sh: /bin/bash: not found / #/bin/sh -c "echo ahh!"ahh! / #
And the problem becomes even more obvious: the busybox image doesnât include
the bash shell.
Caching
Docker also caches each layer in order to speed up the building of images. This caching is very important for efficient workflows, but is somewhat naive. The cache is used for an instruction if the previous instruction was found in the cache and there is a layer in the cache that has exactly the same instruction and parent layer (even spurious spaces will invalidate the cache).
Also, in the case of COPY and ADD instructions, the cache will be invalidated
if the checksum or metadata for any of the files has changed.
This means that RUN instructions that are not guaranteed to have the same
result across multiple invocations will still be cached. Be particularly aware
of this if you download files, run apt-get update, or clone source
repositories.
If you need to invalidate the cache, you can run docker build with the
--no-cache argument. You can also add or change an instruction before the
point where you want to invalidate the cache; and for this reason, you may
sometimes see Dockerfiles with lines like this:
ENVUPDATED_ON "14:12 17 February 2015"RUNgit clone....
I would advise against using this technique, as it tends to confuse later users of the image, especially when the image was built on a different date than the line suggests.
Base Images
When creating your own images, you will need to decide which base image to start from. There are a lot of choices, and itâs worth taking the time to understand the various advantages and disadvantages of each.
The best case scenario is that you donât need to create an image at allâyou can just use an existing one and mount your configuration files and/or data into it. This is likely to be the case for common application software, such as databases and web servers, where there are official images available. In general, you are much better off using an official image than rolling your ownâyou get the benefit of other peopleâs work and experience in figuring out how best to run the software inside a container. If there is a particular reason an official image doesnât work for you, consider opening an issue on the parent project, as it is likely others are facing similar problems or know of workarounds.
If you need an image to host your own application, first have a look to see if
there is an official base image for the language or framework you are using (e.g.,
Go or Ruby on Rails). Often you can use separate images for building and
distributing your software (e.g., you could use the java:jdk image to build a
Java application but then distribute the resulting JAR file using the smaller
java:jre image, which gets rid of the unnecessary build tooling). Similarly,
some official images (such as node) have special âslimâ builds that remove a
lot of development tools and headers.
Sometimes you really just need a small but complete Linux distro. If Iâm going
for true minimalism, Iâll use the alpine image, which is only just over 5 MB
in size but still has an extensive package manager for easily installing
applications and tools. If I want a more complete image, Iâll normally use one
of the debian images, which are much smaller than the also common ubuntu
images but have access to the same packages. If your organization is tied to a
particular distribution of Linux, you should also be able to find a Docker image
for it. This may make more sense than moving to a new distribution that your
organization doesnât support or have experience with.
A lot of the time, itâs not necessary to go overboard with making sure images are
as small as possible. Remember that base layers are shared between images, so if
you already have the ubuntu:14.04 image and pull an image from the Hub that is
based on it, you will only pull the changes rather than the full image. However,
minimal images are definitely a big bonus when aiming for fast deploys and easy
distribution.
It is possible to go ultra minimal and ship images with only binaries. To do
this, write a Dockerfile that inherits from the special scratch image (a
completely blank filesystem) and simply copies your binary in and sets an
appropriate CMD instruction. Your binary will need to include all its required
libraries (no dynamic linking) and have no possibility of calling external
commands. In addition, remember the binary will need to be compiled for the
architecture of the container, which may be different than the architecture of the
machine running the Docker client.2
While the minimalist approach can be very tempting, note that it can leave
you in a difficult situation when it comes to debugging and maintenanceâbusybox wonât have a lot tools to work with; and if youâve used scratch,
you wonât even have a shell.
Rebuilding Images
Note that when docker build is run, Docker will look at the FROM instruction
and attempt to pull the image if it doesnât exist locally. If it does
exist, Docker will use that image without checking to see if there is a newer
version available. This means that just doing a docker build isnât enough to
ensure your images are completely up to date; you also have to either explicitly
docker pull all ancestor images or delete them in order to force the build
command to download the latest versions.
This becomes very important when common base images, such as debian, are updated
with security patches.
Dockerfile Instructions
This section briefly covers the various instructions available for use in
Dockerfiles. It doesnât go deep into details, partly because things are still
changing and likely to quickly get out of date and partly because there is
comprehensive and always up-to-date documentation available on the
Docker website. Comments in
Dockerfiles are indicated by starting the line with a #.
Exec Versus Shell Form
Several instructions (RUN, CMD, and ENTRYPOINT) take both a shell
format and an exec format. The exec form takes a JSON array (e.g.,
["executable", "param1", "param2"]) that assumes the first item is the name
of an executable that is then executed with the remaining items as parameters.
The shell format is a freeform string that will be interpreted by passing to
/bin/sh -c. Use the exec form to avoid the shell munging strings or in cases
where the image doesnât have /bin/sh.
The following instructions are available in Dockerfiles:
ADD-
Copies files from the build context or remote URLs into the image. If an archive file is added from a local path, it will automatically be unpacked. As the range of functionality covered by
ADDis quite large, itâs generally best to prefer the simplerCOPYcommand for copying files and directories in the build context andRUNinstructions withcurlorwgetto download remote resources (which retains the possibility of processing and deleting the download in the same instruction). CMD-
Runs the given instruction when the container is started. If an
ENTRYPOINThas been defined, the instruction will be interpreted as an argument to theENTRYPOINT(in this case, make sure you use the exec format). TheCMDinstruction is overridden by any arguments todocker runafter the image name. Only the lastCMDinstruction will have an effect, and any previousCMDinstructions will be overridden (including those in base images). COPY-
Used to copy files from the build context into the image. It has two forms,
COPY src dest_andCOPY ["src", "dest"], both of which copy the file or directory at src in the build context to dest inside the container. The JSON array format is required if the paths have spaces in them. Wildcards can be used to specify multiple files or directories. Note that you cannot specify src paths outside the build context (e.g., ../another_dir/myfile will not work). ENTRYPOINT-
Sets an executable (and default arguments) to be run when the container starts. Any
CMDinstructions or arguments todocker runafter the image name will be passed as parameters to the executable.ENTRYPOINTinstructions are often used to provide âstarterâ scripts that initialize variables and services before interpreting any given arguments. ENV-
Sets environment variables inside the image. These can be referred to in subsequent instructions. For example:
...
ENV MY_VERSION 1.3
RUN apt-get install -y mypackage=$MY_VERSION
...
The variables will also be available inside the image.
EXPOSE-
Indicates to Docker that the container will have a process listening on the given port or ports. This information is used by Docker when linking containers (see âLinking Containersâ) or publishing ports by supplying the
-Pargument todocker run; by itself theEXPOSEinstruction will not affect networking. FROM-
Sets the base image for the Dockerfile; subsequent instructions build on top of this image. The base image is specified as
IMAGE:TAG(e.g.,debian:wheezy). If the tag is omitted, it is assumed to belatest, but I strongly recommend you always set the tag to a specific version to avoid surprises. Must be the first instruction in a Dockerfile. MAINTAINER-
Sets the âAuthorâ metadata on the image to the given string. You can retrieve this with
docker inspect -f {{.Author}} IMAGE. Normally used to set the name and contact details of the maintainer of the image. ONBUILD-
Specifies an instruction to be executed later, when the image is used as the base layer to another image. This can be useful for processing data that will be added in a child image (e.g., the instruction may copy in code from a chosen directory and run a build script on the data).
RUN-
Runs the given instruction inside the container and commits the result.
USER-
Sets the user (by name or UID) to use in any subsequent
RUN,CMD, orENTRYPOINTinstructions. Note that UIDs are the same between the host and container, but usernames may be assigned to different UIDs, which can make things tricky when setting permissions. VOLUME-
Declares the specified file or directory to be a volume. If the file or directory already exists in the image, it will copied into the volume when the container is started. If multiple arguments are given, they are interpreted as multiple volume statements. You cannot specify the host directory for a volume inside a Dockerfile for portability and security reasons. For more information, see âManaging Data with Volumes and Data Containersâ.
WORKDIR-
Sets the working directory for any subsequent
RUN,CMD,ENTRYPOINT,ADD, orCOPYinstructions. Can be used multiple times. Relative paths may be used and are resolved relative to the previousWORKDIR.
Connecting Containers to the World
Say youâre running a web server inside a container. How do you provide the
outside world with access? The answer is to âpublishâ ports with the -p or
-P commands. This command forwards ports on the host to the container. For
example:
$ docker run -d -p 8000:80 nginx
af9038e18360002ef3f3658f16094dadd4928c4b3e88e347c9a746b131db5444
$ curl localhost:8000
<!DOCTYPE html>
<html>
<head>
<title>Welcome to nginx!</title>
...
The -p 8000:80 argument has told Docker to forward port 8000 on the host to
port 80 in the container. Alternatively, the -P argument can be used to tell Docker to automatically select a free port to forward to on the host. For example:
$ ID=$(docker run -d -P nginx)
$ docker port $ID 80
0.0.0.0:32771
$ curl localhost:32771
<!DOCTYPE html>
<html>
<head>
<title>Welcome to nginx!</title>
...
The primary advantage of the -P command is that you are no longer responsible for
keeping track of allocated ports, which becomes important if you have several containers publishing ports. In these cases, you can use the docker port command to discover the port allocated by Docker.
Linking Containers
Docker links are the simplest way to allow containers on the same host to talk to each other. When using the default Docker networking model, communication between containers will be over an internal Docker network, meaning communications are not exposed to the host network.
Docker Networking Changes
In future versions of Docker (likely 1.9 and up), the idiomatic way to network containers will be to âpublish services,â rather than link containers. However, links will continue to be supported for the foreseeable future, and the examples in this book should work without changes.
For more information on the upcoming changes to networking, see âNew Docker Networkingâ.
Links are initialized by giving the argument --link CONTAINER:ALIAS to docker
run, where CONTAINER is the name of the link container3 and ALIAS is a local name
used inside the master container to refer to the link container.
Using Docker links will also add the alias and the link container ID to /etc/hosts on the master container, allowing the link container to be addressed by name from the master container.
In addition, Docker will set a bunch of environment variables inside the master container that are designed to make it easy to talk to the link container. For example, if we create and link to a Redis container:
$ docker run -d --name myredis redis c9148dee046a6fefac48806cd8ec0ce85492b71f25e97aae9a1a75027b1c8423 $ docker run --link myredis:redis debian env PATH=/usr/local/sbin:/usr/local/bin:/usr/sbin:/usr/bin:/sbin:/bin HOSTNAME=f015d58d53b5 REDIS_PORT=tcp://172.17.0.22:6379 REDIS_PORT_6379_TCP=tcp://172.17.0.22:6379 REDIS_PORT_6379_TCP_ADDR=172.17.0.22 REDIS_PORT_6379_TCP_PORT=6379 REDIS_PORT_6379_TCP_PROTO=tcp REDIS_NAME=/distracted_rosalind/redis REDIS_ENV_REDIS_VERSION=3.0.3 REDIS_ENV_REDIS_DOWNLOAD_URL=http://download.redis.io/releases/redis-3.0.3.tar.gz REDIS_ENV_REDIS_DOWNLOAD_SHA1=0e2d7707327986ae652df717059354b358b83358 HOME=/root
We can see that Docker has set up environment variables prefixed with
REDIS_PORT that contain information on how to connect to the container. Most of these seem somewhat redundant, as the information in the value is already contained in the variable name. Nevertheless, they are useful as a form of documentation if nothing else.
Docker has also imported environment variables from the linked container, which
it has prefixed with REDIS_ENV. While this functionality can be very useful,
itâs important to be aware that this happens if you use environment variables to
store secrets such as API tokens or database passwords.
By default, containers will be able to talk to each other whether or not they have
been explicitly linked. If you want to prevent containers that havenât been
linked from communicating, use the arguments --icc=false and --iptables
when starting the Docker daemon. Now when containers are linked, Docker will set
up iptables rules to allow the containers to communicate on any ports that have
been declared as exposed.
Unfortunately, Docker links as they stand have several shortcomings. Perhaps most significantly, they are staticâalthough links should survive container restarts, they arenât updated if the linked container is replaced. Also, the link container must be started before the master container, meaning you canât have bidirectional links.
For further information on networking containers, see Chapter 11.
Managing Data with Volumes and Data Containers
To recap, Docker volumes are directories4 that are not part of the containerâs UFS (see âImages, Containers, and the Union File Systemâ)âthey are just normal directories on the host that are bind mounted (see Bind Mounting) into the container.
There are three5 different ways to initialize volumes, and itâs important to understand
the differences between the methods. First, we can declare a volume at
runtime with the -v flag:
$ docker run -it --name container-test -h CONTAINER -v /data debian /bin/bash root@CONTAINER:/# ls /data root@CONTAINER:/#
This will make the directory /data inside the container into a volume. Any
files the image held inside the /data directory will be copied into the
volume. We can find out where the volume lives on the host by running docker
inspect on the host from a new shell:
$ docker inspect -f {{.Mounts}} container-test
[{5cad... /mnt/sda1/var/lib/docker/volumes/5cad.../_data /data local true}]
In this case, the volume /data/ in the container is simply a link to the directory /var/lib/docker/volumes/5cadâ¦/_data on the host. To prove this, we can add a file into the directory on the host:6
$ sudo touch /var/lib/docker/volumes/5cad.../_data/test-file
And you should immediately be able to see from inside the container:
root@CONTAINER:/# ls /data test-file
The second way to set up a volume is by using the VOLUME instruction in a Dockerfile:
FROMdebian:wheezyVOLUME/data
This has exactly the same effect as specifying -v /data to docker run.
The third7 way is to extend the -v argument to
docker run with an explicit directory to bind to on the host using the format
-v HOST_DIR:CONTAINER_DIR. This canât be done from a Dockerfile (it would be
nonportable and a security risk). For example:
$ docker run -v /home/adrian/data:/data debian ls /data
This will mount the directory /home/adrian/data on the host as /data inside
the container. Any files already existing in the /home/adrian/data directory
will be available inside the container. If the /data directory already
exists in the container, its contents will be hidden by the volume. Unlike the
other invocations, no files from the image will be copied into the volume, and
the volume wonât be deleted by Docker (i.e., docker rm -v will not remove a
volume that is mounted at a user-chosen directory).
Bind Mounting
When a specific host directory is used in a volume (the -v
HOST_DIR:CONTAINER_DIR syntax), it is often referred to as bind mounting.
This is somewhat misleading, as all volumes are technically bind mountedâthe
difference is that the mount point is made explicit rather than hidden in a
directory owned by Docker.
Sharing Data
The -v HOST_DIR:CONTAINER_DIR syntax is very useful for sharing files between
the host and one or more containers. For example, configuration files can be
kept on the host and mounted into containers built from generic images.
We can also share data between containers by using the --volumes-from
CONTAINER argument with docker run. For example, we can create a new
container that has access to the volumes from the container in our previous
example like so:
$ docker run -it -h NEWCONTAINER --volumes-from container-test debian /bin/bash root@NEWCONTAINER:/# ls /data test-file root@NEWCONTAINER:/#
Itâs important to note that this works whether or not the container holding the
volumes (container-test, in this case) is currently running. As long as at
least one existing container links to a volume, it wonât be deleted.
Data Containers
A common practice is to create data containersâcontainers whose sole
purpose is to share data between other containers. The main benefit of this
approach is that it provides a handy namespace for volumes that can be easily
loaded using the --volumes-from command.
For example, we can create a data container for a PostgreSQL database with the following command:
$ docker run --name dbdata postgres echo "Data-only container for postgres"
This will create a container from the postgres image and initialize any
volumes defined in the image before running the echo command and
exiting.8 Thereâs no need to
leave data containers running, as doing so would just be a waste of resources.
We can then use this volume from other containers with the --volumes-from
argument. For example:
$ docker run -d --volumes-from dbdata --name db1 postgres
Images for Data Containers
Thereâs normally no need to use a âminimal imageâ such as busybox or scratch
for the data container. Just use the same image that is used for the container
consuming the data. For example, use the postgres image to create a data
container to be used with the Postgres database.
Using the same image doesnât take up any extra spaceâyou must already have downloaded or created the image for the consumer. It also gives the image a chance to seed the container with any initial data and ensures permissions are set up correctly.
Deleting volumes
-
The container was deleted with
docker rm -v, or -
The
--rmflag was provided todocker run
and:
-
No existing container links to the volume
-
No host directory was specified for the volume (the
-v HOST_DIR:CONTAINER_DIRsyntax was not used)
At the moment, this means that unless you are very careful about always running your containers like this, you are likely to have orphan files and directories in your Docker installation directory and no easy way of telling what they represent. Docker is working on a top-level âvolumeâ command that will allow you to list, create, inspect, and remove volumes independent of containers. This is expected to land in 1.9, which should be out by the time this book is published.
Common Docker Commands
This section gives a brief (at least in comparison to the official
documentation) and nonexhaustive overview of the various Docker commands,
focusing on the commands commonly used on a day-to-day basis. Because Docker is
rapidly changing and evolving, refer to the
official documentation on the Docker website for full
and up-to-date details on a given command. I have not specified in detail the
arguments and syntax of the various commands (with the exception of docker
run). Refer to the built-in help for this, which can be accessed by
giving the --help argument to any command or via the docker help command.
Docker Boolean Flags
In most Unix command-line tools, you will find flags that donât take a value,
such as -l in ls -l. Because these flags are either set or not set, Docker
considers these to be boolean flags andâunlike most other toolsâsupports
explicitly supplying a boolean value flag (i.e., it will accept both -f=true
and -f). In addition (and this is where things get confusing), you can have both default true
and default false flags. Unlike default false, default true flags are
considered to be set if unspecified. Specifying a flag without an argument has
the same effect as setting it to trueâa default true flag is not unset by
an argument with a value; the only way a default true flag can be unset is by
explicitly setting it to false (e.g., -f=false).
To find out if a flag is default true or default false, refer to docker help
for the command. For example:
$ docker logs --help ... -f, --follow=false Follow log output --help=false Print usage -t, --timestamps=false Show timestamps ...
shows that the -f, --help, and -t arguments are all default false.
To give a couple of concrete examples, consider the default true --sig-proxy
argument to docker run. The only way to turn this argument off is by
explicitly setting it false. For example:
$ docker run --sig-proxy=false ...
All of the following are equivalent:
$ docker run --sig-proxy=true ... $ docker run --sig-proxy ... $ docker run ...
In the case of a default false argument, such as --read-only, the following
will set it to true:
$ docker run --read-only=true $ docker run --read-only
Leaving it unspecified or explicitly setting to false are equivalent.
This also leads to some quirky behavior with flags that normally short-circuit
logic (e.g., docker ps --help=false will work as normal without printing the
help message).
The run Command
Weâve already seen docker run in action; itâs the go-to command for launching
new containers. As such, it is by far the most complex command and supports a
large list of potential arguments. The arguments allow users to configure how
the image is run, override Dockerfile settings, configure networking, and set
privileges and resources for the container.
The following options control the lifecycle of the container and its basic mode of operation:
-a, --attach-
Attaches the given stream (
STDOUT, etc.) to the terminal. If unspecified, bothstdoutandstderrare attached. If unspecified and the container is started in interactive mode (-i),stdinis also attached.Incompatible with
-d
-d, --detach-
Runs the container in âdetachedâ mode. The command will run the container in the background and return the container ID.
-i, --interactive-
Keeps
stdinopen (even when itâs not attached). Generally used with-tto start an interactive container session. For example:
$ docker run -it debian /bin/bash root@bd0f26f928bb:/# ls ...snip...
--restart-
Configures when Docker will attempt to restart an exited container. The argument
nowill never attempt to restart a container, andalwayswill always try to restart, regardless of exit status. Theon-failureargument will attempt to restart containers that exit with a nonzero status and can take an optional argument specifying the number of times to attempt to restart before giving up (if not specified, it will retry forever). For example,docker run --restart on-failure:10 postgreswill launch the postgres container and attempt to restart it 10 times if it exits with a nonzero code. --rm-
Automatically removes the container when it exits. Cannot be used with
-d. -t, --tty-
Allocates a pseudo-TTY. Normally used with
-ito start an interactive container.
The following options allow setting of container names and variables:
-e, --env-
Sets environment variables inside the container. For example:
$ docker run -e var1=val -e var2="val 2" debian env PATH=/usr/local/sbin:/usr/local/bin:/usr/sbin:/usr/bin:/sbin:/bin HOSTNAME=b15f833d65d8 var1=val var2=val 2 HOME=/root
Also note the
--env-fileoption for passing variables in via a file. -h, --hostname
$ docker run -h "myhost" debian hostname myhost
--name NAME-
Assigns the name
NAMEto the container. The name can then be used to address the container in other Docker commands.
The following options allow the user to set up volumes (see âManaging Data with Volumes and Data Containersâ for more details):
-v, --volume-
There are two forms of the argument to set up a volume (a file or directory within a container that is part of the native host filesystem, not the containerâs union filesystem). The first form only specifies the directory within the container and will bind to a host directory of Dockerâs choosing. The second form specifies the host directory to bind to.
--volumes-from-
Mounts volumes from the specified container. Often used in association with data containers (see âData Containersâ).
There are several options affecting networking. The basic commands you can expect to frequently use are:
--expose-
Equivalent of Dockerfile
EXPOSEinstruction. Identifies the port or port range as being used in the container but does not open the port. Only really makes sense in association with-Pand when linking containers. --link-
Sets up a private network interface to the specified container. See âLinking Containersâ for more information.
-p, --publish-
âPublishesâ a port on the container, making it accessible from the host. If the host port is not defined, a random high-numbered port will chosen, which can be discovered by using the
docker portcommand. The host interface on which to expose the port may also be specified. -P, --publish-all-
Publish all exposed ports on the container to the host. A random high-numbered port will be chosen for each exposed port. The
docker portcommand can be used to see the mapping.
There are several more advanced options you may find useful if you need to do more advanced networking. Be aware that several of these options will require you to have some understanding of networking and how it is implemented in Docker. For more information, refer to Chapter 11.
The docker run command also has a large set of options for controlling the
privileges and capabilities of containers. See Chapter 13 for details on
these.
The following options directly override Dockerfile settings:
--entrypoint-
Sets the entrypoint for the container to the given argument, overriding any
ENTRYPOINTinstruction in the Dockerfile. -u, --user-
Sets the user that commands are run under. May be specified as a username or UID. Overrides
USERinstruction in Dockerfile. -w, --workdir-
Sets the working directory in the container to the provided path. Overrides any value in the Dockerfile.
Managing Containers
In addition to docker run, the following docker commands are used to
manage containers during their lifecycle:
docker attach [OPTIONS] CONTAINER-
The
attachcommand allows the user to view or interact with the main process inside the container. For example:
$ ID=$(docker run -d debian sh -c "while true; do echo 'tick'; sleep 1; done;") $ docker attach $ID tick tick tick tick
Note that using Ctrl-C to quit will end the process and cause the container to exit.
docker create-
Creates a container from an image but does not start it. Takes most of the same arguments as
docker run. To start the container, usedocker start. docker cp-
Copies files and directories between a container and the host.
docker exec-
Runs a command inside a container. Can be used to perform maintenance tasks or as a replacement for
sshto log in to a container.For example:
$ ID=$(docker run -d debian sh -c "while true; do sleep 1; done;") $ docker exec $ID echo "Hello" Hello $ docker exec -it $ID /bin/bash root@5c6c32041d68:/# ls bin dev home lib64 mnt proc run selinux sys usr boot etc lib media opt root sbin srv tmp var root@5c6c32041d68:/# exit exit
docker kill-
Sends a signal to the main process (PID 1) in a container. By default, sends a
SIGKILL, which will cause the container to exit immediately. Alternatively, the signal can be specified with the-sargument. The container ID is returned.For example:
$ ID=$(docker run -d debian bash -c \ "trap 'echo caught' SIGTRAP; while true; do sleep 1; done;") $ docker kill -s SIGTRAP $ID e33da73c275b56e734a4bbbefc0b41f6ba84967d09ba08314edd860ebd2da86c $ docker logs $ID caught $ docker kill $ID e33da73c275b56e734a4bbbefc0b41f6ba84967d09ba08314edd860ebd2da86c docker pause-
Suspends all processes inside the given container. The processes do not receive any signal that they are being suspended and consequently cannot shut down or clean up. The processes can be restarted with
docker unpause.docker pauseuses the Linux cgroups freezer functionality internally. This command contrasts withdocker stop, which stops the processes and sends signals observable by the processes. docker restart-
Restarts one or more containers. Roughly equivalent to calling
docker stopfollowed bydocker starton the containers. Takes an optional argument-tthat specifies the amount of time to wait for the container to shut down before it is killed with aSIGTERM. docker rm-
Removes one or more containers. Returns the names or IDs of successfully deleted containers. By default,
docker rmwill not remove any volumes. The-fargument can be used to remove running containers, and the-vargument will remove volumes created by the container (as long as they arenât bind mounted or in use by another container).For example, to delete all stopped containers:
$ docker rm $(docker ps -aq) b7a4e94253b3 e33da73c275b f47074b60757
docker start-
Starts a stopped container (or containers). Can be used to restart a container that has exited or to start a container that has been created with
docker createbut never launched. docker stop-
Stops (but does not remove) one or more containers. After calling
docker stopon a container, it will transition to the âexitedâ state. Takes an optional argument-twhich specifies the amount of time to wait for the container to shutdown before it is killed with aSIGTERM. docker unpause
Detaching from Containers
When attached to a Docker container, either by starting it in interactive mode
or attaching to it with docker attach, you will stop the container if you try
to disconnect with Ctrl-C. Instead, if you use Ctrl-P Ctrl-Q you can detach
from the container without stopping it.
This code will only work when attached in interactive mode with a TTY (i.e.,
using both the -i and -t flags).
Docker Info
The following subcommands can be used to get more information on the Docker installation and usage:
Container Info
The following commands provide more information on running and stopped containers:
docker diff-
Shows changes made to the containers filesystem compared to the image it was launched from. For example:
$ ID=$(docker run -d debian touch /NEW-FILE) $ docker diff $ID A /NEW-FILE
docker events-
Prints real-time events from the daemon. Use Ctrl-C to quit. For more information on this, see Chapter 10.
docker inspect-
Provides detailed information on given containers or images. The information includes most configuration information and covers network settings and volume mappings. The command can take one argument,
-f, which is used to supply a Go template that can be used to format and filter the output.
docker logs-
Outputs the âlogsâ for a container. This is simply everything that has been written to
STDERRorSTDOUTinside the container. For more information on logging in Docker, see Chapter 10. docker port-
Lists the exposed port mappings for the given container. Can optionally be given the internal container port and protocol to look up. Often used after
docker run -P <image>to discover the assigned ports.For example:
$ ID=$(docker run -P -d redis)
$ docker port $ID
6379/tcp -> 0.0.0.0:32768
$ docker port $ID 6379
0.0.0.0:32768
$ docker port $ID 6379/tcp
0.0.0.0:32768
docker ps-
Provides high-level information on current containers, such as the name, ID, and status. Takes a lot of different arguments, notably
-afor getting all containers, not just running ones. Also note the-qargument, which only returns the container IDs and is very useful as input to other commands such asdocker rm. docker top-
Provides information on the running processes inside a given container. In effect, this command runs the Unix
psutility on the host and filters for processes in the given container. The command can be given the same arguments thepsutility and defaults to-ef(but be careful to make sure the PID field is still in the output).For example:
$ ID=$(docker run -d redis)
$ docker top $ID
UID   PID   PPID  C  STIME  TTY  TIME      CMD
999   9243  1836  0  15:44  ?    00:00:00  redis-server *:6379
$ ps -f -u 999
UID  PID   PPID  C  STIME  TTY       TIME  CMD
999  9243  1836  0  15:44  ?     00:00:00  redis-server *:6379
$ docker top $ID -axZ
LABEL           PID   TTY  STAT   TIME  COMMAND
docker-default  9243  ?    Ssl    0:00  redis-server *:6379
Dealing with Images
The following commands provide tools for creating and working with images:
docker build-
Builds an image from a Dockerfile. See âBuilding Images from Dockerfilesâ and âHow Images Get Builtâ for details on usage.
docker commit-
Creates an image from the specified container. While
docker commitcan be useful, it is generally preferable to create images usingdocker build, which is easily repeatable. By default, containers are paused prior to commit, but this can be turned off with the--pause=falseargument. Takes-aand-marguments for setting metadata.For example:
$ ID=$(docker run -d redis touch /new-file)
$ docker commit -a "Joe Bloggs" -m "Comment" $ID commit:test
ac479108b0fa9a02a7fb290a22dacd5e20c867ec512d6813ed42e3517711a0cf
$ docker images commit
REPOSITORY  TAG   IMAGE ID      CREATED              VIRTUAL SIZE
commit      test  ac479108b0fa  About a minute ago   111 MB
$ docker run commit:test ls /new-file
/new-file
docker export-
Exports the contents of the containerâs filesystem as a tar archive on
STDOUT. The resulting archive can be loaded withdocker import. Note that only the filesystem is exported; any metadata such as exported ports,CMD, andENTRYPOINTsettings will be lost. Also note that any volumes are not included in the export. Contrast withdocker save. docker historydocker images-
Provides a list of local images, including information such as repository name, tag name, and size. By default, intermediate images (used in the creation of top-level images) are not shown. The
VIRTUAL SIZEis the total size of the image including all underlying layers. As these layers may be shared with other images, simply adding up the size of all images does not provide an accurate estimate of disk usage. Also, images will appear multiple times if they have more than one tag; different images can be discerned by comparing the ID. Takes several arguments; in particular, note-q, which only returns the image IDs and is useful as input to other commands such asdocker rmi.For example:
$ docker images | head -4
REPOSITORY              TAG     IMAGE ID      CREATED       VIRTUAL SIZE
identidock_identidock   latest  9fc66b46a2e6  26 hours ago  839.8 MB
redis                   latest  868be653dea3  6 days ago    110.8 MB
containersol/pres-base  latest  13919d434c95  2 weeks ago   401.8 MB
To remove all dangling images:
$ docker rmi $(docker images -q -f dangling=true)
Deleted: a9979d5ace9af55a562b8436ba66a1538357bc2e0e43765b406f2cf0388fe062
docker import-
Creates an image from an archive file containing a filesystem, such as that created by
docker export. The archive may be identified by a file path or URL or streamed throughSTDIN(by using the-flag). Returns the ID of the newly created image. The image can be tagged by supplying a repository and tag name. Note that an image built fromimportwill only consist of a single layer and will lose Docker configuration settings such as exposed ports andCMDvalues. Contrast withdocker load.Example of âflatteningâ an image by exporting and importing:
$ docker export 35d171091d78 | docker import - flatten:test
5a9bc529af25e2cf6411c6d87442e0805c066b96e561fbd1935122f988086009
$ docker history flatten:test
IMAGE         CREATED         CREATED BY  SIZE      COMMENT
981804b0c2b2  59 seconds ago              317.7 MB  Imported from -
docker load-
Loads a repository from a tar archive passed via
STDIN. The repository may contain several images and tags. Unlikedocker import, the images will include history and metadata. Suitable archive files are created bydocker save, makingsaveandloada viable alternative to registries for distributing images and producing backups. Seedocker savefor an example. docker rmi-
Deletes the given image or images. Images are specified by ID or repository and tag name. If a repository name is supplied but no tag name, the tag is assumed to be
latest. To delete images that exist in multiple repositories, specify that image by ID and use the-fargument. You will need to run this once per repository. docker save-
Saves the named images or repositories to a tar archive, which is streamed to
STDOUT(use-oto write to a file). Images can be specified by ID or asrepository:tag. If only a repository name is given, all images in that repository will be saved to the archive, not just thelatesttag. Can be used in conjunction withdocker loadto distribute or back up images.For example:
$ docker save -o /tmp/redis.tar redis:latest
$ docker rmi redis:latest
Untagged: redis:latest
Deleted: 868be653dea3ff6082b043c0f34b95bb180cc82ab14a18d9d6b8e27b7929762c
...
$ docker load -i /tmp/redis.tar
$ docker images redis
REPOSITORY          TAG                 IMAGE ID            CREATED
VIRTUAL SIZE
redis               latest              0f3059144681        3 months ago
111 MB
docker tag-
Associates a repository and tag name with an image. The image can identified by ID or repository and tag (the
latesttag is assumed if none is given). If no tag is given for the new name,latestis assumed.$ docker tag faa2b75ce09a newname
$ docker tag newname:latest amouat/newname
$ docker tag newname:latest amouat/newname:newtag
$ docker tag newname:latest myregistry.com:5000/newname:newtag
Adds the image with ID
faa2b75ce09ato the repositorynewname, using the taglatest, as none was specified.Adds the
newname:latestimage to theamouat/newnamerepository, again using the taglatest. This label is in a format suitable for pushing to the Docker Hub, assuming the user isamouat.As above, except using the tag
newtaginstead oflatest.Adds the
newname:latestimage to the repositorymyregistry.com/newnamewith the tagnewtag. This label is in a format suitable for pushing to a registry at http://myregistry.com:5000.
Using the Registry
The following commands relate to using registries, including the Docker Hub. Be aware that Docker saves credentials to the file .dockercfg in your home directory:
docker login-
Register with, or log in to, the given registry server. If no server is specified, it is assumed to be the Docker Hub. The process will interactively ask for details if required, or they can be supplied as arguments.
docker logout-
Logs out from a Docker registry. If no server is specified, it is assumed to be the Docker Hub.
docker pull-
Downloads the given image from a registry. The registry is determined by the image name and defaults to the Docker Hub. If no tag name is given, the image tagged
latestwill be downloaded (if available). Use the-aargument to download all images from a repository. docker push-
Pushes an image or repository to the registry. If no tag is given, this will push all images in the repository to the registry, not just the one marked
latest. docker search-
Prints a list of public repositories on the Docker Hub matching the search term. Limits results to 25 repositories. You can also filter by stars and automated builds. In general, itâs easiest to use the website.
Conclusion
There has been a lot of information in this chapter! If you even just managed to skim the main points, you should have a reasonably broad understanding of how Docker works and the main commands. In Part II, we will see how to apply this knowledge to a software project, from development through to production. You may find it easier to understand some of the material in this chapter after seeing it in practice.
1 Donât worry if Iâve lost you here. It should make more sense after looking at the output of docker build in our debug example.
2 Itâs actually possible to take this concept of minimal computing even further by abandoning Docker and the full Linux kernel in favor of a unikernel approach. In a unikernel architecture, applications are combined with a kernel containing only the features used by the application, which is then run directly on a hypervisor. This gets rid of several unnecessary layers of code and unused drivers, resulting in a much smaller and faster application (unikernels commonly boot in under a secondâthat is, they can be started in direct response to user requests). If youâd like to learn more about this, take a look at âUnikernels: Rise of the Virtual Library Operating Systemâ by Anil Madhavapeddy and David J. Scott and MirageOS.
3 In this discussion and throughout the book, I will refer to the container being linked as the link container and the container being launched as the master container (as it is responsible for initiating the link).
4 Technically, directories or files, as a volume may be a single file.
5 OK, two-and-a-half, depending on how you want to count.
6 If youâre connected to a remote Docker daemon, youâll need to run this on the remote host via SSH. If youâre using Docker Machine (which you will be if you installed Docker via the Docker Toolbox), you can do this via docker-machine ssh default.
7 Second equal?
8 We could have used any command that exits immediately here, but the echo message will serve to remind us of the purpose of the container when we run docker ps -a. Another option is not to start the container at all by using the docker create command instead of docker run.
Get Using Docker now with the O’Reilly learning platform.
O’Reilly members experience books, live events, courses curated by job role, and more from O’Reilly and nearly 200 top publishers.

