Chapter 4. Sending Data to Your Application
So far we have looked a bit at HTML and CSS in the browser as well as at the Python programming language that we will use within the server.
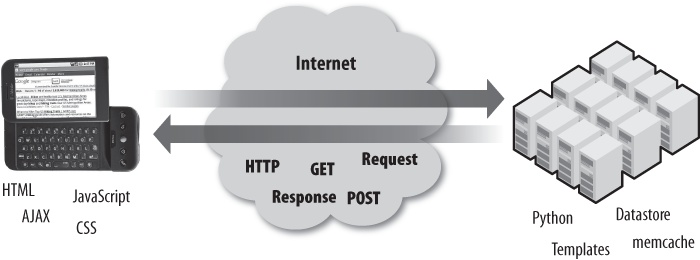
In this chapter, we start to put it all together by looking at the HyperText Transport Protocol (HTTP) and how the browser interacts with the server. This interaction between the browser and server across the Internet is called the request/response cycle because the cycle of the browser making a request to the server and getting a response from the server happens over and over as we browse the Internet. The request/response cycle is the middle portion of Figure 4-1.
Making an HTTP Request
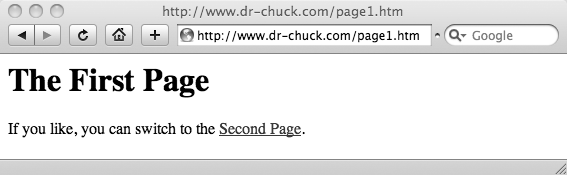
When you type a Uniform Resource Locator (URL) into the address box of your web browser and press Enter, you are asking your browser to retrieve a particular document somewhere on the Web. The URL http://www.dr-chuck.com/page1.htm can be broken down into three parts (as shown in Figure 4-2):
- The first part of the URL indicates which network protocol is to be used when your browser contacts the host and requests the document. Usually the protocol is either http:// or https://, indicating HTTP or secure HTTP, respectively. Sometimes you will see a URL that starts with ftp://, indicating that the File Transfer Protocol (FTP) must be used to retrieve the document.
- The second part of the URL is a host that is connected to the Internet. In this example, the hostname is www.dr-chuck.com.
- The third part of the URL is the document that we are to retrieve from that host. In this example, the document is /page1.htm.

Using the information in the URL, the browser can retrieve the requested document following the rules of the HTTP protocol. The browser first makes a connection on the default port 80 to the host www.dr-chuck.com. Once the connection is established, the browser requests the document by sending the following command:
GET http://www.dr-chuck.com/page1.htm HTTP/1.1
The GET indicates that this is a simple request to GET a document. This command indicates which type of HTTP request (or HTTP method) we are making. Other HTTP methods include POST, PUT, and DELETE.
The server running at www.dr-chuck.com receives this request, finds the document page1.htm, and returns the following HTML as the HTTP response:
<h1>The First Page</h1>
<p>
If you like, you can switch to the
<a href="http://www.dr-chuck.com/page2.htm">
Second Page</a>.
</p>
And then it closes the connection. This completes our first HTTP request/response cycle.
The browser then reads and parses the returned HTML in the HTTP response and renders a page that looks like Figure 4-3.
If you were to click on the Second Page link, the browser would see the href value of http://www.dr-chuck.com/page2.htm and repeat the steps of an HTTP GET request by making another connection to www.dr-chuck.com on port 80 and sending the following command:
GET http://www.dr-chuck.com/page2.htm HTTP/1.1
And the server would respond with the following HTML document:
<h1>The Second Page</h1>
<p>
If you like, you can switch back to the
<a href="page1.htm">
First Page</a>.
</p>
Figure 4-4 shows this interaction showing the GET request being sent from the browser to the web server and the web server returning the HTML document as the response.
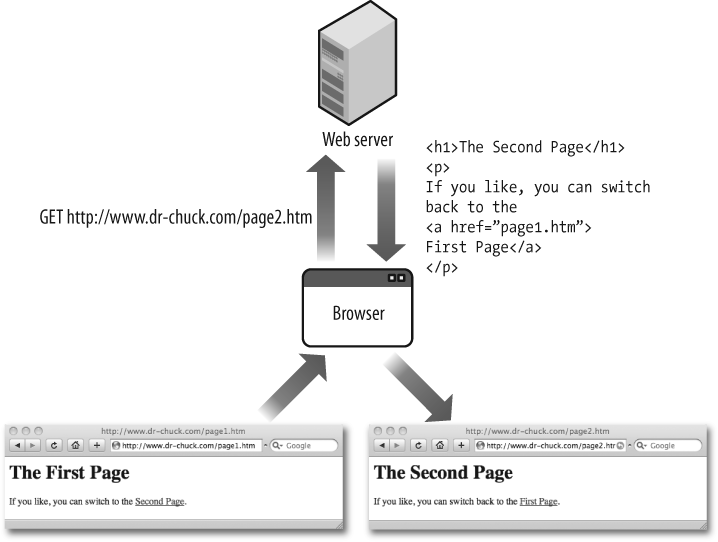
Note that in the second page, our hypertext reference (href) is simply page1.htm. If the protocol and host are omitted from the hypertext reference, it assumes the same protocol and host as the current document was retrieved from. This lets pages be moved more easily from host to host. If the href includes the full protocol and hostname, it is called an absolute reference, and if these are omitted, it is called a relative reference because the href is assumed to be relative to the current document.
We can happily go back and forth between the first and second pages—with each click, the browser makes a connection to the host on port 80, sends an HTTP GET request for the document, and then displays the HTML, which is returned in the HTTP response.
Hacking the HTTP Protocol
The HTTP protocol is simple enough that we can actually emulate the protocol by hand. We can make the same connection as the browser and send the same command to the server and see the server return our HTML document over the connection.
To make this connection directly, we use the telnet command built into most operating systems. Start a Windows command-line interface or Mac OS X Terminal program and run the following telnet command to connect to HTTP port 80 on www.dr-chuck.com:
$ telnet www.dr-chuck.com 80
Trying 74.208.28.177...
Connected to www.dr-chuck.com.
Escape character is '^]'.
GET http://www.dr-chuck.com/page1.htm
<h1>The First Page</h1>
<p>
If you like, you can switch to the
<a href="http://www.dr-chuck.com/page2.htm">
Second Page</a>.
</p>
Connection closed by foreign host.
$
Once the connection is established, we type the GET command with the requested document and press Enter. The web server will respond with the HTML of the requested document.
The HTTP protocol has many more options and features, but you have now successfully hacked the most basic aspect of the HTTP protocol.
The HTTP Protocol Standards
One of the reasons that the Web is so successful is that all of the details of the network protocols are very carefully documented in open and public specifications. These standards are quite mature and in wide use across many different software and hardware environments. The Internet Engineering Task Force (IETF; http://www.ietf.org) is the standards organization responsible for the creation and maintenance of these Internet standards.
The IETF standards are called Requests for Comments or RFCs. The basic idea when developing an RFC is that engineers produce a straw man standard and request that the rest of the IETF review the documents and provide any comments on how the standard should be fixed and/or improved. At some point, when the comments are properly addressed, the specification matures and goes into use.
The HTTP protocol is covered by a number of different RFCs. The main RFC that provides the groundwork for the HTTP protocol is RFC-1945, which was written by Tim Berners-Lee, Roy T. Fielding, and Henrik Frystyk Nielsen in May of 1996. You can view the text of this RFC at http://tools.ietf.org/rfc/rfc1945.txt.
Look on page 22 of the specification for a description of the GET request that we just sent to our server to request a document. As you look through the table of contents of RFC-1945, you can begin to see the complexity and richness of the HTTP protocol. If you take a few minutes and read closely, you will also see that the details of HTTP are described very precisely, which makes it easier to write interoperable software from multiple sources.
Watching HTTP in Action
As you move forward, you will need to debug the interactions between your browser and the server, as well as many other interactions. An essential tool to help you understand and debug many aspects of web programming in the browser is the Firebug plug-in for Firefox, written by Joe Hewitt.
Firebug is a great complement to the Web Developer plug-in for Firefox, which you should have already installed (see Chapter 2). To install the Firebug add-on, go to https://addons.mozilla.org and search for Firebug. Follow the instructions and install the plug-in. Once the installation is complete, you should have a small bug icon in the lower-right corner of the Firefox window.
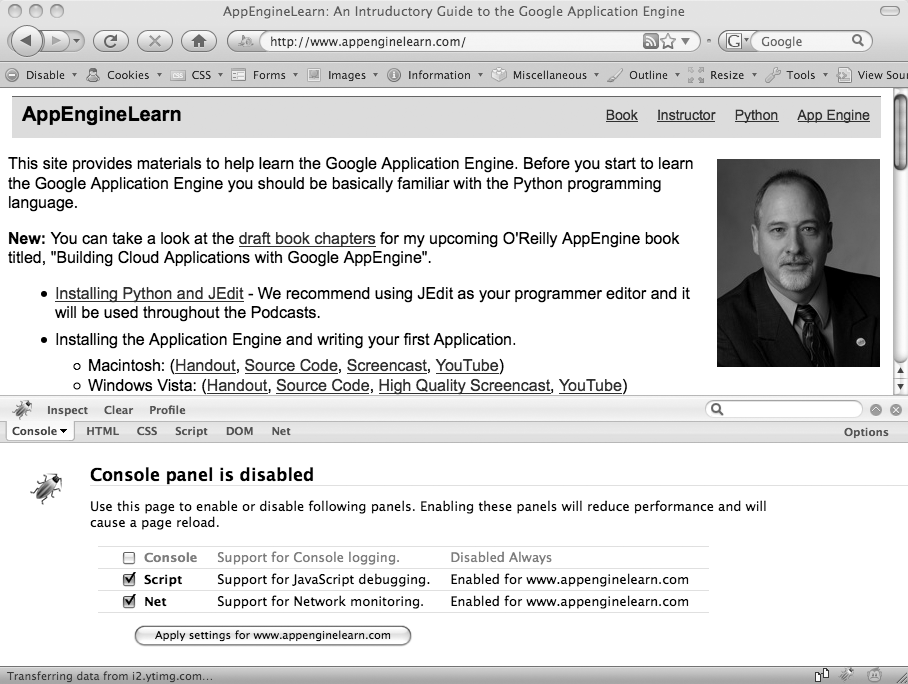
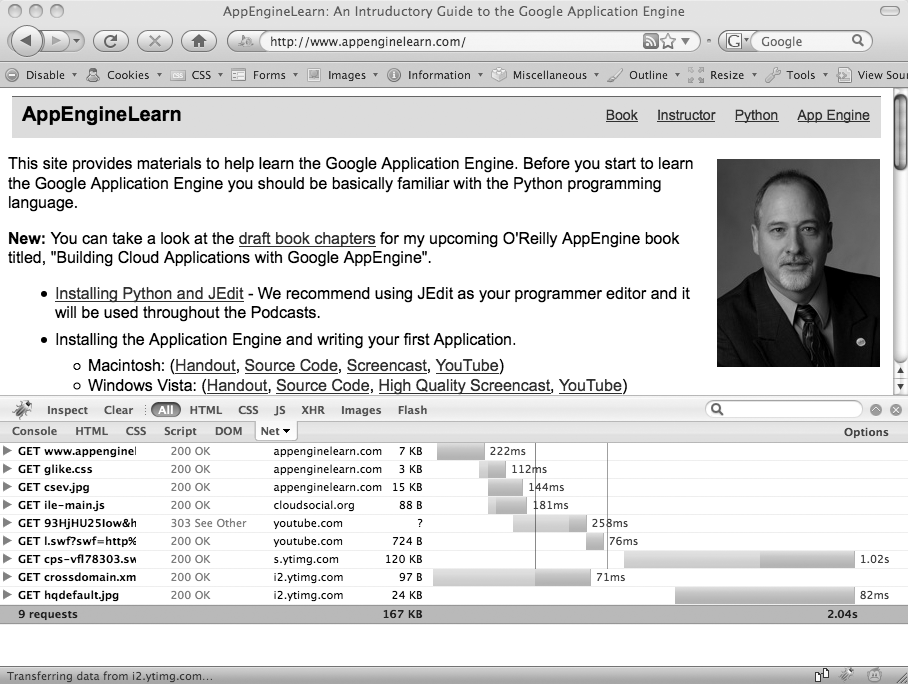
To start Firebug, click on the bug icon in the lower-right corner of Firefox. The screen will split in two, with your original web page in the top half and the Firebug console in the lower half. You can adjust the size of each half by dragging the border bar up or down. When you first visit a site, you may need to enable Firebug for the site, as shown in Figure 4-5.
Once you have enabled Firebug for the site, switch to the Net tab in the Firebug interface and click the Refresh button to reload your web page.
As the page reloads, you will see a new line in the Firebug window each time the browser makes a new HTTP request, as shown in Figure 4-6. Initially, it requests the document from http://www.appenginelearn.com but in that document there are references to JavaScript, CSS, and image files. When the browser sees a reference to one of these embedded files, it issues additional GET requests to retrieve those files. The browser made 11 separate GET requests to assemble the documents needed to render this page. You can see the amount of time it took for each request and the amount of time it took to produce the entire page.
Next, you learn how the browser sends data to the server for processing using the HTTP POST request.
HTML: Building a Form
The number-guessing application is back. We will first build the HTML for the form to prompt for user input and then write the App Engine code to handle the input and play the game, as shown in Figure 4-7.
To review the rules for our game, the computer has chosen a secret number; we are given a number of chances to submit a guess to the server. The server tells us whether our guess is high, low, or correct. Hopefully, over time, we’ll arrive at the right number.
In order to make an interactive web page that prompts for input and sends it to the server, we need a <form> tag on the page. The following is a sample use of the <form> tag to create the input portion of the example page:
<form method="post" action="/">
<p>Enter Guess: <input type="text" name="guess"/></p>
<p><input type="submit"/><p>
</form>
In the <form> tag, we have several attributes. The method attribute tells your browser that we will be sending the data to the server using an HTTP POST and the action attribute tells your browser where to send the form data when the Submit button is clicked.
The form itself is made up of HTML interspersed with <input> tags. There are a number of different types of <input> tags: text, submit, button, checkbox, file, hidden, image, password, and reset. For now we will focus on text and submit.
The text input area provides an area on the web page for the user to type in data. We give the text area a name so that when there are multiple text areas on a form, we can keep the data from each input area separate when it is sent to the server.
You can have multiple forms on a single page and have hypertext links on the page in addition to form submit buttons. Depending on where the user clicks on the page, the next HTTP request may be a GET or POST request. If the user clicks on the Submit button within a form, the browser makes a POST request and sends the form data along with the POST request.
Sending Form Data to the Server Using POST
If you recall, when we talked about the HTTP GET request, we said that the web browser makes a connection to the host on port 80 and then sends a single line with the GET request, including the document that is being requested:
GET http://www.dr-chuck.com/page2.htm HTTP/1.1
When we make a POST request, we send additional data to the server along the same connection, as shown in Figure 4-8.
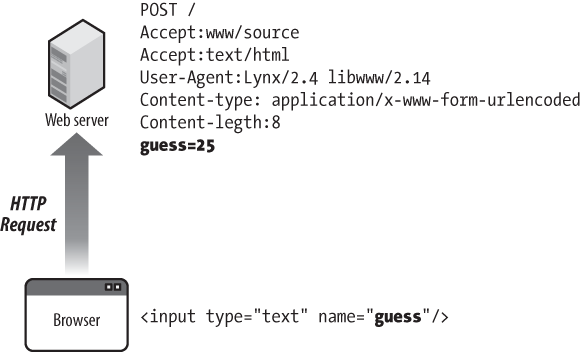
The first line is the POST request that includes the URL to which the post is being sent. Then a number of informative messages to the server about the type of browser that is being used, how the POST data is encoded, how much POST data is present, and so on.
Then, after all the informative messages, we see the actual POST data. It is a very simple keyword=value format, in which the field name (as specified in the HTML) is the keyword and the text which was typed into the form is the value. So in this example, the POST data is:
guess=25
The POST data goes into the server, just like an HTTP GET response, and the server does some processing and then returns some HTML to the browser as an HTTP response that the browser displays as the new page. So both a POST and GET HTTP request give us a new page for display in the browser.[10]
Handling Form Data in the App Engine Server
So far pretty much everything we have done up to this point in the book has been what we call flat HTML. We place an HTML document in a file and we can look at that file from our laptop or put the file up on a web server and view the HTML from the Web. When you are working with flat HTML, a server is optional.
To handle a POST request and generate dynamic HTML based on the POST data, we must run software on a server. So to complete our guessing game, we will need to write an App Engine program in Python.
Our browser will (1) make the POST request to our web server, and the web server will (2) run our Python program, which will produce (3) the HTTP response with the new HTML for display on the browser, as shown in Figure 4-9.

So now we need to make a simple App Engine program. For instructions on how to set up and start App Engine on your system, see the appendixes.
This application will consist of two files. The first file is app.yaml, which names the application and decides how to route the incoming URLs, as follows:
application: ae-01-guess
version: 1
runtime: python
api_version: 1

handlers:
- url: /.*
  script: index.py
In the handlers section, we keep things really simple and route all the incoming document URLs (/.\*) to a program file called index.py. The app.yaml file is in a format called Yet Another Markup Language (YAML). YAML uses a simple syntax to represent keywords and values and structured data using colons (:) and indenting.
We do the main work in the index.py file. Through the magic of the App Engine framework, the code in index.py is started when a request comes into the server and runs from top to bottom for each request. The POST data is available to us as standard input, which we access using a built-in feature of Python called sys.stdin.
The basic outline of the program is to check any POST data and parse the POST data to find the numeric value of the guess. Then we check to see whether the guess is correct, high, or low, and print out an appropriate message, and then print out the HTML for the <form>, so the user can submit a new guess if they like:
import sys

print 'Content-Type: text/html'
print ''

print '<pre>'

# Read the form input which is a single line
# guess=25
guess = -1
data = sys.stdin.read()
# print data
try:
   guess = int(data[data.find('=')+1:])
except:
   guess = -1
print 'Your guess is', guess
answer = 42
if guess < answer :
   print 'Your guess is too low'
if guess == answer:
   print 'Congratulations!'
if guess > answer :
   print 'Your guess is too high'
print '</pre>'

print '''<form method="post" action="/">
<p>Enter Guess: <input type="text" name="guess"/></p>
<p><input type="submit"></p>
</form>'''
Stepping through the code, here’s a description of what is happening at each step:
-
In the first line, we do an
import
          sys
to make the “sys” library available to us so that we can read the standard input. The “sys” library is a collection of functions that come with Python. - We print out a header line indicating the content type and a blank line to signal the start of the actual HTML. You will notice when you view source later that you do not see any the header line(s). This is because the header lines are part of the HTTP response but not part of the HTML document.
-
Then we use
sys.stdin.read()to pull in the rawPOSTdata from the incoming request. If this is aGETrequest, we will not get any data onstdin. -
Then we use Python string functions to split the
guess=25string into parts and pull out the number after the equals sign and convert it from a string to an integer (see Chapter 3 for details on the string parsing in this line of code). Because we may have no data or improperly formatted data, we put the string parsing and conversion in atry/exceptblock. If anything goes wrong, we set theguessvariable to –1. -
Next we use a series of
ifstatements to check whether the incoming guess is correct, high, or low, and then print out an appropriate message. -
At the end of the program, we print out the text of the HTML form using Python multiline string syntax. In Python, if you start a string with triple quotes (
'''), the string continues until it finds a matching set of triple quotes—even if the string continues for multiple lines.
This program runs for every request regardless of whether it is a GET request or a POST request.
To run this application, create a folder named ae-01-guess and put the app.yaml and index.py files into the folder as shown previously. Assuming that you have installed App Engine following the instructions in the appropriate appendix, you should be able to start App Engine in the command or terminal window by typing the following command in the folder above the ae-01-guess folder:
apps csev$ dev_appserver.py ae-01-guess/
INFO 2008-12-27 14:30:27,023 appcfg.py] Server: appengine.google.com
INFO 2008-12-27 14:30:27,386 dev_appserver_main.py] Running application ae-01-guess
on port 8080: http://localhost:8080
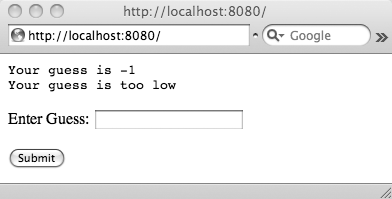
Once the application is running, we can navigate to http://localhost:8080/ by typing the URL into our browser. When we enter the URL, the browser makes an HTTP GET request to retrieve the document. As there is no POST data, the code in the try block will fail and guess will be -1, so the first screen will look as shown in Figure 4-10.
If you view the source of this page, you will see the following HTML, which was generated by our Python program:
<pre>
Your guess is -1
Your guess is too low
</pre>
<form method="post" action="/">
<p>Enter Guess: <input type="text" name="guess"/></p>
<p><input type="submit"></p>
</form>
This HTML is simply the accumulated output of all the print statements in our index.py program. As the index.py program runs, its standard output forms the HTML response that is sent to the browser.
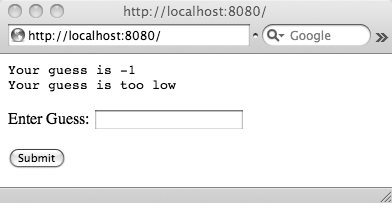
If we enter a guess such as 100 and click Submit, our browser sends an HTTP POST to our application. This time the standard input contains the string guess=100, so the code in the try block succeeds in parsing the input guess and we GET the output shown in Figure 4-11.
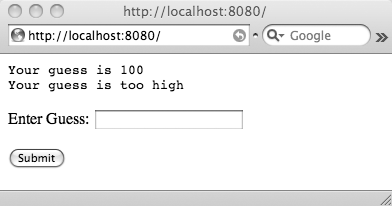
As we continue to make guesses, the browser sends POST requests to our server program and we GET responses—until hopefully we arrive at the correct answer.
Make sure to test your application to confirm that it properly handles numbers that are too high, too low, and just right. Also test to see whether the program does something meaningful when you leave the text input blank and click Submit or enter nonnumeric data in the field and click Submit. It is always a good idea to think through how to test your applications quickly and thoroughly. One general approach is to come up with a series of inputs that make sure that your test sequence touches every line of your program at least once.
Sending Form Data to the Server Using GET
We usually send form data to the server using a POST, but it is also possible to send form data to the server using GET. Just change the method to GET as shown:
<form method="get" action="/check">
<p>Enter Guess: <input type="text" name="guess"/></p>
<p><input type="submit"/><p>
</form>
When you send form data using GET, the parameters are appended to the document that is being requested, as follows:
GET /check?guess=25If you use the GET method to pass in form data, instead of the data appearing on sys.stdin(), it appears as part of an environment variable named QUERY_STRING. We would have to change the previous example program to detect when we were processing a GET request and parse the incoming guess value from the query string instead of from standard input.
When we use the App Engine webapp framework, it automatically knows how parameters are passed differently using GET and POST and handles both cases on our behalf.
App Engine Log
Web applications get their input from browsers and send their output back to browsers, so it is sometimes a little hard to figure out what is happening inside of the program. This is especially true when someone else is using your application and complaining that it is breaking.
This type of situation is where the application log is really helpful. The log is a place that you can monitor your application’s behavior, even when other users are using the application in their browsers.
Depending on how you are running your App Engine, the log is either in a command window/terminal or available from the Google Launcher. In either case, the log is a series of messages that are updated in real time as HTTP requests are received and the program produces the results. Here is a sample log for the application we just ran:
apps csev$ dev_appserver.py ae-01-guess/
INFO 2008-12-27 14:30:27,023 appcfg.py] Server: appengine.google.com
INFO 2008-12-27 14:30:27,386 dev_appserver_main.py] Running application ae-01-guess
on port 8080: http://localhost:8080
INFO 2008-12-27 14:30:37,454 dev_appserver.py] "GET/HTTP/1.1" 200 -
INFO 2008-12-27 14:30:44,464 dev_appserver.py] "POST/HTTP/1.1" 200 -
INFO 2008-12-27 14:31:10,850 dev_appserver.py] "POST/HTTP/1.1" 200 -
INFO 2008-12-27 14:31:13,820 dev_appserver.py] "POST/HTTP/1.1" 200 -
You can see as the App Engine server starts up and is ready to receive requests on port 8080 (instead of the default HTTP port of 80). You can see a single GET request for the “/” document when we initially load the page and then three POST requests as we are making guesses to try to find the secret number.
The “200” is an HTTP status code that is being returned to the browser and that indicates the success or failure of each request. Some common HTTP status codes are: 200 = Success, 301 = Document has been moved (redirect), 404 = File not found, and 503 = Server Unavailable/Overloaded.
Our first application keeps things really simple—for example, we did not differentiate between which code we ran for a GET request and which code we ran for a POST request. We skimmed by this little problem by using a try/except block and knew that a GET request would have no data and the except block would cope with that situation.
But our user interface might have looked a little better if we had checked to see whether this was a GET request and not do the guess parsing or guess checking at all. We would only look at and parse the POST data if we actually get a POST request.
It turns out that we have access to the HTTP method and many other details regarding our incoming HTTP request through CGI environment variables (explained in the following section).
Looking at All the Data Available on an HTTP Request
There is a lot of data available to our program in addition to the POST data. The App Engine environment makes this data available to our application for each incoming request so that we can do things differently based on this information.
The environment variables fall into three categories:
- Variables describing the server environment (SERVER_SOFTWARE or SERVER_NAME)
- Variables describing the request data (REQUEST_METHOD, HTTP_USER_AGENT, or CONTENT_TYPE)
- Variables describing the browser environment variables (HTTP_USER_AGENT, HTTP_ACCEPT, and so on)
You can find documentation about these parameters at http://hoohoo.ncsa.uiuc.edu/cgi/in.html. This is a very old website that describes the Common Gateway Interface (CGI), which was the way that the very first web servers passed input data from an HTTP request into application code running on the server.
We will write an application that reads and dumps out all the information available to our application. We call this the “dumper” program because it just looks at its input and dumps it out.
The dumper program consists of a very simple app.yaml file and a single index.py Python file that contains the complete code of our App Engine program.
The app.yaml file names our application and routes all incoming requests to the index.py script as before:
application: ae-02-dumper
version: 1
runtime: python
api_version: 1

handlers:
- url: /.*
  script: index.py
The logic for our dumper program is completely contained in the index.py file:
import os
import sys

print 'Content-Type: text/html'
print ''
print '<form method="post" action="/" >'
print 'Zap Data: <input type="text" name="zap"><br/>'
print 'Zot Data: <input type="text" name="zot"><br/>'
print '<input type="submit">'
print '</form>'

print '<pre>'
print 'Environment keys:'
print ''
for param in os.environ.keys():
    print param, ':', os.environ[param]
print ''

print 'Data'
count = 0
for line in sys.stdin:
  count = count + 1
  print line
  if count > 100:
    break

print '</pre>'
Let’s walk through each of the parts of the dumper program’s index.py.
The first print sends the HTTP response headers, followed by a blank line to indicate the start of the HTML document:
print 'Content-Type: text/html'
print ''
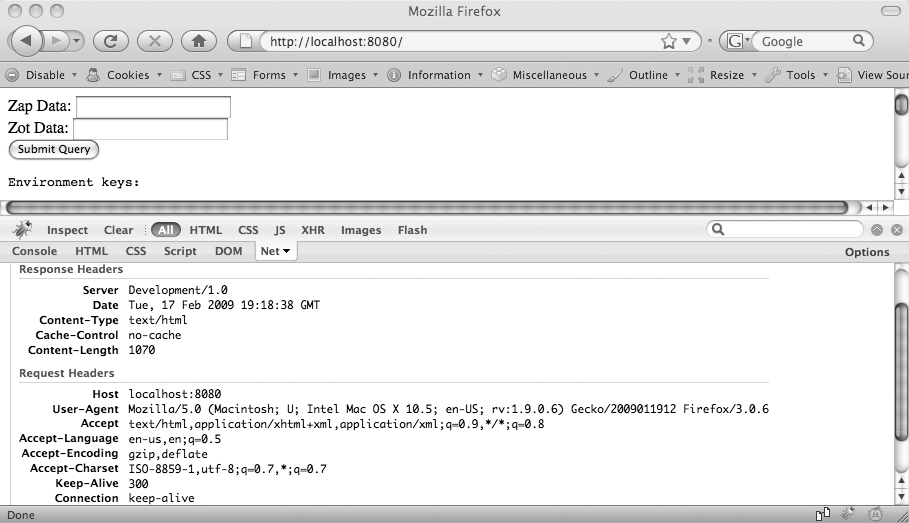
When you select View Source on an HTML page, you are not shown the response headers because they are not part of the HTML document. However, with the Firebug plug-in, you can see the HTTP response headers under the Net tab, as shown in Figure 4-12.
The next set of print statements produces the HTML for a form that we use to send some more complex POST data to our program. This form now has two input text areas named zap and zot, so we can see what happens with multiple input areas:
print '<form method="post" action="/" >'
print 'Zap Data: <input type="text" name="zap"><br/>'
print 'Zot Data: <input type="text" name="zot"><br/>'
print '<input type="submit">'
print '</form>'
The form is quite basic, with two text fields and a Submit button. The next lines of the program read in a set of variables passed to our program as a Python dictionary. These are the environment or CGI variables. They are a combination of the server configuration as well as information about the particular request itself.
We iterate through the keys in the dictionary and then print the keys and values, separated by a colon character, using a Python for loop:
print '<pre>'
print 'Environment keys:'
print ''
for param in os.environ.keys():
    print param, ':', os.environ[param]
print ''
The output from this section is as follows:
HTTP_REFERER : http://www.appenginelearn.com/ SERVER_SOFTWARE : Development/1.0 SCRIPT_NAME : REQUEST_METHOD :GETHTTP_KEEP_ALIVE : 300 SERVER_PROTOCOL : HTTP/1.0 QUERY_STRING : CONTENT_LENGTH : HTTP_ACCEPT_CHARSET : ISO-8859-1,utf-8;q=0.7,*;q=0.7 HTTP_USER_AGENT : Mozilla/5.0 (Macintosh; U; Intel Mac OS X 10.5; en-US; rv:1.9.0.5) Gecko/2008120121 Firefox/3.0.5 HTTP_CONNECTION : keep-alive SERVER_NAME : localhost REMOTE_ADDR : 127.0.0.1 PATH_TRANSLATED : /Users/csev/Desktop/teach/appengine/apps/ae-02-dumper/index.py SERVER_PORT : 8080 AUTH_DOMAIN : gmail.com CURRENT_VERSION_ID : 1.1 HTTP_HOST : localhost:8080 TZ : UTC USER_EMAIL : HTTP_ACCEPT : text/html,application/xhtml+xml,application/xml;q=0.9,*/*;q=0.8 APPLICATION_ID : ae-02-dumper GATEWAY_INTERFACE : CGI/1.1 HTTP_ACCEPT_LANGUAGE : en-us,en;q=0.5 CONTENT_TYPE : application/x-www-form-urlencoded HTTP_ACCEPT_ENCODING : gzip,deflate PATH_INFO : /Data
Because this is an HTTP GET request, there is no data to print.
You can consult the CGI documentation for the details on each of the previously mentioned variables: http://hoohoo.ncsa.uiuc.edu/cgi/in.html.
When we are programming at the CGI level, we are using the old mystical ways of the early web server programs. We won’t use this pattern for much longer, but it is good to start by understanding the low-level details and then delegate the handling of those details to a web framework.
The last part of the index.py program dumps out up to the first 100 lines of POST data, if the data exists:
print 'Data'
count = 0
for line in sys.stdin:
  count = count + 1
  print line
  if count > 100:
    break
According to CGI rules, the POST data is presented to the application via its standard input. In Python, we can read through the predefined file handle sys.stdin to access our POST data using a Python for loop.
If you look at the bottom of the initial output of the program, you will see that there is no POST data because when you navigate to http://localhost:8080, the browser issues an HTTP GET request for the initial document (/).
To test POST data dumping code, we must enter some data into the Zap and Zot input fields and click the Submit button, as shown in Figure 4-13.
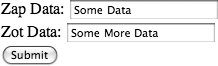
When we click Submit, our browser sends a POST request, which we can immediately see in the REQUEST_METHOD variable change from GET to POST:
Environment keys:

HTTP_REFERER : http://www.appenginelearn.com/
SERVER_SOFTWARE : Development/1.0
SCRIPT_NAME :
REQUEST_METHOD : POST
HTTP_KEEP_ALIVE : 300
SERVER_PROTOCOL : HTTP/1.0
QUERY_STRING :
  ...
And if we scroll down to the bottom of the output, we can see the actual POST data:
GATEWAY_INTERFACE : CGI/1.1
HTTP_ACCEPT_LANGUAGE : en-us,en;q=0.5
CONTENT_TYPE : application/x-www-form-urlencoded
HTTP_ACCEPT_ENCODING : gzip,deflate
PATH_INFO : /

Data
zap=Some+Data&zot=Some+More+Data
To make parsing easier, the POST data is encoded by escaping spaces and special characters. Each parameter starts with an ampersand (&) to distinguish its new parameters from the data of the previous parameter. To make sense of this input, we would have to parse the input data using string parsing and then unescape the data to get back to the actual data that was typed into the form.
-
There are two ways to encode
POSTdata. The easy way to encode thePOSTdata is called “application/x-www-form-urlencoded&rdquo -
this approach concatenates all the data into a single line of input as shown earlier. The more complex way to encode
POSTdata is called multipart/form-data and is described in the next section.
Advanced: Multipart POST Data with File Upload
Let’s dig a little deeper into the complexity of the HTTP protocol before we sit back and delegate all the hard work to the App Engine framework in the next chapters.
This is our last “low-level” example—and after you play a bit with this code, you will probably be quite content to learn and use the framework that nicely hides all the detail of the protocol from us.
Take the sample code (ae-02-dumper) and make the following changes to the form code:
print '<form method="post" action="/" enctype="multipart/form-data">'
print 'Zap Data: <input type="text" name="zap"><br/>'
print 'Zot Data: <input type="text" name="zot"><br/>'
print 'File Data: <input type="file" name="filedat"><br/>'
print '<input type="submit">'
We have switched to a multipart encoding of the data and added an input field of type filedat so that we can attach a file to this request. If you are uploading file data from a form, you are required to encode the form data as multipart. You can look at the documentation for multipart encoding in RFC-2046, section 5.1.3: http://tools.ietf.org/html/rfc2046#section-5.1.3. (It was written by Ned Freed and Nathaniel S. Borenstein in 1996.)
If you skim this document, you’ll notice that it appears complex, but if you read it closely, you’ll see that the rules for looking at multipart data are very clear and precise. It is quite possible to write programs to handle the incoming data reliably. The key is that this code should be written only once and made available to programmers like us to use so that we can ignore all the details.
To see our program produce the multipart data, run the program again, type in some data, select a file, and then click Submit (Figure 4-14).
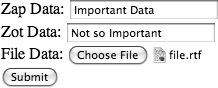
When you click Submit, the program will produce the following output (abbreviated here):
GATEWAY_INTERFACE : CGI/1.1
HTTP_ACCEPT_LANGUAGE : en-us,en;q=0.5
CONTENT_TYPE : multipart/form-data; boundary=---------------------------
515204530388471006681910962
HTTP_ACCEPT_ENCODING : gzip,deflate
PATH_INFO : /

Data
-----------------------------515204530388471006681910962

Content-Disposition: form-data; name="zap"

Important Data

-----------------------------515204530388471006681910962

Content-Disposition: form-data; name="zot"

Not so Important

-----------------------------515204530388471006681910962

Content-Disposition: form-data; name="filedat"; filename="file.rtf"

Content-Type: application/rtf

{\rtf1\ansi\ansicpg1252\cocoartf949\cocoasubrtf350

{\fonttbl\f0\fswiss\fcharset0 Helvetica;}

{\colortbl;\red255\green255\blue255;}

\margl1440\margr1440\vieww9000\viewh8400\viewkind0

\pard\tx720\tx1440\tx2160\tx2880\tx3600\tx4320\tx5040\tx5760\tx6480\tx7200\tx7920\t
x8640\ql\qnatural\pardirnatural

\f0\fs24 \cf0 Here is an rtf file. Yay!}

-----------------------------515204530388471006681910962--
You can see that the input data that is sent to our application now consists of a number of lines. Each of the fields in the form has a separate section in the input stream coming from the browser. The browser chooses a section boundary string and tells us the boundary string as one of the environment variables.
When the file data is listed—the browser simply sends in all the data in the file—the file that was chosen was in Rich Text Format (RTF), and it was very small. The uploaded file could be anything such as an image—and it could be very large—the browser simply sends all the data in the file through the connection, and then, when all the file data has been sent, the browser sends the boundary string.
This why when you send a file with a form, it can take quite a while if your upstream network connection is slow. It’s because the browser is patiently sending all the file data up to the server on the HTTP connection. The browser often gives a progress bar as the file is uploaded to give you some sense of how much data has been sent so far.
We won’t bother writing Python code to parse this multipart data format—it has already been done for us in the App Engine framework. Just remember that you could write that code if you wanted to, by spending some quality time with RFC-2046. But for now, we will focus on writing our application instead of writing a bunch of HTTP parsing code.
Summary
In this chapter, we took a look at how the HyperText Transport Protocol (HTTP) operates in some detail. We have examined how the browser makes requests to the server and how the server processes those requests and returns an HTTP response.
We looked at how form data is passed into the server, as well as a whole series of server environment variables that are made available to our application by App Engine.
App Engine gives us a very primitive Common Gateway Interface (CGI)—compliant interface with environment variables, standard input, and standard output, which we can make use of if we choose to write our applications at a low level. We can examine all the data that App Engine makes available to our scripts.
Ultimately, programming at this low level is only of passing interest because we will delegate much of the detail of handling the request and response to the built-in web application framework in Google App Engine. However, as we switch to depending more on the framework in upcoming applications, it is good to have a general sense of what is really going on at a low level.
When we use the framework for the first time, our code may initially seem a little more complex, but the framework takes care of a myriad of small details of parameter passing, parsing, headers, and conversion. Given that details can get pretty intricate in HTTP pretty quickly, learning and programming in the App Engine framework is a small price to pay for the benefits that we gain in our productivity and the reliability of our applications. It is always good to use existing code instead of building and debugging your own code from scratch—particularly if that code is supported and also used by Google.
Exercises
- What are the three parts of a Uniform Resource Locator?
- What is the HyperText Transport Protocol command to retrieve a document?
- How are special characters encoded in the Request-URI? Hint: Look on page 24 of the 1996 version of RFC-791 (source: http://tools.ietf.org/html/rfc791).
- What command would you use to “hack” HTTP and connect directly to a web server to retrieve a document “by hand”?
- Use the Firebug extension in Firefox to watch the network activity for a Google.com page and then time your favorite band’s MySpace page (or any band’s). How many documents and how many milliseconds (1/1000 of a second) are required for each page?
-
What is the purpose of the
actionattribute on a form tag in HTML? - Give an example of a checkbox input tag in HTML (this will require a bit of research online).
- What Python object is used to pass in all of the data from a form to an App Engine application (string, dictionary, list, integer)? Why is this a good data structure to represent incoming form data?
-
What is the purpose of the
import
          sys
statement in an App Engine application? - In the URL http://localhost:8080/, what does the 8080 mean? Why is it there?
-
Why is a
try/exceptneeded in the simple application used in this chapter? What would happen if you did not usetry/except? Try it and see what happens. -
When do you use HTTP
GETand when do you use HTTPPOST? -
True or false: You must use HTTP
POSTto send form data to an application. - Why are logs important to a developer when a web application is in production?
-
When would you use multipart form data on a
POSTrequest?
[10] Later, you will learn about Asynchronous JavaScript and XML (AJAX) and its ability to update parts of pages, but for now, we will keep it simple and replace the entire page.
Get Using Google App Engine now with the O’Reilly learning platform.
O’Reilly members experience books, live events, courses curated by job role, and more from O’Reilly and nearly 200 top publishers.

