In the beginning, Samba servers were managed solely by a text configuration file named smb.conf. Today settings are mixed between the smb.conf file and local database files in /usr/local/samba/var/locks (or the location specified by the lock directory setting in smb.conf). The database (tdb) files are normally managed through command-line tools such as pdbedit or net and Windows management tools such as User Manager or MMC plug-ins. There are several editing tools for smb.conf, such as SWAT, but most administrators still prefer to fire up their favorite text editor.
In previous chapters, we introduced some of the basic smb.conf settings, yet we have so far barely scratched the surface. At last count, there are more than 360 configuration options defined in the Samba source code. Though this sounds intimidating, approximately 90 percent of installations require less than one-quarter of the available options (or parameters; we use these terms interchangeably). Consider how much functionality we were able to obtain with fewer than a dozen in Chapter 2. For this reason, we do not discuss every option. Rather, our approach is present the common and necessary parameters in the context of a working server. If you require a full reference, the smb.conf manpage, available both in the documentation and on the Samba web site, contains an alphabetical index of all the configuration options and their meanings.
In this chapter, we introduce the structure of the Samba configuration file and show you how to use options to create and modify disk shares. In subsequent chapters, we discuss browsing, how to configure users, security, printing, and other topics related to implementing Samba on your network.
The Samba configuration file, called smb.conf by default, uses the same format as the Windows ini files. If you have ever worked with such a file on a Microsoft client, you will find smb.conf easy to create and modify. And even if you haven’t, you will find the format to be simple and easy to learn. Here is an example of a Samba configuration file:
[global]
    ## core networking options
    netbios name      = RAIN
    workgroup         = GARDEN
    encrypt passwords = yes

    ## netbios name service settings
    wins support      = yes

    ## logging
    log level         = 1
    max log size      = 1000

    ## default service options
    read only         = no

[homes]
    browseable         = no

[test]
    comment           = For testing only, please
    path              = /export/tmp
This configuration file, based on the one we created in Chapter 2, sets up a workgroup in which Samba authenticates users using encrypted passwords and the default user-level security method. WINS server support is enabled and to be provided by the nmbd daemon. We’ve configured very basic event logging to use a logfile not to exceed 1 MB in size and added the [homes] share to allow Samba to export the home directory of each user who has a Unix account on the server.
Let’s take another look at this configuration file, this time from a higher level:
[global]
    ...
[homes]
    ...
[test]
    ...
The names inside the square brackets delineate unique sections of the smb.conf file; the section name corresponds to the name of each share (or service) as viewed by CIFS clients. For example, the [test] and [homes] sections are unique disk shares; they contain options that map to specific directories on the Samba server. All the sections defined in the smb.conf file, with the exception of the [global] section, are available as a file or printer share to clients connecting to the Samba server.
These sections help to group settings together by defining the scope of a parameter. There are two types of parameter scope:
- Global
Global options must appear in the [
global] section and nowhere else. These options apply to the behavior of the Samba server itself and not to any of its shares.- Share or service
Share options can appear in share definitions, the
[global]section, or both. If they appear in the[global]section, they define a default behavior for all services, unless a specific share overrides the option with a value of its own.
The remaining lines of our smb.conf example are individual configuration options for each section. An option’s specific scope continues until a new section is encountered or until the end of the file is reached. Because parameters are parsed in a top-down fashion, if you set the same option more than once in the same section, the last value specified is the only one that will be applied. Each configuration option follows a simple format:
option=value
Options in the smb.conf file are set by assigning a value to them. Some of the option names are self-explanatory. Others might require consulting the smb.conf manpage. For example, read only is self-explanatory and is typical of many recent Samba options. In many cases, the common settings are easily understood.
Parameter values in smb.conf fall into five categories:
- Boolean
Yes/No, True/False, 1/0.
- Integer
The maximum value of the integer depends on the use of the parameter. Note that some options accept a range of valid integers such as a minimum and maximum uid. Certain values, such as 0, may have special meanings—in this case, to not apply the option at all.
- Character string or list
Aside from boolean, this is the most common parameter type. Strings are often free-form, such as comment fields, lists of users and groups, or directory paths.
- Enumerated types
Some parameters accept a value from discrete list of possibilities. The most common option of this type is the
securityparameter, which accepts values ofshare,user,server,domain, orads. Anything other than the values in this list are reported as syntax errors and the parameter reverts to its default value.- Plug-ins
These are predominately new to Samba 3.0. Several smb.conf settings accept the name of an internal or external module. For example, user account information can be stored in an smbpasswd file or in an LDAP directory. The storage location is controlled by the plug-in value for the
passdb backendparameter.
Warning
The testparm utility verifies only the syntax of parameter names and Boolean parameter values. It is not smart enough to know whether values such as an arbitrary string or a director path are valid.
Parameter names are case- and whitespace-insensitive.
For example, READONLY is the same as Read Only or read only. For consistency, option names in this book are usually lowercase and usually follow the spacing conventions as they appear in the smb.conf manpage.
The rules are a little less clear when dealing with parameter values. Generally, the whitespace and capitalization rules are defined by the use of the value. For example, case does not matter for Boolean values: YES is the same as Yes. But string or list values might be case-sensitive, and at a minimum should be assumed to be case-preserving.
Consider the case of a directory path on disk. Common Unix filesystems honor case in file and directory names. This means that /EXPORT is not the same path as /export. However, what if Samba were sharing a FAT filesystem in which case does not matter? What about user or group names? Should they be considered case-sensitive in smb.conf? Normally Unix does treat account names as case-sensitive strings. The bottom line is that string values are case-sensitive when the underlying system that makes use of them is case-sensitve.
When a string is used by Samba itself or as a value transmitted to Windows clients, it can generally be considered as case-preserving but case-insensitive. The comment option for a share is a good example here. The [test] in our smb.conf specifies:
comment = For testing only, please
Samba strips away the spaces up to the first F in For. The remainder of the string is seen as it is by Windows clients. The character case here is only cosmetic.
If an option accepts multiple strings such as a list of usernames or groups, there are two issues of which you must be aware. The first is knowing which characters Samba will interpret as entry delimiters.
The standard delimiting characters in smb.conf are:
Whitespace
Comma (
,)Semicolon (
;)New line (
\n)Carriage return (
\r)
You haven’t been introduced to a parameter that accepts a list of values yet, but imagine a list of users. All of the following lists of three items are semantically the same:
rose, smitty, foo
rose smitty, foo
rose; smitty foo
So this brings us to to the second question: how can we define a list entry that contains one of these delimiting characters? The most common example is a username that contains a space. The answer is that we explicitly group the tokens in an entry together by surrounding the string with double quotes.
"Alex Rose", smitty, foo
However, never use quotation marks around an option name; Samba will treat this as an error.
smb.conf section names are case-insensitive, but the whitespace does matter when a client attempts to access the share. For this reason, many admins find it easier to avoid share names with whitespace in them.
You can continue a line in the Samba configuration file using the backslash, like this:
comment = The first share that has the primary copies \
          of the new Teamworks software product.
Because of the backslash, these two lines will be treated as one line by Samba. The second line begins at the first nonwhitespace character that Samba encounters; in this case, the o in of.
You can insert single-line comments
in the smb.conf configuration file (not to be confused with the comment parameter) by starting a line with either a hash (#) or a semicolon (;). For example, the first three lines in the following example would be considered comments:
#  Export the home directory for a each user
; Pulls the home directory path via the getpwnam( ) call
; (e.g. a lookup in /etc/passwd)

[homes]
    browseable         = no
Samba ignores all comment lines in its configuration file; there are no limitations to what can be placed on a comment line after the initial hash mark or semicolon. Note that the line continuation character (\) is not honored on a commented line. Like the rest of the line, it is ignored.
Warning
Samba does not allow mixing of comment lines and parameters. Be careful not to put comments on the same line as anything else, such as:
path = /data # server's data partition
Errors such as this, where the parameter value is defined with a string, can be tricky to notice. The testparm program won’t complain. The only clues you’ll receive from testparm are that it reports the value of the path parameter as /data # server's data partition. Failures result when clients attempt to access the share.
You can modify the smb.conf configuration file and any of its options at any time while the Samba daemons are running. The question when they will take effect on the server (and be seen by clients) requires a detailed response.
When changing core NetBIOS or networking settings, such as modifying the name of the server or joining a domain, it is best to assume that a restart of all Samba daemons is necessary. For other global parameters and most changes to shares, apply these rules:
When a new connection is received, the main smbd process spawns a child process to handle the incoming request. The new child rereads smb.conf upon startup, and therefore sees the change.
Once started, Samba daemons check every three minutes to determine whether any configuration files have been modified, and if so, reload and act on the parameters.
An administrator can force an immediate reload of smb.conf by sending the smbd process the Hangup (HUP) signal or by sending a
reload-configmessage via the smbcontrol utility.Scanning for new printers in the underlying printing system (e.g., CUPS or /etc/printcap) is controlled by the
printcap cache timeparameter, which specifies the monitoring interval in seconds.
Warning
Be wary of editing smb.conf on a live system. This is an easy way to introduce syntax errors in smb.conf that are unintentionally propagated to client connections. A good practice is to update a copy of the server’s smb.conf and then move it to the existing configuration only after you have verified that it has no syntax errors or unintended changes. It is also a good idea to apply some type of version control to server configuration files such as smb.conf.
The next question that should be asked is what happens to active client connections when you restart Samba. The daemon that directly handles client connections is smbd. smbd’s architecture uses a fork-on-connect model of handling incoming TCP connections. If you kill the main smbd process, all child processes continue until the client disconnects, and each smbd exits normally. However, until the parent is restarted, the host machine does not allow additional incoming CIFS connections.
If an smbd child that is handling an active connection is killed, all files and shares that the client had open become invalid. Windows clients will automatically reconnect to the server as soon as the user attempts to access one of these previously valid resources. In many instances, the user will never know that the connection was dropped and reestablished. There are a few exceptions:
If the server does not support encrypted passwords, current releases of Windows cannot reauthenticate the user, because they cache only the hash of the user’s password and not the clear text.
Many applications, when stored on a remote system and run from a network drive, crash when the connection is dropped. However, local applications simply accessing datafiles or documents on a network drive frequently experience no problems during the reconnection.
Because a new copy of the smbd daemon is created for each connecting client, each client can have its own customized configuration file. Samba allows a limited yet useful form of variable substitution in the configuration file to allow information about the Samba server and the client to be included in the configuration at the time the client connects. A variable in the configuration file consists of a percent sign (%), followed by a single upper- or lowercase letter. Variables can be used only on the right side of a configuration option (i.e., after the equal sign). An example is:
[pub]
    path = /home/ftp/pub/%a
The %a stands for the client system’s architecture and is replaced according to Table 4-1.
Table 4-1. %a substitution
|
Client operating system (“architecture”) |
Replacement string |
|---|---|
|
Windows for Workgroups |
WfWg |
|
Windows 95, 98 and Millenium |
Win95 |
|
Windows NT |
WinNT |
|
Windows 2000 |
Win2K |
|
Windows XP |
WinXP |
|
Windows Server 2003 |
Win2K3 |
|
OS/2 |
OS2 |
|
Samba |
Samba |
|
Linux CIFS filesystem client |
CIFSFS |
|
All other clients |
UNKNOWN |
In this example, Samba assigns a unique path for the [pub] share to client systems based on what operating system they are running. The path that each client would see as its share differ according to the client’s architecture:
/home/ftp/pub/WinNT
/home/ftp/pub/Win2K
/home/ftp/pub/Samba
...
/home/ftp/pub/UNKNOWN
Using variables in this manner comes in handy if you wish to have different users run custom configurations based on their own unique characteristics or conditions. Samba has more than 20 variables, shown in Table 4-2.
Table 4-2. Samba variables
|
Variable |
Definition |
|---|---|
|
Client variables | |
|
Client’s architecture (see Table 4-1) | |
|
|
IP address of the interface on the server to which the client connected |
|
Client’s IP address (e.g., 172.16.1.2) | |
|
Client’s NetBIOS name | |
|
Client’s DNS name (defaults to the value of | |
|
User variables | |
|
Current Unix username (requires a connection to a share) | |
|
Username transmitted by the client in the initial authentication request | |
|
|
User’s domain (e.g., the string |
|
Home directory of | |
|
Primary group of | |
|
Primary group of | |
|
Share variables | |
|
Current share’s name | |
|
Current share’s root directory | |
|
Automounter’s path to the share’s root directory, if different from | |
|
Server variables | |
|
Current server process ID | |
|
Samba server’s DNS hostname | |
|
Samba server’s NetBIOS name sent by the client in the NetBIOS session request | |
|
Home directory server, from the automount map | |
|
Samba version | |
|
Miscellaneous variables | |
|
The SMB protocol level that was negotiated | |
|
The current date and time | |
|
The value of environment variable | |
Here’s another example of using variables: suppose that you do not want to share the user’s Unix home directory, but prefer instead to keep a separate set of home directories specifically for SMB/CIFS clients. You can do this by defining a path in the [homes] service that includes the %U variable.
[homes]
    path = /export/smb/home/%U
    ...
Tip
People often wonder what the difference is between %U and %u. The value of %U is derived from the username sent during the CIFS session setup request covered in Chapter 1. This occurs before a connection to any share. The %u variable is expanded from the uid assigned to a user in the context of a file share. This can change depending on the share. More about this issue is explained in Chapter 6, when we discuss the force user option.
When user rose connects to the UNC path \\RAIN\homes, the path statement expands to /export/smb/home/rose. Samba does not automatically create this directory if it does not already exist. One way to solve this this problem is to instruct Samba to run an external program or script when a user connects to a specific share. More about this technique is discussed in Chapter 6.
Now that you’ve gotten your feet wet with variables, we will talk about a few special sections of the Samba configuration file. Again, don’t worry if you don’t understand every configuration option listed here; we go over each of them in the upcoming chapters.[*]
The [global] section appears in virtually every Samba configuration file, even though it is not mandatory. If the section is not present, Samba uses the default values for all global settings. Any option that appears before the first marked section is assumed to be a global option. This means that the [global] section heading is not absolutely required; however, following the rule that it is better to explicitly state what you mean, include it for clarity and to protect your server against changes in default behavior in any future Samba releases.
There are two purposes for the [global] section. Server-wide settings are defined here, and any options that apply to shares will be used as a default in all share definitions, unless overridden within the share definition.
To illustrate this, let’s again look at the example at the beginning of the chapter:
[global]
    ## core networking options
    netbios name      = RAIN
    workgroup         = GARDEN
    encrypt passwords = yes

    ## netbios name service settings
    wins support      = yes

    ## logging
    log level         = 1
    max log size      = 1000

    ## default service options
    read only         = no

[homes]
    browseable         = no

[test]
    comment           = For testing only, please
    path              = /export/tmp
When Samba reads its config file, it creates a special internal service that contains the default values of all parameters. Any service parameters that you define in the [global] section are assigned to this list. When a client connects to the [test] share, Samba first consults the explicit parameter list for that share. Then it looks in the default settings for implicit option assignments. Explicit settings take precedence over any compile-time or [global] defaults. In other words, if the [test] service contained a line that said read only = yes, the share would be marked as read-only regardless of the default or global value the parameter had been assigned.
If a client attempts to connect to a share that doesn’t appear in the smb.conf file, Samba searches for a [homes] share in the configuration file. If a [homes] share exists, smbd begins a search to validate the share name as a Unix username. If that username appears in the password database (e.g., /etc/passwd) on the server, Samba creates a temporary share bearing the specified username and all the attributes of the [homes] share.
For example, assume that a client system is connecting to the Samba server RAIN for the first time and tries to connect to a share named [alice]. After verifying the user’s credentials, smbd searches smb.conf for a share named [alice], but fails to locate one. There is however, a [homes] share, so Samba then attempts to validate the username alice in the server’s /etc/passwd (or other account database). If the validation is successful, Samba then creates a share called [alice] for use during the client’s session. From this point on, the share [alice] is treated as a normal file share. Any variables are expanded according to the standard rules.
We will delay a detailed explanation of Samba’s printing features until we get to Chapter 7. For the sake of completeness, however, we will introduce a third built-in section.
This section, named [printers], performs a service for system printers analagous to what the [homes] share does for user home directories. If a client attempts to connect to a share that isn’t in the smb.conf file and the [homes] check fails (or [homes] is not defined), Samba will check to see whether it is a printer share (assuming that the [printers] has been included). Samba does this by querying the operating system’s printing system database to see whether the share name appears there. If it does, Samba creates a share named after the printer.
This behavior means that as with [homes], you don’t have to maintain a share for each printer available on the system in your smb.conf file. Instead, Samba honors the Unix printer registry if you ask it to, and provides these printers to the client systems. However, there is a potential difficulty: if you have an account named fred and a printer named fred, Samba will always find the user account first and ignore the existence of the printer, even if the client really needed to connect to the printer, assuming that both [homes] and [printers] sections are defined. We revisit the [printers] section again in Chapter 7.
When one of the Samba daemons is launched, it looks first at any configuration file specified with the -s option or in the default compile-time-defined location (e.g., /usr/local/samba/lib/smb.conf). There are two smb.conf options that allow you either to replace or to extend the current configuration at runtime. These two options,
along with the copy directive, which allows you to clone one share in smb.conf into another, are described in Table 4-3.
Table 4-3. Configuration file options
|
Parameter |
Value |
Description |
Default |
Scope |
|---|---|---|---|---|
|
|
string |
Sets the location of a configuration file to use instead of the current one. |
None |
Global |
|
string |
Specifies an absolute path to a file that should be read and parsed into the current configuration file. |
None |
Global | |
|
|
string |
Allows you to clone the configuration options of another share in the current share. |
None |
Share |
The global config file option specifies a replacement configuration file that will be loaded when the option is encountered. If the target file exists, the remainder of the current configuration file, as well as the options encountered so far, will be discarded, and Samba configures itself entirely with the options in the new file. Variables can be used with the config file option, which is useful in the event that you want to use a special configuration file based on the NetBIOS machine name or user of the client that is connecting.
For example, the following line instructs Samba to use a configuration file specified by the NetBIOS name of the client connecting, if such a file exists. If it does, options specified in the original configuration file are ignored:
[global]
    config file = /etc/samba/smb.conf.%m
If the configuration file specified does not exist, the option is ignored, and Samba continues to configure itself based on the current file. This behavior allows a default configuration file to serve most clients, while providing for exceptions with customized configuration files.
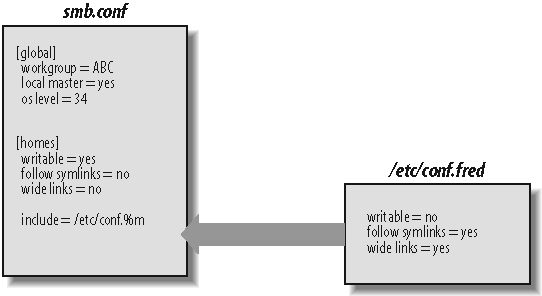
The fundamental difference between the config file option and the include parameter is that the former completely replaces all existing configuration settings, yet the latter does just as its name implies: it inserts settings from an additional file in the current configuration. Figure 4-1 illustrates how all three options override their previous values. This option also can be used with variables for such purposes as including additional settings that differ for each client machine.
[global]
    include = /usr/local/samba/lib/smb.conf.%m
If the configuration file specified does not exist, the option is ignored. Options in the include file override any option specified previously, but not options that are specified later. Because the included file is inserted into the main file, beware of including global options into the section for a file or printer share as this will generate an error in the Samba logfiles.
The majority of parameters can be overridden in an included file, but a few cannot. The workgroup and the server string directives are two examples of parameters that cannot be redefined.
The copy configuration option allows you to clone the configuration options of the share name that you specify in the current share. The template share must appear earlier in the configuration file than the share that is performing the copy. For example:
[basic]
    read only    = no
    browseable    = yes
    available    = no

[data]
    copy         = basic
    available    = yes
    path         = /data
Note that any options in the [data] share defined prior to the copy directive are overridden by those from the [basic] share. However, the top-down parsing of smb.conf allows us to reset these copied values by specifying more options after the copy parameter.
We now start from scratch and build a configuration file for a new Samba server. Our goal is to create a working server and to examine the options that are important for basic functionality. The server will export a single share named [data].
First, we’ll introduce three configuration options that should appear in the [global] section of our smb.conf file:
[global]
    #  Server configuration parameters
    netbios name = PIGEON

    workgroup = GARDEN
    server string = Engr Dept Server (Samba %v)
    encrypt passwords = yes
    security = user
This configuration file is pretty simple; it advertises the Samba server under the NetBIOS name PIGEON. In addition, it places the system in the GARDEN workgroup and displays a description to clients that includes the Samba version number. The last two parameters explicitly relate to how Samba is to validate user credentials in connect requests. You’ve already been briefly introduced to encrypted password support in Chapter 2. The security parameter value of user was not been explicitly mentioned. However, we relied upon it as Samba’s default authentication model in Chapter 2 when creating user accounts with smbpasswd and connecting to the server using smbclient. Both parameters are covered in depth in Chapter 5 in the context of users and groups. Until then, the information you previously learned is sufficient for your current needs.
Because this is a perfectly valid configuration file, it is possible to test it out. Create a file named smb.conf under the /usr/local/samba/lib directory and enter the displayed parameters and values. It might also be a good idea to test the new configuration using the same steps that you followed in Chapter 2. Be sure that your Windows clients are in the GARDEN workgroup as well. After double-clicking the My Network Places icon on a Windows client, you should see a window similar to that in Figure 4-2.

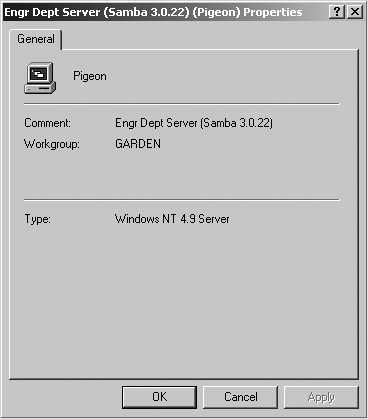
You can verify the server string by either viewing the properties of the Samba host (right-clicking the server icon to launch the context menu and selecting the Properties option), or enabling the details listing of hosts in the workgroup from the View menu. PIGEON’s properties are displayed in Figure 4-3.
If you were to click the PIGEON icon, a window would appear that shows the services that it provides. In this case, with the exception of the built-in Printers and Faxes icon, the window would be completely empty, because there are no shares defined on the server yet.
Table 4-4 summarizes the server
configuration options previously used. All three of these options are global in scope, so they must appear in the [global] section of the configuration file.
Table 4-4. General server options
|
Parameter |
Value |
Description |
Default |
Scope |
|---|---|---|---|---|
|
|
string |
NetBIOS name of the Samba server. |
Server’s unqualified hostname |
Global |
|
|
string |
NetBIOS group to which the server belongs. |
WORKGROUP |
Global |
|
|
string |
Descriptive string for the Samba server. |
Samba %v |
Global |
The netbios name option allows you to set the NetBIOS name of the server. For example:
netbios name = YORKVM1
The default value for this configuration option is the server’s hostname—that is, the first part of its fully qualified domain name. For example, a system with the DNS name public.example.com would be given the NetBIOS name PUBLIC by default. Although you can use this option to restate the system’s NetBIOS name in the configuration file (as we did previously), it is more commonly used to assign the Samba server a NetBIOS name other than its current DNS name. Remember that the name given must follow the rules for valid NetBIOS machine names as outlined in Chapter 1.
Changing the NetBIOS name of the server is not recommended without a good reason. One such reason might be if the hostname of the system is not unique because the LAN is divided over two or more DNS domains. For example, YORKVM1 is a good NetBIOS candidate for vm1.york.example.com to differentiate it from vm1.falkirk.example.com, which has the same hostname but resides in a different DNS domain.
Another use of this option is to relocate SMB services from a dead or retired system. For example, if SALES is the SMB server for the department and it suddenly dies, you could immediately reset netbios name = SALES on a backup Samba server that’s taking over for it. Users won’t have to change their drive mappings to a different server; new connections to SALES will simply go to the new server.
The workgroup parameter sets the current workgroup (or domain, as you will see in Chapter 9 and Chapter 10) in which the Samba server will advertise itself. Clients that wish to access shares on the Samba server should be in the same NetBIOS group. Remember that workgroups are really just NetBIOS group names and must follow the standard NetBIOS naming conventions outlined in Chapter 1.
The default option for this parameter is set at compile time to WORKGROUP. Because this is the default workgroup name of every unconfigured Samba system, we recommend that you always set your workgroup name in the smb.conf file. When choosing your workgroup name, make sure to avoid duplicating a name of an existing server or user.[*]
The server string parameter defines a descriptive comment string that will be associated with the server. You can use variables to provide information in the description. For example, our previous example entry was:
[global]
    server string = Engr Dept Server (Samba %v)
The default for this option simply presents the current version of Samba and is equivalent to:
server string = Samba %v
So far we have not defined the [data] share on our server. So the next step is to create the directory tree on disk that will be exported, as well as the share section in smb.conf to make it accessible to clients.
Samba requires that the directory path being shared actually exist in order for clients to connect it. Otherwise the client will receive an error message about a “bad network path.” So if this is a new share with no preexisting files, we must create the path first. The second of the following commands sets the permissions to allow anyone to create files and directories, but the sticky bit prevents a user from deleting another user’s files.
root#mkdir -p /export/smb/dataroot#chmod 1777 /export/smb/data
The service details in smb.conf resemble the [test] share we created in Chapter 2:
[data]
    path = /export/smb/data
    comment = Data Drive
    read only = no
The [data] share is typical for a Samba disk share. The share maps to the directory /export/smb/data on the Samba server. We’ve also provided a comment that describes the share as a Data Drive.
Samba’s default is to create a read-only share. As a result, the read only option must be explicitly disabled for each disk share
that is intended to be writable. Of course, we could define read only = no in the [global] section as the runtime default.
Now, if we connect to the PIGEON server again by double-clicking its icon in the Windows Network Neighborhood, we will see a single file share entitled data, as shown in Figure 4-4. This share has read/write access, so files can be copied to or from it.
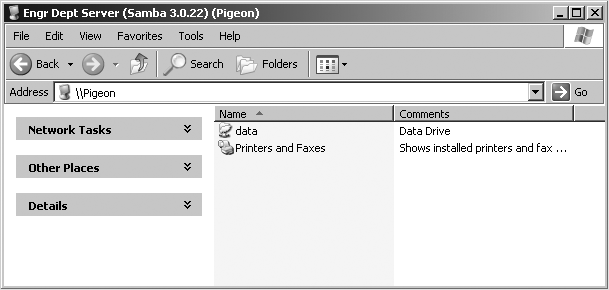
Table 4-5 lists the basic Samba configuration options previously introduced for disk shares.
Table 4-5. Basic share configuration options
|
Parameter |
Value |
Description |
Default |
Scope |
|---|---|---|---|---|
|
|
string |
Specifies the Unix directory that will be provided for a disk share or used for spooling by a printer share. |
/tmp |
Share |
|
|
string |
Sets the comment that appears with the share. |
None |
Share |
|
|
string |
Sets the MS-DOS volume name for the share. |
None |
Share |
|
|
boolean |
Controls whether clients should be allowed to write the share. |
|
Share |
|
|
boolean |
Inverse of |
|
Share |
This option, which has the synonym directory, indicates the absolute pathname for the root of the shared directory or printer. You can choose any directory on the Samba server. If the connected user is unable to change to the directory due to a lack of appropriate permissions or because it does not exist, Samba refuses the user’s connection request.
The comment option allows you to enter a free-form string that is transmitted to the client when it attempts to browse the share. A user can see the comment by using the Details view on the share folder or with the net view command at a Windows command prompt. For example, here is how you might insert a comment for a share:
[network]
    comment = Software installation drive (I:)
    path = /export/smb/software
Be sure not to confuse the comment option, which documents a Samba server’s shares, with the global server string option, which documents the server itself.
This option allows you to specify the volume name of the share, which would otherwise default to the name of the share given in the smb.conf file.
Some software installation programs check the volume name of the distribution CD-ROM to make sure that the correct CD-ROM is in the drive before attempting to install from it. If you copy the contents of the CD-ROM into a network share and wish to install from there, you can use this option to make sure the installation program sees the correct volume name:
[software]
    comment = Software installation drive (I:)
    path = /export/smb/software
volume = ASVP-102-RTYUIKAThe options read only and writable (also called writeable or write ok) are inverse Boolean options. Both default to enforcing read-only behavior on a file share but in a logically opposite fashion. If you want to be able to write data to a share, you must explicitly specify one of the following options in the configuration file for each share:
read only = no
writable = yes
Samba treats both parameters as the same feature. If you specify more than one occurrence of either or both options, Samba adheres to the last value it encounters for the share.
By default, both smbd and nmbd bind to all available broadcast-capable network interfaces on a system. There are times when you may wish to restrict this behavior, such as on a multihomed host that acts as a gateway from the internal network to the Internet, or perhaps on a laptop that has both a local network connection and a dial-up VPN connection.
Here’s a simple example. Assume that our Samba server can access two subnets. The device eth0 is is bound to the 192.168.1.0/24 network and 192.168.2.0/24 is available on eth1. If Samba is not supposed to advertise itself on the 192.168.1.0/24 network, we must instruct it to use a subset of available network interfaces and bind only to those listed:
[global]
    interfaces = eth1
    bind interfaces only = yes
These two parameters, which are always used together, work in combination to restrict smbd and nmbd to the specified networks. The interfaces parameter can accept a device name (eth1), an IP address or hostname, a network/netmask pair (192.168.2.0/24), or a broadcast/netmask (192.168.2.255/255.255.255.0). The bind interfaces only option limits the behavior of smbd and nmbd to the subnets represented by the interfaces list. nmbd does not accept any broadcast messages that originate outside these subnets and smbd binds to only the specified interfaces.
It is important to realize, however, that if packets can be routed between the two networks in our example, a client on the 192.168.1.0/24 network can still access the Samba server using its 192.168.2.0/24 address.
A second alternative to restricting traffic is the hosts allow and hosts deny options. Unlike the previous two global parameters, these new options can be used on a per-service basis. If these options sound familiar, you’re probably thinking of the hosts.allow and hosts.deny files found in the /etc directories of many Unix systems. The purpose of these options is identical to those files; they provide security by allowing or denying the connections of other hosts based on their IP addresses. However, Samba includes its own internal implementation of the TCP Wrappers functionality, so there is no need for additional external libraries or configuration files.
Here’s a simple example that allows a portion of the hosts on the 192.168.1.0/24 network to connect to our server. Notice that we have removed the interfaces and bind interfaces only lines to ensure that smbd and nmbd bind to both eth0 and eth1 :
[global]
    hosts allow = 192.168.2. 192.168.1.100
    hosts deny  = 192.168.1.
With the hosts allow option, we’ve specified a 192.168.2. IP address, which is equivalent to saying: “All hosts on the 192.168.2.0/24 subnet.” The trailing period is very important. Without this ending puncutation, Samba does not correctly interpret the address as a network. We have also added a single host from the 192.168.1.0/24 network to the access list. However, we’ve explicitly specified in a hosts deny line that hosts on the 192.168.1.0/24 network cannot connect.
It is important to understand how Samba sorts out the rules specified by hosts allow and hosts deny :
If no
allowordenyoptions are defined anywhere in smb.conf, Samba allows connections from any system.If
hosts alloworhosts denyoptions are defined in the[global]section of smb.conf, they determine general access to the server, even if either option is defined in one or more of the shares.If only a
hosts allowoption is defined for a share, only the hosts listed are allowed to use the share. All others are denied.If only a
hosts denyoption is defined for a share, any client that is not on the list can use the share.If both a
hosts allowoption and ahosts denyoption are defined, the allow list takes precendence. But if a host does not match the allow list or the deny list, it is granted implicit access.
Warning
Take care that you don’t explicitly allow a host to access a share, but then deny access to the entire subnet of which the host is part.
Let’s look at another example of that final item. Consider the following options:
hosts allow = 111.222.
hosts deny = 111.222.333.
In this case, hosts that belong to the subnet 111.222.*.* will be allowed access to the Samba shares. The deny list in the case is completely disregarded because it is a subset of the allow list. To allow all hosts in the 111.222.0.0/16 network except those on the 111.222.333.0/24 network, we can specify the following hosts allow shorthand notation:
hosts allow = 111.222. EXCEPT 111.222.333.
The networking options introduced earlier are summarized in Table 4-6.
Table 4-6. Networking configuration options
|
Parameter |
Value |
Description |
Default |
Scope |
|---|---|---|---|---|
|
|
string |
Client systems that can connect to Samba. |
none |
Share |
|
|
string |
Client systems that cannot connect to Samba. |
none |
Share |
|
interfaces |
string |
Network interfaces Samba will respond to. Allows changes to defaults. |
All available interfaces capable of broadcasts |
Global |
|
bind interfaces only |
boolean |
When enabled, Samba will bind only to those interfaces specified by the |
|
Global |
The hosts allow option (sometimes written as allow hosts) specifies the clients that have permission to access shares on the Samba server, written as a comma- or space-separated list of hostnames of systems or their IP addresses. You can gain quite a bit of security simply by placing your LAN’s subnet address in this option.
You can specify any of the following formats for the option:
Hostnames, such as
ftp.example.com.IP addresses, such as
130.63.9.252.Domain names, which can be differentiated from individual hostnames because they start with a dot. For example,
.ora.comrepresents all systems within the ora.com domain.Netgroups, which start with an at sign (
@), such as@printerhosts. Netgroups are usually available only on systems running NIS or NIS+. If netgroups are supported on your system, there should be anetgroupsmanual page that describes them in more detail.Subnets, which end with a dot. For example,
130.63.9.means all the systems whose IP addresses begin with 130.63.9.Network/netmask pairs such as 192.168.1.0/24 or 192.168.2.0/255.255.255.0.
The keyword
ALL, which allows any client access.The keyword
EXCEPTfollowed by one or more names, IP addresses, domain names, netgroups, or subnets. For example, you could specify that Samba allow all hosts except those on the 192.168.110.0/24 subnet withhosts allow = ALL EXCEPT 192.168.110.(remember to include the trailing dot).
The hostname localhost, for the loopback address 127.0.0.1, is included in the hosts allow list by default and does not need to be listed explicitly unless you have specified it in the hosts deny list (probably as part of a subnet). This address is required for Samba to work properly.
Other than that, there is no default value for the hosts allow configuration option. The default course of action, in the event that neither the hosts allow or hosts deny option is specified in smb.conf, is to allow access from all sources.
Tip
If you specify hosts allow or hosts deny in the [global] section, that definition applies to all connections to the server. In a sense, this definition overrides any hosts allow lines in the share definitions, which is the opposite of the usual behavior. In actuality, the service level definition applies to the tree connection requests described in Chapter 1 and the [global] defaults apply to all packets prior to that request (i.e., protocol negotiation and authentication).
The hosts deny option (synonymous with deny hosts) specifies client systems that do not have permission to access a share, written as a comma- or space-separated list of hostnames or their IP addresses. Use the same format for specifying clients as the hosts allow option earlier. For example, to restrict access to the server from everywhere but the subnet example.com, you could write:
hosts deny = ALL EXCEPT .example.com
There is no default value for the hosts deny configuration option, although the default course of action in the event that neither option is specified is to allow access from all sources.
Tip
Never include the loopback address (localhost at IP address 127.0.0.1) in the hosts deny list. The smbpasswd program needs to connect through the loopback address to the Samba server as a client to change a user’s encrypted password. If the loopback address is disabled, the locally generated packets requesting the change of the encrypted password are discarded by Samba.
In addition, both local browsing propagation and some functions of SWAT require access to the Samba server through the loopback address and do not work correctly if this address is disabled.
The interfaces option specifies the networks that you want the Samba server to recognize and respond to. This option is handy if you have a computer that resides on more than one network subnet and want to restrict the networks that Samba will serve. If this option is not set, Samba searches out and utilizes all broadcast-capable network interfaces on the server, including loopback devices. The loopback interface (lo) is automatically added to this list.
The value of this option is specified as one or more sets of IP address/netmask pairs, device names, or broadcast/netmask pairs, as in the following example:
interfaces = eth0 192.168.2.30
You can optionally specify a numeric bitmask, like this:
interfaces = 192.168.220.100/24 192.168.210.30/24
Make sure to specify the device name in the interfaces list if your Samba host is configured to use DHCP, because the server’s IP address and netmask may change.
The bind interfaces only option can be used to force the smbd and nmbd processes to respond only to those addresses specified by the interfaces option and to loopback network devices. To prevent Samba from processing any packets (including broadcast packets) whose source address does not correspond to any of the network interfaces specified by the interfaces option, define the following line in addition to a list of interfaces:
bind interfaces only = yes
Virtualization has become a hot topic in recent years. Unix administrators have a longer history managing virtual services. Samba’s capability to provide multiple virtual servers
comes with a twist. Originally Samba relied upon the name sent by the client in the NetBIOS session setup request to fill in the %L variable (Table 4-2).[*] An administrator could then include alternative configuration files based on the destination name that the client used in the connection. However, with the introduction of NetBIOS-less CIFS in Windows 2000 and later clients, this name is no longer available. In fact, nothing but the standard TCP and IP headers are available in the initial connection request packet.
There are two solutions to this problem. One is to force the client to use the NetBIOS session transport layer. By default, smbd binds to TCP ports 139 and 445. Clients running Windows 2000 or a later Microsoft OS prefer to conect to port 445 and thus bypass the overhead of NetBIOS. However, the smb ports option allows administrators to restrict smbd solely to TCP port 139 and thus force the clients to use NetBIOS services for locating and accessing a Samba host.
Once you have restricted clients to using NetBIOS sessions, you can again use the name passed by the client to fill in the %L configuration variable and therefore conditionally include various configuration files. The only piece of information yet presented is the option for defining additional NetBIOS names to which the server will respond.[†]
Now to put all the pieces together. This example builds a server named PIGEON, which registers the additional names of SEAGULL and PELICAN. smbd binds solely to port 139 and uses the destination name used by the client in the connection request to include the configuration files for the various virtual hosts:
[global]
    netbios name    = PIGEON
    netbios aliases = SEAGULL PELICAN
    server string   = Engr Dept Server (Samba %v)
    workgroup       = GARDEN
    smb ports       = 139
    include         = /usr/local/samba/lib/%L.conf
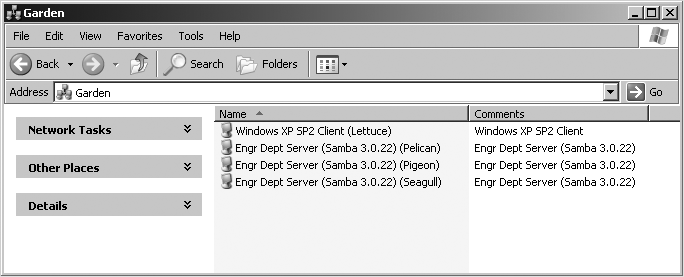
Figure 4-5 illlustrates how the virtual servers would appear when browsing the network. Notice that all three hosts, PIGEON, SEAGULL, and PELICAN, have the same comment string when a user views the server details.
To support virtual configurations over port 445, the server must possess multiple network interfaces, although they do not necessarily have to be real interfaces; virtual interfaces work also. In this case, the destination IP address transmitted in the connection request determines what role the Samba server should play. When a client contacts Samba, smbd fills in the %i variable with the IP address to which the client connected. In this case, the configuration can drop the netbios aliases option and add the new names to the domain name service.
If the server has three IP addresses, 192.168.1.10 (pigeon), 192.168.1.11 (seagull), and 192.168.1.12 (pelican), we can update the configuration file to appear as follows:
[global]
    netbios name = PIGEON
    workgroup = GARDEN
    include = /usr/local/samba/lib/%i.conf
Notice that we have removed the smb ports line, so the parameter reverts to the default of both 139 and 445. Having removed the netbios aliases option, we enter the hostnames into our DNS server:
; Bind 9 address entries
pigeon      IN      A       192.168.1.10
seagull     IN      A       192.168.1.11
pelican     IN      A       192.168.1.12
Any legacy clients such as Windows NT or Windows 9x/Me will continue to be able to access the server. But Windows 9x/Me clients are unable to use DNS names or IP addresses of CIFS/SMB connections and therefore are unable to access any virtual server other than PIGEON. None of the Windows NT-based operating systems are subject to this limitation.
Table 4-7 summaries the new parameters necessary for configuring virtual Samba hosts.
Table 4-7. Virtual server configuration options
|
Parameter |
Value |
Function |
Default |
Scope |
|---|---|---|---|---|
|
|
string |
Additional NetBIOS names to respond to, for use with multiple virtual Samba servers. |
None |
Global |
|
|
integer list |
List of port numbers to which smbd should listen for incoming CIFS requests. |
139, 445 |
Global |
The netbios aliases option can give the Samba server more than one NetBIOS name. Each NetBIOS name listed as a value is displayed in the My Network Places of Windows clients. When a connection is requested to any of the servers, it connects to the same Samba server.
[global]
   netbios name     = BOSS
   netbios aliases  = SALES ACCOUNTING ADMIN
nmbd registers each additional NetBIOS name with the list of addresses provided by configured network interfaces. But only the server’s primary name (the value of netbios name) is used for network browsing (Chapter 8), domain control (Chapter 9), and domain membership (Chapter 10).
The smb ports parameter controls the TCP ports on which smbd listens. The default list, ports 139 and 445, matches Windows 2000 and later servers. It is possible to bind smbd to a nonstandard CIFS/SMB port, but only non-Microsoft clients that are flexible enough to connect to alternative ports will be able to access the server. A more common use is to restrict smbd to only one of the default ports, such as forcing clients to use NetBIOS transport services:
[global]
smb ports = 139Occasionally, you’ll need to find out what Samba is up to, such as when Samba is performing an unexpected action or is not performing at all. To find out why Samba did what it did, check the logfiles.
Samba logfiles can be as brief or verbose as you like. Here is an example of what a Samba logfile at level 3 looks like:
[2005/07/21 13:23:25, 3] smbd/service.c:close_cnum(514)
  cabbage (192.168.1.100) closed connection to service IPC$
[2005/07/21 13:23:25, 3] smbd/connection.c:yield_connection(40)
  Yielding connection to IPC$
[2005/07/21 13:23:25, 3] smbd/process.c:process_smb(615)
  Transaction 923 of length 49
[2005/07/21 13:23:25, 3] smbd/process.c:switch_message 4-8)
  switch message SMBread (pid 467)
[2005/07/21 13:23:25, 3] lib/doscalls.c:dos_ChDir(336)
  dos_ChDir to /home/samba
[2005/07/21 13:23:25, 3] smbd/reply.c:reply_read(2199)
  read fnum=4207 num=2820 nread=2820
[2005/07/21 13:23:25, 3] smbd/process.c:process_smb(615)
  Transaction 924 of length 55
Much of this information is of use only to Samba programmers. However, we go over the meaning of some of these entries in more detail in Chapter 12.
Samba includes several options that allow administrators to define the granularity, verbosity, and location of logfiles. Each of these are global options and cannot appear inside a share definition. Here are some of the more common logging options that you might use on a production server:
[global]
    log level = 1
    log file = /var/log/samba/log.%m
    max log size = 50
Here, we’ve added a custom logfile that reports information up to debug level 1. This is a relatively light debugging level. The logging level ranges from 0 to 10; level 0 provides only critical error messages and level 10 provides a plethora of low-level information.[*] A log level of 1 provides some information about connections, and levels 2 or 3 can provide useful debugging information without wasting disk space on the server. In practice, avoid using log levels greater than 3 unless you are working on the Samba source code or temporaily debugging a specific problem.
The logging file is in the /var/log/samba directory, thanks to the log file configuration option. You can use variable substitution to create logfiles specifically for individual users or clients, as with the %m variable. Isolating the log messages can be invaluable in tracking down a network error if you know the problem is coming from a specific client system or user.
Tip
A common question is why two logfiles are created for each client machine when the logfile is defined as log.%m. The reason is the use of port 445 by newer Windows operating systems. When a new connection is received on port 445, the %m can be expanded only to the client’s IP address. After the client transmits its name as part of the authentication process (SMBsessetup&X), Samba can resubstitute the %m variable with the real machine name and reopen the expected log filename.
We’ve added a precaution to the logfiles: no one logfile can exceed 50 KB in size, as specified by the max log size option. If a logfile exceeds this size, the contents are moved to a file with the same name but with the suffix .old appended. If the .old file already exists, it is overwritten and its contents are lost. The original file is cleared, waiting to receive new logging information. This precaution prevents the hard drive from being overwhelmed with Samba logfiles during the life of the Samba daemons.
It is possible to use the system logger (syslog, implemented by the syslogd daemon) in addition to or in place of the standard Samba logging file. However, in order to use syslog, you must first make sure that Samba was built with the --with-syslog configure option. See Chapter 2 for more information on configuring and compiling Samba. See the smb.conf manpage for more information about the --with-syslog option.
Next, configure your /etc/syslog.conf file to accept logging information from Samba. If there is not already a daemon.* entry in the /etc/syslog. conf file, add the following:[*]
daemon.* /var/log/daemon.log
This line specifies that any logging information from system daemons is stored in the /var/log/daemon.log file, where the Samba information will be stored as well. From there, you can set a value for the syslog parameter in your Samba configuration file to specify which logging messages are to be sent to syslog. Only messages that have debug levels lower than the value of the syslog parameter are sent to syslog. This parameter only defines the threshold below which messages are sent to syslogd. The log level parameter still controls which messages are logged in the first place. For example, setting the following:
syslog = 3
specifies that any logging messages with a level of 2 or below is to be sent to both syslog and the Samba logging files. (The mappings to syslog priorities are described in the upcoming section "syslog.”) To continue the example, let’s assume that we have set the log level option to 4. Logging messages with levels of 0 through 2 are sent to both syslog and the Samba logging files, and messages with a level of 3 or 4 are sent to the Samba logging files, but not to syslog.
If you want to specify that messages be sent only to syslog—and not to the standard Samba logging files—you can enable the syslog only option.
syslog only = yes
If this is set, any logging information at or above the number specified in the syslog option is discarded.
Table 4-8 lists each logging configuration option that Samba can use.
Table 4-8. Logging configuration options
|
Parameter |
Value |
Description |
Default |
Scope |
|---|---|---|---|---|
|
|
string |
Name of the logfile that Samba is to use. |
Specified in Samba makefile |
Global |
|
|
integer |
Number of messages that are sent to the logfile. |
0 |
Global |
|
|
integer |
Maximum size of a logfile, in kilobytes. |
5000 |
Global |
|
|
boolean |
Controls whether Samba includes timestamped headers for log entries. |
yes |
Global |
|
|
boolean |
Specifies whether Samba should include the process ID in the log header. |
|
Global |
|
|
boolean |
Specifies whether Samba should include the real and effective uid in the log header. |
|
Global |
|
|
integer |
The threshold below which messages are sent to syslogd. |
1 |
Global |
|
|
boolean |
If |
|
Global |
By default, Samba writes log information to text files in the ${prefix}/var directory defined at compile time (for example, /usr/local/samba/var). The log file option can be used to set the name of the logfile to another location. For example, to put the Samba log information in /var/log/samba.log, you could use the following:
[global]
    log file = /var/log/samba.log
Variable substitution allows you to create logfiles specifically for individual users or clients.
You can override the default logfile location using the −l command-line switch when either daemon is started. However, this switch does not override the log file option. If you do specify this parameter, initial logging information is sent to the file specified after −l (or the default specified in the Samba makefile) until the daemons have processed the smb.conf file and know to redirect it to a new logfile.
The log level option sets the amount of data to be logged. Normally this option is set to 0 (the default, which logs only critical messages) or 1. However, if you have a specific problem, you might want to set it to 2 or 3, either of which provides the most useful debugging information you would need to track down a problem. Levels above 5 provide information primarily for the developers to use for chasing internal bugs, and slow down the server considerably. For normal day-to-day operation, the recommended setting is 0, unless you are tracking specific information.
The max log size option sets the maximum size, in kilobytes, of the debugging logfile that Samba keeps. When the logfile exceeds this size, the current logfile is renamed to add a .old extension (erasing any previous file with that name) and a new debugging logfile is started with the original name. For example:
[global]
    log file = /var/log/samba.log
    max log size = 1000
Here, if the size of any logfile exceeds 1 MB, Samba renames the logfile samba.log.old, and a new logfile is generated. If there is already a file with the .old extension, Samba deletes it. Using this option protects unwary administrators from suddenly discovering that most of the space on a disk or partition has been swallowed up by a single Samba logfile.
It is generally a good idea to use some type of log rotation strategy, either by leveraging internal functionality or by using external tools such as logrotate.
By default, Samba includes a timestamp header with each log entry. This can be very useful when running at level 0 or 1, due to the infrequency at which messages are logged. If you happen to be debugging a network problem and you find that the timestamp information within the Samba log lines gets in the way, you can turn it off by disabling the debug timestamp (also known as timestamp logs). For example, a normal Samba logfile presents its output in the following form:
[2005/10/04 13:55:12, 1] smbd/service.c:make_connection_snum(666)
  rain (127.0.0.1) connect to service lizard initially as user lizard
(uid=780, gid=100) (pid 28317)
With a no value for this option, the output would appear without the timestamp, giving no indication of when the event occurred.
These two options provide a means of separating log messages for different users that are interwoven into a single logfile. When enabled, the debug pid parameter includes a pid=
PROCESSID field in the header information. The debug uid option fills in the real and effective uid and group values in the header. The following is an example of a message written by an smbd with a pid of 28554, a uid of 780, and a gid of 100:
[2005/10/04 14:05:38, 1, pid=28554, effective(780, 100), real(780, 0)] smbd/service.
c:make_connection_snum(605)
Both options require that the debug timestamp parameter be enabled to have any effect.
The syslog option causes Samba log messages to be sent to the Unix system logger and is available only when Samba has been compiled to include --with-syslog when running the configure script at build time. The presence of the string WITH_SYSLOG in the output of smbd -b confirms that compile-time support for syslog has been enabled. The amount of log information to be sent is specified as a numeric value; syslog can accept any valid log level. Logging information with a level lower than the number specified is sent to the system logger. Debug logs greater than or equal to the syslog level, but less than the log level, are still sent to the standard Samba logfiles. For example:
[global]
    log level = 3
    syslog = 2
In this instance, all logging information with a level of 0 and 1 is sent to the standard Samba logs and the system logger, and information at levels 2 and 3 is sent only to the standard Samba logs. Levels above 3 are not logged at all. All messages sent to the system logger are mapped to a priority level that the syslogd daemon understands, as shown in Table 4-9. The default level is 1.
The syslog only option instructs Samba not to use its own logging files at all and to use only the system logger. To enable this behavior, specify the option in the global section of the Samba configuration file, as in the following example:
[global]
   log level    = 2
   syslog       = 3
   syslog only  = yes
This option has no effect if Samba has not been compiled to include the --with-syslog feature.
[*] The [IPC$] share is another specialized service used by CIFS clients for interprocess communication. Samba provides this built-in share regardless of the services listed in smb.conf.
[*] The tools presented in Chapter 8 can help you to scan the network to determine whether a particular NetBIOS name is currently in use.
[†] Samba really doesn’t care what name is used in the NetBIOS session request. The netbios aliases parameter relates more to name registration.
[*] The log levels used in the Samba source code are at the discretion of individual developers. For example, level 100 can be used to debug password changes. Generally, 10 is the highest debug level used when debugging (even by developers).
[*] Many syslogd implementations require that you send a HUP signal to force it to reread its configuration file. Others may require that any new logfiles exist prior to writing to log entries.
Get Using Samba, 3rd Edition now with the O’Reilly learning platform.
O’Reilly members experience books, live events, courses curated by job role, and more from O’Reilly and nearly 200 top publishers.

