Chapter 1. An Introduction to Vagrant
Vagrant is a tool for building complete development environments, sandboxed in a virtual machine. Vagrant lowers development environment setup time, increases development/production parity, and brings the idea of disposable compute resources down to the desktop.
With one command, Vagrant does all of the following:
- Creates a virtual machine for you based on an operating system of your choice.
- Modifies the physical properties of this virtual machine (e.g., RAM, number of CPUs, etc.).
- Establishes network interfaces so that you can access your virtual machine from your own computer, another device on the same network, or even from another virtual machine.
- Sets up shared folders so that you can continue editing files on your own machine and have those modifications mirror over to the guest machine.
- Boots the virtual machine so that it is running.
- Sets the hostname of the machine, since a lot of software depends on this being properly set.
- Provisions software on the machine via a shell script or configuration management solution such as Chef, Puppet, or a custom solution.
- Performs host and guest specific tweaking to work around known issues that may arise. For example, Ubuntu 12.04 LTS breaks VirtualBox networking defaults, so Vagrant makes minor modifications to some configuration in Ubuntu to make sure networking continues working. Vagrant does these sorts of things for many host/guest pairs.
This is all completed in about a minute, but the time it takes can greatly increase depending on the software being installed.
Once Vagrant finishes setting up the machine, you are left with a completely sandboxed, fully provisioned development environment. Due to the shared folders and networking, you continue using your own editor and your own browser to develop and test your applications, but the code itself runs on the virtual machine.
Vagrant handles the entire lifecycle of the machine for you, so in addition to setting up your development environment, Vagrant can do all of the following:
- SSH into the machine.
- Halt (shut down) the machine.
- Destroy the machine, completely deleting its virtual hard drive and metadata.
- Suspend or resume the machine.
- Package the machine state so that you can distribute it to other developers.
Vagrant is a Swiss Army knife for development environments. It does everything you need to create and manage them, and helps enforce good practices by encouraging the use of automation and an environment that more closely resembles production.
If there is something Vagrant can’t do with your development environments, chances are that you can extend Vagrant’s behavior through a plug-in to achieve what you need. If this ends up being something that a lot of people need, then your plug-in could be merged back into Vagrant core, since Vagrant itself is open source. Thus, by using Vagrant, you’re using a tool that thousands of developers have contributed to based on their real-world needs.
Why Vagrant?
In order to understand the need for a tool like Vagrant, it is important to understand the old ways that Vagrant is trying to replace. Prior to Vagrant, the preferred method of working on a web application was to install and configure all the software you needed (e.g., Apache, MySQL, RabbitMQ, etc.) locally on your development machine.
I admit that in the days when web applications were almost certainly just PHP and MySQL alone, this made a lot of sense. Once installed, both technologies are generally “set and forget” and they just work. They also work well with multiple projects due to easy virtual hosts in Apache and database isolation with MySQL.
But today, modern web applications have a lot more moving parts, a lot more options for underlying technologies, and a lot more overall complexity. While PHP and MySQL are still very popular, they no longer clearly dominate the market, and languages like JavaScript, Python, and Ruby are quickly becoming the dynamic languages of choice. For databases, there are now a handful of choices that are equally correct in their valid use case (e.g., MySQL, PostgreSQL, Redis, Riak, Cassandra, etc.). In addition to just languages and databases, there are multiple web servers, application servers, and backend services each with their own use cases (e.g., Apache, Nginx, Unicorn, Thin, RabbitMQ, Solr, etc.).
The various combinations of these technologies that may be used quickly becomes out of hand, and keeping everything properly configured and installed locally is a nightmare. There are other issues with the local install practice as well:
- Everything must be installed manually, by a human. Installing some of the aforementioned software is not at all trivial, especially on Mac OS X and Windows, the primary development platforms. A lot of the software doesn’t even compile or run on Windows at all!
- Configuration is even more difficult than installation. Once the software is installed, it has to be configured. Developers are unlikely to know how to configure it to best resemble production. Misconfigured software can lead to functionality that appears to work in development, but doesn’t work the same in production.
- With manually set up development environments, there is a stark difference between development and production. This leads to a lot of “works on my machine” bugs (i.e., bugs that don’t appear on a developer’s machine, but appear in production). Ideally, development would mirror production identically.
- Multiple projects are difficult to impossible, because each project usually requires slightly different configurations of their services, or can require completely different backend systems. The result is either a brittle setup of poorly configured dependencies, or a system that is running a lot of services that each individual web application may not need. It all gets messy very quickly.
- It’s difficult to keep development environments in sync with other team members, or to bring a new team member on board. Because each developer is responsible for a separate development environment, it is easy for the environments to quickly get out of sync. And when new team members are hired, they are personally responsible for manually setting up an entire complex development environment. The result is confusion and long onboarding times before new team members can actually start working on the project itself.
- It’s difficult for multiple developers to use different operating systems. Some server software is very difficult or impossible to run on certain operating systems. Therefore, developers are stuck mostly using the operating system that is best documented for setting up their development environment.
Vagrant is a modern solution to all of these problems. While not strictly required, Vagrant encourages automation to set up your development environments using shell scripts or configuration management software. Vagrant allows you to work with the same operating system that is running in production, whether your physical development machine is running Linux, Mac OS X, or Windows. Because Vagrant puts your development environment into a virtual machine, working with multiple projects is easy, because each project just get its own virtual machine. Finally, working with a team is easier than ever, since you can share the virtual machine image. And bringing a new team member on board is as simple as telling them to build their Vagrant machine with a single command.
The Tao of Vagrant
Before even installing Vagrant or seeing how it works, it is important to understand the high-level workflow of Vagrant in an actual working environment. These principles are collectively known as “the Tao of Vagrant.”
In a world with Vagrant, developers can check out any repository from version control, run vagrant up, and have a fully running development environment without any human interaction. Developers continue to work on their own machines, in the comfort of their own editors, browsers, and other tools. The existence of Vagrant is transparent and unimportant in the mind of the developer. Vagrant is the workhorse that creates consistent and stable development environments.
System operations engineers work on system automation scripts, again using their choice of editors and tools on their own machines. When they’re ready to test these scripts, they vagrant up, and have a complete sandbox matching production, ready to test real-world scenarios and system automation.
The automation developed by system operations engineers is not only used in production, but also in development. With every vagrant up, developers are getting fully provisioned development environments using the same scripts that are used to set up production. This way, developers work in environments that mimic production as closely as possible.
If something goes wrong, or they just want to start over from a clean slate, developers and operations engineers can run vagrant destroy, which removes all traces of that development environment from their machines. Then a vagrant up again will re-create an identical, fully functioning development environment in a snap.
At the end of the day, Vagrant can suspend, halt, or destroy the development environment, keeping the overall system clean. Never again can developers forget to shut down a stray server process and waste precious compute resources. When ready, vagrant up will bring back a ready-to-go development environment in just a few minutes.
The best part of all this is that this knowledge transfers to every project. Whether working on project A, project B, or even at company A or company B, as long as they follow the Tao of Vagrant, the workflow is exactly the same. As a result, productivity abounds and “works on my machine” bugs disappear.
Of course, it isn’t necessary to follow each and every principle of the Tao of Vagrant to use Vagrant. Vagrant is a general-purpose tool and can be molded into your environment as you see fit. But it is important to see and understand the larger vision behind Vagrant.
Alternatives to Vagrant
There are various ways to achieve what Vagrant does using other technologies. Each of the following alternatives provide some of Vagrant’s functionality, but no solution can match Vagrant feature for feature. And perhaps the biggest disadvantage of all is losing the workflow Vagrant enforces, forcing you to invent your own or mimic the workflow of Vagrant as closely as possible.
Prior to Vagrant 1.1, the top reason people looked for alternatives was because Vagrant was tied to VirtualBox. However, since version 1.1, Vagrant can work with any virtualization layer, with official support for options such as VMware. Vagrant can even work with remote environments such as Amazon’s Elastic Compute Cloud (EC2).
Plain Desktop Virtualization
Vagrant is a layer on top of some virtualization solution. Instead, you could use that virtualization solution directly. VirtualBox is free, but there are also many commercial alternatives (e.g., VMware, Parallels, etc.). Each of these can be used to mimic what Vagrant does.
It is standard practice for this software to support sharing or exporting virtual machines, shared folders, port forwarding, and so on. It is completely possible to do everything Vagrant does with these tools. The major downside is that the approach to do this would be completely manual, and cross-platform support would be nontrivial. Additionally, you lose the predictable Vagrant workflow.
If you have a very specific goal and are OK with losing the benefits Vagrant offers, then this is a reasonable solution.
Containers
Another approach is to use container-based solutions such as LXC or OpenVZ.
Containers don’t provide full virtualization but instead are super-powered isolated environments running the same kernel. A big benefit of containers is that they don’t incur the same overhead as virtualization, since they run just like any other process on your machine. A downside of containers is that you can only run the same kernel that is running on your host system, so you can’t have a Windows container on Linux, for example.
For some work environments, this is not an issue, but there is another major negative aspect of containers for development. Containers are highly specific to the host operating system. Linux supports LXC and OpenVZ, while FreeBSD supports Jails. OS X provides no container support, and neither does Windows. Therefore, container usage requires an entire team to use the same host operating system.
In general, containers are ideal for production usage, since they offer a reasonably secure way to isolate resources within the same operating system without performance overhead. But for development, containers impose strict limitations that are often hard to work with.
Cloud
Another approach is to ditch desktop virtualization altogether and do development directly in the cloud, such as on EC2.
The main benefit of this approach is that it allows developers to work from incredibly low-powered desktop machines in an environment that closely resembles production. It is also possible to mimic much more advanced production environments, since the remote machines can be much more powerful than a typical development machine.
The disadvantage here is that this approach requires an Internet connection, and it can have a much higher financial cost associated with it.
If your organization is at the point where they have enough automation to support this sort of remote work, it is generally quite easy to make the switch to Vagrant, if possible.
Vagrant Versions
Vagrant continues to evolve and improve by adding new features, fixing bugs, and improving existing functionality. It is important to understand the available Vagrant versions and what this book covers.
The first stable release of Vagrant was Vagrant 1.0. “Stable release” means that this version is used widely and is known to work well. More importantly, perhaps, is that the Vagrant project promises to retain backward compatibility for configuration formats used by stable releases. This means that any projects that work with Vagrant 1.0 will continue to work with future versions of Vagrant with minimal or no change.
At the time of writing, Vagrant is on the 1.1+ versions, heading toward an eventual stable version 2.0. Since version 1.0, Vagrant has added many new features. However, since backward compatibility for these features isn’t promised yet, the configuration, usage, and existence of these new features isn’t guaranteed.
Organizations generally use the latest version of Vagrant because it contains the most bug fixes and improvements, but they also continue to use Vagrant 1.0 because it is known to be a stable format.
Because of this, this book covers Vagrant 1.0 features and configurations running on the latest version (Vagrant 1.1+). This ensures that the book remains correct while running on the latest, most bug-free core of Vagrant. The features of Vagrant 1.0 are foundational to the understanding and usage of Vagrant, and are not at all deprecated or outdated.
After reading this book, you’ll be well equipped with the knowledge necessary to learn about and use the latest features of Vagrant which may have not been covered.
Setting Up Vagrant
After learning about Vagrant, what it can do, the benefits it has to offer, and a small history behind it, it’s time to actually install it so we can get up and running with our first virtual machine!
This chapter covers what is required to install Vagrant on Linux, Mac OS X, and Windows operating systems. Vagrant must be installed on every computer that you want to run Vagrant-created development environments. If you’re working in a team environment, laptops are usually distributed with Vagrant preinstalled (or, if not, it should be one of the first software components to be installed).
Vagrant behaves identically across Linux, Mac OS X, and Windows, so your developers can work on the operating system they feel most productive on. No more nightmares setting up Linux services on Windows!
If you’re using Vagrant with VirtualBox, then VirtualBox must be installed separately. If you forget this step, Vagrant will give you a nice error message telling you to install it. VirtualBox is the only thing other than Vagrant that must be installed for Vagrant to function properly.
The order in which you install these components doesn’t matter, since if you install Vagrant first Vagrant will just give you an error message about missing VirtualBox. If you install VirtualBox first, you won’t have Vagrant yet. Either way, the setup process is order independent.
Installing VirtualBox
To get started, I recommend installing VirtualBox first. VirtualBox is open source and cross-platform virtualization software from Oracle. It is available for Linux, Mac OS X, Windows, and other platforms that Vagrant doesn’t explicitly support.
VirtualBox can be downloaded from http://virtualbox.org. VirtualBox provides installers and packages for Windows, Mac OS X, and various distributions of Linux. If you can’t find a package for your operating system, then you can compile VirtualBox from source.
At the time of writing, Vagrant supports VirtualBox versions 4.0.x, 4.1.x, and 4.2.x. The Vagrant 1.0 release will support up to but not including VirtualBox 5.0. Note that you should always use the latest version of Vagrant in order to get the best compatibility with VirtualBox.
Installing VirtualBox also requires setting up a kernel driver for your operating system. The kernel driver is responsible for some low-level virtualization help, makes shared folders possible, optimizes network operating with VirtualBox, and more.
On Windows and Mac OS X, the installation of the driver happens automatically.
On Linux, you may need to install extra packages and run an extra command in order to set it up. Extra packages generally include kernel headers, DKMS (Dynamic Kernel Module System), and perhaps others. The VirtualBox installation process should tell you if you’re missing anything. To set up the kernel drivers on Linux, run /etc/init.d/vboxdrv setup as root.
On all platforms, it is highly recommended that you restart your computer after installing VirtualBox, just to make sure the kernel driver starts up cleanly. This is especially important if you’re installing VirtualBox over a previous version, since VirtualBox has been known to be finicky with replacing prior kernel drivers without a restart.
Installing Vagrant
Like VirtualBox, Vagrant is distributed as a set of packages and installers for various platforms. For this book, we’ll be working with the latest 1.x series. This release series builds on top of the 1.0.x stable series and is essentially a beta series toward a stable version 2.0.
Despite technically being a beta series, most companies quickly adopt the latest version of Vagrant because Vagrant has a history of being quite stable and each release introduces impressive improvements and better support for every combination of host and guest operating system.
The installers for every platform can be found at http://downloads.vagrantup.com. Open this in your browser and make sure you’re on the page listing the downloads for the latest version matching 1.x (where x of course is not a literal x, but some number).
Prior to the installation packages, Vagrant was distributed as a RubyGem. Installation packages are now the preferred way to install Vagrant, so you should uninstall the RubyGem version and follow the instructions for your platform. The RubyGem-based installation is still supported for Vagrant 1.0.x, but is deprecated and will not be supported in any future versions.
Next, we’ll cover the specifics of installing Vagrant on each supported platform.
Mac OS X
Installation of Vagrant on OS X follows a standard process, so if OS X is your primary machine, this should be very comfortable for you.
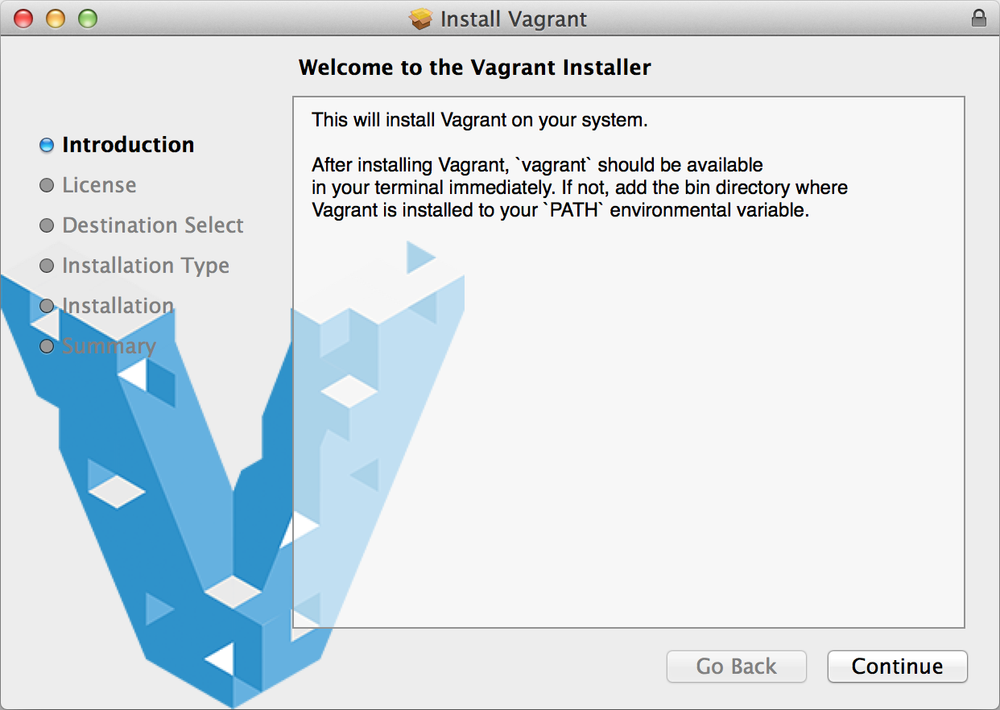
Find the Mac OS X installer from the downloads page opened previously, and download it to the computer on which you’d like to install Vagrant. Just as you’ve likely done time and time again, double-click the DMG to mount it, double-click the installer in the mounted folder, and follow the installation steps. The installer should look like Figure 1-1, a familiar Mac OS X package. The whole process should take no more than a few minutes.
Vagrant installs itself to /Applications/Vagrant, right alongside the other applications installed on your computer. Vagrant also puts a vagrant executable into /usr/bin so it is available by default from the terminal.
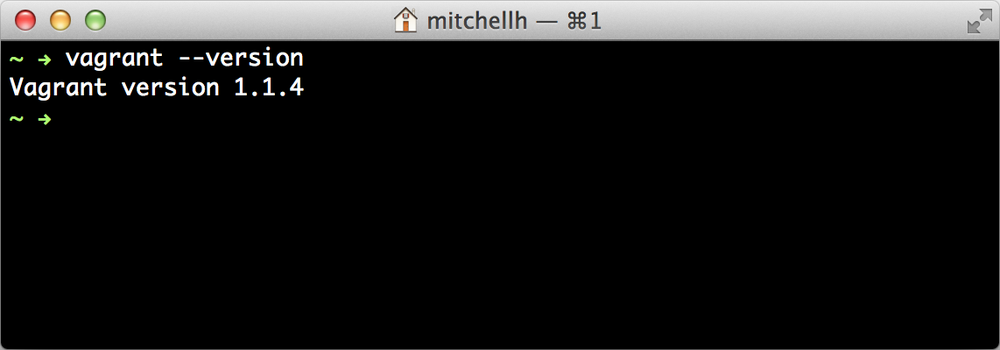
To verify that everything worked correctly, open up a terminal and type vagrant --version. You should see output containing the Vagrant version you just downloaded. Just so you’re sure, you should see something similar to Figure 1-2, although the version number may be slightly different depending on what the latest version is. If everything looks right, you’re ready to go!
Windows
For Windows, Vagrant is distributed as a standard MSI package. This means that once you’re familiar with the manual installation process, Vagrant can also easily be added as an MSI package to be installed automatically across a fleet of computers if you’re managing a large workgroup of Windows machines.
Find the Windows installer file from the downloads page opened previously, and download it to the computer you’d like to install Vagrant on.
The installer is a standard Windows installer in the format of an MSI. This is useful because while it is easy to install locally, Windows also provides many tools for remotely installing MSI-packaged software in case you’re managing many machines. Installing Vagrant on remote Windows machines is outside the scope of this book, but searching for resources on remotely installing MSI packages should yield good results on how to do it.
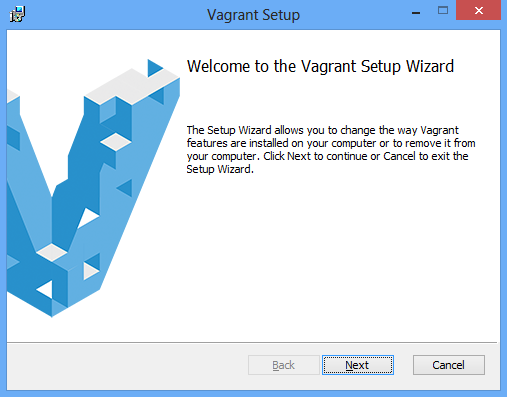
Double-click the MSI and follow the instructions. The installer should look like Figure 1-3. You shouldn’t have to modify any settings, but you can alter things like the installation directory if you’d like.
As part of the installation process, the PATH environmental variable is modified to include the path to Vagrant. In order to see these changes, you’ll have to restart any open command prompts. Vagrant is installed both as a batch file and as a bash file, so it’s compatible with the Microsoft Command Prompt, PowerShell, and Cygwin.
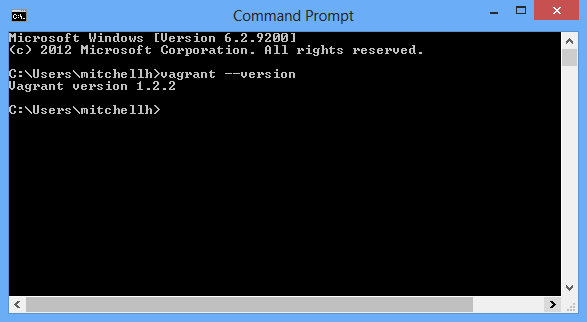
To verify that everything was installed correctly, open the command prompt of your choice and type vagrant --version. The output should include the Vagrant version you just installed. If you’re still unsure, verify that the output looks similar to Figure 1-4.
If everything looks good, then you’re ready to rock!
Linux
For Linux, binary packages for many of the major distributions are available. If a compatible package is available for your distribution, download the package and follow the instructions for your package manager to install it.
If a package is unavailable for your distribution, you may fall back to the deprecated RubyGems installation method. You can report a bug to the project with your distribution and we’ll do our best to provide a package. For more information on the RubyGem installation process, refer to the website. Since it is deprecated, it is not covered in this book.
For the Linux packages, Vagrant installs to /opt/vagrant. You must add /opt/vagrant/bin to your PATH manually in order to have access to the vagrant executable. Future packages will automatically create a symbolic link in /usr/bin to avoid this extra step.
Once this is done, open up a terminal and type vagrant --version to verify Vagrant is available. The output should contain the version of Vagrant you just installed, and should look similar to the following output:
$ vagrant --version
Vagrant version 1.2.3
Common Mistakes
If installing Vagrant isn’t working as expected, you should double-check to make sure that you haven’t made one of the following common mistakes.
Improper PATH Configuration
First, make sure vagrant is configured to be accessible from the PATH variable. On Linux and Mac OS X, you can do this by typing which vagrant into your terminal. This should tell you where Vagrant is. If it doesn’t, then Vagrant isn’t on your path. On Linux, add /opt/vagrant/bin to the path. On Mac OS X, add /Applications/Vagrant/bin to the path.
On Windows, you can open the command prompt of your choice and type where vagrant to find out if Vagrant is on your path. If this tells you Vagrant was not found, then add C:\vagrant\bin to your path (note that if you chose to install it to another directory, you should use that directory).
Also, some installations of Windows, depending on their configuration, require a system restart to see vagrant on the path, so you should attempt that as well.
Conflicting RubyGems Installation
If Vagrant is on your path, but you’re getting errors, then you should verify that you haven’t previously installed Vagrant with RubyGems. If you have, use gem uninstall vagrant to remove it (the command may require administrative privileges), because it sometimes conflicts with the package-installed version.
Once Vagrant is uninstalled from RubyGems, reinstall Vagrant using the package. This must be done to ensure that Vagrant is properly added to your PATH.
If this wasn’t helpful, use one of the Vagrant support channels covered in the next section to get help.
Using Vagrant Without VirtualBox
Since Vagrant 1.1, Vagrant has severed all ties that force you to use VirtualBox. Vagrant can now be used with VMware, EC2, and anything else you can dream of.
In Vagrant terminology, these are called “providers,” and for this book, we will only use the VirtualBox provider. VirtualBox is free and works on every major platform that Vagrant runs on, so this is the lowest barrier to entry to using Vagrant.
However, once you learn more about Vagrant, if you prefer to use something other than VirtualBox, rest assured there are other options available. The creators of Vagrant offer an official VMware provider.
The examples in this book are tailored to VirtualBox, so I recommend using VirtualBox throughout the book.
Help!
If at any point in the book you’re having problems or something is unclear, there are multiple resources available to receive help.
First, Vagrant’s documentation site is full of information that is constantly updated to cover new issues or difficulties people are facing. The documentation is also intuitively organized, so it should be easy to find the topic you need help with to see if the explanation there helps you to better understand.
Vagrant also has a strong community behind it made up of thousands of individuals using Vagrant in their own way. This community is very friendly and welcoming, and can be reached via the mailing list or IRC. It generally takes longer to get a response through the mailing list, but messages are seen by more eyes. With IRC, the chat is in real time, but someone with the right knowledge set or experience may not be available at the time a question is asked.
Finally, in addition to all these resources where you can reach an actual human, you can append --help to any Vagrant command and Vagrant will output help relevant to the command you’re running. How this works will become clear as you progress through the book and become familiar with the Vagrant command-line tool.
Get Vagrant: Up and Running now with the O’Reilly learning platform.
O’Reilly members experience books, live events, courses curated by job role, and more from O’Reilly and nearly 200 top publishers.

