Despite its vast size, the .NET FCL is a manageable collection of classes and their methods. This is because, unlike more traditional development tools such as the Win32 API, the .NET FCL is a collection of types (classes, interfaces, delegates, events, structures, modules, and enumerations) and their members organized into namespaces. A namespace is simply a logical grouping of classes that can in turn contain other namespaces, so that a collection of namespaces forms an inverse hierarchical tree. Organization of types into namespaces helps to prevent collisions in the event that types are identically named.
Although the .NET system of namespaces does not have a single root, we can consider the System namespace at the top of the .NET FCL hierarchy. It includes a wide variety of basic system classes, including data types, exception types, and types defining the most important attributes.
The types in a namespace, in turn, reside in an assembly, which is simply a logical unit of deployment. An assembly provides the Microsoft Intermediate Language (MSIL) code for its contents, which is packaged in a Windows portable executable (PE) file. An assembly also specifies security permissions for itself, maintains a list of the types that it defines and their scopes, and specifies rules for resolving references to external types.
The assemblies in which namespaces of the .NET FCL reside are Windows
dynamic link libraries (.DLLs). Typically, a single assembly contains multiple
namespaces. In addition, however, a single namespace can reside in multiple
assemblies. The System namespace, for example, resides in both mscorlib.dll and system.dll.
Tip
You can use ILDASM, the Intermediate Language disassembler included with the .NET Framework SDK, to see which namespaces and types are available in a particular assembly or DLL.
Namespaces are made available to Visual Studio or to the Visual Basic compiler by identifying the assembly in which the namespace resides. When using Visual Studio as the development environment for your Visual Basic projects, this is done by using the References dialog, as follows:
Select Project → Add Reference from the main menu, or right-click on References in the Solution Explorer window and select Add Reference from the popup menu.
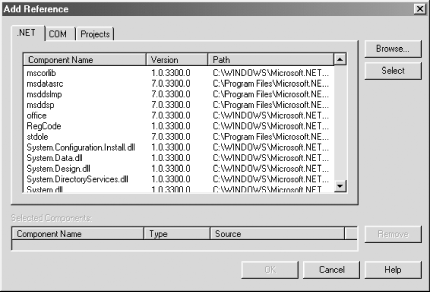
When the Add Reference dialog appears, make sure the .NET tab is selected, as shown in Figure 1-1. (The tab should be selected by default.)
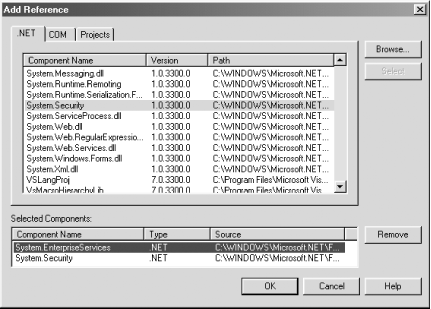
Select one or more DLL whose types you’d like to reference, then click the Select button. The assemblies you’ve added should appear in the Selected Components data grid. (See Figure 1-2.) Repeat this step if necessary until each assembly whose types you wish to access is displayed in the Selected Components data grid in the lower portion of the dialog.
Click the OK button to close the dialog.
Warning
The Add Reference dialog does not list the assemblies whose references have already been added to a Visual Studio .NET project. You can see which assemblies are currently referenced by a project by expanding the References tree in the Solution Explorer window.
When compiling using the VB.NET command-line compiler, assemblies are
made available to the compiler by using the /r: (or /reference:)
compiler switch. Commas are used to separate DLLs if multiple DLLs are referenced.
For example, the following command might compile a standard Windows desktop
application:
vbc MyWinApp.vb /t:winexe /r:system.dll,system.windows.forms.dll
Tip
You may have noticed that you don’t need to specify the path to .NET DLLs in order to access them. This is because they are registered in the Global Assembly Cache (or GAC), a location in which the Common Language Runtime expects to find its shared libraries.
References to some namespaces are added to every project created in the Visual Studio environment. The following are the project types supported by Visual Studio .NET, along with the .NET DLLs each project type automatically references:
- ASP.NET web applications
System.dllSystem.Data.dllSystem.Drawing.dllSystem.Web.dllSystem.XML.dll- ASP.NET web services
System.dllSystem.Data.dllSystem.Web.dllSystem.Web.Services.dllSystem.XML.dll- Class libraries
System.dllSystem.Data.dllSystem.XML.dll- Console applications
System.dllSystem.Data.dllSystem.XML.dll- Web control libraries
System.dllSystem.Data.dllSystem.Drawing.dllSystem.Management.dllSystem.Web.dllSystem.XML.dll- Windows applications
System.dllSystem.Data.dllSystem.Drawing.dllSystem.Windows.Forms.dllSystem.XML.dll- Windows control libraries
System.dllSystem.Data.dllSystem.Drawing.dllSystem.Windows.Forms.dllSystem.XML.dll- Windows services
System.dllSystem.Data.dllSystem.ServiceProcess.dllSystem.XML.dll
All Visual Studio .NET projects written using Visual Basic also transparently reference two .NET DLLs: mscorlib.dll (which contains portions of the System namespace, as well as namespaces such as System.Collections, System.IO, System.Reflection, and System.Threading), and Microsoft.VisualBasic.dll (which defines the functions, procedures, constants, and attributes of the Visual Basic .NET language). The Visual Basic command-line compiler also references these two DLLs automatically, although it doesn’t automatically reference any additional .NET assemblies.
Once you’ve added a reference to an assembly, you can access any of the types in its namespaces by providing a fully qualified reference to the type. For instance, the code in Example 1-4 instantiates objects of the HashTable and DictionaryEntry classes, and also calls a method of the Console class.
Example 1-4. Using fully qualified namespace names
Option Strict On

Public Module modMain
   Public Sub Main
      ' Define hashtable
      Dim States As New System.Collections.HashTable()
      ' Add items
      States.Add("NY", "New York")
      States.Add("CA", "California")
      States.Add("MI", "Michigan")
      States.Add("VT", "Vermont")
      States.Add("WA", "Washington")

     ' Define and fill DictionaryEntry object
      Dim dict(States.Count - 1) As _
               System.Collections.DictionaryEntry
      Dim item As System.Collections.DictionaryEntry
      States.CopyTo(dict, 0)

      ' Iterate dictionary
      For Each Item in dict
         System.Console.WriteLine( _
            Microsoft.VisualBasic.Strings.UCase(CStr(item.Key)) _
            & ": " & CStr(item.Value))
      Next
   End Sub
End Module
In each case, the source code includes the fully qualified name of the
type it instantiates or accesses; the Console class is a type in the System
namespace, while the HashTable and DictionaryEntry classes are both types
in the System.Collections namespace. Note that even the namespace of the supposedly
“intrinsic” Visual Basic UCase function must be specified
or a compiler error (“Name ‘UCase’ is not declared.”) results if you attempt
to compile the program using the Visual Basic command-line compiler. The UCase function,
as you can see from the code in Example
1-4, is a member of the Strings class
in the Microsoft.VisualBasic namespace.
Needless to say, fully qualifying the name of each .NET type quickly
becomes rather tiresome, particularly for types that are nested deep within
a hierarchical namespace. You can, however, use the Imports directive
to import a particular namespace, thereby allowing the compiler to resolve
the reference to a particular type and eliminating the need for you to provide
a fully qualified path to the type. For example, the code fragment shown in
Example
1-4, when rewritten to use the Imports directive,
appears as shown in Example
1-5 (new and modified lines of code appear in
boldface).
Example 1-5. Importing namespaces with the Imports directive
Option Strict On

Imports System
                     Imports System.Collections
Public Module modMain

Public Sub Main
   ' Define hashtable
   Dim States As New HashTable()
   ' Add items
   States.Add("NY", "New York")
   States.Add("CA", "California")
   States.Add("MI", "Michigan")
   States.Add("VT", "Vermont")
   States.Add("WA", "Washington")

   ' Define and fill DictionaryEntry object
   Dim dict(States.Count - 1) As DictionaryEntry
                        Dim item As DictionaryEntry
   States.CopyTo(dict, 0)

   ' Iterate dictionary
   For Each Item in dict
      Console.WriteLine(CStr(item.Key) & ": " & _
                                             CStr(item.Value))
   Next
End Sub

End Module
Note that while no namespaces are automatically imported by the command line compiler, Visual Studio automatically imports a number of namespaces, again depending on the project type. The project types and the namespaces that they automatically import are as follows:
- ASP.NET web applications
Microsoft.VisualBasic
System
System.Collections
System.Configuration
System.Data
System.Drawing
System.Web
System.Web.UI
System.Web.UI.HTMLControls
System.Web.UI.WebControls
- ASP.NET web services
Microsoft.VisualBasic
System
System.Collections
System.Data
System.Diagnostics
- Class libraries
Microsoft.VisualBasic
System
System.Collections
System.Data
System.Diagnostics
- Console applications
Microsoft.VisualBasic
System
System.Collections
System.Data
System.Diagnostics
- Web control libraries
Microsoft.VisualBasic
System
System.Collections
System.Data
System.Diagnostics
System.Management
- Windows applications
Microsoft.VisualBasic
System
System.Collections
System.Data
System.Diagnostics
System.Drawing
System.Windows.Forms
- Windows control libraries
Microsoft.VisualBasic
System
System.Collections
System.Data
System.Diagnostics
System.Drawing
System.Windows.Forms
- Windows services
Microsoft.VisualBasic
System
System.Collections
System.Data
System.Diagnostics
In addition, the AssemblyInfo.vb file automatically
imports two additional namespaces, System.Reflection and System.Runtime.InteropServices,
into every project.
You can have Visual Studio automatically import a particular namespace, which makes it available to all of the source code files in a project, as follows:
Select Project → Properties from the main menu, or right-click on the project name in the Solution Explorer window and select Properties from the popup menu to open the properties dialog.
Select Common Properties → Imports in the treeview control on the right to display the Imports property page.
Enter the fully qualified name of the namespace you’d like to import in the Namespace dialog and click the Add Import button. Repeat this step for each namespace you’d like to automatically import in the project.
Click OK to close the property page.
While the use of the Imports directive can save a
substantial amount of typing, it does mean that the compiler is left to identify
the namespace containing a particular type. This means that, if identically
named types are found in the imported namespaces, Visual Basic will not be
able to determine which type you wish to instantiate. For example, consider
the code in Example 1-6, which defines two custom namespaces, each with a
class named Person.
Example 1-6. Classes with the same name
Option Strict On

Namespace Extensions.Classes

   Public Class Person
      Dim sName As String

      Public Sub New(Name As String)
         sName = Name
      End Sub

      Public Property Name() As String
         Get
            Return sName
         End Get
         Set
            sName = Value
         End Set
      End Property
   End Class
End Namespace

Namespace Extensions.Demographics
   Public Enum Gender As Short
      Male = 2
      Female = 1
   End Enum

   Public Class Person
      Dim shAge As Short
      Dim chGender As Gender

      Public Property Age() As Short
         Get
            Return shAge
         End Get
         Set
            shAge = Value
         End Set
      End Property

      Public Property Gender() As Gender
         Get
            Return chGender
         End Get
         Set
            chGender = Value
         End Set
      End Property
   End Class
End Namespace
This code can be compiled into a dynamic link library. We can then attempt to access the Person class using code like that in Example 1-7.
Example 1-7. A type collision
Option Strict On

Imports Extensions.Classes
Imports Extensions.Demographics
Imports System

Module modMain
   Public Sub Main()
      Dim oPerson As New Person("John Doe")
      Console.WriteLine(oPerson.Name)

      Dim oPerson2 As New Person
      oPerson2.Age = 32
      oPerson2.Gender = Gender.Female
      Console.WriteLine(oPerson2.Gender.ToString)
   End Sub
End Module
However, when we attempt to compile this code, the VB.NET command-line compiler raises two instances of the following compiler error:
error BC30561: ‘Person’ is ambiguous, imported from the namespaces or types ‘Extensions.Demographics, Extensions.Classes’.
To resolve this problem of type collisions, two solutions are available.
The first is to use the fully qualified namespace name to indicate the namespace
containing the type we want to instantiate, just as if we hadn’t used the Imports statement. The second is to assign an alias to a namespace and to use that alias
to identify the namespace containing the type we want to instantiate. To do
this, we also use the Imports directive, which then has
the following syntax:
Importsaliasname=namespace
where aliasname is the alias by which the
namespace will be referenced in code, and namespace is
the fully qualified namespace name.
We can then modify our code example from Example 1-7 to take advantage of aliasing. The result is shown in Example 1-8 (again, modified lines are shown in boldface).
Example 1-8. Using aliasing to prevent type naming conflicts
Option Strict On

Imports cl = Extensions.Classes
Imports Extensions.Demographics
Imports System

Module modMain
   Public Sub Main()
      Dim oPerson As New cl.Person("John Doe")
      Console.WriteLine(oPerson.Name)

      Dim oPerson2 As New Person
      oPerson2.Age = 32
      oPerson2.Gender = Gender.Female
      Console.WriteLine(oPerson2.Gender.ToString)
   End Sub
End Module
Note that we have aliased a single namespace, which has magically resolved the ambiguous reference to both namespaces. The use of an alias, however, means that all further references to types in the Extensions.Classes namespace must use the alias in order to resolve the reference to the type, or we must use the fully qualified name of the type.
Get VB.NET Core Classes in a Nutshell now with the O’Reilly learning platform.
O’Reilly members experience books, live events, courses curated by job role, and more from O’Reilly and nearly 200 top publishers.

