Chapter 4. Forms, Controls, and Other Useful Objects
Introduction
If you are writing a desktop application, you are dealing with forms and controls. Since its first release, Visual Basic has made the dream of drag-and-drop programming possible: just add some controls to a form, press F5, and go.
While this method works, it allows you to design only the most rudimentary applications. Most programs require gobs of code for each on-screen control. Fortunately, .NET simplifies a lot of the plumbing associated with complex controls, so you can just focus on the logic that responds directly to a user action. This chapter shows you how to take advantage of the control features included with .NET’s Windows Forms library.
4.1. Creating and Adding Controls at Runtime
Problem
You need to add one or more controls to a form dynamically at runtime. You used to do something similar to this in Visual Basic 6.0 using control arrays, but those do not exist in Visual Basic 2005.
Solution
Sample code folder: Chapter 04\DynamicControls
You can add any control to a form at runtime just by creating an instance of it. Your code can define the initial properties, such as the location of the control on the form, at runtime. You can also connect events for these runtime controls to event handlers, although the handler methods must exist at design time. (Technically, it’s possible to write a method at runtime, but such programming is beyond the scope of this book and is generally frowned upon.)
Discussion
To test this method of dynamically creating controls, start by
creating a new Windows Forms application and add the following source
code to Form1’s code
template:
Private Sub ShowTheTime(ByVal sender As System.Object, _
ByVal e As System.EventArgs)
' ----- Display the time in the text box, if it exists.
Dim theTextBox As TextBox
' ----- Locate and update the text control.
theTextBox = Me.Controls("TimeTextBox")
If (theTextBox IsNot Nothing) Then
theTextBox.Text = Now.ToLongTimeString( )
End If
End Sub
Private Sub Form1_Load(ByVal sender As Object, _
ByVal e As System.EventArgs) Handles Me.Load
' ----- Add controls at runtime.
Dim dynamicText As TextBox = Nothing
Dim dynamicButton As Button
' ----- Dynamically add a text box control to the form.
dynamicText = New Windows.Forms.TextBox
dynamicText.Name = "TimeTextBox"
dynamicText.Location = New System.Drawing.Point(8, 8)
dynamicText.Size = New System.Drawing.Size(232, 20)
dynamicText.TabIndex = 0
Me.Controls.Add(dynamicText)
' ----- Dynamically add a button control to the form.
dynamicButton = New Windows.Forms.Button
dynamicButton.Location = New System.Drawing.Point(144, 32)
dynamicButton.Size = New System.Drawing.Size(99, 23)
dynamicButton.Text = "Get Time"
dynamicButton.UseVisualStyleBackColor = True
dynamicButton.TabIndex = 1
Me.Controls.Add(dynamicButton)
' ----- Connect the button to an event handler.
AddHandler dynamicButton.Click, AddressOf ShowTheTime
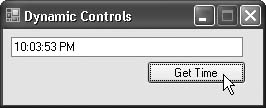
End SubWhen you run the program, you will see two controls—a TextBox control and a Button control—magically appear on the
previously empty form. Clicking the button calls the prewritten event
handler, which inserts the current time into the text box, as shown in
Figure 4-1.
In Visual Basic 6.0, if you wanted to add a control to a form at runtime it was necessary to create a design-time control just like it, and create a dynamic copy of it at run-time. This was due, in part, to the special design-time method used to record form controls. If you opened up the .frm file for a Visual Basic 6.0 form, you would see non–Visual Basic code at the top of the file that defined the controls and the form itself.
In Visual Basic 2005, all form controls, and even the form
itself, exist through standard object creation. When Form1 appears on the screen in a running
program, it’s because somewhere in your program there is code that
creates a new instance of Form1 and
calls its Show method:
(New Form1).Show
Although you add controls to your form using the Visual Studio
Form Designer, Visual Studio actually generates runtime code for you
that dynamically creates the controls and adds them to the form. All
this code is generally hidden in the form’s designer
file. To view this file, select the Project → Show All
Files menu command, and expand the branch for one of your forms in the
Solution Explorer panel. By default, Form1’s designer file is named Form1.Designer.vb.
To create the source code for this project, we added a TextBox and a Button control to the form and then opened
the designer code file. We then copied selected lines from that file
and made slight adjustments before pasting that code into the form’s
Load event handler. Finally, we
deleted the design-time controls from the form.
See Also
Recipes 4.2 and 4.3 also discuss features that are replacements for Visual Basic 6.0 control arrays.
4.2. Iterating Through All Controls on a Form
Problem
You need to make updates to some or all controls on a form at runtime, and all in a common way. You aren’t excited about copying and pasting the same lines over and over again to make the changes to every instance of the same control type.
Solution
Sample code folder: Chapter 04\IteratingControls
The form maintains a collection of all controls on the form. Iterate through this collection, and make your changes as you pass by each item.
Discussion
Create a new Windows Forms application, and add three Label controls to Form1. Name the controls whatever you want,
and change their Text properties to
anything you want as well. Next, add two Button controls to the form, named ActRed and ActNormal. Set their Text properties to Red and Normal, respectively. Then add the following
source code to the form’s code template:
	Private Sub ActRed_Click(ByVal sender As System.Object, _
	      ByVal e As System.EventArgs) Handles ActRed.Click
	   ' ----- Set the background of all labels to red.
	   UpdateAllLabels(Color.Red)
	End Sub

	Private Sub ActNormal_Click(ByVal sender As System.Object, _
	      ByVal e As System.EventArgs) Handles ActNormal.Click
	   ' ----- Set the background of all labels to the
	   '       standard color.
	   UpdateAllLabels(SystemColors.Control)
	End Sub

	Private Sub UpdateAllLabels(ByVal withColor As Drawing.Color)
	   ' ----- Scan all controls, looking for labels.
	   For Each scanControls As Control In Me.Controls
	      If (TypeOf scanControls Is Label) Then
	          scanControls.BackColor = withColor
	      End If
	   Next scanControls
	End Sub
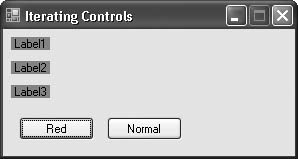
When you run the code and click on each button, the background color of the three labels changes as indicated by the clicked button. Figure 4-2 shows a sample use of this code.
All of a form’s controls appear in a collection accessed through
the form’s Controls property.
Because it is a standard collection, you can iterate through it using
the For Each statement, or any
other technique that accesses elements of a collection. You can also
reference controls by string name:
Dim firstButton = Me.Controls("ActRed")Although controls of all types are added to the Controls collection, you can still determine
their derived data types using the TypeOf statement, as is done in this
recipe’s sample code. This can help you limit updates to a certain
type of control in the collection.
See Also
Recipes 4.1 and 4.3 also discuss features that are replacements for Visual Basic 6.0 control arrays.
4.3. Sharing Event-Handler Logic Among Many Controls
Problem
You have many controls that should use identical event-handler logic for some of their events. You don’t want to rewrite the logic for each control. You accomplished this in Visual Basic 6.0 using control arrays, but they no longer exist in Visual Basic 2005.
Solution
Sample code folder: Chapter 04\SharingControlLogic
You can use a single .NET method as the event handler for any number of control events on the form, as long as those events share a common set of event arguments.
Discussion
Visual Basic 6.0 included a feature called control
arrays that allowed developers to share a single
event-handler procedure among multiple controls. The controls in the
array had to be of the same type and share a common name. They
differed only by the values of their numeric Index properties. Each event handler also
included an extra argument that identified the index of the control
triggering the event.
Visual Basic in the .NET world no longer allows control arrays,
but you can still share event handlers. To do this, you alter the
event method’s Handles clause to
include all the control events it should handle.
Create a new Windows Forms application, and add three new
TextBox controls to Form1. By default, they are named TextBox1, TextBox2, and TextBox3. Add a Label control named ShowInfo. Then add this source code to the
form’s code template:
Private Sub MultipleEvents(ByVal sender As Object, _ ByVal e As System.EventArgs)Handles_ TextBox1.Enter, TextBox2.Enter, TextBox3.Enter, _ TextBox1.TextChanged, TextBox2.TextChanged, _ TextBox3.TextChanged ' ----- Report the current status of this field. Dim activeControl As TextBoxactiveControl = CType(sender, TextBox)ShowInfo.Text = "Field #" & _ Microsoft.VisualBasic.Right(activeControl.Name, 1) & _ ", " & activeControl.Text.Length & " character(s)" End Sub
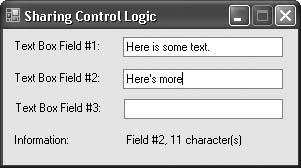
Run this program. As you move from text box to text box and type
things in, the ShowInfo label
updates to show you which text box you are in (based on the number
extracted from its control name) and the length of its content. Figure 4-3 shows the form in
use.
See Also
Recipes 4.1 and 4.2 also discuss features that are replacements for Visual Basic 6.0 control arrays.
4.4. Working with Timers
Problem
You need to have some action occur on a regular basis in your form.
Solution
Sample code folder: Chapter 04\ClockTimer
Use a Timer control, and set
it for the desired interval. Create a new Windows Forms application,
and add a Label control named
CurrentTime to the form. Also add a
Timer control to the form, and name
it ClockTimer. Set its Interval property to 1000, and set its Enabled property to True. Then add the following source code to
the form’s code template:
	Private Sub ClockTimer_Tick(ByVal sender As System.Object, _
	      ByVal e As System.EventArgs) Handles ClockTimer.Tick
	   CurrentTime.Text = Now.ToLongTimeString
	End Sub
When you run the program, that label updates once each second with the current time.
Discussion
The Timer control’s Interval property sets the time between
Tick events in milliseconds (1,000
per second). Although you can set the Interval as low as one millisecond, the
timer’s resolution is limited by your system’s hardware and
operating-system-level factors.
The Tick event fires at
approximately the interval you specify, if
nothing more important is going on. If the code within your Tick event handler is still running when the
next Tick event should occur, that
subsequent Tick event is disposed
without a call to the event handler.
See Also
Recipe 14.8 shows how to have a section of code sleep, or take a small break. Some older Visual Basic code used timers for this purpose, although a timer is not the best solution in this case.
4.5. Determining If a Control Can Take the Focus
Problem
You need to move the current focus to a specific control, but you want to avoid conditions where the focus-setting action would fail.
Solution
Use the control’s CanFocus()
method to determine whether the application can take the focus or
not:
	If (SomeControl.CanFocus() = True) Then _
	   SomeControl.Focus()
Discussion
Event-driven programming can lead to many runtime surprises based on timing. Depending on how you write your code, it’s possible that an event handler will be temporarily interrupted so that another event handler can run instead. Or, more commonly, unrelated event handlers may fire in an order you did not anticipate because of some interesting input action by the user.
If you have an event handler that disables and enables a
specific control, and another handler that sets the focus to that
control, some situations may arise in which the focus action fails
because the control is disabled. While you could check the Enabled flag before setting the focus, there
are other conditions (such as the presence of a separate modal dialog)
that can also stop a control from receiving the focus, even when the
Enabled flag is True. Using the CanFocus() method provides a more accurate
method of determining when it is safe to call the Focus() method.
4.6. Programmatically Clicking a Button
Problem
You want the Click event
handler for a button to run, but you want to initiate this action from
code instead of waiting for the user to click the button.
Discussion
While it’s nice that the Button control has a PerformClick() method to run its Click event handler in an object-oriented
manner, most controls and most control events have no such related
method. If you wish to call an event handler immediately through code,
you have to call it like any other method, passing the correct
arguments:
	' ---- Call the text box control's GotFocus handler.
	TextBox1_GotFocus(TextBox1, New System.EventArgs)
In this case, calling the TextBox1 control’s GotFocus() event handler will run that
handler’s code, but it will not cause the focus to move to the text
box. An even better solution would be to write a shared routine that
the GotFocus() event handler and
your other code both call.
4.7. Drawing a Control
Problem
You want to provide custom drawing code for a control.
Solution
Sample code folder: Chapter 04\ControlDrawing
For most controls, provide an event handler for the Paint event, and add your drawing code
there. This event’s second argument includes a Graphics property representing the canvas on
which you can issue your drawing commands. Some controls also provide
separate DrawItem events that let
you draw specific portions of the control, such as distinct items in a
ListBox control. You can also draw
directly on the form’s surface. This recipe’s code includes samples
for all these activities.
Create a new Windows Forms application, and add two controls: a
Button control named XButton and a ComboBox control named ColorList. Change the ColorList control’s DrawMode property to OwnerDrawFixed and its DropDownStyle property to DropDownList. Then add the following source
code to the form’s code template:
Private Sub Form1_Load(ByVal sender As Object, _
ByVal e As System.EventArgs) Handles Me.Load
' ----- Add some basic colors to the color list.
ColorList.Items.Add("Red")
ColorList.Items.Add("Orange")
ColorList.Items.Add("Yellow")
ColorList.Items.Add("Green")
ColorList.Items.Add("Blue")
ColorList.Items.Add("Indigo")
ColorList.Items.Add("Violet")
End Sub
Private Sub Form1_Paint(ByVal sender As Object, _
ByVal e As System.Windows.Forms.PaintEventArgs) _
Handles Me.Paint
' ----- Draw an ellipse on the form.
e.Graphics.DrawEllipse(Pens.Black, 10, 10, _
Me.ClientRectangle.Width - 20, _
Me.ClientRectangle.Height - 20)
End Sub
Private Sub XButton_Paint(ByVal sender As Object, _
ByVal e As System.Windows.Forms.PaintEventArgs) _
Handles XButton.Paint
' ----- Draw a big x in a rectangle on the button surface.
Dim usePen As Pen
' ----- Provide a neutral background.
e.Graphics.Clear(SystemColors.Control)
' ----- Draw the outline box.
usePen = New Pen(SystemColors.ControlText, 3)
e.Graphics.DrawRectangle(usePen, XButton.ClientRectangle)
' ----- Draw the x.
e.Graphics.DrawLine(usePen, 0, 0, _
XButton.Width, XButton.Height)
e.Graphics.DrawLine(usePen, 0, _
XButton.Height, XButton.Width, 0)
usePen.Dispose( )
End Sub
Private Sub ColorList_DrawItem(ByVal sendesender As Object, _
ByVal e As System.Windows.Forms.DrawItemEventArgs) _
Handles ColorList.DrawItem
' ----- Draw the color instead of the text.
Dim useBrush As Brush
' ----- Check for a nonselected item.
If (e.Index = -1) Then Return
' ----- Set the neutral background.
e.DrawBackground( )
' ----- Fill in the color.
useBrush = New SolidBrush(Color.FromName(CStr( _
ColorList.Items(e.Index))))
e.Graphics.FillRectangle(useBrush, _
e.Bounds.Left + 2, e.Bounds.Top + 2, _
e.Bounds.Width - 4, e.Bounds.Height - 4)
useBrush.Dispose( )
' ----- Surround the color with a black rectangle.
e.Graphics.DrawRectangle(Pens.Black, _
e.Bounds.Left + 2, e.Bounds.Top + 2, _
e.Bounds.Width - 4, e.Bounds.Height - 4)
' ----- Show the item selected if needed.
e.DrawFocusRectangle( )
End Sub
Private Sub XButton_Click(ByVal sender As System.Object, _
ByVal e As System.EventArgs) Handles XButton.Click
MsgBox("Button clicked.")
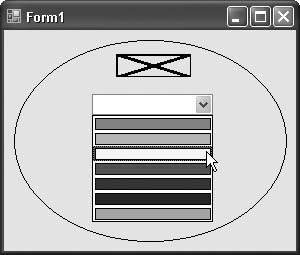
End SubRun the program. The XButton
control no longer looks like a button; it instead looks like a
custom-drawn “X.” Although the button looks strange, it still works.
The ellipse we drew directly on the form’s surface is there. Also, the
ComboBox control now displays
actual colors instead of just the names of colors. This all appears in
Figure 4-4.
Discussion
Some of the controls that support item-level drawing, such as
the ListBox and ComboBox controls, include an e.State property in the data passed to the
event handler. This value indicates the current state of the item
being drawn:selected, not selected, or a half dozen other relevant
states. You do not need to take that property into account if your
implementation doesn’t require it, but it is generally a good idea to
provide feedback to the user in a way the user expects. Adjusting the
display based on this property helps achieve that purpose.
As shown in the sample code, the DrawItem event handler includes e.DrawBackground() and e.DrawFocusRectangle() methods that help you
properly draw the item. Availability of these methods varies by
control type.
See Also
See the recipes in Chapter 9 for examples that use the various GDI+ drawing commands.
4.8. Making a Form the Top-Most Form
Problem
You want a specific form to appear on top of all other forms in your application, no matter which form is selected.
Solution
If you wish to have a Toolbox-type form that is accessible at
the same time as other forms but always remains on top, set the form’s
TopMost property to True.
4.9. Indicating the Accept and Cancel Buttons on a Form
Problem
On a form, you want to have the Enter key trigger a specific button (such as an “OK” button) and have the Escape key trigger another button (such as a “Cancel” button).
Solution
Use the form’s AcceptButton
and CancelButton properties to
assign the appropriate buttons. In the Visual Studio Form Designer,
setting these form properties to the names of buttons on the form will
enable the keyboard shortcuts for those buttons.
Discussion
Setting a button to be a form’s CancelButton object has the side effect of
changing that button’s DialogResult
property to Cancel.
Even if you set an accept button, the Enter key doesn’t always trigger it. For instance, if another button on the form has the focus, that button, and not the form’s accept button, is triggered when the user presses the Enter key.
4.10. Remembering a Form’s Position Between Uses
Problem
You would like the position of a form to be retained between exiting the application (or closing that form) and the next time you access that same form.
Solution
Sample code folder: Chapter 04\RememberFormPosition
Tie the form’s Location
property to a member of the My.Settings object. You do this using the
form’s application-setting property bindings.
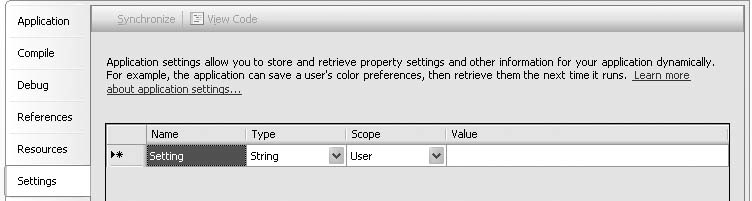
Create a new Windows Forms application. Access the Project Properties window through the Project → WindowsApplication1 Properties (or similar) menu command. Select the Settings tab in this window, as shown in Figure 4-5.
In the first row of the Settings grid, set the Name field to
MainFormLocation, and select
System.Drawing.Point in the Type
field (Figure 4-6).
Close the Project Properties window.

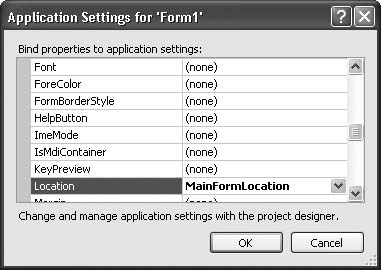
Back on Form1, expand its
(ApplicationSettings) property. One
of the subproperties should be Location. Change its value to MainFormLocation.
The program is ready to use. Run it, and move the form to a conspicuous location. Then exit the program. When you run the program again, the form will be where you moved it.
Discussion
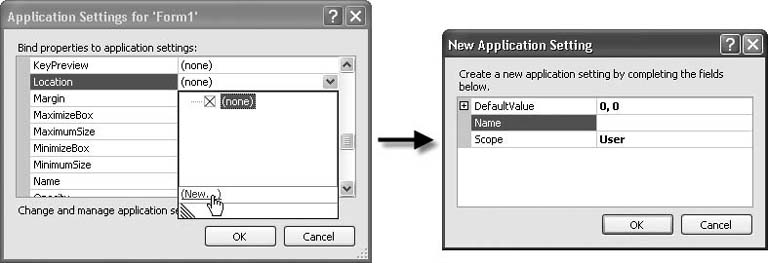
If, when you expand the (ApplicationSettings) property, you don’t
see the Location subproperty, use
the (PropertyBinding) subproperty
instead. Click on the “…” button in its value area to display the
“Application Settings for ‘Form1’” dialog. Locate the Location entry in the form’s settings list,
and set its value to MainFormLocation, as shown in Figure 4-7.
Any settings added to the Settings tab in the Project Properties
window appear as members of the My.Settings object. In this recipe’s case,
you get a new property of type System.Drawing.Point with the name My.Settings.MainFormLocation. You can access
this property as needed in your code.
Another way to add a control-linked setting is to skip the trip
to the Project Properties’ window’s Settings panel, and add the new
setting directly from the control’s list of properties. When you
select the (ApplicationSettings)
property for the form or control and bring up the Application Settings
dialog (Figure 4-7), if
you click the drop-down button in the second column for any property,
one of the choices that appears is “(new).” Clicking this link brings
up the New Application Setting dialog, where you can enter the name
and starting value of a new setting. The new property automatically
obtains the right data type for the linked field. Figure 4-8 shows this method
in action.
4.11. Attaching a Control to the Edge of a Form
Problem
You want a specific control, such as a toolbar, to always “stick” to one edge of the form, no matter how it is resized.
Solution
Use the control’s Dock
property to permanently affix the control to the selected side or
other “dock region.”
Discussion
Dock has six possible values:
NoneThe control performs no docking.
TopThe control attaches itself to the top of the form’s client area and fills the entire width of the client area, if the control supports such resizing.
BottomThe control attaches itself to the bottom of the form’s client area and fills the entire width of the client area, if the control supports such resizing.
LeftThe control attaches itself to the left edge of the form’s client area and fills the entire height of the client area, if the control supports such resizing.
RightThe control attaches itself to the right edge of the form’s client area and fills the entire height of the client area, if the control supports such resizing.
FillThe control fills the entire client area of the form, if the control supports such resizing.
If multiple controls have Dock settings other than None, they are attached to the form edges
according to their z-order settings, starting from the back-most
control. To alter the z-order of a control, right-click on the control
in the Form Designer and select either “Bring to Front” or “Send to
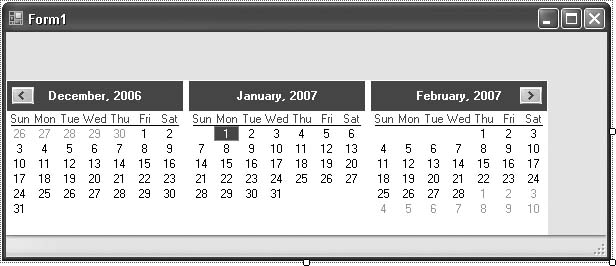
Back” from the shortcut menu. Figures 4-9 and 4-10 show a form with two
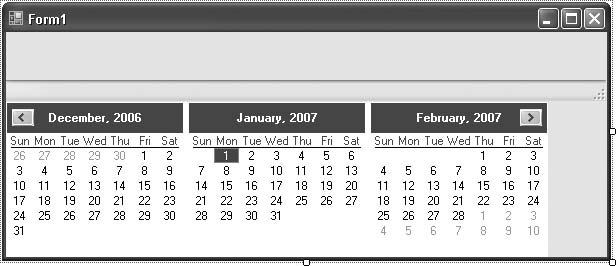
controls with different z-orders docked to its bottom edge: a MonthCalendar control (notice how it
automatically fills the width of the form by adding months) and a
StatusStrip control.
Some controls are designed to dock along a specific edge of the
form’s client area. The most obvious example is the StatusStrip control, shown in this recipe’s
figures, which is designed to dock along the bottom edge of the form.
Other controls, such as the CheckBox control, really aren’t designed for
docking. While you can still dock them, they may not look very
nice.
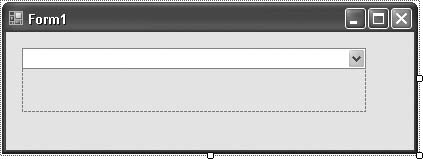
Docking also applies to panels and other containers that can
include subordinate controls. Figure 4-11 displays a
Panel control with an included
ComboBox control that is docked
along the top edge of the panel.
See Also
Recipe 4.12
discusses the Anchor property,
which can be used to attach a control to one, two, three, or four
sides of the form. The Dock and
Anchor properties cannot be used at
the same time on the same control. The last one you set on that
control is the one used.
4.12. Moving or Resizing Controls as a Form Resizes
Problem
You want a control to move or stretch in proportion to how the form is resized.
Solution
Use the control’s Anchor
property to attach it to one or more sides of the form.
Discussion
Setting the Anchor property
of a control tells that control to permanently maintain a consistent
distance relationship with one or more sides of the form or container.
You can anchor a control to any or all of the four sides of a form. By
default, controls are anchored to the left and top sides of the form.
This means that as the form resizes, the controls remain the same
distance from the form’s left and top edges (i.e., they do not appear
to move).
The available Anchor property
choices include Left, Top, Right,
and Bottom, and you can use them in
any combination. The following list shows the types of combinations
you can use with the Anchor
property:
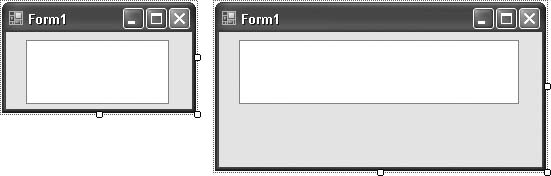
- Anchored to one side
As the form is resized, the center point of the control along the anchored edge is matched to a position on that form edge relative to the changing size of the form. The size of the control does not change. For instance, if a control is anchored to the top of a form and the form is made wider, the control moves to the right in proportion to the size of the form, as shown in Figure 4-12.
- Anchored to two adjacent sides
As the form is resized, the control maintains its distance from both anchor sides. In other words, it seems to be joined to the corner that is shared by the two anchor sides. By default, most controls anchor to the left and top sides of the form and do not appear to move when the right and bottom borders of the form are moved in a resize operation.
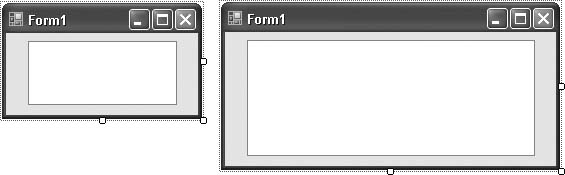
- Anchored to two opposite sides
The anchor sides of the control remain a fixed distance from the anchor borders. For instance, if a control is anchored on the left and right, the control grows by the same number of pixels as the form is widened (see Figure 4-13). When the unanchored direction is resized, the control is moved to keep the portion of space between the unanchored sides and the control the same, but the control is not resized in that direction.
- Anchored to three sides
The control resizes between the two anchor sides that are opposite to each other and remains the same distance from the single anchor border, as shown in Figure 4-14.
- Anchored to all four sides
The control is continually resized with the form. All its sides stay the same distance from all anchored form borders, as shown in Figure 4-15.


Anchoring also applies to panels and other containers that can include subordinate controls.
See Also
See Recipe 4.11
for details on the Dock property,
which you can use to attach a control to one side of a form’s client
area. The Dock and Anchor properties cannot be used at the same
time on the same control. The last one you set on that control is the
one used.
4.13. Limiting the Sizing of a Form
Problem
You want the user to be able to resize a form, but within limits.
Solution
Use the MinimumSize and
MaximumSize properties of the form
to limit the user’s adjustments of the form’s size. As with the
standard Size property, these two
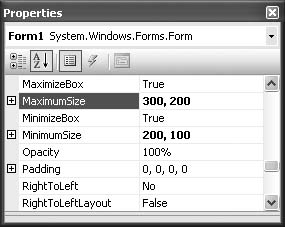
properties encapsulate separate width and height values. Figure 4-16 shows these
settings in use in the Properties panel.
Discussion
These properties do limit the size of the form, whether the user
is resizing the form directly or your code sets the Size property. You will usually want to set
the form’s FormBorderStyle property
to Sizable, and you must set the
MaximizeBox property to False (or in some other way hide the
maximize box, such as by setting the ControlBox property to False).
4.14. Centering a Form
Problem
You want a form to be in the center of the display when it first appears.
Solution
Set the form’s StartPosition
property to CenterScreen.
Discussion
That was easy, but there may be cases where you need to set this
property to Manual, but you still
want the form to appear centered sometimes. To
accomplish this, add the following code to the Load event handler for your form:
	Me.Location = New Point(( _
	   Screen.PrimaryScreen.Bounds.Width - Me.Width) / 2, _
	   (Screen.PrimaryScreen.Bounds.Height - Me.Height) / 2)
4.15. Creating and Moving a Borderless Form
Problem
You want to display a form without any of the typical window
border elements. Also, you want the user to be able to move the window
around by clicking and dragging a PictureBox control.
Solution
Sample code folder: Chapter 04\MoveBorderlessForm
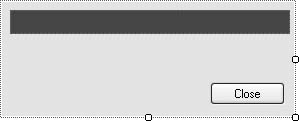
Turning off the border elements is easy: set the form’s FormBorderStyle property to None. Then you can manage the drawing of the
form elements yourself.
Creating a fake titlebar that moves the form is a little more
involved. Create a new Windows Forms application, and add two
controls: a Button control named
ActClose and a PictureBox control named DragBar. Change the button’s Text property to Close. Change the picture box’s BackColor property to ActiveCaption, one of the system colors.
Also, change the form’s FormBorderStyle property to None. The form should look something like
Figure 4-17.
Now, add the following source code to the form’s code template:
	Const HT_CAPTION As Integer = &H2
	Const WM_NCLBUTTONDOWN As Integer = &HA1

	Private Sub DragBar_MouseDown(ByVal sender As Object, _
	      ByVal e As System.Windows.Forms.MouseEventArgs) _
	      Handles DragBar.MouseDown
	  ' ----- When the user clicks the left mouse button, act
	  '       as if the user actually clicked on the form's
	  '       title bar.
	  If (e.Button = Windows.Forms.MouseButtons.Left) Then
	      ' ----- Don't hold on to the mouse locally.
	      DragBar.Capture = False

	      ' ----- Trick the form into thinking it received a
	      '       title click.
	      Me.WndProc(Message.Create(Me.Handle, WM_NCLBUTTONDOWN, _
	         CType(HT_CAPTION, IntPtr), IntPtr.Zero))
	  End If
	End Sub
	Private Sub ActClose_Click(ByVal sender As System.Object, _
	      ByVal e As System.EventArgs) Handles ActClose.Click
	   Me.Close( )
	End Sub
Run the program, and drag the colored picture box control to move the form around the display.
Discussion
All of the activity within a Windows form happens through
messages being processed through a Windows
procedure, or WndProc.
This method has existed since the introduction of Windows. The .NET
Framework put a bunch of pretty classes around the messy parts of this
messaging system, but it’s still there, and you can interact with it
to suit your needs.
Normally, when you left-click on a form window (or a control,
which is just a different type of window), a WM_LBUTTONDOWN message is passed to the
relevant Windows procedure. That message ultimately triggers a call to
one of your form’s MouseDown event
handlers.
Your application includes a “message pump” that makes calls to
each form’s WndProc procedure for
message processing. But there is nothing to stop you from calling that
procedure yourself. In fact, it’s exposed as a form class
member.
When the DragBar picture box
control receives the mouse down event, it says, “Hey, I’ll just send a
fake message to my window’s WndProc
routine so that it thinks the user clicked on the titlebar.” And
that’s what the code does. It sends a WM_NCLBUTTONDOWN message to the form. The
“NCL” part of that code means “Non-Client,” the area that contains the
titlebar and borders. The HT_CAPTION flag tells the message that the
click occurred in the caption area (the titlebar). This is all that’s
needed to trick the form.
4.16. Creating a Fading Form
Problem
You want a form to fade out and disappear.
Solution
Sample code folder: Chapter 04\FadingForm
Use the form’s Opacity
property to slowly fade it out. Create a new Windows Forms
application, and add a Button
control named ActClose to the form.
Change the button’s Text property
to Close. Then add the following
source code to the form’s code template:
	Private Sub ActClose_Click(ByVal sender As Object, _
	      ByVal e As System.EventArgs) Handles ActClose.Click
	   ' ----- Fade out the form.
	   Dim counter As Integer

	   For counter = 90 To 10 Step -20
	      Me.Opacity = counter / 100
	      Me.Refresh()
	      Threading.Thread.Sleep(50)
	   Next counter

	   Me.Close()
	End Sub
Run the program, and click on the Close button to see the form fade
away.
Discussion
You’ll find that on some systems, the form momentarily blinks to
black right when it makes the transition from an opacity of 1.0 to any
other opacity value. On such systems, setting the Opacity property to a non-1.0 value during
the Load event handler still causes
a blink, but it does so when the form first opens, not during the cool
fadeout.
	Private Sub AboutProgram_Load(ByVal sender As Object, _
	      ByVal e As System.EventArgs) Handles Me.Load
	   ' ----- Prepare the form for later fade-out.
	   Me.Opacity = 0.99
	End Sub
4.17. Creating a Nonrectangular Form
Problem
You want to display a form that is nonrectangular; that is, you want some of the form to be invisible.
Solution
Sample code folder: Chapter 04\PartialInvisibility
Use the form’s TransparencyKey property to identify a color
that will be invisible. The sample code in this recipe uses fuchsia
for its “invisible color,” but you can choose any color that meets
your display requirements.
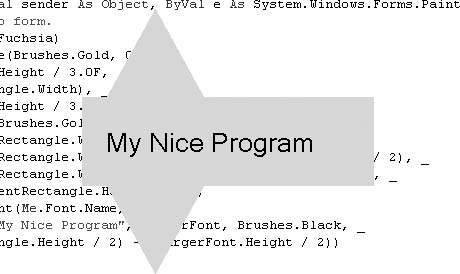
Create a new Windows Forms application. Change Form1’s FormBorderStyle property to None, its StartPosition property to CenterScreen, and its TransparencyKey property to Fuchsia. Then add the following source code
to the form’s code template:
	Private Sub Form1_Click(ByVal sender As Object, _
	      ByVal e As System.EventArgs) Handles Me.Click
	   ' ----- Any click closes the form.
	   Me.Close()
	End Sub

	Private Sub Form1_Paint(ByVal sender As Object, _
	      ByVal e As System.Windows.Forms.PaintEventArgs) _
	      Handles Me.Paint
	   ' ----- Draw a nice logo form.
	   e.Graphics.Clear(Color.Fuchsia)
	   e.Graphics.FillRectangle(Brushes.Gold, 0.0F, _
	      Me.ClientRectangle.Height / 3.0F, _
	      CSng(Me.ClientRectangle.Width), _
	      Me.ClientRectangle.Height / 3.0F)
	   e.Graphics.FillPolygon(Brushes.Gold, New PointF() { _
	      New Point(Me.ClientRectangle.Width / 4, 0), _
	      New Point(Me.ClientRectangle.Width / 2, _
	      Me.ClientRectangle.Height / 2), _
	      New Point(Me.ClientRectangle.Width / 4, _
	      Me.ClientRectangle.Height), _
	      New Point(0, Me.ClientRectangle.Height / 2)})
	   Dim largerFont = New Font(Me.Font.Name, 20)
	   e.Graphics.DrawString("My Nice Program", _
	      largerFont, Brushes.Black, 20, _
	      (Me.ClientRectangle.Height / 2) - _
	      (largerFont.Height / 2))
	   End Sub
When you run the program, it appears similar to the display in Figure 4-18. (We left the development environment behind the form so that you could see the invisibility.)
Discussion
The initial release of Visual Basic 2005 included a bug that prevented the transparency color from properly appearing as transparent in some cases. Specifically, if your form included an image that contained the transparency color, and the workstation was using more than 24 bits of color for its display, the image appeared as opaque. To get around this problem, you need to set transparency on the image manually before you draw it:
	Private Sub Form1_Paint(ByVal sender As Object, _
	      ByVal e As System.Windows.Forms.PaintEventArgs) _
	      Handles Me.Paint
	    ' ----- This code assumes that the form's
	    '       TransparencyKey property is "Fuchsia".
	    Dim logoImage As Bitmap = Bitmap.FromFile( _
	       "C:\MyLogo.bmp")
	    logoImage.MakeTransparent(Color.Fuchsia)
	    e.Graphics.DrawImage(logoImage, 0, 0)
	End Sub
The Microsoft Knowledge Base number for this article is 822495.
See Also
Recipe 9.10
discusses invisibility colors and the TransparencyKey property in more
detail.
4.18. Changing Menus at Runtime
Problem
You want to customize the menu structure in your main form at runtime. The structure should be based on settings made available by some user-configurable method.
Solution
Sample code folder: Chapter 04\RuntimeMenus
The menu-specific classes included in the Windows Forms library can be created at either design time or runtime. This recipe’s code adds a basic menu to a form at design time and enhances it at runtime by adding the user’s Internet Explorer “Favorites” to one of the menus.
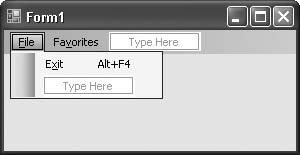
Create a new Windows Forms application, and add a MenuStrip control named MainMenu to the form. Perform the following
actions on this menu:
Add a top-level menu named
MenuFile, using&Filefor itsTextproperty.Add a top-level menu named
MenuFavorites, usingFa&voritesfor itsTextproperty.Add a menu item named
MenuExitProgramthat is subordinate toMenuFile, usingE&xitfor itsTextproperty. Set itsShortcutKeysproperty toAlt+F4.Add a menu item named
MenuNoFavoritesthat is subordinate toMenuFavorites, using(empty)for its Text property. Set itsEnabledproperty toFalse.
Figure 4-19 shows a partial look at this form’s menu structure in design mode.
Next, replace the form’s code template with the following code. I’ve highlighted the lines that do the actual adding of menu items:
Imports MVB = Microsoft.VisualBasic Public Class Form1 Private Declare Auto Function GetPrivateProfileString _ Lib "kernel32" _ (ByVal AppName As String, _ ByVal KeyName As String, _ ByVal DefaultValue As String, _ ByVal ReturnedString As System.Text.StringBuilder, _ ByVal BufferSize As Integer, _ ByVal FileName As String) As Integer Private Sub MenuExitProgram_Click( _ ByVal sender As System.Object, _ ByVal e As System.EventArgs) _ Handles MenuExitProgram.Click ' ----- Exit the program. Me.Close() End Sub Private Sub Form1_Load(ByVal sender As Object, _ ByVal e As System.EventArgs) Handles Me.Load ' ----- Scan through the user's "Favorites" and ' add them as menu items. Dim favoritesPath As String ' ----- Determine the location of the "Favorites" ' folder. favoritesPath = Environment.GetFolderPath( _ Environment.SpecialFolder.Favorites) If (favoritesPath = "") Then Return If (My.Computer.FileSystem.DirectoryExists( _ favoritesPath) = False) Then Return ' ----- Call the recursive routine that builds the menu. BuildFavorites(MenuFavorites, favoritesPath) ' ----- If favorites were added, hide the ' "no favorites" item. If (MenuFavorites.DropDownItems.Count > 1) Then _ MenuNoFavorites.Visible = False End Sub Private Sub BuildFavorites(ByVal whichMenu As _ ToolStripMenuItem, ByVal fromPath As String) ' ----- Given a starting directory, add all files ' and directories in it to the specified menu. ' Recurse for suborindate directories. Dim oneEntry As String Dim menuEntry As ToolStripMenuItem Dim linkPath As String Dim displayName As String ' ----- Start with any directories. For Each oneEntry In My.Computer.FileSystem. _ GetDirectories(fromPath) ' ----- Create the parent menu, but don't ' attach it yet.menuEntry = New ToolStripMenuItem( _My.Computer.FileSystem.GetName(oneEntry))' ----- Recurse to build the sub-directory branch. BuildFavorites(menuEntry, oneEntry) ' ----- If that folder contained items, ' then attach it.If (menuEntry.DropDownItems.Count > 0) Then _whichMenu.DropDownItems.Add(menuEntry)Next oneEntry ' ---- Next, build the actual file links. Only ' look at ".url" files. For Each oneEntry In My.Computer.FileSystem. _ GetFiles(fromPath, FileIO.SearchOption. _ SearchTopLevelOnly, "*.url") ' ----- Build a link based on this file. These ' files are old-style INI files. linkPath = GetINIEntry("InternetShortcut", _ "URL", oneEntry) If (linkPath <> "") Then ' ----- Found the link. Add it to the menu. displayName = My.Computer.FileSystem. _ GetName(oneEntry) displayName = MVB.Left(displayName, _ displayName.Length - 4)menuEntry = New ToolStripMenuItem(displayName)menuEntry.Tag = linkPathwhichMenu.DropDownItems.Add(menuEntry)' ----- Connect this entry to the event handler. AddHandler menuEntry.Click, _ AddressOf RunFavoritesLink End If Next oneEntry End Sub Private Sub RunFavoritesLink( _ ByVal sender As System.Object, _ ByVal e As System.EventArgs) ' ----- Run the link. Dim whichMenu As ToolStripMenuItem whichMenu = CType(sender, ToolStripMenuItem) Process.Start(whichMenu.Tag) End Sub Private Function GetINIEntry(ByVal sectionName As String, _ ByVal keyName As String, _ ByVal whichFile As String) As String ' ----- Extract a value from an INI-style file. Dim resultLength As Integer Dim targetBuffer As New System.Text.StringBuilder(500) resultLength = GetPrivateProfileString(sectionName, _ keyName, "", targetBuffer, targetBuffer.Capacity, _ whichFile) Return targetBuffer.ToString() End Function End Class
Run the program, and access its Favorites menu to browse and open the current user’s Internet Explorer favorites.
Discussion
The bulk of this recipe’s code deals with scanning through a directory structure and examining each file and subdirectory. Most of the files in the “Favorites” folder have a .url extension and contain data in an “INI file” format.
Here’s a sample link to a popular search engine:
	[DEFAULT]
	BASEURL=http://www.google.com/
	[InternetShortcut]
	URL=http://www.google.com/
The last “URL=” line provides the link we need to enable favorites support in our program.
The important part of the program is the building of the menu
structure. Each menu item attached to the form’s main menu MenuStrip control is a related ToolStripMenuItem class instance. These can
be attached to the menu at any time through its DropDownItems collection. Each menu item in
turn has its own DropDownItems
collection that manages subordinate menu items.
To make each new menu item do something, as you add them,
connect them to the previously written RunFavoritesLink method:
AddHandler menuEntry.Click, AddressOf RunFavoritesLink
4.19. Creating Shortcut Menus
Problem
You want to display a custom shortcut menu to users when they right-click on a form or one of its controls.
Solution
Sample code folder: Chapter 04\ShortcutMenus
Use the ContextMenuStrip
control to design a shortcut menu (also called a
context or pop-up menu) that
you can attach to the controls (or form) of your choice.
Create a new Windows Forms application, and add a ContextMenuStrip control named MainShortcutMenu to the form. When you
select that control, it adds a temporary standard menu to the control
that you can use to add new menu items (see Figure 4-20).
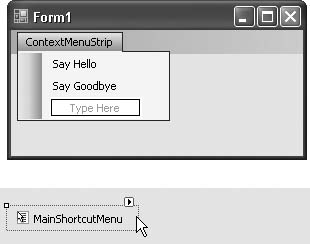
Add two menu items to this shortcut menu:
A menu item named
MenuHello, usingSay Hellofor itsTextpropertyA menu item named
MenuGoodbye, usingSay Goodbyefor itsTextproperty
Select the form itself, and then change its ContextMenuStrip property to MainShortcutMenu.
Now, add the following source code to the form’s code template:
Private Sub MenuHello_Click(ByVal sender As System.Object, _
ByVal e As System.EventArgs) Handles MenuHello.Click
MsgBox("Hello")
End Sub
Private Sub MenuGoodbye_Click(ByVal sender As System.Object, _
ByVal e As System.EventArgs) Handles MenuGoodbye.Click
MsgBox("Goodbye")
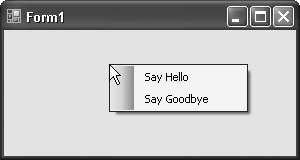
End SubRun the program, and right-click on the form. The shortcut menu will present itself, as shown in Figure 4-21. Clicking on the items puts up a message box saying “Hello” or “Goodbye.”
Discussion
Each form and control includes a ContextMenuStrip property that you can
assign to any ContextMenuStrip
control included with your form. You can create as many shortcut menus
as needed for your controls.
Some controls, such as the TextBox control, already include default
shortcut menus. If you wish to enhance one of these menus, you will
have to design your own menu from scratch and provide your own
implementations for menu items previously found in that control’s
shortcut menu.
Get Visual Basic 2005 Cookbook now with the O’Reilly learning platform.
O’Reilly members experience books, live events, courses curated by job role, and more from O’Reilly and nearly 200 top publishers.

