Chapter 1. VMware Infrastructure Installation
Before we can begin serving the main recipes of our cookbook, we have to make sure that all of our readers understand the terms we’ll use in the rest of the book, and that you have all the necessary components installed. This book aims to be useful for both new and seasoned VMware ESX users. Because of the nature of this cookbook, we will assume from time to time that you have advanced knowledge and understanding of how the products work.
Virtualization provides a way for multiple operating systems to be installed on the same physical hardware. By using virtual technology, we can consolidate hardware and instantly build quality assurance and test environments. This is a tremendous breakthrough, as it allows underutilized equipment to do more than sit around idle, as well as allowing developers and administrators to test and use multiple software configurations and packages that require different operating systems on the same piece of equipment, without having to purchase, set up, and maintain multiple computers. This savings makes the accounting department and managers happy and gives the technology lovers an opportunity to do all the things they want or need to do at the same time.
A typical IT scenario goes something like this: you have lots of servers in your rack or collection of racks. Most of them only run at about 10–15% of their capacity the majority of the time, but you let that happen because you want to keep their various functions and operating systems isolated from one another. This provides some security, both because if one server is compromised it does not necessarily mean that access has been granted to others, and because a problem with one piece of software will not cause other parts of your IT infrastructure to go down as you deal with it.
Virtualization helps you make better use of those physical resources, without compromising the original intent of keeping services isolated. Instead of installing your operating system directly on your hardware, you instead begin with a virtualization layer: a stripped-down OS designed to schedule access to network, disk, memory, and CPU resources for guest OSs, the same way that those guest OSs control that scheduling for their applications. Most virtualization platforms limit themselves to specific hardware and present a specific set of virtual components to the operating systems installed on top of them. This provides a very stable and consistent presentation to the operating systems you install and allows them to be moved much more easily.
Once you’ve installed and configured the virtualization layer, you can partition the physical hardware and assign it to discrete operating system instances that you install on top of the virtualization layer. These virtual installations operate exactly as they would normally. They are not aware of the presence of other virtual installations that exist on the same hardware. Each acts as if it is installed on a predefined piece of equipment by itself, with the virtualization layer controlling what the virtual installation sees and how it interacts with other equipment outside its control. Basically, the virtual installation looks, feels, acts, and is administered exactly the same as a standard installation from the inside, but may be manipulated and configured easily and alongside others from the outside.
Here is the coolest part: virtualization, as provided by sophisticated systems like VMware, also allows you to pool the resources of several physical machines and then divide them up however you want or need. If you have 10 physical servers, each with four processors, 4GB of RAM, and an 80GB hard drive, you can segment those resources to provide a small and low-powered server for your in-house email, a powerful and high-memory processor for the number crunchers in accounting, multiple load-balanced servers for your web server, a separate server for your database, and so on, each with a configuration of memory, disk space, processor power, and so on specific for its needs. Then, if you discover that one virtual server has more resources than it really needs and another doesn’t have enough, you can change the configuration quickly, easily, and without taking your servers offline! You can take a physical server offline for maintenance without losing access to any of your virtual servers and their functions. You can move resources in and out and around your pool as needed, and even automatically. These are the sorts of things we will discuss in this book.
There are many companies that provide powerful and stable virtualization platforms, but we have found VMware’s offerings to be wonderfully stable, flexible, easy to set up and maintain, and well supported. We like VMware. If you are reading this book, you probably do, too, but chances are you want to make better use of its potential than you are doing now—either that, or you have been asked to set it up or maintain it and you are wondering how to get started. Whatever your reason, if you use VMware at all, we hope you will find this book useful and practical.
1.1. What Is VMware Infrastructure 3?
VMware, Inc., is a company headquartered in Palo Alto, California, with over 7,500 employees and about 120,000 customers, including 100% of the Fortune 100. In 2007, it had revenues of over $1.33 billion. VMware is a rapidly growing company that began in 1998 and now has over 20,000 partnerships with companies ranging from somewhat small to extremely large.
VMware Infrastructure 3 (VI3) is easily the most widely used virtualization platform today. It is well tested and has been used in applications ranging from very small, localized installations with just a handful of servers to exceptionally large server farms in major corporations. It is robust, scalable, easy to administer, and flexible. It is also small and fast, which means the virtual installations running on top of it have more processor power and other resources available to them than they would if they were using some of the more resource-heavy virtualization software available.
Unlike some of the other hosted virtualization products you may be familiar with, including the company’s well-known VMware Server, VMware Infrastructure 3 does not require any other operating system. Most virtualization platforms begin with a Linux/Unix, Mac OS X, or Windows platform; install their product on top of it; and then begin segmenting the resources from there. This is how a developer may run a copy of Windows on top of her laptop’s base installation of Linux, perhaps using a product like VMware Server, Xen, or VirtualBox. VI3 is designed to be installed on bare metal, as the base operating system. This design choice eliminates a layer of software between the virtual installations and the hardware and results in faster, smoother performance.
The platform is composed of several major products, including ESX, ESXi, vCenter Server, and vCenter Converter. VMware recently changed the names of its VirtualCenter Server (now vCenter Server) and VMware Infrastructure client (now vCenter client); however, the products themselves haven’t been changed to reflect the new names. We will use the new terminology within the book and reference the versions when appropriate. The remainder of this chapter will introduce these key pieces of technology within the virtualization environment.
1.2. What Is VMware vSphere 4.0?
In June 2009 VMware launched ESX 4.0, which now falls under the vSphere 4.0 suite of products. vSphere 4.0 encapsulates both vCenter and ESX 4.0, along with other products that we don’t discuss in this book. This new release not only brings incremental improvements but takes the virtualization platform to a whole new level by letting you think in terms of complete installations or deployments instead of managing your site server by server. Throughout the book we’ll lightly reference ESX 4.0 in relevant chapters to explain the differences between versions 3.x and 4.x. However, it’s worth mentioning that ESX 4.0 is a completely new product:
ESX4 is 64-bit, as compared to the 32-bit versions of ESX 3.x.
ESX4 supports more hardware and more virtual machines.
The new version sets the bar for commercial virtualization products even higher, with new features such as fault tolerance, vShield, distributed switches, and much more.
For a complete list of new features, please visit the following website:
| http://vmware.com/support/vsphere4/doc/vsp_40_new_feat.html |
Here are 10 features we feel are worth highlighting:
- vCenter server linked mode
This mode allows you to connect multiple vCenter servers in a “linked” fashion. Doing this allows them to share licenses and roles and provides them with an “overview” of the entire virtual environment.
- Host profiles
Host profiles are provided in Enterprise Plus to make it easy to push a template of an already existing ESX host to a new server. This feature is a huge benefit, as it means you no longer need to manually configure networks, storage, and so on in your new ESX Servers.
- Performance, graphs, and events
CPU, memory, storage, and networking graphs are now displayed on one central page. In additional to improved graphs, customers will benefit from improved event messages, alarm settings, and error reporting.
- Storage VMotion within vCenter
You can initiate a storage VMotion within the vCenter client. This takes away the need for the command-line management or third-party plug-ins that were popular with the ESX 3.x versions.
- Enhanced VMotion
Enhanced VMotion Compatibility (EVC) allows customers to initiate VMotion between Intel FlexMigration and AMD-V Extended Migration technologies. In essence, this means you can now move a running server between hosts using different CPU technologies.
- Virtual machine hot add support
You can add CPU and memory resources to an existing virtual machine without having to reboot.
- Virtual machine hardware improvements
Virtual machines can now scale up to eight virtual SMP processors and up to 255GB of RAM. vSphere supports IDE devices, Serial Attached SCSI (SAS), and VMXNET Generation 3 network support.
- Physical node improvements
Physical hosts can now have up to 1TB of memory, 64 logical CPUs, and 320 virtual machines. The 64-bit architecture of ESX4 allows greater memory capacity, better performance, and seamless hardware support compared to previous releases.
- Storage improvements
ESX 4.0 brings a huge set of improvements to the realm of storage within ESX. Thin provisioning for virtual disks enables virtual machines to utilize storage on an as-needed basis, eliminating a major source of wasted space on a storage area network (SAN). The VMFS Volume Grow feature allows you to dynamically grow a Virtual Machine File System without interrupting the running virtual machines. There is also enhanced support for NFS and iSCSI software initiators, which now supply support for jumbo frames on 1GB or 10GB local networks.
- Distributed switch
A distributed switch is provided on Enterprise Plus to let customers create a virtual switch for all their ESX hosts to connect to and utilize. This helps reduce network maintenance and allows virtual machines to be moved to any host using VMotion without having to worry about network connections.
As we mentioned earlier, this is only a small subset of the new features available in vSphere 4.0.
1.3. VMware ESX 3.x/4.x Configuration Maximums
VMware’s vSphere (ESX 4.x) and Virtual Infrastructure (ESX 3.x) products have limits within which they can operate. We feel it is important to include this information so that you have it at your disposal prior to installing ESX/ESXi 3.x/4.x or vCenter. These values can be crucial when planning your virtual environment, and we suggest you read through them to become familiar with the different maximums. We’ve tried to include all relevant, publicly provided values from VMware in Tables 1-1 through 1-16, but you may notice a “-” when we could not find a matching reference between the two versions of ESX.
Value/item | Maximum | |
ESX 3.5 | ESX 4.0 | |
4 | 8 | |
SCSI adapters per virtual machine | 4 | 4 |
Devices per SCSI adapter | 15 | 15 |
SCSI targets per virtual machine | 60 | 60 |
SCSI disk size | 2TB | 2TB |
Size of RAM per virtual machine | 64GB | 255GB |
Virtual machine swap file size | 64GB | 255GB |
Number of NICs per virtual machine | 4 | 10 |
Number of IDE devices per virtual machine | 4 | 4 |
Number of IDE controllers per virtual machine | 1 | 1 |
Number of floppy devices per virtual machine | 2 | 2 |
Number of parallel ports per virtual machine | 3 | 3 |
Number of serial ports per virtual machine | 4 | 4 |
Number of remote consoles to a virtual machine | 10 | 40 |
VMDirectPath PCI/PCIe devices per virtual machine | - | 2 |
VMDirectPath SCSI targets per virtual machine | - | 60 |
Value/item | Maximum | |
| ESX 3.5 | ESX 4.0 | |
8MB | 8MB | |
Max I/O size (before splits) | 32MB | 32MB |
Raw device mapping size | 2TB | 2TB |
Recommended number of hosts that can share a VMFS volume while running virtual machines against that volume | 32 | 64 |
Number of hosts per cluster | 32 | 32 |
Number of VMFS volumes configured per server | 256 | 256 |
Number of extents per VMFS volume | 32 | 32 |
Number of HBAs (host bus adapters of any type) | 16 | 8 |
Number of targets per HBA (iSCSI HBA) | 15 (64) | 256 |
VMFS2 file stores are not supported in ESX4.0, but are fully supported in ESX 3.0–ESX 3.5. Please refer to the ESX 4 documentation on converting your VMFS2 datastore if you are upgrading your ESX software to the latest version.
| Value/item | Maximum | |
| ESX 3.5 | ESX 4.0 | |
Extent size | 2TB (100MB min) | 2TB |
64TB | 64TB | |
File size (block size = 1MB) | 456GB | 456GB |
File size (block size = 8MB) | 3.5TB | 2TB |
File size (block size = 64MB) | 28.5TB | 27TB |
File size (block size = 256MB) | 64TB | 64TB |
Files per volume | 256+(64 × number of additional extents) | 256+(64 × number of additional extents) |
Value/item | Maximum | |
ESX 3.5 | ESX 4.0 | |
Extent size | 2TB | |
64TB (2TB × 32 extents) | 64TB | |
Volume size (block size = 1MB) | ~50TB | - |
Volume size (block size = 2MB) | 64TB | - |
Volume size (block size = 4MB) | 64TB | - |
Volume size (block size = 8MB) | 64TB | - |
File size (block size = 1MB) | 256GB | 256GB |
File size (block size = 2MB) | 512GB | 512GB |
File size (block size = 4MB) | 1TB | 1TB |
File size (block size = 8MB) | 2TB | 2TB |
Files per directory | ~30,000 | ~30,000 |
Directories per volume | ~30,000 | ~30,000 |
Files per volume | ~30,000 | ~30,000 |
Value/Item | Maximum | |
ESX 3.5 | ESX 4.0 | |
26 | - | |
Physical e1000 NICs (PCI-x) | 32 | 32 |
Physical e1000 NICs (PCI-e) | 32 | 32 |
Physical Broadcom NICs | 20 | - |
igb 1GB Ethernet ports (Intel) | - | 16 |
tg3 1GB Ethernet ports (Broadcom) | - | 32 |
bnx2 1GB Ethernet ports (Broadcom) | - | 16 |
Forcedeth 1GB Ethernet ports (NVIDIA) | - | 2 |
Scio 10GB Ethernet ports (Neterion) | - | 4 |
nx_nic 10GB Ethernet ports (Net-XEN) | - | 4 |
ixgbe Oplin 10GB Ethernet ports (Intel) | - | 4 |
bnx2x 10GB Ethernet ports (Broadcom) | - | 4 |
Number of PCI VMDirectPath devices per host | - | 8 |
Number of port groups per standard switch | 512 | 512 |
Number of NICs in a team | 32 | - |
Number of Ethernet ports | 32 | - |
Number of virtual NICs per virtual switch | 1,016 | - |
Number of virtual switches per host | 127 | 248 |
Number of port groups (VLANs) | 4,096 | 4,096 |
Value/Item | Maximum | |
ESX 3.5 | ESX 4.0 | |
2,000 | 2,000 | |
Hosts per vCenter server (32-bit) | 200 | 200 |
Registered virtual machines (32-bit) | - | 3,000 |
Hosts per vCenter server (64-bit) | - | 300 |
Number of virtual machines powered on (64-bit) | - | 3,000 |
Registered virtual machines (64-bit) | - | 4,500 |
Linked vCenter servers | - | 10 |
Hosts in linked-mode environment | - | 1,000 |
Powered-on virtual machines in linked mode | - | 10,000 |
Registered virtual machines in linked mode | - | 15,000 |
Concurrent vSphere client connections (32-bit) | 20 | 15 |
Concurrent vSphere client connections (64-bit) | - | 30 |
50 | 100 | |
1.4. VMware ESX 3.x Server Overview
VMware ESX Server is the foundation for every other piece of the virtualization package. It is the hypervisor, or main software layer that installs on the bare metal and allows everything above it to communicate with the hardware, to allow virtualization. When you install VMware ESX Server, you are actually installing two main components: the VMkernel and the Service Console.
The VMkernel is the base on which all other software in the package is built: the operating system. For those familiar with Linux, this would be the equivalent of (and is built from) the Linux kernel, without any other software.
The Service Console (or COS) is an alternative means of communicating with and configuring the VMkernel using standard Linux and VMware-specific commands to modify and adjust parameters. Typically, management will be done via the vCenter client; however, there may be cases where you find you can accomplish things more easily with the command line or need to use it because you can’t access vCenter.
VMware has designed ESX Server to run only on specific pieces of hardware and has removed support for any kinds of devices it is not interested in, thereby reducing the kernel code. What remains is a stripped-down, fast kernel and tool package with little to no extra overhead. This is one of the things that gives VMware an advantage over other virtualization technologies that require installation on top of a standard operating system, which will be filled with drivers and features you won’t need.
It’s important to verify the hardware on which you will be running your virtualized environment, as VMware doesn’t directly support smaller desktop-related hardware. However, everything that a server needs is well supported. This is a sleek operating system designed to put as little as possible between the virtual machines and the hardware.
1.5. VMware ESX 3.x Installation
Installation of ESX 3.5 is pretty straightforward if you are familiar with installing Linux, and especially Red Hat, as VMware has taken Red Hat’s default installer and made a few modifications.
ESX 4.0 and ESXi 4.0 can now be installed and virtualized within VMware Workstation and VMware Fusion. This allows you to install, test, and get a feel for the product before implementing it on physical hardware.
Before you get started installing ESX, you should verify that your hardware is fully compatible by visiting the following URL—you will notice that ESX 3.5 has a wider range of hardware support than its newer relative, ESXi:
| http://www.vmware.com/resources/compatibility/search.php?action=base&deviceCategory=server |
The ESXi ISO image is available for download at http://www.vmware.com/download/vi/.
ESX Server has the following hardware requirements (refer to Tables 1-1 through 1-16, shown previously, for configuration maximums):
At least two processors chosen from among the 1500MHz Intel Xeon and later, AMD Opteron (32-bit), 1500MHz Intel ViiV, or AMD A64 X2 dual-core processors (be sure to check the latest specs to confirm)
1GB RAM minimum
One or more Ethernet controllers (we recommend a minimum of four ports for the Service Console, VMkernel, Virtual Machine Network, etc.)
Direct attached storage (DAS) or network attached storage (NAS)
Warning
To avoid possible data loss make sure to remove any attached storage, such as Fibre Channel, DAS, or iSCSI disks, before the initial installation of ESX.
The installer has a couple of modes:
- Graphical mode
The recommended method for installation. It uses a mouse and a graphical interface to guide you through the installation. This is the method we will be using for our installation as we continue in this section.
- Text mode
A text-only mode for installing ESX; this option is normally used when you have mouse or video problems in the graphical installer.
To begin the installation, make sure your server is set to boot off the CD-ROM. This can be accomplished by changing the settings in your server’s BIOS. Next, follow these steps:
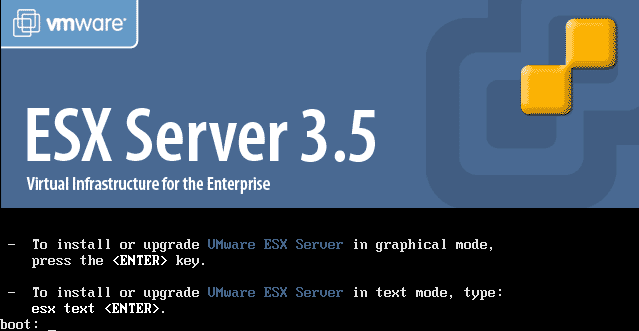
Upon booting from the CD-ROM, you will be presented with a screen that allows you to choose your installation method. Pressing the Enter key accepts the default graphical installer. By typing
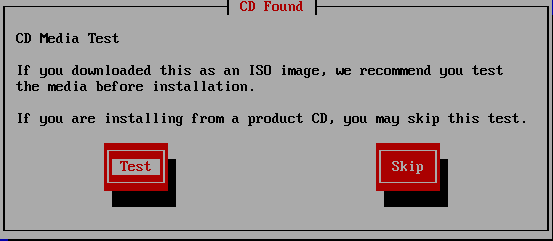
esx text, you can invoke the text-mode installer (Figure 1-1).The installer will begin to load, displaying another screen that will allow you to test the CD-ROM media for errors. If you want to test the media, use the Tab key to highlight the Test button; otherwise, select the Skip button to continue the installation (Figure 1-2).
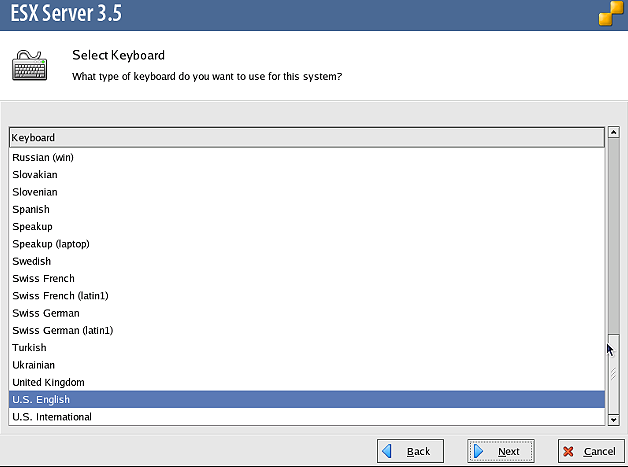
A welcome screen will be presented. Click the Next button to proceed to the keyboard configuration (Figure 1-3), where you will select the default keyboard layout. Click Next to continue.
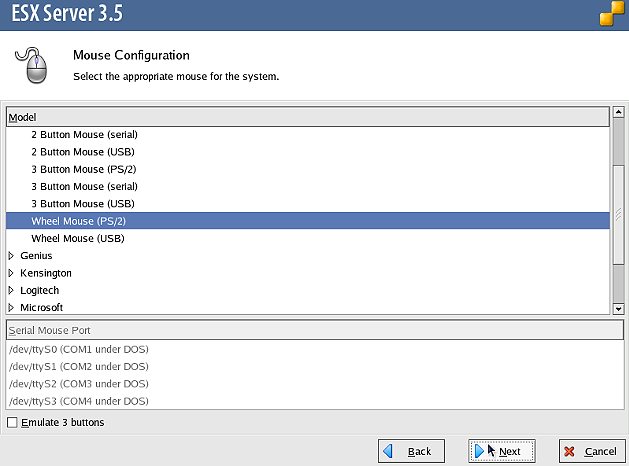
The mouse configuration menu now appears, allowing you to select the mouse type for your ESX Server (Figure 1-4). Accepting the default here is OK because the mouse will not be used at any point after the initial installation. Proceed by clicking the Next button.
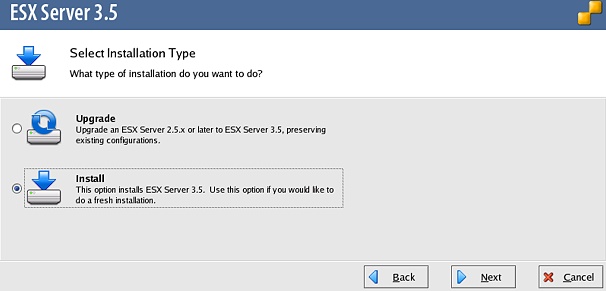
The installer will begin to search for already installed versions of ESX (Figure 1-5). If one is found, you will be given the following options:
- Upgrade
This option can be used for upgrading an existing ESX Server; however, it’s not recommended. Using Update Manager inside vCenter, as discussed in Chapter 5, is a much safer method.
- Install
This will install a clean version of ESX and erase any existing installations, including all configuration settings and data.
If this is the first time the disk has been used, the installer will also give you a warning to initialize an empty disk.
The ESX license agreement will appear. Read the license agreement, select “I accept the terms of this license agreement,” and click Next.
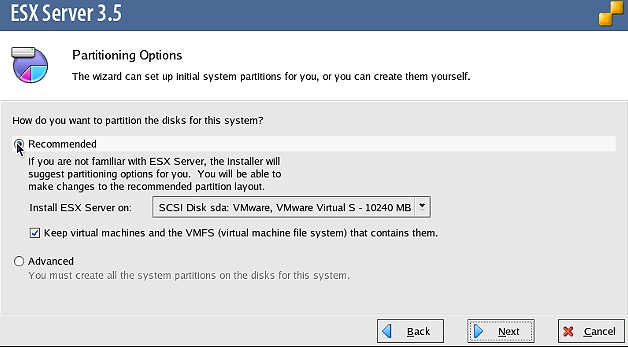
The partition options screen (Figure 1-6) will appear, allowing you to configure the ESX Server’s partitions.
You have two options here:
- Recommended
Configures the default ESX partitions based on the hard drive size. This is the recommended method, unless you specifically need to set your partitions for a more customized install.
- Advanced
Allows you to specify all the partition settings and sizes based on your hard drive size (Table 1-17).
Note
The values in Table 1-17 are general best practices, and you may adjust them higher than the listed values if you have more space available.
Choose the disk on which ESX will be installed, and leave the “Keep virtual machines and the VMFS (virtual machine file system) that contains them” button checked. This is primarily used when installing on top of another ESX installation, to preserve any existing virtual machines and their data. Click the Next button to see the finalized disk partition configuration, then click the Next button to continue.
Warning
To avoid possible data loss make sure to remove any attached storage, such as Fibre Channel, DAS, or iSCSI disks, before the initial installation of ESX.
Mount point | Type | Size | Notes |
Swap | Swap | 544MB | Allows the service console to use disk-based memory when the physical memory isn’t available. |
/boot | ext3 | 100MB | Holds the ESX Server’s kernel bootloader images. In ESX 3.x, the bootloader is GRUB. |
/ | ext3 | 10GB[a] | Holds the operating system, configuration files, and third-party applications. |
/var | ext3 | 2GB[b] | Storage for logfiles. |
None | vmkcore | 100MB | Holds the dump files for the VMkernel and is required for support. |
/vmfs | vmfs | Holds virtual machine vdmk files.[c] | |
[a] The / partition should not be smaller than 5GB. To be on the safe side, we recommend setting this value to 10GB. [b] The /var partition should not be set lower than 500MB, although we think a safer setting would be 2GB. [c] The /vmfs partition doesn’t need to be configured on a local disk, unless you do not have any SAN attached storage. However, it is often convenient to have a local /vmfs file store for testing, generally a local /vmfs partition will use the remainder of space on the local drive. | |||
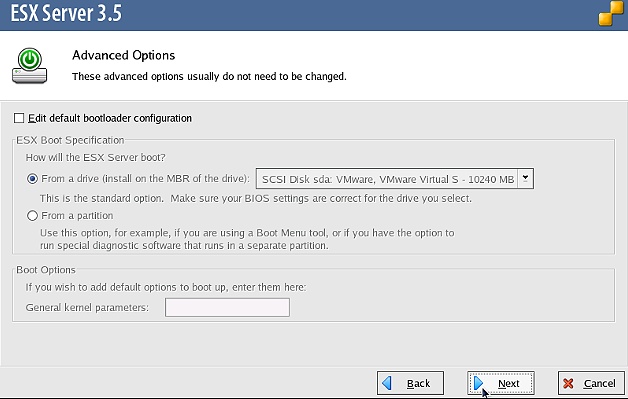
The bootloader window (Figure 1-7) will load, giving you options for how the ESX Server will boot. There are three options here:
- From a drive (install on the MBR of the drive)
The first disk will be selected. If you change this, it’s important that you select the first disk listed in the BIOS. Checked by default, this is the option that will be used on most ESX installations.
- From a partition
This option will be used for legacy installations where the BIOS is stored on the master boot record.
- Boot Options
Allows you to enter specific kernel parameters to be loaded on reboot of the ESX Server.
As mentioned previously, we recommend using the default selections for the bootloader configuration. As a side note, if you decide you need to use the Back or Next buttons during the installation, ensure that the default selection stays checked. Click the Next button to continue.
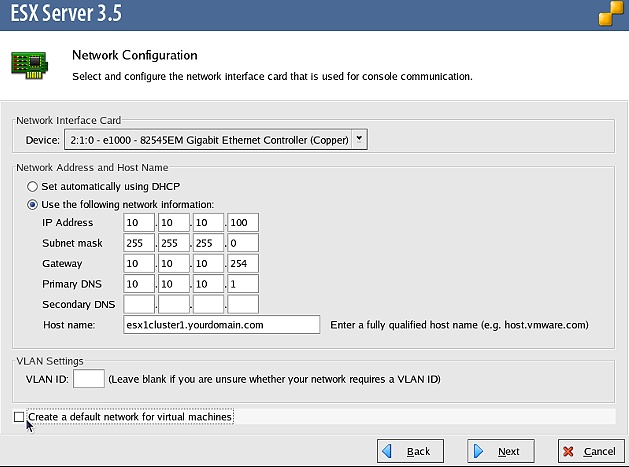
The network configuration section of the installation (Figure 1-8) allows you to specify the network and address type that will be used on the ESX Server. This screen is broken up into four different sections:
- Network Interface Card
The network interface that your ESX Server’s management network will use. We like to use the first interface on the server or add-on card, mainly because when you are managing a large number of physical hosts it is easier to remember which interface is being used on each one.
- Network Address and Host name
You have the option to use DHCP for your ESX Server, but this is not recommended. By default, you will be asked for a static IP address. Fill in the rest of the network fields as necessary.
- VLAN Settings
This allows you to specify whether your ESX Server will be on a specific VLAN. If you are unsure, ask your network team for this information.
- “Create a default network for virtual machines”
This option is enabled by default. You must uncheck it because your virtual machines will be placed on the same network as your service console/management network.
After entering the appropriate network information, click the Next button to continue.
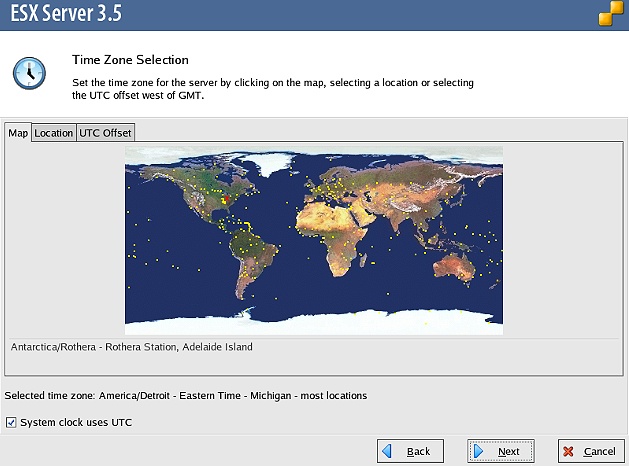
From the next screen (Figure 1-9), select the time zone in which your ESX Server is located. Continue by pressing the Next button.
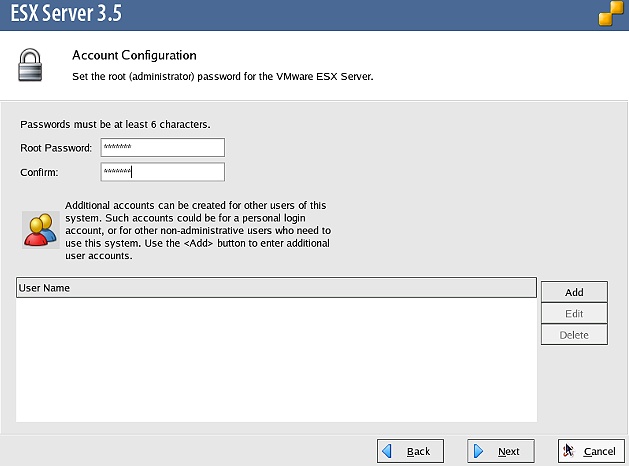
A new window (Figure 1-10) will appear, asking you to set your root password. Enter your root password and set up any additional accounts you might need on your ESX Server, pressing the Next button to continue. (For more information on account usage in ESX, see Chapter 7.)
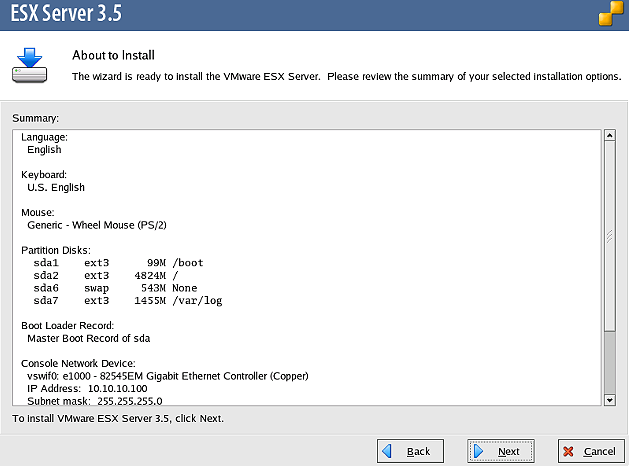
The final window to appear in the installation is the summary (Figure 1-11). This is the last chance you have to make any changes to the installation settings you previously configured, so look over the details carefully. If everything looks OK, press the Next button to begin the installation.
When all is complete, click the Finish button and the installer will exit and eject the CD-ROM.
1.6. VMware ESXi 3.5 Overview
ESXi is a newer form of the technology that strips down the ESX Server even further, to the absolute bare minimum possible. It does not include or rely upon a service console and can perform its hypervisor duties with an installation that takes up a mere 32MB of disk space. In ESX Server, the service console runs on top of the hypervisor alongside the installed virtual machines. In ESXi, the hypervisor is all you install on your hardware. This allows for very fast hardware additions to existing pools. Want to add a new server to your rack? No problem. Hook it up, power it on, install ESXi, set your root password and networking details, take a minute or two to configure the virtual network, and you’re all set. This is an amazingly quick way to create or expand an existing ESX hardware cluster.
Even more exciting than the installable version of ESXi is the embedded version. It is now possible to buy hardware that is preconfigured with ESXi installed on it. This completely eliminates the installation step and speeds up the configuration process. Companies like Dell, which graciously allowed us to borrow some of its equipment as we were writing this book, are now selling servers that require only a little more than racking, cabling, and powering on to expand your VMware cluster.
The benefits of using ESXi over the standard ESX product are that it’s extremely lightweight and installs quickly, it can be purchased on some servers from Dell and other vendors as an embedded option, it has no service console, and it requires less patching and maintenance. ESXi is also available for free and includes the basic functions needed to start a virtual environment.
1.7. VMware ESXi 3.5 Installation
VMware customers who have received a preinstalled OEM version of ESXi may have vendor-specific customizations and drivers. These versions will be different from the downloadable version on VMware’s website.
Before you get started installing ESXi, you should verify that your hardware is fully compatible by visiting the following URL, as VMware’s ESXi product has a much smaller compatibility list than its older ESX model:
| http://www.vmware.com/resources/compatibility/search.php?action=base&deviceCategory=server |
ESX 4.0 and ESXi 4.0 can now be installed and virtualized within VMware Workstation and VMware Fusion. This allows you to install, test, and get a feel for the products before implementing them on physical hardware.
As of Update 3, ESXi has the following hardware requirements:
1500MHz Intel Xeon and later models or AMD Opteron (32-bit mode) for ESXi
1500MHz Intel Xeon and later models or AMD Opteron (32-bit mode) for Virtual SMP
1500MHz Intel Viiv or AMD A64 X2 dual-core processors
1GB of RAM minimum
Broadcom NetXtreme 570x Gigabit controllers or Intel PRO 100/1000 adapters
Basic SCSI adapters—Adaptec Ultra160, Ultra320, LSI Logic Fusion-MPT, or most NCR/Symbios SCSI controllers
RAID adapters—Dell PercRAID (Adaptec RAID and LSI MegaRAID) or IBM ServeRAID controllers
This list represents the minimum requirements to install ESXi, but many more devices are available. To ensure complete compatibility, search for your specific hardware at the aforementioned URL.
The ESXi ISO image is available for download at http://www.vmware.com/download/esxi/.
VMware has a done a great job of streamlining the installation of ESXi. If you are familiar with installing ESX, this will be a breeze. After booting to the installation CD-ROM, you’ll notice a blue screen titled “ThinESX Installer” that looks similar to the bootloader in Linux.
Once the initial boot has completed, the installer will present a couple of options: you can choose to cancel the installation, upgrade an existing installation, or perform a fresh ESXi installation (Figure 1-12). Once you have selected the appropriate installation type, you will be shown the EULA. Press F11 to accept and continue the installation.
Select the disk on which you wish to install ESXi. Typically, this will be a local disk. Also, make sure you have disconnected all your SAN and direct-attached storage, to prevent any accidental data removal. Once you’ve selected the disk, the installation will begin and will take only a few minutes. When it is complete, remove the CD-ROM and reboot the system.
Unlike a normal ESX installation, ESXi requires a little more configuration after the initial install, because the only thing being configured during installation is the disk on which the hypervisor is going to be installed. Once the new ESXi server has been rebooted, you will notice a screen that is similar to the ESX console screen but with two new options: F11 to reboot the system and F2 to manage the system.
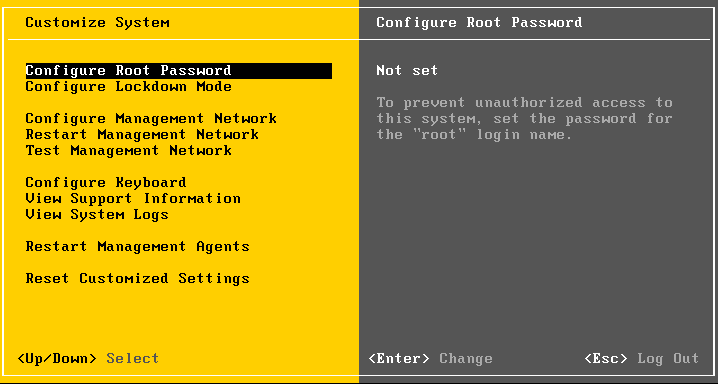
To begin configuration, make sure you have a keyboard and monitor plugged into the ESXi server. Press F2 to access the menu-based configuration utility, which will be the main screen in which all ESXi configuration will take place (Figure 1-13).
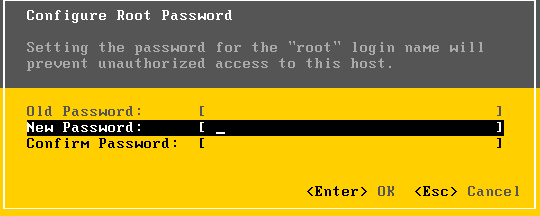
Configure Root Password
This is the first option that will need to be configured, as it is not set by default. The password you set here will be the default for the “root” user account (Figure 1-14).
Configure Lockdown Mode
This is disabled by default. If enabled, it prevents users from logging into the ESXi server remotely as the root user.
Note
Lockdown mode provides a valuable extra layer of security, but it can prove inconvenient for one function that is common on ESXi: managing user accounts. These can be managed via vCenter though, so if you enable lockdown mode it’s a good idea to set up an administrative account that lets you add and remove user accounts remotely through the vCenter client. VMware also offers a remote command-line interface (RCLI) that can perform user account functions, called vicfg-user. This allows you to centrally manage your ESX and ESXi servers from the command line if you choose. For more information on the RLCI utility, see the VMware website at http://www.vmware.com.
Configure Management Network
By default, ESXi will be configured to use the Dynamic Host Configuration Protocol (DHCP) and will automatically attempt to configure the IP address. However, you can bypass this and set your network to use a static IP address using the tools provided in the Management Network interface. Using a static IP address is recommended.
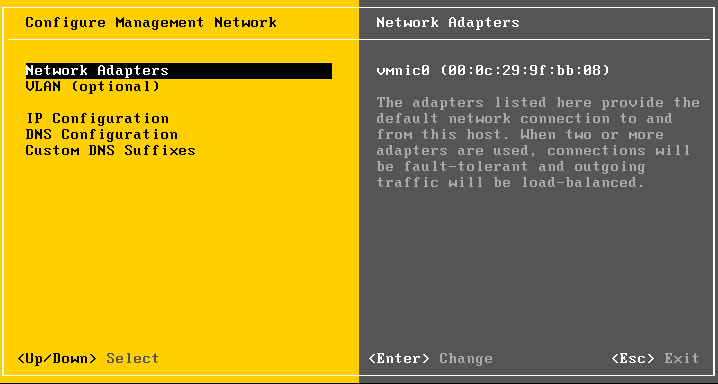
As shown in Figure 1-15, the management network offers a few options to configure your ESXi server.
The Network Adapters option allows you to select which network adapter to use for the service console IP address, if you have more than one interface available; the interfaces will be labeled vmnic0, vmnic1, etc.
You also have the option to configure your service console IP address to use a specific VLAN. This is an optional setting.
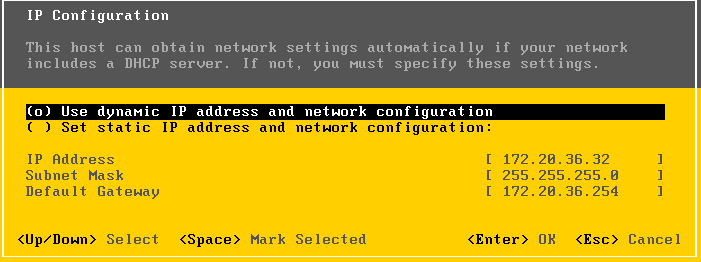
The next option on the list is IP Configuration. Here, you have the option to configure DHCP or a static IP address. Choosing the latter will allow you to enter the basic information needed, such as the IP address, subnet mask, and gateway (Figure 1-16).
The management network configuration screen also provides options to set up your DNS servers and DNS suffixes:
- Restart Management Network
Making changes to a static IP address or renewing a DHCP lease on the network may require a restart of the management network.
- Test Management Network
Testing the management network will allow you to ping different hosts and resolve DNS entries.
- Configure Keyboard
ESXi supports different keyboard layouts: English is the default, but you can select from French, German, Russian, and Japanese.
- View Support Information
No configurable options are available in this menu; however, it provides a general location for your ESXi server’s license key, serial number, and SSL footprint, and the URL to VMware’s support website.
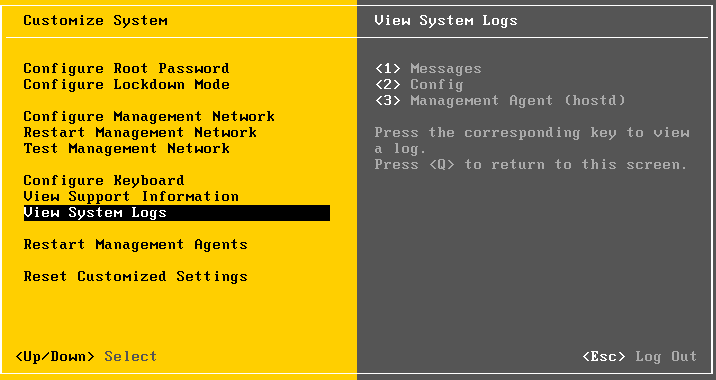
- View System Logs
There are three options available here for viewing log entries. As shown in Figure 1-17, you can view system messages, config, and management agent (hostd) logs.
- Restart Management Agents
From time to time it may be necessary to restart the management agents on the ESXi host without restarting the server itself. If the management agents are restarted, all remotely connected clients (such as vCenter clients and the vCenter server) will be disconnected.
It’s important to note that in your vCenter server the host will show up disconnected while the management network restarts; however, your virtual machines will continue to be unaffected.
- Reset Customized Settings
Resetting the customized settings will reset all the variables on the ESXi server to factory defaults.
To further configure the ESXi server, you can use the vCenter client.
See Also
1.8. VMware vCenter Server 2.x Overview
There comes a point as networks grow when it becomes unwieldy to manage each server individually. For some of us, that happens right around the time the second box is added, because we want to use our time for more interesting things than repetitive procedures and maintenance. VMware vCenter provides a central location for managing all of the virtual machines on your VMware network. It is licensed and sold separately and requires a dedicated Windows server or a Windows virtual machine and a database (Oracle or Microsoft SQL Server). Once installed and configured, it will make the system administrator’s life much easier. vCenter provides a way to distribute resources, manage users, move virtual machines from one piece of physical hardware to another (while still running!), schedule tasks, and much more.
1.9. vCenter Server 2.x Installation
To get started, download vCenter Server from http://vmware.com/download/vi/.
The vCenter Server installation is pretty straightforward. During the course of the installation you will be asked to enter some required information and make some crucial decisions about your environment. We will walk you through those steps in this section.
Note
It’s worth mentioning that if you plan to install your vCenter database on the same server as your vCenter server, the system server requirements will be larger.
VMware vCenter 2.x Server Requirements
One of the following: Windows 2000 Server with SP4 Update Rollup 1, Windows XP Pro with SP2, Windows 2003 Server with SP1 and SP2 (all releases except 64-bit), or Windows 2003 Server R2
2.0GHz or faster Intel or AMD X86 processor
2GB or more of RAM
Minimum 560MB of disk space (2–4GB recommended)
10/100/1000 Ethernet Adapter (Gigabit recommended)
VMware vCenter can also be installed inside a virtual machine within the ESX environment. This allows you to take advantage of DRS and HA.
VMware vCenter 2.x Server Database Requirements
The vCenter Server requires one of the following databases:
Microsoft SQL Server 2000 Standard with SP4
Microsoft SQL Server 2000 Enterprise with SP4
Microsoft SQL Server 2005 Standard with SP1 or SP2
Microsoft SQL Server 2005 Enterprise with SP1 or SP2
Microsoft SQL Server 2005 Express with SP2 (not recommended for production)
Oracle 9i Release 2 Standard: apply patch 9.2.0.8.0 to server and client
Oracle 9i Release 2 Enterprise: apply patch 9.2.0.8.0 to server and client
Oracle 10g Release 1 Standard (10.1.0.3.0)
Oracle 10g Release 1 Enterprise (10.1.0.3.0)
Oracle 10g Release 2 Standard (10.2.0.1.0): apply patch 10.2.0.3.0 to server and client, then apply patch 5699495
Oracle 10g Release 2 Enterprise (10.2.0.1.0): apply patch 10.2.0.3.0 to server and client, then apply patch 5699495
The vCenter Server offers a few download options: you may download an ISO image that can be burned to DVD, or a ZIP file that can be extracted on the server on which you wish to install vCenter Server. Once you have chosen your installation method, follow these steps:
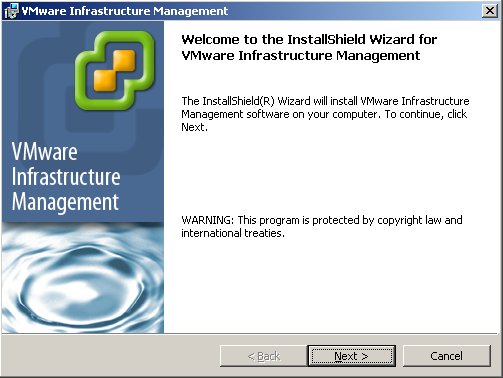
Either insert the CD-ROM and let autorun.exe start the installation, or manually run the autorun.exe located in the ZIP file that you downloaded. A screen similar to Figure 1-18 will appear. Click Next to continue.
The introduction page tells you the benefits of vCenter Server. Once you have read these, click Next to continue.
Read the license agreement and accept it by clicking “I accept the terms in the license agreement.” The circle next to this statement will now show a dot. Click Next to continue the installation.
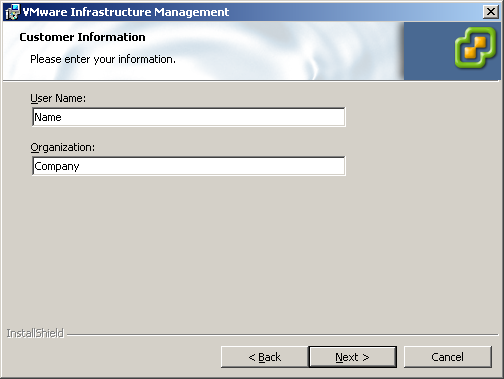
You will now be prompted to enter information about your company (Figure 1-19). When you’re done, click Next to continue.
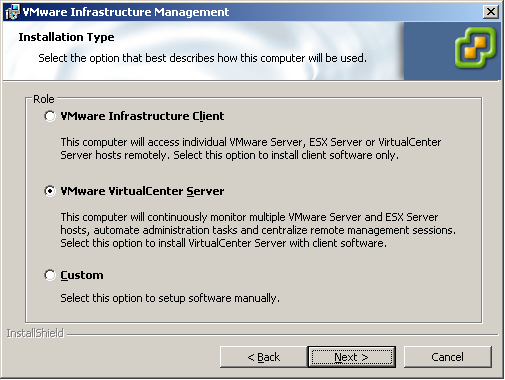
Now that the basic elements of the installation have been taken care of, you must decide what pieces of the application to install. You have three different options, as shown in Figure 1-20 (the names are different in the installer, because although VMware has changed the product names, as of this writing the installers have not been updated to reflect these changes):
- Install VMware Infrastructure Client (vCenter client)
This option will install only the vCenter client (formerly known as the VI client), without installing the vCenter server pieces. This option is appropriate for a desktop or workstation that you will use to manage the vCenter server. The client is automatically installed with the next option.
- Install VirtualCenter Server (vCenter Server)
This is the recommended installation: it includes the VI client (vCenter client), VirtualCenter Server (vCenter Server), Update Manager, and VMware Converter Enterprise for VirtualCenter Server (vCenter Converter).
- Custom installation
This option allows you to install any combination of the four pieces mentioned: VI client (vCenter client), VirtualCenter Server (vCenter Server), Update Manager, and VMware Converter Enterprise for VirtualCenter Server (vCenter Converter).
Once you have chosen the method of installation you wish to use, click the Next button to continue.
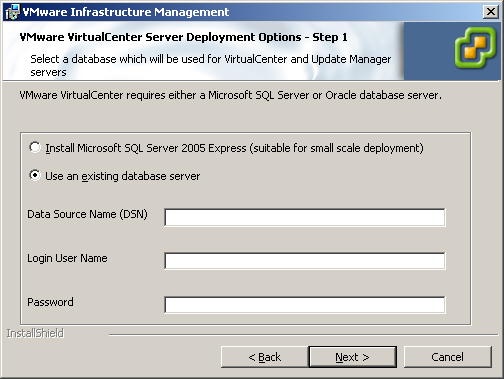
You are now ready to choose the database method (Figure 1-21). vCenter Server supports Microsoft SQL Server 2005 Express (MSDE), Microsoft SQL Server 2000, Microsoft SQL Server 2005, and Oracle 10g. Refer to the database requirements list for the exact versions.
For production installations, VMware recommends that you do not use the Microsoft SQL Server Desktop Engine (MSDE) that is included with the installation, as it’s only suitable for 5 hosts and 50 virtual machines.
Assuming the installation will be in a production environment, select the “Use an existing database server” option and fill in the necessary fields with your database’s information, keeping in mind the following:
You must set up ODBC connections before you use Microsoft SQL Server or Oracle. This can be accomplished in the Control Panel on Windows.
The data source name (DSN) must be a system DSN.
If you are using a local SQL server with Windows NT authentication, make sure to leave the username and password fields blank. Otherwise, enter the username and password.
Once you have entered your information successfully, press the Next button to continue the installation.
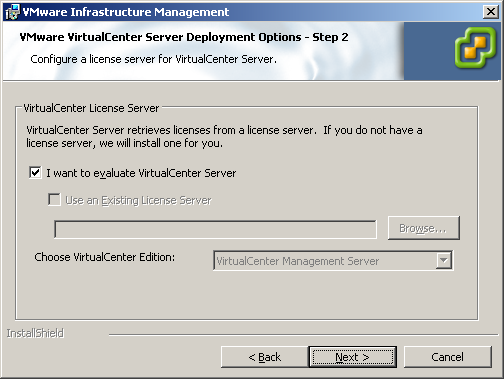
Next, you’ll need to select a license server. There are a couple of options here (Figure 1-22). If you plan to use vCenter Server in evaluation mode for 60 days, select the “I want to evaluate VirtualCenter Server” option. This will install the full product, which can be changed from evaluation mode to a licensed product after installation, if required.
To use a license file, first uncheck the evaluation mode checkbox. The default path of C:\Program Files\VMware\VMware License Server\Licenses\vmware.lic will appear, allowing you to browse to select your license file. Press Next to continue.
If you plan to use a license server, uncheck the “Use an Existing License Server” option, select the edition of vCenter Server that you purchased, and press Next to continue. If this is the first time you are installing a vCenter server, the license server has not yet been installed and you will be prompted with a warning stating “Unable to connect to license server....” Press OK to continue the installation.
If you choose to do a custom installation, proceed to step 8; otherwise, skip to step 9.
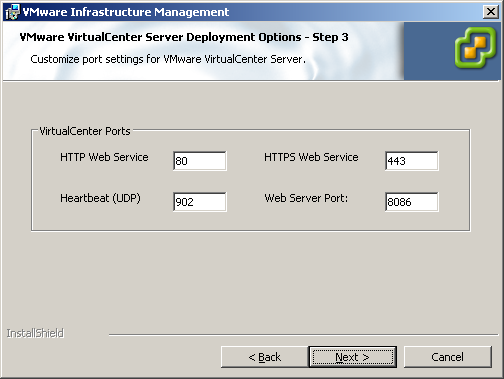
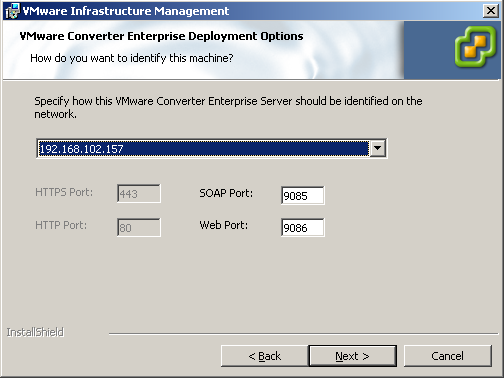
If you selected the custom installation option, you will be allowed to modify the ports in which the vCenter Server applications run (Figure 1-23). Modify these or accept the defaults, and click Next to continue the installation.
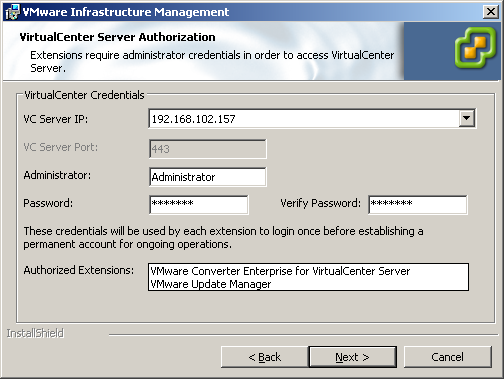
You will be asked to enter information about the system on which the vCenter Server components are going to be installed (Figure 1-24):
- VC Server IP
The IP address or domain name of the system on which vCenter Server will be installed. Normally, both options will appear in the drop-down menu.
- VC Server Port
This value can be changed only during a custom installation.
- Administrator login/password
The login/password with which to log into Windows on the system on which you are installing vCenter Server.
Once you’ve entered the appropriate values, click the Next button to continue the installation.
If you chose to do a custom installation, proceed to step 10; otherwise, skip to step 12 to continue the installation.
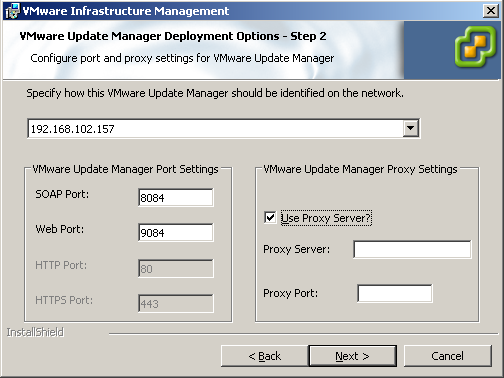
During a custom installation, you will be asked to enter information for the VMware Update Manager. You can use the same database as the one you used earlier for the vCenter server, or a separate database (Figure 1-25). When you are satisfied with the settings, click the Next button to continue the installation.
After configuring the Update Manager settings, if you are doing a custom installation, you will be asked to enter information for the Converter piece of vCenter (Figure 1-26).
Enter your port and IP information or accept the defaults, and click Next to continue the installation.
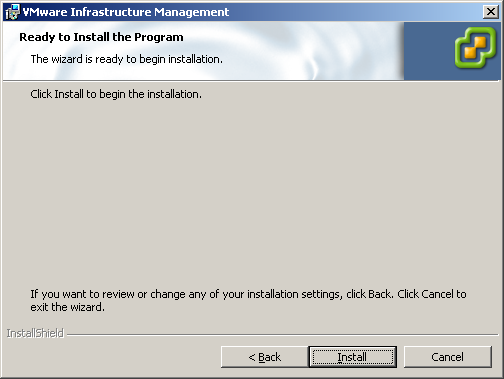
Click the Install button (Figure 1-27) to start the installation. During the installation process each piece will be installed, along with .NET if it is missing from your server.
After the installation has completed, click the Finish button to begin configuring your ESX Servers.
1.10. VMware vCenter Client 2.x Overview
The vCenter client (formerly the VMware Infrastructure client) is used to manage individual ESX hosts as well as to provide an administration interface to the vCenter server. It is included with the vCenter Server download.
1.11. vCenter Client 2.x Installation
vCenter client requirements are:
One of the following 32-bit operating systems:
Windows 2000 Server with SP4 Update Rollup 1
Windows XP Professional with SP2
Windows 2003 Server with SP1 and SP2
Windows 2003 Server R2
Windows Vista Business
Windows Vista Enterprise
.NET Framework 2.0 (this is included with the VCenter client installer)
266MHz Intel or AMD X86 processor
256MB RAM minimum (2GB recommended)
150MB storage space for the basic installation (additional space is required if you will be storing your virtual machine templates locally)
10/100/1000 Ethernet adapter (Gigabit recommended)
The vCenter client is normally installed along with the vCenter Server installation. However, it is possible to install the vCenter client by itself on other computers by going to https://youresxserver/client/VMware-viclient.exe and downloading the client installer. Once you’ve downloaded it, run the application. The installation is very intuitive.
1.12. License Server Overview
It is possible to manage your VMware licenses on each machine individually using host-based licenses. However, it is much more convenient, especially as networks grow large, to set up one VMware license server as a repository and use it to manage your licenses, allowing them to float between hosts. Doing so also opens up new options that are not available when using individual host-based licenses, such as using VMotion to move virtual machines from one physical host to another. In particular, a license server enables the distributed resource scheduler and high availability features in ESX and vCenter.
1.13. License Server (vCenter 2.x) Installation
The license server has the following requirements:
One of the following: Windows 2000 Server with SP4 Update Rollup 1, Windows XP Pro with SP2, Windows 2003 Server with SP1 and SP2 (all releases except 64-bit), or Windows 2003 Server R2
266MHz or faster Intel or AMD X86 processor
256MB RAM minimum (512MB recommended)
25MB hard drive space for a basic installation
10/100/1000 Ethernet adapter (Gigabit recommended)
If you use the VMware Infrastructure installer, it will automatically install the license server for you. However, it is possible to install the license server on another server. To install this piece, navigate to the \vpx folder on the installation CD and run the VMware-licenseserver.exe file to begin the installation.
The installer will begin. Accept the license agreement and continue the installation by clicking the Next button. You will be prompted for your license file; either enter the path or use the Browse button to navigate to its location. Click Install to begin the installation. When finished, click Finished to complete the license server install.
1.14. vConverter Overview
vConverter is a free application available from VMware that allows you to transform your physical servers into virtual servers easily, moving them from their own machine(s) into your VMware system. There are two ways this can be done. In a cold migration, you power down a server and convert it while it is offline. With vConverter, though, you can also perform a hot migration, which allows you to convert and migrate a live, operating server while it is in use. VMware Converter also allows you to take older virtual machines and migrate them into a new network while upgrading them to the current version.
1.15. vConverter Installation
The installation of vConverter is pretty straightforward.
vCenter Converter Standalone 4.x components (client, server, and agent) can be installed on the following platforms:
Windows 2000 with SP4
Windows XP Professional (32-bit and 64-bit)
Windows 2003 (32-bit and 64-bit)
Windows Vista (32-bit and 64-bit)
Windows Server 2008 (32-bit and 64-bit)
Red Hat Enterprise Linux 4.0 (32-bit and 64-bit)
Red Hat Enterprise Linux 5.0 (32-bit and 64-bit)
SuSE Linux Enterprise Server 10 (32-bit and 64-bit)
Ubuntu 6.x
Ubuntu 7.x (32-bit and 64-bit)
The vCenter Converter Standalone 4.x server and agent components (without client support) can also be installed on the following platforms:
Red Hat Enterprise Linux 3.0
SuSE Linux Enterprise Server 8
SuSE Linux Enterprise Server 9 (32-bit only)
Ubuntu 5.x
vConverter can be downloaded from the following URL (registration is required to download, and you will have two options—one for supported Windows platforms and one for supported Linux platforms):
| http://vmware.com/download/converter |
VMware has done a great job of porting the familiar Windows-side GUI to the Linux version of the tool, allowing you the same “feel” with whichever version you prefer.
Installation on Windows
To install vConverter on Windows:
Download the Windows executable.
Run the installer, clicking Next at the introduction screen.
Accept the license agreement by checking “I accept the terms in the license agreement” and clicking Next to continue.
Choose the directory in which to install the files. The installer will default to C:\Program Files\VMware\VMware vCenter Converter Standalone. Once you’re satisfied, click Next to continue the installation.
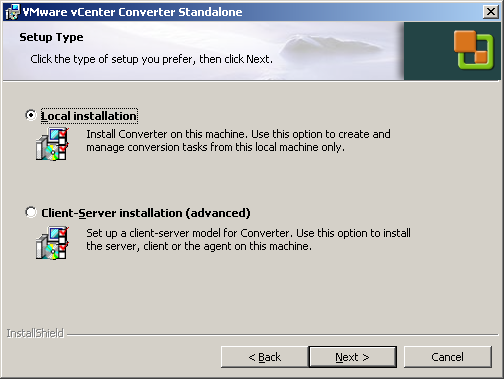
Select the type of installation you want to do. There are two options here, as shown in Figure 1-28:
- Local installation
This installs vCenter Converter on the server. It allows you to create and manage conversion tasks from this local server only.
- Client-Server installation (advanced)
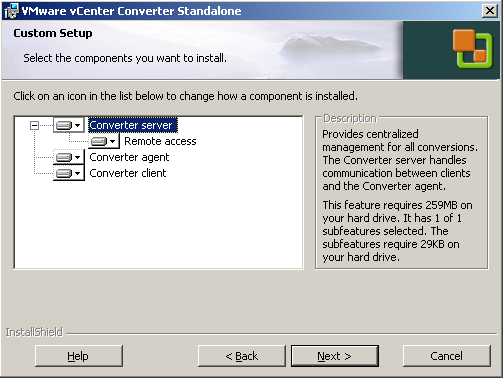
This option sets up a client/server model for vCenter Converter. Here, you can install the individual client, server, and/or agent pieces on the local server (Figure 1-29).
If you choose “Local installation,” proceed to step 7; otherwise, continue to step 6.
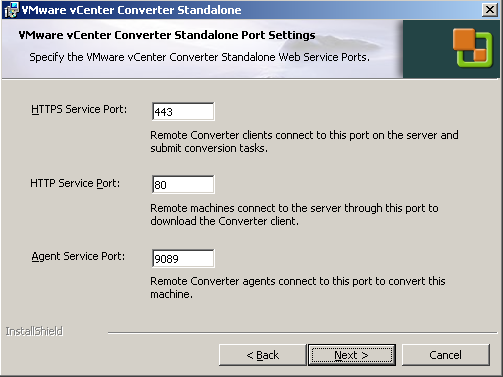
The advanced installation choice gives you the option to specify which ports vCenter Converter will use (Figure 1-30). The defaults are:
HTTPS Service Port—443
HTTP Service Port—80
Agent Service Port—9089
When you are satisfied with the ports, click Next to continue the installation.
You are now ready to proceed with the installation. Click Install to continue.
When the installation has completed, you will have the option to automatically launch the vCenter Converter client. Click the Finish button to complete the install.
Installation on Linux
On each of the various Linux distributions we have tested, we have found that the default options worked well. Here are the steps to follow:
Download the Linux-based installer.
Extract the tar file by running
tar xvzf
            Vmware-converter*.tar.gz
. This will produce a directory called vmware-converter-distrib.Change to the vmware-converter-distrib directory.
Run the vmware-install.pl file as root (you can switch to the root user or use
sudo).You will be presented with the license agreement. Press the space bar to read through it. When asked, type
yesto agree and press Enter to continue the installation.After accepting the license agreement, you will be asked if you wish to install the vCenter Converter Standalone client. The default is Yes, so you can press Enter.
You will be asked if you wish to install the vCenter Converter Standalone server. Again, the default is Yes, so you can press Enter to continue.
The installer will ask for the directory in which you wish to install the executable files. The default is /usr/bin; however, you can change this if required by entering the path. Press Enter to accept either the default or your custom path.
You will now be asked where the VMware vCenter Converter Standalone library files should be installed. The default is /usr/lib/vmware-vcenter-converter-standalone; however, you can enter a different directory if you prefer. Press Enter when you’re ready to move to the next step.
Next, the installer will ask if you wish to create the path for the library files. The default is Yes, so you can press Enter to continue the installation.
Enter the path that contains the init directories for rc0.d and rc6.d. The default is /etc. Press Enter to accept the default, or after entering a custom path if required.
Enter the path to the system’s init scripts. The default is /etc/init.d. Press Enter to accept the default, or after entering a custom path if required.
You have the option to enable remote access in vCenter Converter Standalone. The default is No, but you can change this to Yes if you wish to allow other vCenter Converter clients to connect to this instance. Press Enter to accept the default, or after changing the value.
Enter the directory in which you want the icons to be installed (the default is /usr/share/icons). Press Enter to accept the default, or after entering a custom path.
Enter the directory that contains your .desktop menu entry files (the default is /usr/share/applications). Press Enter to accept the default, or after entering a custom path.
The installation will now begin.
Once the installation has completed, you can check the System Tools menu in your X11 windows environment or launch the client from the command line by running the vmware-converter-client application.
1.16. VMware ESX 4.0 Installation
Like ESX 3.5, this new version is easy to install. If you have previously installed ESX 3.5, you will notice that the installer has received an upgrade: it’s a little more user-friendly and has a more polished look. ESX 4.0 also uses an upgraded version of the Red Hat Linux platform: Red Hat Enterprise 5.x.
Before you get started installing ESX 4.0, you should verify that your hardware is fully compatible by visiting the following URL:
| http://www.vmware.com/resources/compatibility/search.php?action=base&deviceCategory=server |
The ESX ISO image is available for download at http://www.vmware.com/download/vi/.
ESX 4.0 is based on a 64-bit hardware platform, so unlike the previous version, which would run only as 32-bit, you can only install on a 64-bit platform. VMware suggests the following as the minimum requirements for the ESX Server 4.x installation:
A processor that supports 64-bit installations (e.g., all AMD Opterons, and the Intel Xeon 3000/3200, 3100/3300, 5200/5400, 7100/7300 and 7200/7400).
2GB RAM minimum.
One or more Ethernet controllers (we recommend a minimum of four). VMware suggests Intel or Broadcom-based controllers, but you may check the hardware compatibility list for other options.
Local, Hardware iSCSI, or SAN storage.
Warning
To avoid possible data loss make sure to remove any attached storage, such as Fibre Channel, DAS, or iSCSI disks, before the initial installation of ESX.
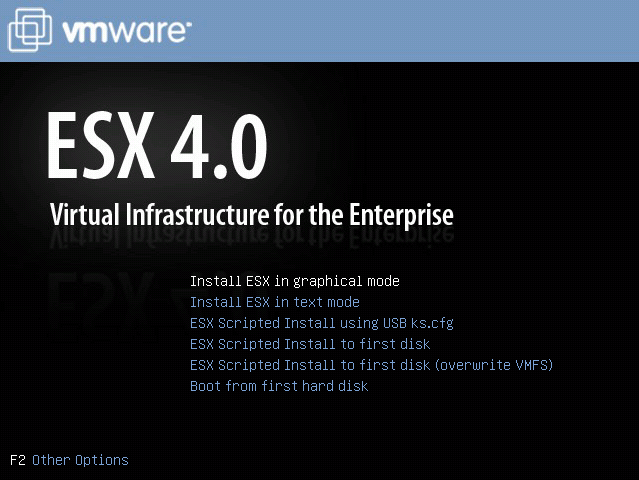
The installer has the same graphical and text install modes as 3.5 and includes three other options for initializing the installation:
- Install ESX in graphical mode
The recommended method for installation. It uses a mouse and a graphical interface to guide you through the installation. This is the method we will be using for our installation as we continue this section.
- Install ESX in text mode
A text-only mode for installing ESX. This option is normally used when you have mouse or video problems in the graphical installer.
- ESX Scripted Install using USB ks.cfg
This allows you to build a custom kickstart script and launch it from a USB storage device.
- ESX Scripted Install to first disk
This is a default installation included on the ESX 4.0 media, and it cannot be customized. The default password for the installation is mypassword.
- ESX Scripted Install to first disk (overwrite VMFS)
This is a default installation included on the ESX 4.0 media, and it cannot be customized. This option will delete any VMFS storage you may have, removing any virtual machines at the same time. The default password for the installation is mypassword.
To begin the installation, make sure your server is set to boot from the CD-ROM. This can be accomplished by changing the settings in your server’s BIOS.
When you boot the ESX4 CD-ROM, you will notice a new installation screen (Figure 1-31) with the options we just mentioned.
Here are the installation steps:
We are going to install using the graphical mode, since this will be the most widely used option. When you begin the installation, you will notice that the look and feel of the installer is a little more polished than in previous releases.
Once the installation has begun, you will be presented with a welcome screen instructing you to check your hardware to ensure it’s compatible with ESX4. To continue the installation, click the Next button and accept the license agreement by checking the box. Then click Next again.
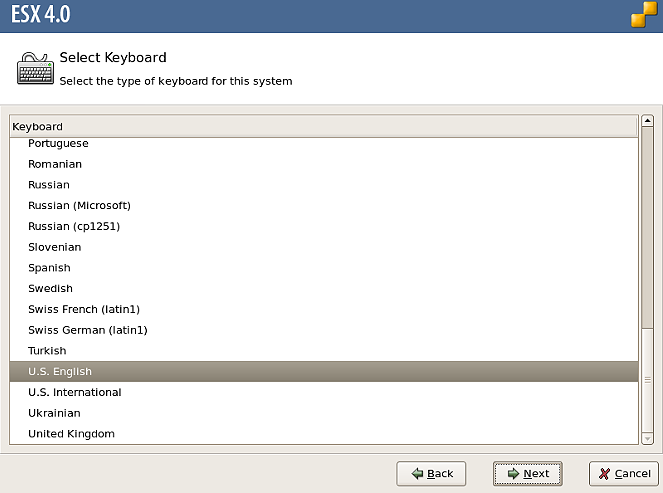
You will now be presented with the option to select which keyboard layout you want to use during the installation and afterward. Typically, you will select your language here (Figure 1-32). Click Next to continue the installation.
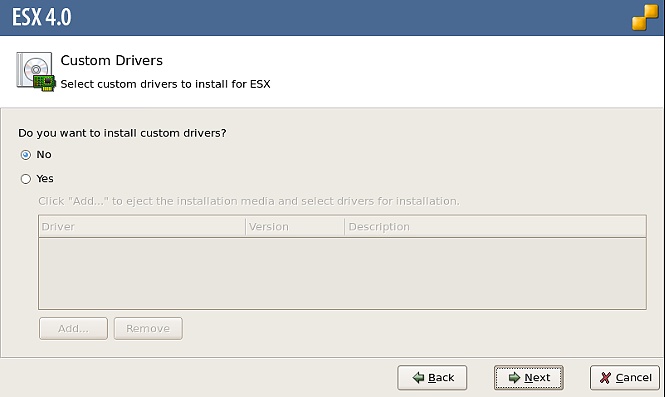
The next screen is new in ESX 4.0; it lets you load custom drivers for your hardware. This can be beneficial if the hardware you are using isn’t compatible with ESX 4.0 out of the box (Figure 1-33).
Warning
If you need drivers that are not already installed, you have to install them at this screen. You will not be able to install them later.
If you have no drivers to install, click the Next button to continue the installation. To add a custom driver, click Yes and then the Add button and select the driver from your media. When you are finished, click Next to continue the installation.
The installer will give you a warning stating that the installer is going to load the drivers. Once this step is completed, you cannot add any custom drivers. If you are ready to continue, press the Yes button and the drivers will begin to load. When it finishes loading, the installer will say it is 100% completed. Click the Next button to continue the installation.
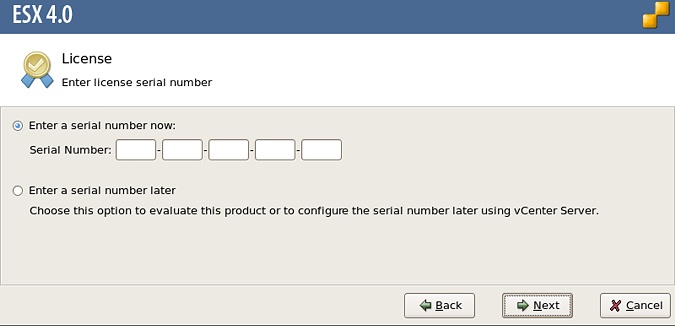
Next, you have the option to enter a license serial number either now or later (Figure 1-34). This is a new screen within the ESX 4.0 installer. If you choose to enter the serial number later, the installer will give you a default 60-day trial license. If you do not have a license, you can use this option to get ESX installed and add your serial number at a later time. Click Next to continue the installation once you have selected an option.
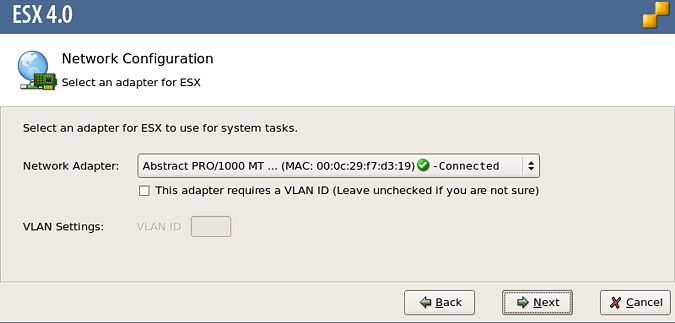
Next, select the network adapter that will be used for system tasks; this is generally called the service console (Figure 1-35). If your network requires VLAN identification, you also have the option to enter that ID here. If you are unsure, leave it blank; you can configure this option later, after you’ve installed ESX, by using the vCenter client. Once you have selected the network adapter, click the Next button to continue the installation.
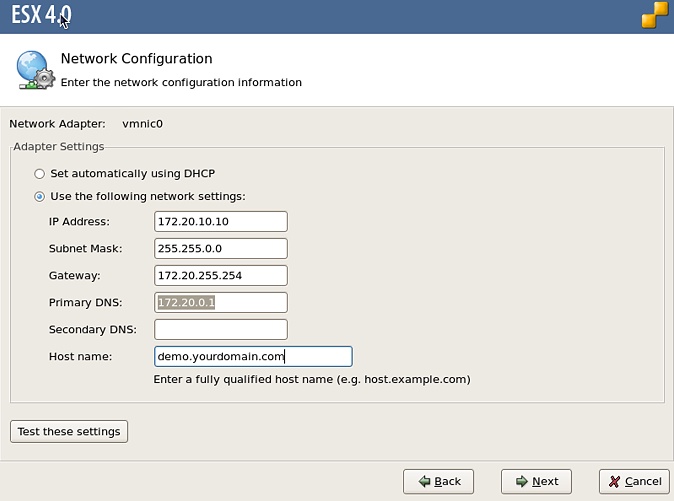
Now you will be presented with options to configure networking (Figure 1-36). You have two options here: “Set automatically using DHCP” or “Use the following network settings.” Generally, if you are planning on deploying the ESX Server in a production environment, you will want to use the latter option. However, there may be cases where you won’t have the necessary IP information; DHCP will work fine, just make sure to change it later.
The network configuration screen in ESX 4.0 also has a “Test these settings” button so you can validate your network settings before continuing the installation.
Once you have entered your network configuration, click the Next button to continue the installation.
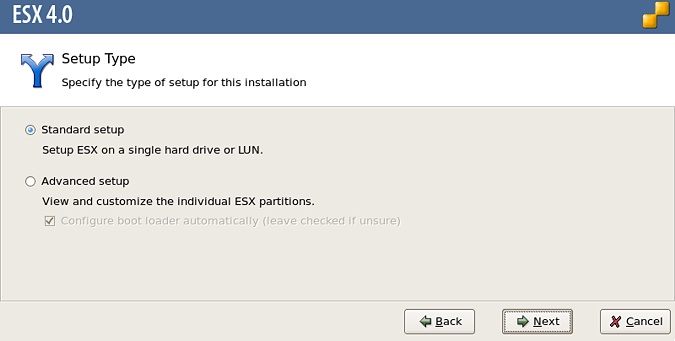
Next, you will be presented with the option to install with the Standard or Advanced storage configuration options (Figure 1-37). In this recipe we are going to use the Standard installation option and let the installer configure the default partitions for us.
However, your configuration might be different and require the use of the advanced options, where you can manually configure different aspects of the storage partitions. The suggested partition sizes for an advanced disk partitioning installation are listed in Table 1-18.
Warning
To avoid possible data loss make sure to remove any attached storage, such as Fibre Channel, DAS, or iSCSI disks, before the initial installation of ESX.
Select the method you wish to use to configure your storage and click the Next button.
Mount point | Type | Size | Notes |
Swap | Swap | 600MB | Allows the service console to use disk-based memory when the physical memory isn’t available |
/boot | ext3 | 1.25GB | Holds the ESX Server’s kernel bootloader images and vmkcore partition |
/ | ext3 | 10GB[a] | Holds the operating system, configuration files, and third-party applications |
/var | ext3 | 2GB[b] | Storage for logfiles |
/vmfs | vmfs | The remaining portion of the disk should be allocated here[c] | |
[a] The / partition should be at least 5GB in size. To be on the safe side, we recommend setting this value to 10GB. [b] The /var partition should be at least 2GB in size. [c] The /vmfs partition doesn’t need to be configured on a local disk, unless you do not have any SAN attached storage. However, it is often convenient to have a local /vmfs file store for testing, generally a local /vmfs partition will use the remainder of space on the local drive. | |||
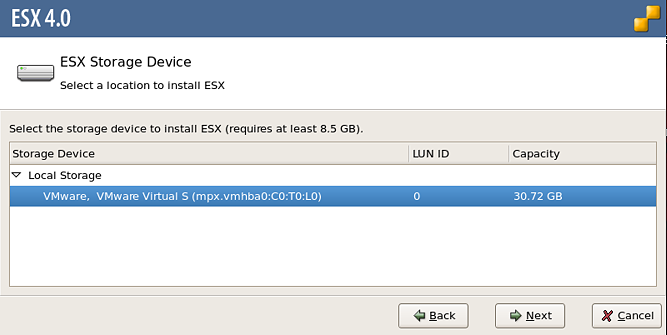
The installer will now present you with the disks available for the ESX installation (Figure 1-38). Select the disk on which you want to install ESX and click the Next button.
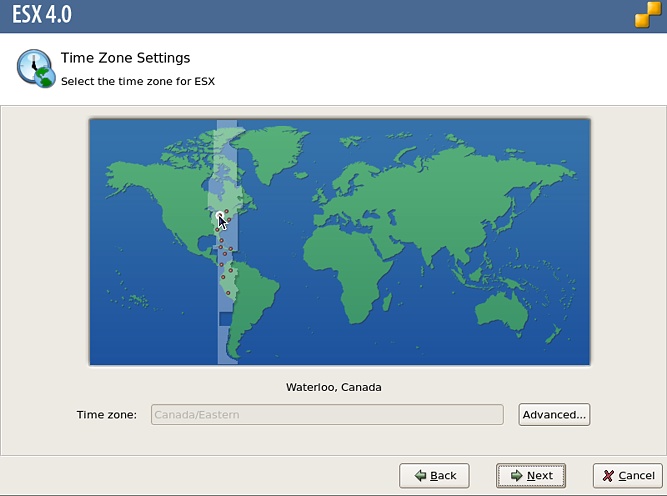
Once the disks are partitioned, you will need to select the time zone in which your servers are located (Figure 1-39). It’s important to ensure that your ESX Servers have the correct time zone set and that all the ESX Servers in your cluster have the same time and time zone configured to ensure compatibility between the nodes.
Once you’ve selected your time zone, press the Next button to continue the installation.
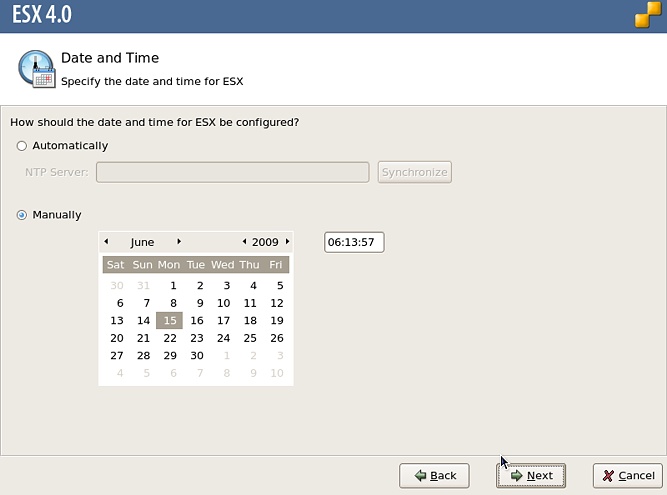
As mentioned in step 10, it’s very important to ensure that your ESX Servers all have the same time and time zone set (Figure 1-40). In this step, you have the option to configure an NTP server or set the time manually. We suggest that if you have an NTP time server, all your ESX hosts point to that.
Once you’ve configured the date and time, press the Next button.
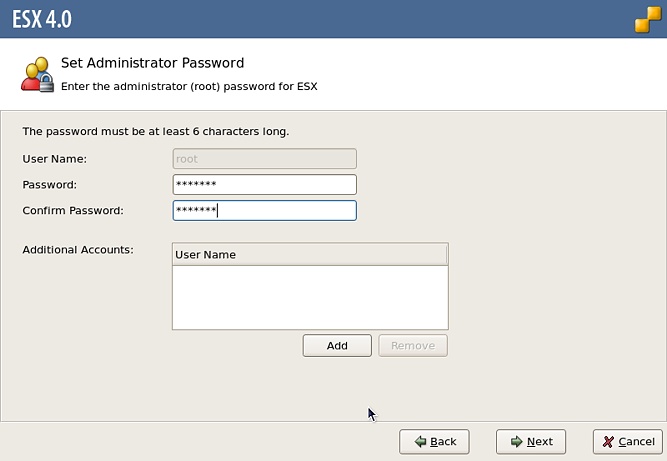
Next, you need to set the root password on the ESX Server (Figure 1-41). The root password is what you’ll use when initially connecting to the ESX. You also have the option to add other user accounts on this screen if you wish.
Once you’re finished, click the Next button to continue the installation.
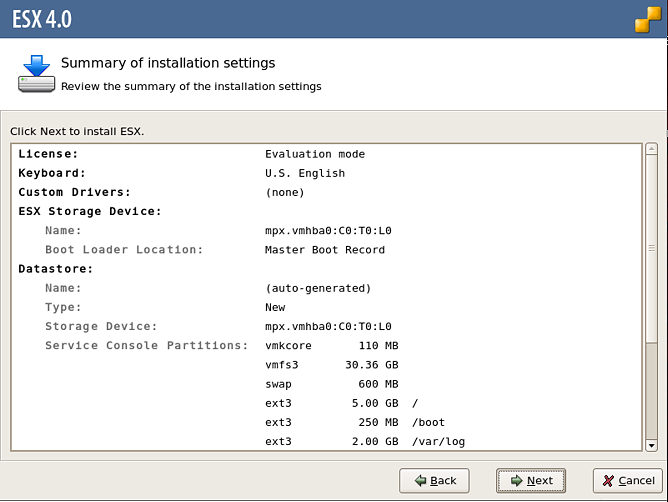
Finally, you will be shown a summary of the installation, which you should review (Figure 1-42). If any changes need to be made, you can use the Back button to make them. Once you are satisfied, click the Next button and the installation will begin. This process can take between 15 and 20 minutes, depending on the speed of your server.
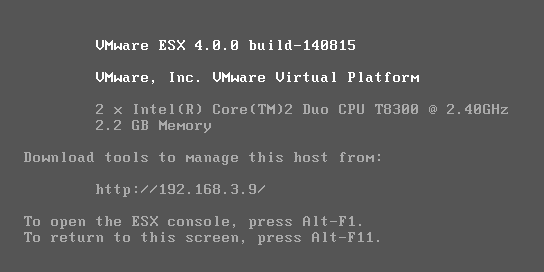
When the installation has completed, press the Finish button. Your new ESX4 server will be rebooted, and a screen similar to Figure 1-43 will be shown. At this point, you can now add and configure this server from the vCenter client.
Get VMware Cookbook now with the O’Reilly learning platform.
O’Reilly members experience books, live events, courses curated by job role, and more from O’Reilly and nearly 200 top publishers.
