Chapter 4. Asterisk
Hacks 41–58: Introduction
The Linux domain of free software is a land flowing like milk and honey with telephony hacks—the hackers’ Promised Land, so to speak. Of course, many of these hacks translate to BSD, and even to Mac OS X, since they’re cast from a similar Unix mold.
In this chapter, I’ll cover Asterisk—the open source telephony server designed originally for Linux, but now available for Mac OS X and BSD. Asterisk is a workhorse, a flexible, open system that’s the telephony equivalent of Apache, the world’s most widespread web server.
Because of its modularity and flexibility, Asterisk is as much a platform as is Linux. It’s sort of become the cornerstone of Linux-based telephony, thanks to a vibrant developer community and a sound, open source foundation.
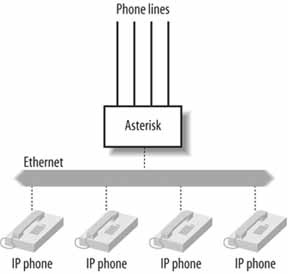
Getting Telephony Devices Connected to Asterisk
Besides implementing "pure VoIP”—voice calls over packet networks like the Internet or your Internet Protocol local area network (IP LAN)—Asterisk can also handle legacy telephone technologies, such as analog phones and phone lines, T1 lines, and various kinds of legacy signaling methods. A large and growing selection of PC expansion (PCI) cards are available that facilitate connecting analog phones and phone lines to an Asterisk server. So, if you want, you can build an Asterisk server that doesn’t use VoIP at all—just legacy technologies like analog phones. Or you can build a server that bridges those previous-generation devices with Voice over IP.
The Asterisk software is maintained by Digium, Inc. (http://www.digium.com/), a manufacturer of many of the interface cards (and VoIP gateway devices) Asterisk supports. You can certainly use other interface cards with Asterisk, such as those manufactured by Sangoma and VoiceTronix. These manufacturers provide drivers for Asterisk’s Zaptel driver framework that allow Asterisk to use them.
To FXO or to FXS, That Is the Question
To use traditional analog telephones and lines with an Asterisk server, you’ll need to understand the difference between FXO and FXS. Their definitions are a source of some confusion, even among telecom folks. FXS (foreign exchange station) interfaces are used to connect telephones, which are FXS devices. FXS interfaces cause the Asterisk server to appear like the telephone company’s central office switch when you plug in a phone. FXO (foreign exchange office) interfaces, on the other hand, are used to make your Asterisk server appear like a telephone so that you can connect it to the central office switch.
So, FXO interfaces connect your server to the phone company, and FXS interfaces connect your server to analog phones. Keep this distinction in mind as you work through the hacks in this chapter.
FXS and FXO interfaces are manufactured by many companies, including Intel, Digium, Sangoma, and Cisco, and they come in a variety of hardware flavors, too: PCI cards, rack-mountable enclosures, and tiny little single-line “converter boxes” that are reminiscent of Ethernet media converters. Though these interfaces are self-contained, standalone devices, they tend to be called media gateways, or just gateways.
And Then There Was T1
Digital circuits that employ the T1[1]carrier (the most widespread type of digital telecommunications connectivity) can also be used to connect legacy phones to the Asterisk server, and to connect the Asterisk server to central office switches. Depending upon your needs and on what is available from your phone service provider, you might employ a primary rate interface (PRI) to hook up to 23 phone lines at a time to an Asterisk PBX, all on a single T1. Likewise, you can connect a T1 to an FXO interface box (a media gateway) to connect analog phones to the server, or you can connect a T1 to a device called a channel bank to connect 24 legacy analog phones or analog phone lines.
I’ve chosen hacks that will let you experiment with Asterisk while avoiding the relatively high cost and management overhead of T1s, though. I don’t have a T1 in my home or in my business test lab, and I don’t expect you to, either. Fortunately, though, lots of other great sources of information about T1 are available. For starters, check out T1: A Survival Guide (O’Reilly). Then, when you’re ready to integrate legacy digital telecom into Asterisk, check out Switching to VoIP (O’Reilly) and Asterisk: The Future of Telephony (O’Reilly) for the details. You’ll also get a much deeper exploration of Asterisk and enterprise telephony, to boot!
Now, let’s get hacking, shall we?
Turn Your Linux Box into a PBX
Install and test the Asterisk open source telephony server on your Linux PC.
Some RPM packages are available to simplify Asterisk’s installation, but manual compilation is relatively easy. So I’m going to show you how to download, compile, and install Asterisk the “old-fashioned” way. The development branch you’ll download from is stable, though once you get comfortable with Asterisk, you’ll want to jump out on the bleeding edge and try the developer releases, too. Each release tends to introduce something new and worthwhile, even if it’s not in the stable branch yet.
The easiest place to download the Asterisk software is the CVS repository at Digium, the company responsible for Asterisk and some of the hardware components that work with it. To access the CVS repository, you’ll need to be logged into your Linux computer at a shell prompt as root. Type these commands to run the CVS check-out routine and download the source code:
	           $ cd /usr/src
	$ export CVSROOT=:pserver:anoncvs@cvs.digium.com:/usr/cvsroot
	$ cvs login
	$ cvs checkout zaptel libpri asterisk
Alternatively, you can specify a particular version of Asterisk:
$ cvs checkout -r v1-2 zaptel libpri asteriskWhen prompted, use anoncvs as a password. If you don’t use /usr/src as the local location for compiling programs, substitute the appropriate path. The CVS client you’re running here will create the /usr/src/asterisk directory that contains all the Asterisk source code. Once the download completes, you are ready to begin compiling.
Asterisk consists of several software components for Linux. Not all of these packages are required, as some of them are drivers for Digium’s interface cards. If you aren’t planning to use Digium’s cards, you’ll need to build only the last of the three, asterisk:
- libpri
A driver module that supports Zaptel-compliant interface cards (described in this chapter’s introduction) so that ISDN and PRI trunks can be interfaced with Asterisk
- zaptel
A driver module that allows legacy telephone line interfaces cards that provide FXO, FXS, and T1/E1 signaling to be used with Asterisk
- asterisk
A modular software daemon that provides telephony, management, and call-accounting features, including voicemail, Session Initiation Protocol (SIP) telephone support, dial plan, and so on; in a nutshell, Asterisk is an all-software PBX
If you’re wondering about these technical terms, don’t worry. As you experiment with Asterisk and learn more about VoIP, they’ll become very familiar. For now, just compile and install all three packages.
After you run the CVS download, the source code for each Asterisk software component is sitting in its respective directory in /usr/src. Let’s compile each software component by issuing the following commands. Again, you need to compile zaptel and libpri only if you’re planning on using legacy or Digium interface cards. Many of the examples in this book use legacy devices, so it’s probably a good idea to compile them all right now. Here is the sequence of commands:
	           # cd zaptel
	# make clean ; make install
	# cd ../libpri
	# make clean ; make install
	# cd ../asterisk
	# make clean ; make install
Warning
Do compile Zaptel before you compile Asterisk, or else Zaptel features will be missing from the Asterisk build. What is Zaptel, you ask? Keep reading….
It should take 20 minutes at most to complete the whole build on an average PC. Once built, Asterisk is ready to use. But you can’t race a Ferrari without a training lap on the test track, and you can’t really use Asterisk until you understand the basics of configuring it. So it’s time for driving school. To get started, run this command in the Asterisk source directory:
# make samplesThis creates a basic sample set of Asterisk configuration files and places them in /etc/asterisk. You might want to peruse these files—especially extensions.conf and sip.conf, where you’ll likely be spending a lot of time.
If you’ve used an RPM package or some other precompiled Asterisk distribution (or if you’ve obtained a Linux distribution with Asterisk already installed), you can still obtain the source distribution files from Digium’s CVS repository and issue only the make samples command. This will give you the sample configuration files without actually rebuilding Asterisk on your PC.
Start and Stop the Asterisk Server
The Asterisk program has two modes of operation: server mode and client mode. The server is the instance of Asterisk that stays running all the time, handling calls, recording voicemails, greeting callers while users are away, and so on. The client is the instance of Asterisk that allows you to monitor and manipulate the server while it runs. The mode the program uses depends on how Asterisk is invoked at the command prompt or within a shell script.
To launch Asterisk in server mode, execute this command:
# asterisk -vvv &The more v’s, the more verbose Asterisk’s console output will be.
To connect Asterisk in client mode on the local machine already running in server mode, execute this command:
# asterisk –rOnce the Asterisk client is connected to the Asterisk server, you can use Asterisk’s command-line interface to issue queries and commands about the telephony server. These include listing calls in progress, listing used and unused channels, and stopping the Asterisk server.
You can shut down the server using one of several Asterisk CLI commands:
Restart now
Restart when convenient
Stop now
Stop when convenient
The "restart” commands stop and then restart the Asterisk server process, which can be helpful in situations where the server’s configuration has changed significantly and needs to be restarted. The “stop” commands just shut down the Asterisk server process. You’ll have to execute the Asterisk program in server mode to get it running again.
The “now” and “when convenient” arguments tell Asterisk how quickly to shut down or restart. If you want to interrupt the current calls and tasks in progress on the server, “now” is appropriate. If you want Asterisk to wait until all the calls and tasks are finished and there is no call activity at all, “when convenient” is appropriate. Generally, especially if you’re planning to have any callers besides yourself on the system, get in the habit of using “when convenient.”
Linux-Specific Start and Stop Scripts
Depending on your particular flavor of Linux, be it Fedora, Debian, SuSE, or something else, you’ll find your system’s normal startup scripts in a place that’s unique to each flavor. Fortunately, Asterisk’s Makefile has an option that lets you automatically generate start and stop scripts that are specific to your flavor of Linux. In your Asterisk src directory, just issue the command make config, and the scripts will be installed. These scripts start and stop not only Asterisk, but also the Zaptel drivers, if you’ve compiled them.
As it stands at this point, your Asterisk server won’t be especially useful. You’ll be able to explore the Asterisk command prompt with asterisk–r, but the truly fun stuff, like hooking up phone lines and phones, is still to come. To try out Asterisk’s cool demonstration routines—like interactive voice response (IVR) and an Internet-based VoIP call—you’ve got to configure a phone of one sort or another to access the Asterisk server. Keep reading!
Attach a SIP Phone to Asterisk
Asterisk is a phone system. But it won’t do you much good without some phones connected.
You’re about to use a SIP telephone to access the de facto auto-attendant greeting and to access a brief demonstration of an Inter-Asterisk Exchange (IAX) trunk over the Internet. Sound like too much? Don’t worry; most of this is already configured with Asterisk out of the box. The toughest part for a VoIP beginner will be making sure Asterisk is willing to answer SIP calls—and that’s pretty easy.
Tip
You won’t need a regular phone line for this hack—just a SIP phone, Asterisk, and an Internet connection.
SIP is one of several standards that allow IP voice endpoints and application servers such as Asterisk to establish, monitor, and tear down media sessions across the network. Asterisk uses SIP to facilitate calls on behalf of SIP-based IP phones such as the BudgeTone 101, the Cisco SIP IP Phone 7960, and the Avaya 4602. I’ve chosen the BudgeTone 101 hardware because it’s cheap, but you can go even cheaper and apply this hack using a softphone like the X-Lite [Hack #4] , which is free.
Configure a Grandstream BudgeTone 101 IP Phone
The BudgeTone 101 phone has a Menu key, an LCD display, and two arrow keys that you use to navigate its configuration menu options: DHCP, IP Address, Subnet Mask, Router Address, DNS Server Address, TFTP Server Address, Codec Selection Order, SIP Server Address, and Firmware Versions (called Code Rel on the phone’s screen). When you get to the option you want, you press the Menu key to select it, and then you enter the numeric data required for each option using the keypad. Use this menu only to set up the IP address, subnet mask, and router (default gateway) address.
To get the phone enabled for the next configuration step, turn off DHCP and assign an IP address, subnet mask, and router address.
More advanced configuration is performed using the BudgeTone’s built-in web configuration tool. When you access the IP address you assigned to the phone using your web browser, you’ll be prompted to log in to the phone. The default password is admin.
Then, you’ll be confronted with a big page of configuration options. Many of these options are available only through this interface, not from the phone’s keypad menu. After you apply your configuration changes, you need to power-cycle the BudgeTone.
Some IP phones offer a Telnet interface rather than (or in addition to) a webb-ased one. To use these tools, you must connect to the phone with a Telnet client rather than with a web browser. In any event, once you’ve set the network configuration on the BudgeTone, ping its address from another host on the same network subnet to make sure it’s speaking Transmission Control Protocol/Internet Protocol (TCP/IP).
Set the IP Phone to Use a SIP Server
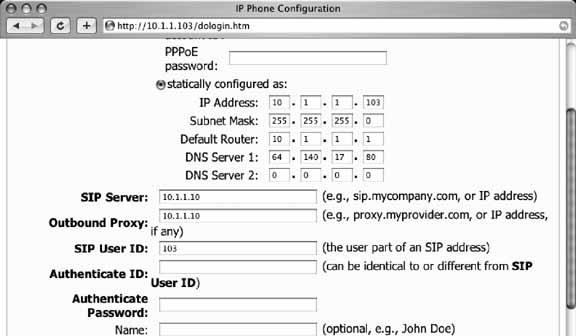
The IP phone, whose address I’ll assume is 10.1.1.103, must be set to use your Asterisk box as a SIP server if you’re to interact with the Asterisk demo. In your test lab, the IP phone should refer to the IP address of the Asterisk server (10.1.1.10, say) being used as its SIP server. Configure the SIP User ID setting as 103, too. For the DTMF Mode option, select SIP Info. Then apply the config changes and reboot the IP phone. (The same configuration options are supported by other makes of SIP phone, too.) The configuration page for a BudgeTone phone that has been configured to use a local SIP server (your Asterisk box) is shown in Figure 4-1.
Allow the IP Phone to Place Calls Via Asterisk
Until you authorize a SIP phone to communicate with Asterisk using Asterisk’s SIP configuration file, you will always receive SIP error messages when trying to dial to (or through) the Asterisk server. This is Asterisk’s way of ignoring what it sees as an unauthorized endpoint. Unlike traditional PBXs, which tend to give network access to any phone connected on an active port, SIP servers tend to enforce some security—usually in the form of password authentication.
So tell the Asterisk server to stop ignoring requests from your IP phone. Asterisk, the softPBX, refers to IP phones and other SIP devices as channels. SIP channels (or peers, if you like) are defined in Asterisk’s configuration file, /etc/asterisk/sip.conf. To enable the phone as configured in Figure 4-1, add the following to the end of this file:
	[defaultsip]
	type=friend
	context=default
	username=103
	fromuser=SIP Phone
	callerid=103
	host=10.1.1.103
	nat=no
	canreinvite=yes
	dtfmode=info
	disallow=all
	allow=ulaw
The preceding configuration settings add the 10.1.1.103 IP phone that matches the configuration of the Grandstream BudgeTone. Take note of the username, callerid, and host values, which resemble each other (103) in this case. They don’t need to resemble each other, however, because there’s no relation between a phone IP address and its SIP username or caller ID. These can all be completely different.
Tip
One of the biggest differences between SIP and its predecessor, H.323, is that SIP identifies its phone endpoints (or terminals in H.323-speak) by IP address (and port number) exclusively, whereas H.323 still relies on their Ethernet MAC hardware addresses. This makes SIP more flexible!
There are two ways to enable the configuration change you’ve just made. One is to restart Asterisk:
# asterisk -rx restartBear in mind that restarting your softPBX might be acceptable at home or even in a small office environment, but you’d better make sure no calls are in progress if you restart it in any production environment, lest you draw the ire of angry phone users. Perhaps a better way to handle the addition of a new endpoint to the softPBX is the reload method. To do this, issue the Asterisk reload command using the -rx shell option:
# asterisk –rx reloadOr log into the Asterisk CLI (as in “Turn Your Linux Box into a PBX”
[Hack #41]
) and issue the Asterisk reload
command:
pbx*CLI> reloadNo calls are interrupted when the reload occurs. This should keep everyone who is using the system at that moment happy.
Now, you can place calls to the Asterisk server and to the other peers and channels that will be connected to it. The default configuration installed with Asterisk when you compiled it allows for several interesting demonstrations of its capabilities using a SIP phone. (You also can try them using an analog phone, if you have a Zaptel card installed and a phone hooked up—but that’s another project [Hack #44] .)
Listening to Asterisk
In its default configuration, Asterisk has an auto-attendant that can route calls. To try it out, take the IP phone off the hook and dial 2. Then dial the BudgeTone’s Send button. You will hear a friendly voice saying, “Asterisk is an open source, fully featured PBX and IVR platform….”
Tip
Try this demo while watching the call progress on Asterisk’s console by issuing asterisk –vvvvvr at a Unix shell before beginning the call.
While listening to the automated attendant greeting, dial 500. This will cause the Asterisk server to greet you, connect you to a server at Digium, Inc. using the Internet, and allow you to listen to another automated greeting—the one being played back by a production Asterisk PBX at Digium’s office. This connection does not use the Public Switched Telephone Network (PSTN) at all, but rather, a Voice over IP “trunk” that is set up on the fly by Asterisk.
Tip
The Voice over Internet demo requires User Datagram Protocol (UDP) port 4569. If you’re using a firewall or NAT device, be sure it permits outbound traffic on this port. Most broadband routers will permit this type of traffic by default.
You can also perform an echo test by dialing 600, and you can access Asterisk’s built-in voicemail service by dialing 8500. This will give you at least some idea of how your voice sounds when it’s been processed and played back for the person on the other end of a call.
Connect a Phone Line Using an FXO Gateway
The easiest way to interface Asterisk to a standard phone line—like the traditional phone line in most homes—is by using a telephone media gateway.
There are essentially two ways to connect a traditional, non-IP phone device—be it an analog phone, a digital phone interface, or a telephone line—to the Asterisk system. The first way is via the Zaptel telephony framework, a driver standard that permits telephony interfaces to be used with Asterisk. (Oddly, Zaptel’s inventor, Jim Dixon, named his creation after the early 20th century Mexican revolutionary, Emilano Zapata.)
Zaptel engineering is a very deep subject that warrants its own hack [Hack #44] , and even its own book (such as O’Reilly’s Asterisk: The Future of Telephony), so we’re going to start with the other way of connecting non-IP phone devices to Asterisk: via media gateways. Once you’ve got this down, you can move on to the wonderful world of Zaptel.
A media gateway is a device that offloads the responsibility of hardware interfacing from the server. It converts non-IP signaling into VoIP signaling and vice versa. Media gateways don’t need driver frameworks like Zaptel to support connecting phone lines or other legacy technology. They come ready to install on the network, with no software to compile. Just plug, configure, and go. Connecting legacy phones and phone lines to Asterisk via a media gateway is decidedly easier than using Zaptel, so that’s the route we’re taking here.
The analog telephone adapter (ATA) pictured in Figure 1-1 of “Get Connected” [Hack #1] is a media gateway, since its job is to connect an analog phone to a VoIP service provider’s SIP server over the Internet. In this case, though, we want to do the reverse of that. We want to connect a telephone company line to our own server. We’ll do it using a Clipcomm CG-200 media gateway, an inexpensive, Korean-made gateway that supports connecting up to two phone lines (the CG-400 supports up to four).
When complete, the phone line, connected to the media gateway, will be answered automatically by the Asterisk server, and a greeting message will be played for the caller.
Configure the Gateway
The Clipcomm CG-200 and CG-400 are similar to other phone media gateways: they provide an Ethernet interface (or two) and two or more FXO ports that each allow you to connect a telephone line. But unlike some other gateway hardware, the Clipcomm has a fantastic web-based configuration interface, as shown in Figure 4-2.
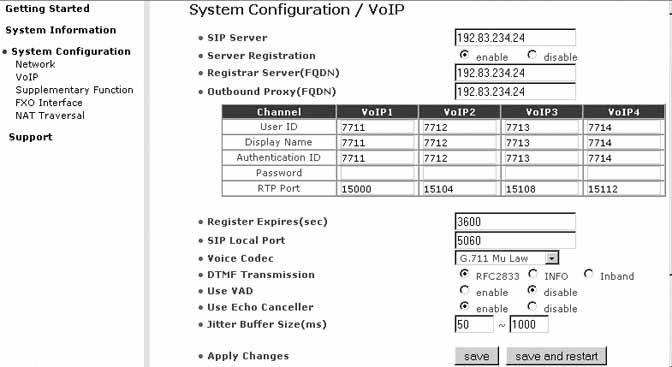
Let’s assume you’ve already set up the TCP/IP basics on your Asterisk server machine and on your media gateway. Make sure you can ping back and forth between them, too. Then, accessing the VoIP configuration page on the Clipcomm, enter the Asterisk server’s IP address into the SIP Server field. Enable SIP Registration and enter the Asterisk server’s IP address again into the Registrar and Outbound Proxy fields. This will cause the media gateway’s SIP client to register with the Asterisk server.
Tip
Registration is the process by which a SIP client is authenticated with the SIP server and is also the means by which the SIP server knows how to reach the endpoint in case it needs to route a call to it. Just as a TCP/IP device can register with a DHCP server, a SIP client can register with a SIP server, called a registrar.
Now, you’ll need to tell the media gateway what credentials (username and password) to use for each phone line you’re going to be “passing through” to the Asterisk server. If you’re just connecting a single line, you need only establish credentials for VoIP1. (VoIP2, VoIP3, and VoIP4 correspond to the second, third, and fourth phone lines you can connect.)
The User ID tends to be a phone number. When this User ID is dialed by a caller, it signifies that this SIP endpoint should be called. This differs from the Authentication ID, which is used to register the SIP endpoint with the Asterisk server. Authentication ID and User ID needn’t be the same, but they often are. In this case, we’ve chosen 7711 for both. This is the number we’ll use later with Asterisk to handle calls to and from the phone line that’s connected to this media gateway.
Click the Save and Restart command button to reboot the media gateway. Then click Supplementary Function. This will pull up a page similar to the one in Figure 4-3.
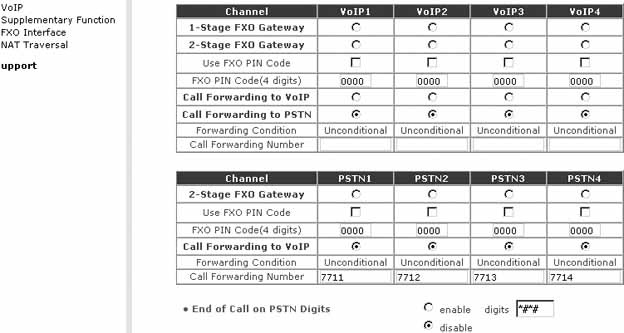
On this page, you can see the FXO channels that correspond to the VoIP channels. They’re called PSTN1, PSTN2, etc., and they represent the two or four RJ11 jacks on the gateway’s back panel. To get incoming calls from the attached phone line to be forwarded automatically to the SIP server on the Asterisk machine, click the radio button under PSTN1, labeled Call Forwarding to VoIP. Now, when calls come into the Clipcomm from the phone-company line, they’ll be answered automatically, and the Clipcomm will attempt to route them through to the Asterisk server. Don’t forget to save this configuration.
Configure an Asterisk SIP Peer for the Gateway
Asterisk refers to SIP endpoints as SIP peers, and it uses /etc/asterisk/sip.conf to establish settings for them: everything from usernames and passwords to basic audio preferences. Our objective here is to establish a SIP peer configuration for the media gateway we’ve just configured. So, using your favorite text editor, add the following to your sip.conf file:
	[7711]
	callerid="Outside Line" <200>
	canreinvite=no
	context=default
	dtmfmode=rfc2833
	host=dynamic
	port=5060
	type=friend
	username=7711
Notice how the bracketed heading and the username setting of 7711 match the media gateway’s User ID and Authentication ID settings, respectively.
Make Asterisk Answer Automatically
Now, save sip.conf and open up /etc/asterisk/extensions.conf. This file tells Asterisk what to do whenever a user dials a phone number. It contains the “dial plan” that guides the system-wide call-handling functionality of the Asterisk server. In the [default] section of the file, comment everything out and add these lines:
	exten => s,1,Answer
	exten => s,2,Playback(abandon-all-hope)
	exten => s,3,Hangup
Save the file and launch (or relaunch) Asterisk:
# asterisk -rx reloadNow, calling the phone number of the line connected to the media gateway will result in the call being answered by the Asterisk server. You’ll hear a voice message, and then the call will be hung up.
Connect a Legacy Phone Line Using Zaptel
You don’t need to buy a VoIP phone to make use of Asterisk—use your home phone instead.
About a dozen interface cards support the Zaptel standard, allowing you to connect something as simple as a two-wire analog telephone, or something as sophisticated as a digital T1 breakout box (called a channel bank) for connecting digital business phones. In this hack, you’ll see how to connect a phone line using such an interface card—either an X100P or a TDM400P, both manufactured by Digium.
To build a Linux PBX that can communicate with the PSTN (the network that 90 percent of the world still uses for telephony), you’ll need at least one trunk channel to communicate with the FXS interface in the phone company’s central office switch. This channel will provide you with a dial tone from your local phone company, so calls to and from the PSTN can be handled by the Asterisk server. There’s not much to setting up an FXO channel with Asterisk. One way, covered in this hack, is to install an X100P, TDM400P, or similar FXO line card in the Asterisk server. (The other way is to use an FXO media gateway [Hack #43] ).
Install an Interface Card
To get started, you’ll need to obtain an Intel i537-based FXO interface card such as the Digium X100P. (If you’d like to save a few bucks and build your own X100P clone, check out “Brew Your Own Zaptel Interface Card” [Hack #64] .) Install the X100P card into your PC’s PCI bus (sorry Mac users, you’re stuck using a media gateway, as covered in the previous hack) and connect an RJ11 standard phone patch cord from the wall jack of an active telephone company Plain Old Telephone Service (POTS) line into the appropriate port of the X100P. On the X100P, this port is the one marked with an etching of a telephone wall jack.
Now, download and compile the Zaptel driver and Asterisk
[Hack #41]
. This creates the zaptel and
wctdm modules, which need to be loaded during startup, by adding this code to the script that launches Asterisk, right before the line where Asterisk itself is launched:
modprobe zaptelmodprobe wctdm/etc/rc.d/init.d/asterisk start
By now, the card is in a PCI slot on the Asterisk server, the phone line is connected, and you’ve compiled and installed the Zaptel drivers. Your next step is to define the FXO trunk connection as a channel that is usable by Asterisk. Once defined, you can reference the channel within your Asterisk call-routing scheme. The POTS line can serve as the full-time gateway for all PSTN calls and all telephones in your home or office. Or the POTS line can just be a connection mechanism so that the Asterisk server can answer incoming calls on the POTS line if they aren’t answered by a person within a certain number of rings. But first, the FXO connection must become a named Asterisk channel.
Each voice channel in Asterisk has a number. This number consistently represents the same channel throughout all of Asterisk’s configuration files and in its logging output. The numbering of voice channels—especially those that require a dedicated piece of interface hardware in the server—is determined by the order in which their drivers are loaded and the order in which they are identified in the PC’s PCI bus. Figuring out which card is which—say, in a situation where you have just installed three or four X100P cards, each with its own POTS line—can require a bit of trial and error. In this project, we’re using only one card and one line, so it should be a breeze.
The voice channel we’re going to create will be called Zap/1-1. Asterisk follows a similar convention when naming all voice channels, even if they aren’t analog phone line channels. The channel name is divided into two pieces. The first piece, Zap/1, refers to the physical Zaptel interface channel (which is either an FXO/FXS interface or a PRI channel). The second piece, -1, refers to the line number (more on multiple-line interfaces later).
Tip
For Zaptel interfaces that support only a single line, you can refer to them without the line number—i.e., Zap/1 and not Zap/1-1.
Assuming you haven’t touched the Asterisk configuration files since running make samples in the first Asterisk hack, you’ll have to make only two quick config changes to fire up your POTS line. The first change is in /etc/zaptel.conf. Add the following lines to the end of the file:
	fxsks=1
	loadzone=us
	defaultzone=us
The first line tells the Zaptel configuration program, ztcfg, to set the X100P card to use FXS
Kewlstart signaling—a variation of conventional FXS loop-start signaling. The number 1 is referenced because only one Digium card is installed, and it has only one channel, like the X100P card, so it’s card number one and its channel will be 1 as well. If two cards were installed side by side, the first line would say fxsks=1-2 instead. If there were more than one channel per card (like the TDM400P), a single channel number would be used for each channel on that card—i.e., fxsks=1-4 for a card with four lines attached. fxsks=1-8 would work fine if you had two TDM400Ps installed with four FXS modules apiece. The next two lines in the code snippet localize the FXS signaling functionality of the X100P interface with loadzone and defaultzone. Other valid zones include fr, de, and uk.
Now, you might be asking yourself, “Why am I configuring the FXO interface card to use FXS signaling?” The answer is simple: to communicate with the FXS device interface at the central office, the local interface must use FXS signaling. Recall from this chapter’s introduction that only FXS devices can receive signals meaningfully from FXO devices, and vice versa.
Tip
To alleviate confusion over FXS/FXO kernel module naming, wcfxs has been deprecated in favor of wctdm in releases of Asterisk later than 1.0.5.
The next change you need to make is in the /etc/asterisk/zapata.conf file. The sample configuration should be completely commented out (comments are denoted by semicolons at the beginning of the line). If it’s not commented out, place a semicolon at the front of each line. Then, add the following lines to the end of the file:
	context=default
	signalling=fxs_ks
	usecallerid=yes
	echocancel=yes
	callgroup=1
	pickupgroup=1
	immediate=no
	channel=>1
The first line tells Asterisk what set of assumptions to make (i.e., what “context” to choose) when handling calls coming in on the POTS line. The second line tells Asterisk (not ztcfg) what type of signaling the X100P has been set to use. The following lines turn on a few traditional telephony features—caller ID, echo cancellation, and other stuff that’s covered in more detail later. The last line assigns all the previous settings to channel 1. The assignment of these inherited settings uses the => assignment operator rather than just an equals sign (=). The Asterisk configuration parser doesn’t distinguish between them; the convention is merely for ease of human readability.
Tip
Contexts are Asterisk’s way of meaningfully grouping call-flow scenarios. A context describes what behavior is caused by dialing 1 at the outset of a call, while another context describes what behavior is caused by dialing 1 at some point thereafter. These contextual behaviors are defined in /etc/asterisk/extensions.conf.
You’ll need to make one more quick change to Asterisk’s sample configs: change the Zap/g2 definition for $TRUNK in
extensions.conf to Zap/1. (This step might not be necessary with earlier versions of the sample config.) This will allow outbound dialing to be directed to the correct channel, Zap/1, the one that represents the connection to the PSTN.
Now, since you’ve added a new hardware interface, you must restart Asterisk. Once you’ve done that, try calling the POTS line you’ve connected to the X100P using a second phone line or your cell phone. After a few rings, assuming you haven’t changed the configuration, Asterisk will answer and you should hear the familiar demo greeting that you heard in “Turn Your Linux Box into a PBX” [Hack #41] . If you examine Asterisk’s console output during this demo, you’ll see something like this:
	-- Starting simple switch on 'Zap/1-1'
	-- Executing Wait("Zap/1-1", "1") in new stack
	-- Executing Answer("Zap/1-1", "1") in new stack
	…
	-- Playing 'demo-abouttotry'
	-- Executing Dial("Zap/1-1", IAX@/guest@misery.digium.com/s@default) in new stack
	…
Through the console output, you can trace every step Asterisk took to recognize, answer, and process the incoming analog call from the PSTN and to connect it using the IAX protocol to a remote server across the Internet. Note that although this chapter is about legacy, circuit-switched telephony, we’re using IAX to get our feet wet with VoIP. Plus, the IAX demo is so easy to run with Asterisk “out of the box” (it isn’t broken by broadband routers the way SIP often is) that it’s a great way to demonstrate how a VoIP signaling protocol can be used with legacy signaling on the PBX.
Forward Your Home Calls to Your Cell Phone
Using Asterisk, you can create a simple call forwarder, so calls to your home can follow you whenever you go.
Asterisk is a programmable platform in the same way that the Apache Web Server is. There are many ways to program Asterisk, but all of them connect in some way to the core of Asterisk’s functionality—its so-called “dial plan.” The dial plan begins (and usually ends) in /etc/asterisk/extensions.conf. Using the dial plan, you can program how your softPBX should behave, which phones should ring when different digits are dialed, how long they should ring, and what to do if nobody answers when they ring.
So, it’s actually pretty straightforward to program the dial plan to forward all incoming calls from a certain line to another phone number via a second line. There are many uses for this, including having your phone calls follow you wherever you go, as well as using the Asterisk server as a screen so that you don’t have to give people the number you are forwarding to. This is a great way to keep your cell phone or parents’ home phone number private. The Asterisk server will dial the cell phone on the second line and then bridge (or conference) the two lines together for the duration of the call.
The hardest part about setting up this configuration is connecting two lines (or two SIP peers acting as lines [Hack #43] to the Asterisk server. Once that’s done, the forwarding part is simple. But before we get to that, let’s check out the configuration for the two lines.
Let’s assume that two SIP peers are connected to the Asterisk server, vis-à-vis a media gateway with two SIP clients, like the Clipcomm used earlier [Hack #43] . The sip.conf configuration for these peers would look something like this:
	[7711]
	callerid="Outside Line 1" <200>
	canreinvite=no
	context=incoming
	dtmfmode=rfc2833
	host=dynamic
	port=5060
	type=friend
	username=7711

	[7712]
	callerid="Outside Line 2" <201>
	canreinvite=no
	context=default
	dtmfmode=rfc2833
	host=dynamic
	port=5060
	type=friend
	username=7712
Line 1 is SIP peer 7711, and line 2 is SIP peer 7712. Let’s say that the line we’re going to receive calls on is line 1, and the line we’re going to use to call the cell phone is line 2. Note context=incoming. This creates a context within Asterisk for incoming calls to arrive. Now, open up extensions.conf so that you can create a dial plan—a set of instructions that tell Asterisk what to do in this incoming context—to correspond to peer 7711’s incoming context setting:
	[incoming]
	exten => s,1,Dial(SIP/7712/${CELL_PHONE},30)
	exten => s,2,Playback(abandon-all-hope)
	exten => s,3,Hangup
Since sip.conf indicates that all incoming calls from SIP peer 7711 should enter the incoming context, we’ve created that context in the dial plan (as shown in the previous code snippet). Using the special s extension, whose purpose is to incorporate into the context incoming calls that haven’t been triggered by a user dialing an extension number (calls like those incoming from the outside world), we can specify three steps to deal with the call:
Dial the cell phone number on the second SIP peer (7712). You can specify the number—for instance, 1-440-864-8604—instead of using the
${CELL_PHONE}variable, since we haven’t really covered variables yet. The30specified in the first command says to attempt to bridge (conference) the call on the two lines for up to 30 seconds before giving up.If the call isn’t bridged because the
Dialcommand times out, thePlaybackcommand will play a greeting. In this case, I’ve specified a greeting calledabandon-all-hope.If either of the previous steps cannot be completed, the caller will be disconnected.
So, when an incoming call from SIP peer 7711 hits the server, SIP peer 7712 (the “second line”) will be directed to call your cell phone and attempt to bridge the call.
I know what you’re thinking: “Why wouldn’t I just use my phone line’s built-in call-forwarding service to do this?” My answer is “Selectively Forward Calls” [Hack #46] .
Selectively Forward Calls
You can pass caller ID signals into Asterisk, and have them acted on appropriately—including auto-ignoring the people you don’t want to speak to.
By making some clever use of Asterisk’s built-in caller ID channel variable and a little workflow logic, it’s easy to turn your call-forwarding project from the previous hack into something even more useful. In this hack, we’ll make Asterisk forward calls to your cell phone only if they’re from a certain caller ID. That way, you need only be bothered with answering your cell phone if dear old Mom is calling (or your boss).
Asterisk refers to the one or more voice communication links of a phone call as channels. So, when a call-forwarding setup that uses two SIP peers is active, it’s said to use two channels. Each channel has with it a number of channel-specific variables that contain information about the ongoing call. When the call ends, the channels, and these channel-specific variables, disappear. One of these variables is ${CALLERIDNUM}, which contains the phone number of the calling party, as signaled by the calling peer. (On the PSTN, caller ID signals originate from the exchange switch of the calling party.) We can use this variable to figure out whether we want to forward a call.
Warning
Unless you’re paying for caller ID service, your Asterisk server won’t receive caller ID signals, and this hack won’t work. Some phone companies (and just about all VoIP service providers) include caller ID for free.
Consider the following:
	[incoming]
	; Priority 1: Check to see if the call is Mom's home phone.
	; If so, go to priority 5; if not, continue to priority 2.

	exten => s,1,GotoIf($["${CALLERIDNUM}" = "3138853352"]?5:2)

	; Priority 2: See if the call is Mom's cell phone.
	; If so, go to priority 5; if not, continue to priority 3.
	exten => s,2,GotoIf($["${CALLERIDNUM}" = "3132981848"]?5:3)

	; Priority 3 and 4: This call's not Mom, so just drop it.
	exten => s,3,Playback(carried-away-by-monkeys)
	exten => s,4,Hangup

	; Priority 5: Dial my cell phone for 30 seconds to connect Mom.
	exten => s,5,Dial(${MYCELLPHONE},30)

	; Priority 6 and 7: If not answered in time, drop the call.
	exten => s,6,Playback(carried-away-by-monkeys)
	exten => s,7,Hangup
Note the syntax of the GotoIf command. If you’re familiar with logic control structures in programming, the ? should look like a “then” in an if-then workflow statement. A colon (:) separates the then-target from the else-target. The targets correspond to the step numbers in each of the exten directives, of course.
If you think Asterisk dial-plan syntax is atrocious, well, you’re right. Don’t get too hung up on it now, though. There are some good references out there for Asterisk dial-plan commands, including http://www.voip-info.org/ and the unforgettable classic, Switching to VoIP (O’Reilly). For now, just keep hacking, and you’ll get comfy.
Hacking the Hack
With a little modification, you should be able to forward incoming calls to different numbers, depending on their caller ID values. Just rearrange the previous example so that each GotoIf numbered target step contains a Dial command with a different phone number—one for Mom, one for Dad, etc. You can even forward calls with no caller ID signals (like those from telemarketers) to a fun destination
[Hack #48]
.
Report Telephone Activity with Excel
With a little help from Microsoft Excel, you can dig into your CDRs, chart your top callers, and create utilization records for the users of your PBX server.
Most commercial softPBX systems provide a detailed logging mechanism for keeping track of when and to whom calls were made and received. Asterisk provides this, too. In /var/log/asterisk/cdr-csv/Master.csv, a flat text log of all call activity is retained. It’s a snap to import this into Excel or your favorite spreadsheet for analysis. You can download the file from your server using FTP, or you can run the following command to email it to you (keep in mind that large logfiles might not work well with this trick):
#cat /var/log/asterisk/cdr-csv/Master.csv | mailme@mydomain.com
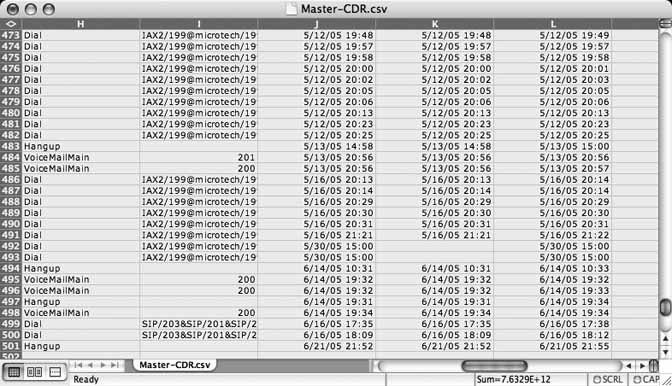
Of course, replace me@mydomain.com with your email address. If your Linux server has sendmail or a similar Simple Mail Transfer Protocol (SMTP) agent running (most do), the contents of the file will be emailed to you. You can then copy and paste them into Excel, as shown in Figure 4-4. Place the cursor on column A, row 1 before pasting.

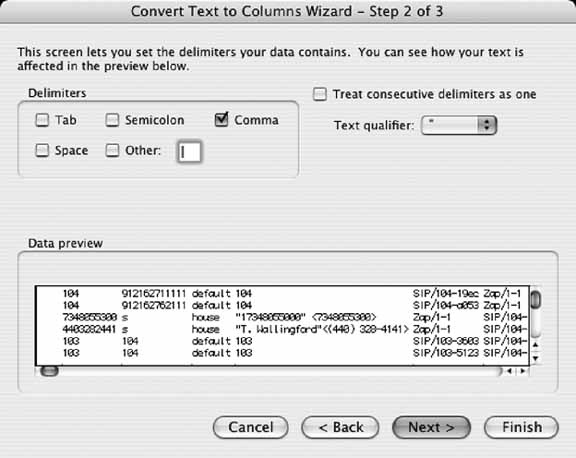
Once you paste the text or open the file, select column A by clicking the A column heading. Then use Excel’s Text to Columns function, on its Data menu. This will launch a wizard that will help you organize the text file into columns so that it’s actually useful within Excel. You’ll see a preview of the text you pasted in the bottom portion of the window that appears. Leave the Delimited radio button selected and then click Next.
Select Comma as a delimiting character, make sure no other delimiters are selected, as in Figure 4-5, and click Finish. Now, you’re ready to label the column headings according to their purposes. Insert a blank row at the top of the spreadsheet, and you can label them as outlined in Table 4-1.
|
CDR field |
Description |
|
Account code |
A tag that can be used in billing and analysis |
|
Source: | |
|
Destination: |
The unique identifier of the endpoint receiving the call |
|
Context*: |
The dial-plan context of the call (more on this later) |
|
Caller ID: |
The calling-party identification signals supplied by the calling endpoint |
|
Incoming Channel: |
The voice channel that routes to the caller |
|
Destination Channel: |
The voice channel that routes to the receiver |
|
Application*: | |
|
Last Data Sent to Application*: |
Information the application uses to connect the call |
|
Start Time: |
The time of first contact from the caller to the softPBX |
|
Answered Time: |
The time the receiving endpoint answered, if applicable |
|
End Time: |
The time of the end of the call, regardless of whether it was answered |
|
Duration: |
The length, in seconds, from the first contact to the end time |
|
Billable Duration: |
The length, in seconds, of connected, billable time during the call |
|
Disposition: |
The last known status of the call during this application |
|
AMA Flags*: |
Automated Machine Accounting flags, used by some telephony billing software |
The field names marked with an asterisk (*) record Asterisk proprietary information. For example, the Application field might not have a meaningful correlation on another softPBX because not all softPBXs refer to telephony functions as applications.
The idea here is that once the CDR is imported into Excel—or another data-analysis tool—you can interpret it in interesting ways. Suppose you want to figure out which customer places the most calls to your technical support department. You can count occurrences of that customer’s caller ID in the CDR. Or, if your teenage daughter is receiving a dozen calls a day, you can bill her accurately for them!
With CDRs in Excel, Crystal Reports, or even a homegrown Perl program, a savvy telephony administrator can do the following:
Determine which channels are used the most and the least
Determine which endpoints are called most often
Calculate the percentage of outgoing calls that are out of your area code
Create a list of calls, broken down by endpoint
Create an invoice for a paying subscriber to the softPBX
Tip
Asterisk’s CDRs can also be stored in PostgreSQL, MySQL, and even syslog, depending upon the modules you compile and install.
Creating a Call Report
One of Excel’s coolest features is the Pivot Table Report. I actually used Excel for years without touching this menu option, passing over it dozens of times, until one day I had to build a sales report for an application I’d been developing. I had a choice between coding the report myself, building it in a tool like Access, or performing the analysis in Excel. The only problem with that last option was that I didn’t know how to do the analysis in Excel—I knew only that it could be done.
So, I turned to the Pivot Table Report (or should I say, I—ahem—pivoted to it) and built a sales summary in five minutes, which to this day is still in use at the office where I built it. Needless to say, I’ve sworn by the Pivot Table Report function ever since. I never knew what I was missing out on by passing over that peculiarly intimidating Excel menu option. And, when it comes to those telephony logs, the Pivot Table Report function ever since. I never knew what I was missing out on by passing over that peculiarly intimidating Excel menu option. And, when it comes to those telephony logs, the Pivot Table Reports, you can generate some very cool call-activity analysis. List your top callers. List your top system users. Or just figure out your total long-distance and local utilization down to the minute to verify your phone bills.
We’ll do one report that sums activity (in minutes) by caller and a second report that adds a breakdown of the total minutes for every phone number called by each caller. To get started, we’ll first need to get our hands on the Asterisk CDR logfile, as described at the beginning of this hack. Next, we’ll insert a blank row at the top of the worksheet and key in the names of the CDR fields at the top of each column, as shown in Figure 4-6. This will be needed to make the Pivot Table Report. (The names of the CDR fields are laid out in Table 4-1.)
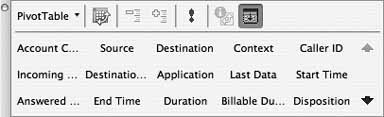
Once the CDR columns are labeled, select Data → Pivot Table Report. Now, you’ll get a wizard. Click Next on the first step, where you’ll find yourself being prompted to provide the name of a data range where the source data exists. In this case, the source data is the first sheet in the workbook—the one that contains the CDR data. Select this sheet and drag-select all of the columns that contain CDR data. Then, return to the wizard window and click Next. The final step asks you where you want to put the report; choose the option to place it in a new worksheet. Then, click Finish. As shown in Figure 4-7, you’ll now have a pivot-table toolbar with the names of your CDR columns on it.
Now, you can drag those column names from the pivot-table toolbar to the left and right columns of the blank Pivot Table Report worksheet. Dragging to the left pivot-table column treats the data from that CDR column as a group label. If you’re familiar with Crystal Reports or Access, data grouping in reports should be a friendly concept. If not, read on—you’re in good hands. Dragging to the right column of the Pivot Table Report worksheet treats the data from the CDR column as summary data.
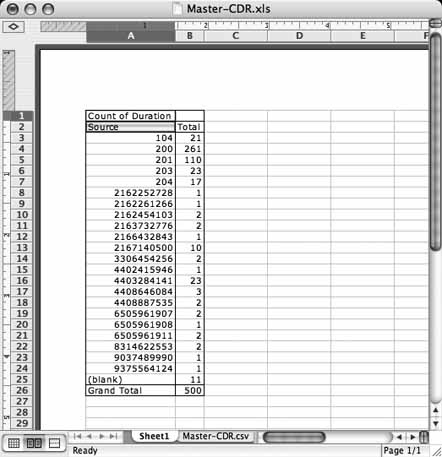
It’s probably easier just to start dragging column headings and see what happens. Start by dragging the Source column to the left column in the pivot table. Next, drag the Duration column to the right column in the pivot table. These two drags will build a report like the one in Figure 4-8, which shows a sum of minutes for each caller on the system over the period of time covered by the CDR worksheet.
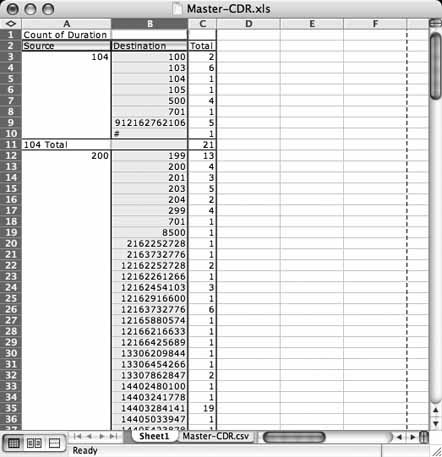
In Figure 4-8, the majority of callers are PSTN phone numbers (the 10-digit numbers), though the majority of minutes are from private extensions (104, 200, etc.). Extension 200 has the most minutes—261. Of course, this report doesn’t tell us how extension 200 spent all those minutes (whom 200 was talking to), so let’s drag another CDR heading from the toolbar to the lefthand column. Drag the Destination column, and the report will now show the minute totals of each phone number to whom each caller placed calls, as shown in Figure 4-9.
Experiment with the other columns. What can Excel tell you about your call activity? With these reports, you’ll have a handle on precisely who called whom, and when. That way, if your mom ever says, “Why don’t you ever call?” you’ll have the perfect response: “Mom, we talked 108 minutes last week alone, and 96 minutes the week before!”
Kindly Introduce Telemarketers to Mr. Privacy
If you enjoy being contacted by anxious telephone pitchmen promising a lower interest rate or offering a great deal on term life insurance while you’re just sitting down to dinner, skip this hack.
Using techniques similar to those in “Selectively Forward Calls” [Hack #46] , it’s possible to discern between phone numbers that supply a caller ID and those that don’t. This is different from merely identifying a certain caller ID number and then handling it. What we’re doing here is shoveling all unidentified calls into a certain action.
If you like, you can even have your phone server handle these calls without interrupting you, putting a decisive end to those annoying dinner-hour calls from “Private” or “Unknown.” Using a great little feature in Asterisk, the
PrivacyManager command, we can fight fire with fire. This dial-plan command screens calls as described earlier, identifying the caller ID, or forcing the calling party to enter a caller ID if none is provided at the outset of the call. Best of all, everything can happen without your phone ever ringing, saving you from the aggravation of a sales pitch when you’re trying to enjoy a filet mignon.
Consider the following from the [default] context, in extensions.conf:
	exten => s,1,PrivacyManager
	exten => s,2,Dial(Zap/2,30)
	exten => s,3,Hangup
	exten => s,102,Hangup
The first priority of this extension contains the PrivacyManager command, which prompts the user to enter his 10-digit telephone number if no caller ID signals have been sent on the channel to identify the caller. If the caller doesn’t enter his phone number, he gets dumped to priority 102 (100 plus the current priority), where the call is disconnected using the Hangup command.
Tip
When telemarketers call you, pretend you’re Scarface, brandishing your Privacy Manager and saying, “Say hello to my little friend.”
If the caller does successfully enter his 10-digit phone number, the dial plan proceeds to the next priority. In the previous example, a Dial command rings a phone connected to a Zaptel card (that’s what’s referenced by Zap/2) for 30 seconds before giving up and disconnecting the call if nobody answers.
Hacking the Hack
You can combine this hack and “Selectively Forward Calls” [Hack #46] to maintain privacy, and to pick and choose functionality based on caller ID—for instance, forwarding calls based on who’s calling. And as shown here, you can make sure you know who’s calling, with your new friend, Mr. Privacy:
	[incoming]
	exten => s,1,PrivacyManager
	exten => s,2,GotoIf($["${CALLERIDNUM}" = "3138853352"]?6:3)
	exten => s,3,GotoIf($["${CALLERIDNUM}" = "3132981848"]?6:4)
	exten => s,4,Playback(carried-away-by-monkeys)
	exten => s,5,Hangup
	exten => s,6,Dial(${MYCELLPHONE},30)
	exten => s,7,Playback(carried-away-by-monkeys)
	exten => s,8,Hangup
	exten => s,102,Playback(carried-away-by-monkeys)
	exten => s,103,Hangup
Build a Four-Line Phone Server
Create a simple, fully functional small-office PBX.
An Asterisk server can be the nerve center of two kinds of telephony networks: an all-VoIP network that uses only IP-based connections to route calls, or a hybrid VoIP/legacy network that uses both IP and time division multiplexing (TDM) technologies to route calls.
In this hack, you’ll use a Digium TDM400P card to turn your Asterisk server into a full-blown PBX that can support up to four legacy phones (or four legacy phone lines) at a time. These legacy devices will be able to call, and be called by, VoIP phones. This setup is depicted in Figure 4-10.
The TDM400P card has four modular interfaces that can host either FXO or FXS modules. FXO modules allow you to connect phone lines to your server, and FXS modules let you connect phones. You can use any combination of FXO and FXS modules (up to four) on a single TDM400P, so you can connect two analog phones and two phone lines, or one phone line and three analog phones, and so on. When you purchase the TDM400P card, you can specify what combination of interfaces you’d like. Here’s the main thing to remember, so you don’t get the wrong configuration: the redcolored FXO modules connect phone lines, and the green-colored FXS modules connect phones. So, if you want three analog phones to share a single analog phone line, you would use three FXS modules and one FXO module.
The Linux driver framework that allows Asterisk to use the TDM400P card is called Zaptel, and if you worked your way through “Turn Your Linux Box into a PBX” [Hack #41] , you’ve already got the Zaptel drivers installed. Since these drivers don’t yet work with Mac OS X, you’ll be able to use the TDM400P card only on i386 Linux. I’ll cover enabling the drivers in a moment.
Warning
If you’re using certain servers, the TDM400P might not be compatible with certain Dell PowerEdge servers. Also, some Intel equipment has known issues with the TDM400P card. So check Digium’s web site (http://www.digium.com/) to be sure: you could save yourself some time and aggravation. VoiceTronix makes alternative cards that you might want to consider, too.
But first, you need to get the card installed. This is pretty straightforward. If you’ve got a spare PCI slot, you’re ready to snap the card into place. There are four numbered modules on the card, which correspond to the four numbered eight-wire jacks on the case plate of the card. Before inserting the card, screwing down the back brace, and replacing the PC’s cover, you might want to note which jacks are for connecting phones and which are for connecting phone lines. It’s hard to know once the case is on.
There’s one more thing to connect after the TDM400P is slipped into place: a four-wire hard-drive power cable that runs from one of the PC’s power leads to a power connector on the card. This cable brings power to the card above and beyond what’s available from the PCI bus so that the card can provide ring voltage to any phones that are connected. You don’t need to connect this little power cable if you aren’t using FXS modules.
Once the card is in and your Linux box is booted up, you’ll need to make sure the Zaptel drivers that were compiled when you first installed Asterisk are loaded before Asterisk is launched as a part of your normal system startup. To accomplish this, execute these commands before Asterisk is launched, perhaps in /etc/rc.d/rc.local:
	/sbin/modprobe zaptel
	/sbin/modprobe wctdm
	ztcfg
Note the difference between this startup routine, which provides driver support for both analog phones and analog phone lines, and that of “Connect a Legacy Phone Line Using Zaptel”
[Hack #44]
, which provides driver support only for phone lines. The addition of wctdm is the difference.
Tip
Run make config in your Zaptel and Asterisk source directories to create startup scripts that are customized for your Linux distribution.
The wcfxs driver needs to be modprobed only if you’re using FXO modules (with phone lines attached), and the wctdm driver needs to be modprobed only if you’re using FXS modules (with analog phones attached). The ztcfg application tests the Zaptel driver configuration and returns nothing if it’s valid. If there’s a hardware error or a problem with the Zaptel configuration files, which we’re about to discuss, ztcfg will return an error description to the standard error output.
The /etc/zaptel.conf settings tell the Zaptel driver framework which modules on the TDM400P card are which. For a card with two FXO and two FXS modules, a configuration file like this would be used:
	; zaptel.conf example
	loadzone = us
	defaultzone=us
	fxsks=1,2
	fxoks=3,4
The numbers assigned, 1 through 4, are channel numbers that Asterisk will use to refer to activity on each module. Within Asterisk, each legacy interface port on the TDM400P has its own channel. Since the point of this hack is to build a four-line phone server, we’re going to assume that all of the channels are using the same type of signaling:
	; zaptel.conf example
	loadzone = us
	defaultzone=us
	fxsks=1,2,3,4
In this case, there are four FXO interfaces, to which we’re going to connect one phone line apiece. fxsks (FXS Kewlstart) signaling is specified because the phone company switch to which these phones connect expects us to be using a telephone. Ordinarily, telephones interface to that phone-company switch (called a foreign exchange office in signal-ese) using electro-mechanical line signaling (called FXS signaling in Asterisk slang). Hence, our switch will be pretending to be a phone by using FXS signaling on its FXO interfaces. Confused yet? No worries—once your server is up and running and your TDM400P is functioning as planned, you’ll probably never need to mess with it again.
Now that you’ve saved zaptel.conf, bring up /etc/asterisk/zapata.conf in a text editor and make sure it resembles this example precisely:
	[channels]
	language=en
	context=default
	signalling=fxs_ks
	usecallerid=yes
	hidecallerid=no
	callwaiting=yes
	callwaitingcallerid=yes
	threewaycalling=yes
	transfer=yes
	callreturn=yes
	group=1
	channel => 1
	channel => 2
	channel => 3
	channel => 4
This block of config fine-tunes the settings of the four Zaptel channels that are provided by the card (for a concise description of what all of these settings do, check out Chapter 17 of O’Reilly’s really amazing book, Switching to VoIP). Save this file before proceeding.
Set Up Incoming Calls
Now, pay a visit to /etc/asterisk/extensions.conf. Here, you’ll need to adjust the default context section of the file so that incoming calls on the four lines can be handled appropriately.
Take a look at this sample default context section in extensions.conf, which deals with incoming calls from the TDM400P-connected phone lines (and from any other channels that point to the default context):
	[default]
	exten => s,1,Dial(SIP/100,30)
	exten => s,2,Voicemail(100)
	exten => s,3,Hangup
So, as of right now (or at least after you reboot your Asterisk box or load the kernel modules manually), incoming phone calls to the connected phone lines will ring on the SIP phone configured as SIP peer 100. For a refresher on SIP peers, refer back to “Connect a Phone Line Using an FXO Gateway” [Hack #43] .
Set Up Station-to-Station Calls
If you’d like your SIP phones to be able to call each other, be sure to add the following extension to the default context:
	exten => _1XX,1,Dial(SIP/${EXTEN},30)
	exten => _1XX,2,Voicemail(${EXTEN})
	exten => _1XX,3,Hangup
The _1XX pattern matches any phone numbers dialed that are three digits long and begin with 1. It deals with them by attempting to ring the SIP peer that is registered with a user ID that matches the extension number dialed, and then sends them to the appropriate voicemail box after 30 seconds if the SIP peer doesn’t answer.
Set Up Outgoing Calls
Now, you’ve got to make it so that any connected phones can place calls using the four lines that you’ve just hooked up to the installed FXO modules. This is accomplished by a special pattern-matching extension in those phones’ contexts. For SIP phones, this is established in sip.conf. Let’s say that a SIP phone’s context is [private-phones]. To allow this SIP phone to dial out using your newly connected phone lines, you’ll need to make sure there is a context in extensions.conf that looks something like this:
	[private-phones]
	exten => _NXXXXXX,1,Dial(Zap/g1/${EXTEN})
	exten => _NXXXXXX,2,Congestion
	exten => _1NXXNXXXXXX,1,Dial(Zap/g1/${EXTEN})
	exten => _1NXXNXXXXXX,2,Congestion
	exten => 911,1,Dial(Zap/g1/911)
	exten => 911,2,Congestion
The string patterns _NXXXXXX and _1NXXNXXXXXX are actually masks designed to identify phone numbers that are 7 and 11 digits long, respectively. This way, if the dialed number is 7 or 11 digits long, Asterisk knows it must dial the number (represented by the variable ${EXTEN}) using the group of four phones (Zap/g1) you previously defined in zapata.conf. The 911 extension performs call routing to the phone company’s Public Safety Answering Point (PSAP), via the standard 911 phone number. (In countries other than the United States, local jurisdictions will use different numbers for this purpose, so check with your local emergency dispatch authority to find out what number to use.)
Of course, none of this is going to work until the drivers are loaded and the dial plan is reread by Asterisk, so give your machine a reboot, or load the modules and restart Asterisk manually. Then, call and be called—on the cheap. The coolest thing about the PBX you’ve just built is its cost effectiveness. To buy a four-line business phone system new is usually more expensive than equipping an Asterisk box like you’ve done in this hack. Plus, you’ve got access to Asterisk’s programmable dial plan and application programming interfaces (the Asterisk Gateway Interface and Asterisk Manager API), giving you a metric ton more capabilities than a low-end commercial PBX.
Master Music-on-Hold
“Can you hold on a minute?” the operator asks. Suddenly you’re listening to Frank Sinatra singing “New York, New York.” Before you know it, you’re tapping your finger and the wait doesn’t seem so bad.
Few things are more dreaded among telephony end users than the short yet foreboding phrase, “Please hold.” Perhaps what bothers folks is that they never know quite how long they’re going to be on hold, or maybe it’s the notion that they’re going to have to re-explain themselves to a whole new person who winds up on the line after the hold time is over with. Fortunately, music-on-hold makes that wait time a little bit more tolerable.
Asterisk gets its music-on-hold sound signals from MP3 files that are decoded and piped to Asterisk by one of two supported MP3 players: Mpg123 and MPEG Audio Decoder (MAD). In this hack, I’m going to use MAD because there are some well-documented security issues with Mpg123 that have yet to be dealt with. (Of course, if you’d like to use Mpg123, you can just issue make mpg123 from your Asterisk source directory.) To get MAD, start at http://mad.sourceforge.net for a list of mirror sites to download the MAD distribution. You’ll need three pieces: the ID3 library, the MAD library, and the madplay application. Each is in a separate archive that you’ll need to download, unpack, and install as follows:
	# cd /root
	# mkdir mad
	# cd mad
	# wget http://kent.dl.sourceforge.net/sourceforge/mad/madplay-0.15.2b.tar.gz
	# wget http://internap.dl.sourceforge.net/sourceforge/mad/libmad-0.15.1b.
	tar.gz
	# wget http://peterhost.dl.sourceforge.net/sourceforge/mad/libid3tag-0.15.
	              1b.tar.gz
	# tar xvzf madplay-0.15.2b.tar.gz
	# tar xvzf libmad-0.15.1b.tar.gz
	# tar xvzf libid3tag-0.15.1b.tar.gz
	# cd libid3*
	# ./configure
	# make
	# make install
	# cd ../libmad*
	# ./configure
	# make
	# make install
	# cd ../madplay*
	# ./configure
	# make
	# make install
Now, type
madplay and press Enter. If you get a “failed to load” message about one of the library files, as shown here, the installation routine might have put the libraries in the wrong location:
	madplay: error while loading shared libraries: libid3tag.so.0: cannot open
	shared object file: No such file or directory
If this is the case, try moving them. On my system, I had to move them to /usr/lib:
	           # mv /usr/local/lib/libmad.so* /usr/lib
	# mv /usr/local/lib/libid3tag.so* /usr/lib
Once madplay executes without any error notices, you’re ready to go on to the next step. You’ve got to tell Asterisk’s voicemail module that you want it to use madplay as its preferred player. Comment out the default line in the /etc/asterisk/musiconhold.conf file, and add an entry like this in its place:
	default => custom:/var/lib/asterisk/mohmp3/,/usr/local/bin/madplay \
	--mono -R 8000 --output=raw
This tells Asterisk to use the madplay application to stream random MP3 files from /var/lib/asterisk/mohmp3 in mono at a forced sample playback rate of 8 MHz (perfect for telephony).
Though you don’t need the Zaptel driver or card for a SIP-only setup, music-on-hold bridging is dependent on the Zaptel driver framework’s built-in timing code, and you won’t hear much music on hold unless you load either a real Zaptel driver (for a real Zaptel card) or the Zaptel ztdummy driver, which is meant to fill in on machines that don’t have an actual Zaptel board installed. Lucky for you, when you compiled the Zaptel drivers [Hack #41] , you also unwittingly compiled ztdummy. How convenient. Put these commands in /etc/rc.d/rc.local before Asterisk loads if you have no Zaptel card installed:
	modprobe zaptel
	modprobe ztdummy
Next, make a test extension that lets you listen to some on-hold music. Place an entry like this in /etc/asterisk/extensions.conf in the most appropriate context:
	exten => 100,1,MusicOnHold(30)
	exten => 100,2,Hangup
The idea here is that when you dial 100 in this context, you’ll get 30 seconds of hold music before the server disconnects your call. Save the changes to /etc/extensions.conf, and go ahead and reboot your Linux box (or modprobe ztdummy and restart Asterisk).
Hacking the Hack
You can assign different groups of phones and phone lines to their own music-on-hold classes (classes define selections of recordings that you can assign to groups of peers) so that they hear different music. A group of SIP phones can be in one music-on-hold class, and a group of Zaptel-connected phone lines can be in another.
Add as many classes as you like (such as default, as shown earlier) to the musiconhold.conf file, and then “point” your various Zaptel channels and SIP phones at those classes. For Zaptel channels, you’ll configure this in zapata.conf. The first two Zaptel channels are pointed at the Stevie-Ray class, and the second two are in the BB-King class:
	[channels]
	language=en
	context=default
	signalling=fxs_ks
	usecallerid=yes
	hidecallerid=no
	callwaiting=yes
	callwaitingcallerid=yes
	threewaycalling=yes
	transfer=yes
	callreturn=yes
	group=1
	musiconhold=Stevie-Ray
	channel => 1-2
	musiconhold=BB-King
	channel => 3-4
Hacking the Hack Some More
If you’d like to use a streaming MP3 Internet radio station instead of a group of MP3 files for your on-hold music source, make an entry like this in musiconhold.conf to create a class:
default => /var/lib/streaming,http://64.236.34.196:80/stream/1040
Now, create the directory /var/lib/streaming and leave it empty, and this class will play back the streamed audio after your next Asterisk restart.
Record Calls
Pitch the microcassette and stick-on microphone. With Asterisk, all you need to record a phone call is Monitor().
There are two ways to record calls with Asterisk. One way is to use a softphone that supports call recording or some other client-side desktop solution (in fact, “Secretly Record VoIP Calls” [Hack #85] describes precisely this scenario). The other way is to have Asterisk do all the recording and have SoX do all the mixing. SoX, short for SOund EXchange, is the Swiss army knife of sound-conversion tools. It allows all kinds of format conversion, resampling, and mixing, topics covered in more detail in “Create Telephony Sounds with SoX” [Hack #24] .
To record a call with Asterisk, you can use the built-in
Monitor dial-plan command. In extensions.conf, any extension can be monitored as follows:
	exten => s,1,Answer
	exten => s,2,Monitor(wav,most-recent-call,M)
This example creates a WAV file called most-recent-call-
ext in /var/spool/asterisk/monitor. The M argument causes the call to be mixed automatically so that caller and receiver can both be heard in the same file. Without the M, Monitor would just create two different files, most-recent-call-in-ext and most-recent-call-out-
ext. ext represents the extension that the caller dialed to trigger this Monitor to begin with.
Tip
SoX must be installed for the M option to work. Without SoX, Asterisk cannot output automatically mixed call recordings. Most of the major Linux distributions provide a SoX package as an installation option.
Hacking the Hack
If you want to keep every call you record without overwriting already-recorded WAV files, you’ll need to come up with an automatic way of uniquely naming every file that Monitor creates. The best way to do this is probably to base the filename off of the current system date and time. Not only does this make them unique, but it also affords you an easy way to find files by date and time later on when you need them. This example uses the ${DATETIME} variable to produce a file whose name is something like 112205-09:45:42-40:
	exten => 40,1,Answer
	exten => 40,2,Monitor(wav,${DATETIME},M)
Once the files are recorded, you can use cron to automatically archive them with gzip, or even use the mail command to send them to an email address, much as you did with faxes in “Build an Inbound Fax-to-Email Gateway”
[Hack #91]
.
Get Your Daily Weather Forecast from Your Telephone
The Weather Channel has “Local on the 8s” every 10 minutes, but why wait 10 minutes for your forecast when you can be listening to it on your IP phone right now?
Aside from cataloging sea species and running a really great tsunami readiness web site, the National Oceanic and Atmospheric Administration (NOAA) also operates the National Weather Service. Those are the guys from whom excitable TV meteorologists get their severe weather warning and watch information. But TV weather guys don’t have an exclusive on NOAA’s weather data feeds.
At NOAA’s web site, http://www.noaa.gov/, localized weather data is published in text-file feeds that are updated regularly. Your Asterisk server can grab these feeds and, thanks to Festival [Hack #92] , read you a weather report based on their contents. Have a look at this example:
	exten => 50,1,Answer
	exten => 50,2,System(/usr/bin/curl -s \
	ftp://weather.noaa.gov/data/forecasts/city/oh/cleveland.txt \
	| text2wave weather-feed.wav
	exten => 50,3,Wait(1)
	exten => 50,4,Playback(/tmp/weather-feed.wav)
	exten => 50,5,System(rm /tmp/weather-feed.wav -f)
	exten => 50,6,Hangup
The extension 50 grabs the text feed for Cleveland, Ohio, using the curl application, and immediately converts it using text2wave, a piece of the Festival distribution, into a WAV, which it plays back using Asterisk. If you want to keep tabs on the weather in a few different cities, you can create an extension for each.
Tip
If you don’t have curl, grab it from http://curl.haxx.se/.
Put a Happy Face on Asterisk Using AMP
When you’ve got Apache and MySQL on your Asterisk PBX, you’ve got the makings of a web-based administration interface for your whole phone system.
Since Asterisk runs on Unix, it is able to leverage many of the niceties of a modern Unix environment: shell scripts, Perl programs, sockets, and so on. Historically, one of the chief shortcomings of Unix—and of Linux in particular—is the lack of a graphical user interface (GUI). Asterisk shares Unix’s general inferiority in the user-interface department. But there’s something you can do about it.
Asterisk Management Portal (AMP) gives you some real interface power tools: a web-based configuration tool suitable for nontechnical administrators, database routines for storing and retrieving the PBX’s dial plan, and some handy preconfigured call flow and fax features that make day-to-day life with Asterisk much easier. For instance, AMP lets you upload music-on-hold files using a web interface and lets you create IVR menus without having to type them directly into extensions.conf or to program Asterisk macros.
How AMP Works
AMP provides a web-based GUI using Apache and connects to Asterisk using a combination of techniques—most notably, via the Asterisk Manager API. It uses PHP to build the web pages you interact with, and it controls Asterisk with code written in Perl. MySQL provides a repository where the entire dial-plan configuration is stored, retrieved, and modified by the web interface.
The Setup Process
AMP has a ton of software prerequisites, as you can see. But it’s fairly easy to install. The basic steps are spelled out here and are detailed in the following sections:
Get the prerequisites, including Apache and MySQL.
Install Perl modules and custom telecom tools.
Build the MySQL database.
Run AMP’s install script and finish up.
Get the prerequisites.
A few dependencies are standing between your Linux server and AMP. Check to make sure that your Linux box is running Apache, libtiff, MySQL with development libraries installed, PHP (version 3 or higher), OpenSSL, Perl, ncurses, SoX, and curl. If you’re running a Red Hat 7 or later distribution, you should have all of these packages either preinstalled or available via RPM. If you’re not using Red Hat, chances are still pretty good that you’ve got everything you need, because most of these packages are either commonplace or required by Asterisk, and therefore are already installed on your machine.
Before you can go any further, though, you need to be certain that your Asterisk instance is running as a nonroot user. To do so, follow the recommendations in “Run Asterisk Without Root, for Security’s Sake” [Hack #54] , because the rest of the AMP installation is going to assume your Asterisk instance runs as a nonprivileged user. But keep your finger on this page, because there’s a lot more to do!
Install Perl modules and telecom tools.
You can download AMP from http://amportal.sourceforge.net. Unpack the AMP source distribution using tar (there are numerous examples of tar-unpacking throughout this book) into the /usr/src/ directory. Once it’s unpacked, install the Net: Telnet Perl module from CPAN, which allows Perl-based packages such as AMP to use Telnet sockets:
# perl -MCPAN -e "install Net::Telnet"Now, to enable AMP’s music-on-hold upload feature, you can use vi to make a few modifications to the PHP configuration (PHP 4 users might need to substitute /etc/php4/apache2/php.ini in place of /etc/php.ini). The idea here is to increase the upload_max_filesize value to 20M and to change the corresponding LimitRequestBody value to 20000000. This way, you’ll be able to use AMP to upload large files, like music-on-hold MP3s.
	                 # vi +482 /etc/php.ini upload_max_filesize=20M
	# vi +14 /etc/httpd/conf.d/php.conf LimitRequestBody 20000000
Tip
If you’ve already modified your PHP configuration files, these commands will not work correctly, and you should find the appropriate lines manually instead.
Next, you’ll need to install the Asterisk Perl modules for Asterisk, like this:
	                 # wget http://asterisk.gnuinter.net/files/asterisk-perl-0.08.tar.gz
	# tar xvgf asterisk-perl-0.08.tar.gz
	# cd asterisk-perl-0.0.8
	# perl Makefile.PL
	# make all
	# make install
Then, grab a couple more Perl modules from CPAN and install them (these enable the forwarding of faxes received, if you want AMP to handle faxes):
	                 # perl -MCPAN -e "install IPC::Signal"
	# perl -MCPAN -e "install Proc::WaitStat"
To make sure that AMP’s email integration works correctly, grab a copy of the MIME Construct package from Roderick Schertler (http://search.cpan.org/src/ROSCH/mime-construct-1.9) and unpack it to /root or /usr/src, whichever you prefer. Then, from the directory where it’s been unpacked, install it as follows:
	                 # make Configure.PL
	# make install
To add fax-receiving support to AMP, install the spandsp package per the instructions in “Turn Your Linux Box into a Fax Machine” [Hack #90] . Then, you’ll need to set up the MySQL CDR interface for Asterisk. (When you downloaded the Asterisk CVS, this was downloaded to /usr/src/asterisk-addons.)
	                 # cd /usr/src/asterisk-addons
	# make clean
	# make
	# make install
Configure the MySQL database.
Now you’re getting to the meat of the hack: the MySQL database for storing the CDRs and AMP’s replica of the Asterisk configuration. To set this up, blow the dust off your latent MySQL skills, and issue the following commands:
	                 # /usr/bin/mysql_install_db
	# /etc/init.d/mysqld start (or /etc/init.d/mysql start)
	# mysqladmin -u root password 'db_root_pwd'
	# mysqladmin create asteriskcdrdb -p
	# mysql --user=root --password=db_root_pwd asteriskcdrdb < \
	/usr/src/AMP/SQL/cdr_mysql_table.sql
	# mysqladmin create asterisk -p
	# mysql --user root -p asterisk < /usr/src/AMP/SQL/newinstall.sql
The text files directed to MySQL’s standard input are provided as a part of the AMP distribution, and they contain all the queries needed to set up AMP’s database. Now, launch the MySQL client:
# mysql --user root -pOnce you get to the mysql prompt, you can begin entering the access privileges for the database:
mysql>GRANT ALL PRIVILEGES ON asteriskcdrdb.* \ TO asteriskuser@localhost IDENTIFIED BY 'amp109';Query OK, 0 rows affected (0.00 sec) mysql>GRANT ALL PRIVILEGES ON asterisk.* \ TO asteriskuser@localhost IDENTIFIED BY 'amp109';Query OK, 0 rows affected (0.00 sec) mysql>quit
Run AMP’s install script and finish up.
About the only conventional part of this configuration is AMP’s shell script for installing its standard files, which you need to run now:
# /usr/src/AMP/install_ampFinally, add /usr/local/lib to the /etc/ls.so.conf file, which will include the spandsp fax libraries you loaded earlier. Add the following lines to your /var/lib/asterisk/.bash_profile file:
	                 # PATH=$PATH:/usr/sbin:$HOME/bin
	# export PATH
	# export LD_LIBRARY_PATH=/usr/local/lib
Then open /etc/rc.d/rc.local in your favorite text editor. Replace the line that currently loads Asterisk (probably something like asterisk –vvv &) with this:
/usr/sbin/amportal start
Are you still reading? Excellent! You’ve just installed AMP. Now, to try it out, you can restart Asterisk, Apache, and MySQL, or you can just reboot to achieve the same effect. Once your reset or reboot is done, point your browser to http://
AsteriskServerAddress. You’ll be greeted with the Asterisk Management Portal, the ultimate Asterisk GUI. Now, go have fun configuring. (If you want this page to be secured by a username and password, you can use Apache’s htpasswd utility. For more info on this, check out http://www.apache.org/.)
Run Asterisk Without Root, for Security’s Sake
Running a critical service as root makes a security-minded sysadmin squirm. But it doesn’t have to be that way. Asterisk doesn’t need to run as the all-powerful root user.
By default, Asterisk runs as root—the user account with total, unrestricted power. This is generally considered a bad idea, as an exploit to Asterisk can lead to someone taking over your entire machine. To avoid this, the Apache Web Server doesn’t usually run as root. This hack shows you how to run Asterisk as a less-godly user.
To do so, create a user called asterisk. In the following command, I use the Red Hat adduser command:
# adduser -c "Asterisk PBX" -d /var/lib/asterisk asteriskNext, you’ll need to alter Asterisk’s Makefile, located at /usr/src/asterisk/Makefile. Using your favorite text editor, find the ASTVARRUNDIR constant in the file, and alter its definition to match what follows:
ASTVARRUNDIR=$(INSTALL_PREFIX)/var/run/asterisk
The directory referenced here needs to be writeable by the user running Asterisk, just as the directory normally used should be writeable only by root. By changing the setting, you’re allowing Asterisk to use a directory that can be written by its own nonroot user account. Now, recompile Asterisk using this sequence of commands:
	           # cd /usr/src/asterisk
	# make clean ; make install
Once the recompile and install are done, you’ll need to make sure the new user account has appropriate permission to several Asterisk-related directories, including the one you referenced in the altered Makefile:
	           # chown -R asterisk:asterisk /var/lib/asterisk
	# chown -R asterisk:asterisk /var/log/asterisk
	# chown -R asterisk:asterisk /var/run/asterisk
	# chown -R asterisk:asterisk /var/spool/asterisk
	# chown -R asterisk:asterisk /dev/zap
	# chmod -R u=rwX,g=rX,o= /var/lib/asterisk
	# chmod -R u=rwX,g=rX,o= /var/log/asterisk
	# chmod -R u=rwX,g=rX,o= /var/run/asterisk
	# chmod -R u=rwX,g=rX,o= /var/spool/asterisk
	# chmod -R u=rwX,g=rX,o= /dev/zap
	# chown –R root:asterisk /etc/asterisk
	# chmod -R u=rwX,g=rX,o= /etc/asterisk
You can now launch the Asterisk server from the new user account, or from root using the su command:
# su asterisk -c /usr/sbin/safe_asteriskFinally, you’ll need to adjust the safe_asterisk script so that it uses the new user account to launch Asterisk, rather than root. To do so, open /usr/sbin/safe_asterisk in your favorite text editor, and add su asterisk -c before each instance of an asterisk command. Be sure to leave the commands unchanged, aside from prefixing them with the su command.
Once these steps are taken, Asterisk will have only as much power as you grant the asterisk user. Would-be attackers might be able to crash Asterisk, but in so doing, they won’t be able to gain access to root’s credentials.
Link Two Asterisk Servers with PSTN
You don’t have to have dedicated point-to-point lines to link two PBX systems. Just use the PSTN phone lines that are already connected to them, and you can simulate a direct link.
You can build a two-office unified dial plan using two Asterisk servers. This way, a user need only dial the extension of the user at the other office to reach him, instead of calling that office’s main number, waiting for prompts, and then dialing the user’s extension. Asterisk can handle all of these steps automatically, routing the call to the other office’s PSTN trunk, waiting until it’s answered, and dialing the recipient’s extension to complete the connection. Figure 4-11 illustrates just such a configuration.
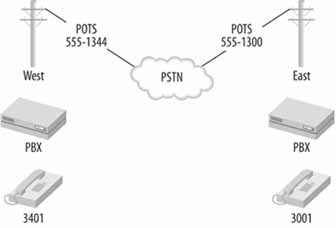
Ordinarily, if a West user wanted to reach an East user, he’d have to pick up his phone, dial the phone number of the East office, wait for an answer, and then request that user, either by speaking with a receptionist or by dialing that user’s extension. This awkward process is shown in Figure 4-12. Direct Inward Dial could shorten the process, but the dialing user still wouldn’t be able to reach his co-worker using a convenient, four-digit extension.
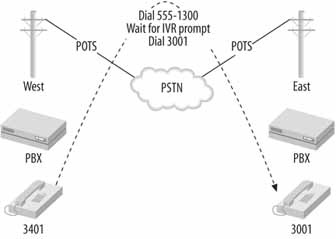
The Configuration
We’ll use the same dial-plan extension-numbering convention as shown in Figure 4-12. Phones at the East office will be 3000–3099; phones at the West office will be 3400–3499. Have one SIP phone register with the East server and the other SIP phone with the West server (our West user will be using the phone that registers with the West server, and the East user will be using the East-registered phone). The following code shows the SIP peer config for 3001 at the East office:
	# East office sip.conf
	…
	[3001]
	callerid="East User" <3001>
	canreinvite=no
	context=default
	host=dynamic
	mailbox=3001
	secret=3001
	type=friend
	username=3001
The following code represents the SIP peer config for 3401 at the West office:
	# West office sip.conf
	…
	[3401]
	callerid="West User" <3401>
	canreinvite=no
	context=default
	host=dynamic
	mailbox=3401
	secret=3401
	type=friend
	username=3401
With these first two configs committed, the SIP phones can now register with their respective Asterisk servers and place calls in their own default contexts. But they still can’t call each other without dialing a lengthy PSTN phone number, waiting for the auto-attendant, and dialing the extension on the answering Asterisk system. To get around that, we can tell both Asterisk servers to route calls bound for the extension-number range of the other office out through the PSTN and automatically dial the extension on the answering system, as follows. We’ll start with the dial-plan config for the East office:
	# East office extensions.conf
	…
	[default]
	exten => _34XX,1,Dial(Zap/1/5551340,35,mD(${EXTEN}))
And we’ll institute a mirror of that config so that West office users can dial 30XX extensions:
	# West office extensions.conf
	…
	[default]
	exten => _30XX,1,Dial(Zap/1/5551300,35,mD(${EXTEN}))
Let’s dissect this exten directive. First, _30XX is a wildcard expression that matches any number dialed that begins with 30. 1 is the extension priority. The Dial command tells Asterisk to dial the number of the other office on the Zap/1 channel and to wait for up to 35 seconds for the call to be answered. Then, the D(${EXTEN}) option tells the Dial command to send DTMF digits representing the extension number that was dialed by the user. ${EXTEN} is an Asterisk variable that always contains the extension number used for the current call. Finally, as with all Dial commands, the call will be connected after the DTMF digits are sent.
The net result of this config is that the users at West can dial 3001–3099 to reach the users at East, and the users at East can dial 3401–3499 to reach the users at West, all without any PSTN dialing or auto-attendant interaction. Here, the PSTN trunks are used like private trunks to connect two switches, while the dial plan makes it easy for the users.
Control Caller ID When Using PSTN Trunks
In the preceding example, the receiving PBX doesn’t know the extension number of the party who is calling, because the calling PBX supplies the caller ID signals for the Zaptel channel and phone line being used, not the caller ID signals for the extension that originated the call. So, the receiving user will see that she is getting a call from the “other office,” but she won’t know which user is calling her.
Using some Asterisk dial-plan wizardry, you can preserve the original caller’s caller ID information throughout the interswitch calling process:
	# West office extensions.conf
	…
	[default]
	exten => _30XX,1,SetCIDNum(${EXTEN})
	exten => _30XX,2,Dial(Zap/1/5551300,35,mD(${EXTEN}))
In this case, Asterisk will supply the originating extension number as the caller ID number. SetCIDNum establishes the caller ID number for outgoing channels on the current extension. This config would, of course, have to be mirrored for the East office, too:
	# East office extensions.conf
	…
	[default]
	exten => _34XX,1,SetCIDNum(${EXTEN})
	exten => _34XX,2,Dial(Zap/1/5551340,35,mD(${EXTEN}))
Tip
To override the phone company’s caller ID, you’ll need to be using PRI signaling, and the phone company will have to permit you to supply your own caller ID information.
There you have it: a two-office Asterisk PBX network that uses existing telephone lines to simulate a direct link between the two sites.
Link Several PBXs over the Internet
Since wide area networking is the cornerstone of IP networking, VoIP can be extended outside the local area network. Six PBXs on six continents all managed by one person? No problem.
One of the beauties of VoIP is the last two letters—IP. IP stands for Internet Protocol, and IP is the protocol that makes the Internet and private wide area networks (WANs) possible. It provides the fundamental addressing and routing scheme that keeps data traffic flowing around the globe.
Just as people have been setting up VPNs to link remote offices’ LANs over the Internet, you can now use the Internet to link several remote PBXs to create one large interconnected voice network. This will enable extension-to-extension calling from one office to another, over the Internet, all at no cost per call. Asterisk is the perfect solution for this purpose.
Tip
Keeping VoIP secure as it travels the globe is no simple matter. You can use Internet-based VPNs, but they can degrade quality. A more expensive and more reliable alternative to secure global VoIP trunks might be a managed VPN service or a frame relay service.
I will assume that you already have Asterisk in use as the PBX at all of your offices. If this is not the case, you might want to look into setting up an Asterisk gateway machine—a server that provides VoIP enablement for a legacy PBX (see “Build a Four-Line Phone Server” [Hack #49] and “Connect a Legacy Phone Line Using Zaptel” [Hack #44] for ideas on how to use legacy TDM interface cards).
Now let’s assume:
You have three offices: one in Chicago, one in Tokyo, and one in London.
None of the offices has more than 99 separate extensions.
They all have 24/7 Internet connectivity.
They all have static IP addresses.
Their Asterisk installs are directly on the Internet, or the network administrator has forwarded/passed UDP port 4569 to the Asterisk server in each location.
It is worth pointing out that the last three items do not necessarily have to be the case. With all of Linux’s power, you can actually work around those issues. While this is too much information for me to cover here, you can use the "register” feature of IAX with dynamic IP addresses, even those behind NAT! A simple Google search should return the necessary details to use register statements successfully to work around those problems.
Let’s also assume that none of your locations has overlapping extensions. That is, each location has globally unique extension numbers. For the purposes of this hack, we are going to assume that your extensions are set up like so:
- Chicago
81XX (where XX is 01–99)
- Tokyo
82XX
- London
83XX
So your first extension in Chicago is 8101, and your last possible extension in London is 8399.
If your extensions are not set up like this, it will probably be to your advantage to renumber. As you will see, this method has one big advantage: unless every extension is globally unique, it’s more difficult for each Asterisk server to route calls.
The beginning “8” signifies an internal extension. I begin with this to standardize on four-digit extensions so that an internal extension is readily recognized as being a free internal call, as opposed to an outside call to the pizza place. (This prefix helps Asterisk figure out where to route the call—to an internal user or to the phone company.) Using the same numbering convention around the world will make your life easier. When you bring that new office in Stockholm online, you just have to assign it the 84XX range and update your Asterisk servers, and the phones around the world will automatically recognize it as a valid range.
If you have not already done so, let’s set up some basic DNS records for this system. We are going to create several A records in our existing DNS zone, twidgets.com. These A records are going to be called chicago.twidgets.com, tokyo.twidgets.com, and london.twidgets.com. They should each point to the static IP address of the Asterisk server at each respective location.
Once DNS is set up properly, verify basic IP connectivity by using the
ping command to each location, from each location. Ping Tokyo from Chicago and London. Ping London from Tokyo. You get the drift. This is what you should have so far:
|
City |
Hostname |
Extension block |
|
Chicago |
chicago.twidgets.com |
81XX |
|
Tokyo |
tokyo.twidgets.com |
82XX |
|
London |
london.twidgets.com |
83XX |
Configuring the Dial Plan
On each Asterisk server, you need to add a matching extension for each dial pattern. So, log into your server in Chicago and add the following to your [internal] context in /etc/asterisk/extensions.conf:
	exten => _82XX,1,Dial(IAX2/guest@tokyo.twidgets.com/${EXTEN},20)
	exten => _82XX,2,Congestion
	exten => _83XX,1,Dial(IAX2/guest@london.twidgets.com/${EXTEN},20)
	exten => _83XX,2,Congestion
Let’s take a look at what we have done so far. In the first line, we’re telling Asterisk to create an extension that matches anything in the 8200–8299 range. (Remember those X’s from before? They signify to Asterisk any digit between 0 and 9.) The first thing that Asterisk should do is try to reach that extension at the Tokyo office by using the IAX protocol (Version 2) with the username guest. The guest username is just a placeholder. You can use a more descriptive name if you want.
Tip
The IAX protocol is a signaling protocol, like SIP, which is more efficient at trunking multiple simultaneous calls between the same two locations.
If that extension at the Tokyo office is unreachable for any reason, Asterisk will return congestion. Congestion is usually signaled to the user as what is called "fast-busy.” If you have ever left a POTS phone off the hook for too long, you have heard a fast-busy.
Adding the Remote Locations
Save extensions.conf and reload Asterisk with asterisk -rx reload. If the servers in Tokyo and London have been set up with those extensions, go ahead and try calling them. They won’t be able to call you back yet, but you should at least be able to verify that you now have direct dial around the world (for free)!
You should now repeat this process on your Asterisk servers in London and Tokyo. For brevity’s sake, I will give abridged versions of the preceding instructions for the Tokyo and London offices.
For Tokyo, edit /etc/asterisk/extensions.conf and add the following to your internal context:
	exten => _81XX,1,Dial(IAX2/guest@chicago.twidgets.com/${EXTEN},20)
	exten => _81XX,2,Congestion
	exten => _83XX,1,Dial(IAX2/guest@london.twidgets.com/${EXTEN},20)
	exten => _83XX,2,Congestion
Save extensions.conf and reload Asterisk with asterisk -rx reload.
For London, open /etc/asterisk/extensions.conf and add the following to your internal context:
	exten => _81XX,1,Dial(IAX2/guest@chicago.twidgets.com/${EXTEN},20)
	exten => _81XX,2,Congestion
	exten => _82XX,1,Dial(IAX2/guest@tokyo.twidgets.com/${EXTEN},20)
	exten => _82XX,2,Congestion
Save extensions.conf and reload Asterisk with asterisk -rx reload.
Hopefully, after this hack, you have realized that with four lines of configuration on three Linux boxes around the world, Asterisk can revolutionize the way your organization communicates. What would have been incredibly difficult and expensive to do just a few years ago has now been reduced to a few pages in a book. It’s truly amazing!
—Kristian Kielhofner
Route Calls Using Distinctive Ring
Do you have only one phone line, but wish you could use two phone numbers with your Asterisk server? Try distinctive ring.
Distinctive ring is a feature offered by some phone companies that permits you to use two or three phone numbers with the same POTS line. Depending on which number is dialed, the ring signal will differ, causing the ring to sound unique for each number. This feature allows parents to avoid answering their teenagers’ incoming calls. With a fax/voice ring switch device, you can use distinctive ring as an inexpensive way to receive both fax and voice calls on a single line.
Tip
Distinctive ring is a legacy signaling solution. That is, it works only with POTS. On VoIP trunks, such functionality would be handled by out-of-band signaling.
With Asterisk, you can use distinctive ring to route calls automatically from the PSTN trunk to a specific phone or group of phones. Or, the distinctive ring can just be passed through to all of the phones on the private network, which will ring distinctively, and the intended recipient can answer her call on any available phone.
You can configure each Zaptel channel to detect up to four different distinctive signals. The first thing you’ll need to do is open zapata.conf and add this configuration to the section for the trunk in question:
usedistinctiveringdetection=yes
Tip
Enabling distinctive ring on a Zaptel channel will cause a slight delay before Asterisk can answer incoming calls, because the distinctive ring signals can take up to five seconds for the Zaptel channel to detect.
The signals used by distinctive ring consist of analog electrical cadences—variations in voltage that cause analog phones to produce certain ring patterns. Asterisk uses the dring attribute in zapata.conf to describe the signals. Unfortunately, these signals vary from one regulatory jurisdiction to the next, and you’ll have to figure out what value to give dring attributes yourself.
Here’s how. When an incoming call is received on a POTS interface, Asterisk records the ring pattern in Asterisk’s verbose logging output (assuming you launched Asterisk with -vvvv on the command line). Use the tail command with its -f option to watch your logfile for changes as they occur:
# tail -f /var/log/asterisk/fullWhile tail is following the logfile, call each number that causes distinctive rings on your POTS lines. When the POTS interface senses the ring pattern, a log entry will appear containing Asterisk’s representation of it: a string of digits made up of three values separated by commas. Each value represents a duration of ringing, such that each ring pattern could have up to three rings of varying length in a one- or two-second time span. The pattern repeats at regular intervals until the call is answered.
This string supplies a value to the dring argument in zapata.conf. Repeat this process until you’ve identified the strings needed for each phone number associated with your POTS line. Here’s a sample config in zapata.conf that describes two distinctive ring signals and assigns them different contexts in the dial plan:
	usedistinctiveringdetection=yes
	dring1=325,95,0
	dring2=95,0,0
	dringcontext1=TedsCalls
	dringcontext2=JakesCalls
	channel =>1
Tip
Distinctive ring features outside North America can use caller ID signaling instead of ring-pattern signaling to indicate which phone number is being called. Check with your telephone company to see how they support distinctive ring.
The Zaptel channel’s configuration will tell Asterisk the context into which distinctively rung calls are sent. In this example, we’ve used a POTS line with two ring signals and two corresponding contexts. Now, we’ve got to create those contexts in the dial plan. Here’s a sample that accomplishes that in extensions.conf:
	[TedsCalls]
	exten => s,1,Dial(SIP/201,30)
	exten => s,2,Voicemail(201)

	[JakesCalls]
	exten => s,1,Dial(SIP/202,30)
	exten => s,2,Voicemail(202)
There! Ted’s distinctive ring will send Ted’s calls to SIP/201, and Jake’s distinctive ring will send them to SIP/202.
Tune Up Your Asterisk Logs
How much log detail is too much? That depends on whom you ask. Asterisk’s log output can be pretty granular, which is bad for disk utilization and good for troubleshooting.
Log analysis should be the core of your daily system monitoring and security activities. Like other softPBX servers, Asterisk supports flexible logging, providing several levels of logging detail in several different files. It also supports using syslog.
You configure Asterisk logging in the /etc/asterisk/logger.conf file, which Asterisk reads at boot time or whenever it is started. The first section of the file is [general], where you can assign a value to the dateformat option to specify what date format to use in Asterisk’s logs. To figure out the syntax of the data formats, read the manpage for strftime() by running man strftime.
The next section, [logfiles], describes which files should be used for logging output and how detailed each should be. The syntax for this section is:
filename => level,level,level…
Consider the following logging configuration:
	[general]
	[logfiles]
	messages.log => notice,warning,error
	debug.log => notice,warning,error,debug,verbose
In this example, messages.log will contain a digest version of Asterisk’s logging output, and debug.log will get everything in minute detail. Be careful with logs, though—Asterisk won’t start once the logfiles reach 2 GB in size. On a busy system, a file like the preceding debug.log would hit that size pretty quickly, so make sure your logfile rotation includes Asterisk.
If you use console as a logfile name, Asterisk will assume you mean the console device, not an actual logfile. So, if you add this to the [logfiles] section, the desired level of logging will be output to the console session where Asterisk is launched:
	[logfiles]
	console => warning,error
Some attackers cover their tracks by removing commonly used logfiles that could contain evidence of their tampering with the system. So it’s generally a good idea to keep logfiles in a nondefault place. That way, if an attacker uses an automated program to remove logfiles, the program will be less likely to find and destroy Asterisk.
Tip
If you were an intruder and wanted to control Asterisk, you might start by attacking the Asterisk Manager—the remote API that allows users who’ve provided the right password to control certain aspects of Asterisk’s operations via a TCP connection. If your Asterisk server is open to the Internet, pay special attention to Asterisk Manager log entries.
To change Asterisk’s default log location, edit /etc/asterisk/asterisk.conf and change the astlogdir directive to a path of your choosing. (Then make sure that path has appropriate permissions to allow Asterisk to write files in whichever path you choose.) A sample asterisk.conf follows:
	[directories]
	astetcdir => /etc/asterisk
	astmoddir => /usr/lib/asterisk/modules
	astvarlibdir => /var/lib/asterisk
	astlogdir => /var/log/asterisk
	astagidir => /var/lib/asterisk/agi-bin
	astspooldir => /var/spool/asterisk
	astrundir => /var/run/asterisk
Syslog can be a target for Asterisk logging output, too. To enable it, use a syslog keyword in the [logfiles] section, similar to the console keyword:
syslog.local0 => warning,error
Get VoIP Hacks now with the O’Reilly learning platform.
O’Reilly members experience books, live events, courses curated by job role, and more from O’Reilly and nearly 200 top publishers.

