Chapter 4. Projects
There’s no better way to learn something new than by example. I’ve put together some simple projects that you can follow along with to learn some skills for Connect IQ. First, you’ll learn how to run the example programs that come with the Connect IQ SDK, and also how to modify one of those examples. Next, you’ll step out of the physical confines of the simulator and use ANT+ technology to talk to an external sensor, the Garmin tempe temperature sensor. Finally, you’ll learn how to communicate with an authenticated web service.
Note
You can download these projects and other sample code from Garmin’s connectiq-apps GitHub repo.
Personal Data Tracking
The Project Explorer in the Connect IQ perspective shows all the Connect IQ projects in your workspace. Unless you’ve been exploring on your own, you should only see one project, MyFirstApp. Keeping track of which project an open file corresponds to can be tricky, so I suggest you right-click on MyFirstApp and choose Close Project. That will collapse its folders and also will close any of its files you may have open. Do the same with any other projects you’re working on.
-
Now you’re ready to import one of the Connect IQ sample projects. Choose File→Import, and the Import dialog will appear. Make sure General→Existing Projects into Workspace is selected as shown in Figure 4-1. Click Next.
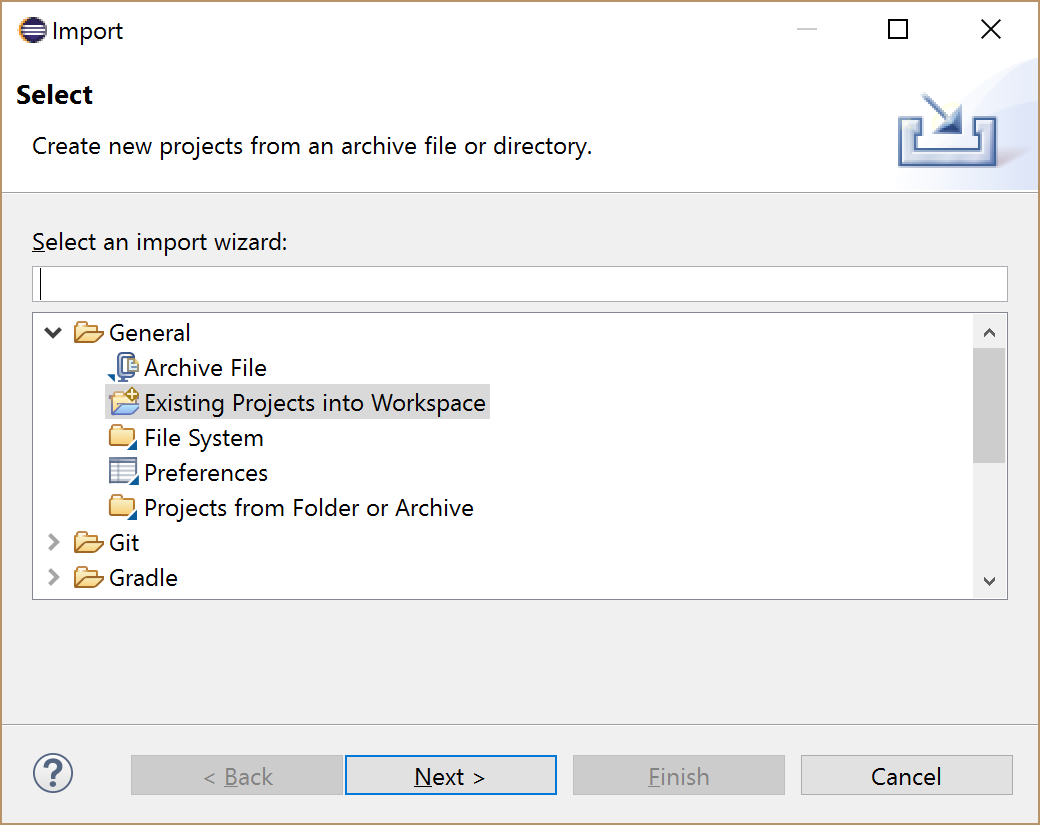
Figure 4-1. Importing an existing project
-
In the next page of the dialog, click Browse next to Select Root Directory, and make your way into the folder where you extracted the Connect IQ SDK. In the samples subdirectory, choose RecordSample (don’t choose any of its subdirectories) and click OK.
-
Back in the Import dialog, check the box to the left of Copy Projects into Workspace. That way, you’ll be working on a copy of the sample (very important in case you make any mistakes) rather than the original. The Import dialog should look like Figure 4-2. Click Finish. The RecordSample project will appear in your Project Explorer.
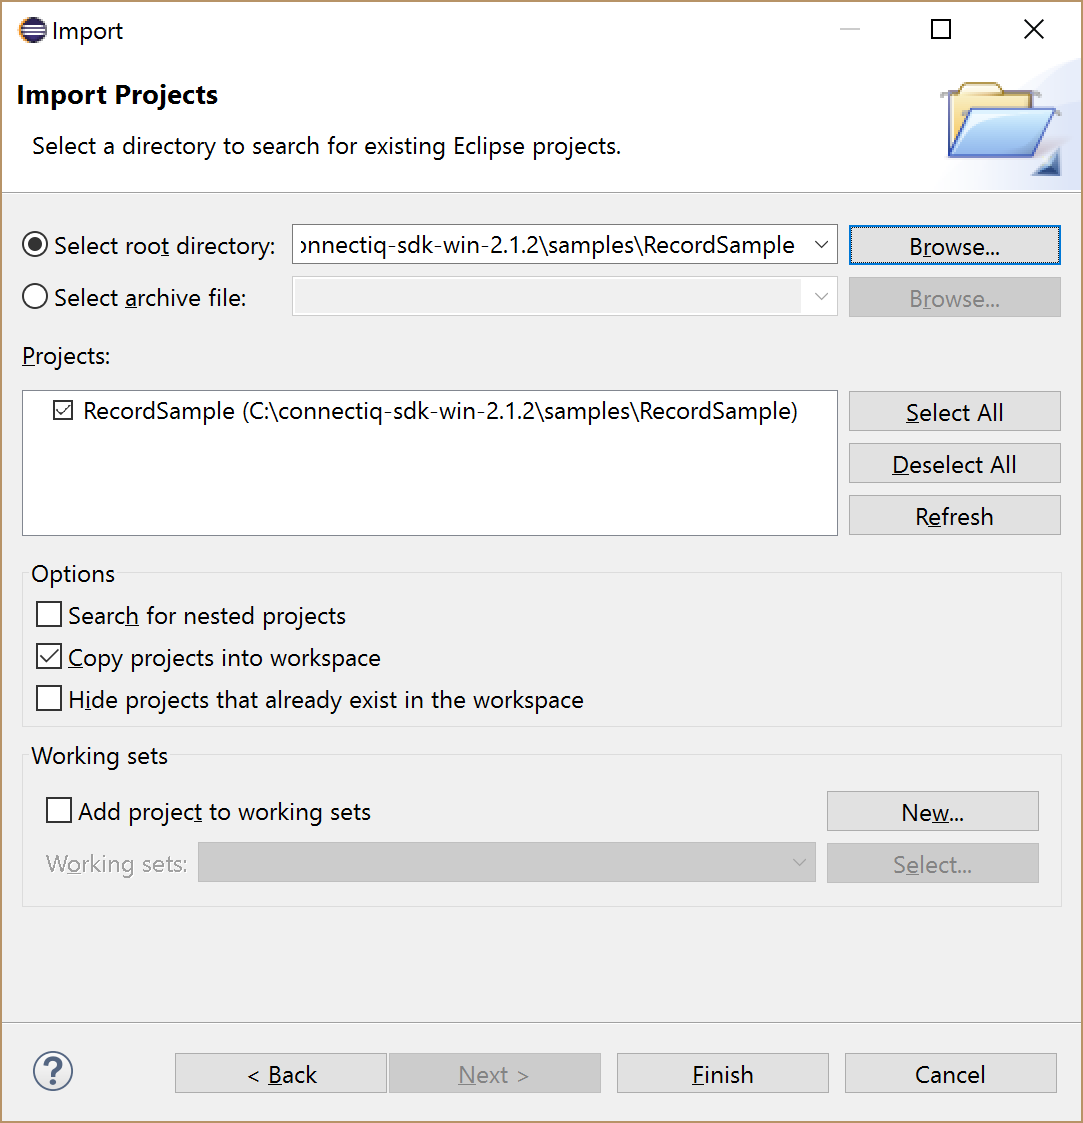
Figure 4-2. Importing the RecordSample
This project is a simple track recorder. If you run it on your watch or your simulator, it will generate a FIT file with GPS locations. It’s preconfigured for the Square Watch format as well as a few other devices. To run it, right-click on the project, then choose Run As→Connect IQ App.
Note
The Run As option lets you bypass creating a Run Configuration. But you’ll be asked to choose what kind of device to run it on when you launch it as shown in Figure 4-3, so you may also want to create a Run Configuration for convenience (see “Create a New Connect IQ Project”).
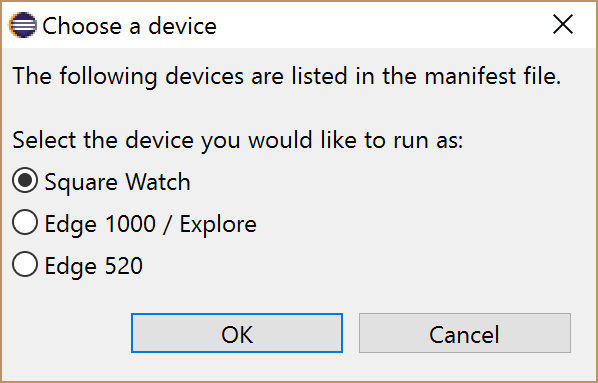
Figure 4-3. Choosing what kind of device to run as
Choose the Square Watch option, and when the simulator starts, you’ll see a blank screen with the text “Press Menu to Start Recording.” Press the menu button on the simulator, and it will start recording data. You can press the menu button again to stop the recording. Let it run for a minute or two and then use the button again to stop.
Note
On devices without a menu button, such as the vívoactive HR, long-press on the right button to start and stop the recording.
You can also run the sample directly in your device with the Connect IQ→Build for Device Wizard option in Eclipse.
Note
If your device is not one of the few devices supported by the sample, right-click RecordSample in Project Explorer, choose Properties, make sure Connect IQ is selected in the lefthand side of the screen, check the box for your device, then click OK.
Access the FIT File
When you’re done recording, select Simulation→FIT Data→Save Fit Session to save the FIT file to a location on your computer.
If you ran the sample on your device, you can later retrieve the FIT file from your device. Connect it to your computer with the USB cable, and look in the GARMIN/ACTIVITY folder.
The FIT SDK includes some programs you can run to convert FIT files to other formats, such as comma-separated values. But if you’ve paired your device with the Garmin Connect App, and if you’re signed up for an account, you can view your recording by clicking the menu icon and choosing Activities, as shown in Figure 4-4 (be sure to sync your device from your phone first). You’ll then see a list of activities—in this case, “CityName Walking.” Click on an activity to see all the information that the sample app recorded.
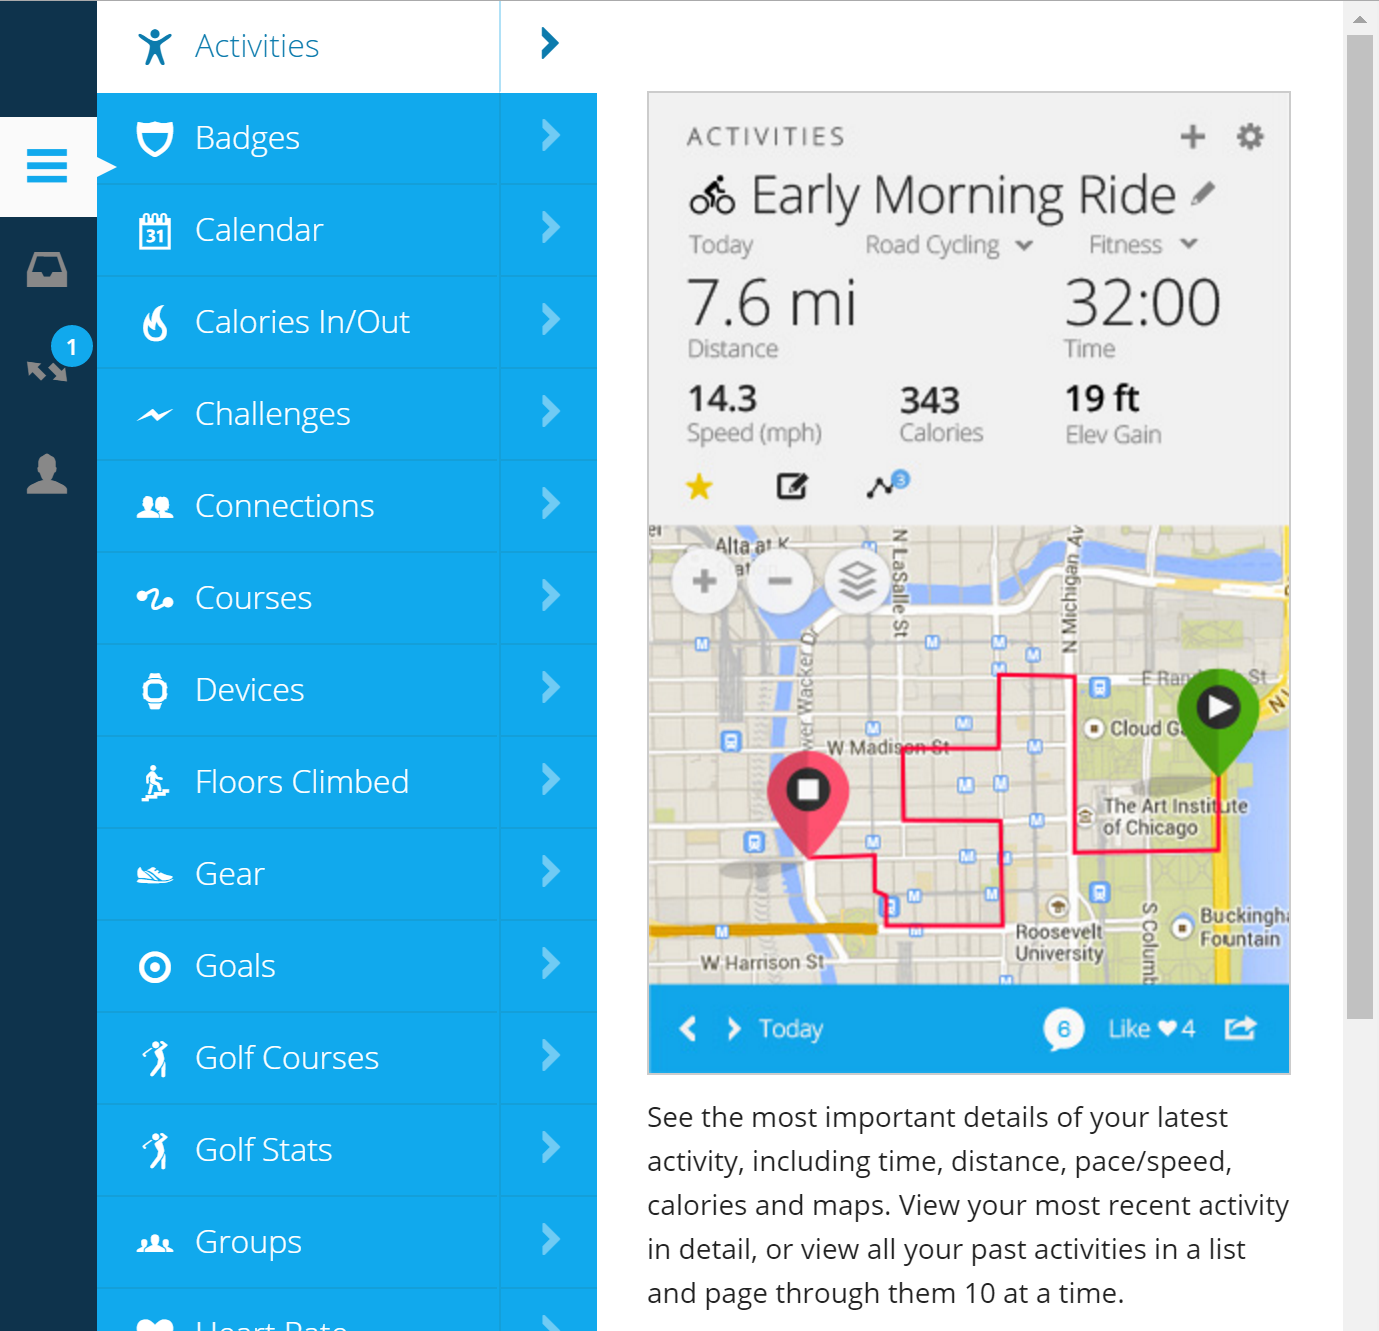
Figure 4-4. Selecting your activities on Connect
Add a New Field
What if you want to track additional data into the FIT file? Here are some quick changes you can make to the sample app to record a numeric value. First, open up RecordSampleView.mc in Project Explorer, and make the following changes.
Right below using Toybox.ActivityRecording as Record;, add these two lines so you can use classes and objects from these packages:
using Toybox.FitContributor as Fit;
using Toybox.Timer as Timer;
Next, you’ll need to add the following lines right under the line class BaseInputDelegate extends Ui.BehaviorDelegate:
var mFooField;
var mFooValue = 0;
var fooTimer = null;

function updateFoo() {
    mFooValue = mFooValue + 1;
    mFooField.setData(mFooValue);
}
The first three lines add three new variables to the BaseInputDelegate class: one that represents the new data field, another for its underlying value, and the third for a Timer object that will be fired periodically. The updateFoo() method is a new method that the Timer object will call for you. It just increments the value by 1 each time.
Next, in the onMenu() function, add the following lines right before session.start(); (this creates a new field that’s recorded into the FIT file, sets its value to the value of mFooValue, and then sets up and starts a timer to periodically update the value and the field):
mFooField = session.createField("Foo", 0, Fit.DATA_TYPE_FLOAT,
          { :mesgType=>Fit.MESG_TYPE_RECORD, :units=>"bars" });
mFooField.setData(mFooValue);
fooTimer = new Timer.Timer();
fooTimer.start(method(:updateFoo), 1000, true);
Just below those lines, right before session.stop(), add the following line:
fooTimer.stop();
That line ensures that the timer is gracefully terminated before the recording stops.
Before you try to run this app, right-click RecordSample in Project Explorer, select Properties, go to Connect IQ, and check FitContributor under Permissions. Click OK.
Here’s the part of the RecordSampleView.mc file that you modified, with new lines shown in bold (some long lines have been wrapped from the original so it fits on the page):
using Toybox.WatchUi as Ui;
using Toybox.Graphics as Gfx;
using Toybox.System as Sys;
using Toybox.Lang as Lang;
using Toybox.ActivityRecording as Record;
using Toybox.FitContributor as Fit;
using Toybox.Timer as Timer;

var session = null;

class BaseInputDelegate extends Ui.BehaviorDelegate
{
  var mFooField;
  var mFooValue = 0;
  var fooTimer = null;

  function updateFoo() {
    mFooValue = mFooValue + 1;
    mFooField.setData(mFooValue);
  }
  function onMenu() {
    if( Toybox has :ActivityRecording ) {
      if( ( session == null )
          || ( session.isRecording() == false ) )
      {
        session = Record.createSession({:name=>"Walk",
                        :sport=>Record.SPORT_WALKING});
        mFooField = session.createField("Foo", 0,
          Fit.DATA_TYPE_FLOAT,
          { :mesgType=>Fit.MESG_TYPE_RECORD, :units=>"bars" });
        mFooField.setData(mFooValue);
        fooTimer = new Timer.Timer();
        fooTimer.start(method(:updateFoo), 1000, true);
        session.start();
        Ui.requestUpdate();
      }
      else if( ( session != null ) && session.isRecording() ) {
        fooTimer.stop();
        session.stop();
        session.save();
        session = null;
        Ui.requestUpdate();
      }
    }
    return true;
  }
}
If you look inside one of the generated FIT files, you’ll see the Foo field being populated. Here’s an excerpt from a FIT file that I recorded on a vívoactive HR with this app, and converted to CSV using the java/FitToCSV.bat utility in the FIT SDK:
| Field 12 | Value 12 | Units 12 |
|---|---|---|
Foo |
5 |
bars |
Foo |
6 |
bars |
Foo |
7 |
bars |
Foo |
8 |
bars |
Foo |
9 |
bars |
Foo |
10 |
bars |
Foo |
11 |
bars |
Notice how it simply increments, which is consistent with what’s in the updateFoo() method.
Next, you need to add some string labels to the strings.xml file and create a fitcontributions.xml file to instruct Connect IQ as to how to graph these values. Expand the resources folder under RecordSample and double-click strings.xml. In Chapter 3, you used the Eclipse XML visual editing tools to modify resource files. This time, I’d like you to try editing the raw XML. Click the Source tab under the editor window, and you should see this in the editor:
<resources>
    <string id="AppName">RecordSample</string>
</resources>
Add three new lines, one for the field label, one for the graph label, and one for its units. Your strings.xml file should now look like this:
<resources>
    <string id="AppName">RecordSample</string>
    <string id="foo_label">Foos</string>
    <string id="foo_graph_label">Foos</string>
    <string id="foo_units">bars</string>
</resources>
Save the file. Next, right-click the resources folder, add a new folder called contributions, then add a new file to that folder called fitcontributions.xml. Use the Source tab of the XML editor to add the fitContributions resources as shown:
<fitContributions>
    <fitField id="0" displayInChart="true" sortOrder = "0"
    precision="2" chartTitle="@Strings.foo_graph_label"
    dataLabel="@Strings.foo_label" unitLabel="@Strings.foo_units"
    fillColor="#FF0000" />
</fitContributions>
Save the file, and run the app on your device. You won’t be able to see the new field appear on Garmin Connect, because your app needs to be approved and published in the Connect IQ store for custom fields to appear. However, if you run the monkeygraph utility (Connect IQ→Start Monkeygraph), you can see how the graph would look. Before you run monkeygraph, go back to Eclipse and choose Connect IQ→App Export Wizard. This will create an IQ file that could be submitted to the Connect IQ store. But it also contains important metadata that monkeygraph needs to be able to graph the values. Select the RecordSample project, and export the IQ file somewhere.
Next, run monkeygraph, then use File→Open IQ File to open the file you just created. After that, use File→Open FIT File to open one of the FIT files you recorded after running the app. You’ll see a graph like the one in Figure 4-5.
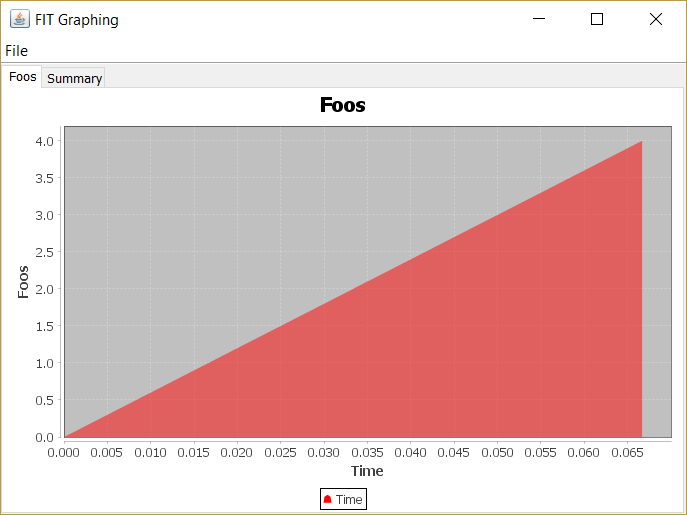
Figure 4-5. Graph of your foos as measured in bars
Read Data from a Sensor
Now let’s experiment with talking to a sensor using ANT+ technology, the Garmin tempe temperature sensor. This project won’t be an activity recorder; it will display the values, but won’t record them.
-
Choose File→New→Connect IQ Project. Name it TempeApp, make it a Watch App, and choose Square Watch as the target platform (along with any other platforms you want to use).
-
Delete the following files or directories from the project (right-click, then choose Delete): resources/menus, resources/layouts, and source/TempeAppMenuDelegate.mc. These files relate to portions of the sample app (specifically, the part that displays the sample menus) that you won’t need for this project.
-
Open source/TempeAppDelegate.mc in the editor, and remove the entire
onMenu()function. The file should look like this when you’re done:using Toybox.WatchUi as Ui; class TempeAppDelegate extends Ui.BehaviorDelegate { function initialize() { BehaviorDelegate.initialize(); } } -
Right-click TempeApp in Project Explorer, select Properties, and check ANT under Permissions. Click OK.
-
Double-click the source/TempeAppView.mc file to open it in the editor. Replace its contents with the code shown in Example 4-1. Save the file.
-
Right-click the source folder, choose New→File, name it TempeSensor.mc, and put the code shown in Example 4-2 in the file. Save it.
Example 4-1. Source of the TempeAppView.mc file
using Toybox.WatchUi as Ui;using Toybox.Graphics as Gfx; using Toybox.System as Sys; class TempeAppView extends Ui.View { // The class for the app view
var mTemp = 0; // current temperature var tempTimer = null; // timer for update frequency var mSensor; // sensor object function updateTemp() {
mTemp = mSensor.data.currentTemp; // Read the temperature Ui.requestUpdate(); // Request a screen update } function initialize() {
// Create and start a timer. tempTimer = new Timer.Timer(); tempTimer.start(method(:updateTemp), 10000, true); try { // Create the sensor object and open it mSensor = new TempeSensor(); mSensor.open(); } catch( e instanceof Ant.UnableToAcquireChannelException ) { Sys.println( e.getErrorMessage() ); mSensor = null; } View.initialize(); // Initialize the UI } // Load your resources here function onLayout(dc) {
} // Called when this View is brought to the foreground. function onShow() {
// (re)start the timer tempTimer.start(method(:updateTemp), 10000, true); } // Update the view function onUpdate(dc) {
dc.clear(); // Clear the display // Set a white color for drawing and draw a rectangle dc.setColor(Gfx.COLOR_WHITE, Gfx.COLOR_TRANSPARENT); dc.fillRectangle(0, 0, dc.getWidth(), dc.getHeight()); // Draw black text against a white // background for the temperature dc.setColor(Gfx.COLOR_BLACK, Gfx.COLOR_WHITE); dc.drawText(dc.getWidth()/2, 0, Gfx.FONT_XTINY, "Temperature:"+ mTemp, Gfx.TEXT_JUSTIFY_CENTER); } // Called when this View is removed from the screen. function onHide() {
tempTimer.stop(); // Stop the timer } }
Here’s where you declare which libraries you are using. The
askeyword lets you assign a shorter alias for them. So instead of writingGraphics, I can writeGfxthroughout this file.These three variables represent the current temperature read from the sensor, a timer object for updating the value periodically, and a sensor object to refer to the sensor itself.
This function is called by the timer, and does two things: gets the latest value from the sensor and forces the user interface to refresh, which causes the
onUpdate()function to be called.This function gets called when things start up. It creates a timer that fires every 10 seconds, and also attempts to open the sensor, which is represented by the
TempeSensorclass.The
onLayout()method is called when your app starts, and sets up the layout of your app’s view. Because you’re only drawing directly on the screen in theonUpdate()function, as opposed to displaying UI elements whose contents are refreshed, you don’t have any layout to perform. Thedcargument is short for “drawing context,” which is an object that’s provided to your app for all drawing operations. You want to put something on the screen? You go through thedc.The
onShow()method is called when the app comes back into the foreground. This restarts the timer (it will be stopped inonHide()). This reveals a key part of power management. The device runtime will notify your app when the user sends it to the background. It does this by calling theonHide()method. When the user returns to the app later, the device calls youronShow()method.This function clears the screen, puts a white background on there, and adds some text with the current temperature read from the sensor.
This stops the timer when the app gets sent to the background. See the preceding discussion for the
onShow()method.
Example 4-2. Source of the TempeSensor.mc file
using Toybox.Ant as Ant;
using Toybox.System as System;
using Toybox.Time as Time;

class TempeSensor extends Ant.GenericChannel
{

  const DEVICE_TYPE = 25;  // The ANT+ device type
  const PERIOD = 65535;    // How often we expect new data

  hidden var chanAssign;   // The channel assigned by the radio

  var data;                // Stores the data received from the
                           // sensor
  var searching;           // Whether we're currently searching for
                           // the sensor
  var deviceCfg;           // Device configuration details

  // This flag indicates we've obtained enough
  // data to read the temperature
  var tempDataAvailable = false;

  class TempeData
  {
    var currentTemp;
    function initialize()
    {
      currentTemp = 0;
    }
  }

  class TempeDataPage
  {
    static const PAGE_NUMBER = 1;

    function parse(payload, data)
    {
      // The payload (what we received from the sensor) has
      // a few data points in it. We're just interested in
      // the current temperature.
      data.currentTemp = parseCurrentTemp(payload);
    }

    hidden function parseCurrentTemp(payload)
    {
      // Mask most significant byte (MSB) to see if it's > 127
      var intHigh = payload[7] & 0x80;

      // Combine the most significant and least significant bytes
      var currentTemp = (payload[7] << 8) | (payload[6] & 0xff);

      // If the MSB is over 127, invert its bits and multiply by -1
      if (intHigh > 0) {
        currentTemp = (~currentTemp & 0xFFFF) * -1;
      }
      currentTemp = currentTemp / 100f; // Divide by 100 to get
                                        // actual temp
      if ((currentTemp < -327) || (currentTemp > 327) ) {
        return 0;
      }
      return currentTemp;
    }
  }

  function initialize()
  {
    // Get the channel
    chanAssign = new Ant.ChannelAssignment(
      Ant.CHANNEL_TYPE_RX_NOT_TX,
      Ant.NETWORK_PLUS);
    GenericChannel.initialize(method(:onMessage), chanAssign);

    // Set the configuration
    deviceCfg = new Ant.DeviceConfig( {
      :deviceNumber => 0,               // Wildcard (any matching
                                        // device)
      :deviceType => DEVICE_TYPE,
      :transmissionType => 0,
      :messagePeriod => PERIOD,
      :radioFrequency => 57,            // ANT+ Frequency
      :searchTimeoutLowPriority => 10,  // Timeout in 25s
      :searchTimeoutHighPriority => 2,  // Timeout in 5s
      :searchThreshold => 0} );         // Pair w/all sensors
    GenericChannel.setDeviceConfig(deviceCfg);

    data = new TempeData();
    searching = true;
  }

  function open()
  {
    // Open the channel
    GenericChannel.open();

    data = new TempeData();
    searching = true;
  }

  function closeSensor()
  {
    GenericChannel.close();
  }

  function onMessage(msg)
  {
    // Parse the payload
    var payload = msg.getPayload();

    if( Ant.MSG_ID_BROADCAST_DATA == msg.messageId )
    {
      if( TempeDataPage.PAGE_NUMBER ==
          (payload[0].toNumber() & 0xFF) )
      {
        // Were we searching?
        if(searching)
        {
          searching = false;

          // Update our device configuration primarily to see the
          // device number of the sensor we paired to
          deviceCfg = GenericChannel.getDeviceConfig();
        }
        var dp = new TempeDataPage();
        dp.parse(msg.getPayload(), data);
        tempDataAvailable = true;
      }
    } // end broadcast data

    else if( Ant.MSG_ID_CHANNEL_RESPONSE_EVENT == msg.messageId )
    {
      if( Ant.MSG_ID_RF_EVENT == (payload[0] & 0xFF) )
      {
        if( Ant.MSG_CODE_EVENT_CHANNEL_CLOSED ==
            (payload[1] & 0xFF) )
        {
          open();
        }
        else if( Ant.MSG_CODE_EVENT_RX_FAIL_GO_TO_SEARCH
                 == (payload[1] & 0xFF) )
        {
          searching = true;
        }
      }
      else
      {
        //It is a channel response.
      }
    } // end channel response event

  } // end on message

}
Note
To determine the available device types, you will need to go to the ANT+ website and register for a developer account. Next, log in with your developer account, go to Downloads page on the ANT+ website, and download the PDF corresponding to the device profile you’re interested in. You’ll typically find the device type under the Slave Channel Configuration section of the document.
You will also find an explanation of how the data payload is structured in this document.
There are several variables used throughout this program. The
DEVICE_TYPEis the type of device with ANT+ technology we’re working with, and thePERIODrefers to how often the sensor is expected to send new data. The other variables relate to the configuration of the radio, and the data received from it (thedatavariable).This class represents the value from the sensor that we’re interested in: the current temperature.
The data from the sensor comes back as data pages. This class reads through each page, parsing the payload contained in the page, and extracts the current temperature from it. The
parse()function calls theparseCurrentTemp()function and stores the value it gets from it into thecurrentTempfield of theTempeDatavariable,data.This function receives the ANT message and extracts the current temperature from it. The ANT message comes in as an array of bytes; elements 6 and 7 are the least significant and most significant byte that, when combined, give us a two-byte integer that contains the temperature.
The range of numbers that can be represented in two bytes is 0 to 65,535. Divided by 100, that gives us a range of 0 to 655.35 degrees, in .01 degree increments. However, temperatures can be negative, so the values 0 to 32767 represent 0 to 327.67 degrees, while the values 32768 to 65535 represent the range -327.67 to 0 degrees. Technically, 0 represents positive 0 and 65535 represents negative 0, but they are numerically equivalent.
This function assigns a radio channel for the ANT network, then configures the device to communicate with the tempe sensor. It then creates a new
TempeDataobject and stores it in thedatavariable.The
open()function reopens the ANT communications channel.This
closeSensor()function closes the ANT communications channel.This method is called when a message is received from the tempe sensor. It retrieves the payload from the message, allocates a data page for parsing the payload, and parses the newly received data. It also includes some code to handle various types of activities that might occur in the course of radio communications.
After you’ve saved all your changes, you can run it on the device or the simulator. If you’re using the simulator, you’ll need the USB adapter described in “What You’ll Need” and any drivers required by it. Figure 4-6 shows the current temperature (in Celsius) on the simulator.
For further exploration of ANT and ANT+, check out the following resources:
- ANT/ANT+ N5 Starter Kit
-
Dynastream Innovations, a Garmin company, makes the N5 Starter Kit, which includes a programmer with cable, two ANT radios, an input/output board, USB carrier, and a battery board for powering one of the radios. You can use their N5 SDK to develop firmware that runs directly on the radio modules and create your own ANT/ANT+ products.
- ANT Developer Forums
-
On the ANT+ forum, you’ll find discussions, advice, and answers for all your ANT/ANT+ development questions.
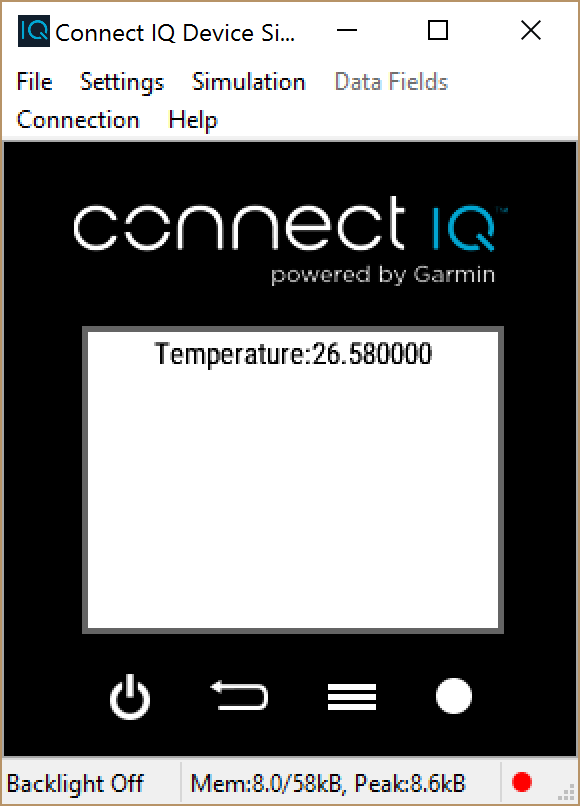
Figure 4-6. Reading the temperature
Working with an Authenticated Web Service
OAuth provides a standard way for developers to authenticate their apps against a web API. Before you can use an API in your app, you (the developer) must register yourself and your app with whoever provides the web API. Your users must also be registered as users with whoever provides the API. When your app goes to authenticate to a web API, it first uses the app’s credentials, then asks the user to log in to the service, and then gives your app permission to access her data.
OAuth provides a special challenge to wearables: how can you type your username and password into the little screen on your wrist? You can’t, at least not easily. As a result, Connect IQ has a few tricks up its sleeve: first, you invoke the makeOAuthRequest function, which causes a notification to appear on the user’s paired phone that’s running the Garmin Connect app. This notification (Figure 4-7) takes the user to a web page that allows him to sign in and grant permission. Once this process is complete, the user is notified that sign-in is complete, and asks him to return to his watch.
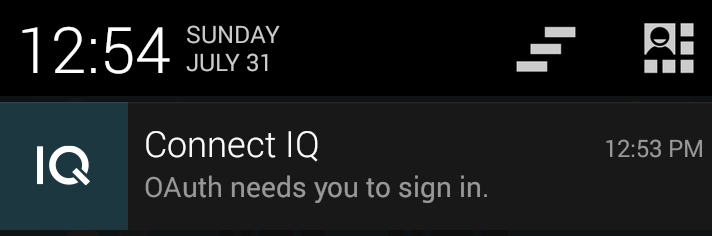
Figure 4-7. How Garmin Connect Mobile notifies users that they need to sign in
What happens if your watch app or widget times out before the user finishes logging in?
To address this, your app should call registerForOAuthMessages to receive the result of the login process. If your app closes before the login process completes, the result will be cached on the device until the next time your app calls registerForOAuthMessages, at which point the result will be passed to your callback immediately. Once you have the access token, you can use it as an argument to makeWebRequest, which is the function you use to actually call the API.
Activity Summary
Strava is a popular fitness app and online community. Strava can collect workout information from its own Strava app as well as other fitness communities, including Garmin Connect. Strava offers a developer API that allows access to an athlete’s workout history and other information. This section looks at an example app that accesses an athlete’s four-week summary of workouts and summarizes it in a Connect IQ widget. Because it is a large app, I won’t be showing it in its entirety here. The source code is accessible from GitHub.
To access the Strava API, you need to first create an app definition. To do this, you need to go to Strava’s developer site and create an application. You’ll need to obtain the following values from the Strava developer site, and create a source/Keys.mc file with the following information (replace the values in quotes with your actual ID, secret, and token):
var ClientId = "FROM STRAVA API ADMIN"
var ClientSecret = "FROM STRAVA API ADMIN";
var ServerToken = "FROM STRAVA API ADMIN";
The app is split into two halves: login and display. If the app hasn’t gotten an access token, it needs to authenticate the user. Most of the work is done in the LoginTransaction class, which is contained in source/StravaLogin.mc. This class follows the OAuth login flow described earlier.
When the Strava app is launched (source/StravaApp.mc), its getInitialView method creates a LoginView (StraveLoginView.mc), which kicks off LoginTransaction’s go method, in turn calling makeOAuthRequest:
function go() {
    // Kick off a request for the user's credentials. This will
    // cause a notification from Connect Mobile to appear.
    Comm.makeOAuthRequest(
        // URL for the authorization URL
        "https://www.strava.com/oauth/authorize",
        // POST parameters
        {
            "client_id"=>$.ClientId,
             "response_type"=>"code",
             "scope"=>"public",
             "redirect_uri"=>$.RedirectUri
         },
         // Redirect URL
         $.RedirectUri,
         // Response type
         Comm.OAUTH_RESULT_TYPE_URL,
         // Value to look for
         {"code"=>"value"}
    );
}
Earlier, LoginTransaction’s initialize method had set up a callback to handle OAuth messages:
Comm.registerForOAuthMessages(method(:accessCodeResult));
The makeOAuthRequest call will cause the login prompt to appear in Garmin Connect Mobile. Once the user has completed credential entry, the accessCodeResult callback is invoked with the response from the authenticating server, including the temporary access code. At this point, the user is done with the browser on her phone, and your app will use makeWebRequest to request the access token with an HTTP POST request. If this request is successful, it will call our delegate’s handleResponse method with the access token:
// Convert the authorization code to the access token
function getAccessToken(accessCode) {
    // Request an access token via POST over HTTPS
    Comm.makeWebRequest(
        // URL
        "https://www.strava.com/oauth/token",
        // Post parameters
        {
            "client_secret"=>$.ClientSecret,
            "client_id"=>$.ClientId,
            "code"=>accessCode
        },
        // Options to the request
        {
            :method => Comm.HTTP_REQUEST_METHOD_POST
        },
        // Callback to handle response
        method(:handleAccessResponse)
    );
}

// Callback to handle receiving the access code
function handleAccessResponse(responseCode, data) {
    // If we got data back then we were successful. Otherwise
    // pass the error on to the delegate
    if( data != null) {
        _delegate.handleResponse(data);
    } else {
        Sys.println("Error in handleAccessResponse");
        Sys.println("data = " + data);
        _delegate.handleError(responseCode);
    }
}
What do you do with this token? Fortunately, Connect IQ offers nonvolatile storage of app properties so you won’t need to re-authorize each time you run the app. For apps in the Connect IQ app store, the persistent data is encrypted using a randomly generated asymmetric key, and app access is validated with digital signatures (see the Connect IQ security model). You can use the app properties to store away the access token you receive from the server:
// Handle a successful response from the server
function handleResponse(data) {
    // Store the access and refresh tokens in properties
    // For app store apps the properties are encrypted using
    // a randomly generated key
    App.getApp().setProperty("refresh_token",
                             data["refresh_token"]);
    App.getApp().setProperty("access_token",
                             data["access_token"]);
    // Store away the athlete id
    App.getApp().setProperty("athlete_id",
                             data["athlete"]["id"]);
    // Switch to the data view
    Ui.switchToView(new StravaView(), null, Ui.SLIDE_IMMEDIATE);
}
Once you have the access token, you can use it to make authenticated requests to the server by passing the access token in the HTTP headers:
Comm.makeWebRequest(
    url,
    _parameters,
    {
        :method=>Comm.HTTP_REQUEST_METHOD_GET,
        :headers=>{ "Authorization"=>"Bearer " + accessToken }
    },
    method(:onResponse)
);
Keep It Brief
The Connect IQ Communication API brings the wearable web to Garmin devices. However, there are some subtleties to how to expose a web service to a Garmin device. Because all of the communication takes place over a Bluetooth Smart connection (you may know this as Bluetooth LE or BLE), the device is bandwidth limited. Data transfers through the Connect IQ SDK will have a transfer speed less than 1 Kb/s, generally between 400 and 800 bytes/s. For comparison, a single tweet from Twitter’s API can be upwards of 2.5 Kb. Connect IQ does some magic under the hood to minimize the amount of data that’s transferred from the phone to the watch, but you can quickly see how pulling a user’s last few tweets could be somewhat time consuming.
This classic proverb of “Less Is More” couldn’t be more true when considering JSON responses. When working with web services, consider what information you really need to have at the Connect IQ level and keep your bandwidth budget in mind when you make decisions about what to ask a server to send back to you.
The projects in this chapter are meant to give you a foundation in Connect IQ development, but also a start on whatever you might want to build yourself. You know how to record sessions and define your own data fields. You’ve seen how to talk to external sensors and read their transmissions. And you have gotten an overview of using OAuth to authenticate to web services and fetch data from them.
Now you can combine these things, or mix up your own from scratch. For example, you could push your temperature readings to a web service that logs them and displays them online. You could poll a public weather API like the Weather Underground, and combine humidity and weather forecast information with your temperature readings.
The Connect IQ SDK, while preserving backward compatibility with older SDKs, is in a constant state of improvement. When I started this book, a new version was in beta; it was already on its first point release by the time I finished it. Keep an eye on the Connect IQ developer site, especially their forums and developer blog, and sign up for their developer newsletter to stay current with the latest updates.
Get Wearable Programming for the Active Lifestyle now with the O’Reilly learning platform.
O’Reilly members experience books, live events, courses curated by job role, and more from O’Reilly and nearly 200 top publishers.

