Chapter 4. Using APIs
Like many programmers who have worked on large projects, I have my share of horror stories when it comes to working with other people’s code. From namespace issues to type issues to misunderstandings of function output, simply trying to get information from point A to method B can be a nightmare.
This is where application programming interfaces come in handy: they provide nice, convenient interfaces between multiple disparate applications. It doesn’t matter if the applications are written by different programmers, with different architectures, or even in different languages—APIs are designed to serve as a lingua franca between different pieces of software that need to share information with each other.
Although various APIs exist for a variety of different software applications, in recent times “API” has been commonly understood as meaning “web application API.” Typically, a programmer will make a request to an API via HTTP for some type of data, and the API will return this data in the form of XML or JSON. Although most APIs still support XML, JSON is quickly becoming the encoding protocol of choice.
If taking advantage of a ready-to-use program to get information prepackaged in a useful format seems like a bit of a departure from the rest of this book, well, it is and it isn’t. Although using APIs isn’t generally considered web scraping by most people, both practices use many of the same techniques (sending HTTP requests) and produce similar results (getting information); they often can be very complementary to each other.
For instance, you might want to combine information gleaned from a web scraper with information from a published API in order to make the information more useful to you. In an example later in this chapter, we will look at combining Wikipedia edit histories (which contain IP addresses) with an IP address resolver API in order to get the geographic location of Wikipedia edits around the world.
In this chapter, we’ll offer a general overview of APIs and how they work, look at a few popular APIs available today, and look at how you might use an API in your own web scrapers.
How APIs Work
Although APIs are not nearly as ubiquitous as they should be (a large motivation for writing this book, because if you can’t find an API, you can still get the data through scraping), you can find APIs for many types of information. Interested in music? There are a few different APIs that can give you songs, artists, albums, and even information about musical styles and related artists. Need sports data? ESPN provides APIs for athlete information, game scores, and more. Google has dozens of APIs in its Developers section for language translations, analytics, geolocation, and more.
APIs are extremely easy to use. In fact, you can try out a simple API request just by entering the following in your browser:1
http://freegeoip.net/json/50.78.253.58
This should produce the following response:
{"ip":"50.78.253.58","country_code":"US","country_name":"United States,"region_code":"MA","region_name":"Massachusetts","city":"Chelmsford","zipcode":"01824","latitude":42.5879,"longitude":-71.3498,"metro_code":"506","area_code":"978"}
So, wait, you navigate to a web address in your browser window and it produces some information (albeit, very well-formatted)? What’s the difference between an API and a regular website? Despite the hype around APIs, the answer is often: not much. APIs function via HTTP, the same protocol used to fetch data for websites, download a file, and do almost anything else on the Internet. The only things that makes an API an API is the extremely regulated syntax it uses, and the fact that APIs present their data as JSON or XML, rather than HTML.
Common Conventions
Unlike the subjects of most web scraping, APIs follow an extremely standardized set of rules to produce information, and they produce that information in an extremely standardized way as well. Because of this, it is easy to learn a few simple ground rules that will help you to quickly get up and running with any given API, as long as it’s fairly well written.
That being said, keep in mind that some APIs do deviate slightly from these rules, so it’s important to read an API’s documentation the first time you use it, regardless of how familiar you are with APIs in general.
Methods
There are four ways to request information from a web server via HTTP:
GETPOSTPUTDELETE
GET is what you use when you visit a website through the address bar in your browser. GET is the method you are using when you make a call to http://freegeoip.net/json/50.78.253.58. You can think of GET as saying, “Hey, web server, please get me this information.”
POST is what you use when you fill out a form, or submit information, presumably to a backend script on the server. Every time you log into a website, you are making a POST request with your username and (hopefully) encrypted password. If you are making a POST request with an API, you are saying, “Please store this information in your database.”
PUT is less commonly used when interacting with websites, but is used from time to time in APIs. A PUT request is used to update an object or information. An API might require a POST request to create a new user, for example, but it might need a PUT request if you want to update that user’s email address.2
DELETE is straightforward; it is used to delete an object. For instance, if I send a DELETE request to http://myapi.com/user/23, it will delete the user with the ID 23. DELETE methods are not often encountered in public APIs, which are primarily created to disseminate information rather than allow random users to remove that information from their databases. However, like the PUT method, it’s a good one to know about.
Although a handful of other HTTP methods are defined under the specifications for HTTP, these four constitute the entirety of what is used in just about any API you will ever encounter.
Authentication
Although some APIs do not use any authentication to operate (meaning anyone can make an API call for free, without registering with the application first), many modern APIs require some type of authentication before they can be used.
Some APIs require authentication in order to charge money per API call, or they might offer their service on some sort of a monthly subscription basis. Others authenticate in order to “rate limit” users (restrict them to a certain number of calls per second, hour, or day), or to restrict the access of certain kinds of information or types of API calls for some users. Other APIs might not place restrictions, but they might want to keep track of which users are making which calls for marketing purposes.
All methods of API authentication generally revolve around the use of a token of some sort, which is passed to the web server with each API call made. This token is either provided to the user when the user registers and is a permanent fixture of the user’s calls (generally in lower-security applications), or it can frequently change, and is retrieved from the server using a username and password combination.
For example, to make a call to the Echo Nest API in order to retrieve a list of songs by the band Guns N’ Roses we would use:
http://developer.echonest.com/api/v4/artist/songs?api_key=<your api key here>
%20&name=guns%20n%27%20roses&format=json&start=0&results=100
This provides the server with an api_key value of what was provided to me on registration, allowing the server to identify the requester as Ryan Mitchell, and provide the requester with the JSON data.
In addition to passing tokens in the URL of the request itself, tokens might also be passed to the server via a cookie in the request header. We will discuss headers in greater detail later in this chapter as well as in Chapter 12, but by way of brief example, they can be sent using the urllib package from previous chapters:
token="<your api key>"webRequest=urllib.request.Request("http://myapi.com",headers={"token":token})html=urlopen(webRequest)
Responses
As you saw in the FreeGeoIP example at the beginning of the chapter, an important feature of APIs is that they have well-formatted responses. The most common types of response formatting are eXtensible Markup Language (XML) and JavaScript Object Notation (JSON).
In recent years, JSON has become vastly more popular than XML for a couple of major reasons. First, JSON files are generally smaller than well-designed XML files. Compare, for example, the XML data:
<user><firstname>Ryan</firstname><lastname>Mitchell</lastname><username>Kludgist</username></user>
which clocks in at 98 characters, and the same data in JSON:
{"user":{"firstname":"Ryan","lastname":"Mitchell","username":"Kludgist"}}
which is only 73 characters, or a whopping 36% smaller than the equivalent XML.
Of course, one could argue that the XML could be formatted like this:
<userfirstname="ryan"lastname="mitchell"username="Kludgist"></user>
but this is considered bad practice because it doesn’t support deep nesting of data. Regardless, it still requires 71 characters, about the same length as the equivalent JSON.
Another reason JSON is quickly becoming more popular than XML is simply due to a shift in web technologies. In the past, it was more common for a server-side script such as PHP or .NET to be on the receiving end of an API. Nowadays, it is likely that a framework, such as Angular or Backbone, will be sending and receiving API calls. Server-side technologies are somewhat agnostic as to the form in which their data comes. But JavaScript libraries like Backbone find JSON easier to handle.
Although most APIs still support XML output, we will be using JSON examples in this book. Regardless, it is a good idea to familiarize yourself with both if you haven’t already—they are unlikely to go away any time soon.
API Calls
The syntax of an API call can vary wildly from API to API, but there are a few standard practices they often have in common. When retrieving data through a GET request, the URL path describes how you would like to drill down into the data, while the query parameters serve as filters or additional requests tacked onto the search.
For example, in a hypothetical API, you might request the following to retrieve all posts by the user with the ID 1234 during the month of August 2014:
http://socialmediasite.com/users/1234/posts?from=08012014&to=08312014
Many other APIs use the path in order to specify an API version, the format you would like your data in, and other attributes. For example, the following would return the same data, using API version 4, formatted in JSON:
http://socialmediasite.com/api/v4/json/users/1234/posts?from=08012014&to=08312014
Other APIs require that you pass the formatting and API version information in as a request parameter, like:
http://socialmediasite.com/users/1234/posts?format=json&from=08012014&to=08312014
Echo Nest
The Echo Nest is a fantastic example of a company that is built on web scrapers. Although some music-based companies, such as Pandora, depend on human intervention to categorize and annotate music, The Echo Nest relies on automated intelligence and information scraped from blogs and news articles in order to categorize musical artists, songs, and albums.
Even better, this API is freely available for noncommercial use.3 You cannot use the API without a key, but you can obtain a key by going to The Echo Nest “Create an Account” page and registering with a name, email address, and username.
A Few Examples
The Echo Nest API is built around several basic content types: artists, songs, tracks, and genres. Except for genres, these content types all have unique IDs, which are used to retrieve information about them in various forms, through API calls. For example, if I wanted to retrieve a list of songs performed by Monty Python, I would make the following call to retrieve their ID (remember to replace <your api key> with your own API key):
http://developer.echonest.com/api/v4/artist/search?api_key=<your api
 key>&name=monty%20python
This produces the following result:
{"response":{"status":{"version":"4.2","code":0,"message":"Success"},"artists":[{"id":"AR5HF791187B9ABAF4","name":"Monty Python"},{"id":"ARWCIDE13925F19A33","name":"Monty Python's SPAMALOT"},{"id":"ARVPRCC12FE0862033","name":"Monty Python's Graham Chapman"}]}}
I could also use that ID to query for a list of songs:
http://developer.echonest.com/api/v4/artist/songs?api_key=<your api key>&id=
AR5HF791187B9ABAF4&format=json&start=0&results=10
Which provides some of Monty Python’s hits, along with lesser-known recordings:
{"response":{"status":{"version":"4.2","code":0,"message":"Success"},"start":0,"total":476,"songs":[{"id":"SORDAUE12AF72AC547","title":"Neville Shunt"},{"id":"SORBMPW13129A9174D","title":"Classic (Silbury Hill)(Part 2)"},{"id":"SOQXAYQ1316771628E","title":"Famous Person Quiz (TheFinal Rip Off Remix)"},{"id":"SOUMAYZ133EB4E17E8","title":"Always Look OnThe Bright Side Of Life - Monty Python"},...]}}
Alternatively, I could make a single call using the name monty%20python in place of the unique ID and retrieve the same information:
http://developer.echonest.com/api/v4/artist/songs?api_key=<your api key>2&name=
monty%20python&format=json&start=0&results=10
Using that same ID, I can request a list of similar artists:
http://developer.echonest.com/api/v4/artist/similar?api_key=<your api key>&id=
AR5HF791187B9ABAF4&format=json&results=10&start=0
The results include other comedy artists such as Eric Idle, who was in the Monty Python group:
{"response":{"status":{"version":"4.2","code":0,"message":"Success"},"artists":[{"name":"Life of Brian","id":"ARNZYOS1272BA7FF38"},{"name":"Eric Idle","id":"ARELDIS1187B9ABC79"},{"name":"The Simpsons","id":"ARNR4B91187FB5027C"},{"name":"Tom Lehrer","id":"ARJMYTZ1187FB54669"},...]}}
Note that while this list of similar artists contains some genuinely interesting information (e.g., “Tom Lehrer”), the first result is “The Life of Brian,” from the film soundtrack that Monty Python released. One of the hazards of using a database culled from many sources with minimal human intervention is that you can get some slightly strange results. This is something to keep in mind when creating your own app using data from third-party APIs.
I’ve covered just a few examples of how The Echo Nest API can be used. For complete documentation check out Echo Nest API Overview.
The Echo Nest sponsors many hackathons and programming projects focused on the intersection of technology and music. If you need some inspiration, The Echo Nest demo page is a good place to start.
Twitter is notoriously protective of its API and rightfully so. With over 230 million active users and a revenue of over $100 million a month, the company is hesitant to let just anyone come along and have any data they want.
Twitter’s rate limits (the number of calls it allows each user to make) fall into two categories: 15 calls per 15-minute period, and 180 calls per 15-minute period, depending on the type of call. For instance, you can make up to 12 calls a minute to retrieve basic information about Twitter users, but only one call a minute to retrieve lists of those users’ Twitter followers.4
Getting Started
In addition to rate limiting, Twitter has a more complicated authorization system than do other APIs such as The Echo Nest, both for obtaining API keys and for using those keys. In order to obtain an API key, you will, of course, need a Twitter account; you can create one relatively painlessly on the signup page. In addition, you will need to register a new “application” with Twitter on its developer site.
After this registration, you will be taken to a page containing your basic application information, including your Consumer Key (Figure 4-1):
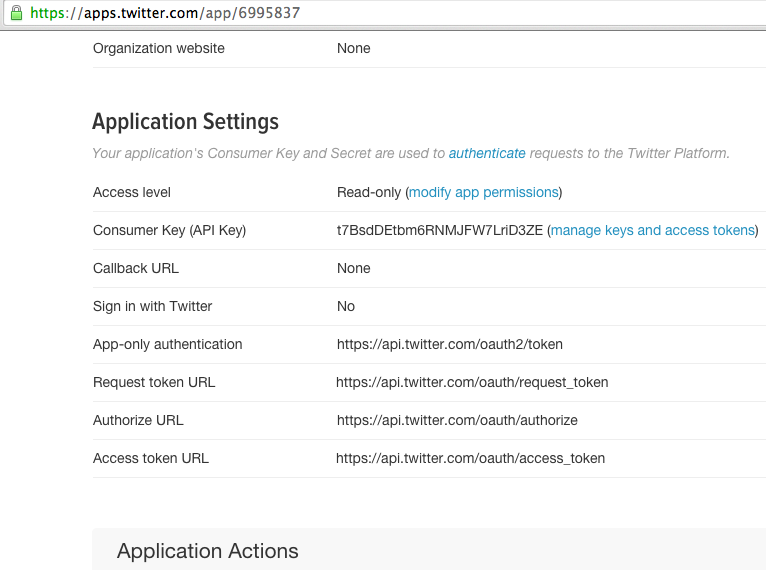
Figure 4-1. Twitter’s Application Settings page provides basic information about your new application
If you click on the “manage keys and access tokens” page, you will be directed to a page containing further information (Figure 4-2):
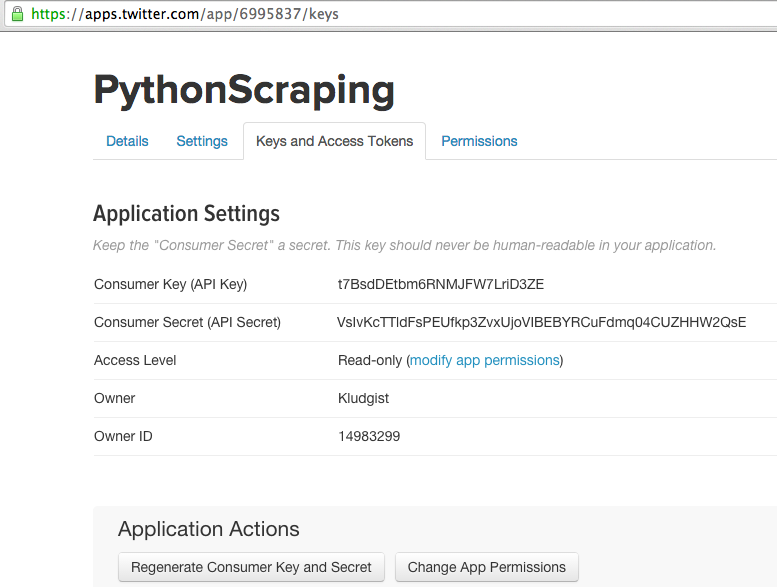
Figure 4-2. You’ll need your secret key to use the Twitter API
This page also contains a button to automatically regenerate your keys should your secret key somehow become public (e.g., if you accidentally publish it as an illustration in a technical book).
A Few Examples
Twitter’s authentication system, which uses OAuth, is fairly complicated; it’s best to wrap it in one of the readily available libraries rather than try to keep track of it yourself. Because of the relative complexity of working with Twitter’s API “by hand,” this section’s samples will focus on using Python code to interact with the API, rather than working with the API itself.
As of this writing, there are many Python 2.x libraries used to interact with Twitter but relatively few Python 3.x libraries available. Fortunately, one of the best Twitter libraries (appropriately called Twitter) is available for Python 3.x. You can download it from the Python Twitter Tools page and install it in the usual way:
$cdtwitter-x.xx.x$pythonsetup.py install
Twitter Credential Permissions
By default, application access tokens are given read-only permission. This is fine for most purposes, unless you want your application to actually make a tweet on your behalf.
To change the permissions of your tokens to read/write, go to the Permissions tab on Twitter’s Application Management panel. The tokens will then need to be regenerated for the permission update to take place.
Similarly, you can update the token permissions to be able to access direct messages to your Twitter account if necessary for your application. Be careful, however; you should give tokens only the permissions they absolutely need. In general, it’s good practice to generate multiple sets of tokens for multiple applications, rather than reuse too-powerful tokens for applications that don’t need all their permissions.
In our first exercise, we search for specific tweets. The following code connects to the Twitter API and prints a JSON list of tweets containing the hashtag #python. Remember to replace the strings in the OAuth line with your actual credentials:
fromimport,OAutht=(auth=OAuth(<AccessToken>,<AccessTokenSecret>,<ConsumerKey>,<ConsumerSecret>))pythonTweets=t.search.tweets(q="#python")(pythonTweets)
Although the output of this script might be overwhelming, keep in mind that you’re getting a lot of information per tweet: the date and time the tweet was made, details about any retweets or favorites, and details about the user’s account and profile image. Although you might be looking for just a subset of this data, the Twitter API was designed for web developers who want to display the tweets received through the API on their own websites, so there’s a lot of extra stuff involved!
You can see an example output of a single tweet when making a status update through the API:
fromimport*t=(auth=OAuth(<AccessToken>,<AccessTokenSecret>,<ConsumerKey>,<ConsumerSecret>))statusUpdate=t.statuses.update(status='Hello, world!')(statusUpdate)
Here is JSON’s description of the tweet:
{'created_at':'SunNov3007:23:39+00002014','place':None,'in_reply_to_screen_name':None,'id_str':'538956506478428160','in_reply_to_user_id:None,'lang':'en','in_reply_to_user_id_str':None,'user':{'profile_sidebar_border_color':'000000','profile_background_image_url':'http://pbs.twimg.com/profile_background_images/497094351076347904/RXn8MUlD.png','description':'SoftwareEngineer@LinkeDrive,Mastersstudent@HarvardEXT,@OlinCollegegraduate,writer@OReillyMedia.Reallytall.Haspinkhair.Female,despitethename.','time_zone':'EasternTime(US&Canada)','location':'Boston,MA','lang':'en','url':'http://t.co/FM6dHXloIw','profile_location':None,'name':'RyanMitchell','screen_name':'Kludgist','protected':False,'default_profile_image':False,'id_str':'14983299','favourites_count':140,'contributors_enabled':False,'profile_use_background_image':True,'profile_background_image_url_https':'https://pbs.twimg.com/profile_background_images/497094351076347904/RXn8MUlD.png','profile_sidebar_fill_color':'889654','profile_link_color':'0021B3','default_profile':False,'statuses_count':3344,'profile_background_color':'FFFFFF','profile_image_url':'http://pbs.twimg.com/profile_images/496692905335984128/XJh_d5f5_normal.jpeg','profile_background_tile':True,'id':14983299,'friends_count':409,'profile_image_url_https':'https://pbs.twimg.com/profile_images/496692905335984128/XJh_d5f5_normal.jpeg','following':False,'created_at':'MonJun0218:35:18+00002008','is_translator':False,'geo_enabled':True,'is_translation_enabled':False,'follow_request_sent':False,'followers_count':2085,'utc_offset':-18000,'verified':False,'profile_text_color':'383838','notifications':False,'entities':{'description':{'urls':[]},'url':{'urls':[{'indices':[0,22],'url':'http://t.co/FM6dHXloIw','expanded_url':'http://ryanemitchell.com','display_url':'ryanemitchell.com'}]}},'listed_count':22,'profile_banner_url':'https://pbs.twimg.com/profile_banners/14983299/1412961553'},'retweeted':False,'in_reply_to_status_id_str':None,'source':'<ahref="http://ryanemitchell.com"rel="nofollow">PythonScraping</a>','favorite_count':0,'text':'Hello,world!','truncated':False,'id':538956506478428160,'retweet_count':0,'favorited':False,'in_reply_to_status_id':None,'geo':None,'entities':{'user_mentions':[],'hashtags':[],'urls':[],'symbols':[]},'coordinates':None,'contributors':None}
Yes, this is the result of sending a single tweet. Sometimes I think Twitter limits access to its API because of the bandwidth required to respond to every request!
For any request that retrieves a list of tweets, you can limit the number of tweets received by specifying a count:
pythonStatuses=t.statuses.user_timeline(screen_name="montypython",count=5)(pythonStatuses)
In this case, we are asking for the last five tweets that were posted to @montypython’s timeline (this includes any retweets they might have made).
Although these three examples (searching for tweets, retrieving the tweets of a specific user, and posting your own tweets) cover a great deal of what most people do with the Twitter API, the capabilities of the Twitter Python library are far more numerous. You can search and manipulate Twitter lists, follow and unfollow users, look up profile information for users, and more. The complete documentation can be found on GitHub.
Google APIs
Google has one of the most comprehensive, easy-to-use collections of APIs on the Web today. Whenever you’re dealing with some sort of basic subject, such as language translation, geolocation, calendars, or even genomics, Google has an API for it. Google also has APIs for many of its popular apps, such as Gmail, YouTube, and Blogger.
There are two main reference pages for browsing Google APIs. The first is the Products page, which serves as an organized repository of its APIs, software development kits, and other projects that might be of interest to software developers. The other is the APIs console, which provides a convenient interface to turn API services on and off, view rate limits and usage at a glance, and even spin up a Google-powered cloud computing instance if you feel like it.
Most of Google’s APIs are free although some, such as its search API, require a paid license. Google is fairly liberal with its collection of free APIs allowing from 250 requests per day to 20,000,000 requests per day with a basic account. There is also the option to raise the rate limits on some of the APIs by verifying your identity with a credit card (the card is not charged). For example, the Google Places API has a basic rate limit of 1,000 requests per 24-hour period, but this can be raised to 150,000 requests by verifying your identity. For more information, see the Usage Limits and Billing page.
Getting Started
If you have a Google account, you can view the list of available APIs and create an API key using the Google Developers Console. If you don’t have a Google account, signing up is easy to do via the Create Your Google Account page.
Once you’ve logged in or created your account, you can view your account credentials, including API keys, on the API console page; click “Credentials” in the left menu (Figure 4-3):
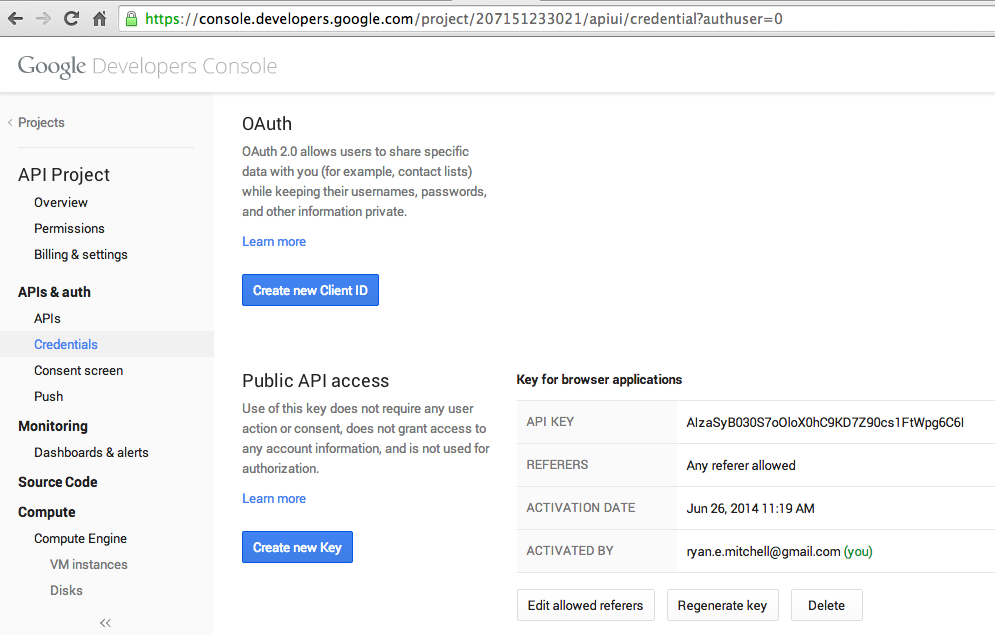
Figure 4-3. Google’s API Credentials page
On the Credentials page, you can click the “Create new Key” button to create an API key, with the option to limit the referring IP address or URL that can use it. To create an API key that can be used from any URL or IP address, simply leave the “Accept Request From These Server IP Addresses” box blank when prompted. Keep in mind, however, that it is important to keep your key secret if you do not limit the originating IP address—any calls made using your API key will count against your rate limit, even if they are unauthorized.
You can create multiple API keys as well. For example, you might have a separate API key for each project, or for each web domain that you own. However, Google’s API rate limits are per account, not per key, so although this might be a handy way to manage your API permissions, it will not work to get around rate limiting!
A Few Examples
Google’s most popular (and in my opinion most interesting) APIs can be found in its collection of Maps APIs. You might be familiar with this feature through the embeddable Google Maps found on many websites. However, the Maps APIs go far beyond embedding maps—you can resolve street addresses to latitude/longitude coordinates, get the elevation of any point on Earth, create a variety of location-based visualizations, and get time zone information for an arbitrary location, among other bits of information.
When trying these examples out on your own, remember to activate each needed API from Google’s API console before sending a request. Google uses these API activations for its metrics (“how many users does this API have?”), so you’re required to explicitly activate the API before using.
Using Google’s Geocoding API, you can make a simple GET request from your browser to resolve any street address (in this case, the Boston Museum of Science) to a latitude and longitude:
https://maps.googleapis.com/maps/api/geocode/json?address=1+Science+Park+Boston
+MA+02114&key=<your API key>
"results":[{"address_components":[{"long_name":"Museum Of Science Driveway","short_name":"Museum Of Science Driveway","types":["route"]},{"long_name":"Boston","short_name":"Boston","types":["locality","political"]},{"long_name":"Massachusetts","short_name":"MA","types":["administrative_area_level_1","political"]},{"long_name":"United States","short_name":"US","types":["country","political"]},{"long_name":"02114","short_name":"02114","types":["postal_code"]}],"formatted_address":"Museum Of Science Driveway, Boston, MA 02114, USA","geometry":{"bounds":{"northeast":{"lat":42.368454,"lng":-71.06961339999999},"southwest":{"lat":42.3672568,"lng":-71.0719624}},"location":{"lat":42.3677994,"lng":-71.0708078},"location_type":"GEOMETRIC_CENTER","viewport":{"northeast":{"lat":42.3692043802915,"lng":-71.06943891970849},"southwest":{"lat":42.3665064197085,"lng":-71.0721368802915}}},"types":["route"]}],"status":"OK"}
Note that the address we send the API doesn’t have to be especially well formatted. Google being Google, the Geocoding API is excellent at taking addresses that are missing postal codes or state information (or even misspelled addresses), and giving you back its best guess at what the correct address is. For instance, the deplorably spelled request argument 1+Skience+Park+Bostton+MA (without even a postal code) returns the same result.
I have used the Geocoding API on several occasions, not only to format user-entered addresses on a website, but to crawl the Web looking for things that look like addresses, and using the API to reformat them into something easier to store and search.
To get the time zone information for our newly found latitude and longitude, you can use the Time zone API:
https://maps.googleapis.com/maps/api/timezone/json?location=42.3677994,-71.0708 078×tamp=1412649030&key=<your API key>
Which provides the response:
{"dstOffset":3600,"rawOffset":-18000,"status":"OK","timeZoneId":"America/New_York","timeZoneName":"Eastern Daylight Time"}
A Unix timestamp is required to make a request to the Time Zone API. This allows Google to provide you with a time zone appropriately adjusted for daylight saving time. Even in areas where the time zone is not affected by the time of year (such as Phoenix, which does not use daylight saving time), the timestamp is still required in an API request.
To round out this all-too-brief tour of the Google Maps API collection, you can also fetch the elevation for this latitude and longitude:
https://maps.googleapis.com/maps/api/elevation/json?locations=42.3677994,-71.070
8078&key=<your API key>
This returns the elevation in meters above sea level, along with the “resolution,” which indicates the distance in meters of the farthest data point this elevation was interpolated from. A smaller value for resolution indicates a higher degree of accuracy in the given elevation:
{"results":[{"elevation":5.127755641937256,"location":{"lat":42.3677994,"lng":-71.0708078},"resolution":9.543951988220215}],"status":"OK"}
Parsing JSON
In this chapter, we’ve looked at various types of APIs and how they function, and we’ve looked at some sample JSON responses from these APIs. Now let’s look at how we can parse and use this information.
At the beginning of the chapter I used the example of the freegeoip.net IP, which resolves IP addresses to physical addresses:
http://freegeoip.net/json/50.78.253.58
I can take the output of this request and use Python’s JSON parsing functions to decode it:
importjsonfromurllib.requestimporturlopendefgetCountry(ipAddress):response=urlopen("http://freegeoip.net/json/"+ipAddress).read().decode('utf-8')responseJson=json.loads(response)returnresponseJson.get("country_code")(getCountry("50.78.253.58"))
This prints out the country code for the IP address: 50.78.253.58.
The JSON parsing library used is part of Python’s core library. Just type in import json at the top, and you’re all set! Unlike many languages that might parse JSON into a special JSON object or JSON node, Python uses a more flexible approach and turns JSON objects into dictionaries, JSON arrays into lists, JSON strings into strings, and so forth. In this way, it makes it extremely easy to access and manipulate values stored in JSON.
The following gives a quick demonstration of how Python’s JSON library handles the different values that might be encountered in a JSON string:
importjsonjsonString='{"arrayOfNums":[{"number":0},{"number":1},{"number":2}],"arrayOfFruits":[{"fruit":"apple"},{"fruit":"banana"},{"fruit":"pear"}]}'jsonObj=json.loads(jsonString)(jsonObj.get("arrayOfNums"))(jsonObj.get("arrayOfNums")[1])(jsonObj.get("arrayOfNums")[1].get("number")+jsonObj.get("arrayOfNums")[2].get("number"))(jsonObj.get("arrayOfFruits")[2].get("fruit"))
The output of which is:
[{'number': 0}, {'number': 1}, {'number': 2}]
{'number': 1}
3
pear
Line 1 is a list of dictionary objects, line 2 is a dictionary object, line 3 is an integer (the sum of the integers accessed in the dictionaries), and line 4 is a string.
Bringing It All Back Home
Although the raison d'être of many modern web applications is to take existing data and format it in a more appealing way, I would argue that this isn’t very interesting thing to do in most instances. If you’re using an API as your only data source, the best you can do is merely copy someone else’s database that already exists, and which is, essentially, already published. What can be far more interesting is to take two or more data sources and combine them in a novel way, or use an API as a tool to look at scraped data from a new perspective.
Let’s look at one example of how data from APIs can be used in conjunction with web scraping: to see which parts of the world contribute the most to Wikipedia.
If you’ve spent much time on Wikipedia, you’ve likely come across an article’s revision history page, which displays a list of recent edits. If users are logged into Wikipedia when they make the edit, their username is displayed. If they are not logged in, their IP address is recorded, as shown in Figure 4-4.
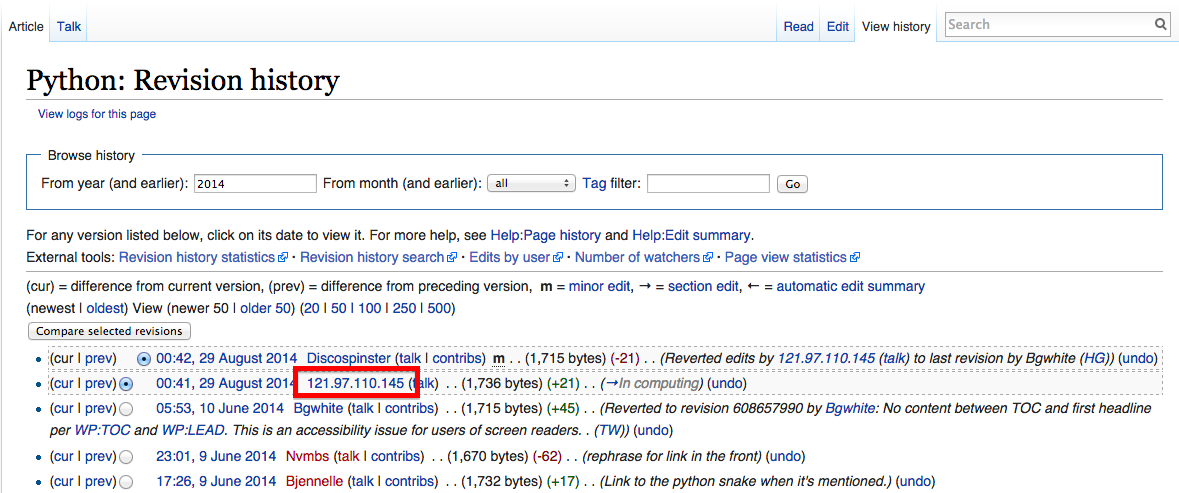
Figure 4-4. The IP address of an anonymous editor on the revision history page for Wikipedia’s Python entry
The IP address outlined on the history page is 121.97.110.145. By using the freegeoip.net API, as of this writing (IP address can occasionally shift geographically) that IP address is from Quezon, Phillipines.
This information isn’t all that interesting on its own, but what if we could gather many, many, points of geographic data about Wikipedia edits and where they occur? A few years ago I did just that and used Google’s Geochart library to create an interesting chart (http://www.pythonscraping.com/pages/wikipedia.html) that shows where edits on the English-language Wikipedia, along with the Wikipedias written in other languages, originate from (Figure 4-5).
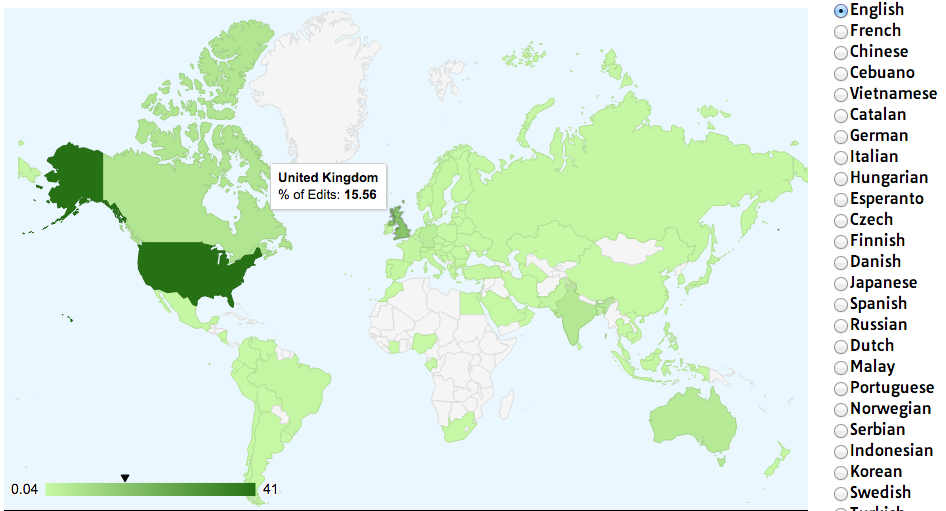
Figure 4-5. Visualization of Wikipedia edits created using Google’s Geochart library
Creating a basic script that crawls Wikipedia, looks for revision history pages, and then looks for IP addresses on those revision history pages isn’t difficult. Using modified code from Chapter 3, the following script does just that:
fromurllib.requestimporturlopenfrombs4importBeautifulSoupimportjsonimportdatetimeimportrandomimportrerandom.seed(datetime.datetime.now())defgetLinks(articleUrl):html=urlopen("http://en.wikipedia.org"+articleUrl)bsObj=BeautifulSoup(html)returnbsObj.find("div",{"id":"bodyContent"}).findAll("a",href=re.compile("^(/wiki/)((?!:).)*$"))defgetHistoryIPs(pageUrl):#Format of revision history pages is:#http://en.wikipedia.org/w/index.php?title=Title_in_URL&action=historypageUrl=pageUrl.replace("/wiki/","")historyUrl="http://en.wikipedia.org/w/index.php?title="+pageUrl+"&action=history"("history url is: "+historyUrl)html=urlopen(historyUrl)bsObj=BeautifulSoup(html)#finds only the links with class "mw-anonuserlink" which has IP addresses#instead of usernamesipAddresses=bsObj.findAll("a",{"class":"mw-anonuserlink"})addressList=set()foripAddressinipAddresses:addressList.add(ipAddress.get_text())returnaddressListlinks=getLinks("/wiki/Python_(programming_language)")while(len(links)>0):forlinkinlinks:("-------------------")historyIPs=getHistoryIPs(link.attrs["href"])forhistoryIPinhistoryIPs:(historyIP)newLink=links[random.randint(0,len(links)-1)].attrs["href"]links=getLinks(newLink)
This program uses two main functions: getLinks (which was also used in Chapter 3), and the new getHistoryIPs, which searches for the contents of all links with the class mw-anonuserlink (indicating an anonymous user with an IP address, rather than a username) and returns it as a set.
This code also uses a somewhat arbitrary (yet effective for the purposes of this example) search pattern to look for articles from which to retrieve revision histories. It starts by retrieving the histories of all Wikipedia articles linked to by the starting page (in this case, the article on the Python programming language). Afterward, it selects a new starting page randomly, and retrieves all revision history pages of articles linked to by that page. It will continue until it hits a page with no links.
Now that we have code that retrieves IP addresses as a string, we can combine this with the getCountry function from the previous section in order to resolve these IP addresses to countries. I modified getCountry slightly, in order to account for invalid or malformed IP addresses that will result in a “404 Not Found” error (as of this writing, freegeoip.net does not resolve IPv6, for instance, which might trigger such an error):
defgetCountry(ipAddress):try:response=urlopen("http://freegeoip.net/json/"+ipAddress).read().decode('utf-8')exceptHTTPError:returnNoneresponseJson=json.loads(response)returnresponseJson.get("country_code")links=getLinks("/wiki/Python_(programming_language)")while(len(links)>0):forlinkinlinks:("-------------------")historyIPs=getHistoryIPs(link.attrs["href"])forhistoryIPinhistoryIPs:country=getCountry(historyIP)ifcountryisnotNone:(historyIP+" is from "+country)newLink=links[random.randint(0,len(links)-1)].attrs["href"]links=getLinks(newLink)
Here’s a sample output:
-------------------
history url is: http://en.wikipedia.org/w/index.php?title=Programming_
paradigm&action=history
68.183.108.13 is from US
86.155.0.186 is from GB
188.55.200.254 is from SA
108.221.18.208 is from US
141.117.232.168 is from CA
76.105.209.39 is from US
182.184.123.106 is from PK
212.219.47.52 is from GB
72.27.184.57 is from JM
49.147.183.43 is from PH
209.197.41.132 is from US
174.66.150.151 is from US
More About APIs
In this chapter, we’ve looked at a few ways that modern APIs are commonly used to access data on the Web, in particular uses of APIs that you might find useful in web scraping. However, I’m afraid that this does not do justice to the broad scope that “software sharing data with disparate software” entails.
Because this book is about web scraping and is not intended as a general guide on data collection, I can only point you in the direction of some excellent resources for further research on the subject, if you need it.
Leonard Richardson, Mike Amundsen, and Sam Ruby’s RESTful Web APIs provides a strong overview of the theory and practice of using APIs on the Web. In addition, Mike Amundsen has a fascinating video series, Designing APIs for the Web, that teaches you how to create your own APIs, a useful thing to know if you decide to make your scraped data available to the public in a convenient format.
Web scraping and web APIs might seem like very different subjects at first glance. However, I hope that this chapter has shown that they are complementary skills on the same continuum of data collection. In some sense, using a web API can even be thought of as a subset of the subject of web scraping. After all, you are ultimately writing a script that collects data from a remote web server, and parsing it into a usable format, as you would do with any web scraper.
1 This API resolves IP addresses to geographic locations and is one I’ll be using later in the chapter as well. You can learn more about it at http://freegeoip.net.
2 In reality, many APIs use POST requests in lieu of PUT requests when updating information. Whether a new entity is created or an old one is merely updated is often left to how the API request itself is structured. However, it’s still good to know the difference, and you will often encounter PUT requests in commonly used APIs.
3 See The Echo Nest Licensing page restriction requirements details.
4 For a complete list of rate limits, see https://dev.twitter.com/rest/public/rate-limits.
Get Web Scraping with Python now with the O’Reilly learning platform.
O’Reilly members experience books, live events, courses curated by job role, and more from O’Reilly and nearly 200 top publishers.

