Windows 10 looks a lot better than previous versions of Windows. The new system fonts, color schemes, taskbar design, typography—it’s all much clearer, more graceful, and more modern than what’s come before.
Still, these changes aren’t for everybody. Fortunately, Win10 is every bit as tweakable as previous versions of Windows. You can change the picture on your desktop, or tell Windows to change it for you periodically. You can bump up the text size for better reading by over-40 eyeballs. You can create a series of virtual “external monitors”—perfect spaces in which to spread out a bunch of apps, each on its own “screen.”
As Microsoft might say, “Where do you want to redesign today?”
Note
Customizing the Start menu is described in Chapter 1; customizing the taskbar is covered in Chapter 2.
It’s fun to customize your PC (especially because it’s your opportunity to replace, at last, that huge Dell or HP logo that came as your preinstalled wallpaper). This is also yet another way to shut off some of Windows’ predefined cosmetics.
To see your design choices, right-click a blank spot on the desktop. From the shortcut menu, choose Personalize.
The Personalization page of Settings opens (Figure 4-1). It offers five tabs of options, all dedicated to changing the look of your desktop world. The Start options govern your Start menu and are described in Chapter 1; the Lock screen options and the other tabs—Background, Colors, and Themes—are described right here.
Windows comes with a host of desktop pictures, patterns, and colors for your viewing pleasure. You want widescreen images for your new flat-panel monitor? You got ’em. Want something gritty, artsy, in black and white? It’s there, too. And you can use any picture you’d like as your background as well.
The Background tab (of Settings→Personalization) offers a huge Preview image, showing off the color scheme of your desktop world at the moment.
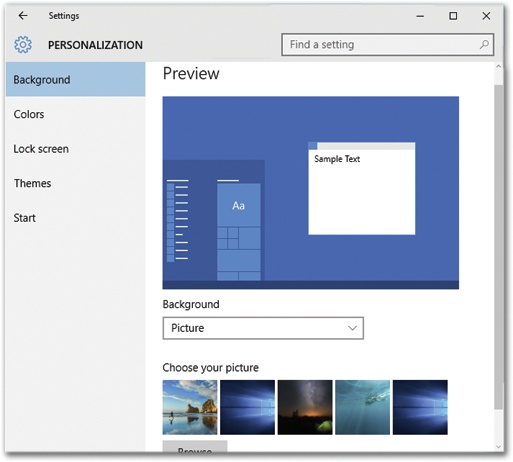
Figure 4-1. The Personalization tab of Settings offers a simplified diagram of your desktop. As you adjust the wallpaper and color scheme options, this miniature desktop changes to show how it will look.
Background is Microsoft’s new word for wallpaper (the image that fills your entire desktop background). The Background pop-up menu offers three choices:
Solid Color is a palette of simple, solid colors for your desktop background. It’s not a bad idea, actually; it’s a little easier to find your icons if they’re not lost among the details of a nature photo (or a Sofía Vergara photo).
Picture starts you off with five luscious nature photos. It also offers you a Browse button that displays what’s in your Pictures folder, because it’s more fun to use one of your own pictures on the desktop. That might be an adorable baby photo of your niece, or it might be Sofía Vergara with half her clothes off; the choice is yours.
Slideshow. The novelty of any desktop picture is likely to fade after several months of all-day viewing. Fortunately, you can choose multiple desktop pictures from the gallery. Use the Browse button to find a promising-looking folder full of images.
Now, from the “Change picture every” pop-up menu, specify when you want your background picture to change: every day, every hour, every 5 minutes, or whatever. (If you’re really having trouble staying awake at your PC, you can choose every minute.)
Now, at the intervals you specified, your desktop picture changes automatically, smoothly cross-fading between the pictures in your chosen source folder like a slideshow. You may never want to open another window, because you’d hate to block your view.
Tip
Once your slideshow wallpaper is set up, you don’t have to wait out the waiting period if you get bored. You can right-click the desktop and, from the shortcut menu, choose “Next desktop background.”
No matter which source you use to choose a photo, you have one more issue to deal with. Unless you’ve gone to the trouble of editing your chosen photo so that it matches the precise dimensions of your screen (1440 x 900 or whatever), it probably isn’t exactly the same size as your screen.
Using the “Choose a fit” pop-up menu, you can choose any of these options:
Fill. Enlarges or reduces the image so that it fills every inch of the desktop without distortion. Parts may get chopped off, but this option never distorts the picture.
Fit. Your entire photo appears, as large as possible without distortion or cropping. If the photo doesn’t precisely match the proportions of your screen, you get “letterbox bars” on the sides or at top and bottom.
Stretch. Makes your picture fit the screen exactly, come hell or high water. Larger pictures may be squished vertically or horizontally as necessary, and small pictures are drastically blown up and squished, usually with grisly results.
Tile. This option makes your picture repeat over and over until the multiple images fill the entire monitor.
Center. Centers the photo neatly on the screen. If the picture is smaller than the screen, it leaves a swath of empty border all the way around. If it’s larger, the outer edges get chopped off.
Span. If you have more than one monitor, this option lets you slap a single photo across multiple screens.
Tip
Really, the Background screen described above is the wallpaper headquarters. But there are “Set as desktop background” commands hiding everywhere in Windows, making it simple to turn everyday images into wallpaper. You’ll find that command, for example, when you right-click a graphics icon in an Explorer window or a graphic on a web page.
This page of Settings lets you specify an accent color—the shade that paints the tiles and background of the Start menu, window buttons, the taskbar background, and the Action Center (Silence for good).
Automatically pick an accent color from my background. If you leave this switch on, then Windows chooses the accent for you. It chooses a color that it believes will provide an attractive contrast to the photo or color you’ve chosen for your desktop background.
If you turn this switch off, then Windows offers a palette of about 50 color squares. It’s prodding you to choose your own darned accent color.
Show color on Start, taskbar, and action center. If you turn this off, your chosen accent color will apply only to Start-menu tiles and window controls; the Start-menu background, taskbar, and Action Center backgrounds will be black.
Make Start, taskbar, and action center transparent. There’s no particularly good reason you’d want these Windows elements to be partly see-through; they’re easier to read when they’re opaque. But you know—whatever floats your boat.
High contrast settings. This link opens the Ease of Access page of Settings. Here the “High contrast” tab lets you choose a high-contrast color scheme (bright text, dark backgrounds) that may be easier to read if you have vision impairments.
Note
In Windows Vista and Windows 7, there was a button here called “Advanced appearance settings.” It opened a dialog box that let you change every single aspect of the selected visual theme independently—scroll-bar thickness, tooltip text size, icon fonts, and so on. Alas, that box, and those options, are no longer available in Windows 10.
As shown in Figure 4-2, Windows includes a number of predesigned themes that affect the look of your desktop and windows.
Each design theme controls these elements of Windows:
Your wallpaper (desktop picture).
Your screensaver.
The design of icons like This PC, Network, Control Panel, and Recycle Bin.
The color scheme for your window edges, plus any tweaks you make in the Color and Appearance dialog box (font size, window border width, and so on).
The size and shape of your arrow cursor.
The sounds your PC uses as error and alert beeps.
The control panel shown in Figure 4-2 offers three categories of themes: My Themes (ones you’ve modified yourself), Windows Default Themes (Microsoft’s canned starter designs), and High Contrast themes. These are designed to help out people with limited vision, who require greater differences in color between window elements. High-contrast themes more closely resemble the squared-off windows and dialog boxes of Windows 2000 (see Figure 4-3).
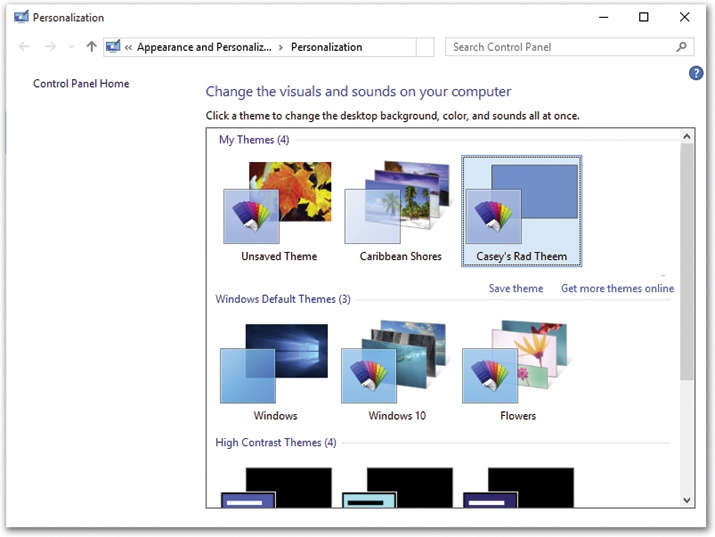
Figure 4-2. To find this screen, right-click the desktop; from the shortcut menu, choose Personalize. Choose Themes, and then “Theme settings.” A theme is more than a color scheme. It also incorporates a desktop background, a standard screensaver, and even a coordinated set of alert sounds. The four icons across the bottom show you the current desktop, color, sound, and screensaver settings for whatever theme you click.
The real fun, however, awaits when you choose one of the canned themes and then modify it. You can make changes on the Background and Colors tabs described above, as well as Sounds, Screen Saver, Desktop Icons, and Mouse Pointers, which are described on the following pages.
When that’s all over, you return to the Themes control panel, where all the modifications you’ve made are represented at the top of the screen—as an icon called Unsaved Theme (Figure 4-2).
Well, you wouldn’t want all that effort to go to waste, would you? So click “Save theme,” type a name for your new, improved theme, and click Save.
From now on, the theme you’ve created (well, modified) shows up in the row of icons called My Themes. From now on, you can recall the emotional tenor of your edited look with a single click on that icon.
If you make further changes to that theme (or any other theme), another Unsaved Theme icon appears, once again ready for you to save and name. You can keep going forever, adding to your gallery of experimentation.
You can also delete a less-inspired theme (right-click its icon; from the shortcut menu, choose Delete Theme). On the other hand, when you strike creative gold, you can package up your theme and share it with other computers—your own, or other people’s online. To do that, right-click the theme’s icon; from the shortcut menu, choose “Save theme for sharing.” Windows asks you to name and save the new .themepack file, which you can distribute to the masses. (Just double-clicking a .themepack file installs it in the Themes dialog box.)
Note
If your theme uses sounds and graphics that aren’t on other people’s PCs, they won’t see those elements when they install your theme.

Figure 4-3. Most people’s Windows desktop windows look like the window shown in the upper left. But your computer may look different, especially if you’ve turned on one of the other styles—like a high-contrast theme (bottom).
On the main Themes Settings screen are some related settings, here labeled Related Settings. They are “Advanced sound settings,” “Desktop icon settings,” and Mouse pointer settings. Read on.
Windows plays beeps and bloops to celebrate various occasions: closing a program, yanking out a USB drive, logging in or out, getting a new fax, and so on. You can turn these sounds on or off, or choose new sounds for these events.
Sounds, too, are part of a theme. To edit the suite of sounds that goes with your currently selected theme, open the Themes Settings page and click “Advanced sound settings.” Or, if you’re starting from scratch, type sounds into the taskbar search box; in the results list, choose “Change system sounds.”
See the list of Program Events (Figure 4-4)? A speaker icon represents the occasions when a sound will play. Double-click a sound (or click the Test button) to see what it sounds like.
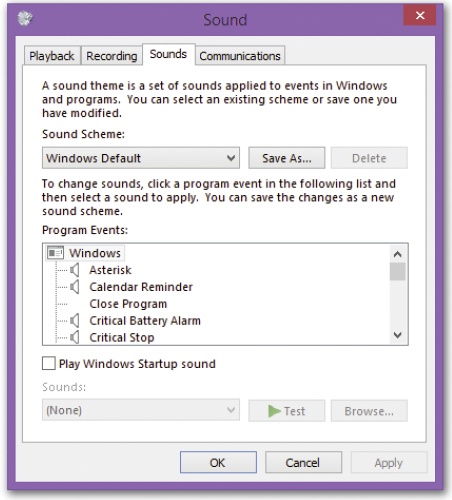
Figure 4-4. Each set of sounds is called a sound scheme. Sometimes the sound effects in a scheme are even sonically related. (Perhaps the collection is totally hip-hop, classical, or performed on a kazoo.) To switch schemes, use the Sound Scheme pop-up menu. You can also define a new scheme of your own. Start by assigning individual sounds to events, and then click the Save As button to save your collection under a name that you create.
Or, if you click the name of some computer event (say, Low Battery Alert), you can make these adjustments:
Remove a sound from the event by choosing (None) from the Sounds drop-down list.
Change an assigned sound, or add a sound to an event that doesn’t have one, by clicking Browse and choosing a new sound file from the list in the Open dialog box.
Tip
When you click the Browse button, Windows opens the Local Disk (C:)→Windows→Media folder, which contains the .wav files that provide sounds. If you drag .wav files into this Media folder, they become available for use as Windows sound effects. Many people download .wav files from the Internet and stash them in the Media folder to make their computing experience quirkier, more fun, and richer in Austin Powers sound snippets.
When you select a sound, its filename appears in the Sounds drop-down list. Click the Test button to the right of the box to hear the sound.
Thanks to the Desktop icon settings link on the Themes Settings screen, you can specify which standard icons sit on your desktop for easy access and what they look like. (Or type desktop icons into the search box; in the results list, choose “Themes and related settings.” Then click Desktop icon settings.)
To choose your icons, just turn on the checkboxes for the ones you want (see Figure 4-5).
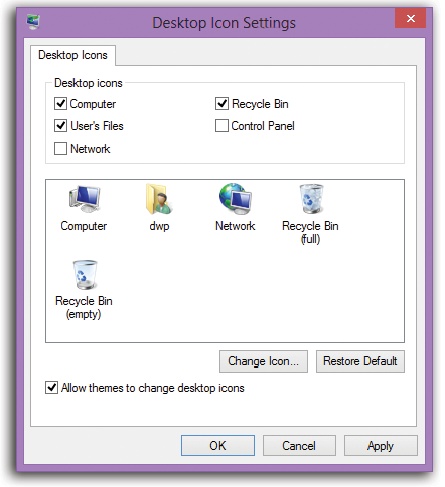
Figure 4-5. Microsoft has been cleaning up the Windows desktop in recent years, and that includes sweeping away some useful icons, like This PC, Control Panel, Network, and your Personal folder. But you can put them back, just by turning on these checkboxes.
You can also substitute different icons for your icons. Click, for example, the This PC icon, and then click Change Icon. Up pops a collection of predrawn icons in a horizontally scrolling selection box. If you see a picture you like better, double-click it.
If your fondness for the standard Windows arrow cursor begins to wane, you can assert your individuality by choosing a different pointer shape. For starters, you might want to choose a bigger arrow cursor—a great solution on today’s tinier-pixel, shrunken-cursor monitors.
Tip
What you’re about to read is the old way of adjusting the cursor shape and size—the more complete way, involving a visit to the old Control Panel. In Windows 10, a few simplified cursor-shape options await in the newfangled Settings program (The Settings App).
Begin by clicking Mouse pointer settings in the Themes Settings box. (If you’re not already there, open the Start menu and type mouse pointer; in the results list, choose “Change how the mouse pointer looks.”)
In a flash, you arrive at the dialog box shown in Figure 4-6.
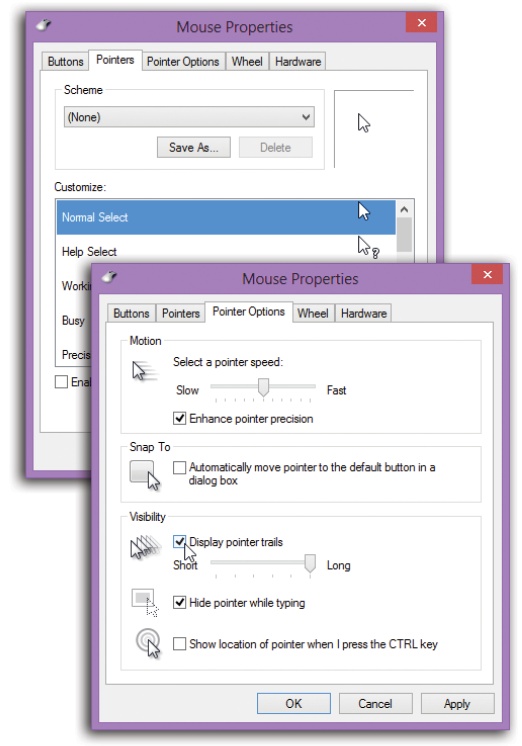
Figure 4-6. Top: The Pointers dialog box, where you can choose a bigger cursor (or a differently shaped one). Bottom: The Pointer Options tab. Ever lose your mouse pointer while working on a laptop with a dim screen? Maybe pointer trails could help. Or have you ever worked on a desktop computer with a mouse pointer that seems to take forever to move across the desktop? Try increasing the pointer speed.
At this point, you can proceed in any of three ways:
Scheme. There’s more to Windows cursors than just the arrow pointer. At various times, you may also see the spinning circular cursor (which means, “Wait; I’m thinking,” or “Wait; I’ve crashed”), the I-beam cursor (which appears when you’re editing text), the little pointing-finger hand that appears when you point to a web link, and so on.
All these cursors come prepackaged into design-coordinated sets called schemes. To look over the cursor shapes in a different scheme, use the Scheme drop-down list; the corresponding pointer collection appears in the Customize list box. The ones whose names include “large” or “extra large” offer jumbo, magnified cursors ideal for very large screens or failing eyesight. When you find one that seems like an improvement over the factory-setting set, click OK.
Select individual pointers. You don’t have to change to a completely different scheme; you can also replace just one cursor. To do so, click the pointer you want to change, and then click the Browse button. You’re shown the vast array of cursor-replacement icons (which are in the Local Disk (C:)→Windows→Cursors folder). Click one to see what it looks like; double-click to select it.
Create your own pointer scheme. Once you’ve replaced a cursor shape, you’ve also changed the scheme to which it belongs. At this point, either click OK to activate your change and get back to work, or save the new, improved scheme under its own name, so you can switch back to the original when nostalgia calls. To do so, click the Save As button, name the scheme, and then click OK.
Clicking the Pointer Options tab offers a few more random cursor-related functions (Figure 4-6, bottom):
Pointer speed. It comes as a surprise to many people that the cursor doesn’t move five inches when the mouse moves five inches on the desk. Instead, you can set things up so that moving the mouse one millimeter moves the pointer one full inch—or vice versa—using the “Select a pointer speed” slider.
It may come as an even greater surprise that the cursor doesn’t generally move proportionally to the mouse’s movement, regardless of your “Pointer speed” setting. Instead, the cursor moves farther when you move the mouse faster. How much farther depends on how you set the “Select a pointer speed” slider.
The Fast setting is nice if you have an enormous monitor, since it prevents you from needing an equally large mouse pad to get from one corner to another. The Slow setting, on the other hand, can be frustrating, since it forces you to constantly pick up and put down the mouse as you scoot across the screen. (You can also turn off the disproportionate-movement feature completely by turning off “Enhance pointer precision.”)
Snap To. A hefty percentage of the times when you reach for the mouse, it’s to click a button in a dialog box. If you, like millions of people before you, usually click the default (outlined) button—such as OK, Next, or Yes—then the Snap To feature can save you the effort of positioning the cursor before clicking.
When you turn on Snap To, every time a dialog box appears, your mouse pointer jumps automatically to the default button so that all you need to do is click. (And to click a different button, like Cancel, you have to move the mouse only slightly to reach it.)
Display pointer trails. The options available for enhancing pointer visibility (or invisibility) are mildly useful under certain circumstances, but mostly they’re just for show.
If you turn on “Display pointer trails,” for example, you get ghost images that trail behind the cursor like a bunch of little ducklings following their mother. In general, this stuttering-cursor effect is irritating. On rare occasions, however, you may find that it helps you locate the cursor—for example, if you’re making a presentation on a low-contrast LCD projector.
Hide pointer while typing is useful if you find that the cursor sometimes gets in the way of the words on your screen. As soon as you use the keyboard, the pointer disappears; just move the mouse to make the pointer reappear.
Show location of pointer when I press the CTRL key. If you’ve managed to lose the cursor on an LCD projector or a laptop with an inferior screen, this feature helps you gain your bearings. After turning on this checkbox, Windows displays an animated concentric ring each time you press the Ctrl key to pinpoint the cursor’s location.
Tip
You can also fatten up the insertion point—the cursor that appears when you’re editing text. See Other Options.
The term “screensaver” is sort of bogus; today’s flat-panel screens can’t develop “burn-in.” (You’re too young to remember, but screensavers were designed to bounce around a moving image to prevent burn-in on those old, bulky, CRT screens.)
No, screensavers are mostly about entertainment—and, especially in the business world, security. You can wander away from your desk without fear of snoopers.
The idea is simple: A few minutes after you leave your computer, whatever work you were doing is hidden behind the screensaver; passersby can’t see what’s on the screen. To exit the screensaver, move the mouse, click a mouse button, or press a key.
To choose a screensaver, type screensaver into the taskbar search box; in the results list, choose “Change screen saver.” The Screen Saver page of the Control Panel dialog box appears.
Now use the “Screen saver” drop-down list. A miniature preview appears in the preview monitor on the dialog box (see Figure 4-7).
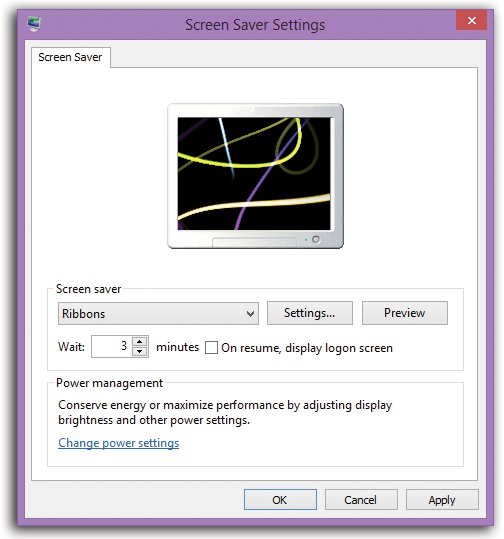
Figure 4-7. “On resume, display logon screen” is a handy security measure. It means you’ll have to input your password to get back into your PC once the screensaver has come on—a good barrier against nosy coworkers who saunter up to your PC while you’re out getting coffee.
To see a full-screen preview, click the Preview button. The screensaver display fills your screen and remains there until you move your mouse, click a mouse button, or press a key.
The Wait box determines how long the screensaver waits before kicking in, after the last time you move the mouse or type. Click the Settings button to play with the chosen screensaver module’s look and behavior. For example, you may be able to change its colors, texture, or animation style.
At the bottom of this tab, click “Change power settings” to open the Power Options window described on mouse.
Tip
If you keep graphics files in your Pictures folder, try selecting the Photos screensaver. Then click the Settings button and choose the pictures you want to see. When the screensaver kicks in, Windows puts on a spectacular slideshow of your photos, bringing each to the screen with a special effect (flying in from the side, fading in, and so on).
The Windows 10 desktop world of icons and windows doesn’t look much different from the Windows 7 desktop. (There’s a Ribbon in Explorer windows, window edges are no longer transparent, and the Start menu and taskbar have new designs—but that’s about it for changes.)
But if you’re used to anything earlier, things look a lot different. You may miss the less flashy, more utilitarian look of Windows Vista or XP. If you’re in that category, don’t worry: Windows comes with a whole trainload of Off switches.
If you drag a window close to the top edge of your screen, the window expands to fill the whole screen. If you drag it close to a side of your screen, the window expands to fill half the screen. If all this auto-snapping makes you crazy, turn it off as described on Split the screen into three or four windows.
The Windows 10 taskbar shows giant, inch-tall icons—with no text labels. And you no longer get one button for each open window; Windows consolidates open windows within each program to save taskbar space.
You can make the taskbar look like it did in Vista or even Windows XP, if you like. Details are on 107.
Then there are all those other things Windows does to show off: Windows seem to zoom open or closed; the Close, Minimize, and Maximize buttons glow when you point to them; menu commands and tooltips fade open and closed; and so on.
It turns out that there’s a master list of these effects, filled with individual on/off switches for Windows’ various animations, pop-up previews, mouse and window shadows, and so on.
To see it, open the Start menu; start typing appearance until “Adjust the appearance and performance of windows” appears in the search results. Click it.
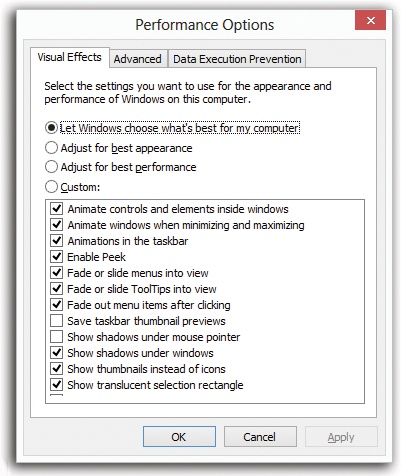
You arrive in the Performance Options dialog box (see Figure 4-8), on a tab called Visual Effects. Now, these aren’t exactly the kinds of visual effects they make at Industrial Light & Magic for use in Star Wars movies. In fact, they’re so subtle, they’re practically invisible. But the more of them you turn off, the faster the desktop will seem to work. (You can turn all of them off with one click—select “Adjust for best performance.”) Here are a few examples:
Enable Peek. Yes, you can turn off the Peek feature, which lets you (a) point to a taskbar thumbnail to see its full-size window pop to the fore and (b) point to the Show Desktop button (right end of the taskbar) to make all windows transparent.
Show shadows under windows/mouse pointer. Take a look: Open windows may actually seem to cast faint, light gray drop shadows, as though floating an eighth of an inch above the surface behind them. It’s a cool, but utterly superfluous, special effect.
Show window contents while dragging. If this option is off, then when you drag a window, only a faint outline of its border is visible; you don’t see all the items in the window coming along for the ride. As soon as you stop dragging, the contents reappear. If this option is on, however, then as you drag a window across your screen, you see all its contents, too—a feature that can slow the dragging process on really slow machines.
Smooth edges of screen fonts. If you look very closely at the characters on your screen, they look a bit ragged on the curves. But when this option is turned on, Windows softens the curves, making the text look more professional (or slightly blurrier, depending on your point of view).
You’re not stuck with the big square tiles, the last remaining visible gasp of Windows 8. See Eliminate all tiles.
You wouldn’t get much work done without a screen on your computer. It follows, then, that you can get more work done if you tinker with your screen’s settings to make it more appropriate to your tastes and workload.
There are two reasons why Windows offers a quick-and-easy way to magnify everything on the screen.
First, people tend to get older—even you. Come middle age, your eyes may have trouble reading smaller type.
Second, the resolution of computer screens gets higher every year. That is, more and more dots are packed into the same-sized screens, and therefore those dots are getting smaller, and therefore the type and graphics are getting smaller.
Microsoft finally decided enough was enough. That’s why there’s a one-click way to enlarge all type and graphics, with crisp, easier-to-see results. There are also various older schemes for accomplishing similar tasks. Here’s a rundown of all of them.
Your screen can make its picture larger or smaller to accommodate different kinds of work. You perform this magnification or reduction by switching among different resolutions (measurements of the number of dots that compose the screen).
When you use a low-resolution setting, such as 800 x 600, the dots of your screen image get larger, enlarging (zooming in on) the picture—but showing a smaller slice of the page. Use this setting when playing a small movie on the web, for example, so that it fills more of the screen.
At higher resolutions, such as 1280 x 1024, the dots get smaller, making your windows and icons smaller but showing more overall area. Use this kind of setting when working on two-page spreads in your page-layout program, for example.
Unfortunately, adjusting the resolution isn’t a perfect solution if you’re having trouble reading tiny type. On a flat-panel screen—that is, the only kind sold today—only one resolution setting looks really great: the maximum one. That’s what geeks call the native resolution of that screen.
That’s because on flat-panel screens, every pixel is a fixed size. At lower resolutions, the PC does what it can to blur together adjacent pixels, but the effect is fuzzy and unsatisfying. (On the old, bulky CRT monitors, the electron gun could actually make the pixels larger or smaller, so you didn’t have this problem.)
If you still want to adjust your screen’s resolution, here’s how you do it. Right-click the desktop. From the shortcut menu, choose “Display settings.” In the Settings screen that opens, click “Advanced display settings.” Finally, in the new dialog box, use the Resolution pop-up menu.
Tip
Depending on your monitor, you may see a weird Orientation pop-up menu here. Believe it or not, this control lets you flip your screen image upside down or into a mirror image. These options make hilarious practical jokes, of course, but they were actually designed to accommodate newfangled PC designs where, for example, the screen half of a laptop flips over, A-frame style, so people across the table from you can see it.
In any case, once you choose an orientation and click Apply or OK, a dialog box lets you either keep or discard the setting. Which is lucky, because if the image is upside down on a regular PC, it’s really hard to get any work done.
This feature is one of Microsoft’s most inspired, most useful—and least publicized. It turns out that you can enlarge the type and graphics on the screen without changing the screen’s resolution. So type gets bigger without getting blurrier, and everything else stays sharp, too. Figure 4-9 shows all.
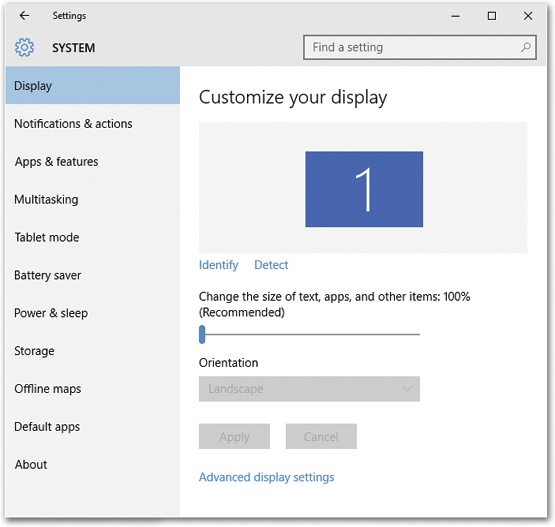
Figure 4-9. To adjust the overall size of type—all type—on your screen, visit this Settings page. (To get here: Right-click the desktop; from the shortcut menu, choose “Display settings.”) You can use the “Change the size of text, apps, and other items” slider to enlarge or shrink everything on the current screen. The range usually extends from 100 percent to 300 percent.
Sure, sure—enlarging the type is pretty handy. Enlarging everything is handy, too. But Microsoft’s Too Much Control team has gone to spectacular lengths to make sure that your options don’t stop there.
You can, in fact, change every single aspect of the selected visual theme independently: title bars, menus, message boxes, palette titles, icons, and tooltips.
To see these controls, open the Start menu and type text size; in the results list, choose “Make text and other items larger or smaller.” Proceed as shown in Figure 4-10.
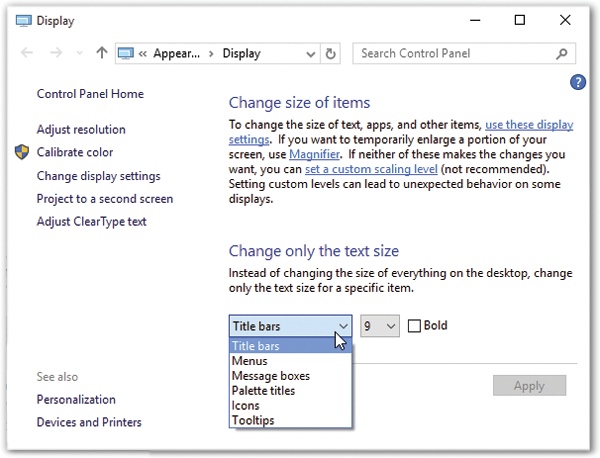
Figure 4-10. Use the pop-up menu to choose an element whose size you want to change (Title bars, Menus, Icons, and so on). Then, using the little menu to its right, you can change the type size used for any of these screen elements. You can turn on Bold for even more seeability. When you’ve exhausted your options—or just become exhausted—click Apply. You can now explore the world of your new, larger-type icon and window elements.
If your “type is too small” problem is only occasional, you can call up Windows’ Magnifier. It’s like a software magnifying glass that fills the top portion of your screen; as you move your pointer around the real-size area beneath, the enlarged image scrolls around, too. Details are on Playlists.
Today’s video cards offer different color depth settings, each of which permits the screen to display a different number of colors simultaneously. You usually have a choice between settings like Medium (16-bit), which was called High Color in early versions of Windows; High (24-bit), once known as True Color; and Highest (32-bit).
In the early days of computing, higher color settings required a sacrifice in speed. Today, however, there’s very little downside to leaving your screen at its highest setting. Photos, in particular, look best when you set your monitor to higher-quality settings.
To check your settings, right-click the desktop. From the shortcut menu, choose “Display settings.” In the dialog box, click “Advanced display settings” and then “Display adapter properties” to open the Properties dialog box for your monitor. Click the Monitor tab, and fiddle around till you’re blue, red, and green in the face.
If your computer has a jack for an external monitor (most do these days—including the video-output jacks on laptops and even tablets), or if your new tablet or laptop offers WiDi (wireless display) technology, then you can hook up a second monitor (or even third monitor) or a projector. You can either display the same picture on both screens (which is what you’d want if your laptop were projecting slides for an audience), or you can create a gigantic virtual desktop, moving icons or toolbars from one monitor to another. The latter setup lets you keep an eye on web activity on one monitor while you edit data on another. It’s a glorious arrangement, even if it does make the occasional family member think you’ve gone off the deep end with your PC obsession.
POWER USERS’ CLINIC: Some Clear Talk about ClearType
ClearType is Microsoft’s word for a sneaky technology that makes type look sharper on your screen than it really is.
Imagine a lowercase “s” at a very small point size. It looks great on this page, because this book was printed at 1,200 dots per inch. But your monitor’s resolution is far lower—maybe 96 dots per inch—so text doesn’t look nearly as good. If you were to really get up close, you’d see that the curves on the letters are actually a little jagged.
Each dot on an LCD screen is actually composed of three subpixels (mini-dots): red, green, and blue. What ClearType does is simulate smaller pixels in the nooks and crannies of letters by turning on only some of those subpixels. In the curve of that tiny s, for example, maybe only the blue subpixel is turned on, which to your eye looks like a slightly darker area, a fraction of a pixel; as a result, the type looks finer than it really is.
ClearType’s behavior is adjustable. To see the options, open the Start menu. Type cleartype until you see “Adjust ClearType text” in the results list; click it.
On the first screen, you have an on/off checkbox for ClearType. It’s there just for the sake of completeness, because text on an LCD screen really does look worse without it.
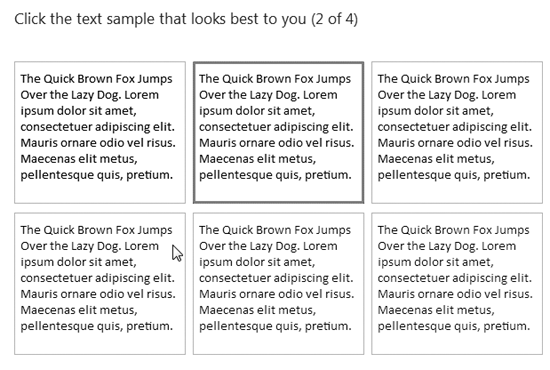
If you click Next, Windows walks you through a series of “Which type sample looks better to you?” screens, where all you have to do is click the “Quick Brown Fox Jumps Over the Lazy Dog” example that you find easiest to read. Behind the scenes, of course, you’re adjusting ClearType’s technical parameters without even having to know what they are. When it’s all over, you’ll have the best-looking small type possible.
Over the years, PC makers have offered different kinds of connectors for external screens—jacks called things like VGA, DVI, HDMI, and DisplayPort. Alas, it’s your burden to figure out which jack your computer has, and to get the right kind of cable or adapter to accommodate your external screen.
Once you’ve done that, treat yourself to an Oreo milkshake to celebrate, and then read on to dive into the software setup.
For the beating heart of Windows’ multiple-monitor controls, right-click the desktop. From the shortcut menu, choose “Display settings.”
In the resulting dialog box, you see icons for both screens (or even more, if you have them—you lucky thing!). It’s like a map, as shown in Figure 4-11.
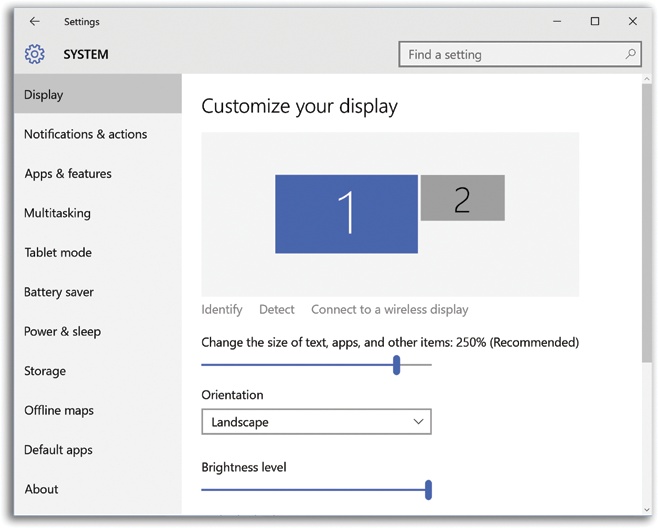
Figure 4-11. Click the screen whose settings you want to change. If Windows seems to be displaying these miniatures out of sequence—if your external monitor is really to the left of your main screen, and Windows is showing it to the right—you can drag their thumbnails around until they match reality. (Click Identify if you get confused; that summons an enormous digit in a black box on each real screen, which helps you match it to the digits on the miniatures.)
To bring about the extended-desktop scenario, use the “Multiple displays” pop-up menu. It offers commands like “Duplicate these displays” and “Extend these displays.”
Click each monitor’s icon and adjust its settings, if you like—for example, resolution (usually, you want the highest available), orientation, and brightness. Don’t miss “Make this my main display,” either. The main display is the monitor that will contain your Start menu and desktop icons. (In Windows 10, your taskbar appears on every monitor. Nice touch.)
The “Change the size of text, apps, and other items” slider described earlier is even more important when your multiple monitors have different resolutions. You can use this slider to match them up better, so that windows don’t abruptly shrink or blow up huge when they move from monitor to monitor.
Click Apply.
Windows asks you to sign out and sign back in again at this point. Do it. If you don’t, you may wind up with some strange visual glitches, like a missing taskbar or funny window sizes.
When your PC lights up again, all should be well with your new multiscreen setup.
Tip
If you click the “Advanced display settings” link, and then “Display adapter properties,” you’re offered a collection of technical settings for your particular monitor model. Depending on your video driver, there may be tab controls here that adjust the refresh rate to eliminate flicker, install an updated adapter or monitor driver, and so on. In general, you rarely need to adjust these controls—except on the advice of a consultant or help-line technician.
Once you’ve hooked up a second monitor, there are more tips than ever:
You can drag a window from screen to screen with the mouse, even if it’s a split-screen, “snapped” app. (Use the top edge of the app’s screen as a handle.)
You can make a window cycle through the left, center, and right positions on each screen by repeatedly pressing
 and the
  or
or  keys.
keys.For example, suppose a window is now floating in the middle of Screen 1. Pressing
+ repeatedly first snaps the it to the right edge of Screen 1, then snaps it to the left edge of Screen 2, then releases it to the middle of Screen 2, and finally snaps it against the right edge of Screen 2. And now, if you press + yet again, that same window “wraps” around to become snapped against the left edge of Screen 1. It makes more sense when you try it.The system tray (notification area) and Action Center appear only on the main monitor.
Eventually, Microsoft says, you’ll be able to give each screen its own desktop wallpaper, exactly as you’d hope. But in the original Windows 10 release, there’s no way to create that effect.
Here’s one of Windows 10’s best new features: a nearly infinite number of full-size virtual monitors. (Microsoft says that it’s heard of people creating as many as 150 screens before this feature conks out. Don’t worry—they’re in therapy.)
Hard-core productivity mavens can tell you how useful it is to set up multiple screens. It’s just fast and useful to have a wider view. You might dedicate each one to a different program or kind of program. Screen 1 might contain your email and chat windows, arranged just the way you like them. Screen 2 can hold Twitter and Facebook, their windows carefully arrayed. On Screen 3: your web browser in Full Screen mode.
Ordinarily, of course, attaching more than a screen or two would be a massively expensive proposition, not to mention detrimental to your living space and personal relationships. But in Windows 10, these are virtual screens. They exist only in the PC’s little head. You see only one at a time; you switch using a keystroke or a mouse click. You gain most of the advantages of owning a bunch of PC monitors—without spending a penny.
Now, virtual screens aren’t a new idea—this sort of software has been available for years. But it’s never been a standard feature of Windows, or so easy to use.
To create a second desktop, enter Task View (click ![]() on the taskbar, or press
on the taskbar, or press ![]() +Tab; see The App Switcher: Alt+Tab for more on Task View).
+Tab; see The App Switcher: Alt+Tab for more on Task View).
Click “New desktop” (the big + icon at the right side) to create a new mini desktop at the bottom of the screen (see Figure 4-12).
Now it’s time to park some windows onto the new desktop. At the moment, all the windows you had open are still clustered on the first screen, ingeniously named Desktop 1. When you point to the Desktop 1 thumbnail without clicking, those windows appear at 50 percent size on the main screen. You can drag one of them, or several, onto your new blank desktop (Desktop 2).
Tip
You can also right-click (or hold your finger down on) one of these app “cards.” From the shortcut menu, choose “Move to”→“Desktop 2” (or whatever desktop you want it moved to).
Figure 4-12 shows this process.
Finally, exit Task View (click either desktop thumbnail, or anywhere on the main screen, or press Esc).
Once you’ve got a couple of virtual monitors set up, the fun begins. Start by moving to the virtual screen you want; it’s like changing the channel. Here are some ways to do that:
When you make a switch, you see a flash of animation as one screen flies away and another appears. Now that you’re “on” the screen you want, open programs and arrange windows onto it as usual.
Note
Windows uses your main desktop’s background picture for all additional desktops. It would be nice if you could choose a different wallpaper for each, to help you keep them straight—and, indeed, Microsoft says that feature will come in one of its steady Windows 10 improvements.
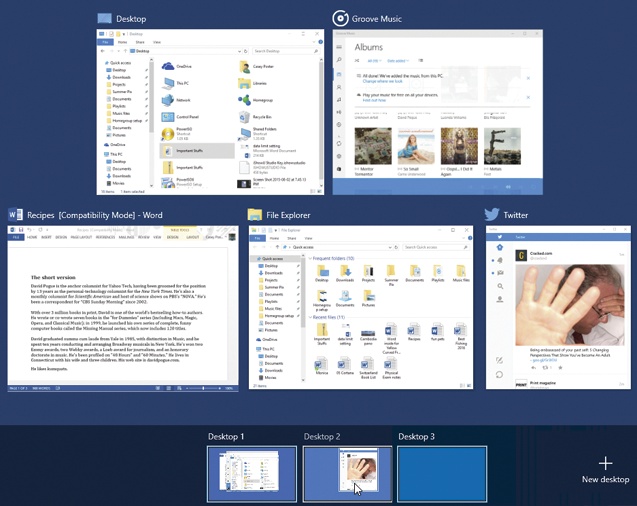
Figure 4-12. In Task View, click “New desktop” (far right) to create the thumbnails of new virtual screens; in this image, three desktops are shown. Then point to the desktop that contains the app window you want to move; that desktop’s windows appear above at half size. Drag directly to the desktop thumbnail you want.
Get Windows 10: The Missing Manual now with the O’Reilly learning platform.
O’Reilly members experience books, live events, courses curated by job role, and more from O’Reilly and nearly 200 top publishers.

