Chapter 4. Security

On the security front, Windows 7 has streamlined several features found in Windows Vista, making them much more accessible and less irritating in this new version of Windows. For example, the infamous User Account Control (UAC) is one of the most annoying features in Vista. In this version of Windows, Microsoft has tweaked UAC so that it interrupts users only when needed. Microsoft has also replaced the Security Center in Vista with the new Action Center in Windows 7, which focuses not just on displaying problems, but also on offering suggestions and solutions to solve problems. The Credential Manager now has the ability to back up its credential information to a file. In addition, Enterprise and Ultimate users can now encrypt a portable thumb drive using BitLocker To Go.

Action Center

In Windows 7, Microsoft has designated the new Action Center as the one-stop place to find all your system maintenance and security messages. The key design goal of the Action Center is to help users solve system issues quickly and conveniently.

The system tray is now less cluttered, compared with its appearance in previous versions of Windows—it now has four main icons: Action Center, Network, Speaker volume, and Date and Time (see Figure 4-1). Mobile computers will have a power icon as well.

The four icons in the System tray
Figure 4-1. The four icons in the System tray

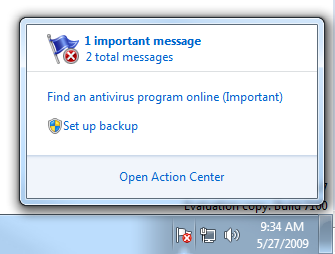
In particular, the Action Center icon (represented as a white flag, which will include a red “x” if there are important messages requiring your attention) replaces several notification icons from Vista, reducing much clutter. When you click the Action Center icon, a pop-up window displays a summary of system messages of varying importance levels. In addition, it also provides a way for you to resolve the error. For example, Figure 4-2 shows that I have two messages for my computer—one important and one normal. The pop up also includes two links for me to resolve my problems—one to find an antivirus program and one to set up a backup for my computer. To view the messages, click the message icons or click the Open Action Center link.

Viewing the messages summary and remedy links for the Action Center icon
Figure 4-2. Viewing the messages summary and remedy links for the Action Center icon

The Action Center will display the details of the messages along with a button to help you solve the issue.

Besides displaying messages on maintenance and security-related issues, the Action Center can also help you troubleshoot problems with your computer and restore your computer to its setup from an earlier time.

Messages are classified into two main categories: Security and Maintenance. Security messages relate to issues concerned with:

  • Windows Update

  • Internet security settings

  • Network firewall

  • Spyware and related protection

  • User Account Control

  • Virus protection

Maintenance messages relate to issues concerned with:

  • Windows Backup

  • Windows Troubleshooting

Messages can be important or normal. Important messages display notification balloons (see Figure 4-3) in the System tray in addition to appearing in Action Center. A good example of an important message balloon is what happens when the Windows Firewall is turned off.

Important messages displaying notification balloons
Figure 4-3. Important messages displaying notification balloons

In the Action Center, you can also expand on each message category to view the status of each Security- and Maintenance-related item for your computer.

Note

The Action Center is for displaying messages and resolving problems, not managing tasks. For example, you can use the Action Center to help you find an antivirus program, but you cannot manage your Windows Firewall in the Action Center.

You have the option to prevent messages from displaying by clicking the Change Action Center settings link in the left side of the Action Center window. Uncheck the item(s) for which you do not want to view a message.

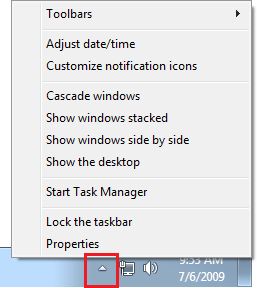
Configuring Action Center via the “Show hidden icons” button
Figure 4-4. Configuring Action Center via the “Show hidden icons” button
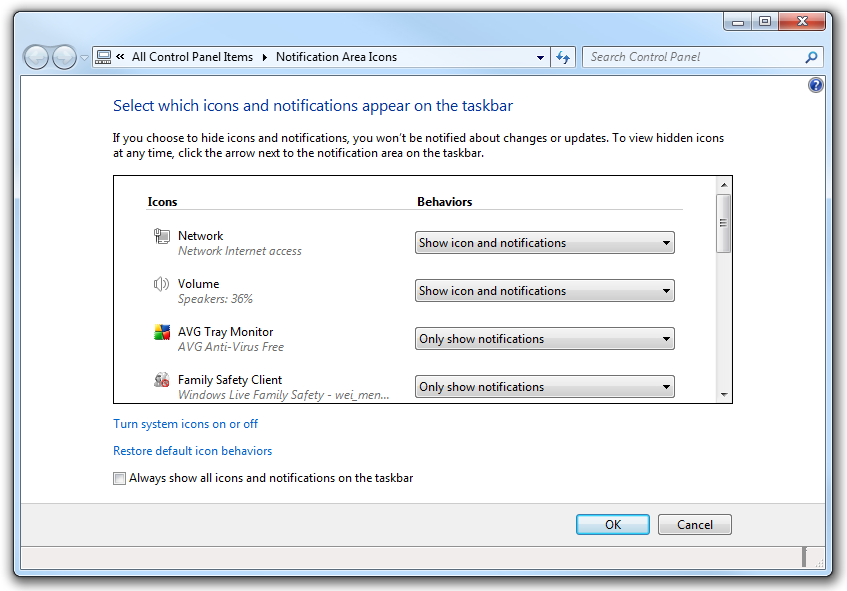
Customizing notification area icons
Figure 4-5. Customizing notification area icons
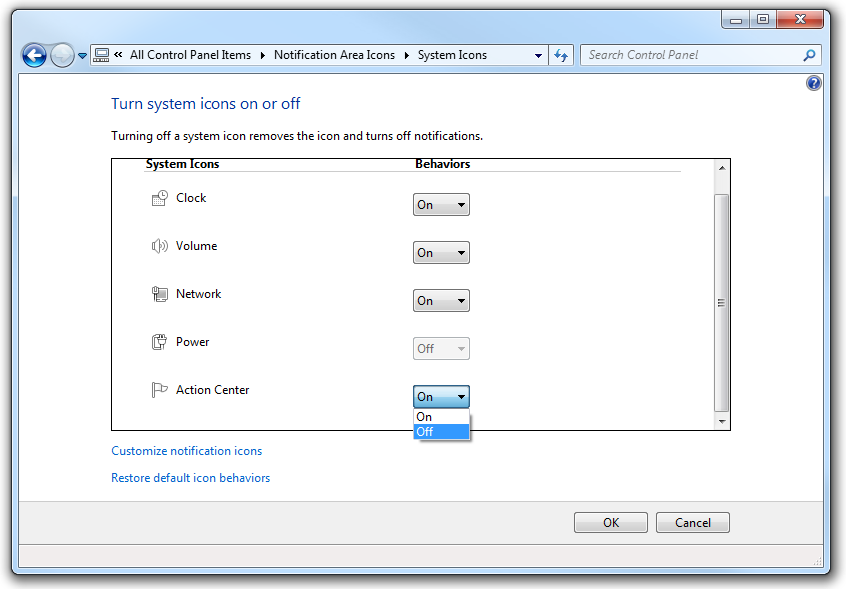
Hiding the Action Center
Figure 4-6. Hiding the Action Center

User Account Control

One of the most fiercely criticized features of Windows Vista is the User Account Control (UAC). Whenever a system-level change is made, Vista’s UAC displays a dialog box prompting the user to continue or stop. This happens regardless of whether it is a program that is making the changes or the user herself (even though she might be logged in as an administrator). And with the frequency that the UAC displays prompts, most users find it a nuisance rather than a useful security alert feature. Moreover, when the user ends up with too many UAC prompts, it actually defeats the purpose, as users simply give their permission without reading the prompts.

In Windows Vista, Microsoft only provided two options to control UAC—turn it on or turn it off. In Windows 7, Microsoft has fine-tuned the UAC so that you can choose when to be notified if changes happen.

To configure UAC, go to Control Panel and select User Accounts and Family Safety, and then select User Accounts. Click the Change User Account Control settings link.

Notice that you now have four levels to specify how you are notified when changes are made to your computer (see Figure 4-7).

Modifying the notification levels of UAC
Figure 4-7. Modifying the notification levels of UAC

The four levels are:

  • Always notify when programs install software or users make changes to the computer. This is the most naggy option, as all changes require the permission of the user (this is the option used by Vista).

  • Notify only when programs make changes to the system. When the user makes changes to the Windows settings, there will be no prompting. This is the default level selected by Windows.

  • Notify only when programs make changes to the system without desktop dimming. When the user makes changes to the Windows settings, there will be no prompting.

  • The user is never notified. This option is not recommended.

When you select a particular notification level and click OK, you will be prompted to confirm the selection.

The Credential Manager

Windows 7 includes a feature known as the Credential Manager to help users save their credentials to a vault. Although this is not a new feature, in this version it has the ability to back up and restore the vault. In the Credential Manager, all the credentials are stored in a secure location known as the Windows Vault.

To use the Credential Manager, go to Control Panel→User Accounts and Family Safety→Credential Manager. There are three types of credentials you can store using Credential Manager (see Figure 4-8):

Windows credentials

Stores the credentials of resources such as servers, printers, and the like.

Certificate-based credentials

Stores certificate-based credentials, such as those from a smartcard.

Generic credentials

Stores generic credentials, such as online IDs.

Launching the Credential Manager in the Control Panel
Figure 4-8. Launching the Credential Manager in the Control Panel

Using the Credential Manager

Note that the Credential Manager is designed to work with resources (such as servers and websites) that make use of the Credential Manager API to retrieve the username and password from the Credential Manager. A good example is Windows Live Hotmail.

When you first log in to Windows Live Hotmail, you have an option to save the password to your computer. When you check the “Remember my password” link (see Figure 4-9), the credential (Windows Live ID and password, in this case) is automatically saved into the Credential Manager (see Figure 4-10).

Remembering the password on the local computer
Figure 4-9. Remembering the password on the local computer
The credential for Hotmail is saved in the Credential Manager
Figure 4-10. The credential for Hotmail is saved in the Credential Manager

Note

For websites that do not use Windows Live Login, Internet Explorer will store the ID and password pair in the Registry.

If you log out from Hotmail now and try to log in again, you will see that your Windows Live ID is now displayed on the login page and that you can log in automatically (without needing to enter the password) by clicking the “Sign in” button (see Figure 4-11).

Logging in automatically
Figure 4-11. Logging in automatically

Linking Online IDs

In the previous section, you saw how Hotmail automatically signs you in using the credentials saved in the Credential Manager. The Credential Manager also allows you to link your login user account with an online ID explicitly (such as those given by your email service provider) so that you can sign in to these services automatically. This is done via online ID providers. An online ID provider associates your Windows login with an online ID so that when you access your online service you do not need to supply your username and password again.

To manually link your user account with an online ID, click the “Link online IDs” link at the bottom of the Credential Manager window (see Figure 4-12).

Click the “Add an online ID provider” link to locate an online ID provider (see Figure 4-13).

You will be brought to a web page where you can locate an online ID provider. At this moment, only one online ID provider is available—Windows Live. Click the Windows Live icon.

Linking your user account with an online ID
Figure 4-12. Linking your user account with an online ID
Adding an online ID provider
Figure 4-13. Adding an online ID provider

You will be brought to a page where you can download the necessary program. In this case, you need to download the Windows Live ID Sign-in Assistant.

Once the download is complete, proceed with the installation. Figure 4-14 shows that the WindowsLiveID provider installed in the Credentials Manager.

The WindowsLiveID provider in the Credentials Manager
Figure 4-14. The WindowsLiveID provider in the Credentials Manager

Click the “Link online ID” link to add an online ID. Enter your Live ID.

You should now see the credentials you entered (see Figure 4-15).

Viewing the credentials you just entered
Figure 4-15. Viewing the credentials you just entered

Now when you use any of the Windows Live services (such as Hotmail and Messenger), you will see that your credentials are automatically filled in for you.

Backing Up the Credentials

A new feature of the Credential Manager in Windows 7 is its ability to back up your credentials to the filesystem. To back up the vault, click the “Back up vault” link.

You will be asked to select a path to back up the vault. Click the Browse... button and specify the path and name of the backup vault. Click Next.

To continue, press Ctrl-Alt-Delete. You will now be asked to protect the file with a password. Enter the password twice and the vault will be backed up.

Note

It is recommended that you save the backup vault to external storage.

To restore the vault, click the “Restore vault” link and supply the password used to protect the file.

BitLocker Drive Encryption

In Windows Vista, you had the BitLocker Drive Encryption feature that allowed you to encrypt the content of entire volumes. In Windows 7, Microsoft has extended this feature to include removable hard disks and thumb drives. This new feature is known as BitLocker To Go.

Note

The encryption performed by BitLocker is transparent to the user—you will use the drive normally and Windows 7 will automatically encrypt the data on the fly when you write to the drive. Likewise, Windows will decrypt the data on the fly when you read from the drive.

BitLocker

The BitLocker Drive Encryption feature in Windows 7 (also available in Windows Vista) allows you to encrypt your hard drives so that it is safe from unauthorized access. Using BitLocker, all data written to a hard drive stays encrypted when it is stored on the drive. When the OS reads the data, it is automatically decrypted. However, if a BitLocker-encrypted drive is removed from a computer, its content will not be accessible unless the correct password is provided. This way, BitLocker helps protect the integrity and security of your data.

Note

Unlike the Encrypting File System (EFS), which allows you to selectively encrypt files, BitLocker encrypts the entire drive.

There are two types of hard drives you can encrypt using BitLocker:

Operating system drive

This is the drive where Windows 7 is installed in.

Data drive(s)

This includes internal data drives attached to your computer.

Note

BitLocker is available only in the Enterprise and Ultimate editions of Windows 7.

To encrypt the operating system drive using BitLocker, right-click the C: drive and select “Turn on BitLocker...” (see Figure 4-16).

Encrypting the C: drive using BitLocker
Figure 4-16. Encrypting the C: drive using BitLocker

Note

Alternatively, you can manage BitLocker on all your drives via the BitLocker Drive Encryption application (see Figure 4-17) in the Control Panel.

In order to use BitLocker to encrypt your hard drive containing your operating system, your computer needs to have the Trusted Platform Module (TPM) chip. BitLocker uses the TPM chip to store the keys that are used to decrypt your encrypted drive during bootup time. Alternatively, if your computer does not have the TPM chip, you can store the encryption key on a USB thumb drive. In this case, you need to insert your USB drive into your computer during bootup time.

Managing BitLocker on all your attached drives
Figure 4-17. Managing BitLocker on all your attached drives

Note

Using BitLocker to encrypt your operating system drive also requires two partitions on the hard drive—one system partition (hidden boot partition) and one operating system partition. Fortunately, Windows 7 automatically creates these two partitions during the installation process.

For encrypting data drives, BitLocker requires the drive to be formatted using either the exFAT, FAT16, FAT32, or NTFS filesystems.

BitLocker To Go

BitLocker To Go is an extension of the BitLocker application that provides encryption support for removable hard disks and thumb drives.

Note

BitLocker To Go is available only in the Enterprise and Ultimate editions of Windows 7.

To turn on BitLocker To Go, simply insert your thumb drive into your computer, right-click the drive icon in Computer (see Figure 4-18) and select “Turn on BitLocker...”.

Turning on BitLocker for a thumb drive
Figure 4-18. Turning on BitLocker for a thumb drive

Now you need to choose a way for the drive to be unlocked when it has been encrypted—using a password or a smartcard. The easiest way would be to choose a password; if you choose this option, supply a password. Click Next to proceed.

In the next step, you have a choice to store your recovery key to a file or print it out. The recovery key is used to temporarily unlock a BitLocker-encrypted drive in the event that you forgot the password. Choose the desired option and click Next.

You are now ready to encrypt your drive. Click the Start Encrypting button to begin the encryption.

Windows will now start to encrypt your drive. It will take some time, especially if you have a large-capacity thumb drive. When the encryption is done, a lock will appear on the drive icon (see Figure 4-19).

The BitLocker-encrypted thumb drive
Figure 4-19. The BitLocker-encrypted thumb drive

From now on, whenever you insert your thumb drive into your computer, you will be prompted to enter the password to unlock the drive. Enter the password and click the Unlock button to unlock the drive.

If you insert a thumb drive encrypted with BitLocker To Go into a Windows XP computer, you will be prompted to enter the key to unlock the drive.

If you forgot your password, click the “I forgot my password” link. You will be prompted to enter the recovery key that you saved/printed earlier. Enter the recovery key and you will be granted temporary access to the drive before you change its password.

You also have the option to automatically unlock the drive on the current computer. If you choose this option, you will not be prompted to unlock the drive every time you insert the thumb drive into the current computer. You should choose this option only if you are sure that your computer is secure and that it is not easily accessible to other people.

You can change the BitLocker feature of a drive by right-clicking the drive icon in Computer and selecting Manage BitLocker. Figure 4-20 shows the options available.

Managing BitLocker on an encrypted drive
Figure 4-20. Managing BitLocker on an encrypted drive

Encrypting File System (NTFS Encryption)

As you have seen, BitLocker and BitLocker To Go encrypt the entire drive to protect the integrity of your filesystems. However, sometimes you may need to encrypt just selected files (or folders), not the entire drive. To do this, you can make use of the Encrypting File System, also known as the NTFS Encryption feature of Windows 7.

Note

NTFS Encryption is available only in Windows 7 Professional, Enterprise, and Ultimate.

To encrypt a file (or folder), right-click its icon and select Properties. In the General tab, click the Advanced... button. Check the “Encrypt contents to secure data” checkbox (see Figure 4-21) and click OK twice.

Encrypting an individual file
Figure 4-21. Encrypting an individual file

You will be asked if you want to encrypt the entire file itself, or encrypt its parent folder as well (recommended). Select the option you want and click OK.

The file will now be encrypted. If you click the Details button as shown previously in Figure 4-21, you will see that the file has been encrypted using a certificate bearing your name (this is created for you automatically).

Note

When you select the certificate name, you will be able to back up the certificate to disk. Doing so allows you to pass your certificate to other users so that they can also access this encrypted file. However, giving your certificate to other users will allow them to access all your encrypted files and folders (that use the same certificate). So, think carefully before you give away your certificates.

See the section Importing Certificates for more information on how to import certificates onto your computer.

To allow other users to access your encrypted file, click the Add... button to add the certificates provided by the users. A user who possesses the certificate contained in the certificates list (shown in Figure 4-22) will be able to access your encrypted file.

Viewing the user access list for the encrypted file
Figure 4-22. Viewing the user access list for the encrypted file

Creating Certificates

When you encrypt a file using NTFS Encryption, Windows 7 automatically creates an encryption certificate for you if you do not already have one. However, you can also manually create your own encryption certificate using the “Manage file encryption certificates” application (just type “Manage file encryption certificates” in the search box of the Start menu).

Note

By creating your own certificates, you can then encrypt different files using different certificates. Doing so allows you to share specific encrypted files with other users without compromising the integrity of other files.

When the application is launched, the window shown in Figure 4-23 should appear. Click Next to continue.

The Manage File Encryption Certificates application
Figure 4-23. The Manage File Encryption Certificates application

If you already have a certificate created for you, you should see it now. To view other certificates on your computer, click the “Select certificate” button.

If you want to create a new certificate, choose the “Create a new certificate” option and click Next.

You will now choose the type of certificate you want to create (see Figure 4-24). If you do not have a smartcard, you should select the first option, where you will create a self-signed certificate stored on your computer. Click Next.

Selecting the type of certificate you want to create
Figure 4-24. Selecting the type of certificate you want to create

Your certificate will now be created. On the next screen, you have the option to back up your certificate to storage. Supply a path and a password for the backup. Click Next to continue.

Now you have the option to update your encrypted files with the new certificate and key (all your encrypted files will now use this new certificate). Select the drives or folders containing the encrypted files and click Next.

That’s it! Your certificate is now created. The certificate is saved as a file with the .pfx extension.

Importing Certificates

When you receive a .pfx certificate from someone else, you can import it into your own certificate store in Windows by double-clicking the .pfx file. When you double-click a .pfx file, the Certificate Import Wizard will appear. Click Next to proceed.

You will be asked to specify the location of the .pfx file. When done, click Next.

Enter the password that was used to protect the certificate and then click Next twice. Finally, if the importing is successful, click the Finish button.

Antispyware and Firewall Applications

As part of its Trustworthy Computing push, Microsoft is very serious about security in Windows. As such, all recent Windows operating systems come with several built-in tools to protect the users. Two tools that stand out are Windows Defender and Windows Firewall.

Windows Defender

Like Windows Vista, Windows 7 includes an antispyware program called Windows Defender. Windows Defender’s role is to prevent, remove, and quarantine spyware in Windows.

Note

Windows Defender was previously known as Microsoft AntiSpyware. Windows Defender shipped with Windows Vista and is available as a free download for Windows XP and Windows Server 2003.

Windows Defender is located within the Control Panel (you can find it by typing “defender” in the Search box). Once Windows Defender is launched, you can start scanning your computer for spyware by clicking the Scan button (see Figure 4-25).

Scanning for spyware using Windows Defender
Figure 4-25. Scanning for spyware using Windows Defender

You can also configure Windows Defender to scan at regular intervals (see Figure 4-26) by selecting Tools→Options.

Configuring Windows Defender to start scanning at regular time intervals
Figure 4-26. Configuring Windows Defender to start scanning at regular time intervals

Windows Firewall

First shipping in Windows XP and then Vista, the Windows Firewall is included in Windows 7 as well. Windows Firewall prevents unauthorized data from traveling between your computer and the network (such as the Internet).

Note

Windows Firewall was originally known as Internet Connection Firewall when it first shipped with Windows XP.

Like the Windows Defender, the Windows Firewall can be accessed via the Control Panel; select System and Security→Windows Firewall.

You can configure Windows Firewall to turn on or off depending on the network connections you are connected to—Home, Work, or Public. Home and Work are considered private networks; Public is considered a public network. Clicking the “Turn Windows Firewall on or off” link will bring you to the customization page shown in Figure 4-27.

The customization page of Windows Firewall
Figure 4-27. The customization page of Windows Firewall

If you have an application that is blocked by Windows Firewall, you can click the “Allow a program or feature through Windows Firewall” link to allow it to pass through the Windows Firewall explicitly (see Figure 4-28).

Granting permission so applications can pass through the Windows Firewall
Figure 4-28. Granting permission so applications can pass through the Windows Firewall

Summary

In this chapter, you read about the various security features that ship with Windows 7. In particular, you have seen the use of:

  • Action Center, the one-stop place where you will find all your system maintenance and security messages

  • User Account Control, to manage the level of warnings you receive when changes are made to the system

  • Credential Manager, to store credentials that you use to log in to websites and servers

  • BitLocker drive encryption, to encrypt data on your hard drives as well as removable thumb drives

  • Encrypting File System, to encrypt specific files on your filesystem

  • Windows Defender and Windows Firewall, to block data traveling between your computer and the network

Get Windows 7: Up and Running now with the O’Reilly learning platform.

O’Reilly members experience books, live events, courses curated by job role, and more from O’Reilly and nearly 200 top publishers.