As you have seen, BitLocker and BitLocker To Go encrypt the entire drive to protect the integrity of your filesystems. However, sometimes you may need to encrypt just selected files (or folders), not the entire drive. To do this, you can make use of the Encrypting File System, also known as the NTFS Encryption feature of Windows 7.
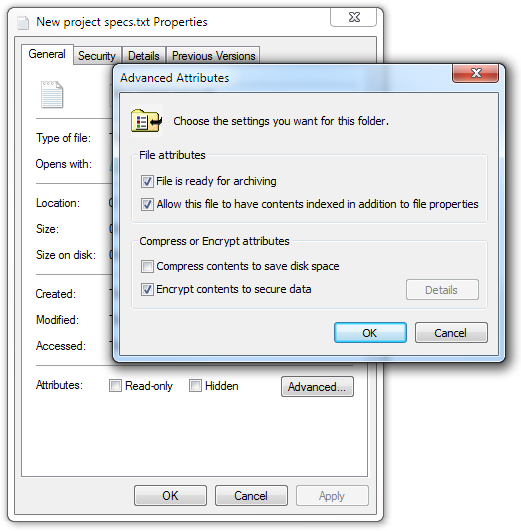
To encrypt a file (or folder), right-click its icon and select Properties. In the General tab, click the Advanced... button. Check the “Encrypt contents to secure data” checkbox (see Figure 4-21) and click OK twice.
You will be asked if you want to encrypt the entire file itself, or encrypt its parent folder as well (recommended). Select the option you want and click OK.
The file will now be encrypted. If you click the Details button as shown previously in Figure 4-21, you will see that the file has been encrypted using a certificate bearing your name (this is created for you automatically).
Note
When you select the certificate name, you will be able to back up the certificate to disk. Doing so allows you to pass your certificate to other users so that they can also access this encrypted file. However, giving your certificate to other users will allow them to access all your encrypted files and folders (that use the same certificate). So, think carefully before you give away your certificates.
See the section Importing Certificates for more information on how to import certificates onto your computer.
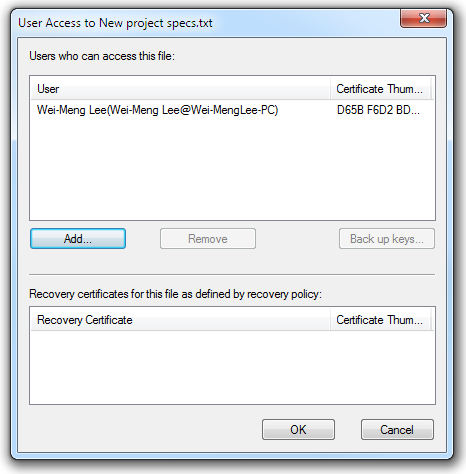
To allow other users to access your encrypted file, click the Add... button to add the certificates provided by the users. A user who possesses the certificate contained in the certificates list (shown in Figure 4-22) will be able to access your encrypted file.
When you encrypt a file using NTFS Encryption, Windows 7 automatically creates an encryption certificate for you if you do not already have one. However, you can also manually create your own encryption certificate using the “Manage file encryption certificates” application (just type “Manage file encryption certificates” in the search box of the Start menu).
Note
By creating your own certificates, you can then encrypt different files using different certificates. Doing so allows you to share specific encrypted files with other users without compromising the integrity of other files.
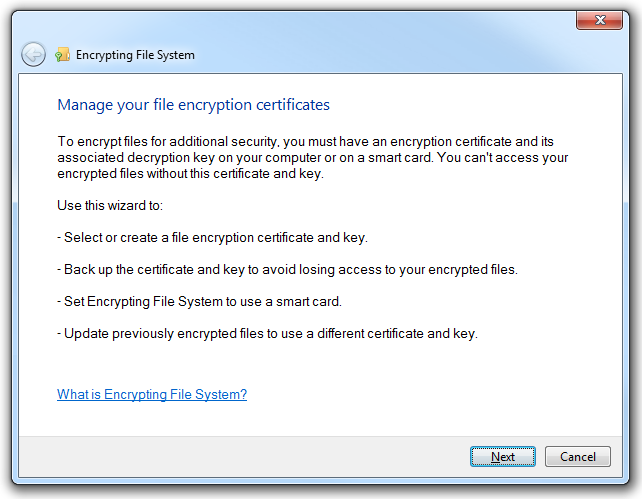
When the application is launched, the window shown in Figure 4-23 should appear. Click Next to continue.
If you already have a certificate created for you, you should see it now. To view other certificates on your computer, click the “Select certificate” button.
If you want to create a new certificate, choose the “Create a new certificate” option and click Next.
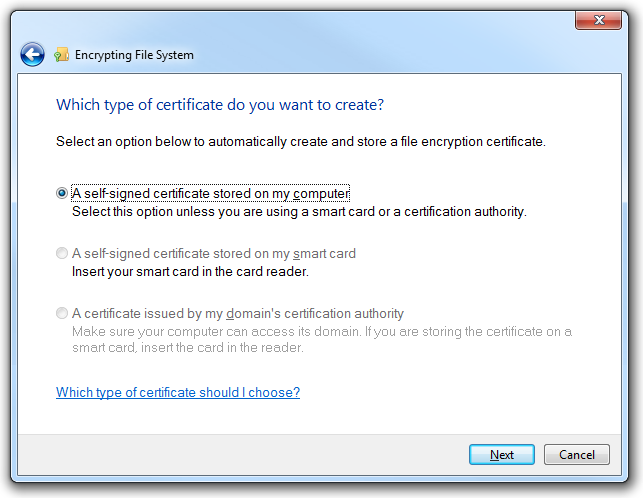
You will now choose the type of certificate you want to create (see Figure 4-24). If you do not have a smartcard, you should select the first option, where you will create a self-signed certificate stored on your computer. Click Next.
Your certificate will now be created. On the next screen, you have the option to back up your certificate to storage. Supply a path and a password for the backup. Click Next to continue.
Now you have the option to update your encrypted files with the new certificate and key (all your encrypted files will now use this new certificate). Select the drives or folders containing the encrypted files and click Next.
That’s it! Your certificate is now created. The certificate is saved as a file with the .pfx extension.
When you receive a .pfx certificate from someone else, you can import it into your own certificate store in Windows by double-clicking the .pfx file. When you double-click a .pfx file, the Certificate Import Wizard will appear. Click Next to proceed.
You will be asked to specify the location of the .pfx file. When done, click Next.
Enter the password that was used to protect the certificate and then click Next twice. Finally, if the importing is successful, click the Finish button.
Get Windows 7: Up and Running now with the O’Reilly learning platform.
O’Reilly members experience books, live events, courses curated by job role, and more from O’Reilly and nearly 200 top publishers.


