2
Running a Script
Without User
Intervention
We have indicated that scripts can be used to save huge amounts of time by carrying out mundane maintenance and configuration tasks automatically. However, it should be pointed out that no matter how sophisticated a script may be, it is never anything more than a text file containing words and symbols that can be understood by an interpreter. It is completely powerless to carry out any activities on a workstation unless explicitly executed. If you happen to be sitting in front of a workstation, running a script is trivial: it usually involves typing its name at the command prompt. While it might sound rather painless on the face of it, this interactive method of running a script is completely impractical if you are attempting to look after a large number of workstations. The reason is simple: visiting each workstation in turn is the time-consuming activity. Unless the maintenance or configuration you intend to carry out is extremely complicated, it is likely to take very little additional effort to carry out the task manually.
Unfortunately, there is no easy way to start a script remotely short of running a Telnet server on every workstation under your control (and there are many good reasons not to do this). Thankfully, however, there are ways of preinstalling scripts so that they run themselves either at predetermined times or in response to a workstation state. The significance of this is that a maintenance script designed to run regularly has to be installed only once and will require no further intervention; a configuration script can be preinstalled and primed so that it will start up by itself when required. In this chapter we explain how to prime a script so that it will start without user intervention; the next chapter is devoted to describing how to extend the techniques so that even the initial installation of a script can be performed remotely.
There are three obvious ways of priming scripts (or anything else for that matter) so that they run themselves without any user intervention. All three can be useful in certain circumstances but are completely impractical in others.
- The first solution involves scheduling the scripts to run at a certain time. This can be done with NT's scheduling service in conjunction with at.exe, the graphical version of this (winat.exe), or with any number of third-party schedulers. This is clearly useful if you wish to run a script that carries out routine maintenance on a regular basis; however, it is often completely useless in the context of workstation configuration, when you require something to run immediately on a reboot, whatever time of day that might occur.
- The second solution is to get the machine to boot up, log itself on as a special user with administrative privileges, and let the logon process deal with starting up scripts. This technique is very useful for running one-off configuration scripts, as it is reliable and provides immediate visual feedback (useful in some environments). An obvious disadvantage is that having machines automatically logging themselves on as administrators might be classified as a security breach even by the less paranoid—what a field day the opportunistic cracker might have passing by an unattended machine as it merrily presents an administrator command shell! We believe, however, that in many circumstances, the potential security hazards are significantly less than they might seem; the opportunistic cracker can be kept at bay (see Chapter 8, Script Safety and Security). Logon scripts are not at all appropriate in situations in which a script must run when users are around—they can cause significant confusion.
- The third solution is to run the script as a service, one of those programs that sits running in the background without a user being logged on. Many essential parts of the system run as services, winlogon.exe being a good example, so this seems like an ideal status for our scripts. In this scenario, the service control manager would quietly run the script at startup while “Press ctrl-alt-delete to log on” floated around the screen; if a script commanded a reboot, the poor machine wouldn't know what had hit it! Although getting something to run as a service is not a trivial task, two utilities that come with the Resource Kit (instsrv.exe and srvany.exe) make this misery more than bearable. For most tasks, this is by far the most elegant solution to getting a script to run automatically.
In the next few sections, we explain in turn how to use each of the methods mentioned. At the end of the chapter, we discuss the security implications of all three methods.
Using a Scheduler
Just to make sure we are all singing from the same hymn sheet, we should first clarify what we mean by a scheduler. A scheduler is an application that is used to automatically launch other applications at a specified time and/or date. On NT, the scheduler runs as a service, continuously checking system time and date against its list of jobs until a match is found. Once matched, the command is executed, and the scheduler returns to its monitoring. This provides a very convenient way of making sure important, regular administration tasks are carried out automatically.
NT provides the scheduler service as well as a command-line interface called at.exe for controlling it. Before we look at the at command, we should explain briefly how to get the scheduler service running: this can be done in one of two ways, either by using the net start command or through the Control Panel. The net start command is used from the command line and, along with net stop, manages the process of—yes, you guessed it—starting and stopping services. To start the scheduler using net commands, type the following at the command prompt:
C:\>net start schedule
This use of the utility net.exe is discussed in Chapter 5, Controlling Services and Drivers. To do the same thing through the Control Panel launch the Control Panel (Start → Settings → Control Panel) and choose the Services applet from the array of icons. Now scroll down to the entry marked Schedule and select the Start button. Done! The Control Panel method also allows you to configure the scheduler to start automatically every time the system is booted. If you intend to use the scheduler with any degree of regularity, it clearly makes sense to configure it in this way. To do this, bring up the Services dialog box as we've just explained. Highlight the Schedule service and select the Startup button. Now check the Automatic radio button in the Start Type box and exit.
Once the scheduler is working, the at command actually becomes useful. It takes a number of parameters, details of which can be found either by typing at /? at the command prompt or using NT's help documents (accessible from the Start menu). Following is a simple example of a task that it is appropriate to schedule and the at command required to set this up; the example is a genuine one that we use ourselves. We've written a small Perl script to automatically mail us important reminders. The script reads a text file that contains the subject information, the date to send the mail, the text of the message, and a recipient list. We have the scheduler run the script at 8:30 a.m. every Monday through Friday. The command looks like this:
C:\>at 8:30 /every:M,T,W,Th,F C:\pls\shout.pl shout.txt
The first parameter is the time in the 24-hour clock format, so 8:30 is 8:30 a.m. The next parameter is the switch /every, followed by the days Monday (M) to Friday (F). This tells the scheduler to execute the command, every Monday through Friday at the appointed time. The final parameter, C:\pls\shout.pl shout.txt, is the command to run (a Perl script called shout.pl and the text file it reads, called shout.txt). As you can see, scheduling a task is not complicated. In order to check the list of scheduled tasks, type at at the command prompt, with no parameters. In our case we get the following:
C:\>at

Status  ID    Day                  Time         Command Line
------------------------------------------------------------------------
         1    Each M T W Th F      8:30 AM      C:\pls\shout.pl shout.txt
Using Autologon
Scheduling is a pretty straightforward, simple affair. Running a script by getting a workstation to log itself on as a user, interactively, although still reasonably simple, is a little more involved. To achieve the desired results, we need to carry out the following three steps:
- Create a local user account. Any script to be run will use the security context of this user, so if any system configuration must take place, the account will have to be given Administrator privileges on the machine.
- Create a logon script for that user (a logon script is a script or program that is run every time a user logs in; the fully qualified path of a logon script can be specified when creating a user account). This step is not necessarily required; see “The RunOnce Alternative” later in this chapter.
- Enable autologon.
Creating a User
We are going to assume that you know about creating users in general (if not, see Windows NT User Administration by Ashley J. Meggitt and Timothy D. Ritchey; O'Reilly & Associates, 1997), so we'll just mention what needs to be done to make the user usable in this context. Create a local user, say gstinit; give it a password, say c1l9o9n8; set the logon path to login.cmd; add this user to the Administrator group.
Creating a Logon Script
A logon script is run every time a user logs on. It can be either a batch file or an executable. Our requirement is to run a Perl script; as such a beast is neither a batch file nor an executable, we wrap it within a batch file that contains only one line, namely, the one that calls the script, for example, C:\scripts\script1.pl. A logon script runs with the security privileges of the logged-on user. It can reside anywhere provided that the user account is configured to find it, but by default NT looks in \winnt\system32\repl\import\scripts.
The RunOnce Alternative
Another way of getting a script to run on logon is to use the RunOnce registry key. The full key name is:
HKLM\SOFTWARE\Microsoft\Windows\CurrentVersion\RunOnce
This key can contain any number of string values that hold the commands you wish to execute once, the first time a user (that is any user) logs on. These values are removed once the commands have been executed. This means that you should never see any values under this key once you have logged on. To set up the RunOnce option, simply create a value (see the later section for details on how to do this), giving it any name you like, and then supply the full path to the program or script you wish to execute. For example:
| Name | Value |
| MyScript | perl.exe C:\scripts\script1.pl |
Enabling Autologon
We now need to look at ways of setting up autologon, a process that is quite straightforward and is well explained in the Windows NT Workstation Resource Kit book. The easiest way to set autologon is to use an application already designed for the job. Although these are not necessarily useful in the present context, as they are designed to run solely from the GUI and cannot therefore be scripted, we'll give you a quick run-through of a couple of freeware applications. We will then explain how to set up autologon manually as well as through a Perl script.
Using Autolog.exe
This is a tiny application, available from http://www.sysinternals.com. When run, it merely presents a dialog box, asking for the following information: account name, machine name, and password. Two buttons, Enable and Disable, do exactly as might be imagined.
Using TweakUI.exe
This is a Control Panel application that Microsoft gives away as freeware.* TweakUI allows you to control and configure a number of aspects of your environment such as your desktop and Internet Explorer settings. It also allows you to set autologon. To do this, install TweakUI and launch it from the Control Panel. Select the Network tab, check the “Log on automatically at system startup box” and fill in the logon name and password in the appropriate text boxes. Select Apply to write out the settings, and there's no more to it than that.
The next time you log out or reboot, NT will automatically perform a logon using the name and password you have set.
Editing the registry directly
So how do these autologon programs work? Actually there is very little to them; they simply write a number of values to the registry and the OS does the rest. As you may know, the registry is a centralized database containing all the configuration parameters for your hardware, your OS, and any other software that chooses to use it. This is the direct replacement for the collection of ini files that Windows 3.1 and its associated programs used. If you don't know your way around the registry, you should read Managing the Windows NT Registry by Paul Robichaux (O'Reilly & Associates, 1998), but for those of you in a hurry, here's a quick question and answer session:
What is the registry?
Basically, the registry is a repository (database) for all the configuration information used by the operating system as well as any other NT-aware application. The information is an amalgamation of a number of static files as well as information extracted by the system at boot time. The stored files are called hives, and each displays a different set of configuration parameters.
How do you see these hives and what are root keys?
The hives are loaded into the registry database dynamically at boot time. The one exception to this is the user hive. This hive contains information specific to the currently logged-on user and is therefore loaded when a user logs on. To view the registry, you need to either use a registry editor program or write code that takes advantage of the registry APIs (which are part of the core Win32 libraries). The registry is hierarchically structured, at the root of which are the so-called root keys. From a programmer's perspective, these root keys are handles to various entry points in the registry; from an administrator's perspective, they are simply the thing you see when first running a registry editor. The root keys are described as follows:
HKEY_LOCAL_MACHINE
Contains all of the machine-specific configuration details. This includes boot-time parameters, information on security, software, and OS behavior (services, device drivers, and so on). All of the registry keys that appear in this book are subkeys of this root key. The key is also what might be considered a “true” hive in that it really is at the root of a hierarchy. By contrast, a hive such as HKEY_CLASSES_ROOT might be considered “virtual” in that it is actually a pointer to a part of HKEY_LOCAL_MACHINE.
HKEY_CLASSES_ROOT
Contains file association information but is used primarily to give backward compatibility to the Windows 3.1 equivalent database.
HKEY_CURRENT_CONFIG
Is a reference to that part of HKEY_LOCAL_MACHINE that points to the currently loaded settings. A machine can be configured with any number of hardware profiles, basically a list of device drivers and such to load.
HKEY_USERS
Contains the details of all users logged on to the local system. In reality this can only ever be two users, the currently logged-on one and the default one (the one used by NT when waiting for a real user to log on).
HKEY_CURRENT_USER
Is a reference to the registry information of the currently logged-on user as found under the HKEY_USERS key. The information here is retrieved from a user's NTUser.dat file.
What are keys and values?
An analogy often used is that of directories and files. The key can be considered a kind of directory with a name attribute and the ability to contain both other keys and values within it. In this scheme, a value is analogous to a file—it has a name, a type, and an actual value. This hierarchical arrangement allows for groupings of similar keys and values under the various root keys.
The files that make up the registry are not directly editable, as they are binary and not meant to be read by human eyes. Therefore, all writing and reading to and from them has to be done via the registry API calls. Luckily, Windows NT is shipped with two perfectly good GUI-based registry editing tools, Regedit and Regedt32.* For this book we are going to exclusively use Regedt32 for no other reason than it's the one we generally use. It does have several very useful features not found in the other program, such as the ability to set security information of registry keys or to load arbitrary registry hives from disk; this is why we tend to use it. Just to ensure that you are happy with us saying things like “traverse the registry,” we'll take time here to give a quick run of the Regedt32 interface and some of its useful features.
Understanding Regedt32
You will not find Regedt32 in the Start menu, as it is considered a dangerous tool by Microsoft (read, it lets you actually configure the thing) and is thus not put in a place of prominence. The executable, regedt32.exe, resides in \winnt\system32. Launch it from either the Run option in the Start menu or from the command prompt by typing regedt32.
The decrepit interface Regedt32 presents does not adhere to the Explorer type of navigation philosophy (i.e., a single dialog with split view, showing a tree on the left and details on the right). Instead, it displays each hive in an individual child window. Each window is split into two, with the left-hand pane displaying the top-level keys for the hive. This pane exhibits the standard Windows 3.51 navigation interface (see Figure 2-1). Traversing registry keys is achieved in a similar way to traversing a file system: a folder icon with a plus on it represents any key that contains one or more subkeys; clicking once on any folder icon displays a list of that key's value names, type, and actual value. These are displayed in the right-hand pane of the hive window. Double-clicking on a folder icon with a plus sign on it simply expands the tree and shows a list of that key's subkeys.
The following summarizes the steps you need to take in order to create or delete a key or value. If you are already familiar with Regedt32 and know perfectly well how to modify the registry, you might like to skip on to the next section.
Keys—Creating
To create a new subkey, go to the key under which the new key is to sit. Highlight it, and select Edit → Add Key from the main menu. A dialog will pop up into which you can enter the name of the key to be created. That's all there is to it. The key is now created and immediately appears in the active window. If you need to change the name of the key, then you'll have to use Regedit instead, as modification of keynames is one of the many features that Regedt32 does not implement (sigh).
Keys—Deleting
To delete a key, select Edit → Delete or simply use the Delete key. It goes without saying that you must make sure you have highlighted the correct key for deletion. The delete option takes out all subkeys and associated values below the key you choose to delete. NT does warn you about this so pay attention to it.

Figure 2-1. The Regedt32 interface
Values—Creating
To create a value, select Edit → Add Value and fill in the resulting dialog box. It requires you to supply a value name and a type. The name can be any string you care to choose; the type must be one of the constants in Table 2-1.
Table 2-1. Registry Value Types
| Value Type | Description |
| REG_BINARY | Information stored as a stream of binary numbers |
| REG_DWORD | A 32-bit number |
| REG_SZ | A null-terminated string |
| REG_MULTI_SZ | An array of null-terminated strings with two null characters as the array terminator |
| REG_EXPAND_SZ | A string with unexpanded environment variables, such as %USERNAME%, to be filled in when the value is used |
Once you've chosen your value type, another dialog box appears, this time prompting you for the actual value. Depending on the value type chosen, you either get a single line (REG_SZ, REG_DWORD, REG_EXPAND_SZ) or a multiline box (REG_MULTI_SZ). For the purposes of this book, we'll ignore REG_BINARY; values of this type tend to be the sort of things you generally don't want to mess with! Enter your data and close the dialog box. Regedt32 now displays the new value name and its associated value.
An existing value can be modified in three different ways:
- Double-click on the value itself, as it appears in the right-hand pane of the active window. This brings up the Value dialog box prompting you to make the change.
- Highlight the string and select Binary, String, DWORD, or Multi String from the Edit menu.
- If it is the name rather than the value that you wish to change, use Regedit instead of Regedt32, and perform the change in the same way as you would modify a filename with Explorer.
Values—Deleting
Deleting a value is achieved in the same way as deleting a key: select the value and either press the Delete key or select Edit → Delete.
OK, that's the simple run-through of Regedt32. We now have enough knowledge to hack about, and will turn our attention to the keys and values that need to be written in order to get a machine to perform automatic logons. Before we do, it would be irresponsible for us not to reiterate what you have probably read many, many times before: messing around with the registry is bad for your health—if you arbitrarily choose interesting looking keys and change values, there is a high probability that something (or maybe even everything) will stop working. There. You've been warned, so don't blame us.
Setting Autologon with Regedt32
Every registry entry associated with logging in a user (including setting autologon) lives under one key, whose name is:
HKLM\SOFTWARE\Microsoft\Windows NT\CurrentVersion\Winlogon
Table 2-2 documents the values listed under this key that may need to be modified in order to get autologon to work.
Table 2-2. Autologon Registry Keys

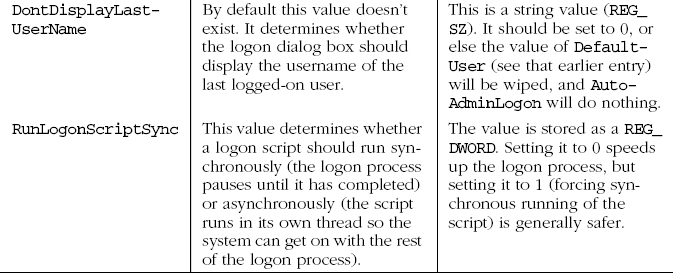
Launch Regedt32 and, starting at the root key HKEY_LOCAL_MACHINE, traverse your way to the Winlogon key (as mentioned earlier). Highlight the key and see what values are present. There are more values than described in Table 2-2, but for the purpose of this book you can ignore the extra ones. Double-click on the DefaultUser value and enter the name of the newly created user account in the dialog box presented, in our case, gstinit. Now step through all the other values that require changing according to the table. Having done this, if you restart your workstation (or even just log out), you'll be automatically logged in again as the gstinit user. If you have also set up a logon script, this will now run.
Setting Autologon with Perl
If you have followed the preceding text and tried changing the registry entries we have talked about, you will be confident of the following:
- You know which root key and subkey holds the values associated with logons.
- You know what needs to be set to get autologon to work and what the values should be set to.
- You know how to set them manually using Regedt32.
We are sure that you will agree that while quite exciting the first time, modifying all of these registry entries would be extremely tedious if autologon were something that we wished to accomplish with any degree of regularity or on a large number of workstations. So now we will attempt to make life a bit easier for ourselves. If we are satisfied that everything is working correctly and that autologon is behaving as it should, we can now write a Perl script to set it up automatically.
The scriptlet that follows, autologon.pl, is extremely basic in that it does no error checking, does not provide any feedback to the user, and provides no flexibility (the registry values are hardcoded). A really useful script would contain all of these points that we omit. However, this is the first Perl script of the book, so we thought we would leave it uncluttered for the sake of clarity. The incantation use Win32::Registry deserves a special mention, because it is one you will see an awful lot throughout this book. It tells Perl to load and initialize the registry module, which presents us with a set of functions to manipulate the Windows registry; these are in fact wrappers for the Win32 registry API functions. For more information on Perl modules and how to use them, see the Appendix, Perl Module Funtions.
# autologon.pl
use Win32::Registry;
Here we open the key SCFTWARE\Microsoft\WindowsNT\CurrentVersion\Winlogon and keep a reference to the returned registry handle in the variable $RegHandle:
Win32::Registry::RegCpenKeyEx
  (&HKEY_LCCAL_MACHINE,'SCFTWARE\Microsoft\WindowsNT
      \CurrentVersion\Winlogon',NULL,&KEY_ALL_ACCESS,$RegHandle);
Now, using the $RegHandle, we set the appropriate values, referencing each by its name:
Win32::Registry::RegSetValueEx ($RegHandle, 'AutoAdminLogon', NULL, ®_SZ, "1"); Win32::Registry::RegSetValueEx ($RegHandle, 'RunLogonScriptSync', NULL, ®_DWCRD, 0); Win32::Registry::RegSetValueEx ($RegHandle, 'DefaultUserName', NULL, ®_SZ, "gstinit"); Win32::Registry::RegSetValueEx ($RegHandle, 'DefaultPassword', NULL, ®_SZ, "c1l9o9n8"); Win32::Registry::RegSetValueEx ($RegHandle, 'DontDisplayLastUserName', NULL, ®_SZ, "0");
Here we delete the values that would otherwise prevent autologon from working. If the values are not present, the call to the function will clearly fail, but we don't bother to trap this:
Win32::Registry::RegDeleteValue($Reghandle,'DefaultDomainName');
Win32::Registry::RegDeleteValue($Reghandle,'LegalNoticeCaption');
Win32::Registry::RegDeleteValue($Reghandle,'LegalNoticeText');
Finally we close the open registry handle:
Win32::Registry::RegCloseKey($RegHandle);
Assuming that you have installed Perl correctly, with the default file associations, the script can be run by typing autologon.pl at the command line:
This all may seem a little long-winded, but try setting up autologon more than a couple of times and the script will soon save time. It has two major advantages over the GUI-based utilities that do the same thing: it can be run from the command line (and therefore remotely, or by a scheduler or by a logon script), and it deals with the LegalNotice keys. We hardly consider unconfigurability as an issue with such a trivial script, as it would take seconds to change a value that is hardcoded into the script itself;* the only disadvantage that we can see with the script over the GUI-based programs that perform the same task is that the script doesn't look as pretty!
Running a Script as a Service
The third way to run a script is as a service. This does not require automatic logon and is therefore considerably more secure. It is also considerably more complex, at least in theory, although in practice the complexity can be dealt with by judicious use of a couple of command-line tools.
What Is a Service?
The term service is bandied around all over the place in various books, newsgroups, and help files on Windows NT. Of course, we all know what a service is: it's something that sits chugging away somewhere in the depths of our machine, literally providing the services that keep the system up and running. Services allow us to connect to a network, print to a computer 50 miles away, shut down safely if our UPS stops receiving power, log errors, run programs when we're not around (as demonstrated in “Using a Scheduler” earlier), and so forth.
This is all true, but if we are going to get a script to run as a service, we'll need to be a bit more specific than that. Amazingly, most commonsense attempts to define services based on an examination of either a Windows NT installation or of the relevant documentation tend to fail. To illustrate what we mean, here are a few possible definitions that we have seen or that might be deduced:
- A service is a program that runs in the background as part of the operating system, providing specific functionality for other programs or for end users. This definition seems fair enough, except that a service can have a user interface, and therefore is not strictly a “background” process at all. It is also not necessarily “part of the operating system,” whatever that means, because it can be written by a third-party vendor and doesn't necessarily run with the LocalSystem security context. We'd better try again . . .
- A service is a program that is controlled by the Service Control Manager. It has to be said that there is indeed a Control Panel applet called Services which really is a frontend to the Service Control Manager. Opening this applet reveals a list of services in conjunction with a series of buttons allowing a user to start, stop, or pause them or even configure their startup type. Further examination of the system reveals that each of the services listed in here can also be found under the HKLM\SYSTEM\CurrentControlSet\Services subkey of the registry. Unfortunately, this discovery leads to more questions than it answers! Within this registry subkey, there are loads of so-called services listed that do not make any appearance in the Service Control Panel applet. As it happens many of them seem to be obscure drivers. So it's back to the drawing board again . . .
- A service is a program that is registered in the HKEY_LOCAL_MACHINE\SYSTEM\CurrentControlSet\Services subkey of the registry. But this definition, too, falls short. Even if you find out what all the various entries in this subkey actually mean* and try to register a program with the correct parameters, there will be absolutely no effect.† So mere presence in this part of the registry cannot be the defining feature of a service.
Before you become too worried, we should tell you that we have found a perfectly satisfactory definition of a service but, amazingly, it took an in-depth read of the Win32 Software Development Kit documentation to find it. We now present the definition we're happy with:
There are two fundamentally different types of services, namely Win32-based services and driver services. Driver services are simply drivers, which may or may not be running in kernel mode; they are normally started during the boot process. Device drivers are of no relevance to us here, so we will move on to a discussion of Win32-based services.
A higher-level Win32-based service can be defined as any program that adheres to an interface defined by the Service Control Manager. Specifically, a program that wishes to run as a service (or to run as several services) must call the API function StartServiceCtrlDispatcher on initialization; it passes to this function a SERVICE_TABLE_ENTRY for each service that it wishes the Service Control Manager to know about. A SERVICE_TABLE_ENTRY contains only two elements: the name of the service (as text) and a handle to a ServiceMain function. It is the ServiceMain function that is responsible for the actual initialization of a service, and its most important function as far as the Service Control Manager is concerned is to make a call to RegisterServiceCtrlHandler. The purpose of this rather clumsily named API function is, unsurprisingly, to register a service control handler function, which can be called by the Service Control Manager whenever it needs to control the service. The Win32 API defines a series of “service control codes” that a service's handler function must accept; these deal with stopping, pausing, starting, and so forth.
Once a program or script that conforms to the Service Control Manager's interface specifications has been written, it must be registered in the services database if it is to appear in the Service Control Panel and actually be useful. Although the services database is merely a series of registry entries—stored in the HKLM\SYSTEM\CurrentControlSet\Services subkey—these are not meant to be manually edited. Instead, the installation or modification of a service is achieved through another set of Win32 API functions, most notably CreateService, Delete-Service, and ChangeServiceConfig. The two preceding paragraphs can be considered only a bare summary of what is entailed in the writing and installing of a service; a more detailed description as to exactly how this should be done is a programming issue well beyond the scope of this book. Despite the brevity of the previous explanation, it should be abundantly clear that while it would be perfectly possible to write a Perl script that installed itself and ran as a service,* this would not be a task for the fainthearted. Nor indeed would it be a task for an overworked system administrator! Thankfully, not all is doom and gloom if you have the NT Resource Kit, as this contains two programs, srvany.exe and instsrv.exe, that take away virtually all the trauma.
Using srvany.exe and instsrv.exe
According to the documentation, srvany.exe is a program that allows anything to run as a service. Despite first appearances, there is nothing magical about this; the cardinal rules of service compliance are not somehow overcome. So what is srvany.exe? It is simply a full-fledged Win32-compliant service. The only difference is that whereas most services listen on network ports, monitor a UPS, or carry out another such activity, srvany runs an arbitrary program. When the Service Control Manager requests that an instance of srvany should start, it reads an entry from the PARAMETERS subkey under its entry in the Services part of the registry and runs the corresponding program.
The tedium of installing a service is dealt with by instsrv.exe (or by a similar program, sc.exe). This program takes a service as a command-line parameter and calls all the Win32 API functions necessary for the successful installation of the service.
Running a script as a service involves installing srvany.exe and setting the registry key that gives the command line necessary to run the script. Specifically, the following steps need to be performed:
- Ensure that instsrv.exe and srvany.exe are both in your path.
- At the NT command prompt, type instsrv srvname path\srvany.exe, where srvname is the name of the service as you would like it to appear in the Service Control Panel, and path is the fully qualified path where srvany can be found. The display should show the following:
The service was successfuly added!

Make sure that you go into the Control Panel and use
the Services applet to change the Account Name and
Password that this newly installed service will use
for its Security Context.
You may have spotted the rather curious spelling of the word “successfully.” This is not a typo in this book; the message is printed exactly as it appears if you run instsrv, weird spellings and all!
- Using either Regedt32 or any other registry editor, find the key HKLM\SYSTEM\CurrentControlSet\Services\srvname. Add a Parameters subkey. Within this key, add a string value (REG_SZ) called Application. Set the value of this key to be the name of the executable that you want to run; if you are running a Perl script this will be perl.exe, but be sure to include the fully qualified path (e.g., C:\perl\bin\perl.exe).
- Next, create an AppParameters string value. This value contains command-line parameters for the application named in the Application value. Set this value to be the name of the Perl script you intend to run. Again, remember to use the fully qualified path (e.g., C:\scripts\junk\hello.pl).
Once these steps have been carried out, the script will have been installed as a service and may be started either from the Service Control Panel (by clicking on the name of the service, followed by Start) or from the command line with the command net start srvname.
By default, a script installed in this way will have the security context of the LocalSystem (meaning that it has the same user rights as the OS does on the machine—for example, full access to the registry), its start mode will be automatic (meaning that the script will be started automatically by the Service Control Manager every time the system is started), and it will be noninteractive (will not display any windows). If you wish to alter any aspect of this behavior, you can do this trivially via the Service Control Panel.*
Using the Service Control Panel
We have mentioned the Service Control Panel several times during the course of this chapter. As you have probably guessed or already knew, it is a graphical interface for controlling services. The interface it presents is very straightforward; an example of its main screen is presented in Figure 2-2.
Figure 2-2. The Service Control Panel
Once a service has been selected from this list, some or all of the options Start, Stop, Pause, and Continue will become enabled; which ones are enabled depends upon which options the service actually supports. The Startup button reveals a set of options allowing you to specify a security context in which the service will run, whether the service will run interactively, and at what stage of the boot process (if at all) the service should start. The HW Profiles option allows you to specify which hardware profiles, if any, the service should be attached to. There's more on this in Chapter 3.
Saving Time with Perl
Installing a script as a service is not something that many administrators have to do regularly. However, the procedure of running instsrv.exe and then hacking the registry is probably just about tedious (and error-prone) enough to warrant being wrapped up in a Perl script. Following is a sample script that takes two command-line parameters—the name of the Perl script to run as a service and its fully qualified path. It then installs srvany (using the second parameter as a name) and writes the necessary registry keys. As you will note, the script assumes that the srvany program can be found in C:\winnt\system32.
#perlserv.pl
use Win32::Registry;
Here, we take the first command-line parameter and store it in the $spath variable. We then take the second parameter and store it in $sname. The value $srvany, the fully qualified path and name of the srvany executable, is hardcoded.
$spath = shift @ARGV;
$sname = shift @ARGV;
$srvany = 'C:\winnt\system32\srvany.exe';
The following line of code uses backticks to execute instsrv.exe. It passes the required parameters, namely $sname and the $srvany. You will note that there is no error checking here (for example, to ensure that the value stored in $sname really is a valid Perl script).
'instsrv $sname $srvany';
Next, we use the three registry manipulation functions (RegOpenKeyEx, RegCreateKey, and RegSetValueEx) to attempt to open the registry key that should have been created by instsrv. If the attempt is successful, we create the Application and AppParameter subkeys and write the appropriate values. Here we do bother with a bit of error checking, largely to reflect the internal dependencies of the actions performed. For details of what all the parameters of the registry functions actually mean, please refer to the Appendix.
$key = "SYSTEM\\CurrentControlSet\\Services\\$sname";
if(Win32::Registry::RegOpenKeyEx
(HKEY_LOCAL_MACHINE,$key,NULL,KEY_ALL_ACCESS,$RegHandle))
{
if(Win32::Registry::RegCreateKey($RegHandle,'Parameters',$NewHandle))
{
Win32::Registry::RegSetValueEx
($NewHandle, 'Application', NULL, ®_SZ, $srvany);
Win32::Registry::RegSetValueEx
($NewHandle, 'AppParameters', NULL, ®_SZ, "$spath\\$sname");
}
}
In order to run this script, type the following at the command prompt:
C:\>perlserv.pl path script
where path is the fully qualified path of the script to run, and script is the name of the script. For example, to install the Perl script rumplestiltskin.pl, which resides in C:\fairytales\silly, type the following:
C:\>perlserv.pl C:\fairytales\silly rumplestiltskin.pl
Security Implications
If you are even mildly worried about security on your network, you might shiver with dread at the possibility that workstations within your jurisdiction are running scripts, maybe even performing interactive logons, out of your eyesight. In the final part of this chapter, we summarize the security implications of adopting any of the script-running techniques detailed so far.
Using a Scheduler
Scheduled tasks can run in the background and do not require an interactive logon session to work, but this does not mean that they are safe. Given that the whole point of a scheduler is to run tasks at specified times, there is a high likelihood that a user could log on to a workstation while it is waiting to run a scheduled script. Although this does not matter in itself, it is imperative to make sure that such a user does not have write permission to any task (or script) that is scheduled to run. The reason for this is straightforward: the scheduler service is likely to be running in the LocalSystem security context, meaning that any task or script that runs will also run with LocalSystem privileges. If a user has write permissions on the task to be scheduled, there is nothing to stop him replacing it with a small batch file or script that runs an arbitrary program as LocalSystem. For example:
REM ScheduledTask.cmd
REM An evil batch file, designed to wreak havoc on an unsuspecting sysadmin
  @echo off
REM First, run a file manager with system privileges
  Winfile.exe
REM Now, run Regedt32, giving us unrestricted access to all keys
  Regedt32.exe
REM Finally, maybe a command shell would be useful
  CMD.exe
This should not cause major panic—simply make sure your file permissions are set correctly and that a script that has been scheduled to run does not do anything silly like fire up a command shell!
Using Autologon
This technique presents a more worrying scenario: a whole load of machines perform unattended interactive logon. What is to stop a user from sitting at one and wreaking havoc or at the very least creating a new account with administrative privileges? The honest answer might be “nothing,” but it must be said that with a bit of care, the danger can certainly be minimized. First, ensure that any script that runs does not take more than a few seconds to execute, does not run a command shell (or another “unsafe” program), and ends by logging off the autologon user and wiping the registry value containing the password. Second, ensure that any logon script is set to run synchronously (using the RunLogonScriptSync registry entry described earlier); this will prevent anyone from performing any interactive tasks while the script is running. Another alternative is to use exclusively the RunOnce registry key to run a script—programs or scripts set to run here will fire up before Explorer loads. It is worth bearing in mind, however, that it is always possible to stop execution of a script by killing its console window (hence the advice to keep such scripts short).
For many configuration (as opposed to maintenance) tasks, autologon is our preferred way of running scripts. The main reason for this is that it allows us to see clearly what state workstations are in at any time during a configuration process and allows us to run scripts that display information on the console, pop up dialogs, and the like. In our environment, the security issue is unimportant because we can guarantee that there is no way a user could take advantage of our autologons while they are being performed; we simply schedule reconfigurations well in advance and physically lock everyone out of the building while they take place. Alternatively, if we are dealing with only a few machines, we configure them in our office. If you are not in a position to be able to do this or if you never actually require a script to provide visual feedback, you are probably best running your scripts another way, for example as services.
A point to reiterate about autologon is that the username and password used by the system to log on are stored in the registry as clear text. It is therefore imperative that any script that runs once logon is successful takes on the task of removing this information from the registry. Username and password will, of course, also be stored as clear text in the script itself; this issue—and script security in general—is discussed in Chapter 8.
Running as a Service
The security issues here are very much the same as they are for autologon. Carelessness in the setting of file permissions could allow a user to run arbitrary commands as LocalSystem (or whatever security context the service is configured to run as); also, a script that itself runs arbitrary commands, spawns shells, performs other such functions, should definitely be avoided. On balance, however, setting up a service is by far the safest method of running scripts: it avoids interactive logon or waiting for a scheduler to kick in. For the ultraparanoid, you can even prevent users from logging onto a machine while the scripts are running. There are many ways to do this, ranging from disabling user accounts to changing the shell to something that merely logs off, or the like. The possibilities are endless, so we leave them to your imagination.
Summary
In this chapter we have shown you three ways of running a script without any active intervention on the part of the system administrator beyond the initial installation stage. Which method is most appropriate to use depends on the type of task your script is to perform: For regular maintenance, use a scheduler. For one-off configuration in a closed environment, autologon provides a simple, robust solution. Running a script as a service is the most generically useful method, as scripts run in this way can work in the background, are safe from a security standpoint, and will work reliably and predictably. In the next chapter, we take the concept of automation further by explaining how to install a script on a workstation that will update itself as and when it becomes obsolete. We will also develop a script that can be used in conjunction with the techniques described in this chapter to automate generic script installation and management.
*This can be downloaded from http://www.microsoft.com and http://www.tucows.com, among other sites.
*Actually they are not both “perfectly good”! One does not include any search facilities, and has an interface that would have looked old-fashioned on Noah's ark; the other is severely restricted in other areas of functionality (e.g., loading hives and setting security attributes). But we'll let that pass . . .
*For a discussion of the security issues, see the section on security at the end of this chapter and the second half of Chapter 8.
*Managing the Windows NT Registry, by Paul Robichaux, has an excellent, thorough description of these.
†Actually, this is not quite true. If you are unlucky/foolhardy enough to set ErrorControl to the wrong value, your workstation will greet you with a blue screen of death at every subsequent bootup!
*It is not strictly true that a service could be written from scratch in Perl, as a small amount of C/C++ wrapper code would be required in order to import the Win32 API functions, but frankly, if you intend to write a Perl script that conforms to the Service Control Manager interface, a little bit of C/C++ wrapper code should be the least of your worries.
*Some of the registry entries associated with making such changes are discussed in Chapter 3, Remote Script Management. Making a service interactive is actually not quite so simple; for an excellent discussion on this subject, see Frank Kim's article “Why Do Certain Win32 Technologies Misbehave in Windows NT Services?” in the March, 1998 edition of Microsoft Systems Journal.
Get Windows NT Workstation: Configuration and Maintenance now with the O’Reilly learning platform.
O’Reilly members experience books, live events, courses curated by job role, and more from O’Reilly and nearly 200 top publishers.

