Chapter 4. Organizing Your Stuff
Every disk, folder, file, application, printer, and networked computer is represented on your screen by an icon. To avoid spraying your screen with thousands of overlapping icons seething like snakes in a pit, Windows organizes icons into folders, puts those folders into other folders, and so on.
This folder-in-a-folder-in-a-folder scheme works beautifully at reducing screen clutter, but it means that you’ve got some hunting to do whenever you want to open a particular icon. Helping you navigate and manage your files, folders, and disks with less stress and greater speed was one of the primary design goals of Windows—and of this chapter.
Creating a Folder
To create a new folder to hold your icons, right-click where you want the folder to appear (on the desktop, or in any desktop window except My Computer), and choose New → Folder from the shortcut menu. The new folder appears with its temporary “New Folder” name highlighted. Type a new name for the folder and then press Enter.
The Folders of Windows XP
The top-level, all-encompassing, mother-ship window of your PC is the My Computer window. From within this window, you have access to every disk, folder, and file on your computer. Its slogan may as well be: “If it’s not in here, it’s not on your PC.”
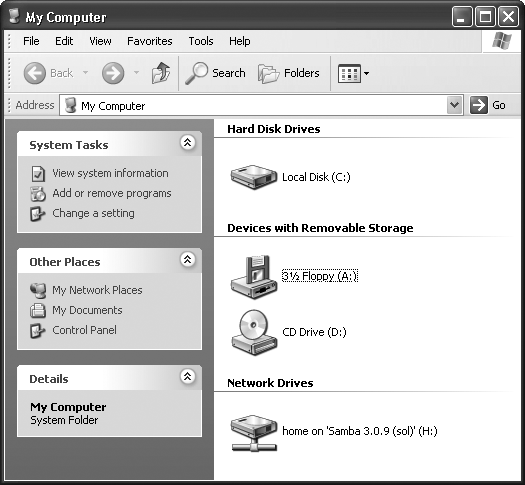
To see it, choose Start → My Computer. You generally see several categories of icons (Figure 4-1):
Hard Disk Drives. These icons, of course, represent your PC’s hard drive (or drives, if you’ve installed or attached additional ones). Most people, most of the time, are most concerned with the Local Disk (C:), which represents the internal hard drive preinstalled in your computer. (You’re welcome to rename this icon, by the way, just as you would any icon.)
Files Stored on This Computer. This category appears only if your computer is a member of a workgroup, not if it’s part of a domain network (see the box on Section 4.2.1). These folders, which bear the names of people with accounts on the PC, store links to all files and preferences for each person.
Figure 4-1. The My Computer window, shown here on a corporate-network PC, is the starting point for any folder-digging you want to do. It shows the disk drives of your PC. If you double-click the icon of a removable-disk drive (like your CD-ROM drive, Zip drive, or Jaz drive), you receive only an error message unless there’s actually a disk in the drive.Devices with Removable Storage. Here, Windows is talking about your floppy drive, CD or DVD drive, Zip drive, USB flash drive, and so on.
Scanners and Cameras. This is where you see the icons for any digital cameras or scanners you’ve installed.
Other. You may also see an icon for the Control Panel here.
What’s in the Local Disk (C:) Window
You might be surprised to learn that your main hard drive window doesn’t actually contain anything much that’s useful to you, the PC’s human companion. It’s organized primarily for Windows’ own benefit.
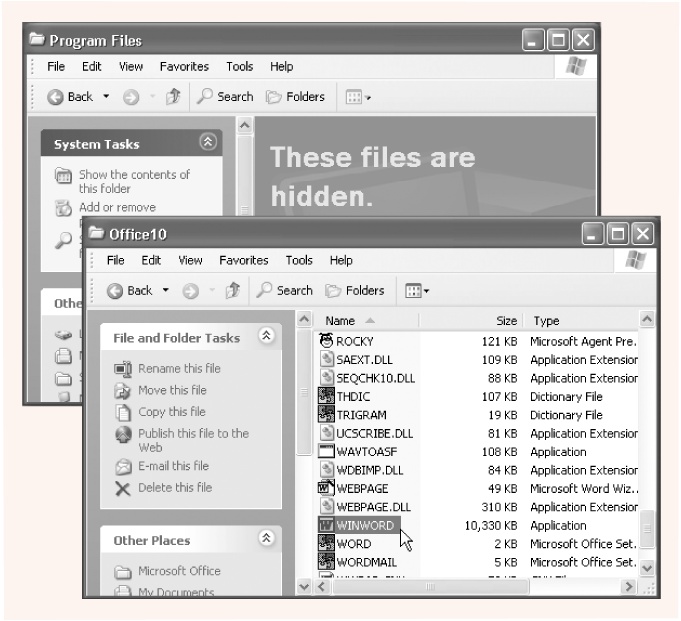
If you double-click the Local Disk C: icon in My Computer—that is, your primary hard drive’s icon—a direly worded message lets you know that these files are hidden. “This folder contains files that keep your system working properly,” it says. “You should not modify its contents.” (Figure 4-2 shows a similar message.)
All of this important-sounding prose is aimed at the kind of person who, before the invention of this warning message, fearlessly or naively cruised through the important system files of their PCs, deleting and moving files until the computer was inoperable (and then calling Microsoft for tech support).
Truth is, the C: drive also contains a lot of stuff that doesn’t belong to Windows—including your files. So when you’re just looking (but not touching) the Windows system files, or when you want to burrow around in your own folders, it’s perfectly OK to click the “Show the contents of this folder” link. Suddenly the C: drive’s formerly invisible contents appear. They include these standard folders:
Documents and Settings. This folder contains folders named for the different people who use this PC. In general, Limited account holders (Section 12.2.1) aren’t allowed to open anybody else’s folder.
If you’re the sole proprietor of the machine, there’s only one account folder here—and it’s named for you, of course. If not, there’s a folder here for each person who has an account on this PC.
Program Files. This folder contains all of your applications—Word, Excel, Internet Explorer, your games, and so on. But that isn’t the impression you get when you first open the folder (Figure 4-2).
Fortunately, making them appear on your screen is easy enough: simply click the words “Show the contents of this folder.” They appear just below the “These files are hidden” message, and also in the task pane. (The Local Disk (C:) drive window works the same way.)
Figure 4-2. Top: The C: drive and the Program Files folder start out looking empty. Bottom: Here’s what Microsoft Word actually looks like—75 little software crumbs in your Program Files → Microsoft Office → Office10 folder. Only one of these icons (the one called WINWORD) is the actual program. But don’t try to move it, or any of its support files, out of this folder.Windows (or WINNT, if you upgraded your machine from Windows 2000). Here’s another folder that Microsoft wishes its customers would simply ignore. One exception: the Fonts folder contains the icons that represent the various typefaces installed on your machine. You’re free to add or remove icons from this folder.
Your Account Folder
Everything that makes your Windows XP experience your own sits inside the Local Disk (C:) → Documents and Settings → [Your Name] folder. This is where Windows stores your preferences, documents, pictures and music, and so on.
In general, the only action you’ll perform that involves this folder is periodically backing up the Local Disk (C:) → Documents and Settings → [Your Name] folder → My Documents folder.
Your account folder actually holds much more than this, but the rest of the folders are hidden, reserved for use by Windows itself. The hidden folders include: Application Data (which your programs may use to store user-specific settings and files), Local Settings (Internet Explorer’s history list and cache file, for example), NetHood (shortcuts for the icons in your My Network Places window), My Recent Documents (document shortcuts, the ones that show up in the optional My Recent Documents submenu of the Start menu), and SendTo, which is described later in this chapter.
Tip
Ordinarily, if your name is, say, Chris, you’re not allowed to open the Frank’s Documents folder; if you’ve been given a Limited XP account (Section 12.2.1), then double-clicking it produces only an error message. That’s the Windows XP security system at work.
But My Computer also contains a folder called Shared Documents. This folder is like the community bulletin board, in that everybody who uses this PC is free to deposit things, take things out, and read whatever resides there. See Chapter 12 for details.
Navigating My Computer
Most of the time, you can get where you’re going on your computer using the commands, programs, and folders listed in the Start menu. But when you need to find something that isn’t listed there—when you need to burrow manually through the labyrinth of folders on the machine—Windows offers two key methods of undertaking a folder quest.
First, you can open the My Computer window, as described at the beginning of this chapter. From there, you double-click one folder after another, burrowing ever deeper into the folders-within-folders.
As you navigate your folders, keep in mind the power of the Backspace key. Each time you press it, you jump to the parent window of the one you’re now looking at—the one that contains the previous folder. For example, if you’re perusing the My Pictures folder inside My Documents, pressing Backspace opens the My Documents window. (Backspace also works in most Web browsers, functioning as the Back button.)
Likewise, the Alt key, pressed with the right and left arrow keys, serves as a Back and Forward button. Use this powerful shortcut (instead of clicking the corresponding buttons on the Standard toolbar) to “walk” backward or forward through the list of windows most recently opened.
Navigating with Windows Explorer
The second method of navigating the folders on your PC is called Windows Explorer— for long-time Windows veterans, a familiar sight. (Note that some people use the term “Windows Explorer” to refer to everyday folder windows. In this book, the term refers exclusively to the split-window view shown in Figure 4-3.)
Using this method, you work in a single window that shows every folder on the machine at once. As a result, you’re less likely to lose your bearings using Windows Explorer than burrowing through folder after folder, as described above.
You can jump into Explorer view using any of these methods:
Shift–double-click any disk or folder icon.
Right-click a disk or folder icon (even if it’s in the Start menu) and choose Explore from the shortcut menu.
Click Folders on the Standard toolbar.
Choose View → Explorer Bar → Folders.
Choose Start → All Programs → Accessories → Windows Explorer.
Choose Start → Run, type explorer, and then press Enter.
No matter which method you use, the result is a window like the one shown in Figure 4-3.
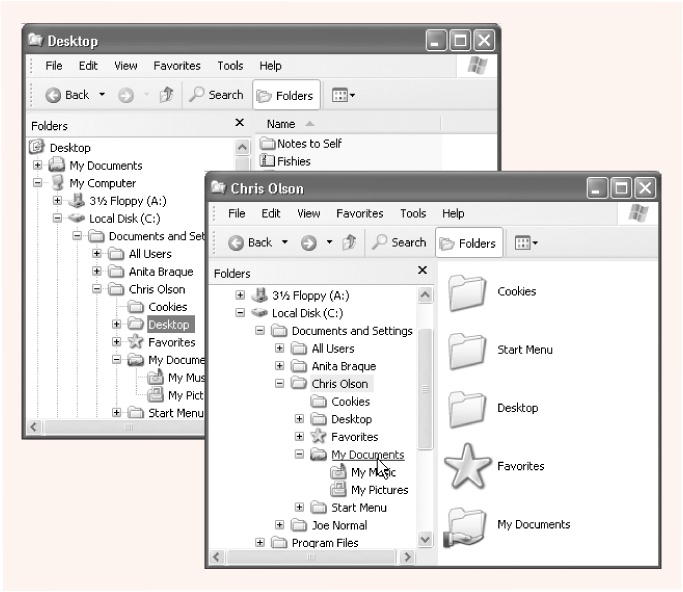
As you can see, this hierarchical display splits the window into two panes. The left pane displays only disks and folders. The right pane displays the contents (folders and files) of any disk or folder you click. You can manipulate the icons on either side much as you would any other icons. For example, double-click one to open it, drag it to the Recycle Bin to delete it, or drag it into another folder in the folder list to move it elsewhere on your machine.
This arrangement makes it very easy to move files and folders around on your hard drive. First, make the right pane display the icon you want to move. Then, set up the left pane so that you can see the destination folder or disk—and drag the right-side icon from one side to the other.
Tip
When you click a folder icon (not its + button) on the left side of an Explorer window, Windows expands that folder’s listing and instantly closes whichever folder you previously expanded.
If you really want to open two different “branches” (subfolders) of your folder tree simultaneously—to compare the contents of two folders simultaneously, for example—just click the little + symbols beside folder names instead of clicking the folder names. When you click the + buttons, Explorer leaves open the listings for the subfolders you’ve already opened.
When the panel is too narrow
As shown in Figure 4-3, expanding a folder provides a new indented list of folders inside it. If you expand folders-within-folders to a sufficient level, the indentation may push the folder names so far to the right that you can’t read them. You can remedy this problem with any of the following actions:
Adjust the relative sizes of the window halves by dragging the vertical bar between them.
Position your mouse pointer over a folder whose name is being chopped off. A tooltip balloon appears to display the full name of the folder.
Use the horizontal scroll bar at the bottom of the left pane to shift the contents.
Viewing folder contents
To see what’s in one of the disks or folders listed at the left side of the Explorer window, you can use either of these techniques:
In the left pane, click a folder or disk; the contents appear in the right pane. To expand the listing for a disk or folder, double-click its name, double-click its icon, or single-click the + button beside it.
Right-click a folder in the left pane and select Open from the shortcut menu. A new window opens, displaying the contents of the folder you clicked. (To open a program or document appearing in either side of the window, double-click it as usual.)
The right-side pane of the Explorer window behaves exactly like any folder window. Don’t forget that you can change it to an icon view or list view, for example, using the View menu as usual.
Keyboard shortcuts
If you arrive home one day to discover that your mouse has been stolen, or if you just like using the keyboard, you’ll enjoy the shortcuts that work in the Windows Explorer window, as shown in Table 4-1.
|
SHORTCUT |
DESCRIPTION |
|
Left arrow |
Collapses the highlighted folder, or if it’s already collapsed, highlights its “parent” folder. (The + key on your numeric keypad does the same thing.) |
|
Right arrow |
Expands a highlighted folder, or if it’s already expanded, highlights the first folder inside it. (The–key on your numeric keypad does the same thing.) |
|
*(on number pad) |
Displays all of the selected folder’s subfolders. |
|
F6 or Tab |
Highlights the other half of the window. |
|
Alt+left arrow |
Highlights whichever folder you last highlighted. |
|
Backspace |
Highlights the “parent” disk or folder of whatever’s highlighted. |
|
Ctrl+Z | |
|
Home, End |
Highlights first or last icon in the folder list. |
|
A, B, C, … |
Highlights the first visible file or folder in the left-pane hierarchy that matches the letter you typed. Type the same letter again to highlight the next matching icon. |
You can also press the letter keys to highlight a folder or file that begins with that letter, or the up and down arrow keys to “walk” up and down the list.
Life with Icons
Both of the navigational schemes described so far in this chapter have only one goal in life: to help you manage your icons. You could spend your entire workday just mastering the techniques of naming, copying, moving, and deleting these icons—and plenty of people do.
Here’s the crash course.
Renaming Your Icons
To rename a file, folder, printer, or disk icon, you need to open up its renaming rectangle. You can do so with any of the following methods:
Highlight the icon and then press the F2 key at the top of your keyboard.
Click carefully, just once, on a previously highlighted icon’s name.
Right-click the icon and choose Rename from the shortcut menu.
You can even rename your hard drive, so that you don’t go your entire career with a drive named “Local Disk.” Just rename its icon (in the My Computer window) as you would any other. You’re not allowed to rename important system folders like Documents and Settings, Recycle Bin, Windows, WINNT, and System32, however.
In any case, once the renaming rectangle has appeared around the current name, simply type the new name you want, and then press Enter. Feel free to use all the standard text-editing tricks while you’re typing: Press Backspace to fix a typo, press the left and right arrow keys to position the insertion point, and so on. When you’re finished editing the name, press Enter to make it stick. (If another icon in the folder has the same name, Windows beeps and makes you choose another name.)
Tip
A folder or file name can be up to 255 characters long, including spaces and the filename extension (the three-letter suffix that identifies the file type). Because they’re reserved for behind-the-scenes use, Windows doesn’t let you use any of these symbols in a folder or filename: \ / : * ? " < > |
If you like, you can give more than one file or folder the same name, as long as they’re not in the same folder. For example, you can have as many files named “Letter to Smith” as you wish, as long as each is in a different folder.
Windows XP comes factory-set not to show you filename extensions. That’s why you sometimes might think you see two different files called, say, Quarterly Sales, both in the same folder.
The explanation is that one filename may end with .doc (a Word document), and the other may end with .xls (an Excel document). But because these suffixes are hidden (Section 5.9.1), the files look like they have exactly the same name.
Warning
If you highlight a bunch of icons at once and then open the renaming rectangle for any one of them, you wind up renaming all of them. For example, if you’ve highlighted folders called Cats, Dogs, and Fish, renaming one of them Animals changes the original names to Animals (1), Animals (2), and Animals (3). Remain calm and press Ctrl+Z repeatedly until you’ve restored all the original names.
Icon Properties
As every Windows veteran knows, properties are a big deal in Windows. Properties are preference settings that you can change independently for every icon on your machine.
To view the Properties dialog box for an icon, choose from these techniques:
Right-click the icon; choose Properties from the shortcut menu.
While pressing Alt, double-click the icon.
Highlight the icon; press Alt+Enter.
These settings aren’t the same for every kind of icon, however. Here’s what you can expect when opening the Properties dialog boxes of various icons (see Figure 4-4).
My Computer. Here’s where you can look up the specifications of your computer’s processor, memory, and components (modem, monitor, mouse, and so on).
Disks. This dialog box contains controls for sharing and security, as well as the disk’s name (which you can change), how much of it is full, and a list of drives.
Data files. The Properties for a plain old document depend on what kind of document it is. You always see a General tab containing all the obvious information about the document (location, size, modification date, and so on), but other tabs may also appear (especially for Microsoft Office files). You can even add your own customized properties using the Custom tab.
Folders. These Properties are the same as found for data files, with the addition of the Sharing tab, which lets other people into the folder (either in person or from across the network).
Program Files. Here’s where you look up details about the program’s version number, corporate parent, language, and so on.
Shortcuts. You can read about these useful controls on Section 4.2.4.2.

Copying and Moving Folders and Files
Windows XP offers two different techniques for moving files and folders from one place to another: dragging them, and using the Copy and Paste commands.
Whichever method you choose, you must start by showing Windows which icons you want to copy or move—by highlighting them.
Highlighting Icons
To highlight (that is, select) one icon, just click it once. But you don’t have to move, copy, or delete one icon at a time; you can select a number of icons in the same folder or disk window. You may want to employ this technique, for example, when moving a bunch of documents from one folder to another, or copying them onto a backup disk en masse.
Tip
It’s easiest to work with multiple icons in Details view (Section 3.2.1.2), where every icon appears in a single column.
To highlight multiple files in preparation for moving, copying, or deleting, use one of these techniques:
To highlight all the icons
To select all the icons in a window, press Ctrl+A (the keyboard equivalent of the Edit → Select All command).
To highlight several icons
You can drag across file and folder names to highlight a group of consecutive icons. Start with your cursor above and to one side of the icons, then drag diagonally. As you drag, you create a temporary dotted-line rectangle. Any icon that falls within this rectangle darkens to indicate that it’s been selected.
Alternatively, click the first icon you want to highlight and Shift-click the last file. All the files in between are automatically selected, along with the two icons you clicked. (These techniques work in any folder view: Details, Thumbnails, or whatever.)
To highlight only specific icons
Suppose you want to highlight only the first, third, and seventh icons in the list. Start by clicking icon No. 1, then Ctrl-click each of the others. (If you Ctrl-click a selected icon again, you deselect it. A good time to use this trick is when you highlight an icon by accident.)
The Ctrl key trick is especially handy if you want to select almost all the icons in a window. Press Ctrl+A to select everything in the folder, then Ctrl-click any unwanted subfolders to deselect them.
Copying by Dragging Icons
As you know, you can drag icons from one folder to another, from one drive to another, from a drive to a folder on another drive, and so on. (When you’ve selected several icons, drag any one of them and the others will go along for the ride.)
Here’s what happens when you drag icons in the usual way (using the left mouse button):
Dragging to another folder on the same disk moves the folder or file.
Dragging from one disk to another copies the folder or file.
Pressing the Ctrl key while dragging to another folder on the same disk copies the icon. (If you do so within a single window, Windows creates a duplicate of the file called “Copy of [filename].”)
Pressing Shift while dragging from one disk to another moves the folder or file (without leaving a copy behind).
Pressing Alt while dragging an icon creates a shortcut of it.
Tip
You can move or copy icons by dragging them either into an open window or directly onto a disk or folder icon. Press Esc to cancel a dragging operation at any time.
The right-mouse-button trick
Think you’ll remember all of those possibilities every time you drag an icon? Probably not. Fortunately, you never have to. One of the most important tricks you can learn is to use the right mouse button as you drag. When you release the button, the menu shown in Figure 4-5 appears, so that you can either copy or move the icons.

Dragging icons in Windows Explorer
You may find it easier to copy or move icons in Windows Explorer, since the two-pane display format makes it easier to see where your files are and where they’re going. (See Section 4.2.4 for a list of the ways to open the Explorer window.) Here’s how to do it:
Make the destination folder visible by clicking the + buttons next to your folder names, expanding your folder “tree” as necessary.
For example, to copy an icon into a certain folder, click the Local Disk (C:) icon to see its list of folders. If the destination is a folder within that folder, expand its parent folder as necessary.
In the left pane, click the icon of the disk or folder that contains the icon you want to manipulate.
Its contents appear in the right pane.
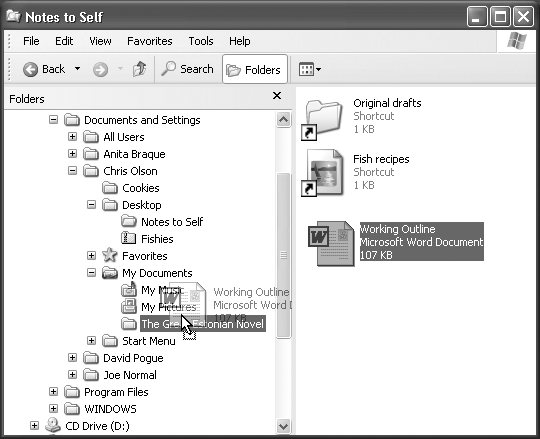
Locate the icon you want to move in the right pane, and drag it to the appropriate folder in the left pane (see Figure 4-6).
Windows copies the icon.
Copying by Using Copy and Paste
Dragging icons to copy or move them feels good because it’s so direct. You actually see your arrow cursor pushing the icons into the new location.
But you also pay a price for this satisfying illusion. That is, you may have to spend a moment fiddling with your windows, or clicking in the Explorer hierarchy, so that you have a clear “line of drag” between the icon to be moved and the destination folder.
Fortunately, there’s a better way: you can use the Cut, Copy, and Paste commands to move icons from one window into another. The routine goes like this:
Highlight the icon or icons you want to move or copy.
You can use any of the tricks described on Section 4.4.
Right-click one of the icons. Choose Cut or Copy from the shortcut menu.
Alternatively, you can choose Edit → Cut or Edit → Copy, using the menu bar at the top of the window. (Eventually, you may want to learn the keyboard shortcuts for these commands: Ctrl+C for Copy, Ctrl+X for Cut.)
The Cut command makes the highlighted icons show up dimmed; you’ve now stashed them on the invisible Windows Clipboard. (They don’t actually disappear from their original nesting place until you paste them somewhere else.)
The Copy command also places copies of the files on the Clipboard, but doesn’t disturb the originals.
Right-click the window, folder icon, or disk icon where you want to put the icons. Choose Paste from the shortcut menu.
Once again, you may prefer to use the appropriate menu bar option—Edit → Paste. Keyboard equivalent: Ctrl+V.
Either way, you’ve successfully transferred the icons. If you pasted into an open window, you’ll see the icons appear there. If you pasted onto a closed folder or disk icon, you need to open the icon’s window to see the results. And if you pasted right back into the same window, you get a duplicate of the file called “Copy of [filename].”
If you find yourself copying or moving certain icons to certain folders or disks with regularity, it’s time to exploit the File → Send To command (see Figure 4-7) that lurks in every folder window (and in the shortcut menu for almost every icon).
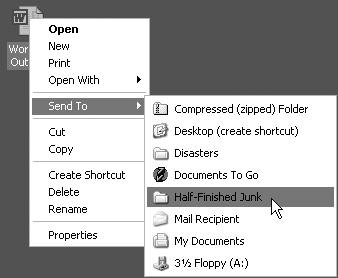
This command offers a quick way to copy and move highlighted icons to popular destinations. For example, you can teleport a copy of a highlighted file directly to a floppy disk by choosing File → Send To → 3 1/2 Floppy, or to a blank CD by choosing Send To → CD Burner. You’re spared the tedium of choosing Copy, selecting the floppy drive, and choosing Paste.
Another useful command is Send To → Desktop (create shortcut), which dumps a shortcut icon onto your desktop background. Then there’s the Send To → Mail Recipient, which bundles the highlighted icon as an email attachment that’s ready to send.
The Recycle Bin
The Recycle Bin is your desktop trash basket. This is where files and folders go when they’ve outlived their usefulness, like a waiting room for data oblivion. Your files stay here until you empty the Recycle Bin—or until you rescue them by dragging them out again.
While you can certainly drag files or folders onto the Recycle Bin icon, it’s usually faster to highlight them and then perform one of the following options:
Press the Delete key.
Choose File → Delete.
Right-click a highlighted icon and choose Delete from the shortcut menu.
Windows XP asks if you’re sure you want to send the item to the Recycle Bin. (You don’t lose much by clicking Yes, since it’s easy enough to change your mind, as explained in the following section.) Now the Recycle Bin icon looks like it’s brimming over with paper.
Tip
To turn off the “Are you sure?” message that appears when you send something Bin-ward, right-click the Recycle Bin. Then choose Properties from the shortcut menu, and turn off “Display delete confirmation dialog.” Turning off the warning isn’t much of a safety risk. After all, files aren’t really being removed from your drive when you put them in the Recycle Bin.
You can put unwanted files and folders into the Recycle Bin from any folder window, from within Windows Explorer, or even from inside the Open File dialog box of many Windows applications (see Chapter 5).
Restoring Deleted Files and Folders
If you change your mind about sending something to the software graveyard, open the Recycle Bin by double-clicking it. A window like the one in Figure 4-8 opens.
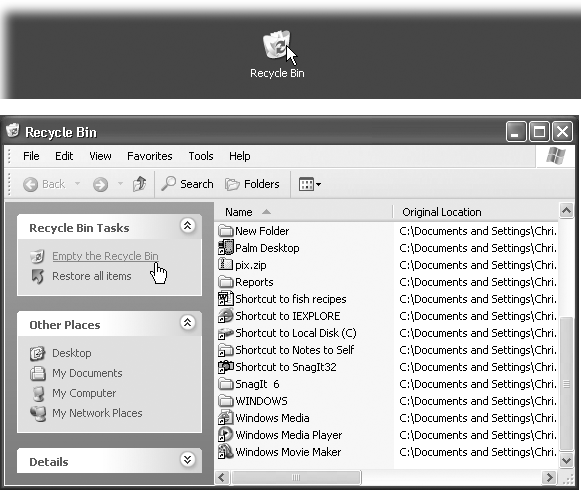
To restore a selected file or a folder—or a bunch of them—click the “Restore the selected items” link in the task pane, or choose File → Restore, or right-click any one of the selected icons and then choose Restore from the shortcut menu.
Restored means returned to the folder from whence it came—wherever it was on your hard drive when deleted. If you restore an icon whose original folder has been deleted in the meantime, Windows XP even recreates that folder to hold the restored file. (You don’t have to put icons back into their original folders. By dragging them out of the Recycle Bin window, you can drop them into any folder you like.)
Emptying the Recycle Bin
While there’s an advantage to the Recycle Bin (you get to undo your mistakes), there’s also a downside: the files in the Recycle Bin occupy as much disk space as they did when they were stored in folders. Deleting files doesn’t gain you additional disk space until you empty the Recycle Bin.
That’s why most people, sooner or later, follow up an icon’s journey to the Recycle Bin with one of these cleanup operations:
Right-click the Recycle Bin icon, or a blank spot in the Recycle Bin window, and choose Empty Recycle Bin from the shortcut menu.
Click the “Empty the Recycle Bin” link on the task pane in the Recycle Bin window.
In the Recycle Bin window, highlight only the icons you want to eliminate, and then press the Delete key. (Use this method when you want to nuke only some of the Recycle Bin’s contents.)
Wait. When the Recycle Bin accumulates so much stuff that it occupies a significant percentage of your hard drive space, Windows empties it automatically, as described in the next section.
The first three procedures above produce an “Are you sure?” message. To avoid the hassle of emptying the Recycle Bin on a one-shot basis, press the Shift key while you delete a file. Doing so—and then clicking Yes in the confirmation box—deletes the file permanently, skipping its layover in the Recycle Bin.
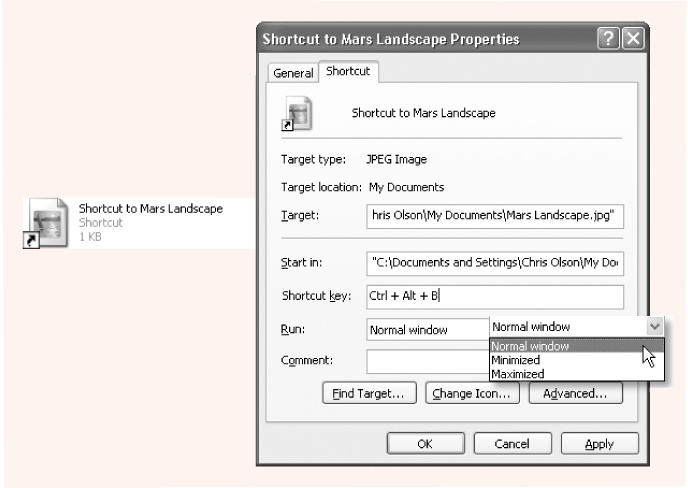
Shortcut Icons
A shortcut is a link to a file, folder, disk, or program (see Figure 4-9). You might think of it as a duplicate of the thing’s icon—but not a duplicate of the thing itself. (A shortcut takes up almost no disk space.) When you double-click the shortcut icon, the original folder, disk, program, or document opens. You can also set up a keystroke for a shortcut icon, so that you can open any program or document just by pressing a certain key combination.
Shortcuts provide quick access to the items you use most often. And because you can make as many shortcuts of a file as you want, and put them anywhere on your PC, you can effectively keep an important program or document in more than one folder. Just create a shortcut of each to leave on the desktop in plain sight, or drag their icons onto the Start button or the Quick Launch toolbar. In fact, everything listed in the Start → Programs menu is a shortcut—even the My Documents folder on the desktop is a shortcut (to the actual My Documents folder).
Tip
Don’t confuse the term shortcut, which refers to one of these duplicate-icon pointers, with shortcut menu, the context-sensitive menu that appears when you right-click almost anything in Windows. The shortcut menu has nothing to do with shortcut icons. Maybe that’s why it’s sometimes called the context menu.
Creating and Deleting Shortcuts
To create a shortcut, right-drag an icon from its current location (Windows Explorer, a folder window, or even the Search window described on Section 2.7.2) to the desktop. When you release the mouse button, choose Create Shortcut(s) Here from the menu that appears. If you’re not in the mood for using a shortcut menu, just left-drag an icon while pressing Alt. A shortcut appears instantly. (And if your keyboard lacks an Alt key, drag while pressing Ctrl+Shift instead.)
You can delete a shortcut in the same fashion as any other icon, as described in the Recycle Bin discussion earlier in this chapter. (Of course, deleting a shortcut doesn’t delete the file it points to.)
Burning CDs from the Desktop
In the old days (two years ago), every PC came with a CD-ROM drive. Nowadays, most new PCs come with a CD burner, a drive that can record new CDs that contain your own stuff.
If your PC has such a drive—either a CD-R drive (CD recordable, which means you can record each disc only once) or a CD-RW drive (CD rewriteable, for which you can buy CD-RW discs that you can erase and rerecord as many times as you like), you’re in for a treat. For the first time, Windows XP lets you burn your own CDs full of files and folders without having to buy a program like Roxio’s Easy CD Creator.
That’s because Windows XP includes Easy CD Creator (pieces of it, anyway). You now have a great feature for making backups, emailing people, or exchanging files with a Macintosh (the resulting CDs are cross-platform).
Tip
This entire section pertains to copying everyday computer files onto a CD. If you want to burn music CDs, don’t use this method. Use Windows Media Player instead. (See Section 6.3 for details.)
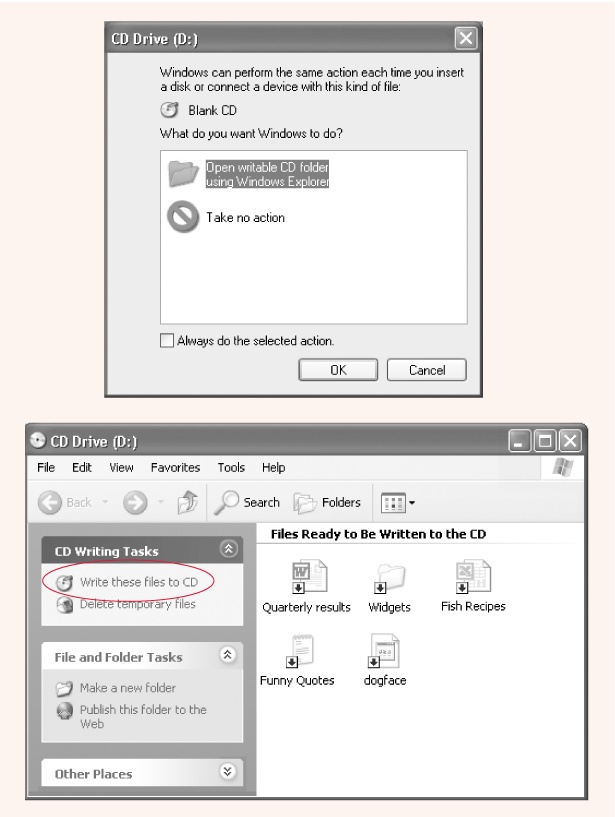
If your PC does, in fact, have a CD burner, start by inserting a blank CD. Windows offers to open a special CD-burning window, which will be the temporary waiting room for files that you want to copy to the CD (Figure 4-10, top left).
Tip
If you’ve turned off this feature, you can open the CD window yourself: open My Computer, and then double-click the CD icon.
Now tell Windows which files and folders you want copied onto it, using one of these three methods:
Scurry about your hard drive, locating the files and folders you want on the CD. Drag their icons into the open CD window, or onto the CD icon in the My Computer window.
Highlight the files and folders you want burned onto the CD. Choose File → Copy. Click in the CD’s window, and then choose File → Paste to copy the material there.
Explore your hard drive. Whenever you find a file or folder you’d like backed up, right-click it. From the shortcut menu, choose Send To → CD Drive.
In any case, Windows now copies the files and folders into a temporary, invisible holding-tank folder. (If you’re scoring at home, this folder is in the Local Disk (C:) → Documents and Settings → [Your Name] → Local Settings → Application Data → Microsoft → CD Burning folder.) In other words, you need plenty of disk space before you begin burning a CD, at least double the size of the CD files themselves.
Remember that a standard CD can hold only about 700 MB of files. To ensure that your files and folders will fit, periodically highlight all the icons in the My Computer → CD window (choose Edit → Select All). Then inspect the Details box in the task pane to confirm that the Total File Size is within the legal limit.
At last, when everything looks ready to go, click the “Write these files to CD” link in the task pane (Figure 4-10, right), or choose File → “Write these files to CD.”
The CD Writing Wizard guides you through the simple process of naming the new CD and burning the disc.
Hard-core Windows power users, of course, sneer at all this. Only with a commercial CD-burning program, they point out, can you burn MP3 music CDs, create mixed-mode CDs (containing both music and files), create Video CDs (low-quality video discs that play on DVD players), and so on.
Still, if you use your burner primarily for quick backups, long-term storage, or transferring big files to other computers, a little bit of free software goes a long way.
Get Windows XP for Starters: The Missing Manual now with the O’Reilly learning platform.
O’Reilly members experience books, live events, courses curated by job role, and more from O’Reilly and nearly 200 top publishers.

