Disk Management
“Disk management” isn’t just a cool, professional-sounding skill—it’s the name of yet another built-in Windows XP maintenance program, one that may be familiar to Windows 2000 veterans, but is completely new to people who are used to Windows Me and its predecessors.
To open this technical database of information about your disks and drives, you can use any of three methods:
Choose Start→Control Panel→Administrative Tools→Computer Management. In the resulting Computer Management window, double-click Disk Management in the list at the left side.
In the Start menu, right-click My Computer. From the shortcut menu, choose Manage. Once again, double-click Disk Management in the list at the left side.
Choose Start→Run; type diskmgmt.msc and press Enter.
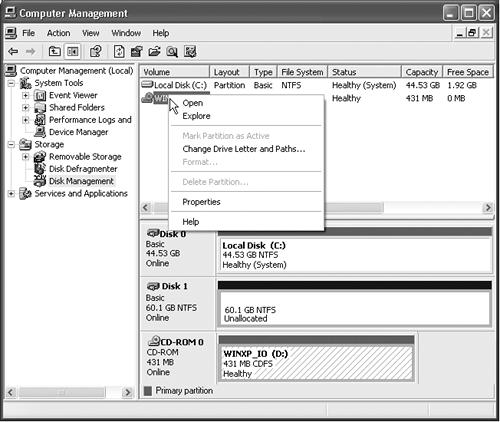
In any case, you arrive at the window shown in Figure 15-7. At first glance, it appears to be nothing more than a table of every disk (and partition of every disk) currently connected to your PC. In truth, the Disk Management window is a software toolkit that lets you operate on these drives, too.

Figure 15-7. The Drive Management window is part of the much bigger, much more technical entity known as the Computer Management console. You access it by clicking Disk Management (in the left-side pane). Then you can operate on your drives by right-clicking them. Don’t miss the View menu, by the way, which lets you change either the ...
Get Windows XP Home Edition: The Missing Manual now with the O’Reilly learning platform.
O’Reilly members experience books, live events, courses curated by job role, and more from O’Reilly and nearly 200 top publishers.

